Crafts can be made with children from 5 years old.
We invite you to make a toy "Petya - cockerel"
To make a toy you need:
Knitting;
Scissors;
Double sided tape or glue.
Step by step manufacturing process
1. Print or redraw the Cockerel templates
.jpg)
2. Cut out the details of the Cockerel using templates.
.jpg)
.jpg)
3. We stick double-sided tape on the body of the Cockerel or grease it with glue.
Remove the protective film from the tape.
.jpg)
If you plan to hang the toy in the future, then cut off about 20 cm of yarn for hanging (after folding it in half) and apply the ends of the yarn to the sticky layer.
Glue the end of the yarn to the center point of the circle and start winding the yarn in a spiral.
.jpg)
Lay the thread tightly to each other, turn by turn.
.jpg)
Continue gluing the thread, but at the same time make sure that one layer of yarn does not climb over another.
Glue the thread over the entire surface of the circle.
.jpg)
Cut the thread. Ready.
.jpg)
Glue a circle of cardboard on the back of the toy yellow color so that the toy is two-sided.
4. Glue the scallop, wing and beak with eyes using double-sided tape or glue.
.jpg)
The toy is ready. The soft surface of the part of the figurine of the Cockerel made of yarn resembles a soft carpet and is therefore pleasant to the touch.
.jpg)
5. You can decorate the New Year's interior with this toy.
.jpg)
.jpg)
.jpg)
The cockerel can become a bookmark.
.jpg)
Also so funny and merry cockerel can be donated.
Good luck with your creativity!
There is a huge variety of techniques in which you can show your Creative skills. The most popular works made in them are various toys designed not only for children's games, but also for home decoration. For these purposes, bright and eye-catching rooster figurines made of various materials. It remains only to find out how to make a rooster with your own hands? For this there is a large number of master classes.
There is a huge variety of techniques in which you can show your creativity.
The process of creating this cockerel is quite simple, so this toy can be made with children over 9 years old. The result is a soft, bright cockerel that will please the eye of not only the child, but the whole family, and will also be an excellent decoration for the hearth.
For manufacturing you will need:
- pair of balls woolen threads red and green;
- a small piece of yellow thread;
- scissors;
- Crochet hook;
- a pair of plastic eyes (can be replaced with beautiful beads);
- wire;
- cardboard rectangle with sides 6 and 9 centimeters;
- cardboard rectangle with sides 4 and 9 centimeters.
 The process of creating this cockerel is quite simple.
 How to make a rooster with your own hands: a master class
The technology for creating a cockerel from yarn includes several steps.
- On a cardboard rectangle with sides of 6 and 9 centimeters, 2 cuts of threads are laid along its long sides: one red and one green.
- Then, a green thread is wound along the short side over the thread cuts. At this stage, it is necessary to wrap the cardboard 60 times. When winding, do not tighten the thread too much, otherwise it will be difficult to remove it from the cardboard backing.
- After the wound yarn is removed from the cardboard, it must be tied up on both sides with yarn stretched along.
- A small amount of thread of the same color is wound over the red cut.
- About 30% of the total length recedes from the red section of the future craft. This place needs to be tied up with a green thread so that the result is a separated rounded head. After tying, a rather long piece of thread should be left.
- Next, prepare the base for the tail. To do this, you need to wind red yarn on cardboard with a side of 4 and 9 centimeters about 20 times. The thread should be wound parallel to the smaller side.
- The resulting skein is carefully removed and then attached to a green thread that fixes the body on the opposite side of the head.
- To make wings, you will need cardboard and red yarn. The rectangle is wrapped with thread along the long side 12 times, then the resulting skein is removed from the warp and rewound in the middle with yarn of the same color.
- The resulting element is inserted into the middle of the green torso, and then fixed with the tip of the thread remaining from the neck. Wings should be tightly clamped in the body.
- From each edge, the wings are pulled over with a small piece of red thread, and then with the help of the remaining tail they are tied together inside the cockerel's body. Excess thread ends are cut off and tucked inside.
- Next, you need to finish the tail. To do this, on cardboard with sides of 4 and 9 centimeters - 20 skeins of red yarn are wound along its short side. You will need 2 similar skeins, they should be attached to the first tail bundle.
- The ends of each skein are tied with a small piece of thread so that they are fluffy.
- The last step in creating crafts is attaching the comb and earrings. On the 4 cm side of the cardboard, a skein of 12 rows of thread is made. The scallop is removed, rewound in the middle and inserted into the cock's head with a hook so that its upper half sticks out from above, and the lower one forms earrings.
- For the beak, you will need yellow yarn folded in half. The thread piece is fixed with a hook and loop. Long thread ends are cut off and then treated with PVA glue so that they do not fluff and create a beak shape. During the processing of the beak, it is necessary to ensure that the glue does not get on other parts of the toy. After the glue dries with scissors, remove excess pile.
- To make cock legs you need wire. From one piece of wire, a foot is formed using three loops arranged in a fan. Then, from the same cut, stepping back a little, a second leg is made. The legs are attached with a long piece of wire to the body. If desired, the wire can be carefully wrapped with yellow yarn.
Since a cockerel made of yarn cannot stand, a loop can be tied to its body. This element will allow not only convenient storage of the toy, but also create the illusion of flight during games.
Gallery: do-it-yourself cock (25 photos)


Origami: fiery paper rooster (video)
How to mold a cock toy from plasticine
Plasticine is a convenient malleable material that even a preschooler can easily handle. One of the advantages of plasticine is its brightness, which allows you to create interesting and memorable crafts. For example, you can easily make a rooster out of plasticine.
For work you will need:
- red, green, yellow and orange plasticine;
- stack;
- a few matches.
How to make a plasticine rooster with your own hands?
- To make a torso, you need to roll an even ball from a green piece of plasticine.
- In order to make a neck, you will need to roll a ball, 4 times smaller in size than the body. The neck is made of orange plasticine. On one side, the orange ball is pressed against the modeling board, and then several notches are made around the circumference using a stack. Further, the neck is attached to the body with a straight side with notches.
- On the upper part the neck is attached to the head, which is made from a small green ball. The head should be smaller than the neck in size.
- The head is immediately decorated with a beak, which is a slightly curved yellow cone, as well as eyes - small white balls with a black center.
- Next, a scallop is made from red plasticine. First, for this you need to mold a cake, and then cut off its upper part, depicting an equilateral checkmark. The comb is attached to the top of the head.
- To make a beard for a bird, you need to mold two cones with a rounded bottom from red material, and then attach them with a thinner part to the lower zone of the beak.
- Next, a tail is made of colored sausages of the same length and thickness. All sausages are assembled in a “bouquet”, fastened together at the base, and their tips are bent back and to the sides so that it turns out bushy tail. The tail is attached to the back of the body.
- For the wings, orange plasticine is used, from which flat droplets are made. With small notches, a feather pattern is applied to the wings using a stack. The wings are attached with a thicker side to the body on both sides.
- In order for the cockerel to stand confidently on its legs, they need to blind a single cone, and then attach 3 fingers on each side to its thin part. The legs are attached to the body with a thickened end, and a line is drawn in the middle of a single cone using a stack.
 Plasticine is a convenient malleable material that even a preschooler can easily handle.
 If the plasticine is too soft and the legs cannot withstand the mass of the figure, they must be made on a match frame, placing the match inside so that its end sticks out above the cone from above. Then the upper tip of the match will need to be carefully inserted into the body.
How to make a rooster with your own hands from geometric shapes: a cone
Bright cockerels can also be made from paper. To make it voluminous bright craft, you will need circles of different colors and sizes in the amount of 6 pieces, as well as any convenient glue.
To make a rooster out geometric shapes, you must adhere to the following plan:
- All circles are folded in half, and then cut into 2 equal parts. One part of each circle is left, and the second is set aside.
- Along the arc of each semicircle, teeth are cut.
- A slightly smaller part is glued to the largest semicircle so that it is located in the middle. According to a similar principle, all parts are glued to each other. It is worth considering that the smallest detail is the head.
- After the last semicircle is glued, you should start preparing the tail. The tail is cut out of 2-3 colors and is single form with three feathers bent down in an arc.
- Then the edge of the semicircle is smeared with glue and glued to the second edge. At this stage, the craft needs to be held a little so that the glue fixes both ends of the paper.
- Wings are made in the same way as the tail of 2-3 colors and a similar shape. The only difference is that the wings are smaller than the tail. Each wing is attached to the side of the cone on opposite sides of the tail.
- Next, a comb and a beak are attached to the head. To make a comb, you will need to fold the red paper in half and draw a figure so that in the end it turns out to be double. Then the comb is cut out and glued to the head with a fold line. The beak is prepared and glued in the same way.
 Bright cockerels can also be made from paper
 The final step in creating a paper toy is gluing the eyes, which consist of two circles: white and black. It is interesting that you can make a chicken according to the same principle, choosing more restrained colors for crafts, decorating with a less colorful tail. In order to make the chicken more believable, you should choose pastel, whitish or brown shades.
Balloon rooster
You can make a voluminous rooster using balloons and threads.
To create a craft you will need:
- yarn bright colors, for example, yellow, orange or red;
- 2 balloons;
- decorative elements for bird decoration.
 You can make a voluminous rooster using balloons and threads
 The cockerel is made according to the following technology:
- First, both balls are inflated to the desired size, and one of them should be slightly smaller than the second.
- Then the yarn is dipped in PVA and wrapped around the ball. It is necessary to wrap the ball tightly enough.
- Next, the balls are left to dry completely, and then pierced with a needle and removed from the thread frame. The head (small ball) is attached to the body (large ball).
- Next, the figure should be decorated. To do this, you can use any elements. Wings and tail can be made from colored paper, and then glued to the frame using PVA. In this case, it is necessary to ensure that several bright colors are present in the wings and tail.
- Paws are also made of paper and attached to the base of the body.
- On the head it is necessary to glue the “crest crown”, earrings, beak, eyes, which are cut out of colored paper.
If there is a desire for such a rooster to stand, its legs must be made of wire. By the way, other elements of the bird can be made from different materials.
What can wings be made of: ideas
In order for the craft to look more lively and original, various materials can be used to decorate its wings:
- paper;
- napkins;
- felt;
- buttons;
- yarn;
- foil;
- threads and wire (decoration according to the principle of isothread);
- capron;
- foil;
- plastic;
- disposable spoons;
- dried leaves and petals.
Paper rooster: master class (video)
In a creative impulse, absolutely any materials can be used that will give the craft not only individuality, but also expressiveness. To stimulate the imagination, you can use any given master class by adding your own unique solutions and elements to it.
New 2017 is the year of the Red (Fiery) Rooster, and its figurine or image will become the most sought-after present. The needlewomen of the "Cross" have a good tradition: to New Year's holiday prepare thoroughly. And this year will be no exception. Many of us will make or are already making a rooster with our own hands, or even not one, but several at once! After all, it is necessary to please relatives and friends with a handmade symbol of the year, and yourself with an exciting process of creating this very symbol in various techniques handmade.
Creating a kind of GUIDE TO MASTER CLASSES from the Internet is also a tradition of our needlework site, which was born a year ago. For you, dear craftswomen, we have selected a lot of only the best master classes on the net. Admire, look closely, discuss and choose the most colorful rooster! And then sew/tie/draw/blind/weave it. So, in what technique can you work on the eve of the New Year holiday?
If you don't have time to work, don't worry. The article contains links to craftswomen who sell finished work.
Cockerels made of paper and on paper
Making cards with the kids
If you are not a professional card maker, then before you start creating postcards, be sure to read our article "Learning to make New Year's cards with your own hands using the Scrapbooking technique". In it you will find not only a lot of ideas, but also get acquainted with the basic rules for creating postcards.
Any cockerel drawn by your child can be placed on a postcard. If it’s difficult for the kid to figure out how to draw a rooster with his own hands, then show him this step-by-step instruction:

And then, a matter of technology. Cut out the cockerel and make it the central part of the composition. For example, your postcard can be so simple, but cute. At work, use christmas paper and a bright red ribbon, add snowflakes, twigs and other holiday paraphernalia. When you have a basic idea, the process of creating a postcard becomes much easier!

Photo from http://itsapatchworklife.blogspot.ru
If your child likes to color in black and white pictures, give him the opportunity. Print out the rooster postcard template on thick cardboard and let the kid get to work. Further, cutting out the blank-ball, you can add a postcard voluminous snowflakes, glue half-beads imitating christmas balls etc. etc. Unleash your imagination with your baby))

YOU WILL USE
You will find 8 more coloring templates, as well as 2 step-by-step instructions for drawing more realistic roosters in the archive, which you can download quickly and for free!
Take note of the idea with a cockerel on a stick, as on a postcard by Elena Yurchenko. Her cockerels are cut out of felt, but you can cut them out of paper.

Colored paper roosters
Colored paper appliqué can also be placed on greeting card. But such an application itself can act as a postcard. To draw and carefully cut out all the details, the children will need the help of their parents, but they can stick it themselves.

Olga-15 offers to make funny paper cockerels in her master class.

A Rooster blank is a rectangular sheet of flexible paper or thin cardboard folded in half lengthwise. Its size is 13.5 × 10 cm. We make 7-10 inclined cuts along the fold line (after about 1 cm). The angle of their inclination is 50-70 degrees, and the depth is ¾ of the height of the folded sheet.
Ekaterina Ivanova in her video tutorial shows how to make a red rooster using the Origami technique:
Roosters in quilling technique
A very interesting idea is to lay out only a luxurious rooster tail from quilling paper. It's not as confusing as laying out a whole cockerel, and it can turn out very effectively! Here is a rooster without a tail as a basis (how it looked in the original, see the photo below).

Print it on a color printer, and fantasize over the tail later. As an example - one such work (although the tail is modest here, but you will try, right?))

And if you are not afraid to make a whole rooster using the Quilling technique, then you can take this finished postcard as a basis:

Or this template:

A cheat sheet on the main elements of Quilling to help you:

Button appliqué
And here are absolutely stunning handsome roosters, lined with multi-colored buttons, half-beads, rhinestones and beads! As a basis, you can take the contours of cockerels from our archive (link just above).


Crochet Cockerels
Many needlewomen with a hook on “you” and will be happy to knit a cockerel from multi-colored threads. And "Cross" will help you decide on the model and offer several master classes on this type of needlework.

You can also buy cockerels knitted from Svetlana.


Roosters from felt
The fastest and most uncomplicated options for creating a symbol of 2017 are felt roosters. The material is easy to process, keeps the shape of the toy well, does not require seams. Vice versa, hand seams on the face of the product give it a special flavor and charm.


Photo from https://madeheart.com


Photo from the site http://ktototam.ru/
A figurine of a rooster neatly cut out of thick felt will be both a Christmas tree toy and a pendant.

Photo from the site http://ktototam.ru
And if you decorate felt cockerels with embroidery, flowers and other decorative elements, then it will turn out incredibly beautiful!

Photo from the site http://mmmcrafts.blogspot.ru

Roosters in Tilda style
Well, how can we do now in our life without the tilde-Rooster? The ToySew website has a master class on sewing this popular toy.

Master Vetic on her blog posted patterns of the Rooster and Hen Goroshkins based on the tilde pattern. An interesting couple will turn out if you make an effort and patience!

And for inspiration:

Cockerel Yurik from Orange Toys
A funny video clip about her tilde roosters was shot by Maria Fedorova (the link to the patterns is in the description of the video!):
Cockerel coffee toys
Aromatic or coffee toys compete with tildes in popularity. There are roosters in this technique.

The coffee cockerel can be like this:

Photo from the site http://zabavochka.com
You can easily sew it yourself using one of the patterns above. “Cross” talked about all the intricacies of creating coffee toys in this master class.
If you think that you can’t cope with such work yourself, contact the master. Julia Charikova has made enough branded coffee scented toys and put them up for sale at this address.

Fur interior toys
Oksana Svyatkovskaya will show her vision of a rooster and show how to sew it correctly ready-made patterns. Her Rooster is sewn from faux fur, but who's to say that it doesn't happen or it's not good?)


In the workshop Everything for creativity (dljatvorchestva) there are a lot of blanks for painting and decoupage. Choose and create!

This is the beauty you can get:


If you don’t want to make a souvenir in the form of a rooster, then you can decorate any wooden surface image of a rooster. There is just limitless scope for creativity! Here are just a few examples for inspiration:


Felted wool roosters
Other craftswomen make wool toys just like real ones! We love and are inspired! And if you really want to buy one of these beauties, then look for them at the Masters Fair (there is a link on each photo).


Elenia collected many different felted Roosters in one place and offered MK to create one of them. Turns out very cute!
Roosters embroidered with a cross, beads and ribbons
Perhaps you love embroidery more than other types of needlework. Then you can place the symbol of the year on a pillowcase, arrange it in the form of a panel, a picture in a frame or a brooch. The main thing is that the image of the Rooster warms your soul. And if you donate your work, find out the preferences of the recipient.
Over 50 various schemes for embroidery of roosters and cockerels you will find in a special album
Elena Tarasova
Nomination in the competition: needlework master class
Name master class: crafts from thread
Master-class for teachers and parents of pupils kindergarten to create original crafts to the New Year.
1. Dear friends, to get started we need the following materials And equipment: ordinary threads 5-6 skeins (cotton is better than synthetic) in the color scheme that is suitable for future crafts; 3 tubes of stationery glue, a long sewing needle (so that it can pierce through a tube of glue, balloons according to the number of craft items (for cockerel 2 balls - head and torso, for fish 1-torso).


2. Thread the needle. Poke a tube of stationery glue with a needle. Pull the thread through the tube. The thread comes out smeared through with glue. Synthetic thread can easily leave glue on your hands and not on the ball, so it is more convenient to use cotton - it absorbs glue better and holds it until the warp ball is wrapped.

3. Inflate balloon the required volume. We begin to wrap it with a thread soaked in glue in different directions. It is better to rotate the ball with the middle, thumb and forefinger, holding the ball with both hands. We bring up to 3-4 layers of winding. Then we leave the ball to dry for several hours by placing it in a deep cup (leave a very wet ball for a day).

4. When the threads are dry, pierce the ball with a needle. Carefully remove the ball from the base.
5. At the next stage, design, we will need the following materials and equipment: cardboard, colored paper, satin ribbons and glue. It is better to take glue with strong fixation, since decorative elements are heavy lye: "Moment", "Second", "Cosmophen".

6. Apply elements to the cardboard base decorative finishes. For cock-eyes-2pcs, comb-1pc, wings-2pcs, breast-1pc, tail-7 feathers. For fish: eyes-2pcs, upper fin-1pc, side fins-2pcs, tail-2 elements, crown-1pc, mouth-1pc. According to the prepared template, we prepare elements from colored paper and glue them to the base.

7. We glue all the elements of the craft to the base ball. Via satin ribbons decorate the rooster.
Related publications:
Dear colleagues, get acquainted - this is Snezhka and Snezhok! This is how my grandson Vadimka called these toys. And what? Great winter names. Snowball and Snowball.
We will need: 1. Silicate glue 2. Stipler 3. Scissors 4. Cardboard 5. Any threads 6. Christmas tree decorations 1. To begin with, we take cardboard.
Master Class " Christmas tree decoration» There is very little time left before the New Year, and I am already thinking about how I will decorate the Christmas tree. Would like to do.
Dear friends! The New Year is approaching, the most favorite holiday for every Russian family. He unites us with pre-holiday chores.
Every child has toys. You can buy anything in the store: any size, color, from teddy bears to newfangled minions. But.
I bring to your attention a master class on making snowflakes from threads. For their manufacture, you will need: - yarn, - cardboard templates,.
Master class Application from threads "Winter clothes" Author: Svyatova Natalya Sergeevna, teacher of MDOU No. 23 of the combined type, Shuya Ivanovskaya.
DIY crafts are gaining popularity due to their practicality and economy. We offer to make interesting rooster crafts with your own hands in a matter of minutes. Let's start simple. Let's start with the usual applications, moving on to more complex options.
Starting simple
For work, we need sculptural clay, plain paper, glue, petroleum jelly and scissors.
Using the plasticine modeling technique, we make the shape of a rooster. Cover it with a layer of Vaseline.
Then glue the first layer of paper, then the rest. Let the products dry well.

We cover the bird with a thin layer of clay.

We cut the cockerel model along the contour. And at the end we glue both halves along the cut. Next, you can finish some details - eyes, scallop, nose from polymer clay. After that, these parts of the cockerel will protrude and the bird will look more realistic.

Let the cock dry again. And paint it with paint.
In the technique of origami
A cute bird can also be made from cardboard using the origami technique. You can see the manufacturing scheme in the following photos.

And this is what the finished version of the bird looks like. Having made a lot of such details, you can easily decorate a house or a certain room.

Heating pad for teapot
But the next instructive lesson will tell you how you can make a beautiful heating pad for a teapot out of fabric.
For work, you need to prepare fabric, insulation, a couple of buttons, threads, decorative material and paper.

The product pattern is transferred to paper, then cut it out.


Then we transfer the pattern of each detail to the fabric and cut them out, making a small allowance of up to one cm.

We fold the fabric and filler and sew them together.

With the help of an ordinary table fork, assemblies are made of decorative material - lace.

We connect the wings with lace, sew them in an arc.

Then we sew the beak, scallop and beard.

We make a beak.

In this way we make a scallop.

And so - a beard.

We connect all the details of the future bird, insert lace, sew the product (except for the bottom).

We turn the workpiece on the front side.

We process the lower part of the product - we frame it.

We use the shell
The following example of ready-made birds from egg cells can act as small souvenirs for any holiday.
Very simple cockerels from an empty egg shell are decorated with buttons (in the form of a peephole), and quilling paper acts as other details.

In order to get a body for a souvenir, you will need to make a small hole in the shell and suck out all the liquid from there. Then decorate the shell using the quilling technique.

The second option for creating a toy in the form of a bird can be seen in the example of the following step by step instructions, in which we will learn how to create a bird from geometric shapes - scraps of fabric. Such a pillow can decorate any kitchen.

To begin with, we take an A4 sheet or old wallpaper and draw the details. Then we cut them out on the fabric. The best fabric for a pillow is the fabric from which other pillows or a duvet cover were made.
Full step by step master class you can see in the following photos.

In the same way, you can make cute pillows from nylon tights.

Unusual Options
Plastic bottles are considered the most popular option for making crafts. Therefore, we will not waste a minute and consider the option of creating a cockerel from bottles. by the most easy option we can consider the idea when we take an ordinary plastic bottle and with the help of improvised materials - paper, adhesive tape and fabric - we create a cockerel.

There are more complex options that are useful for giving. But for them you will need a good imagination, abstract imagination, the ability to create the desired shapes and proportions. Ready schemes there is simply no such thing on the Internet. Therefore, you yourself will have to cut out feathers and plumage, and then assemble the whole structure.
A small craft can also be made from foamiran.
We draw a pattern on the fabric.

We also prepare foam rubber.

We transfer the pattern to foamiran and cut it out.

Then we cut out a strip of blue foamiran, which will glue and hide the foam rubber.

Glue the torso to the foam first.

And then the rest of the details.

We make out the head.

Insert a toothpick underneath.

We plant the cockerel on a solid base. He's ready.

Well, the last craft, which is perfect for kindergarten or school. An unrealistically beautiful cockerel made of natural material - cereals or beans. With such a craft, we are sure that all the first places will be yours.
And the manufacturing technology is very simple. Take a piece of paper and draw the shape of a cockerel on it. You can use stencils, which can be found very quickly on the Internet. Then we apply glue to certain areas and sprinkle on top of the grits. If you use several options for cereals, then we advise you not to cover the entire surface at once, but to work out each detail separately.
If you want to use beans, then know that this work is very painstaking, requires attention and concentration, because you need to spread the grains very close to each other. But the chance of winning will increase several times.

Using the same technology, it is possible to produce not only from natural materials, but also from traffic jams from plastic bottles. Just look at what beauty real artists make with their own hands.
They create not only lonely birds, but also a whole family.

original postcards
You can also use images of a rooster on postcards. fiery rooster will give you confidence in the future, which is why it is so often depicted on postcards. For example, the first option is a plasticine bird on a fence. Such a postcard will delight your friends and acquaintances who live in the village.

The next option for decorating a postcard is such a cute cockerel made of newspaper tubes.
The first step we need to draw a weaving pattern. Green color is the basis that will be in our master class in the form of a yellow tube.

In the middle we bend a red tube in the shape of a scallop. And then yellow.

We glue the working yellow tube.
We make the first turn.

Then we make three more turns, thereby securing the scallop.

We braid the head with an eight. We pull the red tube and make the shape of the beak and beard.

Making additional turns, we braid the cockerel breast. Then we make out the shape of a cockerel.

From the red tube we form a leg at the bottom.

Then we do the second one.

Weave the product to the tail, wrap newspaper tubes and glue them on.

We braid all the feathers with an eight.

We make out the leg more carefully.

Separately weave two wings and fix them.

The rooster is ready.

We create toys
In the form of a cockerel, you can do whatever your soul desires. For example, toys. Here is one of the options for a toy in the form of a bird made of thread and a ball.
First we need to inflate the balloon the right sizes and dip it in glue. Then we dip the threads into the glue and tightly wrap the ball. Thus, the frame for the toy will be ready.
Then we pierce the ball with a needle and draw out its remnants. Using the same technology, we make a head, but it is smaller. Take store-bought buttons or eyes and glue them onto the frame. Then we take colored paper and cut out the remaining parts of the cockerel's body - wings, tail, scallop. Then we make paws. And the rooster is ready.
Now let's move on to the second version of the toy - a bird made of wool, felting will help to make a small cockerel, which will be a decoration for the car.
First we need to make a wire frame. Then plant unnecessary wool on it. After that, add volume to the figure with the main color. With the help of needles, fluff the wool. Separately, we roll the wings, scallop, tail and attach them to the body. We wrap the paws with yellow wool and fix the product on any basis.
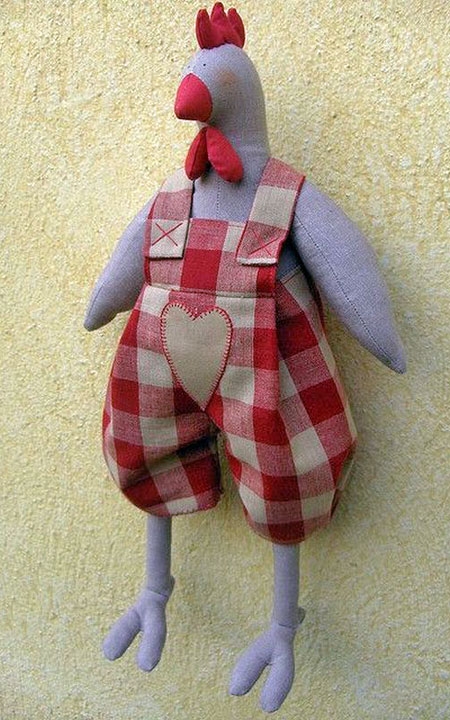
And we also suggest you sew a Raymond rooster, the pattern of each detail is shown below. By increasing or decreasing the pattern, you can sew a larger product or a small toy. And also do not forget that it is necessary to leave a little space on the fabric for seam allowances.

Cockerel is ready!
Video on the topic of the article
We offer to see interesting selection video tutorials on how to make a cockerel with your own hands. Also in these master classes you will learn more about how to make a tilde-style cockerel.