Excellent master class with step by step photos teach you how to make an insect. Make them from natural materials, plastic bottles, paper, candy, and even junk material.
Amuse your little ones by making insects with them. These small animals can be crafted from leftover materials.
How to make a spider with your own hands?

You will get a wonderful soft spider with bendable legs. To do this, take:
- pieces of fur from some old thing;
- stationery knife;
- glue "Moment";
- synthetic winterizer;
- pliers;
- two beads;
- cardboard;
- wire.
Now you need to cut 4 pieces with pliers. One is 4 cm long, the second is 12 cm, the third is 16 cm.
Place a ruler on the back of the fur and cut this material into strips 1 cm wide. Be careful to cut through only the flesh and leave the fur intact.
Lubricate the back with glue, put the wire here, pull the opposite long edges of the fur and glue these blanks.

In this case, one part of the head and two parts of the back must be made of fur, and one part of the head, taking the skin. Place these templates on the back of the materials and cut out with a utility knife.


Through this hole, you turn out a double piece on front side... And there will be skin on the abdomen.

Fill the blanks with padding polyester and close the gaps using a seam over the edge. Place your head against the backrest, insert a couple of pieces of wire into the seam and attach using a hot glue gun. Sew these parts together. The wire is needed to make a bend between the back and the head.

Now place the feet on the working surface so that the short ones are in the center and the long ones are at the edges.

Sew them to the bottom of your head. Attach the eyes. Here is such a wonderful spider.

See how to make insects from disposable spoons... A master class and step-by-step photos will help you with this.
How to make a ladybug - master class and photo

To make such insects, you will need:
- plastic spoons in the amount of 3 pieces;
- black, white and red acrylic paint;
- scissors;
- brush;
- thermal gun;
- black button.

Use scissors or a heated knife to separate the upper parts from the spoons. If you want to make three ladybugs at once, then you will need to paint 6 blanks in red, and three more blanks in black.
When the acrylic is dry, take two red spoons and glue them together slightly overlap. Glue the black spoon down.

Glue a small black button in front, and if not, then cut off the base of the disposable syringe, paint it black.
Carefully draw small black circles on the wings of the butterfly.

Cut pieces of fine wire and glue them as a mustache. And paint the eyes of a ladybug with white paint.

Here's how to make this kind of insect. If you wish, craft three more girlfriends for him. You can play with these figures with your child.

Make an edible ladybug if you wish. This can be given as a gift or made as a decoration for the festive table.
Candy ladybug

Here's how to make this type of insect. First take:
- bulk foam;
- candy;
- toothpicks;
- Scotch;
- corrugated paper two contrasting colors;
- scissors.
Use a knife to cut off any excess from the styrofoam. You should get such a blank.

Attach toothpicks to the back of the candy with tape.

Cut the crepe paper into strips of 4 x 20 cm. Wrap the candy around them. You will be so adorable.

Now cover the head of the ladybug with a wider strip of brown paper, then start attaching flowers here.

Cut out the base for the craft out of plywood and attach a blank of green paper here by facing. To do this, you need to cut it into squares with sides of 4 cm, then screw them onto a thin pencil blade and glue them on a plywood base.

In the center of this stand, place such a ladybug made of sweets.

How to make insects from plastic bottles with your own hands?
Such insects are durable, since this material will withstand low temperatures, summer heat, and precipitation.

Take:
- transparent plastic bottles;
- scissors;
- beads;
- thin wire;
- acrylic paints.
If you can, draw a freehand butterfly. If not, then use a template. Attach it to the surface plastic bottle and cut out.

If you wish, color the butterfly first or do it in a later step. String the beads on the wire folded in half, and bring the two ends forward to form the antennae. On their ends you need to glue a bead or one piece of beads.
This plastic bottle butterfly will decorate your garden or city courtyard. Make a big one if you like. The head and torso for her are made from 2-liter bottles or slightly larger capacity, the wings must also be cut from the bottles. These blanks are fastened together with wire and painted.

Also, this material will make a large spider. Check out the needlework process. Take:
- plastic bottles;
- pliers;
- awl;
- wire;
- cans with black paint.

If you have dark bottles, then use them, if not, in this case, take bottles of a different color, then you will color them.
Take 28 bottles and cut in half. In this case, leave the corks wrapped on the necks of the bottles. Now you need to make 18 identical legs for the spider. To do this, first take a whole bottle and tie the 6 halves you just created to it with a wire. And the seventh part will be with a cork.

Now you need to sew these parts using wire. It will be easier to do this if you familiarize yourself with the following diagram.

You staple the workpiece as if you were stitching 2 pieces of fabric. Now you need to connect the made eight legs into one structure using wire.

Here's how to make an insect further out of plastic bottles. Wire the four bottles together. At the same time, place the two extreme ones slightly below the central ones. Then add five more bottles here. It turned out a head with a chest. Attach the spider legs here.
To make the belly, take three bottles, and secure four more on top. Then, from one and the second side, fix on the left and right one more bottle.

Now connect the abdomen to the main body and you can paint the spider. Of course, this is best done outside.

You can fix this insect on a wooden fence by first drawing a spider web on this vertical surface.

If you do not have so many plastic bottles or this master class seemed difficult to you, then look at another one. It only needs one plastic bottle. From it you need to cut off the top, and then chop the rest of the bottle to the bottom with a knife or scissors to get eight legs. Bend each one several times, then you get spider legs.

You can glue a plastic ball here, as if a spider is carrying its egg. Then it remains to paint the insect with black or other dark paint.

You can turn this ball into a spider's head by screwing three pairs of eyes from a children's mosaic here. Then you will sew a hat for him out of felt and lace. Decorate it with feathers and a pearl bow.

If you want to place your insects near or on a tree, then also craft one from a plastic bottle. You will get such a fabulous bewitching object.

Take:
- 2 liter bottle;
- branches;
- hay;
- polyurethane foam;
- brown paint;
- hot glue gun;
- sawdust.
Cut a hole in the bottle closer to the bottom. Then turn it into a hollow, but first add sawdust here. Then the structure will be more stable. Use a hot gun to make holes in the top of the bottle. This is where you insert the branches. Fasten them, lay them with cotton pads.

Now, starting at the top, apply the foam to the bottle. In this case, you need to hold on to the branches so that they do not change their position.

Most likely, one bottle will not be enough, so use two. When the foam hardens, paint the tree with brown spray paint.
To keep the hollow the same color, put a bag here for a while. When the staining process is over, take it out.

If you want to create a winter landscape, then glue some snowflakes here. Place berries, cones, artificial mushrooms, hay inside the hollow. It will be seen that the squirrel has made such stocks, place its figurine on the branch. And you can place insects on other branches.

If you can make a firefly out of a plastic bottle, then place it under the crown of this tree. In the dark, such an insect will sparkle and become an additional lamp and object of comfort.
Take a green plastic bottle and wrap the same colored wire in three places. You can pre-paint it or take a floral one.

Hide these insect legs on one side, glue the bottle with yellow paper.

To further make an insect, the name of which is a firefly, cut two wings out of cardboard. Glue them onto yellow paper. Make two eyes out of buttons or plastic rings by gluing them on the lid. Make antennae out of soft chenille wire in the winding.
Place a stick glowing in the dark inside the bottle, after which the insect craft is ready.

You can make a firefly not only from a plastic bottle, but also from plastic packages from kinder surprises. Antennae and paws are glued to these containers. And you will draw or make the eyes from cardboard.
Inside each such toy, you need to put a small LED lamp.

In general, insects can be made from a variety of waste materials, for example, from the following.
Insects from egg trays - step by step master class

To make such a gallant ant, you will need:
- egg carton;
- scissors;
- black paint;
- brush;
- eyes for toys;
- chenille wire.
Cut three cells from a cardboard egg carton. Cover them with black paint on the outside and inside. When it's dry, glue the eyes of the ant. If you don't have ready-made ones, attach blisters from pills or buttons as they are. But do not give small children such a toy.
Cut 6 straight lines from the black chenille wire or take three wires the right size... Flex them and attach them to the back of the trays. You will get a wonderful insect ant.
Egg trays - real find for mothers who like to tinker with children without spending special money on it.

To make such a bee, you need to cut out two cells from the tray, paint them yellow. When the paint is dry, have your child paint black stripes on top. Take the eyes for toys, attach them, and the baby will cut out the wings from cardboard, which must be pre-painted or yellow. Make paws and whiskers from black chenille wire. The child will be happy to join you in the creative process.

Taking 5 cells from the trays, you can make a funny caterpillar, and even one cell will turn into an adorable spider. He will need to glue the legs and eyes.

And if you glue two cardboard wings to the caterpillar blank and paint them, you get another insect. Such a butterfly is also easy and simple to make.

It doesn't take long to create a ladybug either. You will make each such insect from two egg trays. Then they need to be painted and applied in a contrasting color to the back of the circle.

You will develop a child's imagination by showing not only how you can use waste materials, but also natural ones. This type of activity will also entertain the baby when you send him for a walk. After all, such insects can be done right while traveling in the park, in the courtyard of the house.
Insects from natural materials - how to do it step by step

Show your beloved child how 3 oval leaves can be turned into a butterfly blank. In this case, the large will become the body, and the small ones will become its wings. The acorn cap will turn into the head of this insect, and two stems of grass - into its mustache. You can take openwork leaves type of strawberry and place four leaves on top of them from flowers of a brighter color. You will also get a wonderful butterfly, and rowan berries will turn into the body of a caterpillar, if strung on a toothpick or on a sturdy twig. Such branches can be attached to one berry, and you get a wonderful spider.
You get a funny dragonfly or a fly if you take:
- maple leaves;
- twigs;
- rowan berries;
- salty dough.

On a twig with salt dough attach the above materials, as well as an acorn hat. If you want to make a fly according to this principle, then make the body out of an acorn, and for the eyes, take two acorn caps and two berries. Attach them using salted dough.

Another option is to take three circles of salt dough and a toothpick with which the main parts are attached. You can make an insect that flies this way.

Go for a walk, look with your child for such natural materials to construct these insects.

If you have older children, then they can make crafts from flowers and plants, which are also natural materials. Arrange yellow flowers dandelion, forget-me-nots so that you get the head and body for a beautiful beetle. Make its legs out of blades of grass.

An adorable butterfly can be crafted from leaves, maple seeds, blades of grass and a couple of beautiful flowers.

If you have sweet pea petals or similar flowers, they will make an adorable butterfly.

Also from similar natural material, for example, you can make a beetle out of rose petals by gluing these petals onto the markings of its head and body, previously made on cardboard.

Pick up petals by color with your child, then you can make applications of picturesque insects out of them.

If you want to see a video master class that tells how to make insects, then you have such an opportunity.
The quilling technique will allow you to make such a voluminous hairy bumblebee.
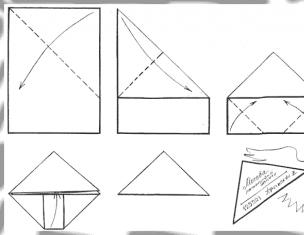
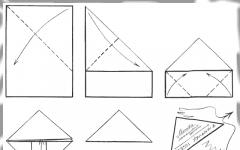
And using the origami technique, you can make a spider.
How to make a children's craft "Spider" from natural material with your own hands. Step-by-step instruction with photo.
Spider - children's handicraft made from natural material
Autumn gives a lot of diverse natural material, which is indispensable for children's creativity... In this article I will tell you how to make a children's craft "Spider" from natural material.
The principle of making this craft is simple: legs are made of fluffy wire, and the body of a spider is made of chestnuts, acorns, nutshell, pebbles, bumps, etc. You can also use not natural, but waste material... For example, plastic bottle caps.
Spider - craft from a nutshell
Materials and tools
For the "Spider" craft made of natural material (nutshell) you will need:
- half walnut shell
- plastic (or made of cardboard) eyes
- (black or multicolored)
- scissors
- glue or double-sided tape (tape)
- thread
How to make a spider from natural material. Instructions

Spider - a craft from chestnuts
Craft "Spider" from chestnut is done in the same way. At the time of making the craft, we did not have enough black fluffy wire for it, so the paws turned out to be short, and the spider itself looks more like an octopus. But the idea of creating an octopus from chestnut and fluffy wire can be used in making bulk crafts on the topic "Sea". In this case, it is better to take a fluffy wire, not black, but, for example, purple.

Spider - a craft made from acorns or acorn hats
A funny spider can come from an acorn or a hat from it.

Spider - craft from stones
Since spiders in nature come in a variety of colors and patterns, the body of the spider can be painted acrylic paints fully or partially. Draw circles, stripes on it, or show your imagination and come up with other patterns.


Or experiment with the color of the fluffy wire for the feet.


I suggest looking at articles about other crafts with spiders (from rubber bands, paper, etc.) in the heading or others (for example, and, etc.).
© Yulia Valerievna Sherstyuk, https: // site
All the best! If the article was useful to you, please help the development of the site, share the link to it in social networks.
Placing materials from the site (images and text) on other resources without the written permission of the author is prohibited and punishable by law.
According to legend, spiders cannot be driven out of the house, they protect the home from negativity and uninvited energy guests.
Make this cute amulet with your own hands - a chestnut spider in the company with a dragonfly made of natural material will perfectly cope with the tasks! A decorative web of threads will never become a reason to think of you as a bad hostess, rather the opposite - all guests will admire original decor! Every novice needlewoman will cope with the task.
Preparation of materials and tools
To create the craft "Chestnut spider on a web", as in the photo, you will need the following materials and tools:
- two chestnuts (large and small);
- viburnum fruits;
- two acorn caps;
- three cones with thuja twigs;
- five petals - "helicopter";
- the fruits of the Safora tree;
- eight wooden skewers;
- thread with sequins (or any other thread);
- wine cork;
- two fuzzy sticks on a wire base, dark brown and light brown;
- a piece of black plasticine;
- scissors;
- glue gun.

If you don't have some materials for decorating, it's okay, use something else or reduce the amount of decorations.
Step-by-step master class on creating decor
First, you need to prepare wooden skewers to create the basis of the craft - a spider web. Leave the length of the skewers 10 cm each (more or less, depending on the desired size finished product), sharpen the blunt edges of the skewers with a knife.

On the finished "skeleton" for the web, closer to the center, tie a thread to one of the skewers. Secure the knot with a glue gun. Then, at the same level, wrap all the skewers one by one, fixing the intersection of the thread on the stick with glue so that the thread keeps its shape better and does not slip. 
After the first level of the web, you need to wrap the thread near the initial knot, fix and make two turns along the same skewer, lifting the thread up to continue the next row of the cobweb. Thus, go around in a circle all the drops to the edges of the skewers, do not forget to fix the intersections with glue, especially the last knot. 
A spider web of threads is ready for. 
Then start making the hospitable host of the spider web - a spider made of chestnut and fleecy sticks. For an insect cap you will need: a helicopter petal and an acorn cap. 
On the edge of the larger chestnut, closer to the top, glue the small chestnut. This will be the torso with the spider's head. Then cut 6 legs of 3-4 cm with scissors from a fleecy stick and bend them slightly in the middle. Glue three spider legs on each side of the body (large chestnut).
Cut off the edge of the "skewer" - this will be the visor of the cap and glue it to the acorn cap, and then to the spider's head. Roll out of plasticine and stick two black eyes. Cut off a piece of stick light Brown and attach around the spider's neck. The spider is ready.

Now it's time to make a dragonfly from a natural material with your own hands: a body made of a piece of a fleecy stick, wings made of "helices", a head made of an acorn cap, eyes made of plasticine. 
Start making a dragonfly from the body. To do this, bend the wire almost in half (make one edge a little longer) and twist it slightly (not tightly), leaving a small loop at the base, and the end thinner. Glue the head - an acorn cap to the loop and glue two round, flat eyes made of black plasticine. Along the edges of the eyelet, glue two "helicopters" on both sides - these will be the wings of a dragonfly.

The caterpillar will be the last guest on the web. To make it, you will need the fruits of the Safora tree (so that the caterpillar is longer, they can be glued) Make eyes and glue them from plasticine. 
Place the chestnut spider and the rest of the inhabitants and glue to a decorative web of threads.
To decorate the composition in the center, glue the composition of thuja twigs and three cones. 
Add a few viburnum or mountain ash brushes along the edges "for a sparkle". The craft is ready.

For the craft "Chestnut spider on a web" you can make a loop and hang it as a talisman. Let the spider protect your home, which will always be full of goodness and long-awaited guests.
Other ideas of what await you in our other publication. Such creativity can be safely attributed to, because it does not require practically any costs.
Visit us more often and subscribe to the groups of the site "Women's Hobbies" in in social networks to be the first to know about the release of new master classes.
As for me, there is no better natural materials for making crafts with your own hands. Nature itself gives us bright, unusual material for our creativity. You can supply yourself with the necessary equipment all year round: shells in summertime, cones in frost. And in autumn, fireworks of colors from falling leaves, acorns, chestnuts and many other interesting and beautiful things.
Walking through the autumn park, filling your chest with fresh air and burning extra calories in a casual game with children, you can gather material for crafts. What to do? Ideas can also be drawn from nature. Surely in the park you have come across intricate patterns of cobwebs. Who is stopping us from "weaving" our pattern? Get down to business!
Required tools and materials:
Twigs;
- chestnut;
- acorn;
- leaves;
- Styrofoam;
- a thread white;
- scissors;
- glue;
- wire with black winding;
- chenille fluffy sticks (wire);
- awl;
- white plasticine;
- artificial eyes.

Craft spiders on a web made of natural material
We need branches that are not very thick, about 0.5-0.6 mm in diameter. We cut 8 sticks 11-12 cm long. On one side we sharpen the tip so that it is sharp. This can be done with a knife or with a pencil sharpener.

We take a piece of styrofoam with a height of about 1 cm (less is not recommended, otherwise the branches will be poorly inserted into it). We cut out a circle with a diameter of about 4 cm. Begin to insert the sharp end of the twigs into it. First, make a hole with scissors. For reliability, grease the tip of the twig with glue and insert. First, 4 branches in opposite directions in a horizontal and vertical line.

Then we insert 4 more branches between the horizontal and vertical "cobwebs". 
Let the glue dry. We take a white cotton thread, tie its tip to one branch, pull the thread to the next branch and wrap it with the thread twice (if you make one turn, the thread will then shift), pull it back to the next branch and again wrap it with thread 2 times. We do this with all the branches. When we return to the stick with which we started, cut the thread and tie the tip (make knots on one side, it will be the back).

In the same way we do the 2nd, 3rd and so on row. The result should be a spider web. 
We take chenille wire... It is better if it is black or brown. If there is no one available (as it turned out for me), then we take any color, we will have a modern spider who is not afraid to experiment with its image. Cut off 6 pieces 4 cm long.

With an awl or a gypsy needle we make a hole in the chestnut and insert a chenille stick into it. Then we bend these pieces, like the legs of spiders.

We will make the second spider from an acorn. The material for the legs will be a wire in a black winding (this is how a cord with a plug is often fastened in new technology, you just do not need to throw them away, if there is no such color, then you can use any or wrap the wire with black threads). Cut off 6 pieces of 3 cm long from the wire. We also make holes with an awl and insert the legs.

We glue artificial eyes to a chestnut spider, and make them out of plasticine for a small spider, rolling it into small balls. 
We glue the leaves. 
We glue our spiders, one in the middle, and the second anywhere. 
Crafts made from natural materials are ready! Enjoy your walks, successful collection of natural material and creative success! 


Crafting a spider on a web made of natural material looks simple, but it looks original and interesting. And it is very easy to make it.
What do you need for the craft?
- Thin branches;
- Dry leaves;
- For a spider to choose from: acorn, bump, chestnut;
- Plasticine;
- Scotch tape, white threads (thicker is better);
- Moving eyes, but they can be made from white and black plasticine.

How to make a craft spider on a web?
First you need to decide what, or what, your spider will be. There are such options:
You will need plasticine, a bump, thin twigs. The branches should not be too dry, so that they do not break off completely when bent.

Prepare 6 identical pieces, broken off from a branch. Glue brown plasticine on the bump between the scales.

Place the twigs in the plasticine to form spider legs. To do this, the branches need to be broken and bent a little. For reliability, the place of the break can be fixed with plasticine.

Next, it remains to glue the eyes and the spider from the cone is ready. All my eyes are moving, but they can be made from plasticine. Roll out two balls of white and the same number of balls, but smaller, of black plasticine. Glue it on the bump, and you get a very funny goggle spider.

Prepare brown plasticine, twigs, chestnuts, and an acorn cap. And also purchased eyes, or plasticine.

On the bottom of the chestnut, glue a small layer of plasticine, which will hold the spider's legs. They also need to be slightly broken or bent, the folds must be fixed with plasticine (optional).

It remains only to glue the eyes, an acorn hat and a funny chestnut spider is ready.

Another simple version of a spider made from natural material. It is made in the same way as from chestnut. You will need branches, plasticine, an acorn, eyes.

You need to glue plasticine to one part of the acorn, and stick 6 bent branches into it. The eyes and nose will complete the look of the spider. I subsequently added plasticine noses to all the spiders.

These are the spiders you can make from natural materials. For crafts, one is enough to choose from.

We make a web for a spider from natural materials
Take 3-4 branches, relatively the same size, connect them crosswise. Secure the intersection with tape. If the branches are very thin, plasticine is enough, the thicker branches need to be properly fastened with tape in several layers, making sure that they practically do not move. Otherwise, the threads will sag.
Then you can immediately wind the threads, but it is better to first glue plasticine on certain areas. The photo shows their location. There are many advantages of this action: plasticine will hold the thread on the branch, hide it, and you can later glue the leaves to it.

Wind up the threads. I have them thin, it is better to take thicker. First you need to wind one tier, from branch to branch, and several times around the place marked with plasticine. Then the second and third. If you wish, you can make more of them.

Everything is ready, glue a large maple leaf on the plasticine in the center - this will be the spider's nest. And on the sides there are any small leaves - probably, they were blown into the cobweb by the wind. But more for beauty.

The web has been made, now it's time to put it in its owner's nest. Here is a chestnut spider on the web.


And now the dwelling and hunting place of the spider from the cone.


The acorn spider has settled well.


And now the spiders are all together, although in a real version the sight would not be for the faint of heart.

This is how a spider on a web made of natural material can be, simple and as natural as possible.