Date: 2012-08-05
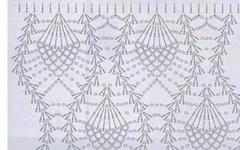
This seam can be called the simplest. You just need to be able to keep a needle in your hands with a thread. Seam "forward needle" is not only independent seamBut, often, the initial element for many other well-known seams. It is also called the markup. Look at the embroidery sample:
Sometimes there is enough such contour image to decorate the corner of the pillow, tack or a small children's thing. To embroider such a simplest image, consider the samples below.

According to the planned line on the fabric, we put a dotted line with a thread. The length of the stitch on the face and the outstanding of the fabric choose in advance. The seam will look neat if the stitches on the face and involve will be the same.
The next sample shows the "double seam forward needle."

We deploy to the right left dotted line, then returning along the same line, fill the gaps between the stitches already laid. We obtain a uniformly smooth outline on the face and the outstanding of the sample (on the illustration, several stitches are shown a bit shifted only for clarity). "Double seam forward needle" allows us to make an embroidery finish neat on both sides. For example, on the curtain, towel and other things, where decorativeness is important on the face and ispart. You can pick up any pattern in the form of contour.
Having mastered the seds, it is possible to apply them in various combinations, for example: seam "Rosyper" - small straight stitches of about 0.3 - 0.4 cm long, laid in various directions, literally scattered by tissue (used as a seam, Filling spaces between embroidery elements), as well as stars or stylized flowers from straight stitches. Consider them in the next sample.

So, we reviewed how to perform the simplest straight seams. Neck "Forward needle" or a good, double seam "Forward needle", "Rosychy", "Star". In the future, we will definitely continue this topic, since there are many combinations of using these seams that give a variety of decorative effects for embroidered products.
Get in addition to the lesson e-learning book! Now - free!
1. Seam "Forward needle", or a mertic
With this seam, you can leapt two or more cuttings, take pockets, braids and other parts, as well as mark up.Stitches are put on the right left, they are visible with facial, and from the wrong side of the product (see Fig. 1).

The stitch length depends on the desired storage strength. Small stitches of the seam "Forward needles" can be guaranteed or charged the details of Croy.
2. Mural Spit
It is used in cases where the fastened layers of the tissue should not be shifted in the longitudinal or in the transverse direction.Seam is directed from top to bottom or bottom up. The release site of the needle is located on the left, near the eyelet entrance to the fabric (see Fig. 2).

Seam short stitches with a small interval between them firmly fastens layers of fabric, such as a collar with lapels. When there are only two layers (tissue with a bulk gasket of volumenflysis or with a lining cloth), then the stitches can be longer, and the interval is greater.
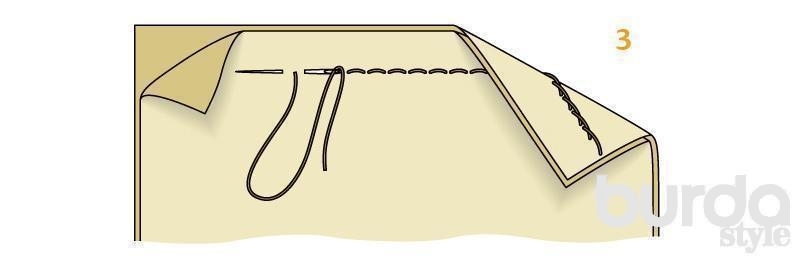
3. Show "Manual Stitch"
The most durable of manual stitches, which is used to perform very short seams, to correct the machine seams, in the case when it makes no sense to use the sewing machine.Initially, enter the needle into the fabric and output it after 5 mm, then enter the needle again, retreating back from the needle output point of about 3 mm and output the needle at a distance approx. 6 mm (\u003d Double Stitch Length). Now enter the needle to the point of the first output of the needle and again output it at a distance equal to the double length of the stitch, continue to be left to the right (see Fig. 3).
4. Povenaya Show
Almost invisible and used when laid lining, as well as to stitch wrapped on pour park sections of the main fabric or for the fixing seam, which is not available for the overacting on sewing machine From the wrong side.Seam is performed on the right left (see Fig. 4).

5. Conducting seam "Kozlik"
In essence, it is finishing seam. "Koztikom" lamp allowance for niza feed in products from elastic fabrics.The seam is performed from left to right in small stitches, Koso offset up / down.
When launching the feed on the bottom of the bottom, make sure that the stitches do not pass on the front of the fabric, that is, the stitch on the fabric must capture only 1-2 filaments of the fabric (see Fig. 5).

In the photo: Painting Ezhena de Blaas, Italian artist of the end of the XIX-beginning of the twentieth century. Figures: Burdastyle.
Material prepared Elena Karpova
Technology lesson on the topic "Seam" Forward needle with passing ""
An abstract lesson on technology for grade 1 on the topic "Seam" Forward needle with passing ""
Description of the material: I propose an abstract lesson technology in grade 1, which will be useful to students of pedagogical colleges, primary school teachers.Subject: Seam "Forward needles with a passing".
Purpose: Formation of manual sewing skills by the method "Forward needle with passing".
Tasks:
- teach the technique of performing a step "forward needle with a passing", to systematize knowledge of students on the rules of safe work with needle and scissors;
- to promote the development of logical thinking, long-term memory, oral speech, small Motoriki hands, develop mental activity, independence, attention and ability to act according to work plan;
- to promote the upbringing of artistic and aesthetic taste, creative activity, perfection, hard work and accuracy in the performance of the product.
Planned results:
Subject: We will have an idea of \u200b\u200bthe seams, learn to perform the neck "Forward needle with a passing".
MetaPered: Universal learning actions (Wood):
cognitive - to master the rules of safe operation of the needle when performing products; follow the rules of the needle in practical work; learn to formulate the problem independently, search for ways to solve the problems of a creative nature;
regulatory - master the techniques of work with a needle and with threads; make action on the sample and the specified rule; To evaluate jointly with the teacher or classmates, the result of its actions, to make relevant adjustments, in collaboration with the teacher and classmates find several options for solving the educational task;
communicative - They will learn how to build clear speech statements, listen to the interlocutor and conduct a dialogue, reason, recognize the possibility of the existence of various points of view and the right of everyone to have their own.
Personal: have motivation to educational and creative activity; Aesthetically perceive the works of art, understand the significance of beauty; Show interest in the subject.
Equipment: Tutorial, presentation, sample of an embroidered napkin, demonstration canvas, a scheme for performing a step "forward needle".
Materials: Fabric for sewing, multicolored threads.
Instruments: Scissors, needle, scrap, needle, pencil, line.
Structure and course of lesson
I. Organizational moment.- Hello guys!
Here the call was given a signal:
work hour has come.
So time do not lose
And start working!
"I hope that it will be interesting in the lesson, you will learn a lot, learn a lot and enjoy this lesson.
II. Actualization of knowledge
- Guys, let's remember what stitch is? (Slide with the image of stitches) (stitching between two consecutive processes of the material with a needle with a rather compound method)
- What is the seam? ("Sooh" - a few identical stitches, following each other)
- What materials and tools are used when performing seams? (When performing seams, we need: cloth, thread, needle, scissors, needle)
- What kind of tool is the main on sewing? Why? (The main tool is a needle, because without it we just could not sew)
- What do you need to remember when choosing a fabric? (Tissue- should be durable, dense)
- Try to tell me what we will do in today's lesson? (Embroider)
- Today we will learn to perform "seam forward needle with a passing" (Sweeping Slide).
- And now look attentively, I have several types of threads on the table. Answer what is used for each of them? (on the table there are sewing, embroidery and knitting threads) (sewing threads are used at sewing, connecting tissues among themselves; embroidery - when embroidered different patterns, and knitting threads are used when knitting from different products)
- Which of these three species Turning to us today will be needed? Why? How is it called? (Embroidery thread, as we will perform seam. Called Moulin)
Self beautiful threads - Moulin. They are made from the best varieties of cotton and paint in different colors. Moulin consists of 6 thin threads, which are easily separated from each other. It is Moulin that we will use for embroidery, because cotton, silk or woolen threads Easion is harder.
- What color thread will you choose for embroidery? (It is necessary to take those that are clearly visible on the fabric)
III. Primary learning of new knowledge.
- Today we will learn to carry out the seam "Need a needle with a passing" (visual show).
- What do you think, what does the word passing? (To drive - means wrapping, wrap something around something, intertwined with something)
See how the word passing is written. Let's read it with a choir. Remember how the new word is written and pronounced.
- Consider carefully seams, compare with the neck "Forward needle".
- What common? What is the difference? (General-stitches in the form of dock. Differs - by passing)
- Guys, what is frosted? Let's read together (Slide) (Screw - Metal cap, worn on a finger when sewing for progress by needle)
1. Preparation of "Track" for embroidery
- In order to start embroider, you need to place the fabric, we will do it with a pencil and ruler. Look carefully how I do it. (showing with simultaneous explanation) We retreat from the edge of the fabric several centimeters and a pencil spend a straight line - a tag on the fabric. It turned out a "track", which will be convenient to embroider.
- To perform the seam "Forward a needle with a passing", you need to pave the stitches of the seam "Forward needle", and then transfer them to threads of another color.
2. To perform the seam, it is necessary to pierce the fabric from the inside on the face, intercept the needle for the edge and stretch the thread while the nodule does not rest in weave, retreat to the left to the distance equal to the stitch, pierce the fabric from the face to the wrong one and intercept the needle for the point In the wrong way to bring it again to face.
- Remember that the stitches of the seam "Forward needle" and the distance between them should be approximately the same.
3. To perform the passing, take a thread of another color. The needle is removed from the inside on the face, piercing the fabric over the first stitch. Then the needle turn the eye ahead and pass each stitch, i.e. Support the needle for each stitch from above. So tighten the stitches to the end of the line. Then the needle is removed on the wrong and fix the thread.
- Before you get started, you need to prepare a tool.
- What tool will work? (needle)
Tool preparation for work
1. Measure the thread;
2. To ingue the thread in the needle;
3. Tie a nodule.
IV. Fizkultminutka "Thread, needle, nodules."
Vi. Primary testing of understanding
- And now try to make a work plan.
Drawing up a work plan:
1. Prepare the necessary materials.
2. Prepare a "track" for embroidery
3. Run the seam forward needle.
4. Run the seam "Forward needle with a passing."
- But before you start working, let's remember security rules when working with needle and scissors.
1) Do not throw the needle, do not leave it in the fabric or in your clothes.
2) During the work of sticking the needle to the needle.
3) Storage spare needles in the needle.
4) Check the number of needles before starting work and after its end.
5) Do not take a needle in the mouth.
6) When sewing use the wrist, corresponding to your finger.
7) Do not leave scissors open on the table.
8) After graduating to cut, put them with rings to yourself.
VII. Primary fixing
Practical work.
- We start to perform the seam "Forward needle with a passing."
VIII. The results of the lesson.
- What did you remember in the lesson?
- What is the name of the seam, which you studied today to perform?
- What do you think the knowledge gained in the lesson will be useful to you in life?
And now, lift your work and show each other. You all worked very well today, I am very pleased with you. Well done!
(Today at the lesson, we learned to perform seam "Forward needle with a passing", remembered the material of the past lesson, the types of threads. Well done, everyone worked very well!)
If you are satisfied with your work at the lesson and the lesson you liked it - then lift the green smiley, and if you were hard, lift the red smiley.
Cleaning workplace.
- The lesson is over. Bye! All work on sewing and embroidery is carried out with a support for these seams.. The study and learning of new manual seams allows you to make a wide variety in the design of products from the fabric. It is best to conduct training new seams on samples or when performing certain products.
Each manual seam consists of stitches. The whole process of performing seams is manually lies in the needle with thread They are injected into the fabric and after a certain distance are output from it. On the tissue remains a trace of different lengths, depending on what distance both punctures were made from each other. The trail from the thread on the fabric is called stitch. The stitch can be a length of 1.5 mm to 3 cm, performed in one direction or have a slope in any side.
Identical stitches, following each other, are called seams. Seams depending on their purpose are connecting (connect two or more layers of tissue together), enchanting (when they are helpfuld of edges, close them) and decorating (For the decoration of the product).
Seam "Forward needle" and its options.
Depending on its appointment of the seam "Forward needles" perform various stitches along the length: from 1.5 mm to 3 cm. The needle at the same time move in one direction - right to left relative to the product (Fig. 8).
The main purpose of the seam "Forward needle" - this is temporary fastening of parts of the product. It is called mertic. The estimation is a mandatory operation when performing even the most elementary products, as it contributes to the fact that the work will be neat, and final connection process Significantly facilitated.
Seam "Forward needle" in two receptions.
It is characteristic of what connects the connecting. 
First product flit small stitches- Switch "Forward needle", then rotate the product by 180 ° and sew the same seam in the opposite direction (Fig. 9). New stitches fill the gaps between previously executedThe needle passes into the same punctures. From the inside and the face it turns out the seam similar to the front side of the string seam.
Seam "Forward needles" has many options, mostly decorating. In this case, it is performed by non-ferrous threads with small or large stitches. Figures 10-15 show the main options adorning seams ahead needle:
- a) the seam is made with multi-colored or monophonic threads in compliance with a certain size and alternation of stitches (Fig. 10, a). The number of lines can be from two to ten. Embroidery resembles a motley braid;
- b) seam is made with strict observance of stitches and their alternation (Fig. 10, b). Such a set can be monochromatic or multicolored;
- c) seams are made in a checker order (Fig. 10, B). To perform them along the drawing line (strips), the ticks are pulled out of the tissue, as for measurements.

To form each line on the needle, the same amount of threads are gaining. In each row stitches alternate in a chess order. Embroidery with chess set reminds motley or monophonic stripes Depending on how embroidery is performed - threads of different or one color.
Student "Forward needle" with passing.

These seams are performed in 2-3 reception. First flash on the line of the drawing screen "Forward needle",
then change the color of the thread, fix it at the beginning of the line and come up with a needle for each stitch. If the needle movement with a thread is a snake and the needle moves from top to bottom, under stitch, then from the bottom up, one version of the seam is obtained - seam "Forward needle" with a "snake" by passing "(Fig. 11, a). If the needle moves a spiral and a needle, as it should be stitches, it turns out the seam shown in Figure 11, b.
Figures 12 and 13 shows the variants of the seams "Forward needle" with a passing "snake".
You can perform several seams "Forward needle" at a distance of 5 mm from each other, having one stitch strictly under another (Fig. 12, a). Passing every seam " snake, "get a metering braid (Fig. 12, b, c). 
There is another version of the seam with the "snake" by passing "snake.
For this execute 2 rows of seam "Forward needle", Posing stitches in a checker order. Next, the thread is placed as shown in Figure 13, but. 
A different type of seam with the passing "snake" is performed as follows. First, lay in parallel to each other suture "forward needle". One stitch falls over the other. Then we upgrade with a needle at once under two stitches. Top and bottom arcs are formed, as with single execution sEV with a passing "Snake"(Fig. 13, b).
Seam "Forward needle" with the "Spiral" and his varieties.

If it is performed in 3 reception by threads of the same or different colorIt turns out a convex lace, which is very suitable for embroidery contour drawings.
Perform this seam so: First, according to the desired drawing, the neck "Forward needle" is stitched, then laid the thread "Spiral" first in one, and then in another direction (in the opposite direction), as shown in Figure 14.
Such a kind of seam "Forward needle" with the "Spiral" passing You can use as finishing on various products. First, they firm the "forward needle" seam "Forward the needle" 2-3 lines. Stitches are one under another or in a checkerboard. Next, under each of these seams, the spiral thread (Fig. 15, a, b) is paved. 
Seam "Through the Edge" serves to coach the edges by cutting products (Fig. 16, a).
It warns the fallout of the threads on cuts, ensures strength and accuracy in the work.Seam can run from left to right and right left.
Stitches are located on the edge of the cutting of the tissue with a slope in the left or right side. Stitches depth and distance between themmust be on the same product the same, but not more than 5 mm. The more often the stitches are fed to each other, the seam is stronger. This seam can be connected to the edges of the product.If we sew small frequent stitches. 
Seam "Through the edge" can be decorating a connecting (for example, when connected parts of case for scissors, Combs and etc.).
An option for this seam is a double seam "Through the edge". It is performed, as shown in Figure 16, b. First flash in one direction, and then in the opposite one. It should be monitored that in the opposite direction the punctures were not in new places, but in those that are formed at the initial execution.
Double seam "Through the edge" is decorating. With it, you can enhance your handkerchief, a napkin. It is also used as a connecting seam (for example, when sewing soft toys, slippers and other works). One of the appointments of this seam is the cutting of cuts so that the fabric does not spit. In this case, the stitches must be shallow and be close to each other.
The main directions of needlework are embroidery, knitting, cutting and linen sewing, outerwear. The way to skill in any of them is based on the ability to use the simplest tools: spokes, crochet, needle with thread.
Self simple seams: Seam "Forward needles", seam "For a needle" (or as it is also called - "Back needle"), suture "stitch" (he is a lowercase seam) - these are shafts of needlework. Without acquaintance with them, you will not teach either embroidery nor sewing.
How to keep a needle and tie a nodule
The work (tissue) is usually kept in the left hand. It is put on the middle and index fingers, pressed large, the remaining fingers of it only slightly hold. Girls with inappropriate to keep the hand with a slightly curved hand, especially when there is a thimble on the middle palace, but this feeling disappears quickly.
The needle is held by two fingers of the right hand: big and middle. Even if she first slipped - do not give up, very soon it will become obedient.
Thread should not be too long, half meter - optimal length. Otherwise, the desire to avoid re-inwing the thread into the needle, if the first is not enough, will turn out even greater trouble: the thread will begin to be confused, it will be inconvenient to sew. "Lanes Fadchen - Fauules Madchen," the Germans say that in translation means: "Long thread is lazy girl."
Thread is in the needle right handLeft at this time remains still, it only holds the needle at the level of the eye to be visible. Remember how Huckleberry Finn was declassified when he changed his girl? For sure, he began to do everything on the contrary, and they immediately recognized the boy.
Sach thread to the needle ear, tie a small nodule on one of her ends. To do this, take the tip of the strip of the guys index and thumb, Wrap it around the index finger of the same hand with a ring, shrouded in the same place where her tip will be covered. Twist a thread from the nail, at the same time the other hand pulling the thread. The ring will be squeaked and turned into a nodule.
Seam "Forward needle"
The simplest seam resembles a dotted with a person and with an inside it is the same. It is necessary to sew right to left, that is, not as we write and read, but on the contrary. It's easy to do such a seam, especially quickly it turns out to sew a fabric, if you get a few "waves" at the needle, and then stretch the thread through them.

Seam "Forward needle"
Seam "Forward needles" is used usually to fasten several pieces of fabric if this is done for a while. "Help" - call this process.
Seam "Back needle", or "for needle"
Having made the first stitch, we start the needle back and pierced, directing the edge not back, and go ahead that the needle turned around, stepped back, but decided to return and continue moving forward. It turned out the seam "For a needle." If you meet the name of the seam "Back needle", we are talking about it too.

Seam "Back needle", facial side

Seam "Back needle", starving
The seams are often used to crosslinking the pieces of fabric, it is much stronger than the seam "Forward needle", but its execution requires a little longer time.
Sooh "Stitch"
The lowercase seam is strong. FROM front face He looks as if he was scoffed on a typewriter. Hence the name. It is done almost the same as the seam "back needle", only the gaps between the stitches remain. It takes it more time, but it is worth it: this seam is the strongest, they often sew parts of clothing.

Sooh "Stitch"
This is the easiest of the seams that is suitable for embroidery, although it cannot be called it even with a large stretch. However, it is possible to stretch in simple drawings by embroider with them, for example, fungus or fish.