Snowflakes on New Year You can make it yourself, it is easily and quickly made of paper. To do this, you can use various step-by-step circuits, cutting patterns and stencils. You can come up with your unique patterns. Various New Year's crafts, tinsel, luminous garlands add festive, make a hint of magic and fabulousness. For the new year, it is advisable to make many different snowflakes and decorate the whole house.
What a snow beauty will turn out - depends only on the flight of your imagination. It can be shallow or large, carved tender or cardboard. Patterns can also be invented by himself and create like Santa Claus, because he always has different snowflakes :)) By the way, the most beautiful - those that create nature and you can learn these ideas. What admiration we cause frozen windows, painted by Santa Moroz himself! After all, it exists! In our children's memories, fairy tales! And this fairy tale must be implemented! Well, what holiday New Year, if there is no magic in it, and there is no miracle!
To create festive atmosphere, via large number Snowflakes can make a garland, decorate the Christmas tree and walls. Dimensions can be very different. If we decorate the Christmas tree, then the sizes of snowy beauties should increase from the top to the base. Small and medium - decorate windows, walls, christmas tree, ceiling. And next to large, volumetric, you can even take pictures and exhibit a report in social networks :))
New Year - family celebrationPerhaps one of the most beloved and we all wait for it with impatience, dressing up the Christmas tree, decorate the house. And we definitely participate with the whole family, we do not give to anyone! :)) Perfectly dress the house with your own hands, with your crafts - Snowflakes are wonderful for this.
In previous articles, we considered. In this article, consider how to give a beautiful and festive look to our house, office, room with snowflakes. Various stencils of fairytale characters, beautiful houses, patterns in the form of a pig or our beloved Khryushi are also perfect.
Horror of snow beauties can decorate anything: garlands, candles, tablecloth and packaging of gifts, mirrors and plates. For creating easy And the delicate setting, they can be suspended to the ceiling, it is desirable to hang them at different levels on thin threads so that each of them "Paris" in the air. The main thing is to show fantasy.
Snowflakes for the new 2019 do it yourself with paper (stencils)
Snowflakes on the new year can be easily and beautiful made of paper. To do this, download stencil-pictures directly from the article and print, but you can simply draw the monitor screen. :)) We put paper, according to the drawn lines, cut out patterns and everything is ready! So, proceed. We choose stencils that we like. :)) With the help of uncomplicated patterns, geometric figures Create beautiful festive crafts.
Children can take part in cutting out snowy beauties, they will help you with pleasure. To make it easier to navigate how to cut them - see a very short video:
Stencil number 1.
This snow beauty reminds patterns created by nature on the window. Cut according to the scheme.


Stencil number 2.
Cut the rhombus, triangles, as in the photo.


Stencil number 3.
Such a snowflake resembles anaya.

Stencil number 4.
Cut the squares.

Stencil number 5.
We make a snowflake from rhombuses.


Stencil number 6.
Create our masterpiece in the form of an openwork Christmas tree.

Stencil number 7.
In this billet, we flute butterflies.

Stencil number 8.
Cut the triangles.


Stencil number 9.
It turns out a star.


Stencil number 10.
Making snowflake - hearts.

Stencil number 11.
Cut the Christmas tree.


Stencils can be printed, and you can draw patterns directly from the monitor. Or come up with your masterpieces. :))
Volumetric snowflakes (3D) for the new year with their own hands from paper - Phased
How to make bulk snowflakes from paper for the new year? With schemes, stencils, templates, detailed description - it is very easy and fast. Options There are big, just a huge set. Consider some of them - stages, using schemes, photos, video, because it would seem, this simple process for someone may seem complex, especially for children ..

Volumetric snow beauties look very effectively and perfectly transmit a fabulous winter atmosphere.
Skin Snowflake
Snowflake will do according to the scheme. Paper sheets fold diagonally, we make three slots from the bend. We connect the two shortest tip. Deploy the workpiece point side. We glue the tips of two middle strips. The workpiece is replaced again and continue until all the ends glue. It turns out 6 blanks.

All billets glue the base to each other.
If it seemed difficult to manufacture this snowflake, you can watch the video and everything will become clear:
Carved bulk snowflake
Such a snowflake is fine and fluffy, and really like kids.

For the manufacture, use a leaf of double-sided colored paper, cutting it off so that the square is to be turned out to be diagonally. Then we turn three more times to get triangles.
There should be three sides and the general side of the bend.

Long end wrap inside, cut off the resulting triangle.

Make smooth long cuts.

Gently deploy the workpiece so that the fringe does not break.

So that snowflakes are in bulk, make some of the same billets (two or three) smaller, connect them in the center. Our Volumetric Beauty is ready!
If it seemed difficult to manufacture, we can gradually consider the whole process using the video:
Snowflake in Quilling technique
Volumetric snowflakes that we do in a quilling technique (art paper) are obtained very beautiful and festive. They can be made of newspapers, but from ordinary paper.

Preparing paper stripes:
- 8 pcs size 25 * 2 cm,
- 16 pieces size 21 * 2cm
- 16 pieces of 19 * 2 cm
But you can take other sizes, then the snowflake will succeed more or less.
Each strips glue ends.

We form the workpiece.

From paper cut out a strip 2 cm wide, we wrap, for example, on nail polish :)) we glue the ends and create a center of snowflakes.

The newspaper is thinner than paper, so you need to make stripes in several layers to give the thickness.
We connect everything into one product.

Creating a bulk snowflake can be considered in gradually with this video:
Multicolored bulk snowflake

Cut the bands of two colors - 5 long, 10 medium, 10 short, as in the photo.

We connect: we glue the ends of the long strip, then we glue the sides of the sides of the sides.

Then there is a turn of short strips. It turns out such a blank.

We combine the stapler or glue billets in the middle. In the center we stick a circle of paper, decorate with any pattern.
It turns out a bulk snow beauty!
Snowflake - Luch

We will need: 2 sheets (square) paper of any color, for example - blue, glue, pencil, decoration - can rhyden.
1. Cut the paper to get a square. We add it diagonally.
2. We fold two more times.
3. We draw three lines for which cuts will pass, but not until the end in the scene, as it will be a snowflake center.
4. Slash through the lines. Below will make triangular slots.

5. Deploy the workpiece.
6. Bend and glue in the center the middle strips of each ray.
7. We make the second snowfish in the same way.
8. We glue the workpiece so that the rays are located in a checker order. The center is perfectly sick and decorated with rhinestones.

Snowflake harmonic

1. Take a sheet of paper, lay down in half.
3. Denote the center.
4. Draw on three or four triangles on each side, rounded the edges and cut.

5. Repeat the same with another sheet.
6. We associate two accordions.
7. We grind the snowflake by forming a circle.
8. Belt four parts with each other.

Team bulk snowflake
You can use ready-made patterns. We take several stencils, we flash, glue or fasten the stapler.

Snowflake ready!

Snowflake-hedgehog
Such a snowflake is easy and easy to do, stepmately following the scheme.

Bulk curly snowflake - easy, simple and beautiful
On the expanses of our Internet you can find a lot of beautiful ideas. I also really liked this snowflake.
We reviewed the most popular and simple versions of bulk snowflakes.
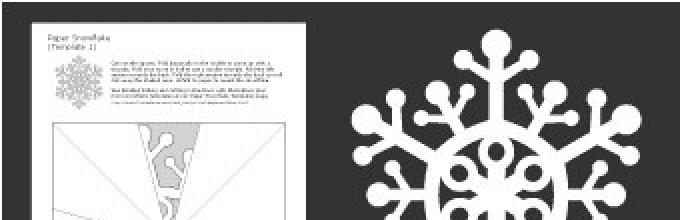
Paper snowflakes - step-by-step schemes (you can print or sized)
Snowflakes made of paper on ready-made schemes (stencils, templates) can be done very easily: you can print, but you can draw directly from the monitor screen, increasing or reducing the scale of the workpiece to of the desired size. And the photo will tell us what they will succeed depending on that or another circuit for cutting.
We fold a sheet of paper, cut, as shown in the diagram. It turns out a folded triangle is a blank for snowflakes.

Consider ready templates, stencils and wonderful schemes. new Year's craftswhich can be easily saved and print. We choose the visiting options, print, cut out and apply patterns on our blanks. With the help of such snowflakes from paper, you can decorate the windows, and all your home make it elegant and festive - after all, ahead of the new year!


Templates (Schemes) Snowflakes for Printout:
Such templates can be printed, attached to the billets, circle a simple pencil patterns of future snow beauty and cut. These schemes can be used to make snowflakes on A4 sheets.
Template 1.

Template 2.

Template 3.

Pattern 4.

Pattern 5.


We looked at many schemes and templates for creating beautiful, elegant snowflakes!
Choose, cut out!
How to make snowflakes on the new 2019 year from paper is easy and fast
Snowflakes on the new year can be easily and quickly made of paper. They are six-pointed, eight-pointed, can also be quadrangular. Consider stages, with the help of the photo the whole process of manufacture. Before cutting the workpiece, you need to fold the sheet properly.
Six-pointed snowflakes:

Ideas of drawings:


Eight-pointed snowflakes:

The thinner will the pattern be, the squad will look at our snow beauty:

It turns out very beautiful if cut out of colored paper or napkins:

It is worth noting that it cuts off just a little closer or further, you can get a completely different result :))!


Choose beautiful, cut out.
Stencils snowflakes for cutting (you can print A4)
Consider stencils of beautiful snowflakes, which can be quickly, easy and simply printed in A4 format, folded according to the scheme and cut.
We fold a sheet of paper according to the scheme:

Select stencil for cutting snowflakes:
Stencil 1.


Stencil 2.


Stencil 3.


Stencil 4.


Stencil 5.


Stencil 6.


Stencil 7.


Stencil 8.


Stencil 9.


Stencil 10.


Stencil 11.


Stencil 12.


Stencil 13.


Stencil 14.
Stencil 15.
Thanks to these stencils, we can easily and quickly get snow beauties.
Snowflakes from paper for the New Year do it yourself - on the windows
The most common way to decorate windows to new Year holidays It is a sticker on them openwork snowflakes, figures of Santa Claus, Snow Maiden and other festive attributes. You can use children's coloring and cut the pictures you like. The jewelry decoration window is fixed either with a soap solution, or with a tape. Thanks to the luminous windows, our snow beauties, New Year's drawings look very beautifully from the street, and our home is perfectly decorated, create warmth and comfort.
If you are well drawn, you can place your paintings on the windows. If not - you can use patterns for cutting:
Templates on windows number 1
Template on windows number 2
Template on windows number 3
Template on windows number 4
Template on windows number 5
Template on windows number 6
Template on windows number 7
Template on windows number 8
Template on windows number 9
Template on windows number 10
Template on windows number 11
Template on windows number 12
Template on windows number 13
Template on windows number 14
These are such beautiful windows can have a new year. These ideas can be found on our immense Internet.))
Here is such a magic can be made on the windows!
To make the snowflakes liked, New Year's pictures: Copy, we move to the A4 sheet, we will increase to the desired size and print.
How to make beautiful carved snowflakes (photo)
Creating houses warmly light furnishings for the new year do not not forget about his natural symbols - snowflakes. How to make beautiful and carved patterns on them? We can survive their beauty in nature on frozen windows and draw on the billets. And can be used ready schemes and templates.
Option 1. Cut the snowflakes by folding the paper sheet and apply patterns according to the schemes, there are a huge set. Here is some of them:
Option 2. You can use the stencils and cut our snowy beauty using an acute dummy knife. To do this we need dense paper Or cardboard, you can also use the substrate for laminate as in the photo. The finished product can be smeared with glue, apply any decorations - sparkles, finely sliced \u200b\u200bnapkins, rhinestones.
Choose the very same beautiful patterns! Create!
With the upcoming holiday!
Paper cutting patterns - with pig
The symbol of 2019 is a yellow earthen pig (babanchik), so it will be great next to the snowflakes to post a fashionista pig or adorable Hruce. Consider templates for cutting, it is easy to right, just and quickly cope with this task :))

Template number 1.
Template number 2.
Template number 3.
Template number 4.
Template number 5.
Template number 6.
Template number 7.
Template number 8.
Template number 9.
Template No. 10.
If you draw well, you can depict a wonderful pig and wonderful Gryushu with friends. And you can use coloring or stencils from the article.
Select the liked template, print or srink from the monitor screen.
Snowflakes for the new year from paper do it yourself in kindergarten
Snowflakes for the new year from paper in children can be easily made with their own hands. Such works of art :)) must be bright, fun and festive. Children's crafts are definitely calculating, decorated with everyone that will tell us our fantasy - sparkles, sliced \u200b\u200brain, flower, beads. To create them, attract children to ensure that the process passes in an unforgettable waiting for a miracle. It also develops motility, accuracy. A child can cut blanks from paper according to the following schemes, templates.
Snow beauty - Magic winter companions, always different and unique. They are cut out of paper, cardboard. Compound and tell about the poems of Santa Claus.
Snowflakes-Sunshikov
We make paper mugs with drawn muzzles, on one snowflake - 2 pcs. We will also need paper strips different lengths 3 types: Long, medium and short. The size of the billet itself depends on the length of these strips. The longer the strips will cut, the larger our snaps will look like.
Every strip of paper glue the ends, getting blanks.
These billets collect snowflakes in the rays. Long strip in the middle, medium and small on the sides.
Then glue with paper circles, placing rays between them.
Ready! We got a cheerful festive snowflake!
Snowflakes-snowmen
Who already go as crafts.
Maybe not all in childhood cut out such beauty, so I want to start with detailed description The process of folding paper and obtain snowflakes from it.
It is better not tight paper, because we will fold it at least three times. By the way, the more than more than you will drive it, the more openwork snowfish. But it will be much more difficult to cut it.
I most often take a napkin for this purpose. They are thinner than paper. And it is easier for them to give the right shape.

We take a square sheet of paper and find it diagonal.


Bending a common edge up.

Watch again, connecting the ends. And cut off the bottom uneven part.

Now we apply a drawing and those schemes that I will show below. And transfer it to this item.

It remains to cut the snowflake along the lines and reveal it.
Of course, I can not limit ourselves to just one master class, so I bring such step-by-step photos Instructions.

First we turn the sheet so that in the edges there were bends.

Remove extra tips and cut the pattern. By the way, the snowflake does not have to be white color. It can be black, golden, red and any other shades.

In this picture dark color Showing what part should be removed. It turns out very beautiful, right?

To secure the result, give three simple patterns For cutting.
And also I invite you to view the video, if you suddenly have some other questions.
I pointed at this stage attention, because further we are waiting not only simple schemes patterns, but also complex taken from fairy tales and film. Therefore, the paper folding stage must be understood and mastered.
Beautiful and simple snowflakes for cutting with schemes, step by step for children
I will start S. simple options and patterns. After all, children show the main interest in cutting out such snowflakes. We just go to meet their desires, sending them to the right path.
So, I will say right away that kids kindergarten You may still not cope with this task. Nevertheless, not all of them still know how to own the scissors well and carefully cut through the lines.
Of course, all the guys are different, but I think that such snowflakes are more suitable for children from 6 years.
We will do this snowflake.

We turn the paper square as we learned. Of course, the photo shows the sequence.

Now we apply this drawing. You can translate it by attaching a napkin to the screen, only you can not press the haired pencil. For can download the picture and print it.

Worked with scissors and that's what happened.

For the sake of interest, you can draw nose-carrot, eyes and mouths at the snowmen.

And it turns out a funny handicraft.

Since you have already learned how to make such snow, then here is a simple selection of light circuits and patterns.


This option is more complicated, for those who have successfully cut out all previous options.

Well, not to miss, for you the idea of \u200b\u200bthe cartoon "Cold Heart". Here and Olaf, and Elsa with Anna and even Sven.

I think that these ideas will like these ideas. This is not all, below will be a lot of a wide variety of templates.
Patterns for cutting out of paper on the window, you can download and print
You can decorate the windows by any snowflakes. Those are obtained by turning, or by these, which is obtained by cutting the stationery knife.

Printed snowflake on the window better toothpaste. It is easily washed off from glass in the spring. And you can also not glue the beauty on the window, but simply to circulate its contour gouache.


There are simple and very openwork. In any case, you need to try them all cut.
Modern 3D snowflakes from paper for the new year with their own hands
And here are also the ideas of the volume 3D snowflakes. I will show you other master classes and ideas.
This beauty is very simple.

As before, we need a sheet of paper. For convenience, the lines are smooth and neat will use such a template with diagonals.

Blue square fold diagonally.

Then using the template, make the folds on the specified lines.

That's what happened.

We apply a drawing and cut it out.

Now flexing all the lines in the form of a semicircle. It turns out an interesting volume.
The following snowflakes are also made on the same principle. I'll show everything again in detail.

For convenience, we will take away from the usual squares and cut the circles from the colored paper.

We find their middle.

Let's turn again.

And further. Total folds three times.

Now we apply a drawing and cut it out.

Deploy the workpiece and make bend, as in the picture.


View of snowflakes on the other hand.

Well, even make another option. For the same idea of \u200b\u200bfolding.


As a result, those volumetric beauties that we did above look like that.

They can be decorated with pompoms, cotton balls, beads and sequins.

If you liked the idea of \u200b\u200bsuch a beauty plan, then you bring three more options.


We now move on to the bulk snowflakes to do from several parts of the paper.
For example, I will start with this white-blue beauty.


As we see, we need the same amount of white and blue parts. Three pieces of each color.

The next master class will seem familiar to many. However, the snowflake is obtained albeit simple, but beautiful. Fasten the details more convenient than double scotch.

If you cut a few snowflakes different size From cardboard or foamflast. That, imposing them on each other, the volume is also obtained.


Before you so beautiful idea. It is done simply and understandable. Strips need to take a width of no more than 1 cm. Otherwise, all the elegance of crafts will be lost.

Here is a variant of gluing 5 identical billets.

With aunts Easy to perform a snowflake from the details in the form of fans. The twig is made of five strips of paper, roll-up.
Another beautiful handicraft idea. We take 6 identical squares. Turn the angle to yourself and make the same cuts. The widest bottoms are the most short at the top corner. Then we connect these parts alternately. Two bottoms on one side. Turn the item and connect the next row on the other side.
It remains to connect the details in one craft.
The following master class is similar to the one that was higher. However, the pattern is obtained by another.

Another wonderful idea. We take the square, turn it out once. And we make cuts from the fold line to the middle of the resulting triangle. Now fix the ends of the rhombuses alternate side.

Well, we talked a little about the volume and 3d, we return to templates.
Large Snowflakes A4 format for beginners - you can download and print
With big snowflakes work easier. Therefore, I led many schemes that are suitable for beginners.
For convenience, start cutting these beauties on the A4 sheet. Then reduce the size.


Also, the more difficult ornament on the diagram, the easier it is to cut it from a large sheet of paper.


After all, on small billets, it is difficult to cut out eyes or narrow scenes.


How do you like the idea of \u200b\u200bdecoration with a dragon?


Gentle stencils with butterflies.


For football lovers there is such a pattern.


Ornament with birds.


This is a whole composition of the Middle Ages.


Take as the basis of the anchor and that's what happens.


The main thing is to choose the template for the level that the child has mastered. Sophisticated ornaments It is better to entrust moms.
Volumetric Ideas of Paper With Cutout Template, Ballerina MK
Many people like the idea of \u200b\u200bsnowflakes - balleria. They really look very elegant and original. As a basis, the silhouette of the ballerina is taken to which beautiful snowflakes are cut. They are put in the form of a skirt.
Here is a master class in video format. For the skirt, I provided a lot of schemes in this article. And the silhouettes of girls will give a video.
As promised, you can use these stencils. They can be downloaded and print. 


Did you like the idea? I am so very.
All interesting paper snowflake patterns, many schemes
Well, now we will not be distracted and begin to get acquainted with the manifold of schemes and patterns.
There are a lot of them. Some of the stated quite complicated. But we are not in a hurry and we enjoy the cutting of this beauty, right?


 Take a look at the drawings, there you can see a variety of motifs: floral, geometric, patterns from the world of animals. Every time you are affected by a human imagination developed!


All pictures can be downloaded to your desktop and enlarge in any graphic program: Photoshop, or Paint.


And, probably, the most popular of them is a snowflake from paper.
There are many ways to make paper snowflake from very simple to very intricate and original.
In this article you will learn how to make beautiful snowflakes, and how to create a variety of New Year's crafts from these snowflakes.
But for a start, it is worth reminding how simple beautiful snowflake is being made, from which in the future we will be repelled.
Scheme of beautiful paper snowflakes
You are offered a detailed instruction for creating standard snowflakes.
If any steps will be incomprehensible to you, below you can find a video instruction.
1. Prepare paper A4 sheet and cut square from it. To do this, you need to bend the angle of paper, pull it to the opposite edge and bend. Then cut off the extra piece and we get a square.
This is how it is done:


2. The triangle that you have turned out to be bent in half and put the top up.


3. Take the left edge of the triangle and pull it a little further than the middle.
After that, pull the allen right edge.
* You can start bending first the right edge, and then the left.
* The main thing is that the edges do not oppose each other.


4. Turn over the workpiece and cut down the bottom in the level of the strip, which you have turned out (see picture).


5. It remains to draw the pattern you cut down the contour. Here are some examples:


Video instruction:
Another option:
Beautiful bulk paper snowflake

You will need:
Paper (White or Color)
Rule
Pencil
Scissors
1. Cut the square from the paper - bend the angle of the sheet, pull it to the opposite edge, bend and cut off the excess lower part. You will need two identical squares.

2. The resulting triangle bend again in half.

3. Cut petals from the first and second billet.


4. Open the workpiece.

5. Middle petals stick to the middle.

6. Repeat the same with the second blank.

7. Spread the blanks with each other.

Such snowflakes can be decorated with a wall or windows.
Cutting beautiful paper snowflakes
Garland from Snowflakes


Suspended design from snowflakes
You will need:
Thread for knitting
Snowflakes (in this example, this ready-made snowflakes from felt, but you can make snowflakes with your own hands from paper or cut them out of felt using a printed and cut pattern).
* One end of the threads stick to the snowflake, and the other to the chambers. Repeat this step with other snowflakes, varying the length of the thread.


Here is another option:

Schemes of beautiful snowflakes from paper bags

Prepare several paper packets of the same size. You can use 2 colors for better effect.
You will also need adhesive pencil.
1. Slide the glue to the lower part of the package and stick to it another package. Repeat the same with several packages.
2. Cut the desired simple pattern in the top of the glued packages.
3. Spread the packages and glue the first and last to get a snowflake.
Video instruction:
How to cut beautiful snowflakes in the form of snowmen


How to make a beautiful snowflake from unnecessary paper

You will need:
Scissors
Hole puncher
Little foam or foam rubber.
From previous points you already know how to cut snowflakes. Therefore, here we will go right away at the next stage.
1. First, take two snowflakes of the same size, but different colors. In this example, the diameter of each snowflake is 7.5 cm.
* One snowflake is better to align, but the second to leave as it is.

2. Prepare the foam or foam rubber and cut a small circle. In this example, its diameter is 10 mm. Inside the mug of the staple make a hole. You will have a small circle after using a stapler - save it.

3. Stick the foam circle to the center of smooth snowflakes, and the small remaining piece in the center of the unlocked snowflakes.

4. On the opposite side of the unlocked snowflakes, apply glue, and glue it to a flat snowfish. Click a bit on the snowflake so that it is slightly "failed" into the ring of foam.
* Make a few such snowflakes to decorate the house and christmas tree.


Snowflakes-medallions are simple and beautiful

You will need:
White paper
Scissors
Stapler
Pencil.
1. Take a sheet of paper A4 paper and cut it along in half.

2. Start bending every half paper into the harmonica. You can first lay down in half, then once again in half and so on to get smooth harmonica.

3. Secure the harmonic in the middle of the stapler or thread.
4. Draw the harmonic in the side of the harmonica, and cut down the contour (see image).

5. Get involved your workpiece and glue its ends to get a beautiful snowflake.

Here are some more pictures:


Beautiful snowflakes from old newspapers do it yourself

You will need:
Scissors
Acrylic paint.
1. Expand the newspaper and place it on the table or other working surface.