April 5th, 2015  Ale4ka.

Topiary is an opportunity for needlewomen to realize yourself and surprise close and relatives. After all, Topiary today is an extraordinary and very popular gift. Topiary from satin ribbons is a beautiful souvenir that keeps warm hands and attracts happiness into the house. You can make this village from roses in a few hours, but to please it will be not one year! Topiary from the tapes looks very elegant. In this master class, we will consider in detail the process of manufacturing such a tree of happiness from flowers with their own hands.
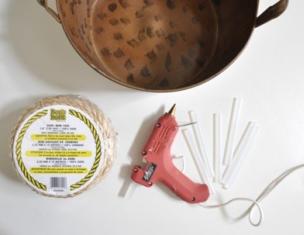
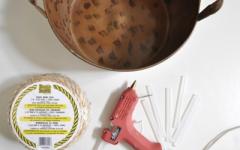
In order to make topiary from ribbons with your own hands we will need:
- red and white satin ribbons for flowers,
- ribbons of green shades,
- polymer glue
- threads with a needle
- building plaster (alabaster),
- flower pot or porridge,
- twig with a tree
- golden paint can
- newspaper,
- mesh for colors and a bow.

Production of the base for the crown
As a ball base, you can use a ready-made foam ball, but in this master class we will produce the basis with your own hands. To do this, take several newspaper sheets and carefully somewhat together to get rounded the form.

Now we confuse the ball with a thread in chaotic order to secure it. The thread in front of it can be moistened in PVA glue.

Creating roses from satin ribbons


Again, bend, but already on yourself, capturing the corner of the previous bend.

We do it until the ribbon will not end, twist the atlas into the bouton, bending the tape at itself at an angle of 90 degrees.

At the end, we flash all the petals at the base of the thread with a needle and spread the rose.

In such ways, we harvest 28 colors - red and white, in an equal ratio.

Below in the video roller shows a master class about creating roses from satin ribbons with their own hands, perhaps this method will seem to you more simple.
Decoration of crown and trunk for Topiaria
Now the most pleasant stage of the master class is to decorate the crown of Topiaria. To begin with, we do the holes on the surface of the bowl ball, then we insert roses into these holes, but do not forget to lubricate their bases with a small amount of glue.

We leave small gaps between roses. Thus cover the entire surface of the base, alternating the arrangement of colors in color.

We do a hole at the base for the crown, I drip some glue and insert a twig into it that you can easily find, walking in the park. But for work, first need to prey to dry this twig, and then paint it. In this master class, the trunk for Topry is a golden twig.

Making green leaves with their own hands
The next step in the master class is the creation of green leaves with their own hands, which we placing around roses. To do this, from wide satin ribbons of various green shades, cutting the circle.

We fold a circle four times, and the edge we melt over the flame of the candle or with a lighter. We press the edge to each other while the atlas is heated enough.

As a result, we leave such leaves.

We process the edge of the leaf.

Insert the leaves between roses to free spaces to fill them all the base.

Product assembly and cutting pot
Decorated Kashpo for Topiaria do it yourself. To do this, take the floral mesh into the tone of the overall composition and wander the pot into it. Top to glue a red bow. Thus, the appearance of the pot is completely transformed.

Now it is necessary to prepare a gypsum solution, for this we get the powder with water and bring it to the condition of thick sour cream. Then immersed in this mixture of the Topiarium and fix it in a vertical position until the alabastral drying is completely drying.

We disguise the surface of the "soil" in a pot of trimming, obtained from the residues of green ribbons.


As a result, we had a gentle and solemn Topiary from satin ribbons, which, without a doubt, to improve the situation in your home or will be a magnificent and unique presentation for any holiday. Continue to do beautiful your own hands and get true pleasure from it! Good luck to you in creativity!

At the end of the article, I as always I want to introduce you to a step-by-step master class dedicated to how to make a topiary from satin ribbons with your own hands or just a ball as an independent decoration for the interior.

 Recently, the Topiary "Tree of Happiness" is becoming increasingly popular. Such an item can be used as a decor element, as well as to give friends and close as a gesture of goodwill and the wishes of the best. In addition, with your own hands, the tree of well-being can create both adults and children. And in this article we will give the master class with a step-by-step photo of the process, how to make topiaries from satin ribbons.
Get a gift to a gift that brings happiness and well-being, I would like to get everyone. Especially if he is made with his own hands. It will become an original decoration and addition to home interior.
The methods of manufacturing topiaries are quite a lot. Needlewomen use different methods, technologies and materials. Special demand is used by the village, the flowers on which are made of satin ribbons. This material is available to everyone, has a large color gamut and is a bright addition to any stylistic design.
 In order to start doing topiary, you need to prepare the necessary set of tools and materials. Basically, each master class passes using:
- ribbons from the satin of different width;
- scissors with sharp blades;
- glue and adhesive pistol,
- flower pots;
- plaster;
- branches from a tree or thick wire;
- needles, threads, newspapers;
- paints (the most convenient to use aerosol).
As an additional jewelry, which can be diversified by flowers for our future trees, use organza, decorative grid and beads of different sizes.
It is desirable that they are harmoniously combined with a common type of product.
Where to begin?
 Topiary should be done, starting with the billet of the ball, which will become the basis and the crown to which the flowers can be attached from satin ribbons. It is completely easy to make it. To do this, we take the newspaper and compress it to the shape of the ball. You need to adjust yourself yourself. If a little newspaper, you can take a few while you fail the basis of the required value.
To reliably fix the newspapers in the round form, it is worth cleaning with its threads, as shown in the photo. There is a master class on the manufacture of topiaries using the already ready-made basics. They are made of dense foam and sold, as a rule, in flower shops or on trays with similar products for needlewomen. They usually apply when used for a wire tree trunk.
In the finished ball, you need to make a deep hole equal to the size of the thickness of our chopstick. To do this, you can use the usual or stationery knife. In this hole it is worth pouring quite a lot of glue and insert a stick, taking this part from the bark.
Topiary from satin ribbons will be durable, if pouring more glue and fix the wooden barrel to complete drying in one position.
Subsequently, it will be possible to smear them and the entire billet.
 When the basis in the form of a newspaper ball-crown and trunk-stick droplets, you can continue the master class. The tree of happiness at this stage needs to be put in a pot and pour the gypsum solution. It will look like in the photo. But you should not immediately release the trunk, otherwise the Topiary will be tilted. So that the product is perfect, hold it for a few minutes. It is smooth in a pot until the plaster dries.
Now you can paint the workpiece. Choose any color and apply it to the basis. It is preferable to use the paint in the form of an aerosol. So your topiary from satin years will easily decorate in the future due to the smooth layer of paint. While paint dries out, you can start making flowers for a decorative tree.
Color manufacturing options
There is far from one master class that clearly trains how to do topiary from satin ribbons. We will give only two. They will tell how to perform a topiary wedding and for the interior.
Method number 1.
 This master class demonstrates how to make a magnificent decorative tree with roses from satin ribbons with their own hands. To do this, you can use red and white ribbons of any width.
For one rose, it will be necessary to cut a 35 cm material. We take tape for the edge and bend from myself. Then begin to twist it, as shown in the photo. For reliability, you can fix the resulting roller around in the middle of the thread.
Having wrapped several layers to get the core, you can start forming flowers. Rose is more similar to the present, if you flexing the edges of the tape on yourself, thereby grabbing the needle with a thread tip of the previous bend. Continuing to make the bend on themselves, turn the rose to the required size. In our case, until you reach the edge of the cut. It is sewn from the back, so that the flower does not collapse.
 The final stage that describes this master class is to assemble the product. To do this, the resulting flowers must be attached to the workpiece. Topiary from satin ribbons will be very neat if it is used for these purposes a glue gun. Capped a little hot glue on the back side of the rose, put it on the ball and hold it, while the glue does not freeze. To the Happiness Tree, made with your own hands, looked more effectively, you can alternate white roses with red ( see photo).
You can decorate the resulting topiyaria from satin ribbons with bows, beads or sparkles. The surface of the gypsum can be hidden by petals of real roses or make it with their own hands using corrugated paper "The grass".
Method No. 2.
 This master class will be devoted to the topic, how to make a wedding topiary from the same material. Technique for which the basis and flowers should be made, as well as the tools, you will need the same as in the previous method. But for such a solemn village, you can use additional accessories in the form of white or pearlescent beads, rhises, or several feathers.
Also at the beginning we make a ball of newspapers, or we take ready-made foam. I fix the barrel (wand or wire) in it, and the other edge is poured by plaster in the pot. After that, proceed to the manufacture of colors. Wedding Topiaria from satin ribbons can be made by white, gold, silver and other, relevant cases, colors. The trunk can be wrapped with silk, paint or covered with sparkles.
It is also necessary to choose a pot in which a solemn toopiary of satin ribbons looked harmoniously. And you can take anyone and paint it at your discretion.
Having made flowers on the technique described in the first way, fasten them to the base. Between them, to give a more attractive type, you can position the decor. You can insert several feathers, or wrap the resulting happiness tree beads, fixing in several places with a glue gun. You can get an unusually beautiful tree of happiness, for example, as in the photo.
A similar topiary from satin ribbons will become an excellent gift for a wedding. Not only newlyweds, but guests will be delighted with the treet of the happiness that you manufacture with your own hands.
"Figure trim" - so from the Latin language, this decorative tree is allegedly translated to decorate the interior. Another name "Tree of happiness". Topiary symbolizes well-being and attracts wealth to the house.
Today it is a popular needlework, because you can "grow" a tree from anything, the main thing is desire and patience.
What is the standard Topiary?
- Crown. This is the main part in this decoration. The crown makes from anything: small flowers, silk ribbons, coffee beans, decorative butterflies, pearl beads, colored buttons, etc.
- The basis of the ball. It is attached to the crown elements. There are also opportunities for mass: a lump of newspaper, mounting foam, papier-mache from paper, even an air ball.
- Trunk. It is enough to choose something similar in shape: a wand, a cardboard roll, a thick branch, even a pencil is suitable. The trunk is then painted or shaved with a ribbon.
- Pot. Capacity is selected suitable for general image. The pot can be purchased ready or do it yourself. For example, from a plastic cup.
- Decor. For decorating, it will suit anything, it is enough to connect the fantasy to "reflect" the topiary of cute decorations. The main thing is not to reboot the village.

Materials and Tools for Topiaria
As with any needlework, for the collar of happiness, materials and tools are needed, without which the manufacture of Topiary is impossible. What do you need for this?
- Scissors and threads to cut the desired pieces and make a ball base.
- Glue, it should be transparent - there should be no traces on the tree.
- Satin ribbons. Necessary thing if you make satin topiary.
- Decorative elements: beads, rhinestones, fiberglass, pebbles, butchers, etc.
- We will need it to wind the trunk, you can replace with a thick cord.
- Capacity where you "plant" your church. Pot or mug.
- The chopper required for the trunk. It is better to choose a suitable branch.
- The newspaper from which you build the basis of the ball (if not ready made of foam).

Popular Topiari varieties
- Flower Topiary. Butons (for example, roses) are made up of a strong paper and are attached to the frame of a crumpled newspaper and wire. A mug is suitable as a pot.

- Coffee Topiary. A variety for lovers of coffee smell. The heart shape enjoys popularity.
- Monetary Topiary. The original variant in which paper or metal money is used. Banknotes use real or copies from the jokes store.

- Spiny Topiari. This whimsical variety of a tree is formed from everything that sits: pins, toothpicks, decorative needles, etc. It looks like a dandelion.

- New Year Topiary. Such a tree is manufactured from New Year's toys and tinsel.

- Chestnut Topiari. Acorns and chestnuts - material for the village of happiness. This composition looks comfortable and homely.

- Paper Topiary. Another popular option is a tree from a napkin, which can be decorated with pieces of fabric, coniferous needles, beads, etc.

- Pearl Topiari. The ball base is decorated with pearl beads. As a wedding gift, this kind is perfect.

- Inverted Topiary. This is a complex, but extravagant option. Decor elements seek on a sack of vessels, forming a trunk. They can flow from mugs, glasses, pots and vases.

- Satin Topiary. For the manufacture uses satin ribbons. This type is one of the most popular, and below we give a master class with step-by-step instructions.

The manufacture of a tree of happiness begins with the crown. For the basis of the ball, it is recommended to use fasteners to get "Chupa Chups", then you need to build 15 small roses from satin ribbons. And with the help of glue, attach all rosettes to the ball.
- First, the first flower is glued, then others are attached to a row. The result will be a ball of roses, but with a free place for green foliage.

- Next, we take artificial leaves, scattered and in the form of twigs. It is desirable that they are the same size. And gently glue them under satin roses, to the place where the free space of strong paper is left with the barrel in the middle.
Important: Spreads place in a checker order. It is necessary to attach them to several rows to get lush foliage. As a result, if you look from above, the view of the future tree should resemble a neat bridal wedding bouquet.

- If you see that the bouquet looks not enough, or there is a free space, you can stick more leaves. Place the sprigs to the very base of the barrel. Avoid "propelin" and do not spare the twigs and leaves.

- Now go directly to the very trunk. He is decorated with green solid paper, the first thing makes the base of the crown in the form of a harmonica and glue.


- Then the barrel is then turned on the same paper (it is better to cut off the long strip). Fix the edge of the paper at the glue by glue, winds wand, and fix again. As a vase, it is recommended to use a plastic embossed cup.


- The future pot for the village cover the gold paint (sold in the cans) and leave up to dry. Prepare a wide ribbon (for a bow) of the same color as roses. Attach it to the base of the trunk under the branches, and put the stones on the bottom of the glass.

- Now we make gypsum to fix the village in a pot. The usual construction is suitable, pour it into a glass and stirred thoroughly, pouring water. There should be a consistency of thick sour cream, in which you need to quickly "transplant" a tree.

- Pour the plaster to the pot with stones, do not forget to level the edges. Wait when the gypsum hardens, and decorate the surface with pebbles into the color of roses. Between the stones lie down the small beads, glue distribute the toothpick, roses decorate varnish droplets.

- As a result, you will get here such a beautiful tree of happiness from satin blue ribbons.

Topicia from satin ribbons: video instruction
You can also watch video instructions, how to make topiary from satin ribbons.
Tree of happiness with their own hands. Master class with step-by-step photos
MARKINA NATALIA Ivanovna Pedagogue of additional education, MBU to the center of extracurricular work, Volgodonsk district, Rostov region.
Description: The master class is addressed to the children of senior school age, educators of additional education, parents, and all those who love to do the needlework.
Purpose: Gift, interior decoration.
Purpose: Making a tree of happiness.
Tasks:
- develop creative imagination;
- to educate the progress;
- develop aesthetic taste;
- educate accuracy when performing work.
Topiary or the happiness tree will serve as an excellent decoration for your interior and at the same time will be one of the best gift options made by your own hands. This decorative tree can create even beginner masters and just lovers. He will learn this skill is easy, and the materials and tools are inexpensive. The most important thing is your time and sincere desire.
Materials and tools required for work:

- Satin ribbon ribbon 2.5 cm wide;
- pink shade threads;
- needle;
- scissors;
- candle or lighter;
- decorative ball;
-Shy tree branch;
-Kachpo;
- Mural pebbles;
-Niversal glue;
- Morning beads.
1. Take a ribbon wide depending on how much a large rose is necessary. I have a 2.5 cm tape, it turns out a relatively small rose. Cut the tape for 25cm, edges process a candle or lighter. We fold one end at an angle of 45 degrees.

Twist the tape 5 mm times 2-3. It turned out a rose bud. On the lower edge of the ribbon with a swirling tube, make some adhesive needle stitches to secure the central part of the rose.

Hold a bud vertically in your left hand, and the right ending the long end outside of 30 degrees.

Wrap a ribbon around the bud.

Again, flex a long end out and turn around. So we do to the end of the tape until you get the necessary amount of roses. Form a beautiful rose. Finding a needle and thread, making a few stitches.

Our rose from the satin tape is ready. Thus, we make 26 roses.

2. We make the basis of our tree, connect the decorative ball and the tree branch (pre-painted in green), fix the universal glue.

3. We put in Kashpo and fall asleep sea pebbles.

4. Start the decoration of our tree, we stick roses, between them beads.

5. Tree of happiness is ready! Optionally, you can decorate moss and ladybug.