It has been proven that by squeezing and unclenching trinkets in hands, a person relaxes, calms down, switches to good thoughts. These tactile cushions and hand gum are known as anti-stress toys and are widely available on the market. However, you don't have to buy them. If you wish, you can make such a little thing yourself, especially since there are many options for how to make anti-stress: it can be a ball, ball, slime, pillow, soft toy.
What is an anti-stress toy
The pads on the fingers are highly sensitive. This knowledge pushed the inventors to create a toy that will contact these parts. The result is soft hand cushions with therapeutic benefits. They are made compact size, and the item fits easily into the bag without taking up much space. The principle of operation of the pads is based on 2 factors:
- Color, pleasing to the eye, improves mood, fills with energy.
- The filler uses hand motility, resulting in relaxation of muscle tone.
The advantage of this product is the release of physical and emotional stress. The antistress has an elastic cover that does not cause an allergic reaction. Due to the properties of the filler, these toys always retain their original shape... Compliant balls also have a beneficial effect on children:
- strengthen the muscles of the arms;
- help to train writing skills;
- reduce stress after prolonged work at the computer;
- develop muscle accuracy;
- increase concentration of attention.
How to make an anti-stress ball
Ball-shaped anti-stress relieves negative emotions adults and children. Tactile texture and bright color cheer up. The store has a wide selection of these products in rubber or polyurethane with gel. However, to make an antistress ball with your own hands at home, you can use a transparent ball, glue, flour, cereals, and legumes. For these purposes, even old socks or an egg are suitable. The choice of materials is wide and depends only on imagination.
From a balloon
Puzzled by the questions of what and how to make anti-stress, pay attention to ordinary balloons, with which you can make different variants... It all depends on the effect you want to achieve when you crush the ball. For a thick ball, it is better to use baking soda, flour or starch. For a toy of medium density, cereals are well suited: lentils, small beans, rice, peas.
First way:
- Prepare 3 balls the same size and shape. Water balls should not be used as they are very thin.
- Prepare 2/3 cup of your preferred filling.
- Inflate the balloon so that it is about 10 cm long. Do not tie it.
- Pass a funnel through the neck and carefully pour the filler into it so that it fills the ball about 6 cm.
- Allow excess air to escape from the balloon. To do this, hold down with your index and thumb neck, and then slowly open them.
- Tie the neck of the balloon.
- Use scissors to cut off any leftovers.
- Place all this first in one and then in another balloon in order to give strength.
- Tie the finished ball, cutting off all excess.
For the second method, it is good to use a non-Newtonian fluid, the peculiarity of which is a different reaction depending on the type of action. For example, its soft and liquid consistency hardens upon impact. To make this kind of filling, you need to dilute 5 tablespoons of starch with a glass of water and stir well. If desired, you can add paint of any color to the mixture. Move the resulting liquid into a ball, filling its volume by 2/3. Tie tight and draw a funny face. Ready product can be placed in a grid for additional effect

From a sock
How to make an antistress toy with your own hands, for example, from unnecessary socks? In every house there are a couple of such products, from which you can make a pillow, popularly called "mnushka". Anti-stress in the form of a ball will be useful not only for adults, but will also contribute to the development fine motor skills in babies. Necessary "ingredients" for work:
- children's and adult socks;
- filler, such as rice and peas;
- stationery scissors;
- decorative elements (ribbons, beads).
Step-by-step instruction:
- Sewing up the neck of an adult sock.
- We wrap it inside.
- Pour the selected filler into a sock.
- Shake well.
- Wrap the rest of the fabric inward. We make sure that the cereal does not spill out.
- Place the resulting ball in a children's sock.
- Sewing up the neck.
- We decorate the ball. If a child will use it, it is recommended to choose large jewelry and sew it tightly.
Slime antistress
Originally hendgam (hand gum) was intended for the development and play of children. However, adults also appreciated the advantage of the invention, from which you can form a variety of shapes, stretch, tear, and then follow the change in it physical properties... Due to the temperature and speed of action, the slime changes the degree of viscosity and does not stick to the surface.
This know-how can be purchased or made on your own, especially since there are many options for how you can make anti-stress. Slime can be made using a variety of materials, for example, plasticine, flour, toothpaste, gelatinous balls diy orbeez. The classic version is antistress with sodium tetraborate. The downside of hand gum is that it dries quickly. You can use it for no more than 20 days, after which you need to create a new handgam, which must be stored in an airtight container.

From ordinary plasticine
A DIY antistress toy can be made from simple plasticine. For this purpose, it is necessary to soak gelatin in water for 1 hour. Then grind the plasticine and melt in boiled liquid. Stir the mass until it acquires a uniform consistency. After waiting for the plasticine to melt, you need to pour the gelatin in a thin stream. Mix thoroughly and let cool. The slime is ready to use.
Of flour
Many are interested in how you can make your own anti-stress from natural products, such as plain water and flour. In this case, the slime is suitable for playing even with children under 3 years old. For adults, she can become an indispensable assistant when you need to switch attention or relieve nervous tension. For the manufacture of you need to do the following steps:
- Sift flour.
- First pour in cold and then hot water.
- Stir the resulting mixture so that there are no lumps.
- Put the mass in the refrigerator for several hours.
How to make a DIY anti-stress pillow
Anti-stress manufacturing technology is not the most complicated. At the beginning of work, you need to choose the design of the future product, build a pattern and transfer it to the fabric of the desired color. The details are cut and sewn on a typewriter or by hand, leaving a small hole. An antistress pillow with your own hands is stuffed with cereals, for example, buckwheat, rice, or polystyrene. The finished product can be decorated with bows, ribbons or bright buttons.
Anti-stress soft toy
DIY antistress toys can be made with any of the available material that almost every housewife has. Otherwise, you can buy toy eyes and filler from specialty stores. As options for filler, you can take synthetic winterizer, cotton wool, foam rubber, buckwheat, small silica gel... The algorithm consists of the following steps.
Good day, my dear Readers! The author of the blog, Maria Zazvonova, is in touch with you with a new gift on how to make a slime at home.
I think you and your children know such a toy as Lizun. You can have fun with it with children, making bizarre shapes, funny throws, using the properties (rapid deformation) of this object.
Ever since the days of serfdom, peasants have frightened their children with Lizun. And later they talked about Babayka, I think you also had to persuade your children using the names of non-existent characters! (You will not sleep - Babayka will take it, and then they said Lizun will come out of the underground!) Not so long ago, this toy became very popular, it could be bought in the form of a simple ball, which, upon impact, changed its shape, and then was going to its original state, which is actually could not but delight children and adults.
How to make a slime at home, you ask?
Now I will describe in detail the ingredients required to answer the above question, "How to make a slime at home?":

Such a toy can be made with a child together, for this we take a bag, I took it with a plastic lock, so that it would be convenient to mix the ingredients later. Add starch and PVA glue to the bag in the same proportion, plus dye and mix thoroughly. Then, so that all the ingredients reach the state we need, we put the bag in the refrigerator for 3 hours. After which Slime is ready and you can safely play!


Below is a video lesson on how to make a slime using a different composition, the child makes:
Attention: The slime should be stored in a closed container, I put it in a glass jar that contained mustard. Plus, I made an inscription on the jar: stop-blues (you can write a remedy for the autumn blues or entertain yourself), if you suddenly want to give a slime to an adult.
No one is immune from stress. A "merry" jar of antistress will bring bright colors to the life of the person accepting the gift!
Thus, we can engage the child in making a new toy, play enough together, as well as make an anti-stress gift for our friends or close acquaintances.
I hope that the post on how to make a slime at home impressed you with a "feat" (by feat, I understand - to allocate time) for a new entertainment! Write in the comments about what you play with the children, what joint crafts you tried to do! Until!
Do you like the idea? Tell your friends by clicking the button of your favorite social network


Discussion: 30 comments
I have never made a slime, but I see that it is not difficult, and the little one will have a lot of pleasure. I went to the store for starch.
Thank you Maria !!
Better to the pharmacy for sodium tetraborate, the child will be more interesting!
How simple it is! And then I constantly buy slimes for my granddaughter. One beautiful spot left a mark on itself.
Yes, it's very simple, I think children from five years old and older can easily do it themselves, I recommend making a slime from a video lesson.
My God, what a lovely Slime.
I remember what a curiosity it was and how he entertained us. Only we did not store it in a jar.
Homemade slime will dry out, but he is still afraid of direct sunlight
I made a slime from plasticine! True, it dried up quickly ... It is necessary to hide it in a jar for the night ... I also described it on a secret blog - I started it on purpose!
They also say that it is better to put them on paper, and not on a fleecy surface, everything sticks to them well and it is also advisable to store the slime in a cool place. Rules: after the game, put it in a jar and put it in the refrigerator. And your darling came out so smiling and green
Quite amusing! Fast and fun! Thanks for the interesting idea!
I agree, we put the children to bed during the day, and set up experiments in the kitchen with my husband
In general, I have never heard of slimes !!)) Something new for me, honestly)))
Slime is a thing ... we played enough while doing: mrgreen:, try only tetraborate ... as in the video
Everything, we do slime at home! Maria, thanks for the instruction! How many interesting things you can do with your own hands. Before the marathon, I had no idea about this.
Yes, if it weren't for the marathon, I wouldn't be so freaky, but there is so much news. Slime is a thing, but I advise you to do it according to the recipe, which is in the video
I have never made slimes, I never thought that it was so easy to do it yourself. You can make and improve your mood for yourself and others))
Yes, during the marathon I learned so much useful
Beyond any doubt
I do remember. Previously, slimes were sold and they really left a greasy mark on the wallpaper. I didn't know what it was made of. Maria, you have revealed a secret to all of us and returned to the past. I will definitely try to make such a cool little thing with the baby.
Elena, do it according to the video with the child, I liked it better.
Thank you Maria, I will definitely use the advice.
Oh, and I loved a lizun in childhood, and even now I don't mind playing with him, especially my husband loves to use any kind of taco!
Yes, I didn’t expect mine either ... with great passion he joined the production of slime
Great thing for dealing with blues! My husband and I made two multi-colored slimes, although they spent about an hour with them, it seems, they haven't played enough yet))))
Thank you for your feedback! There is really no time to be bored with a slime!
This is cool.) As a child, I had a lick, in the form of a shard, from the eyes of which a green lick crawled out. 😀 Very cool stuff.)
Oh, unexpectedly, I have not heard of such. Lizunas are a very funny toy!
Slime is a great craft. And if you add a little powder for printers, you can get smart magnetic plasticine 🙂
Thanks for the super addition, I didn't know, I need to experiment!
We have an ordinary slime, but so that with our own hands ... we will have to try
Add a comment Cancel reply
Greetings to you, Friends, on the blog "WITH A GIFT!"!
For you, I publish verified personal experience ideas for gifts and unforgettable congratulations on different occasions! Emotions, interjections, strong hugs, waving hands in the air ... all this is an invaluable reward for a cool gift! Surprise your friends, colleagues and family with presents by generously charging bright emotions everyone around. Be a Wizard as you plunge into an exciting adventure to find the right gift.
Fighting the blues: art therapy, toys, anti-stress ball
- Joint cream for arthritis and arthrosis - Artrade
- Means Bioliposactor abdomen for weight loss in the abdomen and hips
- How to enlarge breasts by 2 sizes with Upsize cream at home
Sometimes it can be difficult to deal with bad mood, nervous tension. Specially designed art therapy exercises will help get rid of this; pillows, antistress toys; balls that are so nice to wrinkle in your hands.
Art therapy methods and exercises for blues

Here are the most popular types of such psychotherapy. It:
- IZO therapy, when a person finds peace of mind through drawing;
Dilute the gouache in water, drop the resulting solution several times into the center of the Whatman paper, make spots nearby with ink and mascara. Fold the sheet in half, gently pressing the two halves together. Expand the resulting creation. Connect your imagination, thinking what exactly you managed to portray.
With a writing object, move along the sheet of paper, creating various lines. See what happened. Cover parts of the drawing with paints to create accents. Come up with a short story that evokes the art you received.
This training should be done together. Glue the sheets together, lie on them. Have a helper trace the contours of your body. Stand up, color your self-portrait to convey your inner world. Use a certain color for different parts of the body, combine colors.

As you can see, for such a collage, old headphones were used, wires from them, a giraffe figurine, a tassel, a button. Stick the whole thing onto a sheet of Styrofoam glued to the cardboard. Spray some bronze spray paint on top and here's an antique engraving in front of you.
How to deal with the blues of mandalas with coloring pages?

They will also help you find peace of mind, to reveal their potential, abilities. Mandalas are Buddhist symbols, each of which is drawn on a specific occasion. Well, this is traditional. You can choose the template you like, you need to paint it, thereby show your imagination, but without going beyond the provided framework. The result is patterns called zendals.

For the first, only shades of blue were used. The pattern, designed in a single color scheme, looks calm and pacifying. For those who love holidays, bright colors, we can recommend the second mandala. The first means thoughtfulness. If it is closer to you in spirit, you can download an anti-stress pattern to print and color.

The second mandala is called “Festive”. If you are in such a mood, download it, decorate it as you like.

Coloring antistress for adults can be different, include images of nature, animals, plants. Think about what you have a soul for, use such pictures for creativity.

As you can see, the creator of this canvas made a dark background to highlight fragments of his creation. Different shades were used for the flowers, green tones for the foliage. The owl looks more like a fairy-tale character, drawn with a blue pencil.

When there is snow outside the window, it is pleasant to look at the scarlet berries of wild strawberries, white flowers, juicy green foliage. All this you will create, with the help of another coloring picture.

How to make an antistress ball from the blues yourself?

How pleasant it is to wrinkle this pliable product in your hands, giving it a different shape. All kinds of bulk products, water, glass stones, plasticine can serve as a filler for such a ball. If you have any sculpting mass or soft clay left over, use them.

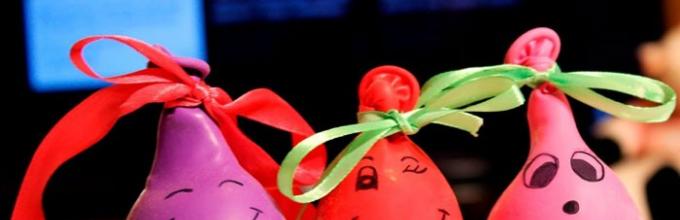
Fill a ball with one of these masses, tie it with a ribbon, decorate it to your liking. If you want to make funny little people, then glue the eyes to them, paint the facial features with a marker or felt-tip pen. Upper part decorate with threads, fabric, you can tie an elastic hair band here.

It's nice to twirl such a trinket in your hands, giving it a different shape.

Such an antistress ball can be filled with flour, and so that it keeps its shape - with plasticine. But in the latter case, it will turn out to be rather tight. If you want to see how to make the filler so that it is pliable on the one hand and keeps its shape on the other, then read about it.
Knead the mixture of starch and conditioner into a container. It's nice to knead it in your hands, to feel the delicious smell of the conditioner.

This mass is filled with anti-stress balls. Crafts from this homemade plasticine will help you get into a good mood. You can decompose the mass into separate containers, add dyes, mix.

- Read about Virgin Star Vaginal Tightening Cream Gel
- How to lose 20 kg - real reviews about Guarchibao
Children will be happy to make ice cream, cake for dolls from such plasticine.

And here is another way to make an anti-stress ball. For him, take:
Roll a sheet of paper like a funnel, pour starch here.

Tie the end of the ball into a knot, tighten well, cut off the top rubber ring. Draw facial features with a marker. When they dry, you can take new toy in your hands, from the heart to wrinkle it.

The next anti-stress ball is not only pleasant to the touch, but also looks very beautiful.

For this thing, take:
Place the pebbles in a plastic container, rinse them with water, and drain. Pour into plastic bottle, fill with water. Pull a transparent ball over the neck, transfer the contents of the bottle into it.

Tie the top end well, after which you can try the toy in action.

You can make anti-stress balls a little different. Fill a regular ball with starch, tie, and a nice toy for grunting is ready. Nowadays balls in a grid are very popular.

While pressing on the toy, it is interesting to watch how its parts pass through the holes, then return to their original position. For this anti-stress you will need:
- regular rubber balloon;
Place the slime or orbiz balls in the balloon, tie it on top. Cut a circle from the grid the right size, lift its edges up, tie. Now you can press on the toy, thereby relieving nervous tension.
Pillow toy for relaxation with blues

They are done in such a way that a person can put a pillow under his neck while lying or sitting in a chair and relieve muscle tension. Such a piece of furniture pleases with its appearance, has a pleasant texture to the touch.

- Resize the presented pattern. Pick up the fleece matching colors... Cut out the details of the torso on this fabric. As you can see, it consists of several parts. They need to be sewn together, leaving the holes not yet sewn into which you will sew the tail and paws. Also, do not grind your head yet.
If you have remnants of fur, old tights, you will get a wonderful anti-stress toy.

For her you will need:
The bones must be well washed and dried completely so that they do not rot later. Cut off the toe or other part from the children's tights. Sew on one side, lay in filler, sew up hole.

You now have a padded inner case. Sew a loop, thread or piece of fur to it, which will soon become the hair of the antistress toy.

To make an outer cover, place the blank on a piece of fur or soft, tactile fabric. Cut it in a circle, collect the edges on a needle, tighten, cut off its excess, after tying a couple of knots.

After you sew on the eyes, you can use the toy for its intended purpose. It will appeal not only to adults, but also to children; it will help them develop fine motor skills.

If you are interested in other tempting ideas on this topic, see how you can make a nice anti-stress toy out of three balloons and air.
How to make an anti-stress with your own hands?
that you discover this beauty. Thanks for the inspiration and the goosebumps.
Join us at Facebook and In contact with
It is believed that by kneading a small plastic mass in your hands, you can calm down, relax, and get distracted from bad thoughts. These nerve-calming trinkets have come to be called antistress toys. And modern stores are full of a variety of colorful, fun stress-relieving balls. But you don't have to buy a toy - it's not difficult to make it yourself! Here are some of the simplest and most successful methods on how to make anti-stress with your own hands.
Balloon antistress
Based balloon there are several options for creating an anti-stress toy. Let's consider two main options.
The first way- with the addition of water and starch. To implement it you will need:
We create a non-Newtonian liquid from water and starch. It has been known about it for a long time and it is often this mixture that is brought to children as original experiments. Its peculiarity is that the liquid behaves differently depending on the type of action on it. Soft to the touch and liquid when objects are smoothly immersed, it hardens when struck. Plastic and lively non-Newtonian liquid is perfect for filling a ball.

To get the filling, you need to mix about 4-5 tablespoons of starch with a glass of water. After stirring, it will be clear whether you need to add a little more starch to make the liquid more plastic.
If you wish, you can add a little paint to the resulting mixture, which will overflow inside the ball and make it more mysterious due to this.
Pour the liquid into a ball so that it is filled by about 2/3 of its volume. We tie it tightly and our anti-stress is ready to use. You can draw eyes and a mouth on the ball to make a funny face.
The anti-stress ball is good both by itself and wrapped in an additional mesh. In the process of kneading, its edges come out through the holes of the mesh and the effect of changing the color of the ball is created by adding paint to the liquid.
Second option- the toy is created without adding water. To do this, pour starch into the ball and tie it tightly. The starch inside the balloon takes on any shape, so kneading it is fun and exciting.
In the absence of starch, flour can be used. It is not so plastic and does not crunch during the game, but it will be a good filling for a toy.

Do not forget to create a mood for your balloon - draw a nose, eyes, a smile and glue a bunch of threads instead of hair. The funny little man is ready!
Another type of anti-stress toy is handgum or hand gum. It is solid and liquid at the same time - it perfectly takes on a variety of shapes and stretches. Hand chewing gum does not adhere to surfaces, does not stick to hands, it can be stretched, torn, re-glued and created from this mass into bizarre shapes.
Hand chewing gum was first discovered in 1943. Chemist James Wright created the substance by accident while trying to invent synthetic rubber. The substance soon found its way into industrial applications - it was used for shockproof cases of mobile phones and for the creation of sports equipment. Today we also know it as a fun chewing gum - a stress reliever toy.
You can make an antistress toy with your own hands. There are several options for creating soft and pliable hendgums. One of them requires PVA glue, paints and sodium tetrabonate.
- Stir PVA glue with paint to obtain the desired color of the future toy. There should be just enough glue to get the desired anti-stress size.
- Add a little sodium tetrabonate and stir again. The glue will begin to take the form of plasticine, become thick and plastic.
- The received handgam is placed in plastic bag for half an hour so that the glue is well saturated with sodium tetrabonate.
- You can play with the new homemade hand gum.

Another interesting anti-stress recipe is from shaving foam. In this case, the handgam turns out to be soft and fluffy, very pleasant to the touch.
- Mix good quality colorless glue with paint and add shaving foam.
- Prepare a thickener solution from a few tablespoons of water, 15 drops of boric acid and a drop liquid soap... The solution must be mixed well.
- we send the thickener to the prepared mass of glue, paint and foam. Mix gently with a stick until the mass is plastic.
- Handgam requires long kneading. At first, it will lag badly behind the hands, but soon it will stop sticking and turn into a soft, delicate toy.
A similar anti-stress can be created without the addition of shaving foam. In this case, the slime will be less fluffy and tender, but more plastic.

The following recipe surprises with the original composition of the ingredients. To create it, you need contact lens fluid, soda, stationery glue and paint.
- First, stir the glue and paint. You can add sparkles for an original effect.
- Adds approximately 10 grams of contact lens fluid. Stir the mass thoroughly.
- Pour in about half a teaspoon of soda. We knead until the slime begins to completely lag behind the dishes and hands.

This copy of the toy-mushka is distinguished by its special ductility, softness and lightness. The toy stretches perfectly and takes on different shapes.
Any self-made hand gum is recommended to be stored in a tightly closed sealed package. And at the first signs of drying, you can soften it a little with plain water.
Methods of art therapy, entertaining exercises, coloring mandalas, an antistress ball, pillows, toys will help relieve nervous tension and relax.
Art therapy methods and exercises for blues
Art therapy is one of the methods of dealing with stress. It includes artistic and creative techniques. Simple exercises show the physical and mental state of a person, heals this and that. Adults become children for a while, forget about their problems, get great pleasure from what funny art therapy exercises include.

Here are the most popular types of such psychotherapy. It:
- IZO therapy, when a person finds peace of mind through drawing;
- game therapy;
- fairy tale therapy;
- dance therapy (dancing);
- music therapy;
- bibliotherapy (reading certain books);
- color therapy;
- sand;
- photo therapy;
- multi-therapy;
- mask therapy (drawings on the face).
As you can see, everyone can find something to their liking. At the same time, it is not necessary to be able to draw, even blots on a sheet can turn into fashionable art. One of the art therapy exercises is based on this.
First exercise
For it you will need:
- ink;
- ink;
- water;
- gouache;
- sheet of whatman paper;
- brush.
Second exercise
It will also unleash your imagination and artistic ability... Take for him:
- felt-tip pen or pencil;
- paper;
- paints.
Do this art therapy with your children. After creating a drawing, the children will come up with a plot based on it, and you tell a short story that your creation will evoke.
Third exercise
Take for him:
- several sheets of whatman paper;
- glue;
- a pen or pencil;
- paints;
- brush.
Fourth exercise
It is based on the one you are already familiar with. Create it using all kinds of materials: magazine illustrations; natural materials; unnecessary things; photos.
As you can see, for such a collage, old headphones were used, wires from them, a giraffe figurine, a tassel, a button. Stick the whole thing onto a sheet of Styrofoam glued to the cardboard. Spray some bronze spray paint on top and here's an antique engraving in front of you.
How to deal with the blues of mandalas with coloring pages?
They will also help you find peace of mind, reveal your potential, abilities. Mandalas are Buddhist symbols, each of which is drawn on a specific occasion. Well, this is traditional. You can choose the template you like, you need to paint it, thereby show your imagination, but without going beyond the provided framework. The result is patterns called zendals.
Such coloring of art therapy implies the use of 4 colors: green; yellow; red and blue. But if you wish, you can use any color. They create patterns on a black and white mandala using only crayons. Paints, felt-tip pens, markers are not used. Pencils help you focus, immerse yourself in the picture, color it the way you want.
In this case, some parts of the pattern can be left unscathed. A person practicing this technique becomes calmer and more balanced. Check out the examples to see what anti-stress patterns you can create.

For the first, only shades of blue were used. The pattern, designed in a single color scheme, looks calm and pacifying. For those who love holidays, bright colors, we can recommend the second mandala. The first means thoughtfulness. If it is closer to you in spirit, you can download an anti-stress pattern to print and color.

The second mandala is called “Festive”. If you are in such a mood, download it, decorate it as you like.
Coloring antistress for adults can be different, include images of nature, animals, plants. Think about what you have a soul for, use such pictures for creativity.

As you can see, the creator of this canvas made a dark background to highlight fragments of his creation. Different shades were used for the flowers, green tones for the foliage. The owl looks more like a fairy-tale character, drawn with a blue pencil.
In the second photo we see the underwater world. You can download this picture, color it as you like.

When there is snow outside the window, it is pleasant to look at the scarlet berries of wild strawberries, white flowers, juicy green foliage. All this you will create, with the help of another coloring picture.

How to make an antistress ball from the blues yourself?

How pleasant it is to wrinkle this pliable product in your hands, giving it a different shape. All kinds of bulk products, water, glass stones, plasticine can serve as a filler for such a ball. If you have any sculpting mass or soft clay left over, use them.

Fill a ball with one of these masses, tie it with a ribbon, decorate it to your liking. If you want to make funny little people, then glue the eyes to them, paint the facial features with a marker or felt-tip pen. Decorate the upper part with threads, fabric, you can tie an elastic for hair here.

It's nice to twirl such a trinket in your hands, giving it a different shape.

Such an antistress ball can be filled with flour, and so that it keeps its shape - with plasticine. But in the latter case, it will turn out to be rather tight. If you want to see how to make the filler so that it is pliable on the one hand and keeps its shape on the other, then read about it.
Take:
- spoon;
- a bowl;
- cheap hair conditioner - 3/4 cup;
- corn starch - one and a half cups.
This mass is filled with anti-stress balls. Crafts from this homemade plasticine will help you get into a good mood. You can decompose the mass into separate containers, add dyes, mix.

Children will be happy to make ice cream, cake for dolls from such plasticine.

And here is another way to make an anti-stress ball. For him, take:
- starch;
- paper;
- balloon;
- scissors;
- marker.

Tie the end of the ball into a knot, tighten well, cut off the top rubber ring. Draw facial features with a marker. When they dry up, you can take a new toy in your hands, wrinkle it heartily.

The next anti-stress ball is not only pleasant to the touch, but also looks very beautiful.

For this thing, take:
- dense ball;
- water;
- decorative glass stones;
- plastic bottle;
- plastic container;
- scissors.

Tie the top end well, after which you can try the toy in action.

Take a transparent ball so that colored stones can be seen through it. To increase strength, you can take not one, but two balls, put the first in the second.
You can make anti-stress balls a little different. Fill a regular ball with starch, tie, and a nice toy for grunting is ready. Nowadays balls in a grid are very popular.

While pressing on the toy, it is interesting to watch how its parts pass through the holes, then return to their original position. For this anti-stress you will need:
- regular rubber balloon;
- for filling balls Orbiz or a viscous mixture of Slime;
- a piece of a fishing net;
- scissors.
Pillow toy for relaxation with blues

They are done in such a way that a person can put a pillow under his neck while lying or sitting in a chair and relieve muscle tension. Such a piece of furniture pleases with its appearance, has a pleasant texture to the touch.
An antistress cat pillow is created from:
- felt;
- fleece;
- filler: padding polyester, holofiber, barn owl;
- threads.

- Resize the presented pattern. Choose fleece in matching colors. Cut out the details of the torso on this fabric. As you can see, it consists of several parts. They need to be sewn together, leaving the holes not yet sewn into which you will sew the tail and paws. Also, do not grind your head yet.
- Cut out the eyes and nose from black and white felt, sew these details on the cat's face. Stitch the two halves of the ears, pin them between the face and the neck of the animal, sew on the wrong side.
- Align the cat's tummy with its upper part, placing two front paws on the side. Turn the workpiece out through the hole on the rump front side, fill it with filler. Put the 2 hind legs of the cat here, the tail, sew the resulting hole on the hands with a blind stitch.
- To add volume to the legs and tail, fill them with filler. Push it in with the back of your pencil.
- Mark the animal's fingers with thread stitches using a needle. Sew the cat's whiskers, the toy pillow is ready.

For her you will need:
- a piece of fur;
- the remains of knitted fabric or children's tights;
- threads;
- filler;
- scissors;
- needle;
- cord.
As a filler, you can use various materials: sand; cereals; Styrofoam. In this case, the seeds of plums were taken, but other berries or fruits are also possible.
The bones must be well washed and dried completely so that they do not rot later. Cut off the toe or other part from the children's tights. Sew on one side, lay in filler, sew up hole.

You now have a padded inner case. Sew a loop, thread or piece of fur to it, which will soon become the hair of the antistress toy.

To make an outer cover, place the blank on a piece of fur or soft, tactile fabric. Cut it in a circle, collect the edges on a needle, tighten, cut off its excess, after tying a couple of knots.

After you sew on the eyes, you can use the toy for its intended purpose. It will appeal not only to adults, but also to children; it will help them develop fine motor skills.

If you are interested in other tempting ideas on this topic, see how you can make a nice anti-stress toy out of three balloons and air.
If you want to make a soft donut with your own hands, which will also help relieve nervous tension, then the next video is for you.
![]()
Calm down and take your mind off negative thoughts various plastic trinkets that can be kneaded and deformed in the hands help. The article describes several ways that answer the question of how to do anti-stress at home. All crafting products are easy to find in supermarkets, pharmacies, and hardware stores.
A cute ball that you can wrinkle in your hands and give it any shape. It is done very simply.
What you need to make it:
- balloons 2-3 pieces;
- flour 1 kg;
- empty water bottle 1 pc;
- scissors;
- felt-tip pen or fork;
- woolen threads.
How to make an anti-stress ball:
- The funnel can be made from a regular plastic bottle neck. Use scissors to cut off the desired part.
- Pull the tip of the balloon over the neck of the funnel.
- Fill the ball with flour quite tightly through this neck.
- Gently push and compress the flour into a ball using a felt-tip pen or fork handle.
- After the ball is filled with flour, tie a ponytail knot.
- In order for the ball to look more fun, it needs to have a haircut.
- You can draw funny faces with a felt-tip pen.
An anti-stress ball is a great way to relax and get your nerves in order.
How to make kinetic sand
Adults and children are madly in love with such anti-stress at home. This is ordinary sand with silicone, which does not dry, sticks well and holds its shape.
The easy way
Natural kinetic sand is obtained the first time. It can be made at home almost free of charge. What materials will be required:
- silicate glue 1 tube;
- boric acid 1 pc;
- sand 1 kg;
- Bowl;
- stirring stick.
Pure white sand for chinchillas is sold at any pet store. It costs quite inexpensively (about 150 rubles). If you are using sand from the street, it must be dried in a skillet and sprinkled through a sieve. Boric acid can be found at your local pharmacy at an inexpensive price.
Preparation method:
- In a separate container, mix 1 bottle of boric acid and 1 tube of glue. The mixture should thicken slightly.
- Pour the resulting viscous liquid into 1 kg of sand.
- Stir the mixture thoroughly with your hands.
This sand is very close to the original to the touch and in terms of properties. It molds well and holds its shape, and crumbles under mechanical action.
Magic sand
Thanks to cheap tools at hand, you can make magical kinetic sand. What is required for this:
- sand 1 kg;
- detergent 200 ml;
- dye 1 package;
- soda 5-6 tablespoons;
- Bowl;
- stirring stick.
How to do:
- Pour 200 ml of detergent into a bowl.
- Add 5-6 tablespoons of baking soda, any color and stir the mixture until smooth. You will get a viscous mass, similar to a slime.
- Add the mixture to the sand and knead everything well with your hands. There is no rush here. Knead the mixture smoothly and thoroughly.
Kinetic sand is ready! You can build Easter cakes from it, and then cut them, observing the magnetic effect of sand sliding.
Anti-stress ball with mesh
Antistress consists of a slime, a ball and a net. When you press on the ball, small bumps come out of the nets. It's pretty easy to do this at home. What you need to buy:
- balloons (can be transparent) 2-3 pcs;
- PVA glue 1 tube;
- soda 2 teaspoons;
- sequins;
- mesh 1 m.
You can use a fishing net, but a laundry net will work as well. It is sold in any hardware store.
How to do:
- The bowl must be filled with glue.
- Add 2 tablespoons of baking soda and some translucent glitter.
- The mass should be watery and resemble a slime. If the mixture is too thick, it must be diluted with water.
- Pour the resulting composition into a ball.
- Tie a knot well. At this stage, the toy already looks great.
- Cut out a part of the mesh approximately 15x15 cm in size.
- Cover the ball with a net and tie the ends.
The resulting liquid should not be too much, otherwise it will not come out well from under the grid.

Slime - a toy for relieving stress
This mass, soft to the touch, can stretch, deform and adhere to the surface.
Color
In order to get a bright slime, the mixture must be tinted during the manufacturing process. You can use food coloring for Easter eggs, liquid colors, acrylic paints, or gouache.
Necessary materials:
- any container (glass);
- dishwashing liquid 200 ml;
- soda 1 tablespoon;
- hand cream 1 tube;
- stirring stick or pencil;
- food coloring 1 package;
- plastic bag 1 pc.
How to make a slime:
- Pour 200 ml of dishwashing liquid into an empty glass.
- Add 1 tablespoon of baking soda to the liquid.
- Squeeze half a tube of hand cream into the mixture and pour out a whole bag food coloring.
- Mix the colored solution thoroughly with a stick until smooth. The mixture will begin to thicken instantly.
- Pour the liquid into a plastic bag and refrigerate for 3-4 hours.
After a few hours, you will get a liquid-viscous slime, which is pleasant to wrinkle in your hands.

Space slime
The toy with the addition of sparkles will appeal to every child. What is needed to make it:
- Bowl;
- stationery glue 1 pc;
- sodium tetraborate 1 bottle
- stirring stick or pencil;
- several shades of dye;
- sparkles.
Not every PVA glue is suitable for creating a slime. It is best to take glue, the packaging of which says "PVA-M". It is intended for gluing paper, cardboard, wood and leather. Sodium tetraborate acts as a thickener here. It is not expensive, but you can find it in any pharmacy.
Method of creation:
- Pour one tube of glue into a bowl.
- Add about half a bottle of sodium tetraborate.
- Stir the mixture well with a stick. Gradually, it should thicken.
- Add a lot of glitter of any color and a few dyes.
- While stirring thoroughly, add a little more sodium tetraborate until the mass thickens. It should come off well from your hands.
Elastic, well-stretching and transparent slime with fine sparkles that spreads over the table is ready!

Shaving foam slime recipe
If you don't know how to do anti-stress at home, then use this method. From these ingredients, a slime of the desired consistency is obtained. What is necessary:
- any capacity;
- Persil fabric softener - 2 caps;
- silicate glue 1 tube;
- shaving foam 1 bottle;
- dye 1 package;
- stick or pencil.
The thickener here is Persil. And you need to buy silicate glue (liquid glass). You can find it at your stationery or hardware store.
How to make a slime:
- Pour thick glue into an empty container (bowl or glass).
- Add 1 pack of food coloring, a few drops of liquid color, or dilute with gouache.
- Shake the foam well so that it is airy and squeeze out half of the bottle.
- Stir everything thoroughly with a wooden stick.
- Add 2 Persil conditioner caps to the mixture.
- Stir the mass constantly to the desired consistency.
This recipe produces the toy that is most similar to the original.

How to make a handgum
It differs from slime in its density. This is a hard chewing gum for hands, reminiscent of plasticine in consistency.
An inexpensive way from ingredients that can be found in any store. Required products and materials:
- silicate glue 1 tube;
- dye 1 package;
- soda 3-4 tablespoons;
- Bowl;
- stirring stick.
How to create handgam:
- Pour 1 tube of glue into an empty container.
- Add 2 tablespoons of baking soda and mix thoroughly.
- Add a few drops of liquid dye to the mixture, acrylic paint or add 1 pack of food coloring.
- Pour another 2 tablespoons of soda into the colored liquid.
- The mixture must be stirred until it thickens completely.
- It is good to wrinkle the handgam in your hands so that it does not stick to them.
Thanks to a simple recipe, an original anti-stress toy is obtained.

Unusual hendgum
For this method, you will have to work hard and spend a little more time, but the result will not disappoint you. What you need to purchase:
- gummy bears 2 packs (about 40 pieces);
- stationery glue;
- petroleum jelly 5 tsp;
- dye 1 package;
- sequins;
- stirring stick.
Cooking method:
- Melt the bears in a container above the candle until they become sticky. The process is laborious, they must be constantly stirred.
- Add half a tube of stationery glue.
- Mix everything thoroughly and add sparkles.
- The mass will gradually begin to thicken. It is necessary to add 5 teaspoons of petroleum jelly to it.
- Once the mixture is smooth, pour it over the parchment and allow to cool.
The handgam will become elastic and will be able to stretch to its perfect condition. It deforms easily and bounces off surfaces perfectly.

Anti-stress video at home
The anti-stress toy, popularly known as "mushka", is designed to calm the nerves. Both children and adults love her. It is pleasant to knead the toy in your hands, to relax, by pressing to give it different interesting shapes.
Antistress can be bought at a children's or gift shop, but it is also easy to do "mnushka" with your own hands. Even children under the supervision of their parents can handle the craft.
Materials (edit)
To create a toy you will need:
- balloon,
- starch,
- water,
- dense mesh (you can from a food string bag),
- containers for stirring.
You can add a little paint to the inside of the toy to make it mysterious. Gouache or watercolor will do.
A mixture of water and starch is known as a non-Newtonian liquid - that is, one that behaves differently depending on the exposure. For example, when struck, it hardens. A non-Newtonian fluid is sometimes called a "chewing gum". This is a great filling for an anti-stress ball.

Manufacturing
To make an antistress toy, you need to mix starch with water in the right proportions: 4-5 tablespoons of starch are poured into a cup, water is poured from top to brim. Everything gets mixed up. Then - for density - a couple of tablespoons of starch are also added. You should get a homogeneous liquid. It can be tinted if necessary.
The resulting liquid must be filled with a balloon. You can use a watering can or funnel for this. Fill the ball 2/3, then tie tightly.

The next step is shaping the toy. The ball is wrapped in a mesh, the excess is cut off. When pressing on the toy, the ends of the ball crawl out of the mesh. If the liquid inside is tinted, it glows. For example, a blue solution in a yellow ball will give the impression of a green liquid inside.
The net is not necessary at all - the anti-stress ball is good on its own. But with a grid, playing with a ball is more fun, and you can also make it with your own hands - weave it from strong threads.
how to make a grid with your own hands
Toy without water
The second option is anti-stress without liquid. To do this, you just need to pour starch into the balloon and tie it. Use a funnel.
The ball will acquire the required volume. Because of the starch inside, it is able to take on any shape. You can draw a funny face on the toy and glue a bun of hair. Sweetheart "mushka" is ready!
If there is no starch, you can replace it with flour. It does not crunch so pleasantly, but it will also make a good filling for an anti-stress toy.

Output:
Making a funny toy-mushka will be a great pastime for children and parents. It only takes 10 minutes to create an anti-stress ball.