The tradition of making floral crowns has existed for many years and remains very popular in modern world. Whether it's a music festival, wedding celebration Or just a weekend with friends in nature, the flower crown is an accessory who will give an irresistible look and a wonderful mood not only with its owner, but also others. Not bad, right? In fact, make such an accessory very easily from the available materials that can be found at home or purchase in the store. Follow the recommendations and you will make your own floral crown for any occasion!
Materials:
- floral wire
- floral tape
- flooring or scissors
- greens
- flowers
We used small flowers and greens. Depending on the color scheme and the desired size, you can choose any flowers as you want, you can even use artificial, which will please you for a long time.
So proceed to work. First, measure the scope to understand how big your crown should be and add an extra centimeter for colors. Cover the wire with a floristic ribbon, one or two layers.
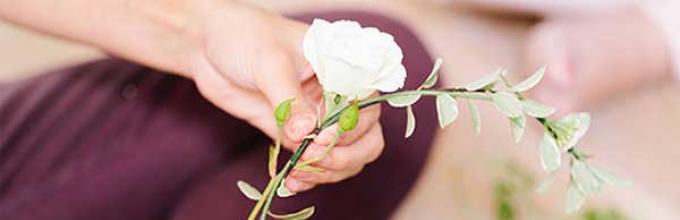
Let's start decorating our crown with flowers and greens. Start from the layer of beautiful greenery, will act as a base. Fasten the stems using a floral ribbon


Now it's time to add to attach the stem to the crown and wrap it several times flying, as we did it with greens, you can cut off the extra stems with scissors or nipples. You can evenly distribute flowers around the entire crown, or just focus on the front or back of the crown. You can use more colors or the opposite of greens. Use different types Colors, to create an unusual type and texture.


Honestly, there is no wrong way to make a crown of flowers. It really depends on what event you make it make, what hairstyle you plan to wear and what flowers you have in your hands.
To work, we will need:
- Beads green cutting - 75-100 gr.
- Beads Lilac - 75-100 gr
- Beads petty light green - 10 grams
- Beads large - 30 gr.
- Beaded wire
- wedding hoop ( children's size)
- Floral tape
- satin ribbon (width 1.5 - 2 cm, length 1.5 m)
This decoration consists of several elements - a central flower with stamens, two semi-column buds, leaves and twigs with beads.
Flower petals, buds and leaves are made in the technique of French axial weaving described above.
Leaves. (6 pcs.)

For the manufacture of leaves, we prepare low from the green bead. According to the above scheme, we make the axis from 10 beerin. Low and twin the axis. Then the arcs start from low. For the severity of the sheet, the angle between the axis and low must be 45 degrees. After the first arc on the axis we ride one large bead, it will make a leaf more air and hide the irregularities of beads. Thus, we make 4 arcs. Finished leaf give acute form. The wire at the top of the sheet (axis) is gently fit and cut.
Bud. (2 pcs)
The bud consists of two elements - the actual flower and a cup of chielistics, each element is fluttered in two copies.

Boot flower is also flying french technician. Prepare the axis of 15 bisperin lilac color. We have 5 arcs, without adding beads to the central axis. In the same way, this is a cup of sewer - the axis consists of 10 bisperin, the number of arcs is 5 pcs. The wire at the top of the sheet (axis) is gently fit and cut. As can be seen in the photo 2 and 3 - the elements turn into a bud and collect one in one.
Stamen. (5 pieces)

The stamens are made in the technique of looping. On the cut of the wire long 10-15 cm. In the middle we make one loop out of 10 small beamin light green. Wire twist for a length of at least 3- 4 cm.
Flower petals. (5 pieces)

For the manufacture of flower petals, you prepare low from the beads of lilac color. According to the above scheme, we make the axis of 15 beerin. Low and twin the axis. Then the arcs start from low. For the severity of the sheet, the angle between the axis and low must be 45 degrees. Thus, do 5 arcs. I give an acute form ready list. The wire at the top of the sheet (axis) is gently fit and cut.
Twig with beads. (4 things)

For the manufacture of sprigs, we prepare a length of wires long 20-25 cm, on the middle of the segment we ride one large green beerin and fasten it with a turn in the middle of the wire. Then arbitrarily repeating the turns to the right and left, flying sprigs.

Assembly the first stage we collect the central flower of 5 petals and stamens. Further on the prepared hoop with a floral ribbon (preferably in the tone hoop), ranging from the center of Freaky, prepared elements. After the fixed central flower on the right and on the left under the petals, the buds are attached to the right, then in the alternative manner we place three sheets and complete the branch from the beads.


We decorate the floral ribbon satin ribbon In the tone, fixing the ends to the hoop by glue.
With their own hands made with the child, it will probably become the most beloved accessory and will be used frequently in games and entertainment. And made specifically to some solemn day, she will help keep memories about this holiday and make it brighter.
Nothing is simple, how to make a crown of paper using ready-made patterns. They can be printed on the desired scale, if necessary, increasing or squeezing to the desired size.
Look at the video how to make a crown of paper:
Corona Cutting Templates
If you take the image on a sufficiently dense and, if you wish, color sheet, you can use it like a blank - cutting it along the contour, bonding or attaching to the gum, you will get ready product. But more often, printouts are used as templates (stencils).


Corona paper with waters
It looks very interesting to the crown of paper with fuels. In order to make the crown, we need: scissors, yellow or golden paper, glue and bright large waters.
First, print a template for cutting the crown:

With the help of a template we apply on yellow paper contours of the future crown.

Cut the crown along the contour.

We glue the crown to the crown bright waters.

We glue the part of the crown with one of the sides.

Correct the size of the crown on the head and glue the crown on the other side.

Corona Cardboard with Wat
This kings and queens will surely like the crown beaten by "fur" from the wool.
To make a crown with a wool rim, print a pattern for cutting:

Cut the printed pattern by contour.

Using the template we apply to the cardboard circuit for cutting.

Glue the cardboard parts of the crown among themselves. On the inner part glue a strip of dense tissue (felt or burlap). Such a crown will be better to stay on the children's head.

The basis of the crown is ready! Decorate the crown of fats and paper stripes. In the circumference, the crown glue the rolled cotton wool, which is stained with yellow paint. Instead of cotton, you can use a strip of light fur.

Corona Cardboard with Flower
The stencil of the crowns choose with regard to the preferences of the child and the purpose of this product.
You can cut only the front part of such a crown and attach a gum to it - then this accessory is suitable in size to any child.
Draw on point side Cardboard contour crown. You can use the printed pattern for cutting.


We glue the crown of a narrow ribbon on both sides.

For decoration, use a brilliant sprinkling - apply it to the crown, having drawn the pattern on it.

It is only worth smoking the sequins - and the crown is ready.

Decorating the crown with a gentle artificial flower.

The crown with a flower will easily complement the image of the magic princess or the sigh fairies.

Crown Elsa from Frozen Cartoon (Cold Heart)
You can make a more complex product using a curly stencil, braid and pebbles from a glass.

The lower part of such a crown should correspond to the scope of the child's head. Top Just fix glue.

Bottom decorate braid.

On the top glue pebbles, draw patterns. It turns out an elegant, neat attribute of power.

Crown Elzy - ready!

You can use to get such a crown of paper, a template for cutting up the top with a more complex shape. The harder the pattern, the more interesting it looks the product.
Funny crown can be made of a paper plate. To do this, cut it from the central part as in the photo. Now paint it and decorate rhinestones and sequins.

Filing the cut sectors. The crown is ready.

Roll Crown from toilet paper
And rolls OT. toilet paper And the towels are easy to turn into small symbolic hats, which princes and princesses often wear fairy tales. It is interesting and touching a small crown of a roll from toilet paper. To make a crown, turn around the cardboard roll with color scotch.

On one of the edges of the roll make deep cuts.

At the bottom of the crown, we draw a rubber in the hole. So that the rubber band did not go to the inner part tie a small nail.

Miniature crown - ready!

Look at the video - how to make a crown for princess with your own hands:
Decorate the crown to your taste, using the full power of imagination - and the handicraft will like any child.
Girls love to dress up. And on thematic costume holidays - all the more! If you are planning a spring holiday, a birthday, put a scene about nature or just want to please the daughter with something unusual and memorable - make a floral hat!
Hat with flowers - do it yourself
You will need a square sheet of colored paper for the base of the hat. It needs two circles: the inner in the size of the child's head and external in accordance with the desired width of the head remove fields. Then you need to divide the inner circle on the 45 degree sectors and make cuts from the center along the lines. Now beat the "teeth" up. The basis for hats is ready.

The next stage is the decoration of hats with flowers. Use 3-4 types of colored paper for the manufacture of colors and butterflies. Well, if the flowers are different form and will have contrasting middle.


You can also add grass, sun, hearts, asterisks.


Crown Princess Spring

This crown is very simple. You will need a piece of dense cardboard for the base (you can use unnecessary packaging). Mark sketch and cut out the basis.

For the decoration of the crown, we will use conventional wipes painted by watercolor. With the help of glue, PVA will cross the crown with colored napkins on both sides.

When the napkins stick and the product will completely dry, you can continue to work. For greater expressiveness, the crown needs to circle on the edge of green paint. Then decorate the crown of multi-colored paper colors And stick beads. Volumetric flowers from bent strips of paper will make our crown even more elegant.

It remains to fit the crown on your young princess head (you can connect the ends of the cardboard tape using a stapler).
Crown with big flower
This crown is decorated with only one, but large and very expressive flower.

The crown is made from green paper tapes of the same width. We cover the baby's head with them, and then form crosshair so that the crown does not slip on the forehead.

Cut the flower petals, we make cuts on each of them and slightly replacing to give the petals curved shape. Then we attach them to the base of the flower cut out of the darker paper. Add line at a dark green pencil at the base of each petal to give them an even more natural look.

The core of the flower is made of rolled pieces of a yellow napkin, and the stamens are from the wires with the beads rushes on their ends.
Autumn with its bright colors simply manites to go out. I want to collect a bouquet beautiful leaf and late colors and build herbarium. But from natural gifts, not only a bouquet can be made, but also the decoration. For example, the autumn crown. How to make such an unusual accessory, read below.
Crown with Ryabina
Build such a headdress is not difficult. We need a rim, adhesive gun, flowers, rowan and dry leaves. If you cook the autumn crown in advance and want it to be preserved for a long time, then you will have to pre-prepare the leaves. They need to stroke the iron and give it to dry carefully, preferably under the press.
We proceed to the manufacture of a headdress. First of all we glue rowan branches. They are heavy and voluminous. Under them will be easy to hide the remaining flowers and leaves. Now we put the main accents. We will do them with the help of big Astra. They can easily be replaced by chrysanthemums or other colors that grow in your country or garden. When the accents are arranged, we begin to glue the leaves. Here the main thing is not to overdo it. It is enough 3-4 large sheets and 3 small. Final action - gluing small dryers. Autumn crown is ready.
Decoration on the head of small flowers

Such a simple and elegant decoration can serve as a crown on the autumn ball. With your own hands, create such an accessory is quite simple. We will again need a rim, but this time is thin, wire. The crown will be made of orchid flowers, Barbaris berries and willow branches. The picture presents a sample made of artificial colors. You can create your headdress in the same way or decorate it with alive plants. We select flowers and berries in one color scheme. If you make a cradle from an artificial material, it will be quite easy to paint it.
Establish to manufacture. On the rim we glue flowers. In the center are large, and on the sides are small. The remaining space needs to fill the willows by branches, on the ends of which we will be tied using wire berries. Weave can be chaotic and asymmetrical. The main thing is that as a result, the flowers and berries are distributed evenly.
Klena Leaf Crown

This is a rather nontrivial way to make a headdress. The autumn crown will consist of a cardboard rim, maple leaves and gold beads. First of all, you need to prepare the material. Disturb the leaves and make a cardboard rim in 4 cm wide. First we glue the front row of leaves. Enveling the rim and fasten them with a glue gun. Thus, the cardboard strip from two sides turned out to be surrounded by leaves. Next we glue the second row. Now the leaves are fixed on the back side of the rim. Thus, we make a beautiful "outstanding". Final stroke - This is gluing gold beads. It is advisable not to fix them throughout the perimeter of the crown, it is better to make such an emphasis on the front part.
Cap Corona

Such a headdress simply adore children. He replaces them summer wreaths. The crown on the autumn ball from maple leaves Even a child can do. We will tell you two methods of its manufacture. The first method is similar to weaving wreaths from dandelions. Only here, instead of the legs of the colors, we will bend and add the branches of the leaves.
The second method is more busy. For such a crown, you will have to make a cardboard basis in the form of a circle. At its ends we learn tapes, which will make it easy to remove and wear a headdress. Maple leaves will need to pre-try and dry. And then, with the help of an adhesive gun, fix on the paper rim. It is advisable to make the crown lush. Therefore, it is not necessary to smoke the leaves, and at least two rows.
Gothic crown

Such a headdress looks quite frightening. But some girls seek this effect. Autumn to do in such a style is very simple. We need thick wire, branches, tape, paint, chains, beads and autumn leaves. Let's proceed to manufacture. To begin with, tweet from wire rim. Then wrap it with a branch. For this purpose, you can use soft and pliable willows. Now with the help of the isol attach to the branch crown. It can be branched branches of apple or rowan. When everything is ready, we paint our headdress in black. It is advisable for this purpose to use paint in the canister. So it turns out evenly distribute the color pigment. After the crown is driving, we attach chains and beads to it. You can repeat the option from our sample, where one bead is in the middle, it is necessary for the forehead, and the other two are located in the area of \u200b\u200bthe ears, and you can come up with your own decor. The final action is to take the crown of dried leaves.
Crown of flowers, butterflies leaves and ribbons

Such a headdress resembles the one we were told about in the first paragraph. But only this version of the crown is more complicated. Here we will use both alive and artificial materials. How to make the autumn crown in this way? Let's proceed. To begin with, we take a wide plastic rim, it will serve as the basis. We glue to it on hot glue, we glue asters and chrysanthemums. We will complement the crown we will be both dried golden leaves and the greenery of indoor plants. The vintage will play a special role in our headdress. We glue them from behind, so that they beautifully fell on the back of the back. They need to need beads and real berries. It is necessary to decorate the finished crown with butterflies, dragonflies and colored ribbons. And remember that such a headdress requires throwing makeup.