Send from fashion or served T-shirts, blouses, trimming fabrics, ribbons, old grandmother bedspread. If you have a revision at home, then there are many such things in the closets. It is not necessary to throw them away at all, since all these products can become an excellent basis for creativity - you can get wonderful mats. And no sophisticated design stuff compares with them. You will also be able to kill two hares: apply with the benefit of your own fantasy and transform the house.
Place the original decorations will be found in any dwelling. Entrance hall, bathroom, kitchen, balcony only will be converted from a beautiful blurred, manufactured personally.
After parsing things, they need to carefully reconsider and select those details that can bring some other benefits. We are talking about buttons, lightning, appliqués. Crafts from them are a separate topic.
The first thing you need for work is thicks. To prepare them, you will have to cut the prepared wealth on the strip. Their acceptable thickness - 1-1.5 centimeters. Prepared strips are stitched with each other. For convenience, the thread itself should be as long as possible. It is still important that she was continuous. It is necessary to try to do without knots, otherwise the knitting process will become complicated, and the finished products will look slightly. To reduce the number of connections, things are cut on the spiral, in the direction of the product nise. By the way, this technology will allow the time for cooking yarn to reduce, and the resulting rug will be much more careful.
The combination of any materials is the usual technology in the manufacture of rugs. Therefore, that will be cut: a bedspread or dress - no matter. The main thing to take into account the colors, because the external appearance of the received product will depend on it.
 Next in the list of tools will be hook. He must be big size. Spokes for knitting will also fit, but with a crochet, the case arises faster. The size we spoke. As for the material - this is a tree. It is necessary to look at the handle of this tool. It requires a long and strong to work to avoid breakage. Another nuance is the bend of the hook - if it is big, then with the capture of wide strips of the fabric of difficulties will not arise.
Depending on the manufacturing technology, a list of necessary tools and materials can be varied. So, to create a fluffy rug you will need to stock:
- the basis of the grid (for example, construction);
- small flaps (length - 20-30, depends on the desired herb size);
- crochet;
- scissors.
For weaving, the frame will be needed (a regular photo frame is coping with this task). Maching it yourself, you need to calculate the size: 30 × 45 cm. Rows of carnations are stuffed with long sides. Between them is withstanding the distance in 2.5 centimeters. Carnations must have small smooth hats.
No special skills for making mats are not required. You only need to gain patience and do not regret the time on the intended.
Step by step instructions for work
 One of the most simple options - Created based on rubber rug. If the latter has a wide hole, then the strip of the fabric, which is trapped into the adjacent holes, is tied by the node. This will prevent its slip. So it is done until the moment of filling the entire space. If the rug has small holes, the strips do not necessarily tie up.
Using as the basis of burlap Work is slightly complicated. Since the finished holes in this fabric are missing, they will have to do with the help of a tweezers. For this thread, walking in parallel, raise, and the tissue strip is inserted.
Denim products in any house will be excess. In terms of their qualities denim - One of the best materials for floor mats. Manufacturing is possible using braid weaving techniques. Jeans-gum are those products from which the products obtained are more successful. Cutting old denim things on the strips (their width should be two or three centimeters), you can start riding.
The order of work is as follows:
- SAMI simple scheme sewing is that the thing cuts into pieces desired size and form, then they are stitched from the wrong side.
- When weaving the rug filament, you need to pull on the carnations. It is done in pairs. The color of the basics itself may be neutral.
- With dense tightening of the ranks of the base will be invisible. With loose weaving, on the contrary, perfectly striking.
- Next is taken into the hands of the working thread and is passed in two ways: on top of the filament or under it.
- At the end of the first row, the thread is carried out through the last major thread and is sent on the opposite path. The number of rows is made to their taste.
- After deciding to change the tone of the working thread, you need to cut off and connect its tip with the thread of the selected shade.
- From time to time you need to tighten the finished rows to the first row. At the end of the work, remove knots and seams (their place from the wrong side) and slowly remove the product from the frame.
You can weigh my own hands rug from nodules:
- To do this, we need to stock up with multi-colored strips of fabric, tape, scissors and a needle with thread. The width, length and density of the bands affect the size of the finished product.
- Work begins with the distribution of the bands in the line. Moreover, the order that is preferable for the finished carpet is selected.
- To fasten the top of the bands used tape. All work is performed using single nodes.
By the way, weaving from the strips is not the only option. The rug may be associated with the use of a thick hook for knitting. He can be double made of denim losquets. And to fill its inner part, foam rubber, a layer of sponge, soft fabric.
Very creative look rugs from balls. The resulting thing will immediately appreciate the kids:
- The cloak is cut by circles. The diameter of them should be the same.
- Then each flap is attached to the shape of the ball.
- In its middle, cotton wool or syntheps are invested.
- At the bottom of the balls are stitched. For firmware, a caprony thread is used. To get a bright and attractive rug, the material is selected multicolored.
- To secure ready-made balls, a grid is used. No last - not trouble. It can be replaced by any dense cloth. Thick strips from old things are well suited for processing edges of the mesh.
Hula-HUP and old T-shirts
Armed with knitted T-shirt of decent size, scissors, weighing things of different colors (Ideally, the fabrics must be single-package) and Hula-Hupe, anyone can make a rug. Important moment: The diameter of Hula-Hup should correspond to the size of the finished rug.
- We start with the preparation of materials. Cut the T-shirt on the stripes. Their width should be 1.5-2 centimeters. In total, there will be ten lanes having a form of a closed circle. Large balls should also be prepared in the number of several pieces. The width of their stripes are measured the same. Colors are chosen different. We have already spoken about the connection of the thread in the previous section.
- Big Hula-Hope can be replaced by a small hoop. In this case, the original napkin will be the finished product.
- At the initial stage, the creation of the rug will have to work with ten stripes. They wear on the hoop. It is done so that each strip passes through the center of Hula-Hup from one side to another. The resulting sample will slightly be treated on the wheel from the bike.
- After the correct location of all bands, you can proceed to work on the next step. It is a filling of empty space strips. The end of the thread is fixed in the place where all the "needles" are cross, and it is intertwined between them. Filling out all the space, you can admire your work.
To obtain more original rugs from unnecessary things on Hula-Hupe, you can definitely alternate multi-colored stripes.
Round, square, elongated - form of mats can be any. Having gained experience in their knitting, it will be possible to swall ash and on such shapes like a butterfly, a leaf, as well as many others. The main thing is to always remember that there is a simple way to dispose of old things and the transformation of the house.
Stock Footage with instructions for beginners
You can see the master class on knitting the rug on the following video:
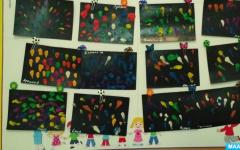
Photo gallery of finished products
In the photo below you can see examples of finished works:
It would seem, well, how can an ordinary small rug can change the interior? But it turns out, he can become not only useful, but also a bright, interesting detail in the interior design. Of course, you can buy it in the store, the benefit that now there are mats for every taste and color. But think about how pleasant will be when you make it with your own hands, especially since such a rug can be easily made of old things, for example: threads, tissues, wine plugs, belts, and a lot of other. All you need is to know step-by-step instructions, stock up with the necessary materials and patience.
1. Rug made of old leather belts
Make a rug made of belts is very simple.
To do this, you will need:
- 10-12 natural or artificial leather belts
- silo or skin perforator
- the twine or rope.
Belts pre-make the same length, cutting off a buckle. Do the holes along the edges of the belts at a distance of about 2-3 cm from each other and 0.5 cm from the edge. Sust them together using a hemp thin rope. The order of stretching the rope is arbitrary, you can sew along the belts, across, cross on the cross between the holes. Also very stylish metal brackets will look instead of rope.
2. Soft rug made of old fabrics

Required material:
- scissors
- pieces of old (unnecessary) fabrics, you can old clothes
- bath rug (with holes)

1. Cut the fabric into small stripes
2. Using a tweezers or hook, start to survey the strips through the holes.
3. Tie all tissue strips on a simple knot.

3. Make a rug made of old towels

Required material:
- old towels
- scissors
- sewing machine (needle and thread)
1. Cut your towels into several stripes. In this example, each strip has a width of about 3 - 4 cm.

For convenience, you can fold each towel in half, cut into 2 halves. Each half is folded again in half and cut in the fold line, etc. It is desirable that all towels are about the same size.

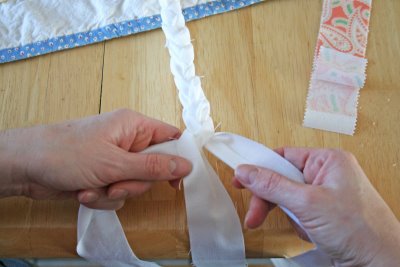
2. Fold together 3 strips of different colors and fasten them with threads (set ends). Start from these strips to determine the "pigtail". After the end of the weaving again firm ends.

3. Make several such "pigs" and then connect them into one long strip using a needle and thread (or sewing machine).

4. Start turning your long strip into the spiral, fixing it with thick thread.

5. Secure the entire design and turn it out so that the seams are from below.

Your rug is ready!
4. Wine plug rug
Corks from wine bottles - a wonderful material for a variety of crafts for home and garden. One of the useful options is to make a rug from traffic jams with your own hands. The cork bark practically does not absorb moisture and the bacteria do not multiply in it, which is why the cork is great for premises with high humidity, that is, for the bathroom. And walking on the rug from traffic jams is not only very nice, but also useful!

In order to make a small rug, you will need:
- 150-180 wine plugs;
- glue;
- cut off the water-repellent material for the base (rubber shower rug or for yoga, rubberized tissue, soft thin plastic);
- acute knife;
- major sandpaper;
- cutting board.
1. Collect and prepare traffic jams. If you do not have the right amount, then the traffic jams can be bought in online stores. Thoroughly wash them in warm soapy water. To remove red spots from wine, soak the plugs in a solution with a bleach and leave them for the night. Then rinse well and leave to dry.
2. Cut each plug along into two parts. Use a cutting board and a sharp knife. If the sections came out very uneven - grab the edges of the sandpaper. For convenience and security, it is better to cut the plug not on the side, but putting it in a vertical position.

3. Squeeze plugs down on the table as they will be located on the rug, decide on the size of the future rug. Then cut out of the rubber material the base of the desired size. Pattern You can come up with yourself, it may be chess, smooth rows, zigzags.

4. Start gluing the plugs to be used with glue suitable for gluing such surfaces. First glue the plugs around the perimeter, then moving towards the center. Excess glue immediately remove the cloth.

The pad from the traffic jams must completely dry. To make it completely waterproof, you can handle the surface with a sealant. If you use the tube pad in the bathroom, it is desirable for preventing it to dry it in the sun at least once a month.


5. Woven rug made of flaps

Required material for making with your own hands:
- tight canvas (base for carpet)
- slices of fabrics
- black thread
- needle
- scissors
- fabric glue
- adhesive tape
- aerosol for protective coating (if desired)

1. Select the size of the carpet and prepare the rope of suitable size.
2. Prepare long fabric strips. Each strip must be approximately 6-7 cm longer the main part of the carpet.

3. Prepare a few bundles of 3 strips and start weave the "pigtail". You need a few blanks to connect them to one carpet. For convenience, fasten the ends of each billet with adhesive tape. Do not leaf to the end - leave a little fabric not woven.
4. Apply glue on a dense cloth. No need to save on the glue.
5. Carefully put the blanks on the web so that they stick.
6. Connect all the blanks with each other with a needle and thread.
7. Remove the adhesive tape from the ends. Cut the ends to be smooth.

The rug is ready!
6. Pump rug do-it-yourself: Option number 1

Required material:
- woolen thread
- scissors
- bath rug (with holes)
1. Wrap a woolen thread around your fingers (the more you will be wrapped, the magnificent will be a pompon).
2. Carefully remove the wound thread from the fingers. Prepare another short thread - about 20 cm long - and tie it around wounded threads (in the middle).

3. Ends Cut with sharp scissors. Extra details also cut off the scissors to get a neat round pompon. But do not cut off the thread that you tied the pompon, you will need it.

4. Make enough pumps to cover the bath mat. After that, start to overtake the thread through the holes and tie it to the rug, thereby connecting the pump to the carpet. Pompons must be close to each other.

5. When you tied all pumps to the carpet, you can cut off the ends of the threads.

The rug from the pumps is ready!
7. A simple pump rug: option number 2

To make such a white-blue rug from pumps, you will need:
- thick woolen threads for knitting;
- mesh base for the rug;
- scissors.

1. Make the pumps of different colors to get a smooth gradient color transition. You can make a one-picture rug or lay out a specific pattern. You can also play pomponium sizes using large, smaller and very small. To do this, look here by what better way Make pumps of different sizes.

2. Now tie every pompon to the grid, observing the color scheme. Try to not be seen canvas between pompons.


If desired, the opposite side of the rug with nodules will be closed with a cloth or knitting so that the rug from the pumps is beautiful on all sides, even from the inside. If you could not find the appropriate basis - the grid is not trouble, the pumps can be simply sewed to any tissue.
8. Round leg rug made by hoop
Old knitted T-shirts Actively used by craftswomen for a variety of crafts, in particular, the idea of \u200b\u200bmaking rugs-rugs is very popular.

Necessary materials:
- 3-4 T-shirts (other things, ribbons or ropes)
- children's gymnastic hoop or Hula-HUP for adults
scissors
The size of the rug depends on the size of the chosen hoop, you can take both the gymnastic hoop of the daughter and a large hoop for weight loss. Weaving technology is very simple, even a child will cope with independently making it in his room round mat On the hoop.
T-shirts or other old upper clothes Cut out the strip equal to the width, from one side seam to another, so that the rings are. Dress every strip on the hoop: first the vertical line, then horizontal, and then each sector shares on the equal part of the strip of T-shirt.
Important! Fabric bands should not be very tight, otherwise the finished rug will be wrinkled and will not keep shape. Ideally, the strip of T-shirt should almost freely dress on the hoop, with minimal tensile tissue.
It is likely that if the diameter of your hoop is more T-shirt strips, it is too stretched or you generally use ropes. In this case, simply wrap the hoop with a cloth or rope and tie a nodule.
Try to all the bases of the bases in the center point. Weave the rug start from the center. Take a strip of T-shirt, secure the loop for one of the lines - the foundations and skip it under and over the longitudinal lines.

When the strip is over, tie to it another ring from a T-shirt, the knots hide under the previous one. Continue the weaving in the same way, alternating the stretching of the strip under and over the longitudinal lines. Try to make each circle be tightly pressed to the previous one, not allowing large spaces and holes between them. After you have finished weaving, cut off the scissors of the ends of the loops and make them a nodule.
9. Backlit mat
Sometimes at night I want to go to the toilet, in the kitchen - eat, drink a glass of water or cook a bottle of a mixture for a child, so you have to get up and go from the bedroom. In the dark, and even half a heart there is a risk of stumble upon something, and the top light is not always possible not to wake up other family members. For such cases, the LED light illumination in the rug will become an interesting and useful solution.

The master of Joanna Narkas (Johanna Hyrkas) came to mind a magnificent idea to use LED tape as the path illuminating the path from the bedroom. The tape is spinning with a spiral, is inside the woven rope of the round rug, and a long tail leads from the room further. Soft cozy light spills on the floor, without interfering.

Such a LED backlight rug can serve as a night light in a child's room. In addition, the ribbon from the rug can be laid along the walls and lead to the toilet or kitchen. For such purposes it is better to use a hermetic closed LED tape. The rug can be made with your own hands, with the help of a big knitting hook Or the fingers are flipped with thick yarn or rope ribbon. Of course, there are expensive models of LED light lights with a light power regulator. But often homemade version is an excellent budget decision, as in this case.
10. Labers rug from jeans

The concept of using clothing items after their wear for other purposes is far from Nova. For decades, women make patchwork mats and blankets from old things. In the same way, you can make a carpet with your own hands from jeans labels. The only problem is to find a sufficient number of labels, because even for a small rug you will need at least 50 pieces.

To make such carpets with your own hands, labels are better to put on some fabric, you can even thin. Outdoor labels on each other and so give the carpet the necessary density. Use for work sewing machineSince manually sew each label - the occupation is very laborious. Make lines around the perimeter of the label, where it was sewn to jeans. Pattern You can choose yourself - the right level mesh, a Christmas tree, a spiral for a round carpet, but the labels are more likely to look in a slightly incorrect manner, ours.
11. How to make a french bracelet mat

Required material:
- old fabric 2 colors (you can use old T-shirts). The width of each piece of fabric is 20-25 cm, and the length is 3 meters. If you use old T-shirts, you can connect several pieces with a thread and needle.
- scissors
- needle and thread
- adhesive tape

1. Spread 5 strips of different colors in this order in which you want them to look at the future carpet.
2. Next to the 5-dimensional stripes, put another 5 strips in the mirror reflection.

3. Take the first strip, in this case pink, and make it, as shown in the image. First, bend the fabric so that the digit 4 formed.
4. Continue to tie a pink strip around the rest of the strips until you reach the middle.

5. Start do the same from the opposite side, taking the other 4 strips with another pink strip. Start also with a number 4, but in the mirror reflection.
6. When two pink stripes will meet in the middle, tie them with each other.
7. Repeat the same thing with the subsequent remaining stripes. Choose the long rug yourself.

8. Start another rug, choosing the same colors. After that, connect both ribs and needle.
Tip: If you wish, you can make another or more similar mats, which can then be sewn into one large carpet.

9. Excess parts can be trimmed, and the ends are fixed by thread so that they do not spread.

12. Pad for bathroom from sea stones

This bathroom rug made with his own hands
The most important thing in the manufacture of a marine rug is to get marine pebbles. They can be collected on the beach during your journey to the sea, or perhaps you live near the beach of pebbles, such stones can be found near the rivers, or in the shop of household goods.
For the manufacture of the rug, we will need it:
- Rubber mat. You can with holes, it will serve for the water of water.
- Smooth sea or river stones. Make sure that they are porous, not too polished and slippery, otherwise they may not be tightly stick.
- Waterproof silicone sealant.
- Glue or old shower curtain.


If on facial side The rubber rug is a texture pattern, it is better to turn it over and start working on the smooth side. So that nothing to blur with silicone shake the prepared film.

Now compact and harmonious spread the sea stones on the surface of the rug, to make sure that you have enough pebbles and outline how they will lie. Perhaps it will seem like a certain puzzle, so be patient!


After you laid stones, as you like, you can start gluing them. This procedure must be started from one corner, taking one pebble one, squeeze a drop silicone sealant On the back of the stone and put it back on the rug. Press it for a few seconds and repeat with the rest of the stones.

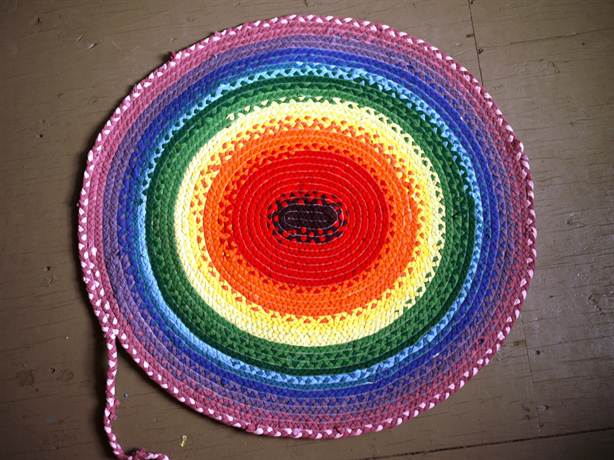
Why in the house is a carpet, no need to explain. Many lovers of homemade creativity make their own hands, getting useful products from the remains of thread, yarn or just unnecessary rags. Among the samples of home carpet, they are not simply inferior to the best industrial samples, but also unique highly artistic, machine technologies are not subject to, see fig. And all this - with minimal expenses, or even the task.
Archaeologists consider the carpet an ancient household item: before guessing that it is possible to dress in the skin, the man is stuck it to himself. Mooding and rowing also the most ancient crafts, and here handmade Still firmly holds its position. For example, a rug from pumps of mechanization with automation is very tight. But at home, the bedside rug from pumps can be made in half a day, and it will be more convenient to the factory, and it will look better, see below.

Household and homemade rugs
The same refers to mats of old things. Their utilization by industrial methods is not very cost-effective and purchasing prices for a nonsense Ragia are not happy. And with his own hands transformed into the carpet, unnecessary clothing will still serve on the farm with benefit.
In this article we will see what and how to make mats for home and cottages do it yourself. But, unfortunately, large outdoor and wall carpets and palaces will have to affect only casual, it is separate big topic. And the napkins, the tracks on the table, the capes for furniture and small wall mats, woven in the Macrame technique, will have to be completely only to mention - this is an equally extensive topic, technologically related to carpetnic care.
In this publication, we will deal with small rugs, in the spacious, called rugs. As can be seen in the photo above, they are not necessarily "Babushkina", which arrived in the kitchen or in the door of the door, although there are needed rugs. The rug pad can be a highly easthetic product adorning living room, and persistent hygienic in a room with high humidity and / or indoors subject to pollution. Or even street, if the rug is intended for the cottage. All this variety is worth, in general, on three whales: material, execution technique and carrier base.
Technique and foundation
From the variety of homemade floor floor mats scatter. But according to the technique of execution, they are divided into a relatively small number of varieties:
- Shty - technologically the simplest, but requiring additional materials (threads) and industrial equipment: sewing machine. On the usual household 1-needle typewriter under the needle to №100 it is possible to sew a completely solid and beautiful rug.
- Braided (related) mats mats from rope - No extra. Materials do not need. Very practical, racks, however, the appearance is quite monotonous, albeit Elegance. Require increased attention and accuracy in work, but the expert on the ability of the author product says a lot.
- Wicker Fabrics Fabrics - labor requires quite a lot, but simple; The material is suitable free thruster. The appearance of the patchwork carpets came out of the skilled hands can be simply awesome. For their manufacture, you need the simplest hand-made weaving machine - the curros - see the video below. Circles for small rugs can be made at home for half an hour-hour from undergraduated materials, see further and at the end.
Video: Rugs from patchwork with their own hands
- Wicker (knitted) crochet. On the knitting mats do not knit, because knitted knitting Products are calculated mainly on vertical loads. Country rugs are made most often round (see Fig. Below); A round rug in the other technique will not be durable. Country mats require a sufficiently large skill, but the starting master can quickly and simply leave the crochet blanks for the spied rugs.
- Knitted woven or semi-rigid-based - These are a dilated carpets up to the "real" patterned and "grass" rugs in the bedroom or children's, in which the foot gently slows down. "Herbal" rugs on the technique are not more difficult than seaside and less labor-intensives, but we need a purchased basis; However, inexpensive, see below. Patterned darous carpets, in appearance not inferior to Persian or Khorasansky, you can weaken the houses on the grains, but it will take a lot of attention, attention and artistic taste.
- Knitted without base - Most often from pieces of plastic film, for example, packages used. To see in them artistic advantages is possible only with a fairing fraction of fantasy, service life up to 6 months, but you can make such a rug in half an hour. Hygienic, possess cleaning shoes properties and themselves are easily cleaning: he sucked, it's good enough - and that's it. Ideal as those who are welcomed to the country and in shower / bob in the same place. For residential rooms are not recommended: in a dry room with non-conductive electricals, sex is intensively accumulated by static.
- Main from natural solid mineral or elastic organic materials Or their imitation based on or without it. Natural minerals are very expensive, and when independent manufacture And very laborious. Organizer (tree, cork; occasionally - horn and bone) on the floor not very hygienic, wet slipper and quickly wear out. The imitation of minerals is quite laborious, but fulfilled at home (see below), the source materials for it are inexpensive, and the aesthetic effect can be magnificent. Made in this way mats are suitable for both internal and external use practically without restrictions.
Ragia and rugs
Homemade rugs-rugs are carried out mainly from natural plant textile and knitted materials: old weapons, yarn, threads, rope (twisted rope) or cable (braided ropes). Synthetic in mats for internal use should be used only intended for carrious things due to the same static electricity; It, through the legs barefoot or in slippers, is very bad affecting health. We will also return to imitation of natural mineral materials, and the solid / elastic organist is quite said above.
Jeans
Through the whole totality best Material For an outdoor rug - denim fabric, especially since old jeans In the house often accumulates a lot. And the easiest way to sew a jeans rug is to cut them into pieces of the desired shape and sew with an inside, on the left above in fig. The denim rug (on the right above) will be acceptable to look at any interior, like denim clothing in any atmosphere, except as popular.

If it's not too lazy to "set jeans a cooler style," you can shelter the blanks on the edge of the contrasting braid (left in the middle), such a rug is suitable in the modern interior. And for the premises of the archaic-rustic design or, say, in the country, from jeans, loose on the ribbons, you can weigh the "Babushkin" rug, building on skouring hand Cusks (see at the end). Elementary techniques "Babushkin" weaving are shown in Fig. down below. 2 denim flowers, faces and inside, enough to get a nice pattern. The basis of the old sheet will go as the basis; Strips twisted into harnesses.
Note: In the process of weaving a denim carpet, it is necessary to connect the duck bands, or to output, or simply not enough. Weaving node in this case is not suitable, because The fabric is dense and the node will be great. Tape jeans are connected in the same way as when weaving a patchwork rug without a machine, see below.
Tights
The second class of things, on the noise of suitable for the rug - tights. How to make a rug from tights, see the training roller below:
VIDEO: Rug from pantyhose do it yourself
Other Star
Lungs Wallows can be brushed on the mat. different ways, See eg. Next video. However, when they are trapped with lying on the floor, the wear resistance of the products leaves much to be desired.
Video: how to make mats from old clothes
If the source thing is knitted, say, the rug will be out of old T-shirts, then pieces of more slices are cut out without seams, kants, etc. Pockets paired. The billets are then dissolved on the tapes, the braids are weave, and a rug sew from braid, see fig. Threads - not thinner No. 20. The base of the basics from Tehkany is obligatory, without it, it will soon slow down and quickly wipes.


For printed fabrics, this technique is not suitable: threads will be climbed along the edges of the ribbons, and holes will be sprawled under the fastening threads. In this case, the workpiece first cut onto the smooth stripes of 5-7 cm wide, each tape - another 4 identical strips, without cutting to the end. Then weave the straps (see fig. Right), and from the straps weave / Tkut rug based on the sheet, like "Babushkin" denim carpet. The finished mat is obtained respectable: double texture speaks of a high class of work.
Note: Sometimes whole rugs flew in the same technique, cutting the blank immediately until the end of 8, 16, 32, 64, etc. narrow strips. But due to the displacement of ribbon transitions, the carpet is or oblique, or with a zigzag edge, depending on how to weave the neighboring four, one in one or mirrored.
The question arises here: how to cut thin fabric On ribbons the same width, the more narrow? For this, the workpiece (and then - wide ribbons) are folded by the harmonica, roll up (it does not hurt it) and pinch the clothespins. Next, we gradually cut through everything at once, starting from the end, and the clothespins are removed as cutting.
Braided mats
Mat mats from the rope are distinguished by enviable resistance and durability. It looks good too. Used mainly as bedside and desktop, because The length of them is 40-45 rope diameters, and the width is approximately 1.25-1.5 times less. Materials other than rope, no need for special experience. Weaving schemes of rope mats are given in Fig. At the heart of the first, pos. 1-5 - the usual direct node. Woven with one end (running) in 5 passes. The rope will require 35-37 length of the rug, i.e. 1200-1500 of its (rope) diameters. Not scary, in meters it will be released 13-17 m.

Sea rug (pos. A-F) is named because it was an indispensable affiliation of a sailor of the star of old times. On a sailing fleet, the sailor who does not know how to make himself a suspension bed-hammock and weave to her a set of mat for the legs, was considered Salagood, in spite of any merit and service. Sea rug knit in 3 passage by weight. Rope (approx. 20% longer than for before. The same length) bend in half and weave 2nd ends. The sea rug is already longer, weaving it more often and smaller. By labor intensity, the same as before., Because It is not necessary to parse 5, and 3 end.
A variety of rope rugs, woven based on the same or other flat nodes, data from the samples is not limited, pos. 1-3 on the trail. Fig. But this is a work much more difficult, to stop on the details of which there is no possibility. As for carpets from rope decorative elements (brandenburov, etc.), found on the woven base (pos. 4) or glued from a solid piece of rope, pos. 5, even strength and resilience, these products are rather decorative than for everyday use.

We try to weave ...
For the manufacture of small, approx. Up to 40 cm long, woven rug made of threads, yarn or plants / harnesses at first and the ribs are not needed. It is enough will be a rectangular piece of cardboard and a dining room fork. The fork immediately pump holes for the base: along the short edges of the cardboard "machine" are drawn, at a distance of 3-5 cm from it, lines. The fork pierce the first 4 holes along the line, then the plug is shifted by 3 teeth to fall into the already punctured last hole, 3 more holes are poured, etc. Cardboard cut the holes; The filament of the foundations are carried out whole, shifting loop under the edge petals - "slices". Free left the ends of the formation of approx. 10 cm.
Note: It is not necessary to take a cardboard longer than 40 cm, in the work it will drive under the tension of the threads.
Then Tkem, as usual, pos. 1-2 fig., Only instead of a shuttle will have to take advantage of the Gypsy needle; The shuttle will not pass between cardboard and cloth. After spending 4-10 yarns, looking at her smoothness, hacking the cloth with the same fork, pos. 3. The ducks are wondering the obviously with an excess, because The missing thread is suggested from the offline, which in this case is not available.

Further, the ends of OK are left for the duck stranded. 10 cm and glued to the "mill" scotch, pos. 4. When the entire base of the zatkin, they are conducted by a needle at least 8-10 transitions of the duck from the inside on the face, pos. 5, and cut off.
The next stage - one of the ends of the foundations, we remove it from the petals of 3-4 her loops and bring them a free end in them, pos. 6. Tighten a bit, but "Tail" yet do not cut! The same is done with the other end of the filament of the foundation.
Now the foundation can be reset from the "peels" completely. Making a rug approx. For a day on a flat smooth surface for fabric self-realty, under the action of residual stresses in the threads. If the loops of the foundation after that have not yet dragged out completely, the rug is smoothed, tighten, shook until they delay. Now you can trim the "tails" of the foundation - the product is ready for use!
Such a way can be weave and rugs from yarn residues or patchworks from ribbon / harness (remember - jeans, tights, rags?) Those and other materials can be used together, but the base and ducks must be homogeneous. They are recruited from individual threads / ribbons fixed by nodules to the left in Fig. It remains to decide how to connect the threads / tapes, the lengths of which are not enough, or to output the pattern. As for the threads, then on the cardboard "machine" - no way, you need to take one-piece. A 2 methods of connecting tapes are shown there in the center and on the right. First you can connect ribbons very short, but the joke will be visible. The second joint is invisible, but the ends of the ends are needed from 4-5 cm.

... and knit
Carpets, as already mentioned, knit crochet. This is generally not easier than knitting, only the properties of finished products differ somewhat. Rugs for crochet mats on the Internet there are many, but beginners to at least figure out legend symbols Loops and operations would have to learn too much the volume of the educational material. Therefore, let's start with the Azov.
How the first loop is done when crocheted, shown on the left in Fig. This is already enough to pass the loop in the looping, impose a braids for a flavored rug. And on the right there is given how to encourage the next row to the previous one.

This can already make a shaft rug, even round, see another video:
Video: Knitting a round rug
Here and experienced mastering It happens, the problem arises: it has tied exactly according to the scheme from the recommended material, and he took and depicted the hump (cap, dome). The fact is that increase the length of the external rows, conducting 2 of their loops in one previous, you can only with an integer loop. It can not be irrational as π. In accuracy, the length of a number of experienced knitters is adjusted automatically, grieving loops. But man is not a robot, all the skills are different. The scheme developed by someone under his hands may not be quite true for the other.
However, it is not necessary to dissolve the finished rug and blame it, and there will be no sense. If he came out not quite similar to the Schute Cap, it can be aligned according to the following instruction:
- Cooking for soaking water I'm joking, 55-60 degrees (hand crashes);
- Divorce in it PVA at the rate of 1.5-2 tbsp. spoons on 10 l;
- Machine the rug, not migrated;
- While mocking, we prepare a solid smooth moisture resistant substrate. Ideal - a piece of plywood, covered with plastic film in 2-4 layers;
- When the water cools up to a little warm (32-35 degrees), remove the rug and lay out on the substrate for drying. Keep in water while it does not cool at all, do not, the effect will disappear;
- If the substrate is plywood or wooden, additionally celve the rug with stationery buttons;
- In full drying, the rug associated with the proven scheme is necessarily leveled. No - look for flaws in your work. An insignificant impurity of PVA dissolve the product does not hurt.
This method of molding woven products came up with Soviet Fanswer and Cechoviki-undergrounders to "self-" jeans to make standing as "firm". Then he was taken to armared and lovers of knitting. There are no long-quality jeans for a long time, but PVA seems to be not spoiled ...
More about round rugs
Round Rugs from Loskutkov on aesthetics can be excellent and even outstanding, see fig.

They do not necessarily need to be defined. First, they can be sewed, as described above, on a rough-textile basis of woven or knitted pigs (in this case, only from pigs), spirals. But the strength and durability will be no higher than that of other coats of carpets.

The second method is weaving radial-based braids from the rope on the hoop for Hula-Hup, see fig. On the right, it gives a good product, but "Blyamba" in the center is a rather difficult problem, as a result of which this technique is rarely used.
Very beautiful and pretty durable round rugs, and patchwork shied, obtained in t. Naz. Technique Patchwork. The essence of it is that the patchwork parts are stitched into fragments of the pattern, which are silent on the griming base, see the plot:
Video: Mat for a house in Patchwork Patchwork
Fluffy grass
Real patterned darous carpets - the topic is immense, like the whole history of the rowing. But make a small simple rug grass at home will not be a lot of work. The first method is the knitting knot to the construction grid. Propylene (this plastic is practically not electrified) or a kapron fluffy rope allows you to get a pile of up to 5 and even 10 cm, pos. 1 on the trail. Fig.
If you want not herbs, but something like a thick planted salad, a fluffy rug can be imposed of squeaks. In this case, that the pile to fall down, the patchwork takes the sewing so that the nodes slightly cut the mesh cells, and knit in checkers, pos. 2.

In the other case, if there is a pattern, it is drawn in advance on the grid, pos. 3. Knit a simple bayonet knots. This node is very reliable, it does not feel barefoot and easily knits both manually and hook, pos. 4 and 5.
The second way, firstly, gives a padding pad, which can be collapsed with a tube and wash in the car. Secondly, from ordinary knitting yarn it turns out a dense not falling pile up to 7 cm high. How such a rug is made, it is clear from the pos. 6-9. The width of the cardboard mandrel for the pumping of the pile stripes - at its desired height. Finished bands are attached to a huge basis.
Some explanations, however, will be needed by pos. 6 and 9. If shifting after the midwife is assumed, it is assumed not immediately, then leapting the undisputed edge of the obsession is needed to be a 1-complete and 3/4 half-eight, which is T. Naz. Eight 7/4. As it is done, shown in pos. 10. The number of turns in one grab is not necessarily 4, it can be 10 or more, depending on the smoothness of the yarn. What she is a hair, the more turns of one loop of the eight can be grabbed. Sourling the stripe can be lying in the dresser anywhere, without sprawling.
With the final sewing, the first pile strip is attached to whether to connect. Then its threads are flexing in a non-working side and admonish the following as close as possible, etc. The edge of the base in the finished rug will be a little peek, so it is trimmed with a braid.
Pomponov rug
It's time to remember both of such pretty, soft and original rugs from pomponov. They are made as in before. Case: Pompons are tied to the construction grid or sewn to a mater-based basis. But how to make the most pompons? Many identical or specified sizes, beautiful, neat?
Search drawings and descriptions of certain devices or machines for making pumps, as they advise in some sources, do not. Excellent pumps are obtained as shown in Fig. "Technological equipment" from a pair of cardboard cutting reusable; For a whole carpet from pompons, in any case, enough.

Pompons can be multi-colored if there is a hive from the threads of different colors, only the same thickness. Somehow it is not necessary to connect the ends of the threads, all the same because it will be cut.
And if you want the pumps to be smooth? Also without any problems: we take a piece of syntheps or fleece, fermenting in a lump, we are tightening with a suitable cloth and tighten the tail of the tail. The fabric, by the way, maybe silk: Sintepon and fleece have antistatic properties and take electric charges.
Video: Pomponov rug do it yourself - master class
Video: Alternative Pomponov Mat Production
Where and how is plastic good?
Lovers of plastic film make sometimes mats, amazing appearance and subtleties of work. But it is impossible to recommend them for residential premises. In dry rooms, plastic is easily electrified, but, say, water in the bathroom in its folds. What is there for the living community soon forms, it is better not to watch the microscope. Especially familiar with the beginning of microbiology.
Plastic film mats can find other use, for example. As arrogant and / or street at the cottage. Properly made rug from polyethylene packages Removes dirt from shoes, although not as good as special cleaning coatings. Cleaning it comes down to drying and shaking, the material is worth a penny, and you can make a new such rug in 10-30 minutes as follows:

- The package is folded into a flat roll and tested; It can also be harnessed from the film, pos. 1 in fig;
- The harness is tightly tightened, the edges of the package are trimmed, pos. 2;
- Working with hands flies, pos. 3;
- Several blanks are associated in the likeness of Pompon, pos. four;
- If the pompon diameter (20-35 cm, depending on which sizes, packets are taken) are minor, they are somewhat connected together or tied to the construction grid.
Rug from ... Stone

Stone mats are original, see fig. Right, and massage the feet. True, stand bare feet on cold kamen is not always nice, but these are still Polbie. The main thing is to find in nature how much you need equal in the thickness of smoothly returned nakeds simply unrealisticly, but to buy an unrealistic expensive choice.
In all respects, it is better a natural stone rug from substitutes of a rounded pebble from polymer clay (plastics, cold porcelain). Do polymer clay Its hands can be at home in the kitchen; Source materials (starch, PVA) are inexpensive. One break (reversals) is enough for 1-3 pebble, depending on their size, and you can simulate not only the bulgo, but also many semi-precious stones, see Fig: Selenite, Nephritis, Amazonite, Yashma, Onyx, Cherdelik, Agat, even lagish , Malachite, Heliotrop and Charoit. A rug made of gems, which also legs no feet - who will say that it's not cool?

The use of plastics for the manufacture of rugs under the stone has, compared with its other applications, some features:
- Prepare a substrate - a solid shield covered with a film.
- The substrate is placed on the basis of the rug from the construction grid.
- Capacities (vessels) are also prepared for ripening the total volume mass, knowingly greasy than the total volume of stones, in an amount equal to the number of colors used.
- The mass of the required colors is preparing quickly to ripe it together at about one time. Each color rushes in its separate dish.
- Immediately at the time of ripening the mass, without shutting it on storage, they make stones and put on the basis of the rug, slightly adding to the grid in them. It is necessary to do it in fairly thick latex gloves so that the stones do not remain traces of palms and fingerprints.
- After 2-3 hours, when the crusts will sleep on the stones, they are altured in height, pressing protruding. Carefully, so that thin still the crust is cracked!
- Move the substrate-pallet for drying into a warm dry privided place.
- Dry to complete drying, based on the speed of complete rejection of 2 mm per day.
- Almost already the finished rug carefully turn over. Dumping stones (rarely, but happens) PVA is lined.
- On the crossing of the grid, which come on the stones, let 1-2 drops of PVA from the medical syringe without a needle.
- Dry 2-3 days, and the rug is ready.
So what is next?
Walking at all times in all peoples, with any political strict economic system, there was a highly profitable occupation. Margin (lifting) in 200-300% In this case, the phenomenon is ordinary. But do not hurry to climb into a credit swamp for the purchase of equipment and deployed handicraft production on one theory: the demands of potential buyers to the quality of carpet products are also traditionally high.
To begin with, it will not hurt to see the master class on the manufacture of household carpets.
Video: Making housecloth rugs - master class
Then - to acquire a weaving machine for carpets. Simple and inexpensive, but suitable for the production of product level products. Its basis is a durable bed; Wooden - from a bar from 40x40 or plywood from 20 mm, pos. 1 in fig. If you were lying around somewhere old window frame, carpentry work disappear.

Next - guide sleeves for threads, rings. Here modernity is better than ancient: Stationery-markers with a long neck (pos. 2) - just what is needed. For handicraft work, they, compared to steel and wooden rings, have several advantages:
- Cheap, calculated apart.
- Installed with women's forces. Screw a few hundred steel rings with threads or put as many wooden - work is still ta and for a hardy man, and the buttons in pine ride and a child.
- Easily rearranged, practically not spoiling wood.
- By size, if you stick close to each other, just suitable for textile mats.
- Putting the ring buttons in a checker order, you can give the basis and / or tissue ducks denser, and putting them with intervals - less often.
- When installing the rings from the buttons, the thread and harness or pigtail will be passed as tight in the windows between the necks.
- Smooth slippery neck buttons will ensure uniform tension of the tissue threads.
It is also possible to impose the costly to the manufacture of the machine too: let it make from a wooden (better - oak) bar and cuts of knitting or cycling spokes comb in full width of the window box for packing a duck. In extremes and fork, you can fill, as described above, but with the comb work faster and better.
The following is a shuttle. The fishing shuttle for weaving networks is not suitable, it is designed for rather complex knitting manipulations. With the textile it will have to turn it all the time, and the expenditure loops will drop, making the movement with their fingers, which is very tedious in the difficult weaving work. Calculated and thoughtful fisherman, just tied the network, you can learn from curved hands- "crabs". Smooth shuttle-spool easily dives into a very dense basis, but it also needs to turn over, which slows down work, and for the manufacture you will need high-quality materials and work in metal.
For textile mats, the handmade weaving shuttle of the old sample is best suited. Its drawing is given above for pos. 3. Material - solid wood, plywood, hard plastic 2-4 mm thick. How to make a thread on this shuttle, shown on the pos. 4. Consumables are embarrassed by key loops alternately with one and on the other hand. To remove the next loop, the shuttle is fed, she herself will come down from the keyboard. It is necessary to do it when the shuttle is outside the base.
Finally, bonding new thread To the ending. How to build ribbons and harnesses, said earlier. And the thread is tied up with a simple weaving node, pos. 5. There are other weaving nodes, but for a fairly thick and durable carpet thread, it is the most suitable.
Well, if the matter went, you liked it, and your creations buyers, then you can think about how to make it yourself or order a real weaving machine for carpets.
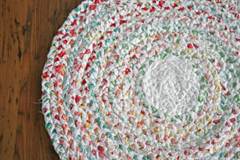
Being visiting your grandmother, you probably saw her small mats made by hand. Our ancestors did not throw out old things, they gave them a second life. Having learned how to weave the rug made of loosets without a hook, you can create it with your own hands. It will become not only the decoration of your home, but also very practical in the use of the thing.
There are quite large hooks for knitting on sale, but such a rug can well do without tools.
Round mat
The easiest option of the rug of flavors - round. For its manufacture you will need:
- Old fabric stuff;
- Scissors;
- Needle;
- Threads.
If you just want to dispose of old things by creating a welcome pad for shoes, you can safely take any tissue. If you have ideas to enter this product in the interior, carefully select the color and texture of the fabric.
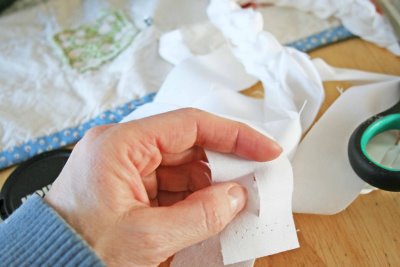
To start, cut the cloth on long flap.
If the fabric is very creepy, it is better to take each strip and remove it, leaving the seam inside. This is a rather time-consuming business, but the product from the treated fabric looks careful and will last longer.
From the resulting tissue segments, brass of the brass are needed. What it will be the tight, the one the resulting mat will be tougher, respectively, if you want a soft rug, then not twist the braid too much.
Build the ends of the pins with a pin.

And start weave.
Having reached the end of the ropes, you need to lengthen them. If you start the nodule, it turns out rude and ugly. There are two options - carefully sew a new end or do on the ends of the cuts of cuts and stretch through the working end an additional rope and its tail to sleep into the cut. Tightenfully tighten, and you will have a long rope without knots or stitching. The whole process is clearly seen in the photo:


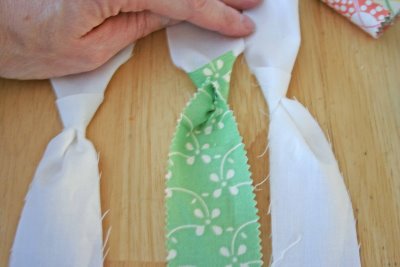
You need to weave enough long pigtail.

Its ends do not yet process, but simply grab them with a pin so that they do not bloom. If in the process of manufacturing the rug you want it to be more, just attach the new sections of the fabric and reach the braid to get the desired diameter of the finished rug.


You can bind the pigtail tape instead of the thread. To do this, you wake it up with zigzag stitches in the side side of the carpet, then in the working thread-pigtail. Tighten the tape, and it will connect the details among themselves.
The edge row of rugs for more strength is better to completely proper or flash thread, then the product will definitely fall apart.

Round rug ready!
Lily bathroom decoration
A comfortable and practical bathroom rug can be made personally. To do this, you will need:
- Old towels;
- Rule and Portnovsky chalk;
- Sewing machine;
- Portnovo scissors.
The process of manufacturing such a rug is not much different from the described above. For a start, cut the towels on long flaps with a width of 4-5 cm.

Connect the first three pieces with a sewing machine. Increasing the "working thread" is also needed using this sewing tool.

When weaving pigtails, raw edges need to be added inside.

In the process of assembly, you need to flash rows by car.

Ward for the bathroom ready! He is very mild and pleasant to the touch, well absorbs moisture and you can wash it.
Woven models
Losktkov mats can be weave using the base. She looks like a small weaving machine. Make a tree frame that will match the size of your carpet. It can be rectangular or square, it all depends on your idea. On the frame you need to fill the carnations at a distance of 2-2.5 cm from each other.

For these purposes, you can use a furniture shield or an old table. Make the machine is easy, and he will last long enough.
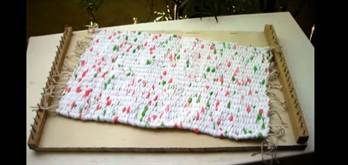
They will strengthen the bases of the base made from the segments of the fabric. On the extreme left thread of the base, strengthen the working thread. It is best to sew it. Pleerate the rug, spending a rope over one base thread and under the other. You can use more complex techniques and weave at once with two working threads. In the process of weaving the fabric you need to constantly sign up so that it is more dense.
Many hostesses love to decorate their home with various products. Made with their own hands, they create an atmosphere of heat, comfort and comfort in winter evenings. A good option Diversify the interior of the apartment, make it elements of the antiquity to it - perform a rug with a crochet of old things, the implementation scheme of which is simple and accessible.
It will be necessary to prepare starting materials. Bear old things. Create T-shirts, dresses, tights, skirts and others made of knitted and synthetic materials. Cut them on the spirals on the stripes, shave in the tangle.
The width of the strip depends on the density of the material. What he is thinner, the wider sliced \u200b\u200bstrips.
Prepare 8.5-10 size hook. It will be wonderful if the girls turn out multicolored.
How to Tie a Round Mat: Scheme
The main rule is compliance with the principle of circular knitting.
Type 3 in. P., Connect them into the ring. The first row shoulder 6 columns without Nakid. In each next row, it is necessary to evenly add 6 columns. In the finished form, the product will be smooth, without convexities and distortions. Knock the rug before necessary sizes.
For a better understanding of the knitting scheme:

To get a more spectacular rug with a convex relief, follow the stepship. Only pillars check, picing the back wall of the loop

Knit pentagon rug according to the scheme
When knitting such a rug is better to use soft knitted things. It is necessary to start with the confusion of a circle of 5 loops. In 1 row - 3 air loops, 2 columns with one nakid in the first loop of the lower row, 2 V. p., * 3 columns with Nakid, 2 V. P. * Schema between the asterisks to execute 5 times. In 2 row - the same as in the first row. But after 3 columns with a nakid knit 1 air loop and then according to the scheme below.

Knitting rug in a circle is performed until the required size. Each corner of the stars is applied separately.
How to make a knitting thread from unnecessary things
In order to get long strips, cut the T-shirt from the bottom up the helix. Immediately wind in the ball so that the "threads" are not confused.
Short strips are simply connected. Return from the edge of 1.5 centimeters, care each strip.

Align two strips so that their slots coincided.

The other end of the upper strip will skip the bottom through the combined slits and pull out. As a result, you will get a nodule.

In this way, you can bore all strips when the product is unsolved.
Rug in the form of a track for the corridor
Looking at the master class to knit rug, from old things you can make it easy to make a beautiful carpet, which is convenient and practical for the corridor.
Cut on strips old T-shirts, T-shirts, skirts. Soak them in the clusters. Better if they are different colors.
Perform a chain out air loops Equal width of the future rug. Next, knit loops with one nakid


When one tangle is over, connect the other. Tips Sweep thread.

The track fit rectangular shapeTherefore, the cloth when knitting will need to turn over.

If the threads did not have enough, cut the strips of the desired width.

As a result of creativity, there is a beautiful walkway for the balcony, cottage or corridor.

Using weaving
Prepare a frame to the size of the future carpet product, recreate the carnations on the two opposite sides. Distance Set 2.5-3 centimeters from each other.
Learn how to the rug from old things with your own hands, the following instruction will help.
Tension strips of material. It is advisable to take it colorless shades. It will be the basis.

Strips stretch at first above the thread, then under it.

At the end of the row, stretch the strip under the filament of the base and move in the opposite direction.

During weaving the rug, sometimes shift ready-made rows to primary row. At the end of the work, all the nodules hide on pour park. Now ready product You can remove from the frame.
We work with nodules
The sliced \u200b\u200bstrips from old T-shirts with a length of about 12-15 centimeters are taken as a basis. Stripeds will need quite a lot. Now they need to rinse in washing machine. As a result, twisted strips are obtained, from which the rug is made.
Put the mesh for the carpet on the table, cut the strip from the bottom. Tolstick pull both ends of the strip and tight them with a silent knot on one side. Now tie the next strip. It is advisable to start from the center of the grid, gradually moving around in a circle to its edges.

Nature rugs can be made of different shapes and color shades.
Round rug from unnecessary things
To better figure out how to tie the rug from old things, learn the following instructions.
Preload unnecessary knitted things on strips 3 centimeters wide.
To the rug turned out to be smooth and beautiful, try the strips to make the same width.
Material use different colors.

Make a loop, get a hook in it.


Check a few loops to get a little pigtail.


The loops are connected in the circle.


Check the air loop.

Hook to grind in a circle loop, picker thread and stretch it through two loops.


Tie on such a scheme the rug of the desired size. On the contour of the finished rug, make a fringe.

Tip: While the raised circle is small, air loops do before each loop.
Master Class