
And decorate your house or tree with them.
You can also use these crafts to decorate gifts, for loved ones, or as a separate gift from children.
Here are just a small part of the crafts that you can do with your own hands from beads and beads.
How to make Christmas toys from beads
You will need:
Fine wire (flower wire can be used)
Nippers
1. Prepare a long thin wire and start stringing beads of different colors, sizes and shapes on it.
2. Inflate the balloon to the size you want.

3. Start wrapping the bead wire around the ball. You can leave a lot of wire at the end to make a crochet hook, or you can use all the wire and add some string or ribbon to hang the toy on the tree.
* You can gradually add beads as you wrap the bead.

4. While wrapping the wire, try to twist it in the same place so that after removing the ball, the wire does not creep apart (this is why we advise you to make a hook).
* Do not wrap the balloon too tightly so that it does not burst.

5. When you have wrapped the whole ball, make a hook from the rest of the wire and cut off the excess.

6. Blow off the balloon and you will have a beautiful christmas ball from beads.

Christmas decorations from beads: herringbone for herringbone

You will need:
Wire (thick and thin enough to string beads on) or a thin brush
Beads and beads of different colors and shapes
Cone (you can do it yourself from cardboard) - not necessary

1. Prepare the cone and wrap the wire in a spiral pattern.If you do not want to make a cone, you can twist the wire with beads into a spiral and then pull one end of the wire (central) to make a herringbone.
2. Bend the ends of the wire to prevent the beads from falling out.
3. Start stringing beads and / or beads on it.


4. You can add braid and thread to hang the decoration on the tree.
5. Pull on one end of the wire to straighten the tree.


New Year's toys from beads (master class, schemes): mini-wreath

You will need:
Thin wire
Beads of 3 colors
Pliers (to make it easier to twist the wire)
Nippers
PVA glue (if necessary)
1. Prepare a thin wire and wrap it around three fingers several times. Twist the ends.


2. Cut three pieces of wire of equal length - in this example, each is 45 cm long. Twist the ends of the wires from one side.

3. From the back side, start stringing beads - one color for each wire. The beads should cover each wire by 30 cm.


4. Start braiding with three beaded wires.


6. Use wire cutters to remove excess wire.
7. Tie a string to the point where the ends of the wire are attached and tie it so that you can hang the mini-wreath.

8. If you wish, you can make a bow from a separate tape and glue or sew it to the already attached tape.
9. Using PVA glue, the braid can be better fixed on the wreath, but this is not necessary.

New Year bead patterns: bead snowflake (photo)


New Year beadwork: Christmas tree

You will need:
Beads and beads
Wire
Pliers
Nippers
* Use silver wire to make a white tree, and copper wire for green.
* Such a small Christmas tree is woven using the "twist loops" technique. Quite simple, but this technique takes a lot of free time.

Each loop contains 6 green and 2 golden beads. To make it, dial the beads in the following sequence: 3 green, 2 gold and 3 green. After that, twist the wire and repeat until you collect the required number of blanks.

* From the top to the base, the branch becomes larger, as well as the number of loops.
* When you have created the required number of branches, start attaching them to the stem in a circle.


How to make a Christmas tree out of beads (video)
DIY beaded Christmas products: balls made of beads and lace

You will need:
Plastic bag
Sequins
Tulle or lace (organza or opaque fabric is an alternative)

1. Take plastic bag and crumple it up to form a ball.
2. Wind the threads around the crumpled bag. You will get a more or less even ball.
Christmas tree made of beads Is excellent christmas craft, which is created to decorate the interior during winter holidays... If you have not yet mastered all the subtleties of beading, then do not worry - we will show you how you can create the simplest Christmas tree. But, of course, and experienced craftswomen will find something interesting for themselves in our selection.
Christmas tree made of beads for beginners - master class
If you do not know how to weave from beads, you can still please yourself and your household with a wonderful craft. The principle of making such a Christmas tree is extremely simple, but the result is a rather spectacular Christmas tree.So, you need to take several ordinary sewing pins (you can buy them at a sewing store) and string several large beads on them. The material should not only be green - it can be red, yellow or blue. The amount of material to be strung on can be arbitrary, the most important thing is that one part of the pin is completely filled. Prepare 5 of these filled pins for the first tier of the tree and 8 for the second.
Take a red ribbon (the toy will then hang on it) and fix 5 pins on it, tighten and form a triangle. In order to fix such a triangular position, you will need to use a decorative star - it will at the same time be the main decoration for the upper part.
Take a small piece of wire and attach it to the bottom of the first pin of the first tier, then start forming the second tier, gradually attaching the rest of the pins, alternating with large green beads. In order for the lower tier to turn out flatter, you should fasten large green beads. Now I'm ready tree made of beads - beginners they can easily repeat this master class.
Christmas tree made of beads - master class
A coniferous tree with golden cones will become a real interior decoration on the eve of the winter holidays. To create a craft, the first thing you should do is to weave a lot of blank legs, which consist of three loops. One loop should contain 9 beads. Weave also 60 pieces of blanks of golden cones.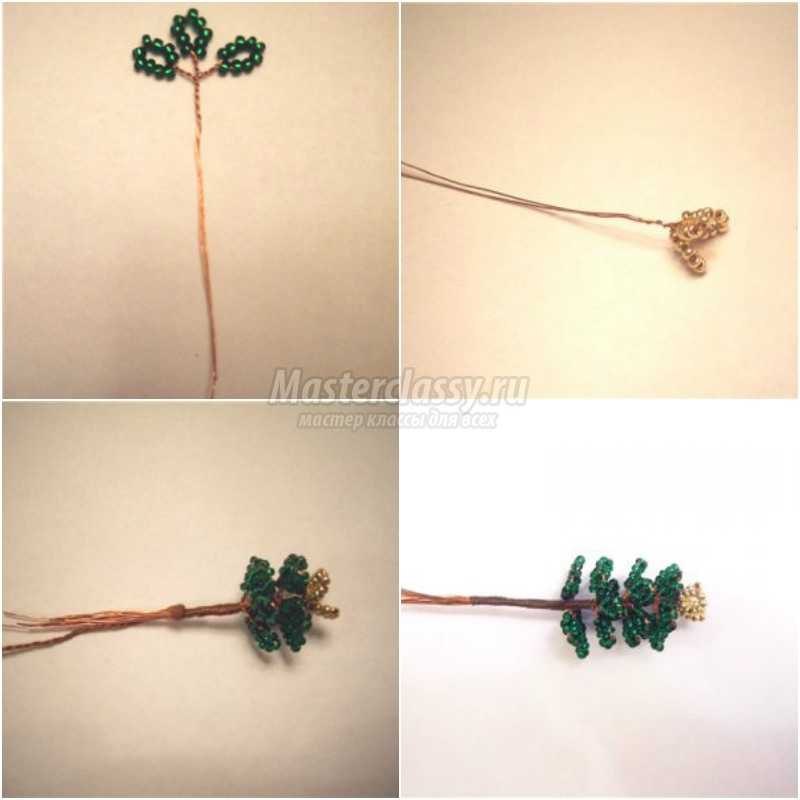
Now start shaping the crown. Weave a 15-piece apical loop. beads, surround it with exactly the same loops in the amount of three pieces. Go down below and attach 8 greenish blank branches. As a result of your work, you have 4 tiers, it remains only to attach 3 branches and the crown is ready.
Add 4 more pieces of sturdy wire to the free ends of the wire to serve as the base for the trunk and roots.
Take the blank of the golden cone and screw 4 greenish branches to it in pairs, then wrap it with thread. Make more heels of the same blanks and screw them three in a row to the crown. For the next couple of rows, six branches should also be made, but each of them should have 6 green legs.

Do not forget that every time you attach the workpieces to the barrel, you need to tighten them with a thread.
Pour gypsum into a beautiful planter and place it in it, securing the bent wire roots. Dry and then coat the surface of the plaster with glue - this will help to fix the shiny decor.
Christmas tree made of beads - master class, photo
The creation of a Christmas tree candlestick can be called a real New Year's magic. Just think how beautiful such a figurine will look on festive table! In addition, such a beautiful souvenir can be presented to relatives or friends.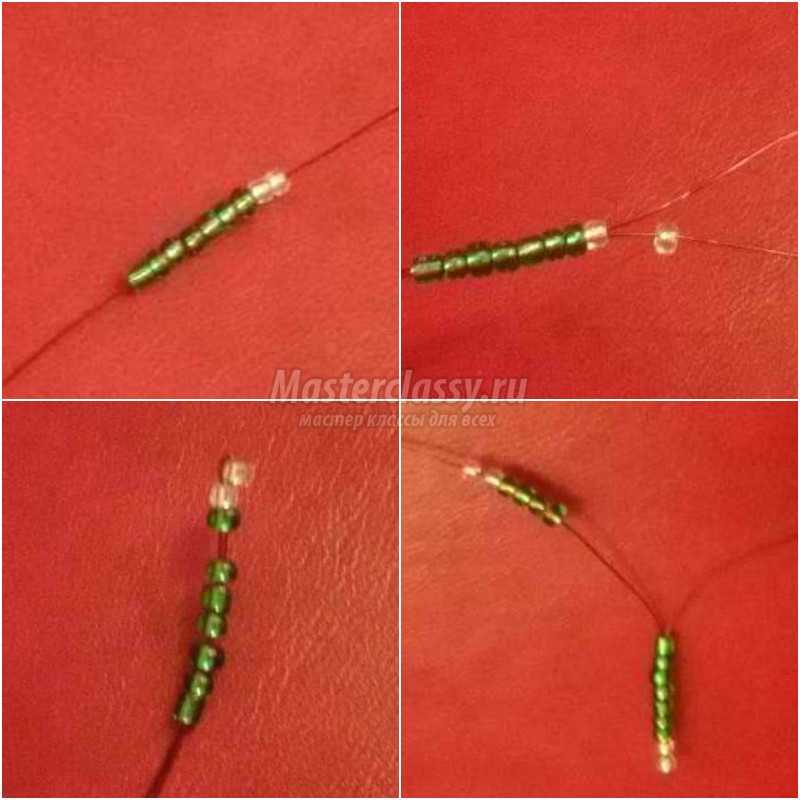
Weaving should start from the top. To create the top needle, 7 green and 2 white beads should be put on a thin wire. Pass the end of the wire back from the white side, skipping the very first one. Pull up the beads and we can state that the upper needle is ready.
Go to the manufacture of side: string, guided by the photo, 4 green and 2 white. Pull them tightly to the base and re-thread the end of the wire, excluding the first round. You have got the first side needle, using the same manipulations, type the second side needle, then the third and fourth in turn - the result should be a cute twig.
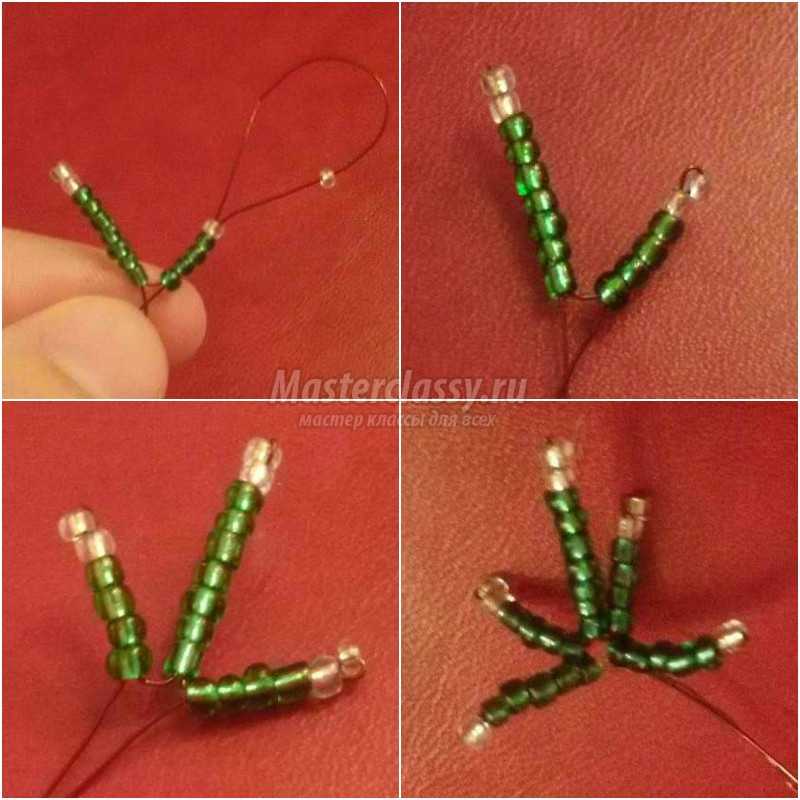
Put 3 more beads on the trunk and repeat everything a couple of times to make 2 more circles of side needles come out - as a result, you will have a top with an upper needle, as well as three side circles with an interval of 3 beads on the trunk.
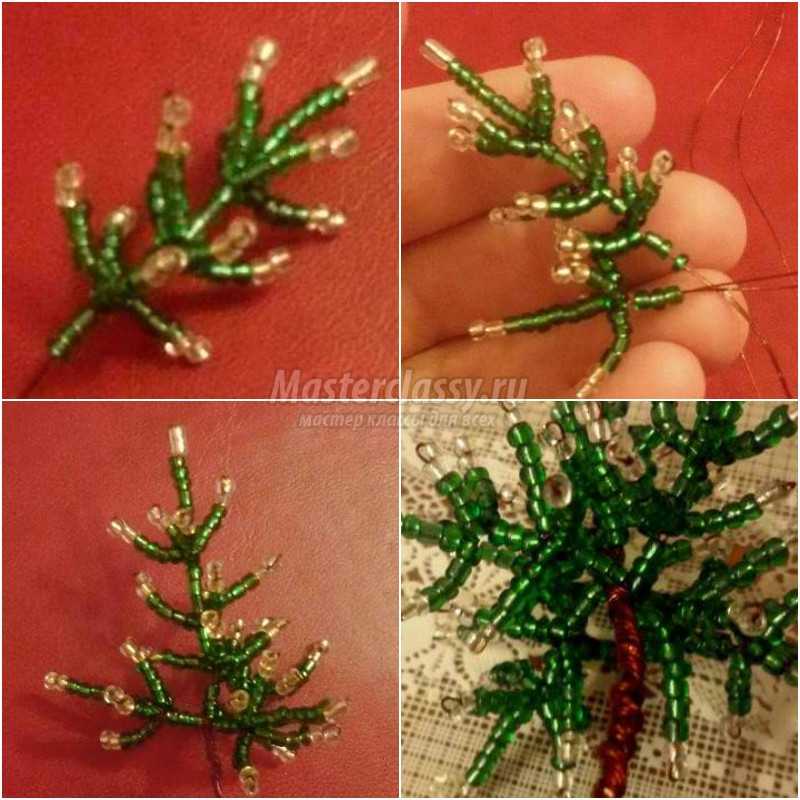
We can congratulate you - you have mastered the method of the needle technique, using it, make 3 identical branches, consisting of the upper needle, as well as a number of side ones. They will need to be attached to the top, attach from the side, tighten the beads on the barrel and twist the wire pieces together, while twisting the wire tight enough to cut the barrel hard and strong. Add a couple more "Christmas tree legs" in the same way.
The blanks for the fourth tier will simply be one row longer, and for the fifth they will be exactly the same as for the fourth, but only 2 pieces of them should be made, and then connected in pairs. So your wonderful is ready, but now you need to worry about creating a decent stand.
In order not to stain the fluffy figurine, it is necessary to wrap it in cling film or foil. Dilute gypsum (or alabaster) to a state of thin sour cream with ordinary water (pour gypsum into the water). Pour the diluted gypsum into a suitable mold. Twist the wire tail of the craft into a loop and quickly put it in the mass, put also a tea candle next to it.
Then comes the moment of decoration - the delivery itself can be painted in any color, decorated with beautiful rhinestones. Well, now in new year's eve you can put a wonderful craft on the table, light a candle and enjoy the beauty.
Christmas tree made of beads - photo:

You will find many beaded Christmas trees, be sure to use them in your work.
Christmas tree made of beads - step-by-step master class
Cutting beads are also perfect for needlework; no less beautiful products will be obtained from this material.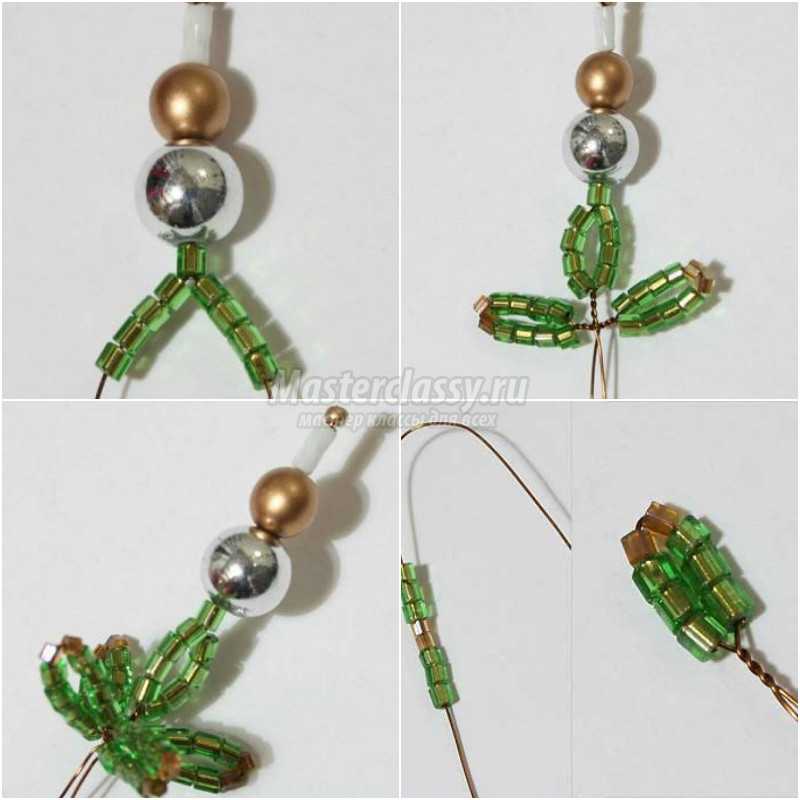
So, the work will start with the manufacture of the top. You need to cut a piece of wire 45 cm long (the wire should be copper or just brown). In the middle of the piece, string a golden bead, followed by a sequence of white bugles, gold and silver large bead, as well as a green bead-cut. Pass the second wire tip through this entire dialed sequence. Cast on 4 light green cuttings for each tip.
Then twist both wire ends together 3-4 turns, at each end add 4 green-2 brown-4 green chops, and loop. Twist the ends by 2 turns, and then again make 2 exactly the same loops - you get the first tier.
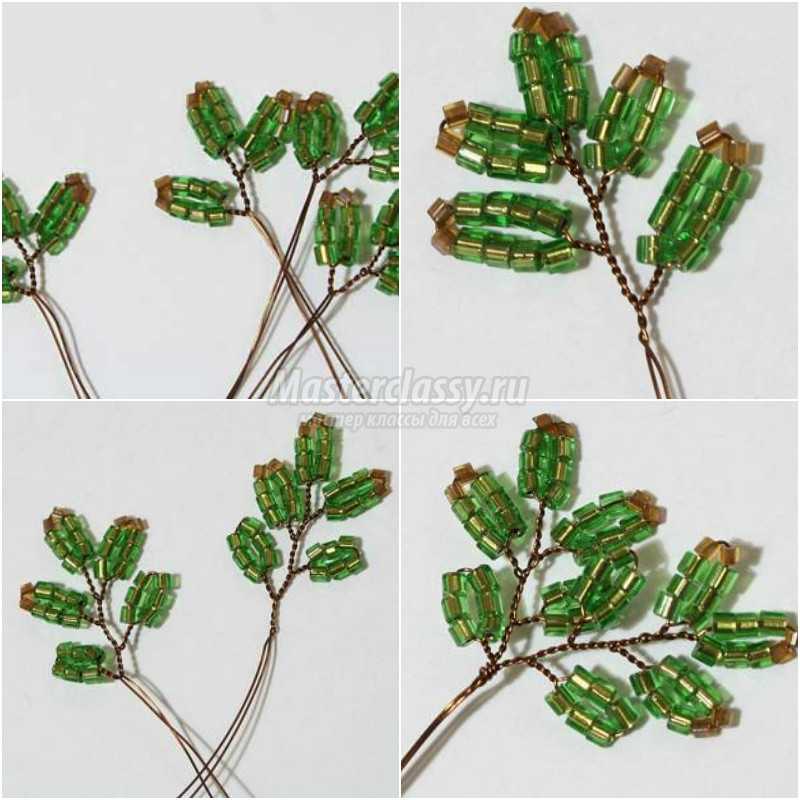
Go to the creation of the second tier - for this you need to cut off 4 wire pieces, the length of each should be 25 cm.Transform them into 4 branches, each of which should contain 3 loops, which should be recruited as follows: 3 green-2 brown-3 green ... Twist the wire from the loop to the loop 4-5 turns, from the last loop 3 turns.
For the third tier, you will already need 4 wire pieces 30 cm long, you will get branches of 5 loops, the first 3 will be done, as for the second tier, and in the next 3 green ones together, you should type 4.
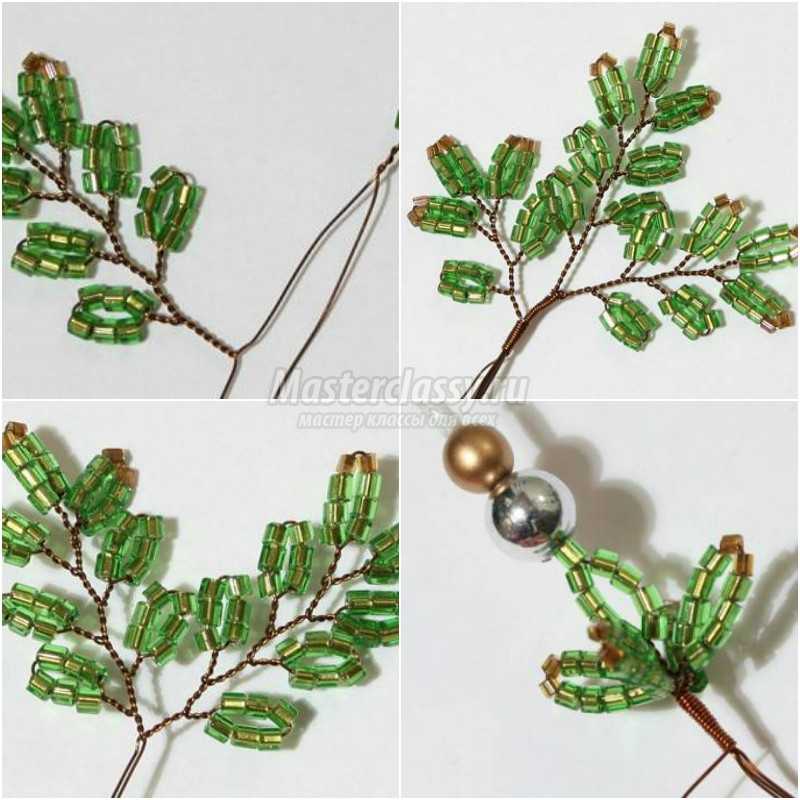
For tier 4, you cannot do without 8 pieces of wire, their length will still be the same - 30 cm.Each branch will have 5 loops: the first 3 do exactly the same as for the second tier, in the next 2, dial 6 light green. Place these blanks in pairs, screwing them 3-4 turns with a spiral.
For the 5th tier, prepare 4 pieces of wire 35 cm long, i.e. you will have 4 blanks with 7 loops each. The last 4 should be different - in them type only 6 pieces of green cabin.
Start the 6th tier in the same way as the fourth, but collect the blanks together differently. Cut an additional piece of 20 cm. From the last loop, wind 12 turns with a spiral with this additional piece, then attach the second workpiece to 15 spiral turns.
7th tier: prepare 4 pieces of 60 cm each. In the middle of the wire, make the first loop, then dial 6 more pieces, as in the sixth tier, while the second wire end should remain long. After the last loop, twist 7 turns. At the long end, also twist 7 loops. Using an extra piece of wire, twist the twig down 8 turns in a spiral.
For the 9th, repeat the same as for the eighth, only the number of turns should be 18.
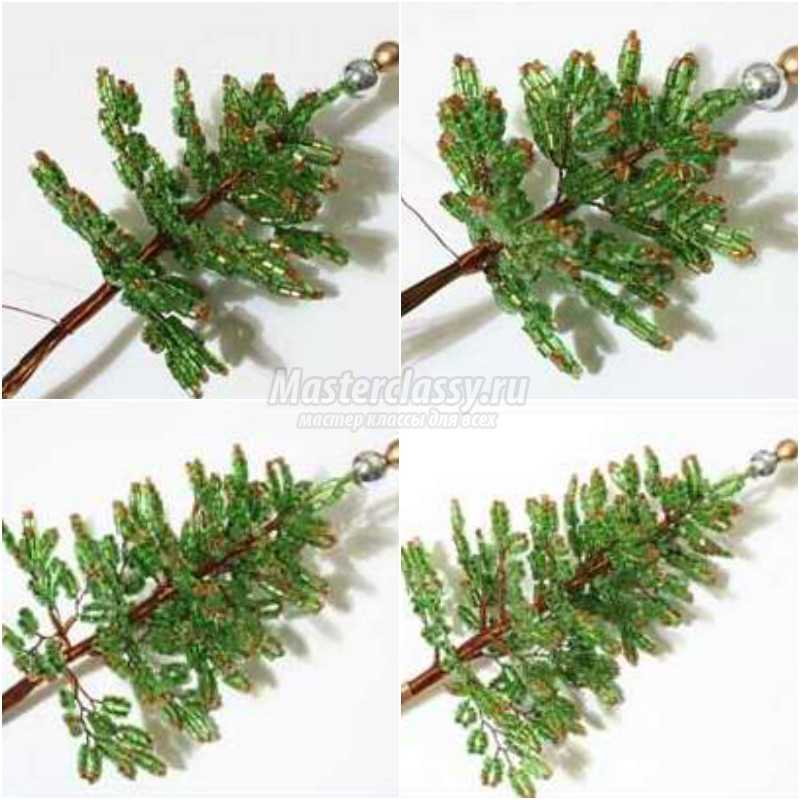
For the 10th tier - 4 x 70 cm, 4 x 35 cm. The large branch should have 8 and 9 loops, the small one - 7, spiral turns - 22. Guided by the photo, collect the tree.

Never before has a toy looked so natural. These little fluffy Christmas trees made of beads with a touch of white snow on the tips of their green paws makes you want to sniff. Alas, they do not smell like pine needles. Crafts in the form of Christmas trees can be voluminous and flat, decorated bright toys or simply powdered with white snow.
Flat herringbone
I present to you video 1, which shows how to make a beaded Christmas tree with your own hands, which can be hung on a real tree as a decoration or decorated as a keychain. The weaving pattern is pretty simple. A master class on making a Christmas tree from beads is shown in detail and clearly. Even a novice master can weave a flat herringbone.
Earrings made of beads and Czech stone
In video 2, you can watch a master class for weaving with your own hands earrings made of Czech stone and beads in the form of a New Year tree. The earrings look so elegant and original that they just need to be made in order to put on the most main holiday of the year.
In the same way, you can create a whole set by complementing the earrings with a Christmas tree pendant. Manipulations with a needle look so natural and uncomplicated that it seems as if this work is not at all difficult. This is the case.
Beaded herringbone
In order to do the weaving of a New Year's beauty with your own hands, you will need:
- wire with a diameter of 0.3 mm.
- white beads - 20 g
- green beads - 80 g;
- A master class on creating a Christmas tree begins with weaving a twig. We collect 2 white beads and 7 green beads. Pass the upper end of the wire through the second white bead and all the green ones. One top white bead remains locking. This will be the case on all branches.
- We collect two more white and 9 green ones. We pass it back through the second white and five green beads. We repeat this operation 6-7 times. We knitted the first branch with our own hands. Our beaded Christmas tree will consist of several such branches.

- The first branch, as the diagram shows, will become the top of the tree, and the wire will become its trunk, to which other branches will be attached. For rigidity, you can wrap the barrel with electrical tape.

- The master class ends with the fact that the beaded Christmas tree is installed in a small bucket with cement mortar or other ballast. This tree compares favorably with a real New Year's beauty in that it does not burn and you can safely light candles near it.


Beaded lace tree

Making this craft is fundamentally different from the technologies described above. It consists in the fact that we first collect long beads, and then we begin to weave patterns and lace from them.

Herringbone spiral
To make a master class for such a spiral Christmas tree, we need a special stiff spring wire and large beads. We choose the color according to the picture below: green, red and white.

The weaving itself, as you can see in the photo, is very simple. This is not even weaving, but a simple stringing of beads on the wire in any sequence you like. After fixing the ends of the beads, it is necessary to give them the shape of a conical spiral. Isn't it a Christmas tree?
I always want a holiday and I always want New Year to spend especially, and a cozy and warm atmosphere will help this. For example, you can decorate a house or apartment with a Christmas tree made from beads with your own hands. It will shine during the day and will be a table decoration on a holiday. We will hold a master class on creating a New Year tree from small beads right now!
Here are some examples of beaded Christmas tree weaving patterns:

DIY master class on creating a Christmas tree from beads
This is one of the ways how to do christmas tree for beginners.

We will need the following materials:
- Drill.
- A rod of metal about 0.5 centimeters and 20 in length.
- The base is wooden.
- Nippers or scissors.
- Thin wire.
- Green beads.
 Now let's take a closer look at the manufacturing process.
- First you need to create a base. Take a wooden square for this and make a hole there with a drill. Next, we will drive the rod into the hole. The basis for the future tree is ready.
- In the next step, let's start making branches. First, put 5 beads on a 20 cm piece of wire. Then we pass one end of the wire through four beads, so that the fifth bead is in the loop. This can be seen in the diagram for beginners.
- Divide the wire into two equal ends. Let's do the same on each of them. Pick up five beads and thread the free end through four beads. Let's do this procedure at both ends. It is necessary to twist them a few millimeters. Then we will repeat everything.
- We independently determine the length of the branches. It all depends on your desires. Next, twist the ends of the wire so that there is 1.5 centimeters without beads. Then we attach them to a metal bar. Accordingly, the farther from the top of the tree, the longer it is necessary to create branches and vice versa. The more branches, the more magnificent the Christmas tree.
 General recommendations for making a Christmas tree:
- When choosing beads, you need to pay attention to shining options, because dull beads are not very suitable for this.
- If there is a desire to create a Christmas tree with snow, then it is good to make the first three spines from snow-white beads, and the rest of the twig from green. This Christmas tree will be more elegant.
- You can experiment a little with the color scheme for nice variations. You can make a pink, red or blue herringbone.
- You can even make Santa Claus and Snow Maiden using beads. Small toys are not needed here, because the tree is already quite elegant.
A self-created Christmas tree can be installed on a table, corner or mantelpiece, in an office, on a dressing table, or on a console, whatnot.
Consider the second version of the Christmas tree with a job description
I always want the tree to delight us at home. It is, of course, difficult to grow conifers in a room, but making a herringbone out of beads is completely realistic. Therefore, I propose to independently make a Christmas tree according to the scheme for beginners.
Before starting work, you need to prepare the following materials:
- Small green beads.
- Green bugle.
- Twelve meter wire.
- Pebbles, Christmas decorations from bugles, sand.
Cut two pieces from the wire by a meter, fold them in half and roll up any jointly laid ends.

Insert the four ends through the bead. Now at each end of the wire we will collect five bugles.

Then, at either end of the wire, pick up two bugles and one bead as in the picture above.
 When you have made the required number of these branches, fold them together every centimeter. The base of the wire must be reinforced.
- The classic way is to fill the shape with alabaster and decorate the top with small Christmas tree branches made of beads and bugles.
- The ends of the wires can be attached to the pebble.
- You can use plasticine as a base for a craft.
Another idea for home decoration using the beading technique
To create a Christmas tree, we need brown and green beads, two large beads, brown copper wire... This Christmas tree consists of ten tiers. When creating it, we will be guided by the diagram.

- Cut off a piece of wire 45 centimeters long. Put on a golden bead in the center. Pass the two ends of the wire through two beads and a green bead. We string four green beads on both sides of the wire.
- We twist the wire four turns, string the beads according to the pattern on each side and twist the loops.
- We fix the ends with two turns, create also two more loops.
- Take four pieces of wire, 25 centimeters each, twist four branches with three loops on each and wrap the wire three turns.
- For the next third row, take four wires of 30 centimeters each, create five loops in the same way as in the first tier.
- To create the fourth tier, eight wires of 30 centimeters are needed. We twist two branches together.
- From four pieces of wire, 35 centimeters each, create the fifth tier, seven loops on a branch.
- We create the sixth tier in the same way as the fourth. We collect two branches, cutting off another 20 centimeters of the wire. First, we create 12 curls on one branch, then attach the second branch with 15 turns.
- To create the seventh tier, we cut off four wires of 60 centimeters each. We make the first loop in the center of the wire, then string around it, using one end of the wire, six loops. We also make seven eyelets on the second side.
- For the eighth tier, four pieces of wire of 30 centimeters each and four of 60 centimeters are needed. From the long ones we make twigs, as for the seventh tier, on small pieces we string five loops each. We attach a small 15 turns to a large branch.
- We also create the ninth tier, but only there should be 18 turns.
- For tier 10, take four wires of 70 centimeters and 4 wires of 35 centimeters. We make nine loops on a large branch and seven on a small one.
- With the help of a wire, we compose all the prepared tiers and wrap it with a spiral.
- We place the Christmas tree on the supply.
TO new year holidays everyone strives to decorate the house in any way. Someone buys colorful toys, tinsel, rain, holiday posters and much more. On the eve of December 31, prices may rise and the quantity of goods may decrease. What to do in such cases? Create yourself! Homemade things always looked very stylish and showed what kind of hostess is a needlewoman and craftswoman.
What to make for a house on New Year's Eve?
What is the main attribute of the New Year? Of course, the tree! Now it is clear, we will do it, but how? Beads are an excellent material for the flight of creativity. It can be of a wide variety of colors, sizes, shapes, and with the help of a fishing line or wire, it can be twisted in any direction. Having stopped the choice on the product and material, you should see what the pattern of the beaded Christmas trees is.
They are completely different. It all depends on the desired end result. The product can be flat, voluminous, small, large, one-color, ornamented. In general, the way your imagination will allow you to see it. If imagination doesn't work, don't be discouraged. You will find out about everything. Beading is not difficult, but it requires concentration and attention. A beaded Christmas tree, the weaving pattern of which will be described below, will easily complement the interior of any apartment. It will decorate your room as a whole or a separate corner of it.
- Take half a meter of wire and put 5 brown beads in the middle. Take the same amount and go through the first 5 with the end of the wire.
- Two rows are ready. Use the same principle to make the third one, but with green beads.
- String 8 pieces from both ends. The next row has 18 beads.
- Insert other colors in places: white, red, blue, yellow.
- Continue working, decreasing the row by two beads each time.
- Decrease by only one after 5 rows.
- The last bead is the tip. We make a star on it. The first row - 1, the second - 2, the third - 1 yellow bead.
- Twist and cut the ends.
This pattern of beaded Christmas trees is even simpler than the first one. The size of the product varies depending on the number of beads.

The third option
White beads are added to the materials. Christmas tree from beads, the scheme of which will be described now, has snowy branches. Progress:
- We create each branch separately. We string about 7 green beads on the wire and 3 white ones. Insert the end in the opposite direction into the last bead. You will get a loop. Roll it up.
- Continue doing this for a few more loops.
- Group them into a bunch.
- Take another wire and do the same.
- Make them different sizes.
- Attach bundles from small to large to the main wire-trunk.
- You can weave a star on the top of your head.

How to arrange work?
Attach flat Christmas trees to special fasteners for earrings, brooches, and so on. Volumetric scheme Christmas trees made of beads provides for the creation of a stand. To do this, pour gypsum, puff pastry or glue plasticine into the tray from a flower pot, and insert a tree trunk into it. Place something around so that the tree does not fall while the mass hardens. Glue shiny pebbles, colored beads, bandages, ribbons, whatever you find to the branches. Get creative and complete the product. Such a tree can be used as a holiday gift. In any case, you will get a gorgeous beaded Christmas tree: the pattern of weaving it, as you can see, is extremely simple, and the product is very beautiful!