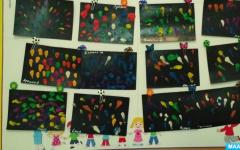
Holiday ... What is it? In the understanding of any person - an adult or child is a gift, a wish, the atmosphere of joy! But in this way you can make any day festive! And to give completely optionally expensive presents - candy is quite suitable. You just need to correctly and unusually practice!
Beautiful made, become a wonderful solution!
And, if you think, the festive reasons in our lives are infinite - then birthdays, then the meeting of the New Year, then March 8, etc. And this means only what to be able to pack gifts is important for everyone!
Especially it becomes noticeable before the New Year holidays. You need to know everyone, but I want everyone to remember this joyful moment for a long time.
Just retracted things will not leave a bright track in mind, they will not be able to create an entourage, and the factory finished packages are not always for the pocket! How to be? It is so cool to delight your loved ones, and a sweet box will definitely help! It is she first that he sees gifted.
So what's the deal? Make yourself - for sweets, small and large things, toys ... In this way, you can give uniquely modest gift.
Tools and materials required for work
To create holiday packages, you will need to purchase:
- Cardboard. It should be very dense, even corrugated, from the boxes from under household appliances.
- Paper. Here the choice is huge - from the usual color to the one that is used in scrapbooking, foil, pastel, bilateral, beer, packaging, etc.
- Whatman. You will be able to apply any drawings and ornaments on it.
- A pack of dense paper napkins with a print suitable on topics.
- Satin ribbons, various braids, shoelaces, bechis, sisal.
- Beads, beads, butchers.
- Malyary and bilateral scotch.
- All kinds of adhesives - from a pencil to a thermoclaus in a pistol. In the arsenal there must be a transparent quick-drying - to decorate boxes by beads.
- Rulers, pencils, circus or round items.
- Punch, Pobbler - for piercing holes in the cardboard.
- Templates of any species and sizes will also be useful in the work.
- Felt sheets, fabric, felt, wool.
- Lurex, sequins.
In general, you can decorate the surface of the box for candies with your own hands as you like - everything depends on your preferences and taste. The only condition will be only that it is necessary to decorate in moderation - sometimes it is better at all anything than too much!
Tips for the manufacture of gift boxes from experienced craftsmen
He, in fact, will be only one: you should not start your first creativity from expensive paper, which you have prepared for your box. Before start with the usual dense - so it will be clear to you, in what places there are cuts, how to better bend, how to collect packaging. It will also become clear whether such such sizes will be suitable for you or it can be somewhat reduced (enlarge) in one place or another.
Simple box in the form of a square or rectangle
This is a universal packaging suitable for any gifts. It is possible to fold everything in it - candy, cookies, soap, decoration, etc. It is natural that the dimensions and design must necessarily comply with the Present. Also orient a gift for the style of events - a romantic date, New Year's Eve, birthday ... You can withstand the postal stylist, wrapped the box in the packaging paper and sticking the brand. Beautifully looks in paper in a small flower - it will create the mood of tenderness. In general, each of yours!
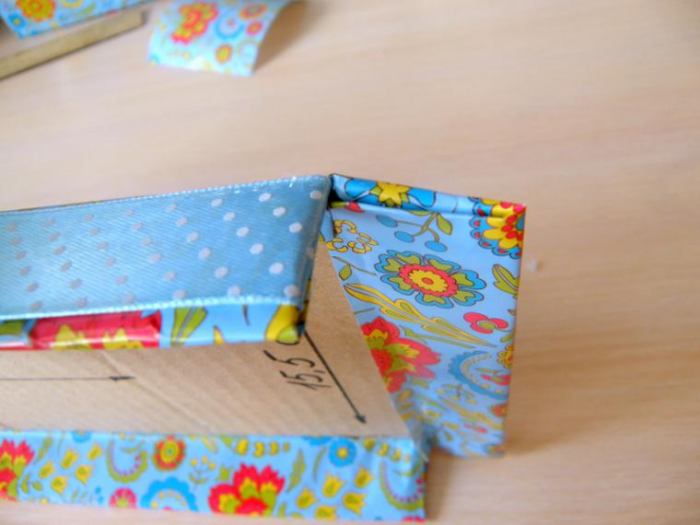
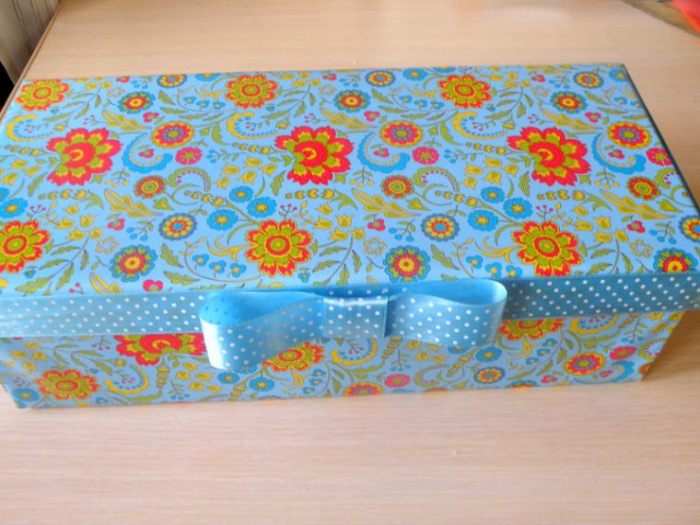
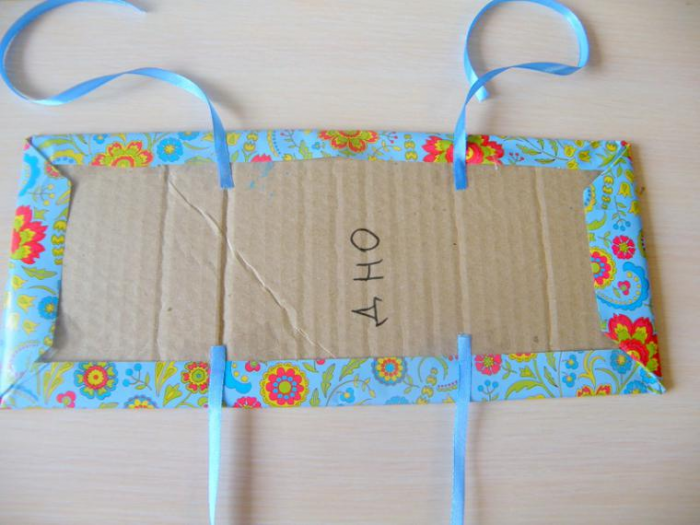
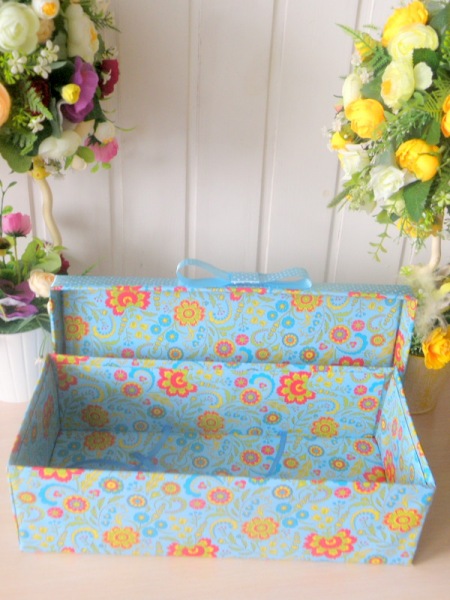
So, create a box for candies with your own hands with the simplest manufacturing technology! In this case, we will not do a separate lid.
First, we decide what size the box we need. Then all drawings do on ordinary paper. Cut and try to bend, estimating the correctness of measurements.
In case of incorrect solution, it is necessary to simply turn the pattern by changing the dimension.
To fit to the required type and come to the final template, we transfer it to the main paper or cardboard. With the help of scissors cut.
All bends we press the stupid narrow item, for example, the ends of the scissors, bend along the resulting groove.
We glue the joints of the joints, we glue two-way tapes, although it is possible to sneak with simple glue - as it is more convenient for you.
All glue and decorate the surface with any remedies.
Ready! Insert the present and tie the ribbon!
Paper Sheet Box in Origami
This gift box is created without any templates, pencils and scissors. For its manufacture, take a simple sheet of cardboard - it's better not the thick of it - and bend the scheme. The lid is done in the same way, only the sheet is taken with the sides of 4-5 mm more.

An important condition here will be only a square form of sheet. Having spent just a few minutes, you will get an excellent and neat box for sweets, with your hands made of cardboard!
Packaging with lids
The necessary toolkit here is common:
- Cardboard sheets.
- Pastel paper segment.
- Lace or twine.
- Scissors with a wavy edge and ordinary.
- Decor - beads, sequins.
- Glue, pencil, banker.
Walls in data boxes double. Dimensions depend on the dimensions of the gift.

There are 2 assembly methods, we will try both. For this, we will do the top and bottom in different ways.
- So, put a gift for cardboard and outline contours. Next, around you draw a detail directly boxes.
- Every line of the fold is consistent, helping yourself a ruler, all bend and sample.
- Corners, bent into the box, cover with another wall and all finally glued.
The plus of this embodiment is that it gives very neat corners. It is not recommended to do very small boxes - double fold gives a rough type of product.
We leave the bottom box for drying, and they themselves will be covered.
It should be more niza, so it is necessary to add 5 mm to each side.
Differences in the assembly are that the angular parts will need to be short. It gives more elegant corners and a light appearance.
The process is similar to the first. When gluing, use glue and clips for fixing double walls.
So - the box is ready, it remains to do decor!
Here are the options unlimited many, depending only from your imagination! You can simply leave the box with beautiful paper, and you can add flowers, beads, lace, etc.
Envelope, Bonbon Room, Case
But is it really necessary to spend precious time for gluing, drying and packaging finish? No, of course! A box for paper is absolutely not necessarily tight. It is important only a beautiful picture.
Similar boxes made of tight paper sheet. The main thing here will be the use of very sharp scissors and the correct bends in the right places.
Let's start!
For example, the envelope is the easiest in the manufacture.

The above pattern is taken to the beautiful double-sided paper and cut out. Now fold on bends and close, having intermitted all the elements with each other or tangle.
Packaging cases look insanely stylish, laconic, suitable to men.

Although brightly decorated excellent and for a female gift!
Bonbonniere - a special box!

Translated from French means "candy". Such boxes to order are quite expensive pleasure! Yes, it and nothing! They are made easily and just do it yourself.
Figure boxes
Such packaging models are better suitable for female presents. But it is not necessary - depending on how to decorate them and what to put inside.
Even after time, this box for sweets, with their hands made of cardboard made, sorry to throw away. They perfectly serve as a box for small items, a case for needlework, etc.
Similar packages are made in the form of hearts, circles, ovals.
Let's try to collect one of the simplest forms yourself.
- The first stage should draw the circumference of the required diameter. We need to cut 6 blanks in the amount of four of the corrugated cardboard and two of the paper. You will also need 3 stripes of thick paper with a length equal to the length of our circles. In the width, they are all different - one is equal to the height of the box, the second is a magnitude of 8-10 mm, and the third is the height of the lid.
- The second stage of gluing 2 circles of corrugated cardboard and on top of the papers.
- Third Stage: The first and second sidewall bands glue with a shift in oblique (diagonally) somewhere on 10 mm.
- Now take the bottom and in a circle glue on it a double cardboard strip, beautiful face up.
- With the lid we do in the same way, gluing the narrow strip.
Superb is suitable such a box for a bouquet of sweets, with your own hands drawn up. Only their sides need to do a little higher than just for candy.

The decoration box is not required, it can be simply tied with a ribbon.
Box in the shape of pieces of cardboard cake
The following packaging option is perfect for the event, on which the present is prepared for each. Several cardboard pieces of cake are perfectly looking together on a dish in the form of a paper cake.
For candies with your own hands in the form of a dessert?
With a circulation or a round item, a plate, for example, draw a circle on a piece of cardboard. Next, we fit the template for the desired size and cut it out.

Below is a template for the manufacture of one piece.

Everything is cut, glued, and then decorated with paper flowers, fruit from felt, beads, etc.
In the same way, you need to create several "pieces", to decorated them and fold them into a whole "cake".
Box - "Cake" from felt and plastic
But this idea is perfectly suitable for indiscer "cake." Such a box for candies is done very quickly.
We need to get a plastic container or another flat container - round, square, figure - no matter.
Felt is also needed, suitable in color, satin ribbons, double-sided tape or glue, sintepon, beads.
From the material, we cut two parts equal to the surface of the container, and two bands - for the box and the lid.
We stick each felt part on the plastic with a scotch or glue, hiding the joints of the junctions with ribbons.
Decorate in the style of confectionery, put candy inside and give!
New Year's box for candies do it yourself
Traditionally, adopted for the new year to give candy. And for the box, do not come up with a better form than a fabulous house!
So, reserve:
- Tolst (about 2.5 mm) cardboard.
- White Watman.
- PVA glue and adhesive gun.
- Stationery knife.
- Scissors.
- Painting scotch tape.
- Tassels.
- Paint white.
- Pencil.
- Decorative napkins in the New Year style.
- Colored paper.
- White cardboard.
- Lace.
- Satin ribbons.
Create a box for candies with your own hands in the form of a house is absolutely simple. Just need to carefully carve out each item, and then collect all together.

For perfectly smooth edges of parts, it is necessary only to the stationery knife. Although if the thickness of the cardboard is less than two millimeters, then you can do alone with one scissors.
When finishing the surfaces, pay attention to the original shades of cardboard - the wall is covered with napkins in the decoupage technique and can remain dark, but on the roof the imitation of snow cover is better before sticking to the napkins to paint it with white acrylic paint or glue Watman.
Interior decoration box-house is done using fabric or multi-colored paper. Superb thin felt looks.
In order to collect the entire design, it is necessary to cut all parts.

Then, with the help of silicone glue, the bottom and sides of the house be bonded, carefully missing each edge and pressing to others, observing the fixation at right angles.
From the inside, everyone is sicking with painting scotch bands, strengthening the entire frame. The inner walls are separated after complete drying of the glue.
At this stage, it will be most convenient to engage in pasting face with napkins.
Very thinly smear PVA glue each wall and apply a layer with a pattern. Everyone is carefully smoothed, not allowing breaks.
We finished with the walls, we begin to engage in the roof. Coloring her paint in white color and glue napkins with snowflakes.
The roof edges decorate a lace strip, beads and artificial snow.
We glue it only on one side of the house, the second part will be used as a box cover.
I smell to the top of the candy - and ready a great gift!
Handmade candy boxes do it yourself
This box in the form of a hood is easier than simple. For her you need:
- A small cut of corrugated paper.
- Cardboard format A4.
- Ribbon.
- Adhesive pistol, plate, scissors.
Initially draw a circle with a plate on cardboard. Cut half from it and glue the figure in the form of a cone from it.
To the edges of it to attach a corrugation, slightly sacking.
Well, all, just fill the cone with sweets, and the top tie a beautiful ribbon.
Universal selection of gift ideas for any case and occasion. Surprise your friends and loved ones! ;)
Greetings to all of you, dear gathered. Holidays all our lives do not end - only someone's birthday passed, as the new year has already grown, and there are other winter-spring holidays ... And we give presents to each of them, who I want to present at least interesting. And what's like a gift box with your own hands will help in this?
I myself really like to congratulate your relatives original. It is very nice to see the smiles of those who congratulate. And cute boxes always contribute to this! After all, they are the first thing that rushes into the eyes when presenting the present.
How to make a gift box with your own hands
Gift packaging may be the most diverse. But there is one rule - cardboard or paper from which you want to make a box should be needed. In this sense, the classic children's cardboard comes far from all.
Where to take such cardboard or paper? First of all, in specialized stores for creativity or even separate scrapbooking. Well, if there is such a store in the city, you will say, and what to do, if there is no such thing at hand or are translated prices?
These leaves will be enough for the manufacture of small souvenir boxes (for jewelry, sweets, toys, etc.). Your family will appreciate
And now I suggest you to start a detailed photo of the master class in which the creation scheme of each individual box will be present.
Master - Classes for the creation of cardboard and paper boxes
Little boxes
First of all, I want to give you 5 expandment with very cute patterns, of which it turns out such a wonderful packaging:

On the first of them - red roses. If you want to impress the lover, then she is for sure for you.
Principles of work with templates:
- Print your favorite scan on thick paper.
- Cut the future box along the contour and cut down in those places where straight lines pass (oriented on light sweeps - the lines location is the same everywhere).
- Bend the box on dotted lines and glue so that parts with semicircular ends lie between the other two and round ends looked up.
- Everything left just how to adjust the lid.


And again roses, but already more tender.

And now two options for the birthday are candy with balls and lollipops.


Big rectangular
This is perfect for large gifts (for example, wall clocks). You need a specialized binding cardboard for you so that the box is really comfortable. By the way, binding cardboard can also be purchased in specialized stores or Ali.
Orange color seats are marked. The lid can also be made, but with a slightly large dimensions (2-3 mm).

For a man
If the present is intended for a man, then I propose to choose one of the following options.
Simple forms in the trend - this is proved by the following 4 templates for creating strict classic boxes. For them, you will need a tight cardboard.


If the gift is designed with a lover, then romantics should be even debugging ^^ here and butterflies, hearts, and all sorts of confessions in love. You can perform them from dense cardboard and from thick paper.


A heart
Cardiac boxes are very popular, because with the help of them you can express your feelings. Or admit to them


Cake
Prepare to a party party, where will everyone need to be presented to a small surprise? Or maybe the wedding is planned? And in that, and in another case, cardboard pieces of cake will come to the rescue.
A beautiful and understandable scheme will suit for bottom, and for the lid.

Paper boxes
Not always boxes need to be dense - sometimes it is enough just to create a beautiful picture. Then I suggest you take this convenient scheme of 6 different packages:

If you go for a holiday to the child (and maybe you want to please your own), then make him a cute box in the form of animals.

Happy parents give here such a boot. Observe traditions: Girls - Pink, boys - blue or blue.

Boxes for the New Year
Mood can be created not only with the help of gifts) You just look at these 8 adorable boxes, each of which can also be a great New Year decoration
Especially needed if for some reason there is no New Year's ate. The main thing in this package is beautiful and gently crop edges.

Snowflake
Of course, this box itself is wonderful, but the highlight can give silver paint on the tips of the snowflakes.
Tip: Give anything in this packaging Girly, adoring cartoon "Cold Heart".

Packing
To present a gift - one of the easiest options.

Box with sweets
For all lovers of beautiful New Year horses and fast Handmade! Take a plastic glass with a smooth surface, cut the edge and cut the edge.
Seal the sliced \u200b\u200bparts inside so that they cling to each other. Inside, put goodness and swipe the top with something nice.

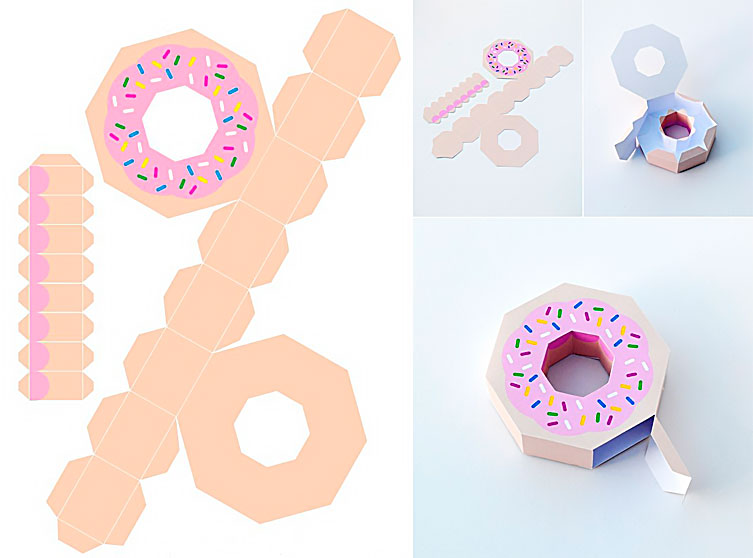
Another option of candy packaging is a donut. He is a little more time-consuming, but more spectacular.
Well, of course, candy itself.

A slightly more modest pyramid from which you can build a geometric Christmas tree. 
A few more boxes
Finally, you have 3 more boxes that have not fit into previous groups.


How to decorate the box with your own hands
The design of the box can be the most diverse - from simple shapes in the form of birds and hearts to intricate colors and bows. I will still write about the decor boxes in the future - do not miss.
In the meantime, subscribe and comment - to ambiguous meetings!
Sincerely, Anastasia Speeva
If you think that make a gift box very hard, then deeply mistaken. In order to make your own hands, the original packaging for the present should be just stocking with color cardboard and patience.
If you show at least a droplet of fantasy, you can please our relatives and close to the original gift.
Ideas, forms and photos of beautiful boxes for gifts do it yourself
 Gift box with openwork decor
  Gift box: Heart
  Square gift box
  New Year's gift box
  Gift box: Star
 If you want to show your friend or relative with all my respect and love, then try to make a gift box for a gift. If possible, try to show all your fantasy and make the most original packaging. If you wish, you can make a round, triangular and diamond-shaped box or make the packaging visually similar to flower, a house, fruit, or even a diamond.
Of course, the latest options will require a little more wizard, but in the end you will get a unique thing that cannot be purchased in the store. The only thing you must remember that such crafts love accuracy. In this case, when cutting out the template, you cannot afford to retreat from the line in any direction.
You must cut through all the lines as accurately as possible, growing creating perfectly smooth edges. In the event that this stage of work will be carried out not as necessary, then with a high probability it can be said that in the end the box will not be completely presentable.
How to make a cardboard box for a gift: template, pattern
 Step number 1.
  Step number 2.
 If you are a newcomer in this matter, then you need to start your acquaintance with a similar type of needlework with the simplest things. Believe me, if you do everything right, then even an ordinary square box will look attractive. Now we will present to your attention a master class with which you can make a rectangular box for gifts.
For her manufacture you will need only glue, scissors and special cardboard. If you do not have this, do not worry strongly. You can even calmly take even the one who uses kids in school lessons, and make a frame of crafts from it. Just in this case, after the box is ready for you to additionally decorate it. This can be done with the help of decoupage techniques or with the help of organza, fate or satin ribbons.
How to make a small mini-box for a paper gift: pattern, pattern
 Scheme for work
  Box for gift
  Ready box
  Template number 1.
  Template number 2.
 If you plan to present a small present, you can make a small box for a similar gift. Making a similar craft, as well as the previous best of all thick paper. If you make it out of fine, then there is a possibility that it will not keep the right shape, or simply breaks from the mechanical impact, which will have a present on its walls.
Yes, and in this case it is extremely important as responsibly refer to the attachment of all side parts. Since there are no secret locks in these crafts, it will be better if you fix everything with glue or double-sided tape. If the first box seems too simple to you, then below we have placed two more pretty interesting templates, printing that you can easily make pretty cute crafts.
How to make a box scrapbooking for a gift?
 Template number 1.
  Box of squares
 In the event that you want to surprise your close man truly, then make a scrapbooking box for it. For its manufacture you will need both ordinary cardboard and special paper for scrapbooking. From the cardboard you will make a durable frame, and with the help of paper, give him a festive look. The most pleasant thing is that in this case you will have a huge field for fantasy. Since it is assumed that this box will be untied, you can decorate it both from the inside and outside.
Moreover, if you wish, you can even in those parts of the crafts that will be folded, provide for places for small presents. For example, you can make places there for notes in which you write the most pleasant words. But keep in mind that congratulatory notes fit well into the overall style of the gift box, they must be sustained in the same color scheme as she.
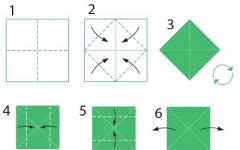
How to make a box for the origami gift?
 Step number 1
  Step number 2.
  Step number 3.
 Recently, the Origami technique has become so popular that even gift boxes began to do with it. In principle, you can make such a crawl from any color paper, but since you still wake up the product for an important holiday, it will be better if you spend on paper for scrapbooking.
In this case, you will not need additional decoration of the inside of the product as you immediately make it like it. The only thing you must take into account to create a box, the master class of which is located above, it is necessary to use two square sheets, one of which will be less literally by 11-12 millimeters. If you do not consider this nuance, then in the end you simply will not be able to connect two parts into one craft.
How to make a gift box with a lid?
 Round Box Production Recommendations
 The gift box with a lid is perfect packaging for heavier and passionic gifts. If you make it a little more than shown in the master class, you can supplement the main gift by sweets, boutonnieres from living colors and hand-made postcards. As you already, probably, realized to make a similar box best of all dense cardboard.
If you have the opportunity, then buy it in a specialized store, or go to the nearest supermarket and take any paper box there. By bringing home, spread it horizontally and put something heavy. Leave it in this position literally for an hour, and then go to the battery of the frame of the future craft. Such a small trick will help you smooth out the bends that would certainly interfere with you in the process of creating your masterpiece.
How to make a gift box with a surprise?
 Box in the form of a piece of cake
  Template №1.
  Template number 2.
 In principle, a box with a surprise can have a completely different form, color and decor. In this case, everything will depend solely on what event you go. If you go for a birthday to the employee, it can be a completely standard box of a square and rectangular shape, in addition to the very present, a sheet with wishes will be laid (it should be as long and folded in the harmonica).
If you are going for a holiday to the child, then make a gift box for it in the form of a piece of cake and be sure to install inside a couple of carton cartoon carton. And so that they really find themselves for the baby surprise, secure the figures on flexible springs, which will push them out as soon as the cover from the boxes will be filmed.
How to make a box for a gift with wishes?
 Pyramid Master Class
  Pyramid Production Recommendations
 If you want your gift box to be simultaneously both packaging, and a greeting card, then make it in the form of a pyramid. In the photo, the above can see the templates for which you can make a pyramid of small size. But if you try to increase the scope of the picture, you will eventually make a pyramid on which you can place the wishes.
Remember, in order for a similar surprise to look interesting, the scale of the picture should be increased at least twice. Only in this case you will have the opportunity to make a pocket product on the outside, in which you can subsequently put cute notes. Yes, and remember, these pockets are not necessary to do from paper, you can safely use for this, for example, lace. Just when they are fixed, then instead of glue, use a stapler.
How to make a box transparent for a gift?
 Rectangular gift box
  High Box for Gift
  Triangular gift box
 Above, we have already shown you how you can make a gift box from cardboard and ordinary paper, and now you will learn how to make a very cute transparent packaging. The most pleasant thing is that for the manufacture of such a craft you do not have to buy material.
Since it is made from an ordinary plastic bottle, then you will have to buy except tapes and grooves for decoration. So, take a transparent plastic bottle and cut the neck and donyshko from it. As a result, you should remain the perfect cylinder in your hands. Then take the scissors and gently cut it exactly as shown in the picture.
After you finish with this, begin to bend the material so that you will clearly see all the ribs of the future craft. If you can't do it with your hands, then use for this scissors. As soon as you understand that the plastic has become more obedient, you can safely collect a box. For reliability, tie it up with an satin ribbon.
How to make a box for a female gift on March 8?
 Template №1.
  Template number 2.
  Template number 3.
 So it happened, but for some reason most women have March 8 are associated with delicate mimosa twigs and almy tulips. That is why making the box for this holiday you must remember that there must be flowers on its outer face. They will be drawn or made by appliqué, solve only you. The main thing is that your packaging show with all your appearance that spring will come very soon.
If you do not want to spend an extra time for decoking the box, then wait on the paper for scrapbooking. If you are ready to work a little bit, then you can download some interesting template on the Internet, make flowers on it and get a finished box with a flower application. Also, if you wish, you can just paint it beautifully.
How to make a box for male gifts on February 23?
 Template number 1.
  Template number 2.
  Template number 3.
 If your family has real men, then you are simply obliged to make on February 23 a special day. It will help you to create a festive atmosphere. Proper packaging for a gift. In principle, it is easy to make it enough. You can make a box on any template or master class with which we introduced you only with the fact that you are preparing a present for a strong sex.
That is, in this case it is best to forget about the flowers, curls and various kinds of female things. It will be better if you do a gift box of paper with a camouflage print, or simply draw the finished product with different shades of green and brown. In the event that you want to store a present for a male older age, you can try to reagree the box with a red star or any other attributes of the Soviet era.
It can also be painted, or print the template and already from the obtained billets make the desired application. Well, if you are an amateur of all new, then try making a box in the form of a male shirt. How to do it you can see in the figure, which is placed slightly above.
How to make a gift box for lovers on February 14?
 Box on February 14
  Template number 1.
  Template number 2.
  Template number 3.
 Many think that the box in the form of a heart is very difficult to make. In fact, this product is made on the same principle that all other packages. All that will be required of you in this case, just find the right template and glue the box with it. We decided to facilitate your task and therefore we offer you a choice of several interesting ideas for gift boxes on February 14.
If you decide to make the largest and volume, remember that in this case you also have a product consisting of two parts. One part will play the role of a gift box directly, and the other will be a lid. Therefore, when cutting out the frame of the future craft, it is necessary to recheck whether one of the parts has a little large size.
As in the case of a rectangular product, it is necessary so that in the end it is possible to wear the upper part to the bottom without any problems. As for the color of the box, it does not necessarily have to be red, if desired, you can make the heart pink, raspberry or even purple-white.
How to make a gift box for a wedding?
 Template №1.
  Template number 2.
  Template number 3.
  Template number 4.
  Template number 5.
 It is probably not even worth saying that the box for a wedding gift should be special. And the matter is not the form of the product, but in his decor. Therefore, boldly choose the template for which you would like to make a similar craft, and then start thinking out how to finish the finished product.
Immediately I want to say that in the end you got something truly festive, the decor must be multi-layered. That is, you can create a volume with the help of flowers pasted on each other, leaves or hearts and supplement all this beauty with elegant curls laid out from rhinestones and fuels.
Beginner needleworks are best to stop their choice on sink and rectangular crafts. Such products are not only done faster, but also decorated easier. Since you are actually a canvas, you can first lay out the future picture from the elements, see how all the items will look together, and only after that begin to fix them.
How to make a birthday gift box?
 Cake Making Template
  Template №1.
  Template number 2.
  Template number 3.
 Birthday refers to those holidays that everyone is looking forward to. There is no difference how old was the perpetrator of the celebration, on this day he still wants to feel like her beloved and expensive. And what else can return us to childhood and give excellent memories as not a gift, sparkled in a box imitating a native cake. Make such a craft is easy, most importantly, to show a little patience.
Above you can see a template for which you can make one piece of cake. If you see that as a result, the gift packaging will have smaller dimensions than you need, then increase the scale to the desired value, simply following all proportions in the process. Then make the required number of pieces, fold them in the circle and measure the diameter of the resulting figure.
But the basis of the received data cut the round stand on which you and exhibit all the workpieces. If you wish, you can enclose its edge openwork snowflakes or lace. When the stand will be ready, fill in all the boxes with the presents, form a cake from them and fix all the satin ribbon.
How to make a gift box for the new year?
 Template №1.
  Template number 2.
  Template number 3.
  Template number 4.
  Template number 5.
 As you already probably understood if you wish, you can make a box for the holiday of any shape and color. As for the new year, then in this case you will have from what to choose. If you show a little bit of patience and smelting, then with the help of our templates, you can make a beautiful snowman, a fluffy Christmas tree, a house or Santa Claus.
If you print templates on a color printer using paper for photos, then you will only have to cut the details of the future box for a gift and gently glue them. If you do not have the ability to print templates, you can always make a gift packaging from a paper package and winter appliqué, such as Santa Claus, Snow Maiden or Snowman.
In this case, the package, depending on the selected character, it will be necessary to make red, white or blue, and then on the upper part of the package to glue the head, for example, Santa Claus. They will need to be tight two pieces and must be foreseen from the very top of the hole for the tapes that later you will tie your present.
How to make a box for a monetary gift?

 Template №1.
  Flowers for decoration
 Now no one will not surprise the gift envelope for money, so most people are trying to present them more original. The optimal option for such a case will be a box for a monetary gift. You can do it on a fairly simple pattern. True, in the manufacture of such a craft, you must remember that in this case you will make a box, the inner part of which will be extended.
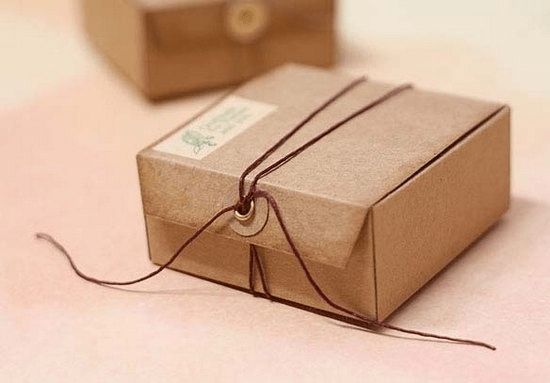
Agree, anticipation of the gift - no less pleasure than the gift itself! Oh, these sweet moments, when trying to guess that hidden inside the elegant box, impatiently unleash satin ribbons, tearing crispy paper cover!
But the gifts are nice not only to deploy, but also packaging. Book in advance with pleasant things to the colleagues, choose gifts for the closest and fervent winter evenings for their design and signing postcards - a sure way to wake up the New Year's mood if it is still sleeping!
Masu Box.
For the warm-up, we chose Masu BO x - Origami box. Such you can minimize even in a taxi along the way to visit: you will not need no scissors, nor glue, only a pair of paper sheets. Moreover, even those whose highest achievement in origami - paper airplanes are unacquained by the principle of their creation.

Comments and tips:
1. For this box, we chose dense bilateral paper for scrapbooking (40 r. Per sheet) in Leonardo (40 r. Per sheet), but it was an error. First, the reverse side of the paper would still be in the end hidden. Secondly, the paper was too dense and therefore unsuitable for origami: it was bad and cracked on bends. As a result, we had to turn out of colored paper with a density of 120 g / m 2 (10 rubles per sheet A4), although a more subtle would fit perfectly.

2. Remember that the base should be less than the lid! We decided that if the sheet was cut into three or four millimeters, then this is enough, but as a result, parts of the box still turned out to be almost the same.
3. To decorate the box (and at the same time hide the extra bends on the lid) using a ribbon (a set of five satin ribbons with New Year's prints cost us about 150 p.). Council for Perfectionists: To hide the edges, to thread them in the slits in the lid (you can easily understand where to do them) and grab with the inner side with a pencil with a pencil. Do not forget to loosen the tension of the tapes so that the lid can be bent.

4. For this small experiment, I absolutely did not want to buy a packing of the filler for the boxes, so that we simply cut into thin strips with a thin crafting paper, which a bouquet was once packaged. It turned out beautiful and eco!

Heated on Origami, we decided to make a "box-pillow", in which it is very convenient to fold sweets.

Comments and tips:
1. Before folding the box, make a bitter along the lines of bend - sell them with a suicide handle or other thin but not acute item. Without this, bend the sheet of paper on the curve will be almost impossible. (In general, we advise you to urge all the places of future folds.) And another advice is easier not to print, but to draw the box the scheme itself. Yes, to carry out the valve line, you will have to use a scribble round item, but then it will be possible to use it instead of a ruler when raging, because by hand it will not work carefully.

2. Valves on one side of them can be punch with a hole to insert a ribbon. But you don't advise you to try to glue them: the valves are almost impossible to press each other so that the glue grabbing, besides, they are so very confident closed.
3. For this box, we took the pastel paper (16 r. For a sheet). The density of 160 g / m 2 perfectly suitable for a small box, and the velvety surface reminded the starry sky and inspired to the decor.
4. To arrange a box as we did, select the constellation you like and draw it with a white gel handle (it is better to do it on a not yet folded box). To stick asteraries (again, the favorite "Leonardo", 72 r.), Skift the Toothpicks in the glue, make a point on paper and attach a star. We used PVA glue, but keep in mind that synthetic materials it keeps not very hard. The secondary sprockets can be made of simple small sequins (they will cost roughly cheaper than curly) - also apply glue on paper and wonder this place a little magic pollen.

Converter
A converter with four petals is an excellent simple packaging that will not require even glue from you. It is easily folded and suitable for gift certificates, CDs, suspension and other small things.
Comments and tips:
1. We took for this packaging paper with a density of about 140 g / m 2, but you could choose and more dense.
2. Petals can be decorated with sparkles - just spend on a cut with a cotton wand dipped in the glue, and make paper in them.

3. If your gift is not entirely flat, then you can make a few millimeters with a height box (as in the photo above).

Paper pyramids
And finally, our favorite is paper pyramids! They look great and, despite their seeming fragility, rather strong. The scheme for their creation is perhaps the most difficult thing, but nothing needs to be glued and intricate it. In such a box, the chocolate candy handmade, flash drive, jewelry, christmas toy ... Yes, anything! 
Comments and tips:
1. For boxes - cheers! - Bilateral paper, which was purchased for origami, perfectly approached. Pastel also behaved fine.

2. On a red box, we cut the snowflake with a dummy knife, and so that through it it was not seen, as hidden inside, we used tracing - cut out four-spins star from it in size of the box and grabbed the pencil glue.
3. The holes for the ribbon ribbon is convenient to do a hole panel, but it is possible to cut through with a knife for paper or pierce with a needle.

P. S.
In the XXI century, it is impossible not to think about saving resources and ethical attitude to nature. If your internal ecologist is protesting against packaging as harmful excess, and you still want to please a fragile gift with a beautiful box or reliably to complete a fragile gift, you can always find a compromise solution. Above we have already written that the filler for boxes can be made from old parchment. Think, maybe instead of paper for origami you can take a beautiful magazine list, instead of synthetic sequins, decorate the boxes with your own drawings, and the satin ribbons should be replaced with a twine or cotton lace.
The options for designing gifts - Mass, it all depends on your fantasy and, believe me, even if it seems to you that you have no standing idea, they will appear as soon as you take the paper and scissors and start creating your first homemade box!


Digest Quartblog
Let's figure out how to place a blue sofa in the interior of the living room, with which it is combined and see the models of stylish options.
In this article we will explore what should be the wallpaper in the flower in the interior of the bedroom, living room, in the kitchen and in the nursery. And also let's see the photo examples of stylish options.
Let's deal with blue in the interior. In this article we will see what colors it is combined, how to use blue in different rooms and what psychologists talk about the shades of this color.
Quarterbog made the most complete Loft style guide in the interior, which will help to understand the style philosophy, decide on materials and design, and will also show the photo of the most interesting examples of industrial housing.
Quarterlog will show and tell how to properly make a japanese bedroom. See our design gallery!
Content
"Want to do well - do it yourself" - the well-known phrase, which in different situations confirms its truth. So, if you want to be beautiful and interesting to make a gift, it is not necessary to access specially trained people and spend money on their services. Let's better create a gift box with your hands from the cardboard, we will do it well and efficiently.
From the cardboard you can make a box with a lid-valve, with a removable lid, a gift bag, a small chest for a memorial souvenir and other products.
Schemes
In order to make a high-quality and beautiful box you will need special templates for which you can cut a blank. We offer several options schemes so that you can choose your favorite. Note that among these schemes you will find such products, when working with which the glue does not need. The design itself is designed in such a way that the box is going and attached due to itself.
This diagram of a gift box of cardboard is suitable for a fine cardboard product. The template needs to be increased to the size you need, transfer to cardboard and cut.
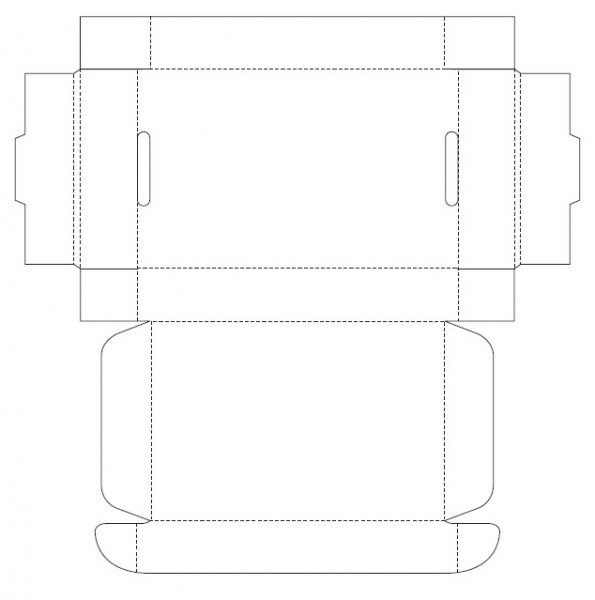
Dotted lines show you where you need to bend the cardboard. Use an old handle or nail file to pre-conduct thin grooves - then the cardboard will be better and more beautiful. With cardboard it is easy to work easy when you already know how he behaves in one way or another.

You can use PVA glue, hot glue, double-sided tape or any other material that will withstand a dense cardboard.
Manufacturing process
First, let's figure it out with materials and tools:
- cardboard (corrugated dense and thin color);
- pVA and glue pistol;
- double sided tape;
- scissors;
- stationery knife;
- line;
- a handle that no longer writes or nail file;
- all sorts of decor - beads, ribbons, lace fabric, twine, paper for queen, napkins for decoupage and so on.
What's next? Choose suitable template for your gift, transfer it to cardboard, carefully cut off with a scissors or a sharp stationery knife, connect the items. Now it remains only to arrange a box. Use your favorite Birthday Colors, remember your hobbies, preferences and use this knowledge in the box design. We offer to take a look at some interesting options:
Laconic design is most often the most stylish and original. Try not to overload a gift box with plenty of decor. Or at least pick the decor in one stylist or in one color scheme.

The main for the box can be cardboard, but on top it can be arranged with burlap, wallpaper, gift paper and other materials. To make the box really perfect, do not forget to arrange it and inside.

On the bottom of the box you can put a sheet of foil, a soft pad, satin tissue, a decorative hay or any other material.
Big gift box
To create a large gift box, you can use the ready-made box from under a small TV, a kitchen combine or any other medium-sized technique. What else will need:
- beautiful wrapping paper;
- satin tapes in tone paper;
- glue gun;
- scotch;
- stationery knife;
- slim monophonic cardboard;
- decorative elements (if you want).
Make a gift box of cardboard with your own hands, the greater for you will not be difficult, but you will spend money on it almost 4 times less than if you buy a finished packaging.
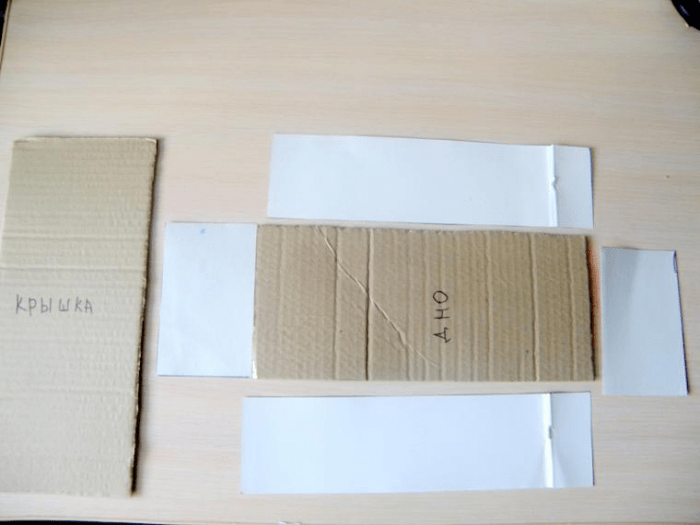
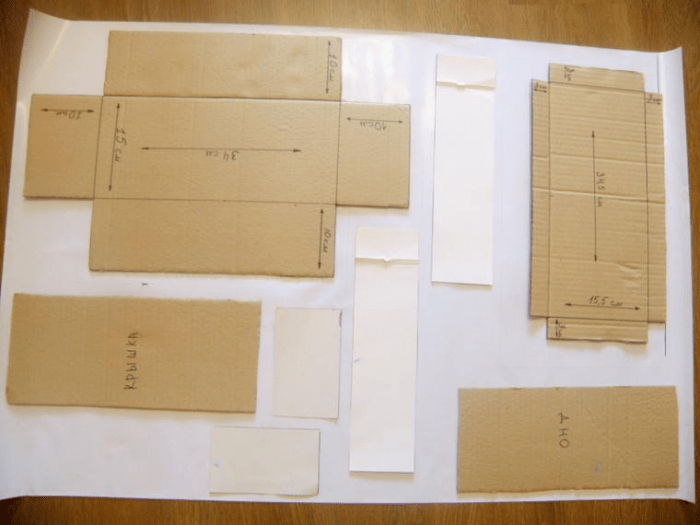
First you need to decompose the finished box so that you have a blank cardboard sheet. Next, you need to draw a circuit with the size of your gift.

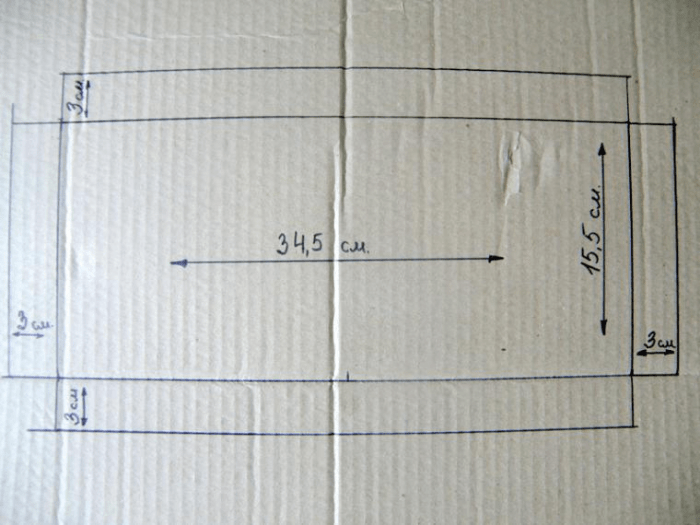
Next, using the stationery knife you need to cut all the details. You will also need a bottom for a box that will also need to be cut. For the bottom of the bottom, use a thin cardboard that will not allow to reduce the inner space of the box.
Now all the details need to be decomposed on the sheet of your wrapping paper. Leave everywhere several centimeters so that you can carefully place the box and close completely cardboard.
Circle all the details and then carefully with glue. Connect cardboard with packaging paper. Try not to use too much glue so that it does not remain on the product.
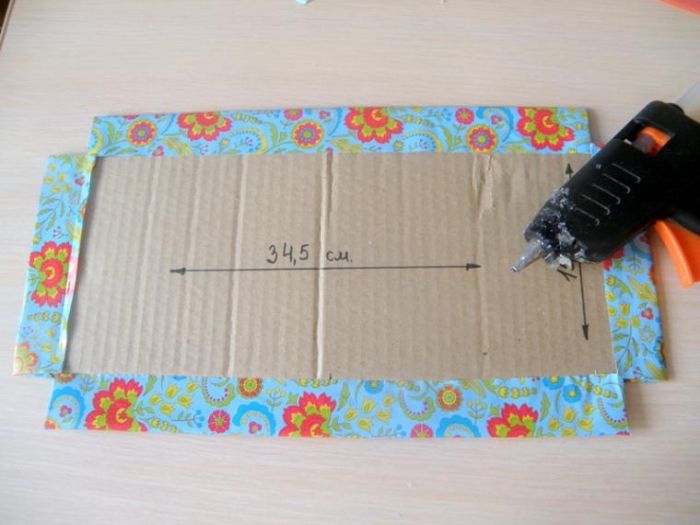
Now with the help of glue-guns, you need to connect the bottom of the bottom and all other box details.

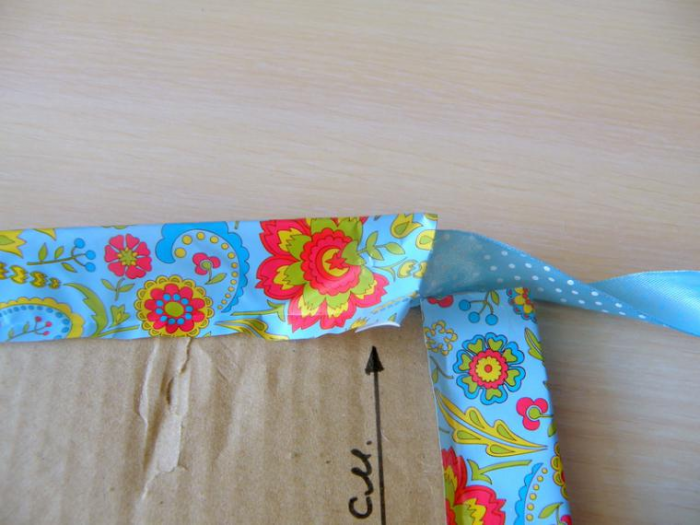
Now take the satin ribbon, the edge gently hide it under the packaging paper covers, as shown in the photo:

From the same tape, make a beautiful bow, which will decorate the finished product.
Do not forget to arrange the inner part of the gift box with your hands from the cardboard.
Inside, you can adapt special ribbons to firmly consolidate a gift. This will be needed if you send it.
The box inside should also be made using wrapping paper, then it will be neat and completed.

Who could believe that such beauty can be made by their own hands at home from the girlfriend?
Round box
If the gift is intended for the lady, and you want it to prevent it in original, then your choice is a round cardboard box.
For her you will need not too fat cardboard, from which you need to cut two circles and two rectangles.
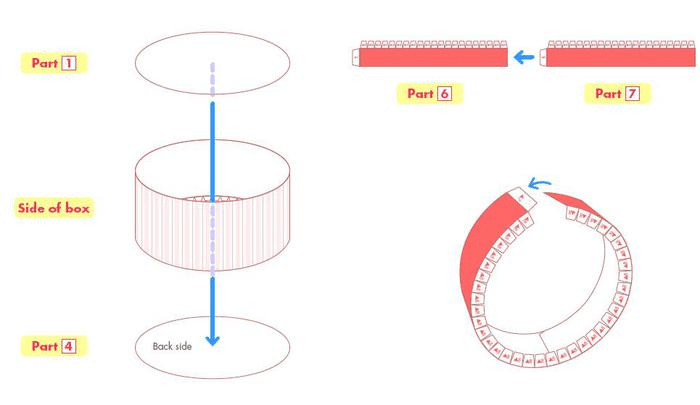
Do not invent complex schemes and do not make unnecessary movements - for a small gift for such a simple version of the creation of a round box will be enough. And think about the design is good:
You can use the technique of fed, decorative flowers from fabric, beads, appliqués, live flowers, postage stamps and another decor.

As a raisin, you can use a dense colorless cellophane to make a transparent box cover.

Try any crawl to start in a good mood, in the place prepared for this. It is desirable that the room is ventilated because you will work with glue. In the room there should be a lot of light so that you can not strain your eyes. All these nuances are very important because the quality of the product depends on it.
The master class on creating a box of cardboard will help you consolidate the material that was set out above:
POST Views: 522