MBOU "SOSH No. 43"
Abstract Technology lesson
in grade 8.
"Fixtures to sewing machines"
prepared
teacher technology
Medvedev Vera Viktorovna
nizhnevartovsk
Date: ____________ Class: _____________ item: Technology. Lesson number _______
Subject: "Fixtures to sewing machines".
The purpose of the lesson: to teach students to distinguish the adaptations to the sewing machine, teach students to work with fixtures
Tasks:
educational:acquaint students with classification and appointment of special machines; repeat PBB when working on a sewing machine;ensure the assimilation of the material on the topic;
developing:instilling skills and skills; Develop the ability to put a goal to memorize the material; develop the culture of oral and written speech; develop the ability to work rationally with instruction cards; Teach studentsanalyze and identify features to sewing machines;
educational:form discipline in work;form in students love for labor and readiness to work in good faith; Learning to keep the material and technical base of the school; educate the ability to comply with labor and life hygiene rules; form elementary skills of homeowers; bring up, feelings of mutual assistance;
Type of lesson:combined.
Classes:
- explanatory - illustrative (story, conversation, work with didactic material, demonstration),
- reproductive (instruction; practical work, independent
work);
Means of education:
subject and natural objects, visual aids;
practical education;
emotional - creative interest, satisfaction in work;
Equipment and clarity: textbook "Technology" Grade 8; visual benefits (tables, instructions for small mechanization devices for sewing machines); Machine, threads, scissors, cotton flap, ruler, chalk.
Object of labor:sewing machines, adaptations of small mechanization
Material - technical equipment:
Student workshops equipment:student desks, chairs, tools and fixtures.
Routing:"Fixtures to a sewing machine."
TSO: computer, screen, projector, with D. - Disc (the lesson is compiled in the POWER POINT program)
Safety:« Safety regulations when working on a sewing machine. "
Literature for teachers: methodological manual 8 class, didactic material
Literature for extracurricular reading of students:school Encyclopedia, Tutorial Technology Grade 8
During the classes:
Organizational part.
Preparation of students for the beginning of work at the lesson
Greeting.
Check the working form of clothing.
Mark absent.
Setting the goals and objectives of the lesson.
PTB repetition.Students repeat safety regulations when working with sewing machines. Teacher asks questions:
What pb should be observed when working on a sewing machine with a manual drive?
What pb should be observed when working on a sewing machine with an electrical drive?
List the CGT when working on a sewing machine?
Statement of new material.
Modern sewing machines have a set of devices that allow you to quickly and efficiently perform many operations. Devices to sewing machines allow you to improve labor productivity, improve product handling. With their help, you can spend loops, sew buttons, fed the edge of secret stitches and , take a lightning flashes, but protect the cut part of the oblique baker, embroider. Industry produced a large number of A variety of devices. Small mechanization devices are available for household sewing machines. Each sewing machine has a set of additional paws and fixtures for performing different lines and seams. The devices include: Pad for the drainage of the cord, the foot - the support, the foot for performing assemblies, the paw for a secret stitch, a foot for coating the loops.
Foot for draining the cord.
It is used when finishing female and children's products. The cord should not be pumped to the material. The working sweeps the material with the hand, guides the cord (Fig. 1).
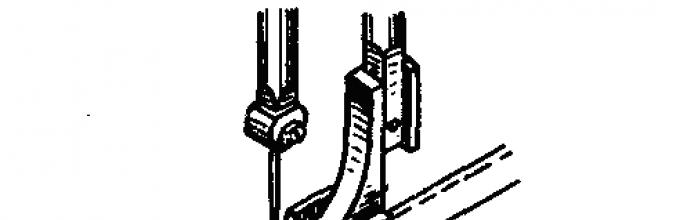
The foot is the propulsion. Slide number 3.
 It is used when sharping sections and adjusting the winds in the underwear. The foot is the swirling keys (Fig. 2). Her left horn has a process with a groove for sweetening the material. Right Horn
it is a line-director.
It is used when sharping sections and adjusting the winds in the underwear. The foot is the swirling keys (Fig. 2). Her left horn has a process with a groove for sweetening the material. Right Horn
it is a line-director.
Fig. 2
Foot for assembly. Slide number 4.
L.  apka - Assembly (Fig. 3) is used to finish women's and children's products. Foot
tough and has a shortened sole
with horizontal slot
from the left side. The paw can be used for uniform superstitution used as a finishing of the product, and for simultaneously connecting two layers of the tissue with the subservit of the lower layer. The material is suggested as a result of the fact that the back of the soles immediately behind the needle hole is cut, and the tension of the thread is stronger than the usual. The edge of the fabric is put under the feet of the assembly, they set the stitch length of the regulator and start sewing. With a stitch length of 4 mm, large assemblies are obtained, with a stitch length of 2 2.5 mm smaller. When working as an assembly, uniform assemblies are obtained, which are not shifted and not knocked. The assembly will not work if the car is very weak tension of the thread. The tension should be as required for sewing products from seats, satin, canvas. Fig. 3
apka - Assembly (Fig. 3) is used to finish women's and children's products. Foot
tough and has a shortened sole
with horizontal slot
from the left side. The paw can be used for uniform superstitution used as a finishing of the product, and for simultaneously connecting two layers of the tissue with the subservit of the lower layer. The material is suggested as a result of the fact that the back of the soles immediately behind the needle hole is cut, and the tension of the thread is stronger than the usual. The edge of the fabric is put under the feet of the assembly, they set the stitch length of the regulator and start sewing. With a stitch length of 4 mm, large assemblies are obtained, with a stitch length of 2 2.5 mm smaller. When working as an assembly, uniform assemblies are obtained, which are not shifted and not knocked. The assembly will not work if the car is very weak tension of the thread. The tension should be as required for sewing products from seats, satin, canvas. Fig. 3
Path for secret stitch.
With the help for a secret stitch (Fig. 4) you can quickly apply the product. In order for the work to be accurate and stitches really secretly, it is necessary to practice the flap of the fabric.
1. On the car you need to install a feet for a secret stitch, a needle 70-80, to fill thin sewing threads in the color of the fabric, weaken a little over the top drink.
2 . Set the corresponding seam view, the stitch length is 3-4 mm.
3. To prevent the bottom cut of the product with a closed slice. At the same time, the line of direct stitches lay so that when you bend the bend on the front side, the edge of 10 mm width was performed.
4. Prepared fabric edge put under a feet for a secret stitch. At the same time, the tight fabric folds along the rest of the secret stitch paw.
5. FROMthe help of the adjusting screw to move the stop to the left so that the needle to fall into the very edge to the left punch. Fig. 4
Foot with a restrictive ruler.
L.  apka with ruler Used when sewing, when the subsequent line must be made parallel to the previous one (Fig. 5). In this way, you can flash rows and squares of the same width, shifting cotton products (for this, the cotton is paved between two layers of the tissue and are uniformly flashing). With this foot, you can sew fastener.
Fig.5 paw with a ruler
The paw with a ruler consists of a foot and a rule of the drivers. The director-director can be brought to the foot and remove from it (the maximum distance to 30 mm) or to completely remove from the rack, for example, during the sewage zipper.
Studge on the fabrics for which the lines must pass, do not need - the paw with the guide line provides parallel to the lines and equal distances between them. But you need to ensure that the guide line slides exactly over the previous line.
If you need to shoot the pattern in the form of cells or rhombuses, then, in addition to the longitudinal lines, there are still transverse lines.
Safety regulations
when working with small mechanization devices.
Installing adaptations of small mechanization must be followed by safety regulations:
Before starting work, it is necessary to remove workplace.
Disable hair, turn the sleeves, remove accessories and decorations.
Without the permission of the teacher, the sewing machine does not sit down and do not install adaptations with small mechanization.
Install and remove small mechanization devices, you need a screwdriver to better fix it on the lap container.
Tools and fixtures can not be left on the platform.
When installing fixtures, do not keep legs on the pedal.
Before starting work, check the installation of the fixtures (whether the adjusting screw is well held by the needle in the needle).
Do not give a sewing machine in motion without fabric and with a lowered paw.
Before working, check the fabric for the presence of a bead and needles in it.
Sit at the sewing machine straight, do not bend close to the moving parts of the machine.
During work not to be distracted.
The light should fall on the working surface on the left side or in front.
Monitor the position of the hands, legs, housing.
After work, bring the sewing machine in order.
Practical work. №1.2. Slide number 5-6.
Practical work number 1
Installing fixtures to a sewing machine.
Tools and materials: working box, fabric loskuts, threads, sewing machine, screwdriver, ruler foot.
:

Fig. 6 foot with guide ruler: 1 - rack; 2-groove; 3-horn; 4-groove for the needle; 5-screw; 6-lever; 7- line - guide;
Practical work number 2
Application of devices to a sewing machine.
Tools and materials: working box, flasking fabrics, threads, sewing machine, foot paw, scissors, iron, path, breakout.
Sequence of performance :

Fig.7. Working with a paw - ruler.
Self-adjoint:switch width is uniform over the entire length, the line is smooth, the tension of the threads is normal.
Induction training: Direct students for assignment
Current briefing:
Fixing material:
Check the organization of jobs;
Check the correctness of the execution of labor techniques;
Check adherence to PTB.
Machine additional tasks to the most successful student.
Work on the tasks cards (1.2,3,4).
1. Fill out a table.
Type of device
2. Work on the tasks cards
Write down the answer:
What devices to the sewing machine do you know? ______________________________________________________________________
What is the foot with the restrictive ruler?
__________________________________________________________________________
What device is used to execute assemblies?
__________________________________________________________________________
What rules of safe work must be observed when installing various paws - devices? ____________________________________________________________________________________________________________________________________________________
3. Extra sentences
Adaptations to sewing machines allow _______________________________________________________________________________________________________________________________________________________________________________________________________________________
4. Fill in Table
Final instruction.
Summing up the classes.
Analysis of characteristic errors and reasons.
Message evaluation of students.
D- / task:
Using such a character, you can determine the state of emotions, the novelty of the material, lesson, originality, etc.
Reflection: Slide number 7
Circle the emoticon that is closest to the level of your today's discoveries in the lesson.

Cleaning jobs.
Used materials
E.V. Ermilova, I.A. Tovochnyak Technology Grade 8 (for girls) M.: Publishing House Mexep 2008, G.
E.V. Ermilova, I.A. Tovochnyak Workbook Grade 8 (for girls) M.: Publishing house Mexep 2008, g
The quality of the redesigned clothing will largely depend on proper selection required tool and fixtures. A well-equipped workplace allows working to improve labor productivity and at the same time high quality perform various operations.
Below are the most common devices used by sewing outerwear.
Folded two-barker sliding ruler (Fig. 119) It is used when performing barbaceous seams of various widths, the edges of the edges of the parts of the valves, stars, sides and the edges of the parts of the parts one or two lines.
: 1 - folding; 2 - the main one; 3 - lever; 4 - the base of the line; 5 - product detail.
Mobile guide paw (Fig. 120) It is applied when equipping various seams - side, shoulder, elbow, etc., overhead pockets, cuffs, as well as when applying finishing parallel lines at a different distance from the edges of the sides, collar, valves, hlyastics, etc.
Foot with a guide (Fig. 121) It is used when performing bargain and sockets, cutting the edges of parts (edging of the weld, bottom, etc.), applying the finishing line along the edge of the valves, hlystics, belts, sides, collar, if there are lines and seams of the same width.

1 - foot: 2 - lever; 3 - Frame line; 4 - product detail.

: 1 - Paw: 2 - Frame foot.
Shutter foot (Fig. 122) It is used when the lateral, shoulder, elbow oxide seams when sewing products made of cotton clothing fabrics.

1 - paw stand; 2 - Paw: 3 - hinge.
Stand-edging With one-sided bending of the fabric (Fig. 123), it is used in the manufacture of products without lining for edging internal edges of the welds, side edges of the floor, the bottom of the product, etc.

: 1 - bracket; 2 - chucks of the edging; 3 - slot for fastening to the platform of the car.
For work, the edging is attached to the machine platform. The end of the strip or braid intended for the edging is twice as the angle, is filled with a wide end of the edentant and with the help of any hook remove it through a narrow end.
The edge of the detail intended for the edging is embedded between the upper and lower chops of the edging so that the edge of the fabric concerned the opposite wall of the edging. In this position, throughout the edging, they hold the edge of the product in the left hand. At the same time, the right hand is sent to the edentor of the braid or strip for edging.
Moving the platform across the platform, adjust the line, sewing strip to the edge of the part.
Clip or hanger manufacture (Fig. 124) allows you to get the exact width loops. When using the device, the tissue strip supplied to the switch, the right edge is bent once, the left is twice and sent under the needle of the machine.

1 - switch; 2 - installation plate; 3 - folding plate; 4 - foot: 5 - loop in finished form.
Foot with wool guide (Fig. 125) creates convenience in stitch; Thanks to her, the lines fall at the same distance from each other.
The roller foot (Fig. 126) applies instead of a paw when the edges of the parts of the cotton pad are applied. The rotating roller is froiting loose edges of the parts connected, which contributes to the preparation of a good seam.
Sillar paw. Paw-roll. Paw with a ruler. Paw Zigzag.
The sewing household machine is equipped with a set of devices that expand its capabilities. In addition to the main paws used to perform direct and zigzag, there are special slaps for processing edges without prior wint, which greatly facilitates high-quality execution different species work.
Shutter foot (Fig. 67). With this foot, the so-called winding seam is performed, used when sewing linen, cotton fabric products and products without lining. Seam has great strength. The left horn of the foot has an internal extension with a shallow groove for bending the edge of the fabric or the bilge after the first crew. Two crosslinkable material are folded by the front sides inwards so that the edge of the lower material performed by 0.3 - 0.6 cm (depending on the thickness of the material) (Fig. 68).

Thus, the fabrics are fed into the paw (Fig. 69). When the machine is running, the maintenance is pushing the protruding cut of the lower tissue (Fig. 70). During operation, it is necessary to ensure that the fabric correctly filled the support. If the fabric begins to leave the proposal slot, it needs to be left right hand to the right, if the tissue begins to overflow the supporter, it is handed over to the left. Stitched fabrics must be revealed by the face down (Fig. 71). The fabric is re-fixed again and produce a second switter (Fig. 72). The final seam consists of four layers: all four layers are stitched from the inside, with outdoor - three (Fig. 73).
With the help of a supporting foot, you can process the edges with open sections in non-switching tissues (Fig. 74).

Paw-roll (Fig. 75). This foot is used for the edges of the edges of the material when sewing underwear, light women's and children's clothing, men's shirts. The paw switch has a special plate, curved in the form of a spiral, and a small stile for bending edges. Prior to work, the edge of the fabric is fastened to the spiral and promoted under the needle (Fig. 76). The width of the seam of seam with a closed slice with a double bending, which gives the foot - the chopper is 1.5 mm. The line passes at a distance of 0.5 mm from the inner adjacent edge (Fig. 77). To obtain a good, smooth heap, the edge of the material is maintained by large and index fingers and allow the material without tension to pass into the paw tongue. Well, if the material when the bar is slightly raised. If the material is in the palm clips more than necessary; then it is necessary to take the edge of the fabric to take a little right, otherwise - a little left.
Paw with ruler (Fig. 78). Foot with a mobile guide line for performing parallel lines at the same distance from each other. The guide paw can be installed from the needle at a distance of up to 3.0 cm. When running the line, you need to monitor that the guide line should be accurately passed through the previous line, only in this case there will be a parallelism of the lines.
The foot serves for the stitches of the details of the subflade and significantly reduces the time for this operation, as it is necessary to apply only the first line of stitches. After removing the rail guide, other operations can be performed, for example, the sewing of the zipper. Using a paw with a ruler, any finishing lines along the edge of the product or the edge of the part can also be performed.
For sewing parallel lines take dual needles with a common flask. These needles are produced three numbers for three distances between the axes: No. 70 - 1.5 mm; 80 - 2 mm; № 90 - 2.5 mm.
The needle of his flask is inserted in the usual way to a needle holder, refueling the threads in front, as in an ordinary needle. For sewing, a zigzag foot is used (Fig. 79) having a wide slot.

Dual needles and zigzag paws are used to perform two parallel zigzag lines (Fig. 80), when adjusting their braid or other finishes.
To perform a relief stitching with cord laying, dual needles and a special foot with a slot (Fig. 81) are also used (Fig. 81). Lesson 20-21
Subject: Fixtures to sewing machine. Application of fixtures for sewing machine
Objectives lesson: 1. Acquaint students with adaptations to the sewing machine and their appointment; with the rules of safe work; Teach the loop
2 Develop practical skills to work on the sewing machine;
3. Promote the formation of accuracy, aesthetic taste and practicality
During the classes
I organizing moment
II Repeat studied
- Classification of textile fibers (on the board)
What is the raw material for the production of artificial fibers? Synthetic fibers?
III Psychological training
Work in pairs (on cards)
Sold out anagram
haail, Viodepro, Hokivma, Stick, Gutelorre. (needle, drive, flywheel, foot, regulator)
What unites these words?
Topics message
What do you think, what will we do in the lesson?
V learning new material
When did the sewing machine appear?
The first project of the sewing machine proposed at the endXV century Leonardo da Vinci. But the car was imperfect, she copied the principle of manual stitch formation. Inventors experimented for a very long time with the arrangement of the easter on the needle. And only in 1834, American Walter Hunt invented the needle with an ear at the pointed end of the needle and a shuttle device. The most famous firm producing sewing machines - Zinger. Since then, the car has changed very much. Now there are sewing machines with software control, they are connected to the Internet. They themselves are configured and performing a lot of diverse operations.
With the help of modern sewing machines, it is possible not only to carry out pieces of fabric, but also to get skinned slices, sewing buttons, make loops for buttons, etc. For household machines, minor mechanization devices are produced. A set of additional paws and devices for performing various lines and seams is attached to each sewing machine.
Work with text
Check out the text, consider various paws, read what they are intended for.
Work in groups
Determine the name of the name of the existing paws.
4 Rules for installing fixture
The needle product is put in the upper position.
- Loosen the adjusting screw, remove the pressure leg.
- Right hand Take a paw to the rod of the lap container so that the grooves of the fastening screw entered the adjusting screw.
- Adjusting screw wrap.
3. Rules of safe work.
How to organize a workplace correctly?
What safety regulations must be observed when working on a sewing machine?
Rules when installing adaptation of small mechanization and working with them the same as when working on a sewing machine. However, you need to remember:
1. When installing devices, do not keep legs on the pedal.
2. Before working, check the installation of the device. (Is it good to keep the adjusting screw leg? Parallel whether it is the teeth of the rail rail
fabrics? Is the needle in the needle hole?).
3. Installing and removing the adaptations of small mechanization, you need to use a screwdriver for better, fixing it on the lap container.
Fizminutka
Practical work (part of students perform manual seams)
Repetition of safety regulations
1 "Coincidence of loops" (according to instruction cards)
Install a special paw to coop the loops. Throwing thin fill in needle No. 70 - 80.
- Circular switch Install in a zigzag lines: 1 mm length; Width 2 mm.
- needle to install in the left and pave stitches on the left half of the loop.
- Return the needle to the middle position, increase the width of the stitch 2 times and make 3-4 stitches for a clip.
Install the former stitch width, to put into the right position. Make stitches on the second half of the loop.
- At the end of the line, perform a few dual width stitches for the second leaf
2. Apply a zigzag lines.
Cooking products are applied to prevent cutting sections zigzag stitching.
The selection of the length and width of the stitch depends on the type of fabric: for very raw tissue - wide stitches and a small distance between them; For not very bulk tissue - narrow stitches, and the distance between them increases.
When processing thin tissues, the zigzag line is paved at a distance of 5 mm from the cut, and then cut the allowances on the seams close to the stitches.
Stitching secret seam
Sewing buttons
VI Total lesson
VII Task at home § 17 Reply to questions. Bring the flaps of fabric 10x10 cm
Modern sewing machines are equipped with fixtures and various legs that allow you to quickly and efficiently perform many "operations, for example, to wash the loops, to sew buttons, fastened the edge of the secret stitches, damage zipper, but protect the slice of the sideline, and richery, knitted seams.
Coincidence of loops
Recent generation sewing machines automatically can perform not only linse loops, but also loops "with eye". However, on a conventional sewing machine, you can coop the loop with a zigzag line.
Before starting to get hinges on the product, it is recommended to perform a sample on the flap of the tissue. This is necessary in order to find the thread you need, adjust the line, set the loop length. The flap remaining from the cutting is twice dollyThe inside is placed or glued the gasket and outlines the location of the loop. Then the sewing machine is installed a special foot for coating loops and slightly weaken the tension of the upper thread. Moreover, for the manufacture of loops, only thin threads and needles No. 70, 80 are used. If there is no loop mode, the selection switch is set to the zigzag lines. Select stitch parameters: length of about 1 mm and width about 2 mm.
The needle put in the left position and lay stitches on the left side of the loop (Fig. 28, 1). Return the needle into the middle position, increase the width of the stitch twice and make three or four stitches for the first assembly (Fig. 28, 2). Install the previous stitch width, the needle put into the right position. Put the stitches on the right side of the loop by pressing the opposite or deploying the fabric (Fig. 28, 3).
Fig. 28. Performing a loop with a zigzag line
At the end of the line, several stitches of the double width for the second scourge are performed (Fig. 28, 4). The switch is installed on the position of the direct line. Make several fixtures.
Cut through the loop in the middle with a special breakfast knife (Fig. 28, 5). In order not to accidentally damage the leaf, at the end of the loop across the seam rolled the pin. Test loops must be performed until you achieve good quality.
To learn how to perform rubber loops on an automatic sewing machine, you need to carefully read the instructions.
Sewing buttons
On a modern sewing machine, you can quickly and firmly sew buttons. To do this, the car needs to lower the conveyor (so that the rack's cloves do not promote the fabric), replace or remove the paw (it depends on the type of machine) and fill thin threads. Switch to set the position of the zigzag lines.
If the fabric is thin, buttons are sewn tightly to the fabric. The button must be put on the fabric on a pre-planned place and start it together with a cloth under the holder of the sewing machine's paw. Lower the paw holder and lower the needle into the right button of buttons. Zigzag's width to install so that the needle in the rotation of the flywheel turns into the left hole, does not cross the button. Make 6-8 stitches. Put the selection switch to the straight line position and make several fixtures (Fig. 29).

Fig. 29. Sewing buttons
Large buttons on a thick material are sewn, as a rule, on the rack. To do this, you need a needle to lower the buttons into the right hole. Put the match on the middle of the buttons (Fig. 30, 1). Lower the paw and make several stitches, then raise the paw, pull out the upper and lower threads by about 15 cm (Fig. 30, 2) and wrap them with a rack (Fig. 30, 3). Manually link the threads node and trim.

Fig. 30. Seving buttons on the rack
Stitching secret seam
Using a foot for a secret tail, you can quickly apply the product. In order for the work to be accurate and stitches really secretly, it is necessary to practice the flap of the fabric.
You need to install a feet for a secret tail, needle No. 70 or 80, to fill thin sewing threads in the color of the fabric, weaken the tension of the upper thread slightly. Set the appropriate seam view, the stitch length is 3-4 mm.
To prevent the lower cut of the product with a seam additive with a closed slice. At the same time, the line of straight stitches lay so that when you bend the item, the edge edge is 10 mm width (Fig. 31, o). Prepared by the edge put under the foot for a secret stitch, while the tong of the upper bending should pass along the pallet stitch paw stop.

Fig. 31. Figure stitching: A - Preparation of the region; B - laying machine lines
With the help of the adjusting screw, it is necessary to move to the left so that the needle with the left of the top layer of the material falls into the most edge (Fig. 31, b) and captured no more than one thread of the main fabric, otherwise the thread will be visible from the front side.
Darn
There are situations in life when it is necessary to raise the ripped clothes, and it is necessary to do it so as not to spoil her appearance. This repair can be performed using a conventional sewing needle manually. That is where your skills will need, perfection and resourcefulness. Of course, if you hooked the nail new Skirt From dense tissue, it will be relatively easy to soak it. On the Drape, Suknet and other thick dilated materials, longitudinal breaks are sewn and "implanted" patch.
This operation can be performed both manually and on the sewing machine.
The set for the sewing machine usually includes a special pad for ducts. With it, you can repair clothes.
On the car you need to install a gear leg, needle number 70, fill thin threads for embroidery, weaken the tension of the upper thread slightly. Install a straight line, check the stitch length in the process.
Retire the bottom thread. At the beginning of sewing upper and lower threads to keep together. Run parallel lines, making rounded turns in the form of serpentine (Fig. 32, 1). When a damaged place is closed with uniform lines, turn the material by 90 ° and similarly to carry out the cutting on top of the lines, while the stem will not be filled with stitches (Fig. 32, 2). This is the simplest reception of the duct, performed using a sewing machine.

Fig. 32. Damaged space Practical work number 12
Application of fixtures for sewing machine
Tools and materials: Work box, flaps of fabrics, threads, buttons, sewing machine, appliances to sewing machine.
- Explore the materials of paragraph 17.
- Follow the sewing machine with slotted hinges with a zigzag lines (see the topic "Cleaning loops").
- Send a button on a sewing machine using a pair sewing foot (see the theme "Seaching Buttons").
- Side the product on the sewing machine with a paw to be laid (see the topic "Figy Switch").
- Slide the damaged place of the fabric on the sewing machine using the duct foot (see the topic "Card").
New concepts
Fixtures to the sewing machine: paws for cozy loops, for sewing buttons, for a secret tail, for cutting.
Control questions
1. What are the devices for the sewing machine? 2. What do you see the advantages of performing a slotted loop on the sewing machine compared with the manual way? 3. What is the difference in the selection of the color of the threads when performing a loop and sewing a button?