Learning to knit on your own is quite normal desire for every woman. Sooner or later, almost everyone comes to this. Therefore, knitting is considered the most popular hobby among fair half humanity. The issue of teaching this skill becomes especially relevant during the period when a girl is carrying a child. Moreover, the knitting process calms and distracts from disturbing thoughts. Also, each expectant mother I want to knit the first clothes for the baby with my own hands, putting all my love into the outfit. And most importantly, such a product will be made in a single copy.
In order to learn this craft on your own, you need to be patient. You need to be very careful and careful.

The success of knitting depends on their the right choice... It is very important that the instrument is comfortable to grip. There are 5 main types of knitting needles:
- Regular - straight knitting needles, tapering towards the end. They are usually used for flat knitting.
- Circular - two knitting needles connected with a flexible cord. They help to make the whole product, without unnecessary joints.
- Flexible - small knitting needles made of metal, lengthened with a trace. Ideal for knitting intricate patterns.
- Hosiery - similar to ordinary ones, but the set includes 5 pieces at once: they put loops on four, and they are knitted with the fifth. They are suitable for knitting footprints, mittens, socks.
Knitting tools are made from different materials, they can be metal, wood or plastic. Each species has its own characteristics. So, for example, the last two types are lightweight. However, knitting needles made of wood can cling to threads, while plastic knitting needles break quickly. Metallic ones are heavier and can dye light threads, but they will last more than one year.
Apart from the type, knitting tools differ in size. It is best to purchase them in the same thickness as the yarn. This will make it possible to make a better product.
Choice of threads
When choosing yarn, you need to know that it is of two types:
- Natural,
- Synthetic.
What kind of yarn to knit with needles is up to you. Natural is usually cheaper, besides, things made of it are pleasant to the body, it does not inject. A natural thread, although it will tingle a little, causing some discomfort, but the skin in such clothes will breathe.
Do not buy too thin yarn, products from it come out shapeless. When choosing a yarn, carefully read the manufacturer's information. As a rule, the package indicates the size of the knitting needles suitable for knitting.

Before starting the main work, you should knit a test flap about 10 by 10 cm in size.Counting the number of loops and rows on it, you can orient yourself with the size of the product.
First steps for beginners
First you need to learn that there are two types of knitting - flat and cylindrical, but any of them starts with loops.
Loop set
It is necessary to try to knit with this, and it is better to start with the simplest set, having mastered which, complex loops will be given much easier.
Distribute the yarn on the palm of your left hand strictly in the center, so that the "tail" is on the left, and the ball is on the right. The section of thread that is located above, and goes to the ball, wrap around the circumference thumb... Now run the thread to your index finger, and go around it from behind. Draw the thread between the second and third fingers. Two strings should fit comfortably in the palm of your hand.
It's time to pick up the tool - 2 knitting needles, which must be passed from above, through the loop located on the thumb. Guide the tools through the buttonhole in the direction of the other buttonhole, which is on the index finger. Pass the tools through the second loop and return to the first. This will form a knot.
For beginners, all this "abra-kadabra" may seem insanely complicated, although in fact it is not at all. If the information is difficult to perceive, then you should watch a video that will help you learn how to make chic things out of threads. Please be patient and do not stop trying, you will definitely succeed!
The basics
To learn the craft, after typing, you need to move on to the knitting process. Exists basic technique, on the basis of which all products are subsequently knitted. It consists in knitting loops with the front and back method.
Face loop for beginners
Having typed on the loops on two knitting needles, carefully remove one of them. So, they will remain on the left, and the right will be free and become a working one. Place the thread stretching from the ball on the index finger of your left hand and pinch it between three fingers so that it does not interfere. We simply move the first loop to the working tool, you do not need to knit it. Now slide the tool into the next eyelet, grabbing the sewing thread. Pass it through the loop, and move the new loop from the left knitting needle to the working one. Do the same with the rest of the loops.

Purl loop
Place the thread in front of the product, push the working needle behind the front wall of the loop and throw the working thread under the tool in your right hand, now pull the captured thread into the loop. Do the same with the rest of the loops.
So that there are no problems with how to learn to knit from scratch, these exercises should be done several times until the whole process comes to automatism. First knit 5 rows in the front way, then the same number with the purl, dissolve and repeat the process again. The more training a novice craftswoman conducts, the easier it will be to start knitting real products.
Learning to knit an elastic band
Making an elastic band is an important stage of learning, because it is present in many products. Having learned how to shape it, you can knit socks, mittens, sweaters, cardigans without any problems.
The technique is based on the alternation of knit and purl. First you need to make sure that the edge of the product is neat. To do this, move the first eyelet to the working tool. The next two loops need to be knit, then purl. Alternate between the two types of knit until you have knitted the entire row. Please note that the last loop must always be purl, even if the front loop falls out in sequence.
Like this in a simple way an elastic band is made on woolen products from scratch.

The technique of narrowing and expanding the product
Often, in the process of making a wool product with your own hands, in some places it is required to narrow or expand it. In order to avoid difficulties, you should master this technique in advance.
In order to add or subtract a couple of loops, you should start either after the first buttonhole not knitted, or at the end of the row, to the last (edging), so you will not ruin the drawing.
Most often, the addition or decrease of loops is done on the front side, unless otherwise indicated in the instructions that you are guided by when making the product. To decrease the buttonhole, you just need to knit two buttonholes at the same time.
There are three ways to add loops that every beginner should know.
1 way - broach
In order to add a loop in this way, it is necessary to make another one from the thread between the loops, facial method behind the back wall. If you do this procedure behind the front wall, then a hole will form in the finished product.
Method 2 - yarn
Before knitting the next buttonhole, throw a ball of thread that you hold with your left hand over the tool. This method is used quite rarely, since small holes remain on the product.
Method 3 - an increase from the number of what was done earlier
Consistency is important here. First, with a working knitting needle, you need to hook the loop from the front row and knit it in the usual way, and then move on to the next loop. Adding loops in this way leaves no trace of unwanted holes.

Closing the eyelets
So, now, when it turned out from scratch to master the basics of this craft, it is necessary to master the process of closing the loops. After the thing is finished, the loops must be closed correctly, otherwise they will open when they are removed from the knitting needles.
- Work the first two stitches at the same time to make one. This is done in the same way as when decreasing the loops.
- Repeat the same, only now using the loop that you got.
- Pull through two loops woolen thread, again forming a loop, which must be thrown onto the right knitting needle.
- Such manipulations should be done to the end of the row, and the very last loop should be knitted.
- Now the knitting needle can be removed from the loops and the thread tightened.
In terms of knitting, there are quite a few of them, but here are the most basic ones:
- Don't be afraid to start from scratch. On the first try, it may not work, but over time you will be able to do any things on your own.
- Before starting work, it is important to carefully study the instructions. Since a misunderstanding or misinterpretation will lead to the product being of poor quality, or not working at all.
- For a beginner girl, first of all, it is better to learn how to make small pieces of yarn measuring 10 by 10 cm. The more training there is, the more quickly the craftswoman will master all the nuances.
- The first things are going to be experimental, so it's best to go for lighter pieces. Choose free models, since a novice craftswoman is unlikely to be able to make a complex, fitted thing.
- Beginners in specialized stores should purchase colored rings. They help to mark the places where you need to add or subtract loops, which greatly facilitates the work.
- If, when making large elements, fatigue is felt in the hands, then it makes sense to use circular knitting needles for work.
- For beginner girls who decide to try the technique using several colored threads, it will be useful to purchase a special ring. It usually has several loops for the threads to keep them from tangling.
- It is useful to have plastic or rubber knitting needles in your handicraft arsenal. They keep the piece on the needles when work is interrupted.
- If it becomes necessary to dissolve part of the product, then it is better to transfer the loops to a thinner knitting needle, so you will not lose any of them.
- An important tip for those who are learning from scratch is to use a crochet to hide the ends of the threads at the final stage of the work much faster and more conveniently.
- When making things from angora, it is necessary to add a silk thread that matches the color scheme. This way the finished product will keep its shape better.
- To have finished product the neck did not stretch, at the time of closing the loops, add a thin elastic band to the woolen thread.
Now the question of how to learn to knit on your own should not bother you. Observing the basic rules and using the given tips in practice, you will be able to please loved ones with things made with my own hands, and the process itself and the resulting result will be a real pleasure.
Since ancient times, things self made were valued dearly and were in high demand. Everyone sought to learn some kind of handicraft in order to provide themselves and their loved ones with exclusive clothing, fakes or original interior items.
Hand knitting is one of the most common types of needlework. With this skill, you can look stylish and fashionable without any special financial costs. Scientists argue that this is not its only advantage: while knitting, a person calms down, relaxes and is distracted from disturbing thoughts.
This article contains step-by-step tutorials detailing how to learn to knit. For novice needlewomen, it will become a real help.
Lesson number 1. Where to start?
For those who are just starting to master the knitting technique, it is necessary to familiarize yourself with the tools with which the process is directly carried out.
The first thing to start knitting any jersey is a set of loops with knitting needles. In order to know how to choose the right ones for a certain type of knitting, you need to understand the main types.
Standard (regular) knitting needles
This type is used for all types of knitting, except for circular. They are made from lightweight materials such as plastic, metal, aluminum, wood. They differ in thickness, from 1 mm to 25.5 mm, and in length. They have one working edge, on the other there is a tip that acts as a limiter.

Stocking needles
They are used for circular knitting, in particular socks, since knitting with 2 knitting needles is not recommended. They are sold in a set of 5 pieces. They have two working edges. The knitting process is carried out as follows: the product is located in an equal number of loops on 4 knitting needles, and the next rows are knitted on the 5th.

Knitting needles for patterns "braid" and "plait"
Due to the bend in the middle of the knitting needle, their use greatly simplifies the process of crossing the loops. Their diameter can be 2-4 mm, chosen in accordance with the thickness of the yarn.

Marking paper clip
With its help, the number of loops is controlled or a specific place on the product is marked.
Circular knitting needles
They are 2 working tips connected with a metal or silicone line. They are used for certain patterns, circular knitting, or when the fabric is wide enough.

Pin
It is used to remove loops that do not need to be knitted at a certain stage. The dimensions of such a device can be different (10-15 cm).

Lesson number 2. Acquaintance with the types of yarn
Opening fashion magazines, you can see that clothes, depending on the seasonal purpose, are knitted from different types yarn. Seeing such beautiful things, every second person asks the question: "How to learn to knit?" For beginner knitters, a lot of information has been published with detailed step by step description... However, in order to create a truly beautiful and original thing, you need to choose the right yarn for it.

Woolen thread
Refers to natural species. For its manufacture is used sheep's wool... Differs in a wide range of colors. Winter things are mainly knitted from it, suitable for any type of pattern.
Cotton yarn
Ideal for any type of knitting. It is pleasant to the touch and does not cause allergies. A product made of such a thread has a gorgeous look.
Melange yarn
It contains synthetic and natural threads as a percentage. Due to their texture, the products are lush and airy. Looks great on three-dimensional drawings.
Mohair
Designed for knitting warm clothes. This thread is very fluffy, so it is not recommended to use it for those things that are directly adjacent to the body. Large drawings are most relevant to her.
Fancy yarn
It is made by observing a certain technology, which consists in combining threads of different texture, color and quality.
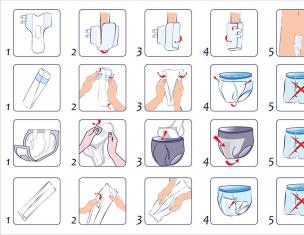
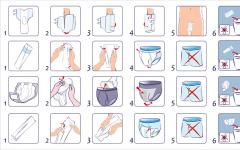
Lesson number 3. Set of the first row
Getting started knitting any fabric, you will need to make a set of loops with knitting needles. For this, a loop of yarn is made, which is thrown over the thumb. One end of the thread goes through the index, and the other just goes down. After that, both threads are fixed with the remaining three fingers. Having fastened the yarn in this way, loops are made with the help of a knitting needle, from which the canvas will be directly knitted.
1st step

2nd step

3rd step

4th step

5th step

Lesson number 4. Face loop
Having learned how to set the first row, you can proceed to the main type of knitting - front loops. They are fundamental to any drawing. In order to get the front loop, knit a thread with knitting needles in a certain way. To do this, you need to hook the loop on the back wall. free spoke and stretch the working thread through it. If the pattern indicates the knitting method for the front wall, then a similar manipulation is performed, only the knitting needle is captured top part loops.

Lesson number 5. Purl loop
The next stage in the development of knitting technique is purl loops with knitting needles. They can be knitted in two ways - behind the front and back walls. The more common type is considered classic. To do this, the working thread is thrown over the canvas, the front part of the loop is captured with a knitting needle, through which the thread is pulled, which forms a new purl loop.

Lesson number 6. Nakid
Nakid - air loop... It is formed by throwing a working thread, adheres with a finger, the subsequent front loop is knitted with knitting needles, as usual. On the side where the purl loops are, knit the yarn over with knitting needles without twisting, so that a hole is formed. This knitting technique is used to create a product with an openwork pattern.
Lesson number 7. Edge and edge loops
When knitting any fabric, you need to pay attention to the first and last loops. They occupy the main place in the manufacture of a quality product. Due to the implementation of a certain technique, the canvas has smooth and unstretched edges. Edge and edge loops are knitted in the following order. At the beginning of the row, the first one is removed without knitting, and at the end the last one is tied with a front loop.
Lesson number 8. How to knit an elastic band? Types and description
There are many different ways for knitting an elastic band. As a rule, almost any product begins with it, so it is very important to learn how to knit it correctly and beautifully. The main condition for her is not to stretch the loops in order to maintain a good density.

So, how to knit an elastic band with knitting needles, we will analyze simple options.
Elastic band 1 x 1
The simplest view. First row: 1 front loop and 1 purl loop. The subsequent rows are knitted according to the pattern.
Elastic band 2 x 2
Knits like the first option, only the row consists of 2 purl loops and 2 front loops.
Double elastic band hollow
In order to tie it, it is necessary to successively alternate 1 front loop, remove 1 loop without knitting. So knit on both sides of the product.
English gum 1 x 1
This option is more difficult for a beginner, but you can try.
An even number of loops is typed on the knitting needle. Then it is knitted as follows.
1st row: K 1, yarn over to the next loop and remove to the working needle, so alternate.
2nd row: a crochet loop is knitted with the front one, and on the next one a crochet is made and removed, repeat to the end.
3 throw: from the beginning of the pattern.
Lesson number 9. How to learn to knit? For beginners: knitting scarf
Having learned the basics of knitting, it's time to try your hand at making a small accessory. You can already decide to knit a scarf with knitting needles for yourself or your family. Such a gift will become the most desirable for them. Any patterns with knitting needles are suitable for him. Width is an individual value: if for a child, then 10-20 cm, for adults - from 15 cm. Length can vary from 1 m or more.
For a scarf, you can use threads of various thicknesses and colors, the main thing is that it is in harmony with the rest of the clothes.
As a picture, those that do not have a seamy side are better suited.

An example of a simple checkerboard scarf is shown below.
Description:
The number of loops should be a multiple of 5, plus 2 edge loops.
1st row: 5 persons. p., 5 out., alternate to the end of the row, knit the last one with the front.
2nd row and all even: according to the picture.
3rd row: alternate 5 faces., 5 out., edge front.
5th row: knitted like 3rd.
7th row: 5 out., 5 persons., Copied to the end of the row, the last edging.
9th, 11th rows: knit like 7th.
13th row: play from the 1st row.
| 13 | . | ■ | ■ | ■ | ■ | ■ | □ | □ | □ | □ | □ | . |
| 11 | . | □ | □ | □ | □ | □ | ■ | ■ | ■ | ■ | ■ | . |
| 9 | . | □ | □ | □ | □ | □ | ■ | ■ | ■ | ■ | ■ | . |
| 7 | . | □ | □ | □ | □ | □ | ■ | ■ | ■ | ■ | ■ | . |
| 5 | . | ■ | ■ | ■ | ■ | ■ | □ | □ | □ | □ | □ | . |
| 3 | . | ■ | ■ | ■ | ■ | ■ | □ | □ | □ | □ | □ | . |
| 1 | . | ■ | ■ | ■ | ■ | ■ | □ | □ | □ | □ | □ | . |
Lesson number 10. Schemes and conventions
Any knitting patterns can have a description or diagram that tells you exactly how to knit this pattern. From the previous lesson, you can see examples of descriptions and schematics. However, in order to understand what has been written, it is necessary to familiarize yourself with the conventions and learn how to read the diagrams correctly. At first glance, they seem incomprehensible, with some kind of squares, rhombuses, arrows, triangles.

However, this complexity is deceiving; it is not difficult to deal with standard abbreviations. In any edition of a magazine or book there is always an item "Conventions", as a rule, all abbreviations in the text and the symbols used are deciphered in it.
For example, the main ones are:
- persons. - front loop;
- out. - purl loop.
Looking at the diagram under the pattern you like, you need to look for the legend. They can be printed at the end of the book or just below the diagram.
For example, it looks like this:
.
- edging;
□ -
purl loop;
■
- front loop;
▲
- 3 loops together;
Ώ
- yarn.
Lesson number 11. Patterns, schemes and descriptions
We will describe simple patterns that need to be knitted, we will arrange the schemes side by side for better perception. Trying to connect the proposed drawings, you need to try to understand as much as possible conventions, since the quality of the entire product will depend on this.
Pattern "Diamonds"

| 19 | ■ | □ | □ | □ | □ | ■ | □ | □ |
| 17 | □ | ■ | □ | □ | ■ | □ | □ | □ |
| 15 | □ | □ | ■ | ■ | □ | □ | □ | □ |
| 13 | □ | □ | ■ | ■ | □ | □ | □ | □ |
| 11 | □ | □ | ■ | ■ | □ | □ | □ | □ |
| 9 | □ | ■ | □ | ■ | ■ | □ | □ | □ |
| 7 | ■ | □ | □ | □ | □ | ■ | □ | □ |
| 5 | □ | □ | □ | □ | □ | □ | ■ | ■ |
| 3 | □ | □ | □ | □ | □ | □ | ■ | ■ |
| 1 | □ | □ | □ | □ | □ | □ | ■ | ■ |
Description:
1st, 3rd, 5th rows: 6 out., 2 persons.
2-20th rows: according to the picture.
7th row: 2 persons., 4 out., 2 persons., 2 out.
9th row: 2 out., 1 person., 2 out., 2 persons., 3 out.
11th, 13th, 15th rows: 2 out., 2 persons., 4 out.
17th row: 1 out., 1 person., 2 out., 1 person., 3 out.
19th row: 1 person., 4 out., 1 person., 2 out.
21st row: repeat from the beginning.
See the lesson 10 for the legend for the diagrams.
Star pattern

Description:
1st row: from 3 loops, knit 3 front loops *, 1 person.
2nd, 4th rows: out.
3rd row: 2 persons., From 3 loops 3 facial, 1 persons.
5th row: as 1st row.
* 3 of 3 loops - 1 person., Yarn over, 1 person.
Pattern "Putanka"

| 3 | □ | ■ | □ | ■ |
| 2 | ■ | □ | ■ | □ |
| 1 | □ | ■ | □ | ■ |
Description:
1st row: 1 out., 1 person., Duplicate to the end.
2nd row: 1 person., 1 out., Alternate opposite to the previous row.
3rd row: repeat from row 1.
Now the frequently asked question is "How to learn to knit?" for beginners will no longer be so frightening and incomprehensible. If you follow exactly the lessons provided, it will be possible to learn how to create original knitted masterpieces in a fairly short time.
/ 19.05.2014 at 21:39
YOU ARE LIKE TO LEARN TO KNIT AND FINALLY TAKE THIS CASE? BOLDER IT IS NOT THAT DIFFICULT!
For the first lesson, you just need to prepare a ball of thread and a pair of knitting needles. It is easier to learn with knitting needles of medium thickness, # 3.5 is fine.
Where do we start? To start knitting, you always need to dial the first row of loops. . In this lesson, we will look at how to cast on loops with knitting needles in the classic way. .
First, we cast on loops 20-25. To do this, measure a segment of approximately 30 cm from the ball of thread and remember it as the "short end" of the thread, and then carefully follow step by step instructions:
- Step 1. On the left hand we throw a loop of threads, as shown in photo 1: the long end of the thread that comes from the ball is passed between the index and middle fingers, the short end of the thread wraps around the thumb. We lightly pinch both ends of the thread with the ring and small fingers. By the way, the short end of the thread should be approximately 3 times the length of the future typesetting row (but I admit honestly, I set this length rather intuitively, it comes with practice).
- Step 2. In the right hand we take 2 knitting needles at once, which we hold with our thumb, forefinger and middle fingers, and insert them under the loop between the thumb and forefinger of the left hand, hooking the thread (see photo):

- Step 3. Move the knitting needles that hooked the thread in step 2 down and to the left (see photo). ATTENTION! We do not clamp the threads too much! They must be freely released to the length required in the process of work!

- Step 4. We introduce the knitting needles from below under the loop formed on the thumb (see photo):

- Step 5. Without removing the two loops formed on the knitting needles in the previous steps, we move the knitting needles up and to the right and insert them on the right under the thread lying on the index finger (see photo):

- Step 6. Pull the thread picked up by knitting needles on the index finger up through the loop formed on the thumb (see photo):

- Step 7. We take out the thumb from the loop and help them to tighten the thread on the knitting needles (see photo). Attention! With this method of dialing, after steps 1-7, 2 loops appear on the needles at once!

- Step 8. Wrap the thumb again with the short end of the thread. Holding the index finger right hand the loops formed on the knitting needles, we again lead the knitting needles down and to the left and pick up the thread lying on the thumb from the bottom and left (see photo):

- Step 9... We carry the knitting needles up and to the right and pick up the thread lying on the index finger from below and on the right (see photo):

- Step 10. Pull the thread picked up by knitting needles on the index finger up through the loop formed on the thumb (see photo):

- Step 11. We take out the thumb from the loop and help them to tighten the thread on the knitting needles (see photo). Next, we continue to repeat steps 8-11 until we collect the required number of loops.

- Step 12 and the last one at this stage: after counting the loops dialed on the needles and making sure that this number satisfies us, we pull out one knitting needle from the row of formed loops and get typesetting row, which we need for the subsequent work:

Here's what we got:

P.S. While we are studying and reading the lesson, it seems difficult and long. Subsequently, after acquiring skills, this process takes a few seconds.
- Summarize: at this ur ock we learned how to type loops for the first row (or make a typesetting row) in the classical way.
And if everything worked out for you, then we immediately proceed to the next lesson, in which we will learn how to knit facial loops.
How to cast on knitting needles in the simplest classic way. Usually this is the very first knitting lesson, because knitting of any thing with knitting needles begins with a set of loops. There are several options. Here we present the most traditional, one might say the classic way of a set of loops on knitting needles. Simple and ordinary, you can safely say the most common set of loops for two knitting needles.
In order for the first row of loops to be relatively free (not tightening the edge of the canvas too much) and to be able to easily start working, most often the loops for the first row are typed with two folded knitting needles.
How to cast on knitting needles for beginners
The following is probably the easiest way to set loops for knitting needles for beginners. It is practical and versatile, in fact it is suitable for knitting a wide variety of things: socks, mittens and gloves, sweaters (plackets, cuffs, backs, front, sleeves and hoods), skirts, sweaters and sweatshirts, hats and scarves. Many begin their training in knitting with him.
Depending on the required number of loops, you need to unwind the thread of the required length from the ball to set. The more loops you need to dial, the more you need to unwind the threads from the ball. For study, it will be enough to rewind 20 centimeters. Place the thread around your thumb and forefinger, pinching both threads with your other fingers. In this case, the free end should be to your left (that is, bend around your thumb), while the thread from the ball goes around the index finger and is on the right side.
Now you need to carefully fold together the knitting needles of a suitable number (size) and pull the horizontal thread stretched between the thumb and forefinger from top to bottom to a level just below the thumb.
In the resulting loop near the thumb and you need to enter the folded knitting needles from the bottom up. Then you need to grab the thread that lies on the index finger, pulling the thread down through the same loop.
Remove the loop from the thumb, and gently pull the free end of the thread down. As a result, on the needles it turned out to dial two loops at once. The next ones will be typed in almost the same way, but already one loop at a time. Now at the top between the index and thumb there will be knitting needles folded together with dialed loops. The set of loops should be continued with a downward movement and inserting the knitting needles into the loop near the thumb, after which the knitting needles grab the thread near the index finger and bring the knitting needles into the same loop, the thread on the left (with a free end) is neatly pulled up, forming a new loop on the knitting needles.
Classic set of knitting needles: video
Of course, in the video, the process of recruiting loops on the knitting needles will be much easier to understand than just in theory from the written text. The video is short and as clear as possible.
The loops of the initial row should not be too tight and not too loose - the "golden mean" rule is important here. As a result, the edge of the product will be neat and even.
To start knitting any product, you need to make a row of loops on the knitting needle (or "dial the loops"). The first step in this action is the sliding loop.
1. Unwind the thread to cast on the required number of stitches. Calculate approximately 25-30mm per loop
2. Take the free end of the thread in your left hand and the thread coming from the skein in your right hand. Form a small circle of thread (see picture), hold it with the index and thumb of your left hand.
3. Place the right end over your index finger.
4. Take a knitting needle, pass its end under the thread behind the circle and pull it towards you.


5. Take the two ends of the thread and pull gently to form a slip knot on the needle.
6. This is your first loop. Now you can pick the stitches you need to start knitting

Loop set
To set the required number of loops for your product, there are several ways, but the simplest is a set of loops with your thumb.
1. Take the free end of the thread in your left hand and pinch it with your fingers. Hold the knitting needle and yarn in your right hand.
2. Pass your thumb under the thread that is between the needle and the fingers of your left hand so that a loop forms around it.
3. Insert the tip of the knitting needle under the buttonhole from bottom to top.


4. Using the index finger of your right hand, draw the thread around the tip of the needle from bottom to top.
5.Pass a knitting needle through the loop on your thumb.
6. Remove the loop from your finger and gently pull on the knitting needle by pulling on the two ends of the thread. Repeat steps 2-5 until the required number of stitches are formed on the spoke.


How to hold the needles and thread
After a set of loops, you can start knitting the first row. In this case, you need to know how to hold the thread and knitting needles.
How to hold the thread
1.When knitting, you must ensure that the thread that you hold in your right hand with a knitting needle is always the same tension. Pass the thread between your fingers as shown in the illustration.
2.Holding the thread this way, you can use your pinky finger to control the thread tension and your index finger to guide the thread around the knitting needle.

How to hold the knitting needles
1. While knitting, hold the right knitting needle like a pencil, between your thumb and forefinger. Hold the left needle like a fork, between your thumb and forefinger. The index finger will control the tip of the needle, and the other fingers will hold the rest of the needle.
2. The picture shows how the first rows of the product should look like. Move the stitches towards the tip of the left knitting needle, then you will not stretch the stitches by removing them.
3. As the piece gets longer, you will need to reposition your right hand and knitting needle because the movement will no longer match the curve of your thumb. Move your hand so that your thumb and forefinger are near the tip of the spoke.

How to use large knitting needles?
Some beginner knitters like to use thick thread and large knitting needles, because the loops are large and the product knits faster. Others, on the other hand, find it difficult to work on large knitting needles. Here are some tips for using large knitting needles and thick thread.
1. Try to hold the right needle with your entire hand, not between your thumb and forefinger like a pen.
2.Hold both knitting needles with your left hand as you thread the thread around the right knitting needle to form a loop. Large knitting needles light, so it's not difficult.
3. Leave the stitches near the tip of both knitting needles. Then you can throw the loop from one knitting needle to another with a light movement. Gradually move the stitches towards the tip of the left knitting needle.


How to recover a lost loop
From time to time you will inevitably lose stitches during the knitting process, but they can be restored. All you need is a hook.
A lost loop is easy to spot. You will see a loop in the middle of the knit and a horizontal thread on top. The first thing to do is to prevent the knitting from unraveling further. To do this, insert a pin into the loop and pin it. Now follow these steps:
1.With the right side to you, knit up to the place where the lost loop is. Remove the pin carefully. The horizontal stitches of the rows form a ladder over the lost loop.
2.Carefully spread the knitting needles and insert the hook into the lost loop from front to back.

3. Pass the hook under the first horizontal thread and hook it.
4. Gently pull the hook through the loop, grasping the horizontal thread.

5.Pull the crochet thread to form a new loop. You picked up the loop from the row it slipped from.
6. Continue working with horizontal threads, repeating steps 2-5 until you reach the current row.

7.To finish, place the loop on the left knitting needle, taking it off the hook. The knitting needle should go into the loop from left to right, as for all other loops.
8. Work lost stitch as normal and continue row. You can now continue working on the product, which is again in excellent condition.

Beginner tip: When you knit for the first time, count the stitches on the right needle after the end of the row. If one loop is missing, you will immediately realize that you lost it in the previous row. One of the mistakes beginners make is splitting the thread. This loop will be uneven. You will notice this in the next row when you get to a low-quality buttonhole. Before knitting, restore it as a lost loop using a whole thread.
How to hold yarn
When sewing the first loops, holding the thread and winding it by the knitting needle to form a loop is not as easy as it might seem.
1. It is necessary to place the thread between the fingers as follows: above the index finger, below the middle, above the ring, below the little finger. The yarn should be on the right.
2. The next stage is decisive. This is how to loosen the yarn to form the loops. The thread is wrapped around three fingers. Pull and loosen the loop again to pass the thread through your fingers. Hold the right knitting needle with your thumb and forefinger as you advance the thread between the rest of your fingers.

3. The index finger of the right hand is released to guide the thread. Often beginners have problems at this stage. Don't strain your finger. He must be flexible and mobile. You must balance your piece and the two needles while continuing to knit. Right now you will need the index finger of your left hand. Use it to return the right needle to its original position after you loop it through the left needle and before you put the thread over it to form the next loop. Also, if you find it difficult to put the thread on the knitting needle, the left index finger will be able to fix the product.
4. If you find it easier, you can let go of the right knitting needle for a while while you put the thread on the knitting needle. Take the right knitting needle with your thumb and forefinger, both knitting needles will be held on the left index finger as you form the loop. Use this technique when sewing large knitting needles.
5. The role of the right index finger in forming the new loop is very important. By raising or lowering your finger, you can increase or decrease the tension. As you pull the thread through the loop on the left knitting needle, keep the same tension, the yarn on the right knitting needle should be tight.

6. Maintain this tension when knocking off the left knitting needle. You can adjust it with your right index finger.
7. After you have knitted the loop, you can tighten it as needed by lifting your index finger and thereby increasing the thread tension.


Tip: you need to learn step by step to feel the knitting needles, knit and control the thread at the same time. The illustration shows how to hold two knitting needles with your thumb and forefinger as you pass the loop over the knitting needle. You will take them in the usual way when you knit a loop with the right knitting needle and fold them off with the left. Hold large knitting needles closer to the tip, not like a pencil.
Close hinges
This means finishing the product so that it does not bloom. You need to follow the knitting that was used in the last row. Front loops are closed from the front side, purl - from the purl
1. Tie two knit stitches on the last row.
2. Pass the end of the left knitting needle under the first knitted stitch.

3. Raise the first stitch over the second and remove it from the right needle. Now there is only one loop left on the right spoke.
4. Work the next stitch on the left needle, now there are two stitches on the right needle. Repeat with all stitches in the row until one stitch remains on the right needle. Cut the thread and remove the needle. Thread the loop and pull

TYPES OF MATCHES
Front loop
The repetition of the rows of the front loops forms a garter stitch. It is necessary to tie two rows to create one of the horizontal lines that characterize this type of knitting. A product made, for example, in garter stitch, has the same appearance on both sides: front and back
To start, cast on the required number of loops, following the directions above.
Make sure the stitches are the same and the knots that form under the knitting needles have the same structure. Take the knitting needle in your left hand to start knitting.
1.Inside. Insert the tip of the right needle into the loop on the left needle from front to back.
2.Around. Using your right index finger, draw the thread around the tip of the right needle from back to front.
3. Down. Pull the tip of the right needle through the loop forwards.


4. Outward. The thread, put on the tip of the right knitting needle, forms a new loop. Slip the first stitch off the left knitting needle.
5. Now a new loop has formed on your right needle. You can continue to knit the following by repeating the steps.
6.Finish the row, keeping the thread tension as equal as possible. All stitches from the left knitting needle have been rolled over to the right knitting needle. Move the right knitting needle to the left hand and knit the next row in the same way. When knitting with a tent, pronounced horizontal stripes are formed


Purl loop
After describing the front loop, we will master the purl. The purl loop forms horizontal semicircles on the side of the garment facing you. If you knit all rows of the product with a purl loop, you get the same result as when knitting with front loops - garter stitch. Meanwhile, in order to get a garter stitch, it is wiser to knit with face loops - they are easier and faster to knit than purl loops. Purl is mainly used in conjunction with knit to form knits such as jersey, rice knit, elastic, etc.
So, for knitting with a purl loop, dial the required number of loops. Make sure all the loops are straight and the knots are the same size. Take the knitting needle in your left hand to start knitting.
1.Hold the thread in front of the workpiece. Insert the right knitting needle under the front thread of the buttonhole on the left knitting needle, from right to left.
2. Using the index finger of your right hand, guide the yarn from the skein around the right knitting needle.


3.Pull the tip of the right needle and thread into the loop from front to back.
4.This creates a loop on the right spoke. Slip off the left knitting needle at the same time.


5. Now a new loop has formed on the right needle, and the thread is again in front of the product. You can knit the next stitch by repeating the previous steps.
6.Finish the row, keeping the thread tension as equal as possible. All the stitches on the left knitting needle are on the right knitting needle. Turn the piece over, take the knitting needle in your left hand and start the next row in exactly the same way. Repetition of rows of purl loops forms the same knitting as repetition of rows of front loops - garter, with horizontal embossed stripes (one stripe = 2 rows)


Jersey
This type of knit is used for many garments because it looks flat and smooth. To get it, you need to alternate the rows of the front and back loops. The rows, connected with the front loops, form the front side of the product, and the back ones - the wrong side. In this case, the relief is formed by regularly tying 2 front loops in rows, connected by purl loops
Cast on the required number of loops, knit the first row with front loops. Flip it over and knit the second row with purl loops. Repeat these two rows to create a jersey knit. Front side knit jersey is a flat V-shape, and the wrong one is a horizontal semicircle loops


Shawl knitting
To get it, you need to knit only with front loops. Cast on the required number of loops and knit to the end of the row. Turn the garment over and knit again to the end of the row. Continue until you reach the desired length. The product will look the same on both sides. Despite the fact that garter stitching is very simple to perform, the slightest inaccuracy in the tension of the thread will be noticeable and the rows will not be even


Rice mating
This simple knitting will quickly become one of your favorites. It doesn't knit as quickly as jersey or garter knit because you have to endlessly skip from side to side. To make a product in rice knit, cast on an odd number of loops and knit a front loop. Then alternate purl and knit stitches until you have knit a whole row. This row will repeat throughout the entire knitting process. Gradually, you will begin to notice that you are knitting the front loop on top of the purl loop of the previous row and vice versa, and thus form diagonals from the loops.
Elastic
When knitting with an elastic band, the product is more elastic than when using other knitting techniques. It is used for cuffs or, for example, to narrow the bottom of a sweater. The simplest type of elastic is English: 1 front loop, 1 purl