What kind of soft toy you will not find in the store today - the choice is simply enormous. But you must admit that a toy made with your own hands will be unique, valuable and even more “soulful”. What kind of soft toy is popular with both girls and boys? Of course, teddy bear! I suggest not to put on the back burner and sew one or even a couple of cute bear cubs.
Popular patterns for sewing soft toys
At all times, bears were in the greatest demand among soft toys.
Traditionally, cubs are sewn from plush or any other fabric with soft pile.
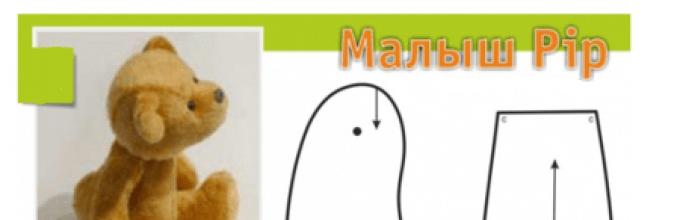
Classic Teddy bear can be sewn using this pattern:

For fans of cartoons about Winnie the Pooh, I propose to sew this funny bear cub in our Soviet

or Disney version.

If you have your own rich imagination, then you can independently come up with a pattern for your own bear.
DIY workshop on sewing soft bears
Fleece is my favorite for making soft toys. This material is delicate and pleasant to the touch. Moderately stretching, easily cut, does not warp when cutting.
In addition, the seams on it are less noticeable and look neat.
I propose to sew one of the proposed bears of your choice.
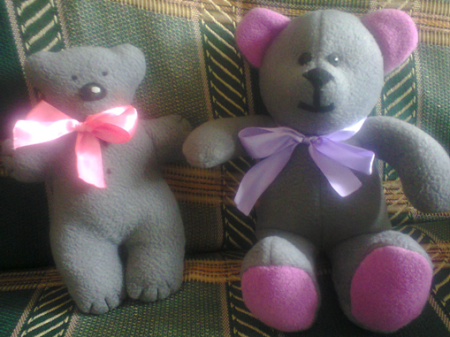
One of them is quite simple - even a novice needlewoman can handle it, the other is a little more complicated.
Necessary materials
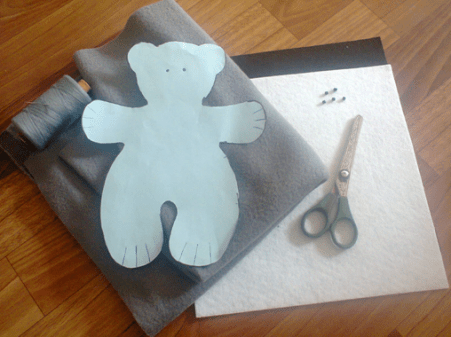
For the simplest and lightest bear, I needed:
- Fleece.
- Two pieces of felt, black and white.
- Sintepon for stuffing.
- Scissors.
- Needle and thread.
- Four black beads.
We take a pattern, if necessary, increase or decrease it to the right size

and cut out two identical parts, not forgetting to retreat a small distance along the edges for the seams.

Step 1. We circle the pattern, leaving a distance for the seams
After we have cut out both parts, we baste them by hand with thread.

Step 2. We connect two parts and sew with a basting stitch
Then we sew both parts. It is better, of course, to use a sewing machine,
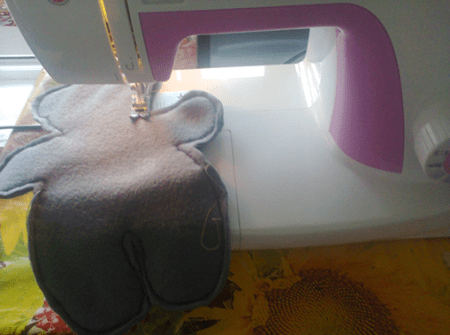
Step 3. Sew on the estimate
but you can also sew neatly by hand.
We do not sew until the end. Do not forget to leave in accordance with the pattern, a small hole on the side, so that you can then turn the workpiece out.
We turn the bear onto the front side, gently and carefully straighten it.
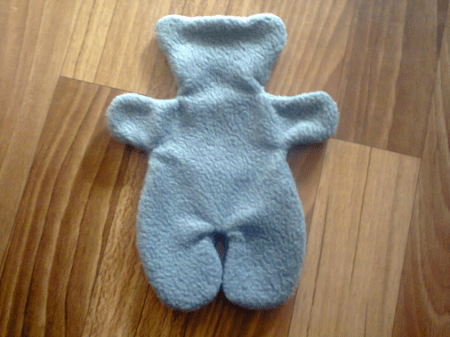
Step 4. Turn the workpiece out onto the front side
Then we take a synthetic winterizer and stuff the toy.
Instead of padding polyester, you can use foam rubber, cotton wool, holofiber or any other filler that will be at your fingertips.
It is very important to thoroughly and evenly fill the toy, try to avoid the formation of thickenings or, on the contrary, too free places.

Step 5. Fill the bear with padding polyester
After filling, sew up the remaining hole with a blind stitch.

Step 6. Sew up the hole with a blind seam
We cut out an oval-nose from black felt, from white a very small speck on the nose, and sew or glue it with a special glue for fabric.
I used Moment Crystal glue.
We embroider the legs with black thread.
Sew on beads - eyes and buttons.
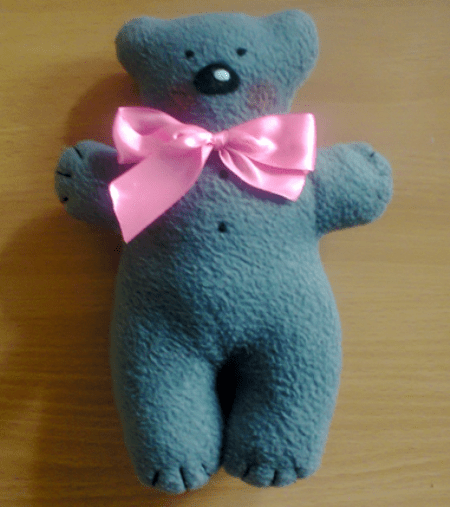
Step 7. Sew the paws and make a face
We will tie a beautiful bow from satin ribbon, brown the cheeks. The bear is ready!
The second bear is already a little more difficult.
To make it, I used this pattern and took again my favorite fleece.
You can use whatever material you like best. This could be: artificial fur, velvet, wool, velor, terry cloth or even jersey.

I took fleece in two colors (I needed a small pink piece for the ears and legs of the bear), thread, a needle, scissors, synthetic winterizer or any other filler, two buttons or two ready-made eyes (they are sold in handicraft stores).

Material for the second bear cub
We will prepare all the necessary patterns, according to which we cut out all the details of our bear cub.

Step 1. We make a pattern and cut all the details
Now we start stitching.
First we sew the head: ears, two back parts of the head, two front ones. Then we collect all three resulting elements together in accordance with the pattern.

Step 2. Sew the head
We proceed to the body.

Step 3. Assembling the torso
It turns out such a blank:

Step 4. You should get the same workpiece.
Sew the upper legs and sew them to the body. We also sew the pink feet to the lower legs.

Step 5. Sew on the upper and lower legs
We attach the head, leaving a hole in order to fill the toy.

Step 6. Sew on the head, leaving a hole
Fill it evenly and carefully.
Cut out a nose and two stripes to form a muzzle from a piece of black felt and sew them on.

Step 7. Stuff the bear and sew on the face
Then we sew on the eyes. Once again, check the uniformity of the packing and sew up the remaining hole with a blind stitch.
Soft toys always attract children and adults. Especially if they are created with my own hands or by hand loved one- grandmothers or mothers. Some people find it completely impossible to sew a stuffed doll or teddy bear. But this is not so: with a pattern and imagination, everything is possible.
Both for the child and for yourself
Love for toys has been inherent in every person since childhood. Probably, many did not finish playing in due time, so adults love to sew Stuffed Toys do it yourself. It becomes an interesting hobby that makes all loved ones and children very happy. Thanks to this passion, you can always cook interesting gift, there are no problems with the holidays - there is always an interesting, soft or fluffy souvenir. For the manufacture of toys, you can use not only new materials, but also unnecessary things in the house: old children's fur coats, sweaters, small tights, of which the child has already grown. This is a very profitable hobby that allows you to get rid of unnecessary things, scraps of fabric, pieces of leather. The interior in the apartments is always decorated, and a special comfort is created in the house thanks to the decoration.
Elephants, bunnies, horses ...
Today, various soft toys are created: animals, dolls and even cubes, books. Everything is done soft and beautiful. To make soft toys with your own hands, patterns can be found in specialized literature or you can compose yourself. Often, the pattern is removed from an old tattered toy: it is carefully ripped open, smoothed and transferred to cellophane. It can become the basis for the manufacture of toys: after a little fantasizing, they modify it, turn a kitten into a bunny, or vice versa. Felt, fur, and bright chintz are well suited for sewing.

Many people sew soft toys with their own hands today: on the Internet there is a large number of sites of needlewomen. Here you can find master classes on sewing Waldorf dolls, Tilda, animals, cartoon characters. An example is the characters in the "School of Monsters". Still, bears, hares, elephants made of beautiful materials are more popular. Very cute elephants and bears are made from bright fabrics. Beautiful and funny animals can be knitted or crocheted from different varieties and types of yarn. In order to get a soft coat, fluffy threads or mohair are taken. But even knitted toys are carried out according to certain patterns and patterns.

DIY soft toys
To make them, you need to make a pattern and prepare:
- paper - tracing paper,
- scissors,
- pencil or pen,
- needles and threads to match the color of the fabric,
- pieces of felt or thick coat fabric, plush, 20x30 cm in size,
- needles for fastening.
Many people prefer making soft toys from fabric and filler. To begin with, you can sew a small bunny, quite simple in design, but very cute.

Felt should be of two colors: one piece of white, the other - as it is or whatever the soul desires. With the help of available materials, you should cut out all the details from felt, but do not forget to make a seam allowance of 5 mm.
Sequence of work
To make soft toys with your own hands, the patterns of which are also in this article, you need a printer. But there is another way: to enlarge the image on the monitor screen to the required size and, attaching tracing paper, carefully redraw it with a pencil. Then cut and transfer to fabric.

Details should be cut out in the same quantity as in the diagram. The body is cut from gray or blue material in duplicate. The tummy, eyes and nose are cut out and pre-sewn onto the front of the body.

Everything is done very neatly: the threads for sewing are taken to match the fabric: the marks on the tummy are sewn with gray threads, the eyes are white, the pupils are black. The mouth is embroidered, a smile is made. Self-made soft toys should have a benevolent expression on the face.

Assembling parts
Ears, paws, tail are sewn together, turned inside out and stuffed with padding polyester so that the layer near the hole is thinner. The back of the base should be laid with the front side up and all the parts that must be sewn in should be placed on it: ears, paws. The front part is superimposed on top, with a white tummy inward. Around the perimeter, everything should be stabbed with needles and carefully sewn with your hands or on a typewriter. There is a filling hole at the bottom.

The stitched base is turned inside out and stuffed with padding polyester. The hole is sewn up and the tail is fixed at the back. It is placed two centimeters above the bottom seam. The bunny is ready and can sit on its own. Similar soft toys, the master class for the manufacture of which is described above, can be sewn in different colors. In the same way, a kitten can turn out.

The year 2014 is ending - the year of the Horse. To sew one of them, you should use this pattern:

To copy it, it is enough to print or reshoot with tracing paper. It should first be increased to the desired size. But you should not make a very large horse: 18-20 cm in height is enough. All details are transferred to paper and cut out. Then all this should be placed on the fabric, outline and leave a seam allowance. All parts must be sewn together: a hole is left for stuffing with padding polyester. Then ears are sewn to the head and eyes are made of black beads. With the help of yarn, a tail and a mane are made. The mane can be sewn onto a piece of braid, and then attached to the horse. For a product to look good, you should choose the right shades of fabric and yarn.
Making a soft toy with your own hands is not at all difficult: materials for the product can be bought in special stores for needlework.

You can find everything you may need in them: felt, yarn, accessories, filler and other components in order to make soft toys.

Today, more and more enthusiastic people appear for whom sewing toys is becoming an interesting hobby. Needlework can be done together with children, which has a positive effect on the development of taste, imagination of the child and promotes mutual understanding with parents.
As the great Coco Chanel used to say, “Handmade things are a luxury.
It is not at all necessary for everyone to have them.
Anyone who wants to have them makes them himself or pays the master for his work. "

Stuffed Toy - First Plush Association baby bear... But there is much more to the concept of a soft toy. This is an interior toy Tilda, and funny toys in a car, and much more. This article contains various types soft toys, as well as techniques for their implementation and step-by-step master classes.

Types of soft toys with your own hands
Such toys can be divided into several subspecies: for children and adults, interior toys, with practical use (for example, needle beds).

Also, toys can be divided according to the type of material used: fur, from cotton or linen fabrics, from felt, from fancy fabrics.

Particularly popular today have regained folk toys, as well as soft toys made in national handicraft techniques.
DIY soft fur toy
This handmade fur toy is especially warm and beautiful. For its sewing, you can use both natural and artificial fur. With an artificial one, of course, it is much easier to work, but deciding to sew a toy with natural fur you will receive a unique designer toy! First you need to decide on the pattern of the toy, the more ready product, the easier it will be to work. Small details are especially difficult for beginners.

Circle the parts and cut with a 0.5 cm margin for the seam. Unlike fabric, it is best not to use scissors when working with fur. If you don't have a tailor's knife, use a sharp utility knife. Cut with sharp, short strokes, do not drive the knife deeply so as not to cut the fur.

Sew the fur, it is necessary to apply two front sides to each other and straighten the fur outward. After sewing the toy, it is necessary to leave a small hole through which the toy is turned inside out and filled with filler. Previously, toys were stuffed with cotton wool, pieces of tissue remnants.
But such stuffing dries for a very long time during washing and often after cleaning the toy was thrown away only because the stuffing was not dry enough and mold appeared inside. Modern fillers are made of synthetic materials (synthetic winterizer and others), which dry quickly and well, do not get confused and retain their shape. After filling, it remains to sew with a blind seam.

The final touch is the eyes, nose and mouth. You can embroider yourself, or you can buy ready-made accessories in a store.

Video: OFFENSIVE CAT / DIY SOFT TOY
DIY felt soft toy
Today felt toys the most popular at children's master classes and handicraft circles. But they appeared not so long ago, and there is even an exact date of their appearance.
 Margaret Steiff and her first dolls
 An enterprising German woman, Margaret Steiff, came up with an idea in a magazine for housewives to sew a stuffed toy out of felt with her own hands. In the magazine, absolutely free, Margaret published a pattern and a detailed master class. But in a note she said where exactly you can buy felt for such toys.
Such a move in 1879 made it possible to found the toy empire in just a few years. The nuance was that the toys were both sewn at the factory, and blanks for toys that could be sewn on their own were sold. She left the empire to her children and grandchildren, and gave the world a fashion for a soft toy.

Master class felt dog

To work you will need: brown, white and black felt, scissors, a needle and thread, beads or eyes for toys and a hot glue gun.

We print the pattern, cut and sew every detail step by step.

Depending on the type of seam, you can create completely different textures of the toy.

If the parts are connected with glue, the toy can only be cleaned dry. When wet, the parts will separate.


DIY soft toys made of fabric
Cloth toys appeared much earlier than felt ones. But with the advent of fur and plush toys, they were unfairly forgotten for a while. With the advent of plastic, even fabric toys for children have gone out of use. But today with a new wave of popularity on manual work once again revived the popularity of the cloth toy. The most popular interior toy today is Tilda.

When you look at the Tilda doll, you get the feeling that the roots of this toy go far back to the Middle Ages. Not at all. Tilda's appearance was in the 90s of the last century by the young designer Tony Finnanger. The girl was full of ideas and one of the many ideas was Tilda. Today it is impossible to imagine tender without her, home interior... And craftswomen from all over the world are simply in love with Tony's idea and create prototypes to their liking.
 Tilda Angels
 Video: Tilda's master class
Do-it-yourself stuffed animals: chicken, fox, horse, penguin, pig and others
With the advent of the crumbs, I want to change the world for the better, create a special atmosphere at home. And the child - he is perfection itself, and so you want him to play with unique toys filled with mother's love.
DIY toys are simple. We have collected master classes of a variety of animal toys from the most various materials... Note that children under 2 years old pull everything into their mouths. Therefore, the material must be natural, preferably lint-free. Wonderful fur toys are best given in the third year of life.


Chicken pattern, it can be sewn as for a baby and put in testicle toys. Or you can create a wonderful Easter basket.
Video: Learning to sew an author's soft textile toy Elephant

Video: How to Sew a Penguin Finger Toy
Aleftinka pig pattern.

Pattern of a giraffe and his company.
 Pattern Cheerful Giraffe
  Flower Elephant Pattern

Since the release of Despicable Me, the toy world has changed forever. Yes, everyone, as before, loves bears, but at the sight of cute minions, kids and adults are delighted. At exhibitions, toys minions are the first to disperse. Would you like to sew for the child yourself? As easy as pie! It remains to choose a favorite hero for your kid.
Video: We sew a minion master class
DIY simple soft toys

For beginners, many details may seem too complicated and the desire to create will gradually disappear. For beginners, we have selected simple patterns that children can cope with with the connection. These patterns are especially relevant in creativity lessons in schools.


Do-it-yourself bouquets of soft toys photo
 Bouquets of soft toys Bears
 Conservationists struggled with the sale of fresh flowers for a long time, until someone introduced bouquets of sweets or toys into fashion. Now this global trend is so popular that in some countries the sale of fresh flowers has halved.
 Bouquets of stuffed toys Kitty
 Gathered for a holiday? Make a bouquet of stuffed toys yourself! This is a unique gift that will take pride of place in the birthday girl's bedroom for a long time to come.
Video: Bouquet of toys. Master class for beginners
DIY soft toys pillows
 Garfield pillow toy
 Well, having touched on the world of toys, it is impossible not to recall the pillow toys that fill the sofas of all needlewomen. These are the favorite things of both family and guests. Please note that sitting down on the sofa, few will resist not reaching out and touching the toy half. And children travel with pleasure with their favorite soft toys, falling asleep to the noise of the roads.

Video: Toy pillow owl
A self-sewn soft toy will wonderful gift dear and close people. After all, a person will be pleased to understand that when you made a toy, you thought about him. Below you will see various patterns and patterns of toys. Let's start, perhaps, with such a cute tiger:
You can sew such a wonderful angel bear,

which pattern is attached:

An assembly diagram is also attached:

Or, for example, you can sew a Smesharik Krosh. Its pattern is quite simple and suitable even for beginners.

And here is a nice little Woof kitten, which is also easy to sew.


Consider some cool toys that you can sew on your own.
Hedgehog


Frog


Owl


Every child loves large soft toys, and even girls are delighted with such gifts. Usually a teddy bear is a favorite stuffed animal, but what if you sew a polar polar bear? Moreover, there is a pattern.
Patterns in the following photos:


The following bear was sewn according to the same pattern:
DIY soft toys using the tilda technique
Sewing tilde toys is very simple. Try it yourself - and you will be convinced of it.
Bunny


These are pretty simple toys to sew.
Deer


Doll


You can sew such toys from fabric, the patterns of which are not needed. Only one pattern is needed, according to which they are sewn. Since their bodies are the same, only the ears and tails change.


You can even sew soft toys from socks.
DIY soft toy "Bunny"
To understand how to sew soft toys with your own hands, the patterns of which are not needed, watch the master class.
Let's make a bunny out of socks.

What is necessary
- Pair of socks;
- Sintepon;
- A piece of velvet (for the nose);
- Button or bead;
- Pieces of fur.

Turn the sock inside out, place with the heel up and cut off the elastic (2.5 cm). Cut the sock in half, starting from the toes, not cutting to the heel of 2.5 cm.

Turn the second toe inside out and place with the heel up. Cut off the elastic band - 6 cm. Cut off the fingers. Cut lengthwise, not cutting to the heel 4 cm. Round the corners of the ears. Cut the piece with elastic in half (future 2 front legs). Cut out a piece for the tail from the fingers.
Pull the tail piece over the edge with a thread, fill with padding polyester and secure. Similarly, you can make a nose out of black fabric. Sew the ears with a seam "over the edge into a loop". Turn the head to the front side and fill it with padding polyester. Pull off the hole and sew in a circle.

Similar to stitching the torso.

Sew with a seam "over the edge into a loop" of the feet and turn them out.
On the head, pull the heel vertically with a thread, then wrap one part of the heel, tighten. This will be 1 cheek. Make the second one. Pull the bridge of the nose with a through stitch.

Make fingers on the legs with thread ties. Bend the bottom of the legs and sew blind stitches to form the feet.

Sew on the tail with blind stitches.

Fill the front legs with padding polyester, pull off the hole in a circle and sew. Make the fingers in the same way as on the legs.
It is impossible to remain indifferent at the sight of a charming soft toy, especially if it is hand-sewn. For a baby she will become a wonderful friend whom she will want to hug before going to bed, and for an adult - just a wonderful individual gift.
Do not be upset if you do not have a sewing education, just the desire to create and the ability to use a needle and thread is enough. Plunge into childhood, making a soft toy, be creative and get a lot of pleasure from the work done!
Simple DIY soft toys for beginners
So, we have already decided that a toy created on our own is much more valuable than a purchased one. To easily make such a unique little thing, you just have to:
- Get acquainted with a simple algorithm for its manufacture.
- Select the required materials.
- Correctly form and cut the pattern of the future toy.
Internet open spaces are filled with patterns of a wide variety of soft toys, but you can find them not only there. It will not be superfluous to look into handicraft shops , children's departments for creativity (here you can buy huge kits and manuals for making toys yourself), bookstores ... If there are old and worn-out soft toys available - they can be ripped open and the parts can be cut around along a contour - this is a ready-made pattern.

Involve your child in the process of making a toy, this is very important! Such leisure will introduce the kid to work and discipline, teach him to be accurate in his actions. Working with different fabrics and small accessories contributes to the development fine motor skills hands, attention and creativity.
But don't forget - safety comes first! Provide your child with blunt scissors to work, do not let sit at sewing machine without adult supervision.
Fabrics used for sewing soft toys
- Jersey , dignity - easy to stretch.
- Faux fur with pile different lengths - suitable for creating pillows in the shape of animals.
- Silk - a rather capricious material, but it is indispensable in sewing and decorating dresses for dolls.
- Cotton - differs in a variety of colors.
- Wool - dense, fleecy fabric.
- Velvet and velor - the presence of a small pile allows you to sew soft toys - animals, imitating their fur.
- Felt - a huge number of crafts can be done by felting.
Soft toy manufacturing technology
- Pick up materials and prepare them for work. The fabric must be washed, ironed, and crumpled places must be steamed.
- Disclose all the necessary details.
- Baste the fabric along the outline.
- Sew all parts of the parts according to the basting.
- Stuff the middle of the toy, use cotton wool, synthetic winterizer, foam rubber.
- Gather all the pieces of the soft toy and sew them together.
- Final processes in the design general view toys.
It is best to use thick cardboard to make patterns. These stencils are easier to trace on fabric, and will last longer to create many more identical toys. Just attach the template to seamy side circle the fabric, pressing it tightly against the fabric.
So you got acquainted with the basics of sewing soft toys with your own hands. To hone your skills, use these simple examples:
DIY patterns and patterns for soft toys
The patterns of these cute animals are quite simple and do not require additional explanations.
DIY soft toy: photo master class
Soft toy "mouse"
Let's try to sew a wonderful little soft toy. It is perfect for playing crumbs up to a year old. The kid will already be able to grasp such a bright and interesting model, and will gladly take an interest in her. This will help him develop his tactile senses. Having mastered the basics of making such light toy, it will be possible to start performing more difficult work.
- Use the proposed pattern, it is already ready in the right size.
- Stock up on bright shreds of fabric and contrasting threads, so the finished product will simply catch the eye.
- Be original - connect the parts not with the purl, but with front side using a buttonhole (overedge) seam. It is for this purpose that bright threads were chosen.
- Attach the ears, nose and eyes to the body.
- Stuff the toy with filler and attach the ponytail.
- Sew together the parts of the head and paws, loosely fill with foam rubber or padding polyester, cotton wool is also suitable if nothing else is at hand. Create the tail in the same way, only you don't need to fill it.
- Sew round shreds to form a carapace, leaving holes for stuffing and connecting the legs and head.
- Gather all the parts together using a blind seam. Sew on the tail last.
- Add eyes to the toy, and the wonderful pillow turtle is ready. You can not only play with it, but also sleep.
A bouquet of soft toys: manufacturing technology with a photo
Gifts of this kind have appeared relatively recently, and are now at the peak of their popularity. Such a bouquet will not fade like natural flowers, but will delight its owners even more long time... You can buy a bouquet of soft toys by spending a lot of money, or you can create it yourself, saving a lot of money.
For work, prepare:
- Small stuffed bear toys - 3 pcs.
- Corrugated paper, organza.
- Ribbons, sticks, a net for bouquets, other decorations.
- Glue gun.
Bouquet making master class:
- First, prepare the base on which the bears will be attached, they will be located on sticks. Cut out two squares from the organza for each stick, form a flower from the shreds and attach with a hot gun to the stick in two layers.
- Do the same from a special mesh for bouquets and secure over the organza. You should get some kind of flowers, as shown in the photo.
- Further, it is about the design of the toys. Get rid of bears from labels, tags, and other factory identification marks. You can simply glue the bottom of the bears to the newly formed flowers on a stick, or you can sew it on discreetly. The second method will allow, if necessary, to "disassemble" the bouquet without spoiling the toys. Now start collecting the whole bouquet. Tie all sticks with toys tightly with tape, you can still fasten them together with a few drops of glue.
- Take the remaining organza and wrap the bouquet with it, fix it in the place where the sticks are attached. Using the corrugation, form another case for the bouquet, you can hide all the working moments in it. Secure the entire piece with a bow. Correct any irregularities with your hands where necessary - form folds.
- This toy is easy to use, the basis for it will be the usual sock. Do not use old, worn out socks: it is a myth that shabby things make bright and colorful things. But, for sure, there is one attractive sock in the house that has lost its pair, so use it.
- Before starting work, decide which cat you would like to make - thin or thicker. Based on this, trim the sock at a specific location. If you want to get a well-fed toy, cut off the part of the sock that covers the foot, and upper part Move the elastic bands to the side.
- Fill the toy with padding, in this case a padding polyester. The torso should be larger than the head, so fill it tightly. After that, bend the free hole inward and fasten it with needles. Sew on the cut and stretch the edges to form the ears.
- Give the product the desired shape with your hands, make the ears sharper. Embroider the pet's face with a contrasting thread according to the previously drawn stencil. Use a back stitch.
- Decorate the cat with a bright accessory - a scarf, bow, tie, bow tie.
Do-it-yourself soft toy rooster
Let's make a small stuffed toy - a pendant made of felt, you can decorate with it christmas tree, or you can simply hang it in a conspicuous place, as a kind of amulet. Let's consider two options.
Cockerel in the shape of a heart.
- Cut two pieces out of felt for the heart, choose white, gray, black, or another muted color as the base. A multi-colored tail will stand out better against its background.
- Take a closer look at the picture, all other parts of the cockerel's body are also cut out in the form of hearts.
- Attach the wing and eyelet to one part of the body, and then carefully sew with the other part of the body, placing the tail, comb and beak in their proper places. Fill the toy with padding polyester a little and fasten the loop.
Snow cockerel.
- This decoration will require less bright colors than for the previous toy, but the easier it is.
- From white felt, cut out the body in the form of a wide figure eight and wings, as in the picture.
- Embroider a joyful image on the face of the toy, use black threads, also process the edges of the wings with them.
- Make a red comb and yellow beak legs.
- Sew all the details of the toy, fill with padding polyester and make a loop.
DIY soft toy owl
You can create such a beauty owl with your own hands, if you have at hand scraps from fabrics of different colors.
Step by step execution of work