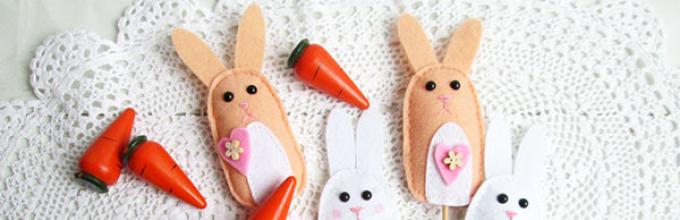
A cute bunny made of felt - can be decorated and used in different ways: with an unstitched bottom part - a toy for finger theater; on a stick - a funny souvenir for Easter or New Year or also a home theater character; without a stick, but with a base-pin on the back - an original brooch for a blouse, handbag or children's backpack. How to make a bunny out of felt with your own hands - in our master class.

For sewing felt bunnies you needed:
felt in two colors (I have beige and white) and colored trimmings (I have pink);
pink floss for embroidery of spouts;
black half-beads 6-7 mm for the eyes;
glue for gluing eyes (I have "Focus");
wooden or plastic buttons for decoration;
padding polyester;
black and pink pencils;
optional - narrow satin ribbon matching felt;
wooden skewers;
white gel pen;
sewing threads to match felt;
pieces of paper;
PVA glue;
simple pencil.

DIY felt bunny: job description
To begin with, we will draw a bunny pattern by hand or print it from this file:

Next, let's prepare the base sticks. To do this, we cut the paper into arbitrary rectangles, fold each in half, grease it with PVA glue, put the tip of the stick and squeeze the paper moistened with glue well around the stick to fix it well. We do this as many times as we want to get bunnies at the exit. Leave the sticks to dry completely.

At this time, we make cutting on felt. It is convenient to cut on colored felt using a white gel pen or a self-disappearing marker - as you are used to.
I used 2 sheets of A4 felt for eight birds with one stone. The bodies, ears and abdomens fit perfectly on one sheet. Abdomen beige colour send the white hares, and white- beige.

Cut out all the details with sharp scissors; we do not leave seam allowances.

We make out the front part of the bunny. Sew on the abdomen, leaving the lower part unsewn! For decoration, I came up with the idea of cutting out the hearts from the remnants of pink felt and sew them through the button, for each bunny - in a different place. We glue the half-bead eyes; embroider a floss nose and mouth; with a colored pencil with slight pressure we make pink cheeks. I made small eyelashes for some bunnies with a sharpened black colored pencil.

Returning to the base sticks. They are already dry. Cut the corners of paper stoppers and try them on to the felt blank to make sure that the stopper is not too large.

We wrap the stopper with a small amount of padding polyester and put it between the back and front parts of the felt bunny.


We take a thread to match the abdomen and sew the lower part of the body so as to securely fix the stick.

And the last thing - we stitch along the perimeter, except for the lower, already stitched, part, the whole hare, not forgetting to put the ears in the place they should. The work has been completed. Optionally, you can tie a satin ribbon bow to the stick.
Today we want to tell you how to make a felt bunny with your own hands. It is very simple to create such a toy, there would be felt and some free time available, and our pattern and step by step master class with a photo will help you in your work. Our felt bunny will win your little ones!
Tools and materials Time: 1-1.5 hours Difficulty: 4/10
- felt;
- cotton wool or any other soft filler;
- scissors;
- bunny template (provided below);
- pencil or pen;
- needle;
- threads to match felt or contrasting;
- black threads;
- small black beads.
Step-by-step instructions with a photo
Do you like small plush toys? Felt toys are very popular these days! So why not create a couple of such rabbits, especially since they are so easy to make? This felt bunny is so adorable that your kids will be happy to play with it!

Before starting work, process the template with a bunny on a computer and increase or decrease it, respectively, to the right sizes... Then, if you are unable to print at home, go to a printing center and print a pattern.

Step 1: print the template
Print and then cut out the template.
Bunny pattern from felt:

Optionally, you can attach an oval circle or heart to the Bunny's tummy.
Step 2: cut out the patterns
Choose a felt fabric that matches the color and size. Place the bunny's body on the felt and carefully trace all sides of the felt with a pencil. You need 2 such details.
Then place the ear and tummy patterns (oval or heart) on the pink felt. Trace the details around the perimeter with a pencil.
Use scissors to cut out all the necessary elements.

Step 3: sew the pink details onto the body
Place the pink parts on the hare's body according to the photo below.

Sew on the ears and tummy of the figurine using hand overlock stitch.
Step 4: make a muzzle
Sew on the face of the figurine two black beads in the form of eyes. Use black thread to gently embroider the nose and mouth.

Step 5: sew the body
Place upper part hare on the bottom so that the drawing is at the top. Use a hand overedge seam to join them together. Start sewing the elements either from the bottom or from the top of the hare. We started with the right ear.

When you're halfway through sewing, fill the craft with cotton, wool, or leftover felt. After filling in half, continue stitches. Fill in each section after you sew it. After finishing the connection, tie 2-3 knots on the remaining thread and cut off the excess.
Hello to all my subscribers and guests of this blog! Catherine is in touch with you. As I promised in one of my articles, today I will share with you the schemes of felt toys. The selection will not be too large, I offer you only what you liked most, what I found on the Internet.
Remember mine, from it you can also take some ideas and ideas of how you can sew these wonderful, and most importantly beautiful, unique felt toys on different topics. If you are not fond of needlework, then perhaps you like to crochet such a charm in an amigurumi style crochet, then go to this one and knit the most important symbol of the upcoming New Year.

Well, whoever sees and thinks about what kind of material this is for the first time, I will say right away that this is the most unpretentious and convenient material to work with. With it, you will not know for sure grief, it does not crumble and the details are cut out very neatly and beautifully the first time.
Now the world does not stand still so much that innovations continue to flow, and in this direction, too, for the smallest, you can even make a carousel over the crib.
And for more children there are ideas and options for work from various cartoons, just imagine how happy the child will be if you give him, for example, a set from the cartoon Superwings.

Or, for example, mimics.

Little Penguin Pororo.

When my kids were a little younger, they really loved to watch Peppa Pig, of course, within reason).

Kitty, you can even make it soft, just fill it with padding polyester.

Did you recognize these handsome men? Yes, yes, Paw Patrol.

For the smallest kids, babies or smeshariki are perfect. I can send the schematics and master class to anyone who needs it, write a comment at the bottom of this article (I will gladly share what is in my piggy bank with you).

We have an alphabet at home from felt fabric with animals and animals. Isn't it brilliant? How do you think?


If you need all such a funny alphabet in the form of animals, write.

Girls can sew such a doll.

Holidays are coming soon, and that's why I wanted to present you something so magnificently beautiful, how do you like this idea? How much is there different options and a squirrel, lion cub, zebra, penguin, bat and even pikachu.


Master class on how to sew felt souvenirs
Now it has become very fashionable to sew toys for children who have just been born or when they are one year old. Usually they do it in the form of a name and some kind of plot. I suggest you watch this video, just those who do not know how the details are stitched together correctly felt toys This video will help you figure it out, see all the stages of work:
Well, and of course, if you dream of sewing any fairytale hero or cartoon characters, then be sure to use this video instruction, based on it you can subsequently make absolutely any animals or men, the main thing is to find and print the template of the one you are planning to sew:
Christmas felt toys for the New Year 2018
When the time comes for the pre-New Year's hassle, everyone will immediately begin to create, so here are some small ideas for you.
Craft in the shape of a deer.
A house with a white snow cover.  The herringbone is beautiful.

Gingerbread men.

Heart.

The symbol of this year is a dog, so you can make it for a Christmas tree, below I will present you with even more schematics with different breeds of puppies.

Patterns of New Year's toys from felt
Of course, mittens, mittens, Christmas trees, horses are a symbol of any year, since all these accessories are always decorated with a fir tree.


You can even make a keychain and give it as a souvenir. 


Or such a table set.

Christmas bell.

Patterns and patterns of felt animals for beginners
Now I offer you fairly simple diagrams for those who are at the very beginning of the journey. Choose and do to your health!
Funny kitty.


Teddy bear in all its glory.


The giraffe is charming.


Insects such as the butterfly and the bee.

Bookmark for books in the shape of a delicate butterfly.

Little fox sister.


This bunny with long ears won me over.

Dog and puppy.


These are the mischievous cute puppies.


Owl toy.

A cockerel and a family of hen and chickens that can be made for Easter.


You can sew various other animals, for example, it can be a monkey, mouse, elephant, lion, pig or bear. They all have the same scheme, just design the muzzle in different ways.


I also really liked the idea of the angel.

Toys for children developing fine motor skills of hands
For the smallest, there are options for crafts in the form of puzzles, it looks quite interesting:


Or you can make such a game, pick up "clothes" for the animal))).

Or make a finger fairy tale or cute animals.

The most famous fairy tale is Teremok.
Or lacing.


That's all for me, what I liked the most and shared with you, so take a thread, a needle, scissors and felt and create different masterpieces. All pleasant creative fruitful work. See you later))).
Best regards, Ekaterina Mantsurova
For many people, creating comfort in their apartment is very important point... You can decorate your home with modern figurines, paintings, flowers, everything that is sold in the store for your home. But if these jewelry are made by hand, then it warms the soul of the creator of such a thing even more. The most pleasant souvenirs are felt crafts, they are soft, fluffy and more reminiscent of real animals.
Personally, I find it most pleasant to make animals out of felt, they turn out like real ones. Here are some animal patterns.
Turkey
Hares

Lizard - gecko

Owlets


Craft from felt with patterns: clever owl
We will print the patterns and attach them to the felt, cut out the necessary details.


We cut out all the parts of the owl, decorate it with flowers and apply blush.

Now we glue the fabric to the felt and glue the braid at the place where they join.

You can use buttons as eyes, cut out felt circles or embroider directly on the face.

We chose the option with cut out felt, sew on the eyes.
We make wings.

Sew the felt with the fabric and lightly fill them with padding polyester.

We sew all parts of the owl with a overlock stitch.

Sew on the back of the owl (back), leaving a hole to fill it with padding polyester.
We finish sewing the owl's head and decorate it with something, it can be beads or embroidered decorative elements. We remind you that the topic of today's article is p dressings made of felt, patterns with your own hands.

Our little owl is ready.
Patterns of flowers from felt
Now I offer you some patterns of flowers.

8 flowers from largest to smallest,

5 colors, from the smallest to the largest,

The pattern consists of 3 flowers, which all come together to form one lush flower.
Consider in more detail floral felt crafts patterns and patterns.

Using the last pattern, we cut out the component parts of the flower.

cut out details from red felt, flowers different sizes, depending on the level of their location. You can sew each flower along the edge, you can skip this, at your discretion.

We put the flowers on top of each other to reduce the size and sew them in the middle, as tight as possible so that the flower goes deeper in the center. The core will be a circle of gray felt, it will just need to be glued to the center of the flower. You can additionally decorate the flower with embroidery or beads.

The flower is ready, it remains only to sew either an elastic band to the flower, if it will serve as an ornament for the hair, or attach a pin if it will be a brooch.
Craft from felt with patterns: cat
Children will be interested in making animals such as puppies, kittens, chickens and the like with their own hands. To make an elegant and imposing cat with your own hands, let's see the cat patterns presented in separate parts: tail -
I have already spoken many times about my love for such material for needlework as felt and how much I love to sew from it. Therefore, when I was faced with the question of what to sew a keychain for a phone, the answer was obvious. But I didn't immediately decide how it should look.
However, everything was decided very quickly. On this day, we had a planned trip to our grandmother and I realized that it would be a bunny. The felt hare is gray, with long protruding ears and a little cowardly. But how to sew it like this? You will find the answer below.
How to sew a hare out of felt with your own hands?
There will be some peculiarities here, since we will not make a toy, but a functional product - a keychain for a phone or for keys. Therefore, we will consider some points in more detail. But before that, a few words about what needs to be prepared for work and where to get the pattern.
Felt hare pattern and list of materials for work
Let's start with the second, namely the list of materials. Our felt hare should look a little scared by design, so think in advance about what its muzzle will be. To do this, you can look at sketches of various emotions on the Internet. Or buy special eyes for toys.
In addition to the peephole, you will also need:
- felt;
- scissors;
- thread and needle;
- filler for toys;
- glue Moment Crystal.
In addition to gray felt, pink is also needed for the ears, heels and tummy. As for the density, for this key fob, I chose a material with a thickness of 1 mm. As a filler, you can take either a synthetic winterizer or holofiber.
Basic manufacturing process
One, two, three, four, five - The bunny went out for a walk! Remember this poem from your childhood? In our case, of course, it will not be possible to do everything "one, two, three", but nevertheless I will try to explain in such a way that making the keychain does not take too much time from you.

Attention
I draw your attention to the fact that in the attached file you will not find the pads for the heels and the nose.
I simply forgot about them when I was preparing a pattern for a hare. But they are very easy to cut yourself. 6 small circles for the hind legs (three for each) and one larger for the nose.

After all the details have been cut out, we proceed to their sequential stitching. Let's start with the heels.
In this case, unlike our previous pet, when sewing, we use a seam "over the edge" with a two-fold thread.
This type of connection gives an additional decorative design in finished product- in this case, it performs, among other things, the role of edging.

In the same way, we sew the legs together. After that, we start making the loop. This is a very tedious business in this case, but you will like the result. From threads in several folds, we need to weave a pigtail with a length of approx. 4-5 cm and fasten with knots on both sides.
Fold it in half and form a loop, apply it to the part and glue it with a piece of gauze.

You can make the length of the loop at your discretion - it seemed to me a sufficient length of half a centimeter.
We connect the tummy to the body, stitching both parts together in a circle, leaving the area for stuffing not sewn up at the top. We fill with filler, sew up and break the thread.

This is how we imperceptibly got to the final stage of the process - to the final assembly of the main parts and the design of the face.
Final assembly of parts and decoration
And now the most interesting stage of work begins, because from this moment, step by step, we will observe the real results of our more and more new actions.
We'll start by gluing the legs to the torso at the base of the neck. And then we connect both parts of the head with the ears, stitching them together in a circle. Before reaching the end, we fill our head with filler and sew up the remaining area.

Great, isn't it? You like? A little more and you will have a new cute keychain for your phone in the shape of a funny eared hare.
Now we take the heels in our hands and, having chosen the position we like, glue them. I glued it so that the upper (more precisely, the front) legs remained mobile.

We glue the pink pads on the heels and fingers, as well as the inner pink parts of the ears. From threads using a primitive round template we make a pompom - the future tail.
We attach the ponytail. Turn over and glue the eyes, nose and mouth. In order to make the mouth, I smeared pink thread, folded 2 times with Chinese super glue and giving the necessary shape, let it dry. Then she cut off the excess and glued it to her face with glue. Moment.

The felt hare is ready. It remains only to insert a ring with a cord into the loop and attach it to the phone.
Share the material with your friends in social networks, add it to your pages or bookmarks, subscribe to my mailing list with new master classes with templates, patterns, announcements of contests and other equally interesting handicraft projects and always be positive and creatively purposeful!
Wish you creative success and good mood!
Tatiana