Sometimes, a laconic, strict and too perfect modern interior is so lacking a bit of charm, individuality, the atmosphere of a homely hearth. Correcting the situation will help the needlework. Beautiful things made with their own hands will fill the house with warmth and comfort, make the interior special, sophisticated and unique. For you, we have collected the most original ideas for 2018 with a step-by-step description and examples in the photo.
Rainbow Decoration on the Wall in Bohemian Style
This bright detail will noticeably transform the interior of the hallway, living room or children. Make such a beauty easier simple, and the result is awesome!
So you will need:
- round decorative napkin made of wooden beads;
- 7 serpent yarn in your favorite colors;
- needle for sewing;
- white thread;
- scissors.

Step by step
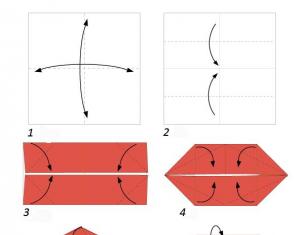
1. Fold the napkin in the pressure and gently sew white thread.
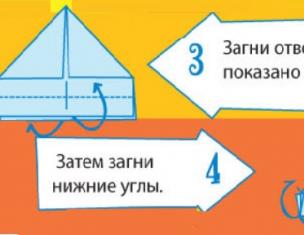
2. Cut the yarn on equal length and volume of the strip, each of which folds twice and the place of bending tie the thread of the same color.

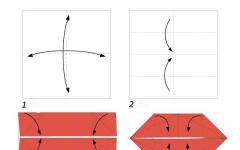
3. Place the colors of each other as you like.
4. Start sewing strands from the center of the flat napkin. Top in the needle one side thread strands, tighten it well to the base of the napkin and go along one of the sides. So that you do not break anything, at the end, leave a few centimeters of the thread free, and then tie it to another strands.

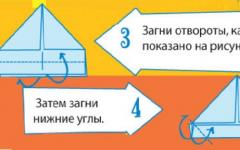
5. Repeat this process with two beams of the same color, and then with two beams of the next color, etc.

6. To hang the product on the wall, make a loop from yarn, sewing it from behind.

Great rainbow decoration is ready!


We propose to make a sophisticated, gentle, elegant candle wreath, which can be decorated.


For work, prepare the following materials:
- metal ring with a diameter of 25-30 cm;
- beautiful twigs with leaves;
- candlestick on the clip;
- thin wire;
- scissors;
- leather lace.

The project in the photo used the eucalyptus branches, but we need to find eucalyptus, so you can replace with sprigs of any plants - fresh rosemary, willow, mint, spruce, thui, etc. and now proceed:
1. If necessary, cut off short twigs.

2. Cut a few pieces of a thin wire with a length of approximately 5-7 cm.

3. Attach the branches to the bottom half-round of the ring so that the roots watched inward. Attach them with a wire at the top and base. 

4. In the photo, the candlestick with a clip. If such a thing failed to find, take another small candlestick and attach the wire in the center of the metal ring. Thinks gently disguise the place of attachment.

5. To hang the product, tie a leather laugh, braid or ribbon, as in the photo.

Magnificent decor on the window is ready!


Keep in mind such a candlestick in the form of a wreath is more decorative. But even if you lit a candle, do not go far and for a long time - it is unsafe!
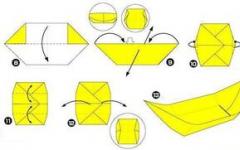
Decorative Wicker Paper Paper
Of the two most common photos from travel, you can make a perfect unusual stunning panel on the wall. How? Tell in the next workshop.

For such a panel, you can take images of absolute any subject. However, it is important to choose photos or pictures so that one is a background, and the second is more graphical and contrast (black and white).
Necessary materials:
- two photographic or patterns in one format that you need to print with fields;
- pencil;
- glue;
- metal ruler;
- stationery knife or scissors.

Step by step
1. Rapid pictures on a strip of about 1 cm wide.

Name strips to not get confused, and cut through the intended lines. For this, there will be empty fields that were left when printing a photo.

2. On the contrast photo, leave a small indent from one edge. When cutting the bands do not reach the end. We cut the second picture on the smooth stripes of about 1 cm. The resulting "fringe" will hold on to the general edge.


3. Start weave on the principle of "one for another". So that the strips did not go to the sides, repeated them periodically.

Finishing weaving, ends can be trimmed or wrapped. Ready panel Insert into the frame and enjoy the masterpiece!

Print on textile with your own hands
You can decorate home textiles with a pretty print using the simplest tools, such as potatoes! Make original pillow covers easily using a regular stamp carved from potatoes. 
Prepare:
- the fabric on which the print will be applied (case for pillow, kitchen towel, etc.);
- textile paint (can be several colors or shades);
- two potatoes.

Let's proceed:
1. For stamps cut potatoes in half. A sharp small knife is applied to half a drawing. It is better to draw geometric figures (squares or triangles), inside which you can apply an additional pattern - for example, strips.

2. Let us squeeze a small amount of paint on a flat surface so that it is convenient to make a stamp and paint lay uniformly.

Tip: on separate flaps of fabric (or paper) Make trial drawings. So you can choose the best options.

3. Choose patterns and stamps covers. For one product, you can use one drawing, but stamping them in different directions, as in the photo. And do not forget to put the newspaper inside the cover or under the fabric so that nothing is blocked.

4. We leave the tissue to dry, at least for an hour.

5. Fix the paint, watched covers from the wrong side at a sufficiently high temperature (in the "Cotton" mode) for 2 minutes. Between the board and cover we are making extra fabric.
The product is ready! Decorative pads with manual print look very colorful.
 Floor lamp from branches
Leisure time, as soon as the trees are preparing for winter - a wonderful period for crafts from branches. And therefore we advise you to take your leisure time with the benefit, make a cozy lamp from natural materials.

And for this you will need:
- branches, different in length and sizes;
- base for the future lamp (for example, vase);
- wire with a light bulb;
- shade;
- glue pistol;
- acrylic paint, sequins, brushes.

Step by step
1. First of all, you need to degrease the surface of the vase, rubbing it with alcohol. Then push her sandpaper well. From this glue firmly connects the branches with glass.
2. Printe branches to a vase with the help of a glue gun, leaving a small plot without branches.


3. Inside the glass vase, we set the lamp in the lampshar.

4. We glue the branches to the remaining vase fragment.


You can leave the composition in natural form, and you can continue to decorate:
Option 1 - Give gray, chaotically paint the twig acrylic paint white.


Option 2. - New Year's. Color sprigs with silver paint and cover sparkles. Calculate the lamp with a rain and small toys and you will have a wonderful Christmas composition.


Option 3. - Scandinavian. The ash-pink is one of the most popular shades in the interior of the last few years. All branches do not necessarily paint, combine a few tones, for example, pink, gray and white. It turns out an exquisite lamp with a Scandinavian character.


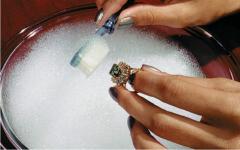
 Marmoring with priests
Marmoring is a popular reception in needlework, when special acrylic paints are diluted over the surface of the water, where various items are lowered - from paper to wooden.
In our example of marching on the dishes, nail polishes are used as dyes (preferably slow dry).

Materials:
- slowly dry nail polishes;
- glass or porcelain cup, plate, vase, etc.;
- disposable container;
- chopping wand.

Step by step
1. Prepare a container. Consider, after breeding varnishes in water, the container is unlikely to be laundered, so take such that then it was not sorry to throw. The second point - the container must be sufficiently volumetric so that the subject can be freely twist around its axis.
Pour the container with water by approximately half. Water must be as hot as possible (so much so as not to spoil the container) - it will suspend the process of drying varnish in water.

2. Add varnish into the water. Keep a jar with varnish horizontally, closer to the surface of the water so that the drip of varnish does not immediately go to the bottom. When contacting with water, it will start blossoming and filing. Therefore, literally in a few seconds you need to have time to form with a wand divorce for marble effect. And you can give the paint yourself to break the thin layer.

3. Pulk dishes in the container with water and varnish.
Keep the container at an angle and twist around your axis, as if collecting a varnish film from the surface of the water. If marmatory is thus the food dishes, be sure to leave the place of touching the lips, i.e. Upper, without varnish.

Idea: Try to experiment and apply layerly several similar shades, for example, red and dark orange. For greater similarity with natural natural stone, work in the gradations of blue and gray.


4. Finished products Leave dry. Drying time will take no more than 5 minutes.The convenience of this technique is that any imperfections in the process of work can be easily removed and start moving again - simply keep a spray to remove varnish.
This decor is pretty resistant. Whether marble divorces wash in the dishwasher - a controversial question, but with a hand-sparing wash, it will certainly laugh until the next staining.If you wish, to securely secure the result, the product can be covered with aerosol transparent varnish.
Even more ideas for your inspiration are presented in the next photo formation.
Embroidery


Original wall decoration


Panels from looskuts of different textures

Decorative yarn fruit

Ideas for children


Colorful textiles


Rug with LEDs

Decorative vases with their own hands


Head chandelier and plaffers


Painting on dishes


Designer watches as idea for masterpiece with their own hands


Needlework is real art to turn the most common items and materials in stunning works. Some skills, desire, creative fantasy - and you will certainly be able to realize any of the ideas presented.
For many people, a favorite hobby is homemade needlework with their own hands. If you have creative abilities, use your full talent in order to create original things and exclusive interior items. Needlework does not require any special skills or knowledge from you. Such an occupation is suitable for both experienced masters and beginner people who have never worked with a needle, scissors and other tools.
At first, you may not manage to make quality products, but with time any, even the most difficult jewelery will be easily and beautiful. For the manufacture of different items, you can use any technicraft materials:
- old clothes;
- colored paper;
- foamed rubber;
- tapes;
- styrofoam;
- beads;
- threads and others.
Almost all materials for the manufacture of home decor are easily accessible, so you do not have to spend a lot of cash on your hobby. Consider how to choose the right view of the needlework. In this case, you need to adhere to one simple rule - do what your soul lies. The most popular types of needlework:
- crafts made of fabric for home;
- beadwork;
- patchwork;
- clothes decor;
- topiary - production of souvenirs from different materials in the form of small trees;
- scrapbooking - this kind of needlework involves the creation of unique postcards and photo albums from undergraduate materials;
- quilling - making crafts from paper with your own hands.
At first, you may fail to make quality products, but with time any, even the most difficult jewelry will be easily and beautiful
This is not a complete list of ideas for home with your own hands. If your horse is sewing, you can create original clothing items, exclusive curtains or interesting soft toys. Author's crafts from the fabric fit perfectly into any interior. For their manufacture, you can use unnecessary clothing, loskutka and any other technician materials. As a result, you will receive products that have no analogues.
Needlework for home and giving perfectly helps people who want to save. Another important advantage of Hendmade is that during work you can develop your fantasy and creative abilities, as well as the ability to see something new and original in simple things. In addition, this is an excellent way to surround yourself with design things created in a single instance. All the most interesting and unique you can make your own hands from the girlfriend. The main thing is desire and patience.
New direction of needlework (video)
Rugs for home and giving do it yourself
Great idea for home and cottages - bright woolen yarn or rugs. Such products will decorate any interior and give him a special charm. They look great in the hallway, bathroom or children's room. Particularly original rugs made of thick yarn of different colors. If you want to save, you can use for the manufacture of rugs unnecessary knitted things - leggings, T-shirts, etc. If you cut them with narrow stripes, it turns out soft, convenient in the work of the yarn. The finished product can be tied with lace. Such mats fit perfectly into the modern interior. Your handicraft will look especially original if you insert LEDs into it. Yarn for the rug need to choose very carefully.
 Great idea for home and summer cottages - bright woolen yarn rugs or ropes
If you take synthetic or acrylic threads, the product will electrify. Woolen threads unpleasantly "pinch" for bare feet. The best option is a half-walled yarn.

In order to make a rope mat, you will need a few meters of thick rope and 2-3 old woolen sweaters. Twist a rope in the form of "snail", bonding every turn of thread. If you need to make a rug quickly, you can use a glue gun. The basis for the rug can be the usual burlap. With it, you reliably lock your product. From old sweaters, make pompons and other details of the decor for the rug.

Crafts from fabric
If you want to revive the country's interior, seek some useful things from old tablecloths or towels. For example, decorative pillows made of soft tissue can be used as decoration for the sofa. To do this, you will need several flaps of fabric, which does not appear when cutting. For the base, you can take the most conventional cotton fabric. Crafts from fabric are distinguished by a wide variety. To decorate the room in the country, you can sew a patchwork or original curtains. Perfectly look in the kitchen fabric bedding for cups and plates. They can be made of any fabric and decorate with a wide braid.
Any needlewoman keeps the remnants of various fabrics. Among them, you can find tiny pieces that cannot be called trimming, but your hand should not be thrown away. Collect all these trimming and make it decorations for the interior. Consider some of the most unusual options:
- furniture update;
- unique accessories;
- decorations for the children's room;
- decor of vases, baskets and kitchen tanks.

Such crafts made of fabric for home and cottages can make any person, even if it does not waste. The fabric can be simply glued to the base, but at the same time the elementary sewing skills you still need. The remnants of the fabric can be decorate the drawers, a metal headboard or a small table. Cotton fabric can make decor for furniture in traditional French style.
Small loskutka can be used to design frames or desktop lamps. A simple glass vase will look like a new way if it is decorated with lace or silk ribbons. For flower pots, you can sew original removable covers. From the residues of the felt will turn out beautiful homemade rings for napkins. If you want to sew beautiful curtains, visit the master class of some experienced designer. At such an event, you can learn many new ideas. When you learn to make various original products from the fabric, create your own blog and share your skill with other people.
Beautiful needles do it yourself (video)
Origami
The most simple crafts from paper, New Year's snowflakes, postcards, airplanes, many were taught to do in school. This simple and affordable material is the basis for the manufacture of various interior design items and decor. Experienced masters use any paper - cardboard, napkins, colored sheets for children's creativity and corrugated paper. The last option is perfect for the manufacture of colors. From such a material, very beautiful realistic products are obtained.

The household often use various boxes and stands from cardboard. To decorate the country area from this material you can make wind turntables. From the summer heat you will save you a cardboard fan, made in the form of a paradise bird. Cylinder from cardboard will be the basis for the manufacture of some animal or aircraft.
Perfectly look in the interior design for the home and summer house "Flowers of Daisy". You will not spend a lot of time on their manufacture. The middle of the flower can be made of yellow paper, and the petals are made of pink or purple. Masters who are constantly working with paper create unique things from this material - floral compositions, picturesque panels or various figures. They get present pleasure from their work. Create, and your life will be happier and more interesting.
Needlework do it yourself
Creativity is like a disease. Despite the lack of time, resources and strength people continue to create. Unimaginable paintings from various materials, carved sculptures and many other, original and beautiful things are subject to work of masters and beginners. Needlework for home It becomes not just interesting, but a prestigious occupation. The passion not only characterizes a person, but allows it to develop and even earn. Based on the diversity of applied arts, their separation appeared.
Women's handicraft.
Women's desire to decorate the house and bring the buzz everywhere, it turned out in the craving for creativity. It is the perfect half of humanity that devotes the lion's share of time to making crafts, writing paintings and embroidery.
It is impossible to allocate purely female types of hand creativity. Basically, they are characterized by:
- lack of technical details;
- long manufacturing time;
- small share of physical exertion;
- painstaking labor.

That needlework do it yourself Can be made from various materials and concerned all areas of life. Since ancient times, sewing and embroidery occupied women. Now there are many materials that contribute to the development of skills in these directions. Tailoring is too complex process. But sew a soft toy for a child, from the girlfriend, will not work.
There is a huge variety of chat techniques. Some are created without a face, many are disappeared after manufacture. Images and character are being developed for toys. The work implies not just manual labor, but a tremendous flight of fantasy, creating entire stories and worlds.
Embroidery also has undergone changes. Now it is possible to embroider not only threads, but beads, ribbons and even wool. Amazing paintings are obtained by combining techniques and materials. Embroidery combines with textile painting and batik.

Male types of needlework.
For men, too, the creative process is also not alien. Solidity and purposefulness helps them create masterpieces from, it would seem, completely non-zealous things.
Male classes are considered:
- artistic forging;
- wood carving and bone;
- work with lighting;
- crafts from tires and metal fasteners.
Examples of male creativity can serve jewelry. Working with a stone requires high concentration and skills of equipment operation. Airbrushing - painting, with the help of pneumatic equipment, are mainly engaged in men. Since products sets require constant monitoring and repair.

Different types of thread are transmitted from generation to generation. These are wooden figures, and gypsum sculptural ensembles. Very popular in winter carving on ice and snow. For this not only you need to be virtuously controlled with chainsaw, but also have a wide artistic horizon.
Currently, the figures and compositions from tires became extremely popular. Working with the material is painstaking and physically exhausting. But the result will decorate any garden and park area, a playground or just heels near the house.
Children's types of needlework.
You say that needlework for kids is too loud! And look at the variety of sold billets for children's creativity. Baby and parents do not need to invent something themselves. You can simply choose from a huge sentence, suitable and character of the child.
For girls, you can collect and decorate an exciting mosaic. Boys will be more suitable for military equipment models created from a variety of wooden or plastic elements.
For the smallest sets of finger paints. They can draw a picture on any surface.
Schoolchildren are interested in decoupage, gilding or found. These are not the cost types of creativity contributing to the development of the child. On the Internet it is easy to find master classes with photos And even step-by-step video lessons. So there should be no problems with the theme.
The modern market of goods is simply replete with capabilities. For any creative direction, the necessary elements will be detected. Therefore, it will not only be the process of work, as well as the choice of tools for its execution.

The mass of books on needlework and decoration of the house will help novice creators. Understanding the high level of skill, you can try yourself as a mentor, using webinars or personal master classes. After all, the process of creativity is an endless improvement.
For each type of Hend Maid, there are exhibitions and the community opens. At such events, in a close circle of like-minded people, share experiences, and absorb other people's knowledge. Opportunities Mass, the main thing is to strive and stop at the result.
Needlework for home with your own hands: Interesting ideas and master classes 2018
Sometimes, a laconic, strict and too perfect modern interior is so lacking a bit of charm, individuality, the atmosphere of a homely hearth. Correcting the situation will help the needlework. Beautiful things made with their own hands will fill the house with warmth and comfort, make the interior special, sophisticated and unique. For you, we have collected the most original ideas for 2018 with a step-by-step description and examples in the photo.
Rainbow Decoration on the Wall in Bohemian Style
This bright detail will noticeably transform the interior of the hallway, living room or children. Make such a beauty easier simple, and the result is awesome!

So you will need:
- round decorative napkin made of wooden beads;
- 7 serpent yarn in your favorite colors;
- needle for sewing;
- white thread;
- scissors.

1. Fold the napkin in the pressure and gently sew white thread.
2. Cut the yarn on equal length and volume of the strip, each of which folds twice and the place of bending tie the thread of the same color.

3. Place the colors of each other as you like.
4. Start sewing strands from the center of the flat napkin. Top in the needle one side thread strands, tighten it well to the base of the napkin and go along one of the sides. So that you do not break anything, at the end, leave a few centimeters of the thread free, and then tie it to another strands.

5. Repeat this process with two beams of the same color, and then with two beams of the next color, etc.

6. To hang the product on the wall, make a loop from yarn, sewing it from behind.

Great rainbow decoration is ready!


We propose to make a sophisticated, gentle, elegant candle wreath, which can be decorated.


For work, prepare the following materials:
- metal ring with a diameter of 25-30 cm;
- beautiful twigs with leaves;
- candlestick on the clip;
- thin wire;
- scissors;
- leather lace.

The project in the photo used the eucalyptus branches, but we need to find eucalyptus, so you can replace with sprigs of any plants - fresh rosemary, willow, mint, spruce, thui, etc. and now proceed:
1. If necessary, cut off short twigs.

2. Cut a few pieces of a thin wire with a length of approximately 5-7 cm.

3. Attach the branches to the bottom half-round of the ring so that the roots watched inward. Attach them with a wire at the top and base. 

4. In the photo, the candlestick with a clip. If such a thing failed to find, take another small candlestick and attach the wire in the center of the metal ring. Thinks gently disguise the place of attachment.

5. To hang the product, tie a leather laugh, braid or ribbon, as in the photo.

Magnificent decor on the window is ready!
Keep in mind such a candlestick in the form of a wreath is more decorative. But even if you lit a candle, do not go far and for a long time - it is unsafe!
Decorative Wicker Paper Paper
Of the two most common photos from travel, you can make a perfect unusual stunning panel on the wall. How? Tell in the next workshop.
The most interesting needlework for home do it yourself

Needlework for home do it yourself most interesting And fascinating, besides a very useful occupation. Thanks to this needlework, the design of your apartment acquires the latest creative appearance.

Many owners seek to give their own housing maximum comfort and comfort. In addition, needlework for home with their own hands is the most interesting and fascinating leisure. Almost every girl agrees that after a difficult day, it does not wait to relax and go to your favorite activity.
Handicraft types of homemade needlework. It is embroidery, knitting on the needles, quilling. Each person will find a leaking to taste. Of course, an interesting needlework for the house is very in demand and now. Every day new technologies appear to create the most unusual and creative crafts.


The most unusual and interesting types of needlework for home do it yourself
One of the latest and modern types of creativity - needlework for the house "Scrapbooking".
Scrapbooking is a way of design of photo albums, in which various ribbons are used to decorate photographs, stickers. It is also possible to use all the memorable things for you that cause associations with pleasant moments from life captured in the photo.
To date, this kind needlework for home with their own hands It is applied not only for the design of photo albums. Handicrafts come up with a huge number of ideas for the design of things in this style - this is a variety of postcards, and packaging for gifts, decoration of the caskets and frames for the photo.
On the Internet there are a huge number of groups and communities for connoisseurs of scarppunking, in which any needlewoman can find something new, interesting and fascinating: master classes, recommendations of specialists, and most importantly - addresses of online stores in which it is possible to purchase absolutely Everything necessary to implement all creative ideas in life.
Decoupage is a very well-known and very popular way to decorate different items: from the most miniature plates and VAZ up to large cabinets. The decoupage technique itself is not very difficult, however, there are special techniques that require specific abilities and skills.
The essence of this type creative needlework For the house, it is that a thin layer of paper is taken with a pattern for the decor and sticks to the surface of the decorated object, creating an illusion of handwritten painting.
The desired drawing for the decoupage can be cut from an ordinary napkin, from the log, wrapping paper, or labels.
Objects from plastic, as well as various decorations made of plastic, dishes and glasses, ceramic vases and pots, gypsum figures - it is all can be embellished with picturesque topics from napkins. The elegance of things created by their own hands and covered on top of the layer of varnish can become an object of hereditary pride.


Decoupage of the candle is the most common and simple method to make your own hands a interesting present for a loved one - a very difficult and very interesting thing that does not require the use of varnish and glue!
Felding is a type of creativity with not straighched natural wool. This type of classes was familiar from the long time. Felt is the first one to have learned to make people from animal wool. But the ability to spin wool came a little later.
Nomadic peoples produced kibita, carpets, shoes, cattle equipment, bags, household dishes. At the moment, felt is used mainly for industrial purposes. However, skilled needlewomen and now they continue to make clothes, shoes and even decorations from wool.
Also, I would like to mention the felting as one of the trends of art. It originated not so long ago, however, it develops very rapidly, the latest techniques and tools arise. The ability of wool to staining began to apply not only in everyday life, but also to create excellent walnies, statues and toys.


For such creativity, no special art education is required at all, therefore Felting is an affordable type of art. For example, to create a picture, a small amount of multi-colored wool and soap solution will be required. The picture will need to lay out of small pieces of wool, slightly moiste and put the shape with your hands. Already after drying, this picture will be similar to a small rug. This technique is referred to as wet fuel. There are also dry felting methods for which special large needles with long jazbins are used.
Survection at home - the most interesting needlework for home do it yourselfMoreover, it is accessible to each mistress.
One of the most exciting methods of cooking candles of the house with their own hands is a sparkling of wax or paraffin.
Candles of such materials are sufficiently solid and well hold the form, which opens unlimited space for the imagination of the needlewoman. Similar candles can be cast into a wide variety of figures, make multi-colored, decorate to your taste, as well as perform threads. Usually such candles are an indispensable attribute at weddings and other celebrations.


Make a candle with your own hands is completely simple - you need to melt the wax or paraffin, fill them with the necessary form, install the wick and wait until it is frozen. For the production of candles it is also possible to buy ready-made materials - candle wax or paraffin mass, as well as philitol.
In addition, it is possible to purchase inexpensive ready-made candles, cut them into a few pieces, without damaging the wick. Separate wax from the wick, melted, and it will be possible to use it for the manufacture of a new candle.
Origami is an ancient type of creativity of paper crafts mainly does not require scissors and glue.
With the help of this type of art it is possible to form various compositions and crafts.
In different countries, exhibitions of crafts and compositions are held; The imagination of craft masters is simply inexhaustible.
Origami is an excellent present, especially if they are made with a soul.
Origami is perfectly suitable for decorating the house. To do this, it will be necessary to purchase beautiful multi-colored paper that does not fade in the sun. For example, to the day of all lovers or to the wedding, it is possible to make a large number of hearts, and for the new year - cute snowflakes and christmas decorations.
If you have found a mistake in the article, please select a text fragment and click Ctrl + Enter..
Needlework for home with your own hands: photoide for creating a luxury decor, tips and master classes
Today we will prove to you what to do the most interesting needlework for the house with your own hands is much easier than it seems to be inexperienced Hand-Maid's lovers.
To comprehend it withlas, you will need a minimum of breeds, skills and time.
At the same time, you will receive original products that will no longer meet anywhere in addition to your own interior.

Tender pillow with their own hands with painting in the Scandinavian motifs in the batik technique

Cozy homemade corner with tapestries and handmade pillows from which the Scandinavian atmosphere blows

Very bright embroidery in fresh colors, performed in the technique of free smooth

Gentle stitch beads by the canvas
The most pleasant in needlework for home and giving do it yourself is that all the necessary tools and materials can be found at hand. There is no need to spend money on ready-made expensive products to make a note in the interior of home comfort, warmth and soulfulness, if you can make them yourself!
Small master class on making unusual home decorations from simple light bulbs
Crafts and knitting do it yourself: how to learn how to make mats

The harmonious combination of blue shades in the interior is complemented by a large hook rug
Outdoor rugs that have been undeserved oblivion a few years ago, come out again at the interior benchmark. They will find a place in children's rooms, hallways, bathrooms, near the bed in the bedroom or in front of the sofa in the living room. Small round or rectangular mats with an interesting texture (shaggy, fluffy, with long elongated loops, and so on) are especially popular. Let's look at two simple master class, having mastered that, you can perform this beautiful needlework for home with your own hands.

Incredibly bright and very motley rug made of flavors of fabric, as well as the emblem, made in the same style
How to make a floor rug: master class for knitting amateurs
You will need the following:
- a thick knitted hook (suitable number 10);
- fat yarn (you can use yarn of different colors, then the finished product will be brighter and original);
- scissors.

Very gentle white rug made of crocheted
Tip! Instead of yarn in its traditional understanding, you can use old knitwear - T-shirts, Longsliva, T-shirts. You will not only find the use of old things, but also get a soft and pleasant to touch the yarn, work with which is solid pleasure.
- Tie a chain of 16 loops by columns without Nakid.
- Combine the first and last loops to get a ring.

Check the first row by the column without Nakid

Catch the colors you like for the rug
A series of photo shows how to move with the thread of one color to another

One of the edges of the edge of the rug lace
Complete the knitting one near the loops of the columns without Nakid.

The final stage of registration of the edge of the rug near the column without Nakid
There are also many interesting ideas of rugs that can be weave, tie with knitting or crochet.

Bright crochet rug with cute tassels
Fluffy grass rug: master class
- five machines yarn of different shades of green;
- very thick hook number 14;
- scissors.

Original rug-grass do it yourself, hooked
Tip! Carefully attribute to the choice of threads. If you take an acrylic or any other synthetic yarn, the finished product may turn out slippery and electrical. If you use woolen threads, the likelihood that the rug will "pinch" you for bosy feet. The ideal option is a half-walled yarn.

Another option of the grass rug, made of flavors of fabric in weaving technique
- Separate the tips of the threads from all sweating and combine them into one improvised thread.
- Check this national jiggedting chain of 20 air loops. This amount will be enough to get a product of 40 cm long. If you want to make a rug of a different size, simply vary the amount of the original loops.
- Make a row from the columns without a nakid, fastening the loop. ATTENTION: Be sure to pull them out so that the canvas was not even, and shaggy!
- Make a square or rectangular fabric you need, tissing every new row of the previous hinges (from each loop should be received new, that is, without openwork pass and additions).
- When the rug will have the desired size, secure the thread of sturdy nodules.
- Scissors cut the elongated previously loops.
In such a simple way, you can create an original mat for the house. Consider, perhaps in your apartment there will be materials that are suitable for creating a real masterpiece?
Pomponov rug
A small master class on rapid and very convenient manufacture of pompon, from which an unusual rug can also be made

Also, the pillows can be issued a pillow, to lie on which it will be still softer

Original cushion, crocheted bias from thick thread

Of the very thick threads, you can create unusual tapestries that will be the original decoration of the walls of your home.

At first glance, simple, but very beautiful embroidery
Handicraft for home: Patchwork and felting from wool
Handmade pillows with Scandinavian ornaments and original inserts
Fabric decor enjoys well-deserved popularity. It helps to bring the home comfort, warmth and soulful in the interior. Especially well fabric decor looks in rooms decorated in almost all style directions. We invite you to get acquainted with the very simple ways of making original fabric paintings.
Toys do it yourself: Sovirts from felt
Master class on the manufacture of small decorative soviek from felt
How to make pictures with your own hands from fabric and natural materials?
- burlap or other natural textiles with a pronounced coarse textile;
- any natural materials (for example, coffee beans, cinnamon sticks, badyana stars, dried flowers, natural moss and so on);
- decorative elements (ribbons, wooden or bone buttons, lace);
- frame;
- cardboard for the base;
- glue pistol;
- scissors;
- simple pencil.

Unusual picture of handmade made of flasks fabric
Idea! Similar paintings made by their own hands, perfectly fit into such styles like Country, Eco, bungalows. Best of all, they look in the kitchen decoration.
- Prepare a cardboard and fabric base. To do this, attach both to the frame, make a pencil mark and cut out.
- Stick fabric to the cardboard, insert into the frame.
- Natural materials put the desired drawing on the fabric and lock the glue gun.
- Complete the resulting pattern with decor (buttons, lace or any other).
- Give the picture to dry.

Original picture in the nursery. Please note how neatly all small parts are made.
Wool felting: master class
And from the fabric you can create a huge lot of interesting things.
Patchwork: master class

Original Handmade Ornaments Print Pillows

An incredibly convenient organizer of fabric for wires and other trifles

Very beautiful styling paintings

Handmade pillow combined from dense linen fabric and leatherette with an uncomplicated decor

Original version of the holder for toilet paper from handmade fabric

Handmade tapestry from natural woolen threads looks very impressive in the interior

Handmade pillows. It looks original from different pieces of fabric.
Picture of fabric in a children's room
We offer to decorate your baby's room a very interesting needlework for the house - a picture of a foam-based fabric.
Dolls do it yourself

The original doll from the fabric made by their own hands will be better for a child
What do you need for this?
- colored patchwork;
- foam base;
- wallpaper for transfer;
- pencil;
- copy paper;
- glue;
- nail scissors;
- any flat sharp object for picing drawing (for this purpose, for example, a spatula for a patchwork) is suitable;
- spindlers.

Another option toys, but already as a pillow for a nursery made by your own hands.
Tip! The breakout (like a spatula) can be replaced by other suitable in the form and thickness, which are under hand. For example, it can be a stupid knife for oil.
- From all sides of the foam blank, retreat 1.5-2.5 cm for the future frame. Produce the resulting rectangle with a spatula.
- Selected image transfer with a copy paper to a foam base.
- Production contour drawing with a spatula.
- Clear the zone that is going to cover with flap.
- The selected piece of fabric attach to the lubricated glue of the area and press it on the previously sold circuit on the contour.
- Cut extra fabric with scissors.
- The remaining flap tails hide the sparkper inside.
- Treat the whole picture.
- Make a frame from the fabric.
Look at what other wonderful paintings can be created with your own hands from threads, fabrics and various decorative elements.

Another original picture, but already out of nails and threads, is perfect for the interior addition

Incredibly beautiful and very realistic volumetric pattern embroidered with a loose

Decorative handmade painting plates

Composition from handmade mandala creates an atmosphere of lightness and airiness in the interior of the room
Beading: Flowers and Bead Trees
Make flowers from beads with your own hands will not be difficult for you. Just follow the recommendations:
More advanced handmadeiders can try themselves in creating a tree of beads with their own hands. How to make stunning bead trees, look further in a gradual master class:
Jewelery do it yourself: Beads do it yourself and bead necklace
In addition to the jewelry for the home and a variety of decorations, you should not forget about the beauty aspects of the handmade and DIY (that is, doityourself). Any fashionista will confirm that sometimes the most elementary decorations with due combination with your way can look more organically and harmoniously, rather than classic yellow or white gold and stones. Moreover, this kind of creativity is not suitable for the smallest princesses. What could be better painstakingly made beads with their own hands or a multicolored bead necklace?
Decoration with your own hands: What is the result?
Hand-Maid is a great art of creating real works of art from the most common materials. A little imagination and our ideas - and you will undoubtedly be able to create an original element of the decor on the joy of yourself and relatives!

Very atmospheric handmade tapestry with Scandinavian motifs will add to the house
Small master class from painting with your own hands Stands for mugs

You can not only embed pictures. You can decorate your casual clothes with unlimited patterns.

Another option hand painted dishes. Very light and fast way to update the old boring service

Incredibly delicate handmade pouf from snow-white fabric with knitted hook elements

Very realistic embroidery using different techniques
Needlework for home with your own hands: Making postcards do it yourself
In case working with threads, beads and tissues you bored, take the simplest. Paper! Original original postcards made by their own hands will become a universal gift for any festive event. We are sure your loved ones will also appreciate your merit skill. See below the master class on creating creative postcards with your own hands:
The article is written on the materials of the sites: Lovely-dom.ru, Rukodelie-rukami.ru, Stroitelstvo21.ru, Pizhonka.Ru, Odomah.org.
My home is my castle. Yes, so often they say. But we don't live with you in the Middle Ages, our fortress should not be an ordinary home, but a cozy nest, where everything is beautiful and convenient. In this article, we will look at the various ideas of decorating rooms that can be made with their own hands without much costs.
Parishion
Even the simplest input zone can be made functional and stylish. Wooden panels will bring fresh notch in the interior. Not only is it just beautiful, it is also convenient. On the panel you can fasten the hooks for bags and jackets. You can also make a small shelf for useful trifles.
For small apartments, there is also an interesting solution. Stove for shoes, hooks and lockers can be combined into one organizer.

The usual entrance door can also be made with a stylish element using wooden fellow.

So that the shoes did not interfere with and do not bundle anything from a wooden box and stones to make an unusual stand. So even after a walk in the rain, your hallway will remain clean.

By the way, instead of pebbles, an artificial rug made of plastic grass can be used.
The old staircase can be used as a shelf for shoes. Now all shoes will be at hand.

For a couple of years, it's fashionable to do all sorts of homemade pieces of wooden pallets. In the hallway you can use them as a coach for shoes. From above, you can make a shelf for trifles or just put flowers, and on the sides to attach hooks for umbrellas.

For domestic owners, there is a small lifehak. So that the bowls for the dog or cat do not interfere with the passage, secure them on a separate shelf in the closet or under the table top.

Surprise your guests a non-standard approach to such an ordinary thing, like hooks for clothes. Wooden rails, branches, selflessness, a little fantasy and voila! Unusual hanger is ready.

Bathroom and toilet room
These premises must be primarily comfortable. However, and do not forget about beauty. After all, everyone is nice when the necessary things are at hand, when you do not need to disperse the wires from the hair dryer or rushing in search of ear chopsticks. We offer some simple ways to organize space.
Old cabinet box or shutter with flea markets can be turned into a toilette stand.

And old floorboards can be used in wall decor. It looks unusual, but it is done very simply: the rails are either glued to the wall, or fasten with self-draws. From above, they can be painted, lacquered or somehow decorated.

Now you can use the cans for feeding drinks and dishes. Why not use them in the decor? You do not have to look for the most Mason jars for which the whole Internet is crazy. Any other suitable.

We are all accustomed to the fact that the towels hang on hooks and occupy a lot of space. Use the shelves for storing bath accessories. And convenient, because you can put something else on the shelves, and beautifully.


Now it has become very possible to use a stone for trimming a bathroom. They cover the walls, decorated the bath. From the pebbles, you can even make a rug! Just do not forget in this case the rubber foundation in order not to scratch the floor.

In order not to bother with the division of linen before washing, make the rack at once with several storage baskets. Baskets can be painted in the color of the linen for which they are intended.

By the way, about washing. Tired of the usual white washing machine? Color her. You will need only incommable enamel and stencil. The latter can be made from painting scotch.

Living room
Quickly and not expensive to get a stylish rack is not problem. Use wooden boxes. They can be composed as you need, making the shelves of various sizes. There is another plus - it is possible to collect such a cabinet with the whole family and greatly have fun.


By the same principle you can make the desktop. We will need modular racks from IKEA, a table top, rail, self-tapping screw and a little paint. The number of racks and the shape of the entire table depends on your needs.
In general, the use of wood in the interior is one of the chips of this year. There are wooden pallets, parts from old furniture, stairs, branches and so on.


Suspended shelves will help make the living room. You can use both ropes of various diameters and straps.


The cornice is always very expensive pleasure. And if you have a non-standard window and the appropriate size you only need to order, it turns into a solid torment. Just exit - use plumbing plastic pipes of small diameter. You only need to paint them into color suitable for your interior.

Another lifehak on the topic curtains. How to arrange a window at all without using cornice? It will take a wooden rail and a lot of hooks for clothes. Do not forget to sew the loops to the curtain.

You can zonate space in different ways: walls, screen, curtains. There is another way - jute cords. You can use any other materials like a ribbon or color fishing line.

Bedroom
Unusually decorate the walls of the bedroom will help garlands and photos. But for this you will not need a heavy frame with glass or any special stuff. Photos can be broadcast on a fishing line, rope or straight on the wall at double-sided tame. And the monochrome garlands will create an atmosphere of comfort and romance.


The shelves of an unusual form will be added to the interior of freshness.


Great idea for girls to organize your decorations. You will need branches, cords and decorative nails. The latter need to fill on the branches at the required distance and hang on the wall on the laces.

New is well forgotten old. With decor the same. It is not necessary to buy a new chest or wardrobe when you have an old one. It can be just painted. And then the favorite thing you will serve not yet few years.


To save space, there is one very simple "chip" - wall-rack. This will help get rid of most cabinets in the room.

Add magic to your bedroom with cotton clouds and garlands.

The old staircase can serve as not only clothes hanger, but also a library shelf. Such a solution seems strange, but you just try - it is really convenient.

The most important element of the bedroom is a bed. A large double bed is a dream. However, often it is worth such a thing. Do not despair, because it is not difficult to make your bed frame for bed. With the help of wooden plates of different thickness, screws, saws and verses can make a frame for the bed just like you want.

Kitchen
The kitchen is the most visited place in the house. Make it functional and convenient enough easily, and now we will look at a few examples of a rational organization of space that will not only help bring order, but also make the room more comfortable.
To blades, spoons, forks and knives, do not interfere with the worktop, use jars. If you paint them, it will be generally great.

In small kitchens you need to use space as soon as possible. Secret shelves and built-in wardrobes in this case are your best friends.
Even in the lockers themselves, you can organize space so that it placed more. Internal shelves can be attached not only on the walls, but also on the sash. It seems such a simple idea, but what is useful.

Lifehak: In order for the lids from the pan and skille to do not occupy a lot of space, use conventional plastic towel hooks.


In deep boxes there is always one problem - it is difficult to get to the point that in the depths. The output is simple - round rotten shelves. All products in sight and simply get them.

We are all accustomed to the fact that in the kitchen drawer spoons, forks and other stored vertically. And if the box is not enough for, for example, the rags? The diagonal placement of the sectors will allow you to accommodate everything.

So that all spices were in sight and not lost on the kitchen countertop, make a stand as a ladder. You can put a small pot with spicy herbs, like parsley, dill, cilantro, or basil. Now everything is at hand.

Corner sofas and kitchen islands can also be collected with their own hands. Moreover, you can think over in them storage facilities for kitchen utensils. Not only will anyone have such furniture, it will still fully answer all your needs.


One of the very comfortable moves in the kitchen is the use of a magnetic tape. It can be kept knives, as well as spices in jars with metal covers. Great idea to save space on the kitchen table.

And your favorite mugs can be hung on ordinary hooks. And stylish, and comfortable.

Who said that when we grow up, then we break up with our toys? No need to do so. You can use small figures in the decoration of your interior. They will be able to find a new life as magnets, stands, handles, or something else that you will come up with yourself.


It would seem that you can do with such an ordinary thing as a refrigerator. Here we all love to hang sticks on it with reminders. And what if you write on the refrigerator itself, and the crayons? You only need to paint it all special paint for chalk boards and enjoy. By the way, this technique works on any surface.

Yard and garden
When decorating the house should not forget about what beyond. Let's start from the input zone. From concrete blocks and pairs of wooden rails, you can make a cute and comfortable table, where flowers will live, watering can, flashlight or anything else.

By the way, from concrete blocks you can make various benches, make up the flower beds, build a brazier and even make kashpo for flowers. It all depends on your imagination.


You can also make stylish otfiki and chairs. Need old tires, liquid nails and a thick rope. The finished design can be painted in any color. Such deputies are suitable for home and for the street, because they will rain them.

Boxes or pallets of wood can serve as the basis for the garden locker. Here you can store various accessories for colors, pots, watering cans and other tools. And if you leave a flat working surface on top, then you can make something to make or transplant the flowers.

What could be unusual in a pot for a flower? It would seem - nothing. However, here you can surprise everyone. Put succulents in the bird cage. When they grow up, it will be very beautiful. And instead of an ordinary suspension pot, you can use the old chandelier.

An ordinary children's inflatable pool can be used as a sofa. Just put an inside with a blanket or plaid, and the sides are covering the pillows.

So beautifully use the candle in the garden, but they constantly blow up the wind. So that this does not happen, you can make candlesticks from empty cans or from ordinary glass. You can all decorate with pebbles or ribbons at will.


This, of course, not all ideas for home and garden, only a small part of what can be done with your own hands. You just need to not be afraid to experiment and fill your home with cute and beautiful things.
If you want to beautifully decorate your house with your own hands, but do not know where to start, we offer you interesting ideas for the decor that you will easily repeat yourself.
Decor for home by your hands
In order to decorate your apartment and make it even more comfortable, it is not necessary to spend fabulous money on the decorator. You can become the master of the interior design itself. For this it is necessary to arm the necessary materials and patience.
Florarium
Need:
- glass container with lid or without (aquarium, vase, bank)
- soil that corresponds to plants
- drainage (sand, small pebbles, ceramzite, broken brick)
- activated or charcoal
- plants
- decorative elements for decoration (figures, houses, branches, snags)
- tools (blade or spoon, tweezers long, sprayer, watering can, scissors)
Popular articles:
- Prepare a container, wash and drying it (you can give boiling water).
2. Pour the first layer - 3-4 cm of sand (you can use clayzit, pebbles or decorative pebbles).
3. Share the second layer - activated coal (can be phantached in tablets) or the usual shallow woody. This layer will absorb all harmful chemicals, prevents the appearance of mold and fungus.
4. Pour 4-9 cm of wet soil (for desert plants - sidewood sand, for tropical - finished substrate).
5. Loose the soil and make a recess for the plant. Clean the roots of the plant from the ground from the pot. Plant and sprinkle soil. Make sure that the large leaves do not touch the walls of the container, otherwise the condensate can constantly accumulate on them and they will rotate.
6. Pour flower and add decorative elements. Ready!
Fetra carpet
As the main material - multicolored felt strips (or any other tight material: an old blanket or plaid, coat, sweater, jacket). You can glue pieces with any glue, in this case the adhesive gun (hot glue) is used. The main feature of the carpet is a beautiful color transition from one shade to another.
The technology of creating the carpet is very simple: to apply a strip of glue to the felt and turn tightly to the roll, the next tape is glued into the joint of the previous one. You can make several large round or oval "rollers" (any other bizarre form) and combine beautifully, giving up that form what you want. Configure them beautifully, and between fill the stripes.
Pillow knot
In order to make such a cunning and a beautiful pillow, you just need to sew a "tube", which after you need to start an interesting node.
To do this, you will need:
- cut knitted fabric or cotton (woolen) tights
- syntheton
- cardboard roll from paper towels or toilet paper
- long stick for the rambling of syntheps
- needle with thread
To simplify the process, take tights and cut off all unnecessary (you can also use the sleeves from the old sweaters, socks, golfs). Connect all the pieces and make a long "sausage".
But if you do not look for easy ways and want to create a new chic decor for home, take the fabric and cut on the strips 20-30 cm. Length of the "pipe", approximately 3 meters.
After building a roll and with the help of it, fill the "tube" with cotton wool or syntheps. Use a wand for the ramp. Scroll tightly and tight, after which the root of the edge.
Tie any original knot, pleaseing your home and guests with an unusual pillow.
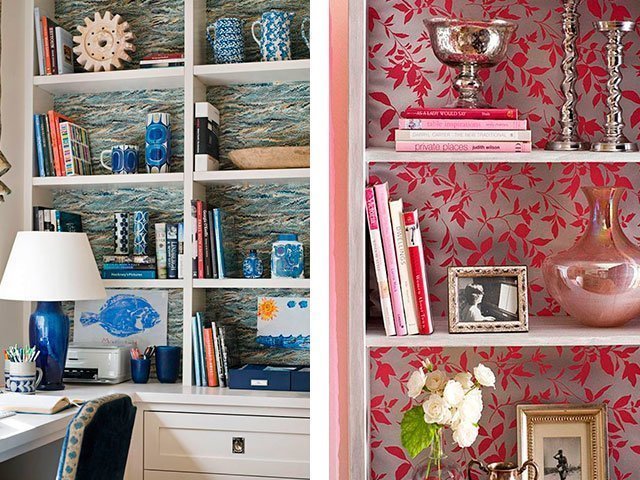
Furniture decor Oboyami
If you want to refresh the interior or just decorate the old boring cabinet, you can resort to the old proven method of furniture decor using wallpaper.


Materials and tools:
- wallpaper:
- sandpaper;
- primer;
- wallpaper glue;
- water based lacquer.
Decor technology is very simple:
- Restore and paint furniture.
- Clean the wooden surface and rebound.
- Glue with glue wallpaper.
- Covered with varnish.
Exploration examples: 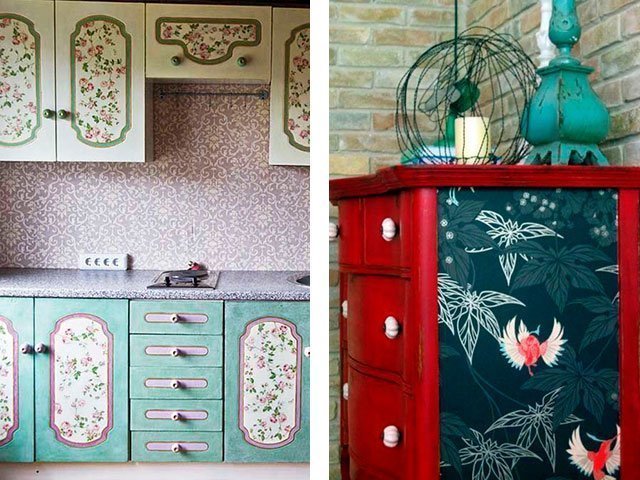


Holder for charging the phone
If you have a diligence and some free time, forget about the phone lying on the floor. The holder for the phone is probably the most necessary acquisition, so you can easily build such a gift to friends. They will certainly be very happy, because it is impossible to buy such a "gadget" in the store, but not everyone has the ability.
Need:
- Empty bottle from cosmetic agent
- scissors
- pencil
- sandpaper
- brush
- paper napkin
Process of creation:
- Stand out the shape of the holder.
- Cut
3. Wash thoroughly, dried and sanding sandpaper.
4. Decoration - can be placed with a napkin or simply paint acrylic paints. If you want to add praises, pebbles, ribbons, beads.
In this case, decorate is just a beautiful napkin. It is necessary to apply glue to the bottle, carefully apply the napkin and align all the folds. Also also apply a layer of glue. Crop the uneven edges, cut the place to charge, beautifully arrange the bottom.
Patchwork Plaid in the style of "Patchwork"
Instruments:
- line
- fabric or existing flaps,
- roller knife
- scissors,
- thread,
- syntheton
- sewing machine.
Materials:
- the cloth;
- syntheps (100 mm) or another filler;
- Threads.
- Cut the required number of squares of different colors 12x12 (in the sewn form they will be 10x10). Plaid 150 * 160 cm \u003d 240 pcs. The same is necessary for the wrong side.
- Cut the synthetone squares of 9.5x9.5 cm.
- Make blanks: fabric-synthetic tube fabric.
4. We put the collected workpiece under the paw in such a way that 1 cm remains from the angle before the start. Then, align the layers of the upper and lower tissues so that their edges coincide, and omit only the needle. With the needle lowered to the fabric, turn the workpiece and flash the block. You must stay in 1 cm to the end of the block so that you have the same battery on the seam as at the beginning of the line. To roughly understand where you need to stop, you can also at the beginning of the line, raise your paw, deploy a cloth and see the remaining distance on the markup on the plate.
5. After you finish rigoring the workpiece, do not cut the thread. Just raise your paw, pull the thread and proceed for the next square.
6. When all the workpieces are stitched, as a result, we turn out a long "garland". Cut the compounds.
7. Next, do it 4 and 5 Steps, getting blanks, stitched crosswise and ready-made to assembly (flash the second line as slowly as possible, especially by the middle of the block so that the fabric feed is evenly).
8. Collect the workpieces in the ranks. To do this fold two inverse side inside And they seek them together with the same allowance on the seam in 1 cm.
9. When connecting the rows together, it is important that the allowances on the seams went in one direction. Moving to lines, lift the needle and foot, and then with a knife for plasticine (a very convenient device!) Move the seam allowances to the desired side. Then again lower the needle and the paw and continue to cross the rows, without circumcise the threads.
So that there were no holes in the scene of the seams, it is better to grab and the batteries themselves are 1 cm. And do not forget about the leaf at the beginning and end of each line.
10. The most difficult behind and remains to simply flash the plaid around the perimeter with the same allowance of 1 cm.
11. Cancel points on the seams. They are cut in such a way that 2-3 mm remained to the line. The distance between the fringe is to your discretion. In my opinion, Ideally cut the allowances every 0.5-0.6 mm. You can and more often, but no less often.
Plaid ready!
New Year's gnomes
To create such wonderful gnomes, you will need:
- Gray and red felt
- Knitted fabric
- White threads and needle
- Scissors, White Paper, Pencil
- Wool (or any other synthetic filler)
- Butcher
- Wooden legs
- Strand of white artificial hair
- Red paint.
- Make a pattern of hats and torso (you can simply attach a white sheet of paper to the monitor and circle along the contour).
- Slee down snowflakes on a white shoe hat.
- Candle the edges of the hats, thus making a "silent".
- White threads are witching the "looper" with the rear side of the header and handles.
11. Make a beard, gathering a strand of white artificial hair (you can simply get over white threads) and a trick to the body.
12. Succession Pugovka - Nose Dwarf.
13. Color in red wooden boots (such blanks you can find in any kind of needlework).
14. Enclose boots to the legs.
15. Connect the hat and the torso (small caring at the base of the hand).
16. Mix white thread on the brush (it turns out a handle).
Bed headboard
3. Turn the headboard face. Snaw the surface of the wattin with aerosol glue and, start on the one hand, rightfully roll up the fabric to the batting. Jack well and smooth out the fabric so that there are no bubbles, folds and distortions. After drying the glue, attach the canvas to the back of the plywood. Well pulling, the canvas, wrap around the frame and secure the furniture stapler.
4. With the help of nails, you can build any pattern, but we will make a neat line around the perimeter.
Make the same marking from each edge and stretch the thread that will serve as auxiliary line.
5. Came places for nails and take them (you can use furniture buttons).
6. Attach the headboard to the wall.
Today we will prove to you what to do the most interesting needlework for the house with your own hands is much easier than it seems to be inexperienced Hand-Maid's lovers.
To comprehend it withlas, you will need a minimum of breeds, skills and time.
At the same time, you will receive original products that will no longer meet anywhere in addition to your own interior.


Cozy homemade corner with tapestries and handmade pillows from which the Scandinavian atmosphere blows

Very bright embroidery in fresh colors, performed in the technique of free smooth

The most pleasant in needlework for home and giving do it yourself is that all the necessary tools and materials can be found at hand. There is no need to spend money on ready-made expensive products to make a note in the interior of home comfort, warmth and soulfulness, if you can make them yourself!
Small master class on making unusual home decorations from simple light bulbs
Crafts and knitting do it yourself: how to learn how to make mats

The harmonious combination of blue shades in the interior is complemented by a large hook rug
Outdoor rugs that have been undeserved oblivion a few years ago, come out again at the interior benchmark. They will find a place in children's rooms, hallways, bathrooms, near the bed in the bedroom or in front of the sofa in the living room. Small round or rectangular mats with an interesting texture (shaggy, fluffy, with long elongated loops, and so on) are especially popular. Let's look at two simple master class, having mastered that, you can perform this beautiful needlework for home with your own hands.

Incredibly bright and very motley rug made of flavors of fabric, as well as the emblem, made in the same style
How to make a floor rug: master class for knitting amateurs
You will need the following:
- a thick knitted hook (suitable number 10);
- fat yarn (you can use yarn of different colors, then the finished product will be brighter and original);
- scissors.

Tip! Instead of yarn in its traditional understanding, you can use old knitwear - T-shirts, Longsliva, T-shirts. You will not only find the use of old things, but also get a soft and pleasant to touch the yarn, work with which is solid pleasure.
- Tie a chain of 16 loops by columns without Nakid.
- Combine the first and last loops to get a ring.

- Tie two loops for lifting to the second row.
- Perform the second circular row by the columns with the Nakud. To do this, use the yarn of another color.

- Tie two lifting loops and go to the third row.
- While working with the third next to increase the number of loops. Instead of knitting in the holes of the previous row, use the gaps between the loops. This will help the rug expand as knitting.

A series of photo shows how to move with the thread of one color to another
- Alternate yarn to get a striped product, and knit it to the desired size.
- Take the finished mat with decorative homemade lace. To do this, skipping one loop of the previous row, you need to make two lifting loops, two air and columns without an inlet.

- Complete the knitting one near the loops of the columns without Nakid.

- The ends of the thread hide from the inside, fasten and cut the tails. It is desirable not to just fasten the ends using the traditional end of crochet, as because of the thickness of the thread, the product may dismiss during the subsequent styrices. Instead, it is recommended to make several durable nodes.
There are also many interesting ideas of rugs that can be weave, tie with knitting or crochet.

Bright crochet rug with cute tassels
Fluffy grass rug: master class
You will come in handy:
- five machines yarn of different shades of green;
- very thick hook number 14;
- scissors.

Tip! Carefully attribute to the choice of threads. If you take an acrylic or any other synthetic yarn, the finished product may turn out slippery and electrical. If you use woolen threads, the likelihood that the rug will "pinch" you for bosy feet. The ideal option is a half-walled yarn.

- Separate the tips of the threads from all sweating and combine them into one improvised thread.
- Check this national jiggedting chain of 20 air loops. This amount will be enough to get a product of 40 cm long. If you want to make a rug of a different size, simply vary the amount of the original loops.
- Make a row from the columns without a nakid, fastening the loop. ATTENTION: Be sure to pull them out so that the canvas was not even, and shaggy!
- Make a square or rectangular fabric you need, tissing every new row of the previous hinges (from each loop should be received new, that is, without openwork pass and additions).
- When the rug will have the desired size, secure the thread of sturdy nodules.
- Scissors cut the elongated previously loops.
In such a simple way, you can create an original mat for the house. Consider, perhaps in your apartment there will be materials that are suitable for creating a real masterpiece?
Pomponov rug
A small master class on rapid and very convenient manufacture of pompon, from which an unusual rug can also be made

Also, the pillows can be issued a pillow, to lie on which it will be still softer

Original cushion, crocheted bias from thick thread

Of the very thick threads, you can create unusual tapestries that will be the original decoration of the walls of your home.

Handicraft for home: Patchwork and felting from wool

Fabric decor enjoys well-deserved popularity. It helps to bring the home comfort, warmth and soulful in the interior. Especially well fabric decor looks in rooms decorated in almost all style directions. We invite you to get acquainted with the very simple ways of making original fabric paintings.
Toys do it yourself: Sovirts from felt
Master class on the manufacture of small decorative soviek from felt
How to make pictures with your own hands from fabric and natural materials?
Prepare the following:
- burlap or other natural textiles with a pronounced coarse textile;
- any natural materials (for example, coffee beans, cinnamon sticks, badyana stars, dried flowers, natural moss and so on);
- decorative elements (ribbons, wooden or bone buttons, lace);
- frame;
- cardboard for the base;
- glue pistol;
- scissors;
- simple pencil.

Idea! Similar paintings made by their own hands, perfectly fit into such styles like Country, Eco, bungalows. Best of all, they look in the kitchen decoration.
- Prepare a cardboard and fabric base. To do this, attach both to the frame, make a pencil mark and cut out.
- Stick fabric to the cardboard, insert into the frame.
- Natural materials put the desired drawing on the fabric and lock the glue gun.
- Complete the resulting pattern with decor (buttons, lace or any other).
- Give the picture to dry.

Original picture in the nursery. Please note how neatly all small parts are made.
Wool felting: master class
And from the fabric you can create a huge lot of interesting things.
Patchwork: master class


Very beautiful styling paintings

Handmade pillow combined from dense linen fabric and leatherette with an uncomplicated decor


Handmade tapestry from natural woolen threads looks very impressive in the interior

Handmade pillows. It looks original from different pieces of fabric.
Picture of fabric in a children's room
We offer to decorate your baby's room a very interesting needlework for the house - a picture of a foam-based fabric.
Dolls do it yourself

The original doll from the fabric made by their own hands will be better for a child
What do you need for this?
- colored patchwork;
- foam base;
- wallpaper for transfer;
- pencil;
- copy paper;
- glue;
- nail scissors;
- any flat sharp object for picing drawing (for this purpose, for example, a spatula for a patchwork) is suitable;
- spindlers.

Another option toys, but already as a pillow for a nursery made by your own hands.
Tip! The breakout (like a spatula) can be replaced by other suitable in the form and thickness, which are under hand. For example, it can be a stupid knife for oil.
- From all sides of the foam blank, retreat 1.5-2.5 cm for the future frame. Produce the resulting rectangle with a spatula.
- Selected image transfer with a copy paper to a foam base.
- Production contour drawing with a spatula.
- Clear the zone that is going to cover with flap.
- The selected piece of fabric attach to the lubricated glue of the area and press it on the previously sold circuit on the contour.
- Cut extra fabric with scissors.
- The remaining flap tails hide the sparkper inside.
- Treat the whole picture.
- Make a frame from the fabric.
Look at what other wonderful paintings can be created with your own hands from threads, fabrics and various decorative elements.

Another original picture, but already out of nails and threads, is perfect for the interior addition