Volumetric drawings on nails with gel polish - new trend season spring-summer 2017. It is a very popular material and is considered an excellent substitute for regular varnish. It is loved by manicurists in salons due to its properties and ease of application. The varnish gives the nails a glossy shine, looks beautiful and unusual. In addition, it lasts a long time, protects the nail plate, does not lose shine over time, provided that it is applied correctly.


New items
Today, the beauty industry offers a huge number of tools and tools for creating nail art. The desire to have a beautiful and neat manicure often contradicts common sense, because a regular visit to the master is an expense. The paradox is that any drawing can be done independently, using numerous manicure products. The right tools and patience are the guarantee of success.
To date, gel varnishes occupy a solid position in the world of nail design. Almost all masters provide nail coating services with such material today. Without any doubt, gel polishes are one of the best achievements of the nail industry in recent years. This hybrid of gel and varnish is immensely popular with both artisans and customers. The main advantages of the technology: convenience and simplicity of the process of applying to the nail; high speed of polymerization in the lamp; color fastness; the intense gloss of the coating remains until the removal procedure; safety of use for the nail plate, hypoallergenic materials.

Gel polish is a product that lasts for two weeks on natural nails.
A specially developed, easily dissolving plastic gel is applied like a regular varnish, but dried under a UV lamp. It is great for girls and women who love beautiful and bright nails but do not want to repaint them several times a week. The gloss of gel polish is incomparable with the gloss of a regular coating, because in the first case it is deeper.
It is difficult to remove or scratch the coating due to its special structure. This coating gives brittle nails elasticity, and thin ones - strength, which avoids breakage of natural nails. The gel is removed with a special liquid and foil. The average wearing time is two weeks.
The novelties of manicure-2017 with its use are not limited to the imagination of the master: it can be flowers, butterflies, zigzags, spirals, geometric figures... It is only important to correctly combine colors that will harmonize not only with each other, but also with the image. The classics of the genre are black and white drawings on the nails that suit any look and for any occasion.


Naturalness in the new season is the main trend. In the palette of new products, delicate peach, creamy, pink, mint, heavenly and sandy shades of gel polishes are in the lead. In this style, it is customary to use a monochromatic coating. An interesting choice for a manicure is the coating “ Cat's eye". Its bright and iridescent structure is reminiscent of feathers.
It is enough to cover your nails with orange, emerald green, lemon, blue, orange or coral varnish to embody the fashionable trends of the season. Dark and berry tones are also trending. The dichromatic technique can add paints using a white or nude coating. This will add contrast, create sophisticated combinations. Interest in "metallized" coatings is growing. In the cold period, they are recommended to be combined with dull matte shades, and diluted with pastel colors in summer and spring.
Metallic shine visually lengthens and narrows the nail plate.

From new products for a similar effect in manicure, there is a designer foil. It is sold in gold and silver. Original shapes and stripes are often used in nail decoration and look fantastic.
Colored foil is also considered new. The pieces resemble a broken stained glass window, walled up in gel polish. In list fashion trends dairy, holographic, steel and pastel shards. Glitter is capable of giving shine to a manicure. The powder does an excellent job with the "sparkling" task. Decorative elements can easily add playfulness, festivity, charm to boring images.


Simple manicure
Many women are aware of the variety of texture varnishes, their huge range of colors and other features. Those who are interested in nail design know when new textures and beautiful shades appear. To date, two main types of varnishes are used to create nail art: the traditional coating for manicure and a novelty - gel varnish. It is customary to allocate a separate line of tools in two categories - varnishes for painting. Their difference from traditional forms- the presence of a thin brush that allows you to display neat lines without using available tools.
Most often, beautiful and contrasting patterns on the nails with ordinary varnish are created using two or three shades of the selected tool, as well as a needle or toothpick. There are two techniques for performing manicure: liquid and dry. The essence of the first option is the execution of drawings on a base coat that has not yet dried out. If you want to make such a simple manicure, follow the technique for creating it:
- Apply a coat of varnish of the chosen shade.
- Without waiting for the base to dry completely, drip a varnish of a different color onto the surface of the nail.
- Use a needle to make drawings, stretching the drops of varnish in the desired direction.

In the case of gel polish, the patterns are made on a dried base.

Good gel polish does not chip or peel off after the first wash of dishes, as happens with ordinary varnishes and is harmless to nails, unlike ordinary gel. The gel polish coating can be easily removed using a special solvent, which cannot be said about the traditional gel extension, in which the artificial material can only be cut down. At home, women can independently create a watercolor drawing, geometric shapes, draw a butterfly, a heart, stripes, abstraction, and also use decor, which should be purchased in advance.
Patterns
At home, you can create simple nail art using gel polish. These can be flowers (roses, tulips, poppies, orchids), butterflies, geometric patterns. It is best to start with simple patterns and only then move on to creating complex ones. A neatly executed drawing always delights others. Experiment is encouraged this season. If you master the general technique of making drawings, then it will not be difficult to create a complex design.
Read more about one of the most popular manicures of 2017 in the next video.
This technique(drawings on nails) - called nail art.
Beginners are recommended to use the following tools for drawing: special brushes for creating patterns on the nail plates; dots (a tool for creating drawings), needles of different thicknesses; toothpicks, lint-free napkins. When creating nail art, proceed in stages:
- First coat the nail plates with a clear, protective varnish. This will prevent damage to them, protect from scratches when creating drawings with sharp objects.
- Apply base - varnish, which you chose as the basis for the pattern, wait until it dries.
- Start creating your designs.
- Let the drawings dry.
- Fix the result with a fixer.


To create an interesting pattern on the nails with a brush, you need experience in drawing. Remember that the applied lines must be smooth, without breaks, of the required thickness, otherwise the manicure will turn into sloppy blots on the nails. When creating a manicure, try to do it in stages.
- Prepare your nails, straighten the ends, get rid of the cuticles, polish the surface.
- Apply the coating.
- When the transparent layer is dry, paint your nails with base varnish.
- Take a brush and start drawing patterns from the tip of your nail.
- When the drawing is dry, apply the fixative varnish.


You can create a simple pattern with gel polish, guided by the following plan:
- Apply base gel to the nail plate, dry in the lamp.
- Cover the gel polish with a shade that will become the base of the manicure.
- Dry the layer for two minutes in a UV lamp.
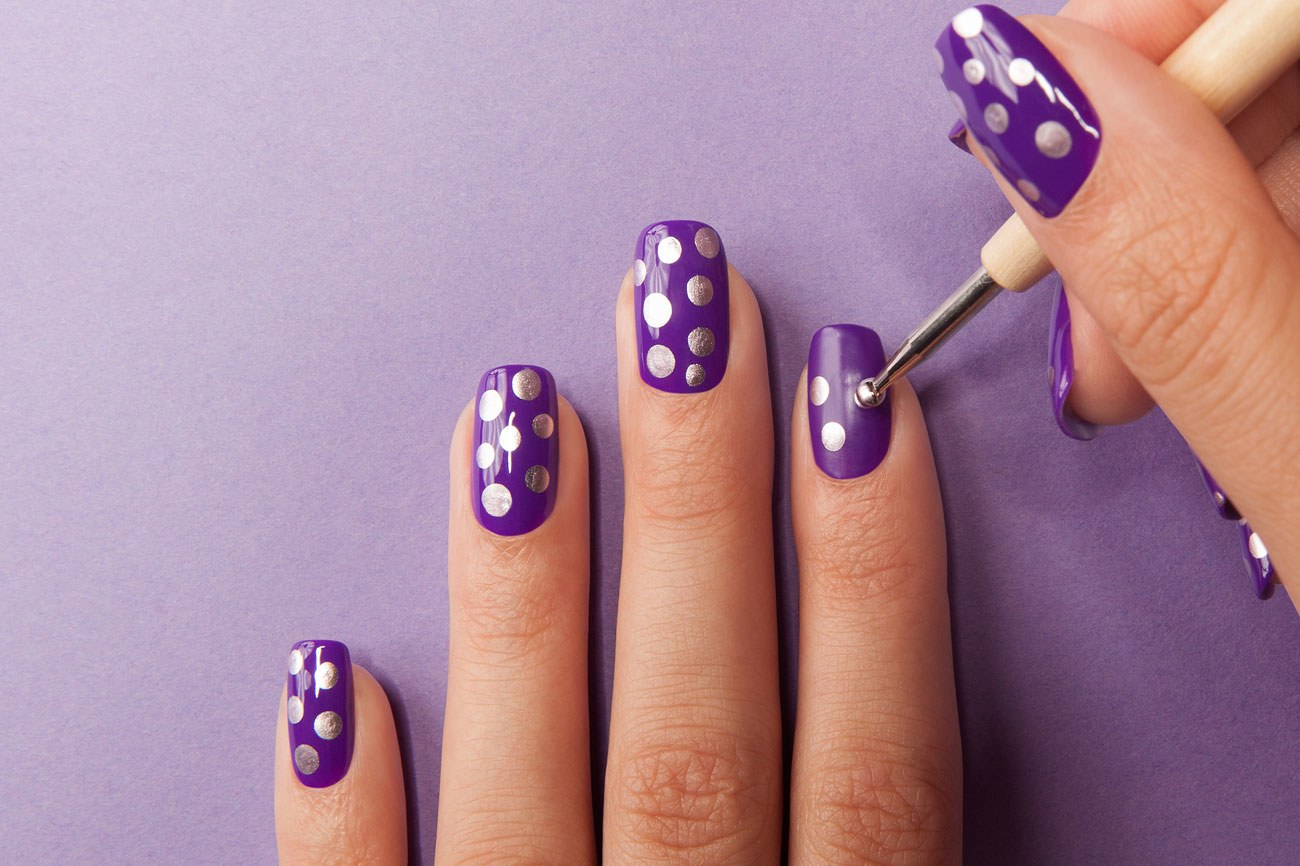
- Using dots, paint dots using the other two colors of the gel polish. It is worth applying them in no particular order. It is best to put dots close to each other, then the manicure will turn out to be interesting and beautiful.
- When the pattern is ready, send your nails into a UV lamp. Finish with a top coat for a glossy shine and extra durability.


Observe the following procedure when creating a simple figure eight pattern:
- Apply the base to the nail plate and cure in a UV lamp.
- Apply the first coat of gel polish, cure in a lamp for two minutes.
- This is followed by a second layer of the same color. Don't dry it. Apply small dots at once with dots and gel polish of a different shade. Take a needle and in the shape of "8", perform quick movements. This can be done both horizontally and vertically.
- Dry in the lamp and then apply a special coating.


Complex patterns include flowers, monograms, animal faces and other art.
- Flowers. If you want to get such a design, you need to prepare a gel polish in two colors: white and black. First apply base gel and dry, then cover with black and send to dry. Color gel polish must be dried within three minutes.
- Monogram... You can create this design using white gel polish and a thin brush. After applying the base, you need to pick up a little white gel polish on the brush and draw a rounded monogram. Their direction and number depends only on fantasy. At first glance, such a design may seem simple, but it will take experience and patience to complete it. To obtain an original and unique design, it is necessary to make monograms in different colors on each nail. For a festive design, add sparkles, rhinestones.
- Snake skin. The drawing is suitable for those who want to get an original and unusual manicure... After the nail plate is prepared, apply green gel polish on it. Dry in a lamp for two minutes, cover with a marsh-colored mother-of-pearl varnish. Do not send to the lamp, but take a brush and apply drops in a chaotic manner with colorless varnish. Wait a while until the drawing appears. Cover everything with a finish and dry.
- Rosettes... To create roses, you need to prepare a dots, four gel polishes (blue, pink, white and green) and a thin brush. First, apply a base coat to your nails and cure in a lamp. Next, cover your nails with white gel polish and send them to dry again. When the base color layer is dry, you can paint the roses.


Subtleties for beginners
If the correct application technology is followed, the gel polish stays on the nails for up to 20 days. During this time, the coating does not lose shine, does not crack or chip, and does not require additional correction. The nails look natural and are protected. Unfortunately, some gel polishes, instead of two to three weeks of socks, begin to crack or flake off a few days after the manicure. This can be caused by improper application, poor product quality and further care. For beginners, before using gel polish, it is better to carefully study its properties and read the recommendations.
- Stage 1. Formation of the free edge of the nail. The free edge of the nail plate should be perfectly flat and absolutely clean (fat-free). If the nail plate delaminates, carefully trim it with a natural nail file. If necessary, you can get a manicure. If you used oils or creams during your manicure, thoroughly clean your nails and dry them for 10 minutes. It is important to remove the cuticle at the first stage.
- Stage 2. Removal of the upper keratin layer of the nail plate. If this is not done, the gel polish will chip off. It is not recommended to touch treated nails. For the final removal of residual moisture and filing, use special tool with a fat-free formula. It provides strong adhesion of the gel polish to the nail plate.


- Stage 3. Base application. If the nail plate is very soft and weak after removing the extended nails, the gel polish may begin to chip off already in the first days after the application procedure. Therefore, before starting a manicure, apply a primer to the weakened plate. It will provide a tight adhesion of the base gel to the natural nail.
The application of a base gel is one of the main components of the technology for working with gel polishes. The base gel serves as a base for the product. It is responsible for creating the bond between natural keratin natural nail and artificial gel material. At the same time, the base gel protects the nail from the penetration of the coloring pigments of the gel polish. In the technology of applying gel varnishes, it is important to ensure that the materials are applied to the nail plate in a very thin layer.


On the brush, type not a large number of base gel and rub in, starting from the free edge.
Then go over the entire nail plate in smooth movements from top to bottom. Make sure that the gel does not come into contact with the skin, cuticles and sides. Next, place the nail in a UV lamp for one minute to cure the base gel. After the base has dried, smooth out the layer with a dry brush. This is necessary so that the colored gel polish lays down evenly, and does not collect and does not spread. Do not forget to cover the end of the nail, pay attention to the uniformity and smoothness of the coating.


- Stage 4. Finishing gel coating. The finish gel is applied with a slightly thicker layer than the colored one. The finishing gel should dry well within two minutes. Insufficient polymerization will result in a loss of shine when the sticky layer is removed.
If you are using color gel polish, keep in mind that all layers must be applied very thinly. If you do not follow the application technology, then waves and notches may appear on the free edge and air bubbles appear over the entire surface of the nail. Using bright, pastel colors, apply two coats of gel polish. Each of the layers must be passed through a UV lamp for two minutes. When working with dark colors, the first coat may be unevenly colored, but you do not need to apply a large amount of gel polish. This problem will be fixed with a second layer. Working with darker tones, it is best to make three thin but even layers.
Nail design, especially if it was created with your own hands, is a great idea in terms of self-expression and image creation. The easiest decorating method is simple nail art... Making them is not at all difficult, there are many ideas that have already been invented earlier. But there will be even more of them if you connect your own imagination. You should start with the simplest techniques, gradually improve your talent and capabilities.
Simple drawings for new masters
At first, not everything will be as smooth as we would like. It's because:
- At first- you are worried, afraid that you will not succeed;
- Secondly- you have not yet gained experience and skill - this is a matter of time and diligence;
- third- you probably do not quite understand what you can draw with and how exactly it is done.

If you follow the main rules, the self-learning process will be more effective:
- Before work, you need to remove the cuticle from the nail plate. A simple warm bath will help with this, into which the hand is lowered for 10 minutes. So it will be easier to lag behind the marigold.
- With a wooden stick (you can use a toothpick) and nail clippers, cut off the coarse dermis (skin) around the nail plate.
- Next, you need to polish the nail plate. By the way, this should be done not only before applying a manicure, but also for prophylaxis, at least once a month. Instead of polishing, if there is no special file at hand, a simple degreasing with a nail polish remover will suffice.
- Basically, the marigolds are ready for drawing. But there is one caveat. Before painting, you should apply a foundation. On it, the drawing lays down more accurately, the drawing process becomes easier. The manicure as a whole will look neater.
- After applying the foundation, wait about 20 minutes.
Now that's all for sure, you can safely start drawing.
What tools and materials should be at hand
Before the procedure for drawing a picture, prepare materials and tools for work, their list and varieties will depend on what you plan to work with, what material you know how to use better, and decide on the theme and color parameters.
Nail polishes
In your work, you will find it useful:
- clear nail polish;
- fortified;
- medical;
- lacquer fixer;
- sequins;
- glitters;
- decorative powder;
- several different shades varnish.

Instruments
Drawing cannot be imagined without tools, so everything will be listed below, it may come in handy in one case or another:
- stickers;
- ready-made stickers;
- template plates;
- brushes;
- needles;
- toothpicks;
- ordinary or decorative scotch tape;
- foil;
- dots;
- acrylic paints.
The simplest drawing ideas for novice masters
Having prepared the nails for work, you can apply a drawing on them with any tools, even handy ones - those that every girl has one hundred percent at home.
Needle work
Original and even in some places uncomplicated drawings can be drawn from a needle. How to use it:
- You do not need to immediately draw on the nail, try to do it on paper. Firstly, you will understand how it works, and secondly, this way you can choose the proportions as close to your nail as possible.
- Apply the base (transparent base) to the nail plate, wait until it is completely dry. The base is always applied in 1 layer.
- After the first base coat has dried, you will need to apply another layer - the background one. Choose the color of the nail polish that will accentuate the marigold, for example, white.
- There is no need to wait for the second layer to dry. You can work on immediately.
- Somewhere in the middle of the plate, drip on a white background, three small dots of, say, red varnish, forming a triangle or alternately one after the other along the nail.
- You can draw with a needle, immediately poking it in the middle of the uppermost point, stretching it to the bottom, and so on to everyone, one by one. There will be such an ornament as in the photo.
- You can drop into the center of a red drop, for example, the same white varnish, then, when stretching, the needle will go white stripe on a red background.
- You can stretch the varnish from side to side, then an unusual pattern is obtained at all.

The color palette in such simple drawings has no definite boundaries. The author himself decides what and with what to combine.
You don't need to work with all your nails at once. Draw them in order from the very beginning to the victorious finish. Otherwise, you will definitely not succeed.
Paint with a brush
This drawing technology is a little more complicated, but with a great desire, any novice master will cope with this task.
Practice, for a start, no artificial nail plates - this will be a very good workout. If they are not at hand, draw a nail on paper, approximately the same size and shape as yours
Drawing technology:
- On prepared nails, first, as always, a base coat of colorless or medicated varnish is applied.
- Leaves the nail to dry. In this technology, all layers must dry completely as they are applied.
- After the base is completely dry, apply a background coat. The color in this technique should be chosen so that it contrasts with the future painting. First, in one step, the brush is led from the center towards the cuticle, then the left side of the plate is painted over, then the right. If you notice, then you should get only 3 brush strokes.
- Further in the work it will be required very thin brush... Soak it in the varnish, be sure to remove the excess. And, as they used to do in school, start drawing an element of a pattern or the drawing itself.
- The final step should be the consolidation procedure. That is, the marigold is completely covered with colorless varnish, along with the pattern.
Here, for clarity, we present a photo of simple drawing ideas.

This technology uses a different number of colors. First, try drawing hearts, simple flowers, lines, and other geometry. If you feel the strength to draw a more complex ornament, feel free to get down to business.
Simple painting on nails with acrylic paints
These paints are respected by professionals and those who know how to paint with them. Their peculiarity is that, in the process of work, they do not spread, they are easy to apply, dry quite quickly, and hold for a long time. In addition, they are not dangerous for human health. Going on sale:
- colorless;
- translucent;
- covering (overlapping the previous layer);
- pasty.
Can be diluted with water without problems. Easy to mix with each other. After drying, on top of them, you can safely apply another pattern, without fear of damage to the original layer. The coating is breathable, looks very attractive and bright.

According to the technique of drawing drawings, there are:
- Oil. It is applied in a pasty and undiluted form. are called so because I resemble oil painting.
- Pasty. It resembles batter in consistency. The composition is not diluted, it is used in the form in which it was purchased. You can only add pigments to it, if the idea of the drawing requires it. Draw in the form of thick strokes. When the paint dries, appearance similar to painting with gouache.
- Watercolor. Water first needs to be mixed with a binder, only then water is added here. Figure in pure form looks like a watercolor ornament. It is characterized by high quality.
- Sliding. You can mix this composition with a structured nail gel. The difficulty here is that it will be quite difficult for a novice master to predict the final result. But after a few trainings it will be possible to learn this too.
- Glazing. You need to work with this material carefully. All layers to be applied must be very thin, almost invisible.

You can paint with any type of brush that you know how to work with. For training, it is enough to purchase 6 basic shades and whitewash in order to correct the errors made in time. To understand them in work, you first need to draw a field in the form of a checkerboard on paper.
For 6 colors, 6 squares of about 2 × 2 cm will be required.On this field, one by one (one by one), apply the purchased paints - paint over the whole square with one pigment, then draw them with horizontal rulers of a different shade, and finally with vertical lines in a different color. You should end up with 36 colors.
Drawing with a brush using acrylic paints
Draw a twig with acrylic paint:
- For the background, choose a very light color (then choose a dark one for drawing) or vice versa. In our example, it is lilac.
- Draw curved lines in yellow. Choose the location at your discretion, not necessarily exactly as shown in the photo.
- On this arc, draw, with curved lines, leaf figures of the same tone.
- Make the veins inside the leaves brighter for that.
- Secure the result with a transparent fixing layer.

If this drawing seems too easy for you, try to recreate these simple ideas. In the first photo, the drawing technique is shown in pictures.

Learning to draw with dots
From the simplest drawings to very complex ornaments professionals paint with dots. Most simple techniques Is a combination of dots, commas, rulers, and so on, of different sizes. The tool needs to be soaked in paint or varnish and start painting with it like a regular brush. In the process of work, the amount of the coloring agent decreases, this can be seen by the ingredient on the nail ornament, which makes the drawing more natural and realistic.

You can draw nails with dots as you like. With it you can draw:
- flowers or animals;
- modify the traditional version of the French manicure;
- it is easy for them to create New Year's motives;
- personify the seasons on the nails;
- very stylish abstraction turns out to be drawn with dots.
Drawings using regular tape
Plain household tape can go a long way in nail art. With it, you can make very different shapes, drawings and even compositions. Geometry is the easiest thing to do - it is based on lines, and cutting them with scotch tape is very simple. The cut strips can be applied to the nail plate in any order or sequentially if you want to create a specific shape.
Scotch tape technique:
- As in all previous cases, the nail is prepared first.
- The first layer is base.
- After drying, apply the background one as you like.
- While the varnish dries, cut a few thin strips of tape (about 1 mm wide, you can also thicker if you want it), the length should be larger than the size of the nail, so that later there will be no difficulties with removing the strips.
- If the background layer is dry, stick the tape on the nail the way you want it.
It is very important that it is solidly high. Otherwise, removing the stripes can damage the background layer if it is not dry well.
- From above, cover the entire surface of the nail with varnish of a different shade or several - this is also your prerogative in choosing.
- Give the varnish a few seconds to dry, but not completely dry.
- Peel off the pasted strips and see what you get.
You can leave everything as it is, or you can still finalize the drawing with a thin brush or dots. By adding sparkles, circles and other elements, also in a different color of varnish.

Today there are many types of decorative tape on sale, it can also be used to create drawings. Here, the need to cut the strips yourself disappears. It can also be used for decoration. Glitter on nails always looks beautiful, and with decorative tape - excellent and unique.
Toothpick drawings
Simple, but unique patterns on the nails can be done with an ordinary toothpick. She is an indispensable attribute of every home, always at hand, can always help in creating a complete image. If you have already learned to work with a needle, then there will be no problems with drawing drawings with a toothpick. The drawing technique and sequence are similar here, only the drawings are slightly different.

Other Methods for Creating Simple Nail Art
In addition to drawing with your own hands, you can use ready-made drawings - stickers, stencils, stokers, template plates.
Stickers
Choose a specific color for your base. Color it nail plates.
After completely dry, stick the selected sticker on top. They are glue-based.


There are some that need to be placed in warm water before gluing. After 10 seconds, they take it out, gently grab the figure with tweezers and transfer it to the nail.

Another type of stickers
If you are looking for an easy and inexpensive way to make a fashionable nail design at home, then be sure to pay attention to the video tutorials for beginners below, which will help you quickly decorate a manicure with a needle on wet varnish. More recently the drawings on the nails were drawn with a needle teenage girls, creating with their own hands beautiful and most importantly - original manicure... Today, even eminent nail art masters often resort to this technique, if you need to make an exclusive design with drawing the smallest details of the drawings.
It is very easy to master this nail art technique even for women who do not have basic drawing skills with thin brushes. In this material you will find different schemes, using which you can quickly apply beautiful patterns on the nails with a needle. To create beautiful drawings, 3-4 tools of different thicknesses are usually used. The thinner the needle, the smaller you can draw elements of nail art on the nail. Now you can buy a set of special needles for applying patterns on the coating of nails, but at home it is quite appropriate to use ordinary sewing needles of different thicknesses, performing a fashionable nail design. For ease of use of the tool, make the holder from an empty ballpoint pen by reinforcing the needle in it with a piece of cork or any other rigidly fixed sealant. You can also secure the needle in an empty auto pencil by screwing it onto the end of the pen. 
For beginners, it is advisable to start with very simple drawing schemes, consisting of ordinary lines and elementary geometric shapes. Having mastered the basic skills of nail art, you will eventually be able to create complex patterns, compositions with flowers or butterflies, sophisticated patterns on nails with an ordinary needle. For work, you can use both contrasting and slightly different colors of varnishes. 2-3 different colors of varnish are enough for drawing with a needle both very simple drawings and complex patterns on the nails. You will also need a base coat to apply the background and protect the natural nail plate, as well as a top coat to fix and protect the created design.
When mastering this nail art technique, try to stick to a few important rules... All sliding movements of the needle should be quick and confident, but do not press on the coating, as you can damage the natural nail plate. When making a continuous line according to the chosen design pattern, do not lift the tool from the nail until this element is completely drawn. The layer of wet polish on which the drawing is done should not be too thick and try to complete the design completely before the polish thickens on the nail.
After the drawing with a needle is completely completed, you can add decorative elements of nail art to the composition (glitter or small sparkles, crystal chips or larger rhinestones, multi-colored beads). If, to complete the composition, it is required to apply dots, thick lines, large patterns and monograms to the hardened coating, then it is best to use dots (instead of varnish, you can choose acrylic paints of the desired color). 
As for the suitable shape of the nails, the design with the help of a needle can be done on absolutely any nail plates, including those on extended with gel. But it is advisable to choose a modern option - a round or square shape for short nail plates and an oval or almond shape for long nails. By the way, instead of regular varnish it is quite appropriate to use shellac or any other high-quality gel polish. The drawing is performed with a needle on a gel-varnish coating of nails before the stage of polymerization (drying) of the applied layer in a UV lamp follows. After that, we apply a top coat to all nails and the fashionable nail design will remain flawless for several weeks.
♦ HOW TO MAKE NAIL DRAWINGS WITH A NEEDLE
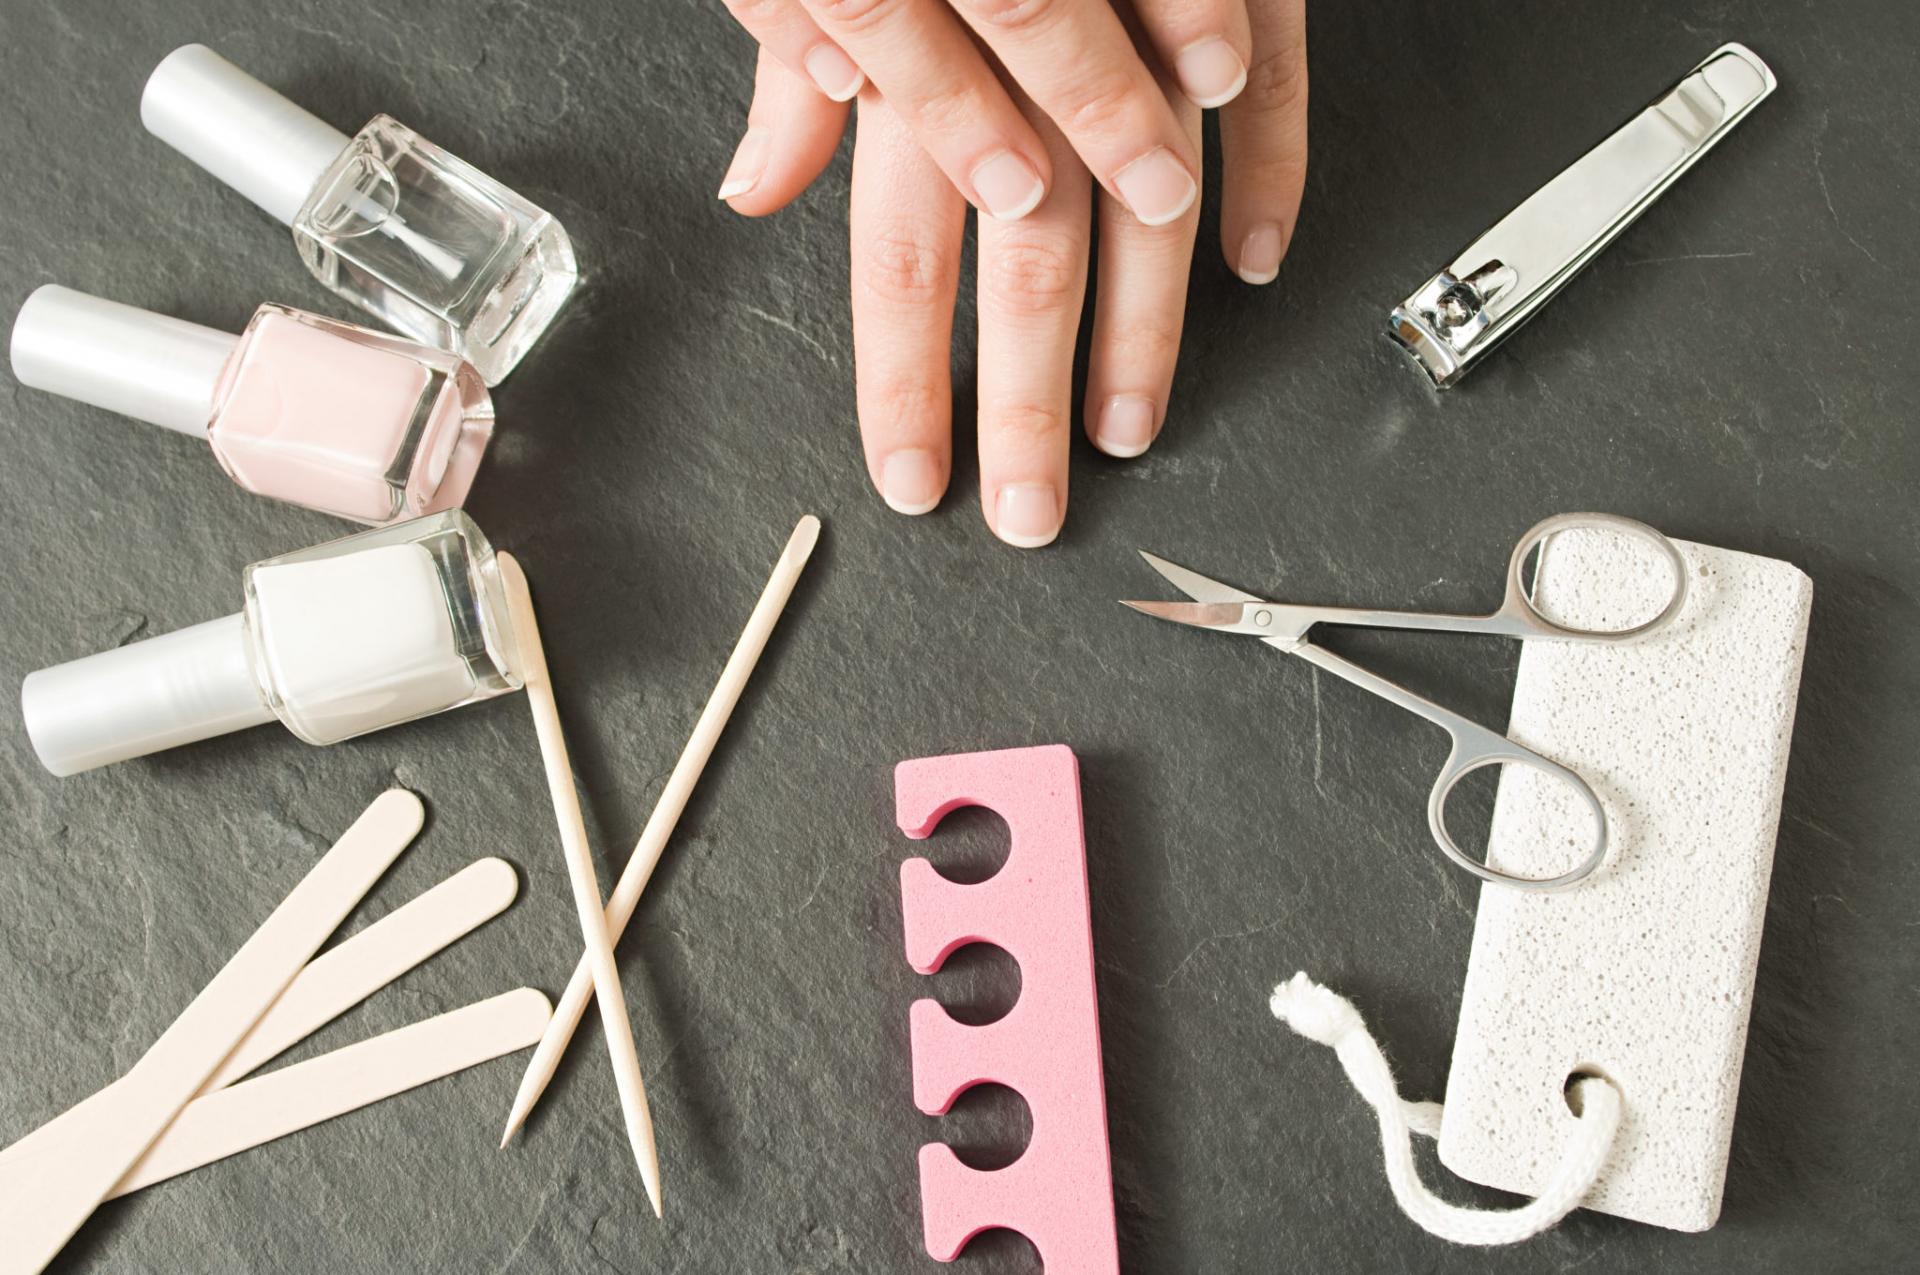
Spread out before the procedure on the manicure table the following accessories : 3-4 needles of different diameters, manicure tools for preparing nails for design (scissors, pusher, glass or ceramic files for shaping the free edge ), as well as buff for polishing, orange sticks, lint-free napkins, degreaser, little for cuticles). If you want to do a manicure with gel polish, then in addition to the finishing and base coat it is necessary to prepare another UV lamp for the polymerization of the layers;
❶ We trim the length of the nails, give the free edge of each nail the desired shape, grind and polish the surface of each plate, then apply a degreaser;
❷ To protect the natural nail from the absorption of the varnish pigment and the appearance of yellowness, apply a base layer in a thin even layer and wait until it is completely dry;
❸ Then we apply a thin layer of colored varnish on the entire surface of the nail, sealing the butt end and wait for the varnish to dry;
❹ And now we need to apply a layer of varnish, on which we will design with a thin needle;
❺ Without waiting for the second layer of varnish to dry, draw a pattern with a marbling effect with a needle. Now we need to drop a few drops of varnish of a different color and, with quick movements of a thicker needle, draw horizontal and vertical lines, figures in the form of an eight. After drawing each element with a needle, be sure to wipe it with a lint-free napkin;
❻ Now we will wait until the drawing is completely dry and apply a protective coating (colorless varnish is suitable for this).
♦ SCHEMES OF THE EASIEST DRAWINGS AND PATTERNS FOR NEIL ART
- No. 1. click on the photo and expand the "Sakura Twigs" diagram and master class

- No. 2. click on the photo and expand the "White twig" diagram and master class

- No. 3. click on the photo and expand the "Golden Pattern" scheme and master class

- No. 4. click on the photo and expand the "Droplets" diagram and master class

- No. 5. click on the photo and expand the "Scales" scheme and master class

Such simple drawings can be made with a needle on nails the first time without even having basic nail art skills.
♦ FASHIONABLE NAIL DESIGN WITH NEEDLE DRAWINGS
On the picture: interesting ideas for design to your manicure
♦ VIDEO LESSONS FOR BEGINNERS
Do you admire when a woman's manicure is done with different designs? And what if we tell you how to do the drawings on your nails yourself, even if you are new to manicure.
Do you admire when a woman's manicure is done with different designs? And what if we tell you how to design your nails yourself. Yes, you have to grasp the easy options first. But remember that they look no less impressive than complex patterns... Today on Manikyurchik.ru you will learn how to make simple gel polish drawings that even beginners can easily complete. Each of them will be supplemented with a list of necessary tools and materials, as well as instructions for implementation.
What you need for drawings
Before making drawings on the nails, you should acquire special equipment, tools, materials.
List necessary materials for any design:
- Everything for gel polish: primer, base, top.
- Color Gel Polish: Multiple colors may be needed.
- Coating drying lamp.
- Brushes, dots and other tools.
Before drawing a pattern, it is worth doing a manicure. Then the nail is treated with a primer, the base and the main color gel polish are applied. Each stage, except for the application of the primer, is dried in a lamp. Then you should choose the simple drawing you want. After applying it, the layer is dried and the top is applied. It should also be cured in a lamp.
Points
The simplest patterns are dots, peas and circles. They can cover both the entire nail and build an uncomplicated pattern.
- dots or needle;
- gel varnishes.
The minimalistic pattern with a dot looks advantageous. For such a design, it is enough to put 1 point on the nail, preferably at the base. It is most convenient to do this with a dots, or with a needle. The technique for working with dotsem is very simple.
Manicure step by step with simple dot patterns
- Put some gel polish on a jar or surface.
- Dip the tool into the drop and transfer the point to the nail.
- Another option is to make a dot pattern.
- By the same principle, dots are applied all over the nail or in the form of any pattern.


Video "Simple Drawings for Beginners: Dot Painting"
If you are new to manicure - drawing from stripes can be done easily and simply. That being said, there are many variations of striped designs that every girl will love. With the help of stripes, you can build a checkered pattern.
What is required additionally:
- thin brush: number 0, 00 or 000;
- gel varnishes;
- adhesive tape: required width (optional).
The parallel stripe pattern can be drawn freehand with a brush. To make the drawing more colorful, alternate the matching colors, and also make lines of different thickness. If you can't draw a neat straight line, then resort to using masking tape.
To do this, after applying the main background color, remove the stickiness from the gel polish with alcohol or degreaser. Stick the tape and apply gel polish on top of it. Then dry the drawing and remove the tape. This can be repeated step by step many times.


Video "Stripes"
Patterns
A drawing with simple patterns of elongated dots can be both an everyday option and an evening one.
What is required additionally:
- dots;
- needle;
- gel varnishes.
Several dots in a row are applied to the main color of the gel polish. It is worth doing this with the help of dots. You can put dots of different colors, as well as add a small one of a different shade to one large dot. After that, a continuous line is drawn with a needle through all points. This creates a beautiful elongated pattern.


Video "Simple Dotsem Patterns"
Flowers
It is quite easy to draw beautiful flowers on nails. They can be arranged based on dots and patterns.
What is required:
- gel varnishes;
- dots;
- needle.
It is worth starting to draw flowers from the petals. For this, rather large dots are placed in a circle. They will form the basis of future flowers. After from each point, it is worth drawing a strip with a needle to the center. Do this with each point. Then, from each point, pull the needle out of the flower with a needle to draw out the petals. Next, the drawing is dried in a lamp. Do not forget to put a dot in the center after polymerization to simulate the middle of the flower.


Video “Simple Flowers for Beginners”
Stretching with sequins
The most impressive design looks like a shiny gel polish.
What you need:
- glitter gel polish;
- fan-shaped manicure brush.
First, choose where the shiny stretch will come from: from the base or edge of the nail. At this point, the concentration of sparkles will be greater, and then will fade away. A strip of shiny gel polish 1-2 mm wide is applied to the selected beginning of the pattern. Then, using a fan brush, stretch this strip to the other side of the nail and dry the layer. Repeat these steps about 3 times. Apply a thinner strip each time and stretch it less and less.


Stretching Glitter Video
How to make it easier for yourself to apply a picture using stamping?
More simply, you can make any drawing using stamping. Large selection of patterns that can be done in a few minutes.
What is required additionally:
- plate with a pattern;
- gel varnishes;
- staple;
- scraper.
A drop of gel polish is placed near the pattern on the plate. It is stretched over the plate with a scraper. Then they lean the stamp against the pattern on the plate to transfer the gel polish. The stamp design is applied to the nail by simply attaching it.


Video “Simple Drawings and Stamping Patterns”
Have you already tried to decorate your nails with gel polish drawings yourself? Create your own unique design and share the result in the comments!
Today, the beauty industry has gone so far that you cannot surprise anyone with a classic manicure. That is why women of fashion reproduce amazing and unique designs on nails. In this case, the patterns are applied various technicians and materials, one of which is multi-colored gel polishes.
Where to begin?
You can learn how to paint with gel polish at home, without resorting to the services of expensive salons.
It is important to stock up before starting work the necessary tools and materials as well as knowledge. To do this, it is enough to study various videos and master classes of the masters.

Instruments
A basic set of tools needed for a gel manicure, usually consists of the following elements.
- Coarse file for coarse polishing.
- Buff for adding shine and improving the adhesion of gel polish to the nail surface.
- Ordinary sewing needle. You can use a pin, it is more comfortable to hold. The needles help draw delicate patterns, but you need to be careful not to scratch your nail.
- Toothpicks. Unlike needles, they do not scratch, but due to their significant thickness, the patterns are less clear.
- Manicure wooden sticks. By analogy with toothpicks, they are used to apply any large parts.
- A set of dots with balls of different diameters. They apply dot patterns and curls.
- Set of brushes. Professionals advise choosing models made from natural pile.
- Several sponges or scraps of sponge that are designed to create gradients or mix colors of different shades. Also, depending on the structure of the sponge, the manicure is given texture.
- Cotton pads and lint-free wipes.


The minimum set of brushes should contain the following types.
- Point. The pile of the instrument is collected at the tip in a pointed lance. During work, the brush is held vertically and only the very tip is dipped in the varnish. Initially, they put a point with it, and then a pattern is pulled out of it. The tool is needed to reproduce small elements, flowers and lace.
- "Hair". The professional name is liner. The brush has a cylindrical shape. It is very thin, up to two centimeters long. As a rule, you need 2 liners: a long one for drawing lines, a short one for curls. Unlike a point brush, the bristles of this brush should be completely dipped into the varnish. The tool is indispensable for geometric patterns, floral designs and monograms.


- Plain flat. The brush has rectangular shape and is intended for obtaining gradient transitions, applying sparkles, acrylic powder, rubbing in and other decorative elements. With certain skills, she draws various patterns in the Gzhel style or medium-sized floral ornaments.
- Dagger-shaped. Similar in shape to a flat brush, but the tip is cut at a 45 degree angle. It is convenient for applying small or thin designs. The beveled brush is used to write hieroglyphs and other elements of oriental painting. Volumetric figures are also included in the zone of its possibilities. It is convenient for her to display "smiles" for a jacket and moon manicure.


- "Petal". The shape is flat, cut on both sides to the middle, forming a thin tip. It can replace point and dagger without any problems, because with the proper skill it copes well with tiny details, painting, glitter and rubbing. For French manicure, the petal is also irreplaceable.
- Fan. A very wide and flat fan-shaped brush is necessary for smoothing color transitions, creating abstract or landscape images, evenly distributing decor in the form of sparkles or powder.


In addition to natural brushes, manufacturers offer their silicone prototypes called shapers. For beginners, they are more suitable option, since the gel polish does not spread on them, it is easier to wash them, the hairs do not bristle over time. In addition, shipers are cheaper than natural tools, so they are not so pity when training.

Coating materials
The list of materials can be no less wide, but we will list the main ones.
- Degreaser. At home, you can use nail polish remover or rubbing alcohol.
- Base. This clear coat is essential for strengthening and aligning the nail plate. Also, the latest novelties contain various vitamin complexes.
- Gel polishes in different shades.
- Finishing top. The transparent tool consolidates the result, making it complete.
- Decorative details: sequins, rhinestones, foil, beads, acrylic powder.
- Stencils make the work of creating a manicure much easier. As a template, not only special purchased, but also made and improvised means are suitable. For example, for geometric patterns, you can use a narrow masking tape, and for an openwork pattern, you can use a piece of lace or tulle.
- Adhesive for fixing decor.

What can you draw with?
Many novice masters are wondering what it is possible to paint on nails coated with gel polish.
It turns out there are many options for this.
Patterns can be applied:
- ordinary varnish;
- acrylic paints;
- watercolor;
- acrylic powder-sand;
- shallac;
- gel polish.

The most common remedy is varnish. It is available, varied, easy to use. To create the simplest design, you only need two shades - for the background and for the pattern. The downside is the thick texture of the gel polish, which makes it difficult for beginners to reproduce fine and small drawings. But in fact, this is a matter of technology, it needs to be worked out.

Acrylic paints are considered another recognized material for manicure. They are easy to use, fit better on the surface, have a wide color palette, do not crack, do not spread, dry quickly. It is very easy to work with them, they do not need to be diluted with water. The only drawback is that they are quickly washed off, so they must be covered with a top fixing layer.

Unlike acrylic, watercolor requires the addition of water, so it dries more slowly. Watercolors allow you to create landscape compositions, but they are difficult to work with. The technology needs to be worked out for a long time.
Popular drawings step by step
The demand for a certain type of drawings directly depends on the season. It's no secret that snowflakes are popular in winter, blossoming tree leaves and buds in spring, flowers and berries in summer, and autumn leaves in autumn.
Let's consider the algorithms for creating the simplest drawings.
Flower
The easiest way is to use dots. In this case, first, gel polish is typed on the ball and the middle of the flower is placed on the desired place of the nail. After a dots of a larger diameter, round petals are marked around it.
Petals can be painted with a brush, beveled or "petal" will do. To do this, you first need to put a drop, and then pull the petal shape out of it with a thin tip. Or start drawing right away, starting from the middle of the flower. The tip of the brush is pressed to the beginning and, without tearing it off, they make a wave-like movement in the form of a semicircle, then the same is repeated on the other side. The result is an oblong petal narrowed in the middle.

Floral ornament is one of the most complex patterns in nail art. Therefore, you should exercise, you can even on a piece of paper. The better you master the instrument, the more accurate the images will be.
Not all masters can reproduce a high quality rose. But the simplest sketch can be done even with your own hands. This will require a spot brush or short liner. We start drawing a rose from the center. We dip the very tip of the brush into varnish and, holding it vertically, put a point, and draw a comma from it. We twist the next arcuate line in the other direction. And so in a circle several times, increasing the length of the arcs. That's all.

Flowers are sometimes painted not on a dried basis, but on a "wet" layer. In this case, the background does not dry out, they immediately begin to work on it with a different shade. Drops are applied at the location of the petals and gradually stretched with a needle, toothpick or thin brush. It turns out a kind of watercolor effect, since the gel polish spreads.

It is customary to glue rhinestones or beads in the middle of the flowers, which will enhance the decorative effect of the design.
Maple Leaf
Autumn designs often associated with brightly colored leaves. Maple variants are very often reproduced. There are many techniques for obtaining them, but we will consider the simplest one.
Before starting work, it is advisable to remember how it really looks. Experienced artists suggest that it is better to start with the center lines, and the maple leaf has five of them, like fingers on a hand. With a needle, we apply five points, which will be the vertices, of which we draw the axes: one central, turning into a leafy stalk, two to the right and two to the left of it. We shape the vertices in the form of arrows - these will be sharp edges. Then you can work either as a liner middle length, or with a thin brush, drawing out the edge of the sheet with wavy lines.

After receiving the contour, further actions depend on the wishes of the master. The drawing can be toned or leave only the sketch. Some draw inner veins on the sheet, while others do not.
Heart
Hearts are the favorite pattern of young girls. It turns out to be very simple to execute them, even beginners will cope with it the first time.
To do this, you only need a toothpick or dots, which put two parallel points at the location of the heart. The distance between them is equal to the width of the pattern.
Then, from each point with a sharp toothpick, pull the tails down to the middle and connect together. That's all, the heart is ready.

Geometry gel polish
Straight, wavy or broken lines, geometric shapes and points have always been popular among fashionistas. Trends recent years confirm that geometric patterns are still in trend, in demand, and most importantly, they are easy to reproduce.
To get even stripes, it is enough to use ordinary masking tape, forming stencils for drawing with it. More complex templates are offered by manufacturers of manicure materials.
One of the elementary methods involves the use of a narrow manicure tape with a sticky seamy side. The strips are glued to the base manicure in random order. Gel polish of the selected shade is applied on top. After drying the coating and removing the tape, we get a monochrome pattern with stripes of the base color. If you need a pattern of contrasting tones, then you should cover your nails with colored varnish before the tape.

Another way. Scotch tape is applied to the base according to the desired pattern. The resulting areas are painted over with gel varnishes of different shades. After drying, removing the stencil and fixing with the top, we get a kind of geometric mosaic.

Summer manicure
Summer models are considered another category of popular patterns. These include palms, fruits, berries. In the summer, you can often find a manicure with a sketch of a watermelon or strawberry, ladybug or sunflower. Some prints are easy to create, others should be practiced to create.
There is nothing difficult in drawing a palm tree. Any fine brush is required. The drawing begins with a drawing of the trunk from the hole of the nail plate. The line should turn out with a thickening at the bottom, thinner at the top and with a slope. Then a drop of varnish is applied to the top and palm leaves are pulled out of it in different directions. Usually 4 to 5 pieces. The jagged edge is best drawn with a needle or, if you have skill, with the tip of a brush.

Classic
With the help of gel polish brushes, classic types of manicure are well decorated: French and moon. It is important to use manicure tools correctly.
The holes can be drawn with a dagger-like brush, and the edges of the French manicure can either be drawn with it, or with an ordinary flat one. For this, the tool is applied first from one side and the line is drawn to the center, and then from the other side, also to the center.

Master classes and lessons
Beginners, in order to learn how to reproduce drawings with gel polish, should improve their technique. It is not necessary to do this on false nails, to spend money on them, it is enough to paint with a brush on paper. Drawing should be smooth and clear.

Consider several master classes in which individual simple ideas are decomposed in stages.
Very fashionable in the last days has become a stamping technology that simplifies the application of patterns on the nail. The name comes from the English stamping - stamping. In other words, silicone stamps with engraved sketches are used to reproduce the pattern. Consider one of the master classes on this method.
- All tools and materials should be prepared first. It is better to choose a special varnish that has a dense texture.
- Then, hands are placed in warm water with sea salt for 25 minutes to steam the cuticle and remove it easily.
- Then each nail is processed separately: old coarse skin, cuticles, and barbs are removed. Gives a well-groomed look to your nails.
- Next, with the help of manicure scissors, the nails are cut to the desired length and the cut is polished with a nail file, giving the desired shape.
- After that, the nail plates are thoroughly degreased with a special agent.
- Then you can buff them with a buff to ensure good adhesion to gel polish and shine.
- Then you can start applying the base. The entire surface of the nail should be completely covered with it. If you cannot distribute the product near the side rollers with your own brush, then it is better to take another, thinner one. After applying, the hand should be turned over with the palm up for a few seconds so that the product is evenly glass towards the middle, and then dried under a UV lamp.

- The next step is color gel polish. The method is the same as for the base coat. The only difference is the number of layers. As a rule, 3-4 repetitions are enough for saturation, not forgetting to carry out drying in a lamp after each.
- After drying, the sticky dispersion layer should be removed from the last layer, for which either a specialized tool is used - clinser, or medical alcohol, or a medical antiseptic.
- Next, they proceed directly to the design. A couple of drops of gel polish should be dripped onto a metal plate with a pattern and distributed with a plastic scraper so that all grooves and grooves are filled, it is better to remove excess varnish. Gently press on the plate with a silicone stamp, the sketch should be imprinted on it without smearing.
- After the drawing is transferred to the nail: the cliché is applied to the nail surface and rolled from left to right. No unnecessary movements are allowed, otherwise the pattern will be disturbed.
- All nails are treated in this way. The stamp must be cleaned after each.
- If there are prints on the finger near the nail, then they should be removed with a cotton swab dipped in nail polish remover.
- Finally, the manicure is fixed with a transparent top and dried.

Summer design workshop.
- Standard nail treatment, creation of a basic manicure. The procedure involves cleaning, shaping and shaping with a base coat.
- Creation of a jacket. French manicure in warm pastel colors: a beige base and a slightly pink smile at the tip of the nail. First, the background gel polish is applied, dried and treated with a cleanser. Next, a smile is drawn with a brush, processed according to the same scheme.
- Then they begin to create a chamomile pattern. With the help of a dots or an ordinary toothpick, yellow drops are applied at the locations of the daisies: one on the little finger and index finger, two on the middle and ring fingers. Typically, the pattern is placed symmetrically. Therefore, on two fingers on the hand, the daisies will be to the left of the center, on the other two - to the right.
- Bye yellow not dry, add a little brown tone on the one hand for saturation.
- With a dotted or beveled brush, paint the petals with white varnish, starting from the outside to the middle. On those marigolds where there are two flowers, it is better to make one of them a little smaller.
- The pattern is dried under a lamp and covered with a finishing top.
- If desired, rhinestones can be glued to the middle of the daisies to enhance the decorative effect.