Many people love to tinker, creating a unique craft, regardless of age. This process especially captivates children, because here you can create real masterpieces of art from an ordinary sheet of paper, a piece of fabric, plasticine or other improvised means. Let's take a closer look at how to keep a child occupied and what crafts you can make from seeds with your own hands.
Useful creative activity
Interaction with small objects will have a beneficial effect on development fine motor skills, so some types of seeds are perfect for sharing with a small child. Let's analyze the most interesting ideas and methods for their manufacture.

You should start working with young children by doing small paintings, and then take on more complex options. More complex applications are suitable for schoolchildren or preschoolers.

Creating similar works requires considerable perseverance and determination, and the beautiful works obtained at the end of the work justify all the effort expended.

Necessary material for work
List necessary materials may vary slightly depending on the method of attaching the seeds themselves or on the type of future work.


The simplest mounting option is pressing into plasticine; even kids can handle it, but under the supervision of adults. The photo of crafts made from seeds shows that they can be either flat or voluminous.

Basic set of materials:
- seeds;
- glue;
- paints (acrylic, food coloring, gouache);
- colored or white cardboard;
- colored pencils;
- soft plasticine.

You can create such masterpieces with children not only in summer period when the watermelon season begins, but also at any other time, if you first take care of preparing the seeds.

Procurement of seeds
Not many people know exactly what types of seeds can be used to make crafts with children. The most common materials are sunflower, watermelon and pumpkin seeds. There are several stages of preparation various types seeds


The process of harvesting watermelon and sunflower seeds is the most simple option. We collect the seeds, then wash them well, and then place them on a napkin or waffle towel and dry them thoroughly in the sun. When the seeds are dry, they can be placed in a special container, which should close tightly and protect them from moisture.

Preparing pumpkin seeds takes significantly longer. We also start by collecting the seeds, then they need to be washed and dried thoroughly.

If white seeds are needed for the application, then at this stage the harvesting process can be considered completed and the seeds can be placed in a jar.

And if you need colored seeds, then you should carry out a procedure for coloring them; this can be done in two ways. Applying paint with a brush. This coloring option will be convenient when work requires no large number seeds, otherwise it will be a rather tedious process.

When mass dyeing seeds, you can use more in a simple way. IN plastic bag you should place the paint on the basis that all the seeds should be immersed in it, add the seeds there and mix them thoroughly with the dye (gouache, acrylic, food coloring).

To obtain brighter and richer tones, leave the seeds in the paint for 10-15 minutes. After completing the procedure, they must be placed on oilcloth and dried again in the sun.

After thorough drying, they can be placed in an airtight container for storage or used for crafts with detailed instructions.


Craft ideas
There is a huge amount various ideas for creating crafts and applications from seeds. Let's look at the most common ideas for collaboration with small children. More detailed manufacturing stages will be discussed in the master class on crafts made from seeds.


Autumn motives
Satisfied simple idea for working with pumpkin seeds. On a sheet of white cardboard, you need to draw a tree trunk with branches and, together with your child, place the seed leaves on them in a chaotic manner.

You can use seeds in several colors: yellow, orange or green. Fallen leaves can be identified under the tree. The foliage should be secured with glue.

Bright cockerel
Using plasticine, lay out the base of the cockerel on a sheet of cardboard. Bright colors seeds will be useful as feathers. They must be carefully inserted into the finished base. If the seeds don't stick well, add a little glue.

Flowers
To make flowers you will need skewers, this will be the stem, and on top of them you need to mark a plasticine ball, this is the middle of the flower. The seeds will be petals; here you can use several types of seeds and collect various flower arrangements.


Preparing for the New Year
In anticipation New Year's holidays You can make an artificial small Christmas tree and real Christmas tree decorations.


You will need it for the Christmas tree plastic straw from the handle. It needs to be covered in a circle with plasticine, and then the seeds should be stuck on the plasticine as needles.

To create a ball you will need a foam base. Using glue, you need to place seeds on it like scales.

Don’t forget about the cord so that you can hang the finished decorative ball on the Christmas tree. After it is completely covered with scales, it will be necessary to paint the scales, if already colored seeds were not used.

Applications
When creating an application, your own imagination is your most faithful assistant. There are a lot of ideas out there if you haven’t been able to come up with them yourself.

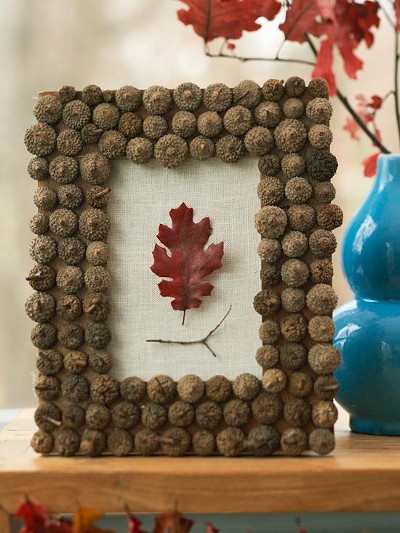
Seeds can be combined with cereals, legumes, beads and even small cones to decorate photo frames or various stands.


Numerous examples of work and ideas that can be implemented by both adults and children. Finished works can not only decorate your home, but also take prizes at exhibitions in kindergarten or school. Therefore, you should not waste time on empty thoughts, but rather get to work and start creating a miracle!

Photos of crafts made from seeds


Every year nature gives us a lot of natural materials suitable for creativity, completely free of charge. The process of creating with your own hands develops the child’s artistic taste, thinking, memory, and fosters perseverance. But the most important thing is that you can have fun and usefully spend time with friends, delighting yourself and others with crafts.
Preparation of natural materials for their further use
Nature is the best artist; she creates natural materials that, in skillful hands, turn into works of art!


Plant materials
Chestnuts
Chestnut fruits have a bright brown color and a shiny surface, so they make excellent DIY crafts from natural materials. The shell of a fresh chestnut is thin and can be easily pierced with an awl. Chestnuts are a fertile material for working with young children themselves. You can make many different dolls.


It is better to store in a cool place in boxes.
Acorns
Oak fruits ripen in autumn, in September-October. collected in various shapes and sizes.


At the same time, their cups (pluses) on which they rest are collected. Pluski are very often used separately from acorns, as an independent natural material for various crafts.

Acorn pluses and balls felted from wool
Watch the video to see how to felt even balls of wool. Olga Skibina:

Acorn tops and Christmas bells


You can store them for a very long time, after thoroughly washing and drying them. But why just store stones when the whole family can have fun playing with them?)


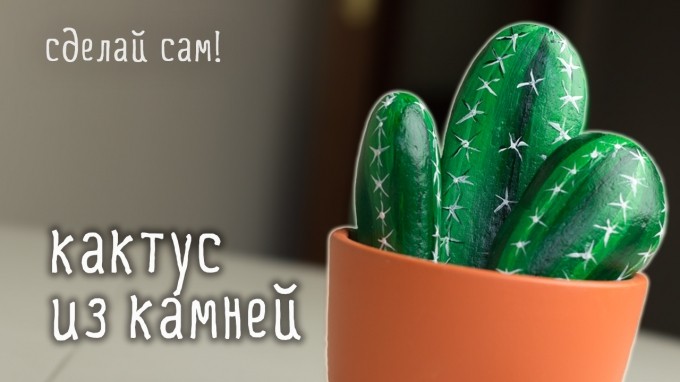
For another way to apply images to river or sea stones, see the video from You Can Do It Craft. You'll be surprised how easy it is!
Shells
You can collect shells on the banks of rivers, seas, and lakes while relaxing with your children. Many of them are original appearance, in shape - oval, scallop-shaped, elongated, etc.
Boil them for a few minutes to free them from living organisms. The shells are washed with a small brush (or a toothbrush), after which they are dried and sorted by type and size. Stored at any temperature.
You can also clean shells in a solution of bleach and water at a ratio of 1:1. Top layer After a while it will disappear, and the shell will remain with a beautiful shiny top.
Animal figures are made from large shells.


Small shells make wonderful applications and garlands:


Shells can be used not only as the main material, but also as additional decoration (bird wings, dog ears, flower petals, etc.)


Sand
Very accessible material that can be collected in any sandbox. It varies in structure. Before use, it must be rinsed and dried thoroughly. And then you can use it as decoration in your works:


Rules for storing natural materials
DIY crafts made from natural materials will be flawless if, after collecting, drying, and pre-processing, you properly store these natural gifts. To do this, you must adhere to certain rules.
- A dark, cool and well-ventilated room is best place for storing natural materials.
- You can buy plastic containers to store each type of material; use cardboard boxes for shoes, tea, sweets; take ordinary glass jars with a screw cap. For seeds, as for beads, it is better to have a container with many compartments.
- Dried flowers are fragile and break easily, so they are placed in a tight box or container. Petals are stored separately from flowers. Flowers with stems can be stored in a vase.
- Prepared leaves are also brittle. You can store them in big books. Also, for safety, put them in labeled candy boxes, secure them with a little tape so that they don’t accidentally open.
- The shells are placed in glass jars or plastic containers with a wide mouth to prevent them from crumbling.
Additional tools for crafts made from natural materials
To create beautiful craft made from natural materials, you will need additional tools and materials.

These could be:
- colored paper;
- cardboard;
- leather scraps;
- scraps of fabric;
- bird feathers;
- foam;
- plasticine;
- wire;
- PVA glue, “Moment”;
- gouache;
- stain;
- varnish, etc.
Paper very often used as a complement to natural materials. Children, bending and gluing it, make the work much more interesting.
Plasticine fasten individual parts of simple toys at the initial stage of work. It is not very durable, but as an addition it is often used in kindergarten and elementary school.

From wire most often the frame of a toy is made, the connection of its parts. Copper wire diameter 0.29-0.35 mm - soft, flexible and durable - most comfortable. And for the frame, wire of a larger diameter is used - 1-1.5 mm.
Threads It’s better to take thick, multi-colored ones (No. 10).
Glue it is better to take white PVA, BF, etc. However, in kindergarten it is better to use PVA glue.
They also use foil, pebbles, cherry pits, and bristles.
It is better to store additional material in a small box with compartments for each type of material.
The use of additional material depends on the plan, the skill of the children, and the degree of development of imagination! Offer your options, but rely more on children's intuition and desire.

It is also additionally necessary to have certain tools for making crafts from natural materials:
- art scissors;
- awl;
- jigsaw;
- tweezers;
- pliers and wire cutters;
- sewing needles;
- brushes for glue and paints;
- a cotton cloth for wiping off glue residue.
Scissors for children they should have blunt ends, small, with rings that are comfortable for a child’s hand.
Awl must be made of durable material with a handle length of about 6 cm, a diameter of about 2 cm, the piercing part is 3.5 cm
Needle I need a large sewing machine. Be sure to store it in a pincushion with a thread threaded into it.
Attention! Only adults use pliers, pliers, and drills!
To draw the outline of the part to be cut out, a simple pencil. For example, a dress, hats for a doll, etc. It is better to take a soft pencil (2M).
Tassels(soft for drawing, harder for glue). It is better to buy squirrel tassels (No. 4 and 6). For glue, use brushes with hard bristles.
Stack- a tool necessary for processing a surface made of clay or plasticine. The length of the stack for children is about 12 cm. You can make the stack yourself from a worn-out brush: round it on one side and sharpen it on the other.
Crafts made from natural materials for kindergarten
Kids love it when in their hands chestnuts and plasticine turn into toys that they can play with. Crafts made from natural materials for kindergarten Not very difficult, so any child can handle it with the help of an adult. Sometimes they are made from fruits and vegetables, but most often they are applications from leaves and animals from cones and acorns.
Crafts from leaves and maple “helicopters”
The easiest and most accessible job, even for kids, is leaf applique. If this is your first time making a composition with your child, offer him a picture that will serve as a template. Don't rush to do everything yourself. Invite your child to choose leaves as desired so that the work turns out similar to the sample. This is how they will develop creativity your child.
Material for application:
- colorful leaves;
- thick sheet A-4;
- glue brushes;
- PVA glue;
- scissors;
- sample.
To make a simple arrangement, you need even, dry leaves. Place them under a press or in a book. In two days the material is ready. Cut out the appropriate pieces with scissors and lay them out on a sheet of paper.
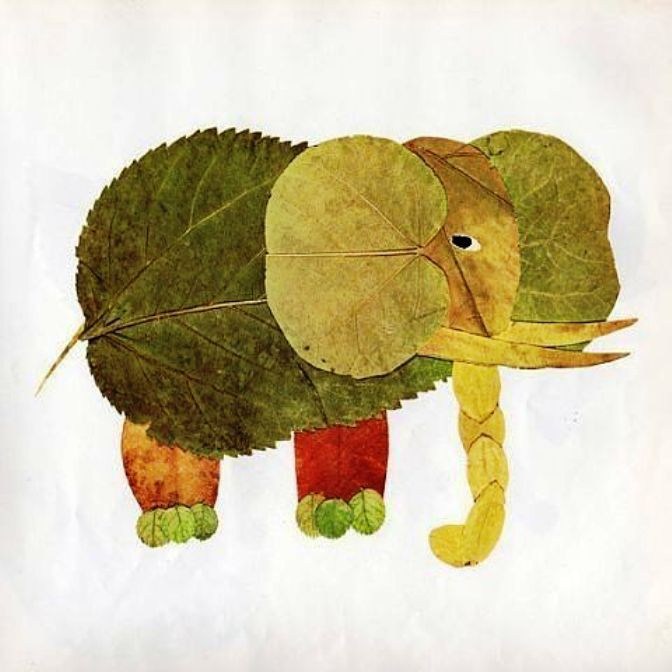
Now you can glue it. First the background and lower layers, and then the finer details. For example, if you want to make an elephant, then first make a body and head out of leaves, and then glue on the trunk, tail, and legs. If you don’t have enough eyes, you can add them in with a marker or make them from tree seeds.
You don't have to do everything according to a template. You can come up with a picture yourself and create an original composition from leaves.


Use as a supplement colored paper, felt-tip pens, paints, so your applications will be even more interesting.
Along with leaves, maple “helicopters” are also ideal as a basis for crafts made from natural materials for kindergarten. Just look at this miracle!

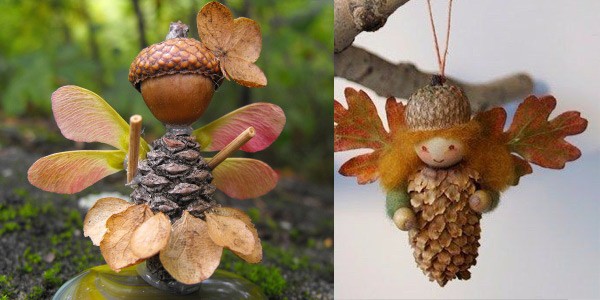
Fairy wings made from maple seeds

Dragonflies from maple "helicopters"
Now you have seen how beautiful and original leaf applications can be. Use these ideas for spending time with your children.
Simple master classes on creating children's crafts from acorns and cones
At the end of summer, acorns begin to ripen, and they make wonderful crafts from natural materials for kindergarten or school. They are well preserved, and on long autumn evenings you can do a pleasant and useful activity with your children that develops fine motor skills of the baby’s hands, imagination and perseverance.
The most common crafts made from acorns are little animals and various people. You can easily make legs, arms, horns and other small elements from toothpicks, matches, thin twigs. An adult needs to help the children poke holes in the acorns.
To attach small parts, you can use a glue gun or Super Moment glue, but only adults should do this. And the safest way for kids to fasten parts together is with plasticine.
Making fly agarics from acorns is even easier! To paint acorns, you need to remove the caps from them, and after the paint has dried, glue them in place.


Acorns are very beautiful in themselves, and if you also paint them with acrylic paints or nail polish, then such crafts will decorate any home.

You can also make hats painted with silver paint original decoration on Christmas tree. The process of creating such an eco-toy is quite simple: we stick it tightly onto a foam ball (you can take an old Christmas ball) acorn caps. And it sparkled new.

We found another video for you, where Niki Junior
In addition to “edible” crafts, kids can choose any of the ones presented in this huge Krestika article! We tried to choose the best and easiest to implement ideas :) Good luck and creative inspiration to everyone!
Cereals and coffee beans are the most accessible materials for handicrafts, which are found in almost every home. They make very creative crafts, which can be used to decorate the interior or gift to a loved one. Crafts made from cereals will allow you to fully unleash your creative abilities and also be fun to do with your children.
When it comes to coffee beans, they not only have pleasant aroma, but also practical enough for creative works, since they differ in optimal parameters. In addition, the smell of quality beans stabilizes nervous system and helps stimulate children's observation, perseverance, formation creative thinking and an original approach to business.
How to make paintings from coffee beans
- A suitable size photo frame.
- Polymer glue or heat gun.
- Depending on the idea of the future painting, you can purchase colored paper, aerosol or watercolor paints, as well as any other accessories to your taste.

Before starting work, you need to remove the glass from the frame and remove the protective film from the frame, remove the cardboard lining, and if desired, you can cover it with paper, a plain fabric, or paint it.
Then you need to think over a sketch of the future work. Using a simple pencil, outline the location of the drawing. You can pre-lay out the grains without gluing them to the base, which will allow you to better think through the design and, if desired, modify it. By carefully thinking through the picture, you can avoid mistakes and omissions. In general, the grains can be placed however you want, in absolutely any direction.
If you want to change the shade of the grains, you can tint them with watercolors or spray paints. Don't forget about different types of coffee, which also have differences in color.
After you decide on the color and design idea, you can start gluing the grains. You should not use too much glue, because during the work it can stick out and create unwanted stains. Remove excess glue in a timely manner by blotting it with a dry cloth.
Instead of a photo frame, you can use a wall clock as a basis and also use it as a basis for your creativity.


No less relevant is the idea of creating a kind of coffee tree or. It can be made by placing a stick on a stand and attaching a ball of light material, such as paper, to the top. Subsequently, the surface of the ball and the stand are covered with coffee beans.
Crafts from cereals for children in kindergarten

The technique of gluing cereals onto paper differs from the previously presented version with coffee beans. For example, legumes can be glued separately. Small grains can be poured onto a surface coated with glue through a stencil.


Alphabet of cereals for children
When introducing a child to letters, as well as learning to read, it is best to use the three-dimensional letter technique. This will help him remember the letters faster and he will be able to enjoy the unique game.
Materials:
- A sheet of cardboard in a neutral shade;
- Pencils;
- PVA glue;
- Scissors;
- Cereals: beans, peas, millet, etc. at your discretion.

Decorate the bottle with cereals or seeds

This craft will be quite non-standard decoration for home. The design depends on the color of the cereals, which, just like coffee ones, can be tinted.
Educational games using semolina
Games with cereals are widely used to develop fine motor skills in children. To increase interest in the game, the croup can be colored. The essence of the method is that the cereal is poured onto a tray or any other flat surface, giving the child the opportunity to make original designs using his fingers. To begin with, you can choose fairly simple shapes like a circle or square, and then move on to some more specific objects. This technique also develops creative thinking baby.

Cereals, seeds and coffee beans are widely used in handicrafts. At the same time, they can be used to make a large number of creative products, interior decorations and even exciting games for children. you can transform ordinary food items and old home decor items into beautiful handcrafted items.
Natural materials- the most beneficial resource for children's creativity. And if you combine fabric, paints, and other available materials in one work, you can get a truly artistic masterpiece! And many works done independently with your own hands and presented on the Internet are direct proof of this.
Following the advice of this MK, I suggest that parents and their children do a simple and very beautiful picture- application “Owl”. This picture will harmoniously fit into any interior of a children's room and will significantly enliven it.
We don't need much to get the job done:
1. Wooden frame size 18*24 cm.
2. A piece of denim approximately 26*32 cm.
3. Sheet of thick cardboard 18*24 cm.
4. Pumpkin seeds.
5. A pair of plastic eyes for toys.
6. Branches of trees or shrubs.
7. Gouache paints (you can also use acrylic paints).
8. Glue “Moment” transparent.
9. A little black plasticine.
10. Toothpicks 3 pcs.
11. Thin brush for drawing.

How to make a painting with your own hands
1. First, let's prepare the field of activity for our application. Let's take the most common one wooden frame size 18*24. We prepare a sheet of thick cardboard measuring 18*24 cm, which is best cut from cardboard box. We put a piece of fabric on it, measuring approximately 26*32. In our case, we took dark-colored denim, since the owl is a nocturnal bird and is awake in the dark. I’m sure that in every home there are old jeans that lie idle, and you don’t dare throw them away, but in our case, we will combine business with pleasure - we will find a worthy use for your favorite old jeans. We bend the ends of the “extra” fabric behind a cardboard sheet...
... and glue them on. We insert the resulting base into the frame and begin making the applique. 

2. We cut the pre-prepared branches of trees or shrubs at our discretion and place them on our base in a frame, after which we glue them using transparent “Moment” glue. This glue is very good because it reliably glues parts to the fabric, and minor flaws in the work are practically invisible.

On the left we lay out an owl figurine from pumpkin seeds, and also glue them. Place the seeds with the pointed end up. We make ears for our owl on top. 
We glue plastic eyes in the middle of the head (they can be purchased at any craft store). Just below eye level we glue an additional seed for the beak.

We glue individual seeds to the branches - these will be leaves. 
From the bottom of the owl we form a tail from 3 seeds. 
You can immediately make our owl claws from black plasticine.
3.
Well, our composition is almost ready, and in order to make it more lively, all that remains is to decorate it. Let's start with the owl: we paint each seed on the owl's body in white, and in order to highlight the head, near the beak and eyes, we decided not to cover the seeds with white paint, but to leave them as they are. Paint the owl's beak orange.

Cover the leaves on the branches different colors, and after the paint has dried, use a toothpick or a thin brush to paint dark veins on them. 

Along with gouache paints, you can also use acrylic paints, their advantage is that they do not wash off even after drying and give a glossy shine. If you used gouache paints, the color of the seeds will be matte, which, in my opinion, does not look so elegant. But no problem! If desired, after the paint on the seeds has dried, all elements of the composition, including tree branches, can be carefully coated with colorless nail polish. Now the whole composition has acquired a varnish shine.
Our kids have so much energy and curiosity! This can and should be used: let the child make something on his own, create his own naive children's masterpieces. Of course, with your help and active participation small touching gifts may appear for parents or grandparents - for a holiday or for absolutely no reason, just to say: “I love you.”
Magical transformation of ordinary objects
When a picture emerges from several types of cereals and seeds, it is akin to a miracle. After all, it is traditionally believed that we cook porridge from buckwheat and rice, and throw away melon and watermelon seeds without a second thought if we are not going to plant them. But it won’t be difficult to look at it differently - and try to use non-traditional materials for making crafts.
Then cereals, legumes, seeds will magically turn into paints, and your imagination can suggest very unexpected solutions, and your little one will receive the first lessons in craftsmanship... But before you start mastering crafts from cereals, give your children a short drawing lesson on... semolina. Pour it into the tray and show how your finger can create a picture: a sun, a Christmas tree, a mushroom... The baby will be delighted!
What may be useful
Just imagine: creativity doesn’t require any special devices or materials. You most likely already have everything you need in your home:

When creating crafts from cereals for children with your own hands, you can use the natural colors of the inhabitants of the kitchen cabinet:
- brown - buckwheat, tea leaves;
- shades of white - rice, semolina, pumpkin seeds, zucchini;
- yellow - peas, millet;
- shortbread - wheat groats;
- black, gray - seeds.
You can create a whole picture from beans of various colors!
DIY rainbow
But if you want brighter tones, for example, red or blue, the solution is simple: change the color of the white raw material food coloring. Even if a young creator suddenly dares to taste a grain or a seed for inspiration, you will have nothing to fear.

However, if you need to color semolina, you need to use a different technology. To dissolve gouache, you need to mix equal volumes of water and alcohol. In a glass or plastic plate, add the resulting liquid to the paint to achieve the desired shade.

Advice. The most convenient option is to paint a larger amount of cereal: not for one application, but with a reserve. Then you will always have a multi-colored palette ready in jars.
Craft base
 You can draw a sketch of the future picture yourself or select an image on the Internet and print it. This is a good solution for adults who are not artists at all.
To begin with, you should try your hand at creating small applications from pumpkin seeds, sunflowers, beans and peas. In this case, plasticine applied to the base inside the contours of the figure can act as glue. For legumes, the retaining layer is needed thicker than for light seeds.
Of course, nothing will work on thin paper; it simply won’t withstand the load. To still use a printed stencil, it is better to stick it on cardboard and then wait until the glue dries.
Fantasy and creativity
What materials do passionate people create their works from: scraps of fabric, pieces of paper, small stone chips... The list can be continued for a long time. And to name all the varieties of crafts is almost unrealistic, there are so many of them!
Hedgehog made from seeds
 You can simply make a portrait of a cute animal with a prickly back, or, to complicate the task, draw a path along which the animal goes to its house.
The “Hedgehog” craft from seeds is not very difficult to make together with your child. Of course, you have already prepared a stencil on cardboard in advance, kneaded the plasticine until soft and poured seeds, buckwheat and rice into the bowls.
After completing each fragment filled with cereal, the excess should be shaken off onto a dish or tray. If you do everything step by step, carefully, the result will definitely please both you and the baby.

Is your hedgehog ready to stock up for the winter? Then make several plasticine mushrooms and apples and attach them to the needle seeds.
The works “Chicken” and “Mushroom Family” are performed similarly..
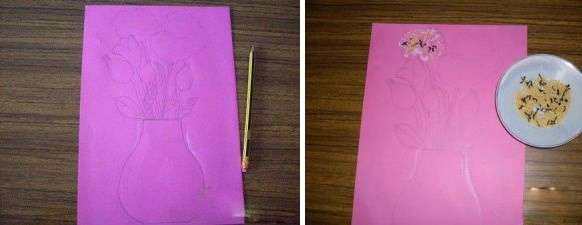
Craft “Flowers in a Vase”
 And now it’s time for men (in this case, age is not the main thing, it’s about the state of mind) to get down to business. To make women smile and feel happier, there is one recipe: give them flowers more often. Having received your bouquet, your mother and grandmother will be touched, and your sister or friend will reward you with a radiant smile.
Making crafts from seeds and cereals with your own hands is not at all as difficult as it might seem at first glance. And if plasticine was needed for the hedgehog, then this time you will need PVA glue.
During the work process, all elements of the drawing must be done one by one and do not apply glue to several fragments at once: it may dry out, while you are working on one flower.
To ensure that each flower turns out neat, shake off excess grains - this way you will see where they did not stick and correct the situation in time.

To make the application look like a painting, you can create a background for a bouquet in a vase. This is not difficult: just apply glue to the free areas of the paper and sprinkle with semolina or dried tea bags. If at the same time the color of the background changes and becomes lighter from the perimeter to the center, the picture will “come to life.”
Panel “Cats on the night roof”
 If you wish, the drawing can be done schematically and made with silhouettes of purrs on both sides of the pipe against the background of the moon and starry sky. Or you can try to create more detailed images - only you can decide how difficult the work will be.
To make it, you can use colored semolina and rice. Using something more massive is not entirely justified, since the panel is made on canvas. It is known that the fabric is overloaded can sag, become deformed and completely ruin the whole job.
If for some reason it is difficult to draw a plot picture yourself, you can print several templates from the Internet, and then transfer the contours to the prepared base.
The panel is characterized by two features: canvas and frame. Whether your work will be enclosed in a finished wooden structure, or whether it will be made from seeds, pasta, or strips of cereal, is up to you to decide. After all, you are the author and have every right to own performance about beauty.
 If you decide to make a picture from colored beans, it is better to take cardboard and plasticine (hot glue). Just keep in mind: in this case, the process of creating a man-made masterpiece will be more like making a mosaic. Or perhaps it will remind your child of putting together puzzles... Either way, it will exciting activity. This picture can also have a frame made of beans in a contrasting color.
It is quite possible that you will want to create new works with other characters: “Geese and Swans”, “Lisa Patrikeevna and Kolobok”... You never know the plots!
Crafts from different cereals, plant seeds are always original and can be used not only as exhibition objects, but also as full-fledged bright accents in kitchen decor or on the desktop. Well, if you are “dragged” into creative process, then, probably, the most different ideas: From topiary and napkin clips to decorated tabletops. Why not?
Attention, TODAY only!


