Needlework is a unique way to create beautiful things and objects with your own hands. For example, weaving from the wire, which is further conversation, allows you to create beautiful jewelry, decor items, makes it possible to decorate your clothes, accessories, home and garden. What can be made from such a material like a wire? What is better to start newcomers?
A little stories about weaving wire
Wire products are valuable accessories and items that have always enjoyed great popularity in both merchants and fair sex representatives. This is confirmed by artifacts found by archaeologists and lovers of antiquities during excavations in the Old Russian Kurgans. In particular, the following decorations and items were found from wire products:
- rchugi;
- bracelets;
- persian;
- suspension;
- chains;
- temple rings.
Interestingly, in each of the finds it was its individual weaving from the wire, which benefits the exhibit to the exhibit among other household items and other utensils. Among the above objects were found and those that were made of thick wrought wire.
Recall that the production of such material was previously considered a very complex and long process. That is why the value of such objects was equated to the price of products from cast noble metals.
In the process of creating accessories, for example, one ring for a chain, the blacksmiths first, a kind of metal harness was emerged, then it was beaten with a hammer until it acquired the form of the cylinder. Accordingly, it was necessary to make a lot of such rings to create a complete chain and only then make a weaving from the wire. Today, the process of manufacturing products has been much simplified, therefore, with sufficient skills and specific assistance, any network user can make a beautiful ring or earrings.
What tools are needed to work?
If you decide to make any wire product, pay attention to the required standard set of auxiliary tools. So you will need:
- pliers;
- nippers;
- round-rolls;
- metal file;
- manual or desktop vice;
- portable anvil.

What types of weaving exist?
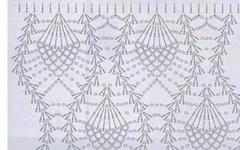
Currently there are several weaving techniques that are used by masters around the world. For example, one of the most popular is the Wire Wrap technique. It helps to beautifully mastered a variety of beads, stones, accessories, create original earrings, cuffs, brooches, earrings and other jewelry. There is also a weaving technique, visually resembling a similar needlework from ordinary yarn and threads. The easiest is also considered "oscillating" techniques, as well as Viking Knit. What is suitable weaving from wire for beginners?
How to pick up the technique of weaving?
Newcomer in any field of activity, including needlework and hobbies, be very hard. There is always a risk to make the wrong choice, hurry with conclusions or take an incorrect decision. Therefore, it is best to start with the simplest and affordable to understand the beginner technique. Let's do it together.
We make a bracelet Viking Knit: Tools
"Viking Knit" is a simple weaving from a wire that does not require soldering of each link individually and provides for work with a large piece of wire. In this case, each link is artificially "increasing" until the entire chain is clicked. For this we need the following materials and tools:
- thin copper wire;
- simple pencil;
- scissors;
- rule (preferably metallic).
Create a basis for the product
Before starting to perform a wire weaving (schema and photos can be found in our article), it is necessary to prepare the basis. To do this, take a ruler, cut a 40 cm long wire and exactly 6 times wrap it around your ruler. Next, remove the loops received and secure them using the free end of the wire. Then save a slightly part of the fastening down, and make a flower from the released loops.

Loop loop: Getting weaving
In the next stage, we take a pencil, we put it on top (with a not enough side), cut off the wire with a length of about 70 cm, we wake her free end into one of the first "petals" of our "flower". Next, go to another "petal" and make the second, third and fourth loop. Go to the second row, clinging now for the loops of the previous one. We do so many more rows until the length of your working wire does not decrease to 10-12 cm. This is how weaving the wire is performed with your own hands.

We increase the wire and moving on
To prolong weaving, it is necessary to artificially increasing the wire. To do this, you screw the new "working thread" to the small tip, and its end is hiding under other links and loops. Excessly cut off and continue to create new rows and loops.

After it seems to you that the wetting obtained will be enough, remove the weaving from the pencil and stretch carefully. It turns out a whole bracelet. Next, disconnect too much, cut and fix it. You can add such a product as beads and a fastener. Bracelet ready. And you can still make such a weaving from the colored wire.
How to make a bracelet using colored wire?
In addition to jewelry, you can make beautiful bracelets from the colored wire. For this will be needed:
- scissors;
- rod for handle;
- two- or four-color wire with a polymer layer;
- large and small beads.
We make the basis for the bracelet
Take a small piece of wire (approximately 15-20 cm) and bend it in such a way that it turned out a kind of cross. Next, take a new piece of wire and begin to wind by zigzag movements. After the 1-2 rows are "pregnant", transfer the resulting billet to the handle rod (secure it on the back of it). Start step bypassing a new wire, doing a loop, as in the first example.
After your bracelet will have a suitable length, it can be removed from the rod, fasten, cut down too much and add to the beauty of beads and a fastener. Bracelet ready. The main thing is that it is easy and quickly done, and also has bright color, so I will like even children.

Weaving from wire (bracelets): What to take into account when working?
While working with wire, you must follow safety. To this end, it is best to wear gloves to your hands, and the eyes protect the glasses. When calculating the length of the product, remember that with dense weaving, the indicator will double, if the wire is removed from the frame.
Working with scissors, round-rolls and booming should be carefully, as it is possible to get injured.
In a word, when working with wire, do not rush anywhere. Do everything without hurrying. And then you will have the most beautiful wires from the wire.
Viking Knit is an ancient way of weaving a chain that does not require soldering units. The chain in this technique woves from a long piece of wire, which increases as needed.
On the Russian name can be translated about as "Viking nodes" or "Viking Weaving". Such a name of the technique received due to the fact that the first decoration of this species was found in the burial of Vikings. But then there were other, more ancient findings, and now it is believed that the technique was originally from the city of Trchipoli in India. I use such a chain for decorations stylized under ancient.
In order to weave the chain with your own hands, you need to stock:
- thin wire (I use copper)
- pencil
- scissors
- ruler

Weaving chains do it yourself
First, we need to prepare the foundation for which the most beginning of weaving will be located. To do this, cut off a piece of wire about 40 cm and we turn it around the line 6 times.

Remove from the ruler, fix the loop, turning around them the free end of the wire.

We reveal the loops in the "Flower", carefully, so as not to remember.

This "flower" bend around a pencil. Cut off a piece of wire, about 70 cm long, and begin weaving. Leave a small free end and make a loop around one of the "petals".

We make the second loop, retreating on one "petal" to the right. In the same way, we continue from top to bottom.

We make 4 loops, and we return again to the first "petal". Now you need to go to the next row, for this purpose we do the next loop, engaging for the first loop of the previous row.

We continue to "loop", every time clinging to the loop in the previous row, until the tip will remain about 10-12 cm.

Now you need to increase the end of the wire so that you can put on. Cut off another piece and bring it under one of the vertical rows of loops.

When we reach weaving to this place, we capture a new wire together with the penetration of the previous row, so it will fix it. We are still circles, and again we get to the place where the new wire sticks out. The most responsible moment: a new wire should be removed from the left of the loop upstairs, and the old wire is clinging to the right of the loop and lead it down.

Carefully look at the photo, everything is not so difficult. This is how it looks in a prolonged state.

Old wire on the next few circles capture together with the penetration of the previous row to fix, and then cut.

Thus, we continue weaving. When it seems enough, remove from the pencil.

And now - focus! Gently, capturing his fingers for the ends, we stretch weaving, and it is transformed.

To calculate the length of the finished chain, you just need to remember that it is stretched by about twice.
That's all, the chain is ready. You can disconnect it from auxiliary loops and use at your discretion.
I want to show and tell how I made a knitted chain for Saturn's pohypanka-lighter.
We will need a simple tool: two riglel with a diameter of 2 mm, a mandrel with a diameter of 7 mm, a jigsaw, a round-roll, a file, a tweezers, a burner.
Both materials: wire 0.5 mm, superchalter, flux (I have PV-209), Silver solder 40%, beat.
I wind the wire on the mandrel and fix the end of the wire.

Annuncing the wire along with the mandrel.
Gearing the turns of the wire superclaim to be more convenient to cut.

We saw the jigsaw.

After sawing the ring, annealing that the glue burned down, and whiten in acid bay.

Now you need to fir the rings - reduce the ends of the wire.


With the help of a file, I make small sawdust from solder and mix with flux 1: 1.

I sold down every ring.

Now all rings need to whiten to remove the scale and the remains of the flux.

Now with the help of the Kruglogs, I make oval links. At the same time, the strength of the rings and the quality of the soldering is checked.

The result, soldering seams need to be placed in the middle of the long side, then it will hide in the middle of the chain.

Start knitting. The first link bend on the rigle in half.

In the first link, I proceed a small piece of wire, it is convenient to hold the chain for it when it is still small. In the first link, I did the second link and insert the Bolt, it calibrates the hole and the chain, pull out the avenue and I felt the third link in his place.
If you wish to wear an exclusive and original option Jewelery, it is not necessary to buy them at all. It is possible to create such decorations. own hands. So, if you set out the goal of making a chain yourself, then you will have to attach a certain skill and use some skills to create a beautiful and original thing. In this article, we will look at how to make a chain of wire with your own hands.
Technique Viking Knit.
Viking Knit is an ancient way to weaving a chain that does not require soldering units. In this case, the chain is made from a long piece of panite, which can always be increasing as needed.
Important! In Russian, this name is translated as "Viking nodes" or "Viking Weaving". Such a weaving technique received its name due to the first decoration of such a species in archaeological burials, which belonged to the ancient Vikings. After this discovery were the others who were even more ancient. However, it is currently believed that initially such a weaving technique was mastered in the city of Trchipoli, which is located in India.
Such a chain can be made like a decoration stylized under ancient. In this case, the following items must be prepared to create an ancient decoration:
- thin wire, as a rule, it is best to apply copper;
- pencil;
- scissors;
- rule.
How to make a chain at home in the technique of Viking Knit:
- First of all, it is necessary to prepare the basis for which the start of weaving chains will be imposed. To do this, cut off a piece of copper wire with a length of about 40 cm and 5-6 times to crush around the line.
- After that, you need to remove the motok from the line, lock the loops, turning around them the end of the rope, which is free.
- Next, reveal the fixed loops in the "Flower". It is necessary to carry out such a procedure very carefully to accidentally not remember our loops.
- Then such a "flower" need to beg around the pencil.
- Cut another piece of wire with a length of about 65-70 cm, and you can begin the weaving process. To do this, leave a small free end of the wire, make a loop around one of the "petals".
- Then you need to make a second loop, while retreating on one "petal" on the right side. In the same way, we continue from top to bottom.
- Next, you need to make another 4 loops and come back again to the first "petal."
- Now go to the next row. In this case, you need to do the next loop, clinging to the first loop of the previous row.
- We continue to knit, clinging every time for the loop of the previous row. We carry out this process until the remaining tip of the wire becomes about 10-15 cm.
- Now you need to make the procedure for extending the returns to possibly knit on. To do this, cut off another piece and start it under the vertical row of the loop.
Important! When in the process of knitting, we reach the area of \u200b\u200bwire extension, then you need to capture a new wire together with the loop of the previous row for dense fixation.
- We are in touching another circle, come to a plot with a new wire. Now you need to produce the correct procedure: for this, a new piece of wire must be derived from the left side of the loop upwards, and the old working wire is cling to the right side of the loop and lead it to the lower direction.
- An old copper caniler on several knitting circles, they are tied together with the loop of the previous row for fixation, then cut off and continue the weaving chain from the wire with your own hands.
- By this principle, we continue to knit. When, in your opinion, the thread will seem sufficient length, the associated product should be removed from the pencil.
Important! To determine the length of the finished decoration, do not forget that the associated product is able to stretch roughly by half.
- And now the most responsible moment: it is necessary to capture your fingers for the ends, stretch the weaving and see how it transformed.
Completed knitting, decoration is ready! Disconnect it from auxiliary loops and can be applied at its discretion.
If you purchase a conventional metal knitted hook and a soft wire, then manifesting certain skills and skills, you can associate a decent chain of the required length. It is important to match the thickness of the hook to the thickness of the panite.
Vivid chain knitting method is very simple:
- When the first loop is made, the next need to pick up the crochet and stretch through the previous loop.
- Cleaning is stretched to the desired length.
- Such a procedure for pulling off the loops from the loops we repeat as many times until the product will be the desired length.
Important! The thickness of the hook must necessarily match the wire thickness. Otherwise:
- If the hook is much thicker than the Wires used, there will be huge holes.
- If the hook is the thinner of the wire used, the knitting process is complicated, since the hook will not be able to capture the loops normally.

How to make a chain with your own hands? If you want to make a chain of brass, steel or copper, then the wire must be alleged that the metal becomes soft and supple. For this:
- The template is made in advance and use a wooden planker with four cloves into it with outer cloves.
- Nails that are located in the form of a diamond, determine the shape of the chain links.
- Applying a template, you need to in-with-shaped s-links in a consistent order, since the hinge tips should be an elongated form.
- The chain links are connected both directly with each other and applying rings that are performed as a wire wire winding, and each round needs to be biled with nipples.
Important! Before connecting the links of the chain, they should be handled with a skin and a file for safe use, since burstles can scratch the skin or leave tightening on clothing.
You can also make your own chain from silver wire. Method of manufacture is exactly the same as when creating decorations from ordinary wire.
Separate rings
How to make a wire chain:
- First you need to cut the prepared wire into several small pieces, which have a length of about 5 cm.
- Then beate the tips, with the power to press them with a flat part of the pliers. There should be a piece of wire, which has round ends have a bent shape.
- Then we take the resulting piece of panicles of pliers in the middle point, bend it in half, pressing one loop to another.
Important! Pliers must be smoothly in the center, otherwise - two loops will not be able to come together. As a result, uneven links are obtained and the chain looks ugly.
Weaving Bismarck chain
This type of golden chain weaving is the most common and beautiful. Weaving chain "Bismarck"
This type of weaving looks good both on men and women. The chain is easy to manufacture, it is not difficult to fit under any weight and length.
Previously, the chains with such weaving people tried to make from 100 to 150 grams, but this fashion has long been in the past and today, the most popular weight is from 20 to 35 grams.
Bismarck is the most attractive weaving, for beginner jewelers, because it does not require many years of experience. In addition, this weaving requires a simple set of tools that can be purchased in specialized jewelry stores.
There are several different species "Bismarck" - flat, "liquid", dense, round and others. All of them are manufactured over the same principle, only have different processing. Despite the permanent change of fashion, this weaving is always popular.
Required tool set
A simple set of jewelry tools will be required. It includes a mold, metal scissors, rollers, pliers with narrow sponges, die, vice, files, gasoline burner. Scissors' ends need to run a little to be comfortable to bite the links. See Figure:

It is desirable, in the arsenal to have several scissors to cut different wire diameters.
The riglels of different diameters are still needed, with the help of them the spirals are made. Rigel is also sold in specialized jewelry stores and are not expensive from 500 to 1000 rubles. Of course, you can make them with your own hands, for example, from bicycle needles or nail. The main thing is that the surface of the Rigel is smooth and smooth.
Necessary blanks for weaving
First, the metal is poured into the table, obtained by the bar, then pass through the rollers, the next step is stretched by the wire of the required diameter through the die. Wire thickness depends on what weight will be at the future chain. We take the battle of the required diameter and make a spiral.


You can screw the spiral manually, and you can use a drill. For a drill, the rigl should be smooth, without bending at the end. There are several ways to appeal spirals. I use such a way: we clamp two small planks in the vice, and we skip the wire between them.

The end of the wire must be slightly flattering and secured into the cut in the rigle. Hook a helix follows clockwise. If you are left-hand, then screw the clockwise arrow.
As a result, we get such a spiral:
After, you need to divorce the spiral, that is, push the rings of the spiral to such a look:

Make it is very simple: the reigleel of the same diameter as the thickness of our wire is inserted into the middle of the resulting helix. The spiral is scrolling with your fingers and between the rings is formed the same distance.

Then cut the links, see Figure:

The links should be chopped so that between the end of the link the distance is the thickness of the wire or a little more, but it is no less, otherwise the links will be bad and have to bite the ends of the link. Now you can proceed to weaving the chain.
Assembling chain

In the left hand take the first part of the link, and right hand We take the pliers or the round bugs and screw the second part of the link in the first. Then the resulting eight is scrolling in opposite sides before clicking, it means that the lock closed and the link is ready. In the resulting link, screw in the first part of the second link, and in it the second part and so as long as you reach the desired length.

Of course, it is possible to weigh slightly shorter, since then when I stretch through the rollers, the chain will stretch a little, plus the castle will add.
The collected chain looks like a spiral, but after soldering and pulling the chain becomes completely smooth and flat. When the link is collected, it must be squeezed, see the drawing.
Process soldering

Circuit loosen in flux and lay out on a soldering board. You can save the links in several ways:
1. Cut the solder small pieces. I smell it next to the chain on the soldering board. Before you take the solder, we separate one piece and bring the flame to the burner flame. It is started until it fuses into the ball, then with a titanium shelf to bring it to the spike place. The spike place is warm and impose solder. Thus you solder each link on both sides.

2. Also cut the solder small pieces. Then we take a thin brush, dry it into flux and touchers to a separate slicer of the solder, so that it remains at the tassel, and gently move it to the place of the spike.
And so repeat this procedure with each link. Then we wait a little while the flux will light slightly and proceed to the soldering. The burner flames bring to the place of the spike on which there is a piece of solder and warm until the solder is cut and smells the link. Once you have gone one side, carefully turn the chain and repeat the procedure.
3. This method is the most convenient and fastest, however, requires a certain skill and snorkels from the jeweler who come with experience. The method is called a soldering wire solder. We take the solder, ride it in the rollers, then skip through the die, to get a wire with a diameter of 0.45 mm. Then we warm the place of the spike with a thin flaming burner. Take the solder to the heated place, touch the tip and flame, we compress the desired number of solder and thus go to the next link.
Whitening of the soldered chain
After soldering, we whiten the chain in any bay suitable for this alloy. You can use conventional citric acid dissolved in hot water. If after whitening it remains light white Flap, then you need to pour soda in one hand and add some water to it, so that it turned out Cashier. The chain is placed in this cleaner. Cover the second hand and circular movements Three minutes 5-7, then rinse the chain in an ultrasonic bath.
Align the chain
At this stage it is necessary to stretch the chain in the rollers. To do this, you need to insert a wire at each end of the chain. It should be such a length so that you can get good for it. We push the shafts of the rollers, we skip the chain with wire and slowly press the shafts, until the top shaft is slightly assembled by the chain to the bottom.
Then we carry it out for the wire and pull it out, then in one, then on the other side. The chain is aligned and becomes a bit flat. It is very important not to drag the chain. After pulling one hand, we carry out the end of the chain and look, in which place there is curvature, then carefully align it with your hands.
Processing and grinding chain
Chain processing begins with ripping. Capture a chain can be different ways. Some perform this procedure only on the plane, only on the sides, stronger or weaker. Running affects the final type of product, it is done on weight.
To do this, it is necessary to push the steel hook from the wire from the wire, to which one end of the chain is hanging, the other end of the chain is tensioned and pressed the file. Under the tensioned chain, it is necessary to arrange the container in which the particles of gold will be crushed to make it easier to collect them.
After fixing with a file, the chain must be pulled by shallow shred paper to remove deep scratches. After the processing is completed, we adjust the required chain length. Then we make ears for the lock and install the fastener.
Now the chain is ready for grinding on a polishing circle using goow's passage. After polishing, it is necessary to wash the chain in an ultrasonic bath and dry the hair dryer. Everything, chain is ready! Other types of weaving chains and bracelets can be viewed