
print Thanks, great tutorial +0
A paper wallet can come in handy for a variety of games, and a simple fold can keep your little one entertained for a while on the road or at home when he gets bored. Moreover, you do not need to have scissors and glue to create it, because it is folded using the origami technique. To make it look nice, use colored paper(better decorative) and various materials to decorate the finished craft.
_svoimi_rukami_materialy.jpg)
- One sheet of A4 or A5.
Step by step photo lesson:
To create a paper wallet, you need one sheet of A4 or A5 paper of any color. Fold in half along the longest side.
_svoimi_rukami-1.jpg)
Open and get a horizontal fold line.
_svoimi_rukami-2.jpg)
Fold a sheet of paper in half left side.
_svoimi_rukami-3.jpg)
Open and begin to bend the corners on the left side to the horizontal fold line.
_svoimi_rukami-4.jpg)
Now the upper and lower corners on the right side should be bent to the center line.
_svoimi_rukami-5.jpg)
We bend the side right corner to the left, so that 1 cm remains to the edge of the fold.
_svoimi_rukami-6.jpg)
Let's do the same on the left side.
_svoimi_rukami-7.jpg)
We turn over the workpiece. Then fold completely to the center fold line.
_svoimi_rukami-8.jpg)
Fold the top side down to a horizontal fold.
_svoimi_rukami-9.jpg)
We turn over.
_svoimi_rukami-10.jpg)
We bend the sides to the vertical fold line, which is located in the middle of the workpiece.
_svoimi_rukami-11.jpg)
We fold the piece.
_svoimi_rukami-12.jpg)
On one side you can see several pockets.
_svoimi_rukami-13.jpg)
We pull out a corner from one compartment.
_svoimi_rukami-14.jpg)
We bend the corner down and get a ready-made paper wallet using the origami technique. It has several compartments where you can put coins and toy bills.
_svoimi_rukami-15.jpg)
Video lesson
What they just don’t do: toys, souvenirs, and useful things in everyday life. One of these things can be called a paper wallet. What can it be useful for? First, for children's games. Secondly, in order to give someone money in it. And, thirdly, as a temporary option, in case a regular wallet becomes unusable for some reason. A paper wallet can also help out on the road, when the main one is hidden away from prying eyes.
Let's see how to make a wallet out of paper. One of the easiest ways is to create an origami wallet. For crafts, we need a sheet of paper rectangular shape. By choosing necessary paper, you can start making a wallet.
Its scheme is quite simple:
Step one.
We bend our sheet across in half and unfold.
Step two.
We place the sheet vertically in front of us. We bend the corners from below and from above to the middle in such a way as when creating an airplane.

Step three.
Bend the noses at the top and bottom corners.
Step four.
Fold the resulting trapezoid to the center of the sheet.
Step five.
We turn the workpiece over and again bend the edges to the center.
Step six.
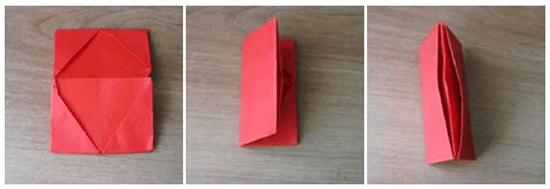
Fold the wallet in half.
Step seven.
We got two small pockets, inside each of which there is a triangle.
Step eight.
 We pull out one of the triangles. Thus, our wallet has a valve for closing.
The wallet is ready to use. Feel free to use. The strength of the structure depends mainly on the selected paper. The choice of paper also affects appearance finished product. The size of the wallet is also determined by the size of the sheet. You can decorate the finished wallet at your discretion.
 You can also make a wallet using a regular application, or take thicker paper and flash all the details. If you connect your imagination, then the scope for creativity is limitless. Some make wallets and purses from cardboard using the scrapbooking technique, someone masters a lot Japanese schemes addition. Some people take plastic instead of paper, for example, soft chocolate wrappers, and sew beautiful wallets. Such products are not only beautiful, but also functional. They are not ashamed to give as the main gift or using instead
This article is useful for those who are interested in how to make a wallet out of paper. You can use a paper purse as a child's toy. And you can also use it in the event that it is decided to present money to someone as a gift - it is pleasant to give bills invested in such a home-made wallet and it is no less pleasant to receive them.
Master class "Paper origami wallet"
To work, the master will need thick double-sided multi-colored origami paper. Naturally, the longer the side of the sheet, the larger the product will turn out. If you take a square with a side of 15 cm, then the purse will turn out to be of such dimensions: its length will be 7.5 cm, and its width will be 3.75 cm.
Acquaintance with the folds "valley"
Since it is necessary to make a wallet out of paper, observing special accuracy (as in any, you should first practice on a sheet of plain paper in order to understand the manufacturing principle itself. First you need to fold the sheet in half towards you and unbend it - this step is called the "valley" fold in the origami technique .

Then you need to fold both edges of the sheet again in half vertically so that they converge in its middle - along the “valley” fold. The fold unfolds again. Thus, the master has two more “valley” folds.

Now the sheet is folded in half horizontally towards itself and from top to bottom, that is, the “valley” fold is again obtained.

On the resulting rectangle, the upper corners are bent towards themselves so that the fold of the vertical “valley” fold is not affected by the new fold. These folds are located at the site of the horizontal fold. The corners also bend.

Description of squash folds
Now we will describe the creation of a squash pleat. Since it is most often necessary to make a wallet out of paper according to the diagrams and descriptions where this term is used, you should get acquainted with the process of performing this version of origami folding.

To do this, the fingers are placed inside between the layers of corners, and then push them apart, moving to the middle of the workpiece, thereby letting the top layer of paper along the middle fold "valley". The squash fold at first looks like a voluminous pound, but the master crushes it with his fingers, and it forms the shape of a house with a triangular roof.
Acquaintance with the folds of the "mountain"
At this stage of work, you need to fold two folds of a different type - a “mountain”. They differ from the "valley" in that they are formed by bending the workpiece in the opposite direction from the master.
These folds run in the middle of the squash folds, dividing the so-called roofs of the houses in half.

Now folds "valley" are formed at the corners of the first layer at the bottom of the workpiece.
Since you need to make a wallet out of paper with a lid that would close the hole in the cavity of the purse, it is made from the corner obtained by the last folding. The “valley” fold is formed with a slight indent from the line of passage of the edge of the squash fold.

Now the next “valley” fold completes the formation of the curly lid of the wallet.

At this point in the diagram, a strange icon is drawn under the picture - a loop with an arrow. It means that the workpiece should be turned over to the other side. Then the second unused layer, remaining after the formation of the lid, is folded using the “valley” method - corners towards the middle.

And the resulting corner is bent along the edge of the squash fold and pushed inside the workpiece.

Turning the product over to another, already front side, we get a paper wallet. It is not so difficult to make it with your own hands, as can be seen from the explanation. After the learning process has been completed, you can begin to make a model from double-sided multi-colored paper designed for products using the origami technique.
Outlets are full of a variety of wallets and special coin boxes. Of course, such products are purchased on long time if you have not decided which wallet you need, we recommend that you learn how to make a wallet out of paper.
Folding a simple wallet without glue
What can be made from paper? If the question concerns such material, then first of all, applications and animals come to mind. This is not so, a wonderful wallet can turn out from a paper base. Folding wallets is loved not only by children, but also by adults. The wallet is based on the principle of folding envelopes. Theme about.
First of all, we will learn how to make a paper wallet using the origami method without glue. Ready craft not necessarily used for money. In the product, you can store parts for crafts, magazine clippings, important paraphernalia. Wallets can be customized own will. And if you use kraft paper, then the product is not difficult to present to your friends for the holiday.
Each wallet will be constructed from paper. The material does not require training or skills. Working with paper is very easy. In addition to paper, prepare:
- scissors;
- pencil;
- paints, colored pens or pencils.
Before we tell you how to make a paper wallet, we want to warn you that only careful and consistent work will help you achieve a beautiful result. Take your time in the process of creating a wallet.
Please note that for the manufacture of a durable product, the paper must be selected thicker. Let's get started:

The wallet is ready. It can be decorated at your discretion. If you think this tutorial on how to make a simple paper wallet is too primitive, check out the instructions below.
Multicolored paper wallet
To make, prepare:
- A4 sheet of any color;
- long line;
- pencil.
Now we will learn how to make a multi-colored paper wallet:

- Take a sheet and fold it in half horizontally. We press the resulting bent part with a ruler. We straighten the workpiece.
- Now fold the material in the vertical direction. We press the bent line.
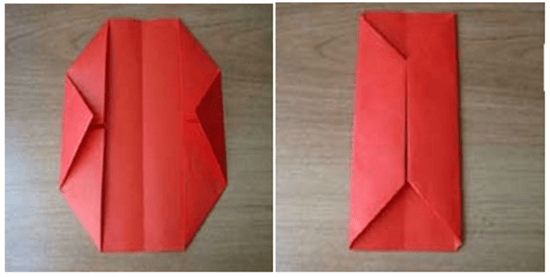
- Take a ruler with a pencil and mark identical angles on each side of the workpiece. We make folds along the marked strokes. Carefully smooth out.
- The triangles placed at the top are laid back. Turn the future wallet over with the back towards you. An octagonal figure should lie in front of you. We wrap the blank on both sides inward so that a rectangular figure remains.
- Fold back the edges of the envelope. We press everything with a ruler. There are protruding edges on the back. They can be fixed at the bottom with glue. top you can’t glue it, this is a part of the wallet that will open.
- The product is almost ready. It remains to put it under a heavy press so that it does not deform when it dries.
The work is over. You have learned how to make a colorful paper wallet. Today, paper for creativity is on sale. Which is painted with patterns or divided into stripes of different colors. You can use this material option and then your wallet will be especially bright.
paper wallet
What else can you do with paper? Prepare for work:
- sheet A4;
- long line;
- scissors.
How the work is done:


The wallet is ready. Now you know what else you can do with paper. If this product is not enough, we will surprise you with more interesting wallets.
use for wallet
If we are talking about working with paper, we cannot forget about origami. This is one of the first arts that will tell you what you can do with paper.
We take paper and get to work. Step by step instructions:


Making a coin box
Recently, the coin has become very popular. This is a small wallet that is not intended for storing paper bills, but for tokens in the subway or for cash coins, fits perfect. Not many people know what can be made from paper and it.
All you need to prepare is:
- empty juice packaging or similar;
- ruler;
- core glue;
- pencil;
- scissors.
You can add a template to this list.

Ready product It will be very practical, and most importantly convenient. Why use juice packaging? This paper has increased strength, and the packaging stands out with an important advantage - a lid. Template 2 Scheme of a magical children's wallet
For the next job you will need:
- several sheets of thick cardboard;
- three pieces of elastic for linen;
- stick hot glue.
A magic wallet can hide money inside without locks, and the product opens in any direction.
Let's get to work:
- cut out two identical rectangles from cardboard with sides 10x7 centimeters;
- cut off three pieces of ten centimeters from a common skein of gum;
- glue rubber bands to one of the pieces of cardboard, turn the workpiece over and wrap it with rubber bands;
- we apply a second cardboard figure, you need to glue the edges of the rubber bands to it;
- We wait until the glue finally hardens and decorate the product.
Of course, all of the listed manufacturing options will not be able to replace a real wallet for a long time. But this does not mean that the very idea of creation should be abandoned. It is not necessary to use it for its intended purpose. Are you sure you have a lot at home? pleasant things for which such simple but interesting wallets are required.
The art of origami is one of the oldest arts that came from Japan. These paper folding activities are attracting people different ages from around the world. Today we are faced with the task: how to make a wallet out of paper with your own hands. If you have a free minute - look at our master class and 13 schemes.
It's interesting to understand the schemes and make different wallets. Fascinating activity for adults and children, which develops thinking and motor skills, brings calm and peace. Let not everything work out right away - it does not matter, try again. You can do origami at any time, this hobby will not require you to spend a lot of money.
If you do origami with a child, he will become diligent, inquisitive, learn to fantasize, think logically. Mathematics will no longer seem complicated and incomprehensible to him, such activities develop taste and spiritual harmony.
You will need a sheet of A4 paper. Before you make a paper wallet with your own hands, we will find suitable paper or thin cardboard. The shops have special paper for origami. Ideally, it is better to use it, colored cardboard or thick wrapping paper, just fit it to the desired size.
An origami wallet is great from gift bags or candy boxes. In order to make paper origami for children, glossy magazines can also be used.
So, we begin to make a paper wallet for money with two pockets. To do this, take an A4 sheet.

It is better to train on a simple white sheet, and then switch to colored paper.

Bend the sheet in half lengthwise. We iron the fold with your hand, and then with a ruler. We make a clear line in the middle of the sheet. Much depends on this, we do not want our product to be crooked and oblique.

Unfold and turn over with a fold to the table. That is, our "unfolded book" should look up.

We bend the right half of the sheet to the center. We iron with a ruler. We do the same with the other half of the sheet - we direct it to the center and also iron it with our hand and a ruler.

We bend the right side (open the right half). Fold the right side in ⅓. to the center. We iron.

We wrap the right side again by ⅓ - 3.5 cm. If you fold the “book” now, you will see the shape of your wallet.

Turned upside down.

We bend from above and below by 0.7-1 cm. The bent parts should be the same.

We are moving the work forward. As you can see, we have a double fold of paper from below, and we need to fold small corners on the lower single fold. We make corners on one side and the other.

We fold the curved edges inward, as in the photo.

Bend the sheet with a folded corner and put the side with a double fold into it. We do the same on the opposite side.

It remains only to bend our wallet in half.

On the video - folding a wallet with your own hands out of paper:
In the art of origami, a system of special signs is used to help in the process of work. Here are the most common ones:


Schemes - how to fold an origami wallet
Now that we know all the basic conventions by folding paper, it will be easier to make an origami paper wallet with your own hands. In life, there are situations when you need to give money instead of a gift (for a wedding, for example). Now you know how to make a paper wallet or envelope.