This style of nail design can hardly be called a novelty, because it came in modern fashion from the distant 20s of the last century, when he was held in high esteem by Hollywood actresses. Today, the popularity of manicure with holes is still at its height - modern fashionistas perform it to make the final touch to a solemn or everyday look. It is not difficult to do it at all, even a girl who absolutely cannot draw can perform this manicure at home. This is its main and undeniable advantage. In addition, it is appropriate in any situation, and therefore you do not have to renew the coating too often. From this one you will learn how to make a moon design correctly, look at the photos with the most amazing manicure options, and at the end you will find a tutorial video with a master class.
Execution technique
Do you want to learn how to do moon nail design? Believe me, it's very easy! To create amazing stylish manicure with pretty holes, you only need two colors of varnish and stencils, which can be found in any specialty store. If you already have everything you need at hand, then you can start doing a moon manicure.
- First, put your nails in order: remove the old coating, cuticle, give them the desired shape.
- Apply the varnish you chose as the color for the holes and wait until it is completely dry.
- Carefully stick the stencils on the hole of the nails and apply the base color polish. This can be done without stencils, but it will not turn out so smoothly.
- Now they can be carefully peeled off, after which you need to fix the manicure on the nails with a top coat.
That's all - a beautiful lunar design is ready! You can experiment with different colors, complement the manicure with rhinestones or drawings - the scope for imagination is unlimited. If you are not entirely clear on how to do this nail design, look at the photo instructions.

What colors to choose?
Lunar nail design is a close relative of the well-known jacket, so its classic version implies that the base of the nail will remain colorless. To do this, the nail is first covered with a transparent base, and then a stencil is attached, and varnish of any color is applied. This option can be done for everyday life, if you use neutral shades.
But experiments are not forbidden, but even welcome! At home, you can make the moon design unique, original, memorable. Use combinations of red and black, silver and burgundy, play in contrast or create a delicate range. You can use absolutely any color. The main thing is that they harmoniously combine with each other.


The choice of materials is also great: conventional varnishes, gels, shellacs, foil for manicure. Your imagination is not limited by anything!
Hole Nail Art Ideas
Though strict rules there is no design in this type, yet several of the most popular varieties of moon manicure can be distinguished.
- Timeless classic - red. Usually it is combined with a white or beige shade.
- The nude manicure, that is, the inverted classic jacket, is constantly popular.
- The combination of equal volume of two bright colors and a flesh-colored hole. You can leave it transparent. In this case, you do not need to additionally paint over the hole - just cover the top with a fixative.
- You can make an option with a triangular design of the hole. Usually it is performed with a special brush, but at home you can use the most ordinary adhesive tape, carefully forming triangles at the base of the nails. The combination of a bright triangle and a white base is especially popular.
- If you want to create a manicure with shiny varnishes, then you need to do it a little differently. First, the base is applied and completely dried, and only then a hole is created using stencils.
You can choose any of the options - they are all very popular and relevant. Harmoniously combine them with your image, and you will always be on top. And so that fresh and original ideas appear in your head, we suggest you look at the selection the best options photo design.


Little tricks will help you make your manicure neat, even and beautiful.. Be sure to keep these tips in mind when you decide to decorate your nails with a moon design.
- After applying the base color, do not wait until it is completely dry, but immediately remove the stencil. Thanks to this technique, the line will be perfectly flat.
- If you want to complement the design with rhinestones, then apply them only along the color combination line. You can also use special stickers for the central part. But these two elements of decor cannot be combined in any case.
- Be sure to fix the result with a top coat. So the freshness of the manicure will last for a long time.
- When using black, choose the best combinations with white and red shades, as well as with gold and silver. Such nail art looks trendy!
These simple tips and your wild imagination will create a real miracle - the nails will look elegant and original. In this article, we told you about a stylish and very popular type of nail design. In conclusion, we invite you to look interesting video with a master class from Tom Bachik, L̀Oreal Paris international manicure expert.
The mysterious title Lunar manicure”, For many years now, it has been attracting fans of well-groomed female hands. What does the satellite of the Earth have to do with this name? Maybe there is a secret in the time of creating a manicure, and should it be done during the full moon, for example? I can say for sure - everything is much simpler! It got its name only from the shape of the young Moon - a semicircle (month) and from the base of the nail - a hole (lunula). Let's discover a few simple ways and learn how to make "Moon Manicure" at home ( step-by-step instruction).

We will create a similar manicure, of course, on well-groomed nails. To begin with, let's pay attention to the presence of a base liquid or varnish base. Its formula protects the nail plate from staining and from aggressive components that make up the varnish, levels and prepares the surface for applying a decorative coating. We will complete any of the methods with a fixer, finish varnish or a special drying varnish.
Let's decide on the shape of the "Moon Manicure". It is of two types. The first method is characterized by a contrasting, prominent color at the base of the nail, a tubercle outward, as if repeating the shape of the lunula. The second, on the contrary, is curved and highlighted along the growth line nail plate, at its base, that is, forms the shape of a young month.

Method one
We need two contrasting colors. Let's take an ordinary varnish - in a tube with a familiar brush, and varnish for decoration - with a thin brush. The main varnish can be anything - it all depends on the imagination and mood. Lacquer decor, we take with shimmering particles, for example, with golden or silver. So, he will emphasize the lunar base of the nail. Apply base coat to the entire nail. You can wait until it dries. Then, on top of the applied varnish, at the base of the nail, we apply the desired shape - a month or a tubercle. Everything is very simple!
Method two
For this method, take two bottles of varnish with the desired colors. After applying the base polish, cover the nail plate with the tone you like. Let's wait until it dries. Then, at the base of the nail, draw the shape of a semicircle with the second color. In this method, it is important to carefully apply the "lunar" tubercle. If it didn’t work out evenly, and the edges crawled out onto the skin, we take a cotton swab dipped in nail polish remover and remove the “errors”. Cover with fixative. For a moon manicure with a moon-shaped option, this method is hardly suitable, because the edge of the brush is wide enough and it will be difficult to make a shape that looks like a month. If we really liked the colors of varnishes, and only they are able to cheer us up, and it’s inconvenient to work with the “native” brush, we’ll turn to the eyeliner brush for help after washing it, or we’ll look for an artistic brush with a sharp end.

Method three
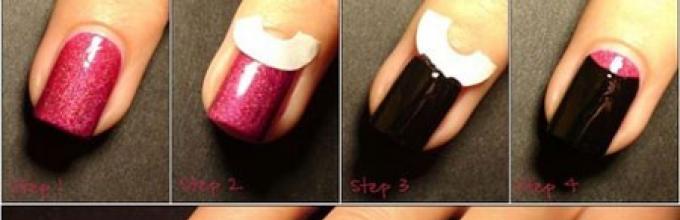
This method, the simplest, does not require much effort and concentration, because it is done using stencils. They can be bought at any specialized store. Stencils look like ordinary paper stickers, on one side of which a special adhesive base is applied. These "helpers" are very convenient for any of the two options for "Moon Manicure". If the stencils are not purchased in advance, then it is worth cutting out semicircular stickers from stationery for notes with a sticky layer. If this is not the case, then you will have to do a manicure in the second way described above.
Let's get started! We cover the nail with the desired color of varnish after applying the base. We are waiting for complete drying. Then, we glue special stencils to the base of the nail plate as we planned, that is, in the form of a lunula or a month. Do not forget to step back from the beginning of nail growth, because this area will be covered with a different color. Fill in the left space with a contrasting tone. We are waiting for drying or until the layer of varnish "grabs". We remove the stencil, removing it in the direction of the tip of the nail, so as not to damage our "moon" design. Be sure to finish with the finishing solution.

"Moon Manicure" can be created with a single polish. In this case, some part remains unpainted. Or part of the base - the nail holes, or the nail plate, with the exception of the "lunar" design. Only a colorless base and a fixer are used.
You can add a third color to the design and highlight the edge of the nail with it, as in a “jacket”, or draw the base of the “lunar” tubercle-month with a thin brush.
There are different ways to make a "Moon Manicure" at home (step by step instructions). Having turned on fantasy and some creativity, we use the available decorative elements - broths, stones, foil, hologram, confetti for nails and much more.
Lunar manicure fell in love with many fashionistas. Do you also want to make yourself such a nail design, but do not know how? We suggest using step by step photos moon manicure, posted below.
What is the peculiarity of the moon manicure? Its highlight lies in the obligatory allocation of the nail hole (lunula). That is why this nail design was called "moon". It looks unusual and spectacular with almost any image, be it festive or working.
You can make a moon manicure in several ways: using special stencils or a brush for painting nails.
Lunar manicure with stencils
First, let's look at how to make a moon manicure using stencils.
- We process the nail and apply a base coat of varnish of the color you need.
- We wait until the base layer dries, then we fix the stencil in the area of \u200b\u200bthe nail hole.
- We cover the nail with a varnish of a different color. A combination of contrasting varnishes looks more effective.
- We are waiting for drying and cover with a fixative.
As you can see, this nail design is done without much difficulty. If you do not have the opportunity to buy stencils, then you can cut them yourself from adhesive tape, adhesive tape or insulating tape.
As an illustrative example, we suggest that you familiarize yourself with the step-by-step photo instructions for the moon manicure. To enlarge a photo, click on it.


Draw a moon manicure with a brush
If you prefer to work with nail painting, then you can use brushes to create a moon manicure. You can do it like this:
- We prepare the nail and apply the base coat of varnish. You can omit the base coat if you want to leave the nail hole unpainted.
- With a thin brush, we collect a small amount of varnish and circle the area of \u200b\u200bthe hole.
- Next, with a standard brush, apply nail polish (contrasting, bright or dark).
- We cover the nail with a fixative or transparent varnish.
Pictures of moon manicure ideas
Lunar manicure can be classic or modified according to your desire. It all depends on your imagination and preferences. It can be decorated with rhinestones, sparkles and other decor.


Hole shapes are in the form of an arc, a semicircle, a corner or a flat strip.
The color solution should be based on a harmonious combination of the base shade and the color of the hole. These two colors should be contrasting, emphasizing the idea of this nail art.
Lunar manicure can be done in combination with other techniques: French, floral print, sparkles, rhinestones.
For creating lunar design the following materials are needed:
- 2 colored varnishes;
- stickers;
- thin brush;
- base for manicure;
- varnish - fixative.
How to do a moon manicure in a classic way:
- Choose the colors of the varnishes so that they organically complement each other. The base coat is better to take bright color, and the hole is muted.
- Make a hygienic manicure, carefully processing the cuticle. This element should be removed very carefully so that no burrs and torn edges remain. This is important because the emphasis is on the bottom of the nail.
- Apply a transparent base on which the decorative coating will lie evenly.
- Next, proceed to the technique itself. Cover the nail plate with the main decorative coating in two layers. This varnish should be matte, as the “smile” will look out of place on the mother-of-pearl texture.
- Stick the stickers so that only the moon cavity remains free.
- Apply a second varnish to the open hole.
- Immediately remove the stencils without waiting for the varnish to dry. If this is not done, then the dried varnish can be removed along with the stencils.
- Decors should be applied along the border of two varnishes. Applying decorative elements in the middle of the plate will spoil the whole idea of a moon manicure.
- Finally, apply a strengthening clear varnish.

Benefits of moon nail art:
- easy to do at home;
- moon manicure on short nails looks great;
- suitable for any style of clothing.
This technique can be performed without stencils. To do this, strips of the desired shape must be cut from the adhesive tape in order to apply the coating on them.
If the girl has excellent artistic skills, then the hole can be made independently, outlining it with a thin brush.
Making a moon manicure with gel polish
Lunar nail art, made with gel polish, not only lasts longer on the nails, but also looks especially solemn and elegant.
The following combinations are considered the most successful: black and gold, burgundy with black, cream with black.
The latter option is perfect for office everyday life and business meetings. Colored manicure looks interesting, creating a spring mood on the nails.

For work you will need:
- UV lamp, power not less than 36 watts;
- a set of varnishes: base, finish and 2 color;
- smooth wipes: do not use cotton wool, as it leaves villi on the nails;
- degreaser;
- nail polish remover;
- stencils for making holes;
- additional decors: rhinestones, sparkles, colored dust, foil.
How to make a moon manicure with gel polish:
- Make a hygienic manicure. To do this, push the cuticle back with an orange stick and remove the skin around the cuticle.
- File your nails with a nail file, giving them the desired shape. For moon nail art, an oval is most suitable. Important point: Do not file wet nails, as this can lead to delamination.
- Degrease the natural nail plate. This is necessary for a strong adhesion of the decorative coating to natural fabrics.
- Apply a base gel polish of a transparent color to the prepared surface and dry under the lamp for about 30 seconds.
- From above, cover the nails with the main color in one layer and dry.
- Apply a second layer of base color and dry again for 1.5 minutes.
- Stick stencils on the nails and apply the varnish of the second decorative coating on the hole. Dry the fingers under the lamp for 2 minutes.
- Apply a top coat to the platinum and dry again.
- Decorate the nails with decorative elements along the junction of two varnishes.
- Remove the sticky layer with a tissue.
- Treat cuticles with moisturizing oil.
- Manicure is ready!

There is another interesting method of highlighting the well by gluing foil. To do this, semicircular elements are cut out of this material and glued to the base of the nail using special glue. In this case, the base coat should already be present on the nails.
There is another moon manicure technology using transfer foil:
- Prepare pieces of foil for the hole so that they match the shape of natural nails. "Smile" can be both concave and everted. It depends on the desire of the client.
- Gently apply nail glue to the “smile” area and let it dry until it becomes transparent.
- Apply a piece of foil to the area of the nail treated with glue and smooth the application with a spatula.
- Carefully remove the foil: it will leave the desired color in the form of a hole on the surface.
- If texture foil was used, then the nails may not be covered with a finishing layer.
The biggest advantage of gel polish is its durability. For at least 2 weeks, he will delight his mistress with a pristine bright look.
Making a moon manicure with shellac
Shellac is a popular tool for creating chic long nails on the for a long time: 3-4 weeks.
It is very important to choose the right color scheme: shades should be combined with each other and mutually complement each other. It would be appropriate to combine shellac of different textures: glossy with matte.
For work, you will need the same materials and tools as for the previous technology, only shellac will be used instead of gel polish.

How to make a moon manicure with shellac:
- Do unedged manicure. To do this, push back the cuticle and carefully remove the skin at the bottom of the nail.
- Create oval shape plates with an abrasive file. For girls who love experiments, you can make nails triangular shape. Only the hole in this case will also be triangular - with the tip up. But it should be noted that this technology is only suitable for long nails.
- Degrease the top surface of the nails.
- Apply the base on the plates and dry the fingers under a UV lamp.
- Remove the sticky layer with lint-free wipes.
- Cover the nails with the main color, preferably bright in 2 layers, each of which must be dried separately for 2 minutes.
- Stick on stencil stickers that provide moon shaped areas.
- Apply the first layer of smile and then remove the stickers. If uneven edges are obtained, then this must be corrected before drying under the lamp.
- Apply a second layer of "smile" and dry under the lamp for 2 minutes.
- Apply a top coat, sealing the edge of the nail.
- To highlight the "moon", you can draw a line of the third color along the border or sprinkle it with sparkles.
To remove shellac, you must:
- The top layer must first be cut with a nail file, the abrasiveness of which is 180 units.
- Then take a cotton swab dipped in shellac remover and wrap each finger with it. Leave for 15 minutes.
- After the time has elapsed, release the fingers from the cotton wool - the coating will come off by itself. If this does not happen, then the remnants of the product should be removed with an orange stick.

Advantages of shellac:
- looks beautiful on both long and short nails;
- strengthens thin and damaged plates;
- the coating does not deteriorate under the influence of household chemicals;
- provides a bright and shiny look to the nails;
- the composition is not hazardous to health: shellac can be used by pregnant and lactating mothers;
- can be easily removed without special tools.
Shellac Disadvantages:
- high cost, which can be compared with building;
- needs correction;
- shellac is able to deform under the influence high temperatures: because of this, microcracks appear on the nails;
- fungus may appear under the coating.
Lunar Manicure Nail Design
There are a lot of options for performing a fashionable moon manicure: you just have to turn on your imagination. The only condition is a competent combination of colors.
In this design, it is not necessary to use only contrasting shades.
You can paint brightly only the lunula, and cover the rest of the surface with a transparent varnish. You can do the opposite: leave the hole natural, and cover the rest of the plate with a bright varnish or pastel calm tone. In the latter version, there will be a natural effect.
So, let's look at the most popular moon nail art ideas.
Red moon manicure
The classics of moon nail art are red claws with a white (unpainted) lunula. You can make this vintage version like this:
- Make a hygienic manicure: shape the plates, process the cuticle.
- Degrease the surface of natural fabrics.
- Apply a clear base.
- If you plan to make a pure white lunula, then cover your nails with white varnish. If the “smile” is planned to be natural, then a transparent base will suffice.
- Stick stickers on the lunula area. The crescent can be made both concave and convex. Stencils will provide the desired shape.
- Cover the claws with red varnish.
- After 2 minutes, when the coating is dry, remove the stencils.
- Apply a finishing coat.
If there are no stencils, then a manicure can be done without problems in another way. To do this, repeat steps 1-4, and then cover the nails with solid red varnish. Next, take a thin brush and carefully draw a “smile” with white. The lunula area is painted white on top of the main red.

Red moon manicure tips:
- This design looks perfect on medium nails. If the claws are too short, then it is better to draw the lunula smaller, as it visually shortens the plates.
- To make the manicure bright and saturated, a bright coating should be applied in 2 layers.
- Decors do not need to be applied to all 10 fingers. It is enough to highlight a few fingers with rhinestones. It's original and stylish.
- In a red manicure, the lunula does not have to be white. It can be painted over with any other color that is combined with scarlet shades. For example, a red and black manicure, red and gold, remains a classic option. The last option is perfect solution for gala evenings.
- Lunula does not have to be oval, it can be made in the shape of other geometric shapes: triangle, square, letter "W".
An exquisite manicure will last a long time if it is created using modern high-quality materials: gel polishes.
The most sophisticated and expensive design of the moon manicure is black. However, this nail art requires special care and accuracy. Black nail art does not tolerate misses and uneven lines.
The most relevant ideas of black moon manicure:
- black with silver;
- black with gold;
- black and white.
Lunar manicure can be done in the following ways:
- Classic. This is when the shape of the lunula is curved in the direction of nail growth.
- "Concave Moon". In this case, the “smile” frames the nail bed. This option is very beneficial "lengthens" short nails.
- Lunar French manicure. This option combines 2 techniques of French and moon manicure.
- Lunar foil design.
- Lunar nail art using decorative elements.

Lunar jacket technique:
- Treat the nail plates and cuticles, and then cover them with a transparent base.
- Cover the entire surface of the plate with black varnish with a graphite tint.
- Carefully circle the free edge of the nail with a red “smile” line. If you are not confident in your artistic ability, then it is better to use stencils.
- With the same red varnish, make a lunula at the base of the nail.
- After the decorative coatings have dried, apply the final coat.
Technique for performing black nail art with decors:
- Make hygienic treatment of claws and cover them with transparent varnish.
- Stick stickers in place of the hole.
- Cover the rest of the nail with a dark blue varnish.
- When the surface is slightly dry, the stencils should be removed.
- Paint the hole bright pink.
- Apply a few peas of the same pink color to the blue area. Rhinestones, sparkles, colored sand can serve as an alternative.
- Seal the manicure with a finishing layer.
White moon manicure
White color is considered universal, as it is combined with almost all existing pigments.
The most relevant ideas for a white moon manicure are a combination with a red or black coating.

Black and white moon design:
- Prepare in advance materials and tools for work.
- Pour warm water into a special bath and add a few drops of essential oils.
- Dip your fingers in water to soften the cuticles.
- After water procedures gently remove cuticles.
- Apply foundation on dry and treated nails.
- Cover the claws with the main color: black or white. It depends on the idea of manicure.
- Glue the stencils on the nails, leaving the lunula area free.
- With a thin brush, cover the hole with the opposite shade. If the main color was white, then the lunula will be black and vice versa.
- Let the art dry.
- If desired, apply a few rhinestones to one of the phalanges of the hand.
- Cover the masterpiece with a fixing transparent varnish.
Making a moon manicure at home is not difficult. The main thing is to decide on the color scheme and technique. To do this, you can consult with a competent specialist or look at magazines with current ideas lunar design.
shared
Since the advent of manicure, a lot has been invented original ideas design, one of which is lunar. Its history began in the first decades of the 20th century, just at the time when nail polishes in red and pink tones were released to the world market for the first time. Then the nails, completely painted in one color, were not considered fashionable, therefore, along with the French one, new version design - lunar. When the idea was shown in American films, it was immediately picked up by millions of the fair sex. Now this design is popular again. How to make a moon manicure at home?
In order to make yourself a fashionable moon manicure, it is not at all necessary to contact a specialist and go to the salon. If you have already done a manicure before, then no difficulties will arise. First make sure you have the following materials and items:
Keep all tools clean. To avoid any infection, the instruments must be disinfected with alcohol before each use. Pour it into a spray bottle and spray directly onto nail clippers and nail clippers.
Advice! The base for varnish, fixative and color coating is best purchased from the same company. So the manicure will last longer. It's all about the similarity of the compositions: one manufacturer will add components that combine with each other.
If you have not found the special round stencils that are needed to create a smooth hole line, you can make them yourself. To do this, use paper tape: it does not leave sticky marks, unlike ordinary tape, and it is easier to work with. Cut out semicircles from it that repeat the shape of the hole, and then attach to the surface of the nail.
Paper tape is a great replacement for conventional stencils
The result will be no different from what is obtained using stencils.
Lunar manicure at home: step by step instructions
In order for the result of a manicure to pleasantly surprise you, you should follow the instructions, as well as some rules and tips.
Important! Carry out the procedure in a well-ventilated area: the varnish has a very bad smell.
Consider the procedure step by step:
Manicured nails - business card every girl and woman
Manicure is ready! At the end of the procedure, lubricate the cuticles with special oil, and apply cream on your hands.
Advice! If you have short fingers, then an oval shape is ideal for this type. It will visually lengthen them, make them more elegant and sophisticated.
Lunar manicure without a stencil
If it suddenly turned out that you don’t have either an ordinary stencil or one that you can do with your own hands using paper tape, and you really need to make a moon manicure, you can do without them. It is worth noting that this is quite difficult and definitely not suitable for beginners. The difficulty lies in the fact that the hole will have to be painted with a brush. And in order for the line to turn out to be even and neat, you have to try. So, from the tools you will need all the same, only instead of stencils you need a brush. All steps are exactly the same. First, start drawing the contours, and only then paint over the space inside them.
Choose a thin brush with high-quality bristles
Adjust the lines as needed, make them as perfect as possible. If there are problems with drawing the hole on right hand seek help from loved ones.
How to do a reverse moon manicure?
Reverse moon manicure is the opposite of the usual. The area of the hole, as it were, turns inside out, repeating the line of the cuticle. This design was invented relatively recently in order to diversify the usual moon manicure.
Reverse moon manicure is original and simple
The execution technology practically does not differ from the usual one: stencils of a different shape will be required. They are harder to find as this kind of design is not very common. If you were unable to purchase them, use the method already described: cut them out of paper tape. Carefully draw arches that will fit under your nails. Attach them to the plates in the same step as in a regular moon manicure. Apply a fixative when finished. Reverse wells are usually left under natural color nail, but there are also design options where they are highlighted in a different tone.
Lunar manicure master class: video
Lunar Manicure: Design Ideas
 A very interesting solution: dark green moon manicure, where the holes are highlighted with a golden stripe
  Lunar manicure of juicy orange color will certainly cheer you up and give positive
  Elegant moon manicure with white patterns, made with burgundy varnish
  A milky pink moon manicure decorated with rhinestones is perfect for a wedding or a romantic dinner.