Wind chime is an oriental talisman, which has become a popular accessory not only in our home, but also in our summer cottage territory. Today we create it with our own hands, at no extra cost, from improvised items.
Air bells came to us not so long ago, at about the same moment as feng shui was popularized in the country. But, we can say that from the first days of its appearance, this talisman has become very interesting to many people, who are happy to hang the accessory at home and even in the country, where every slightest breath of breeze not only causes pleasant and positive sounds, but also attracts positive energy.
For a long time, the music of the wind is considered a kind of transformer negative energy positive and, even if you don’t believe it, you can simply decorate the entrance to the house, gazebo or patio with cute feng shui elements that will not only delight with sound, but also attract the attention of guests.
It is possible to acquire such a talisman today without much difficulty, since it is not only on the windows of specialized oriental stores, but also on market stalls, in the gift departments. But, you see, there is no need to spend money if you can make a souvenir from everything that is considered superfluous in the house - cans, old pencils, small metal tubes, shells, and so on.
How to make wind chimes with your own hands
For this, only desire and imagination are needed, the rest is a matter of time and practice. Having produced your first talisman, putting into it a piece of soul, good mood and positive emotions, of course, you can stop, but you can continue to create, because the options for the mascot are simply not counting.
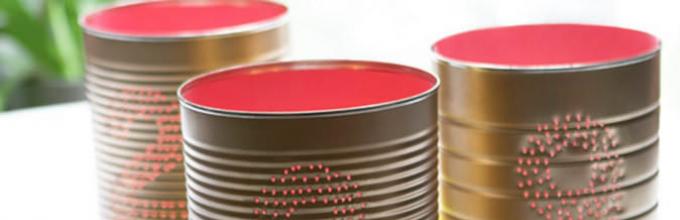
From tin cans
A popular feng shui accessory for a summer residence can be made from cans, roughly speaking, from garbage, which will now be useful. To create this element, you do not need much - cans different sizes, thin strong thread or twine, paint, jewelry in the form of beads or plastic plates.
Further, everything is simple - you paint clean cans in different colors to make the accessory more fun, and tie the cans at different heights from the base, fastening them on ropes with knots. You can also decorate the ropes with beads, coins, plates, and so on. The result is a pretty cute piece that makes an interesting sound when swayed in the wind. Believe me, it will also become the subject of heated discussions and jokes in the company of friends.

From clay pots
To do this, you will need 3-5 clay flower pots, preferably small in size so that the accessory does not turn out to be of great weight. Next, a strong twine is taken, at the end of which a bead is tied or a large knot is tied to stop the first clay pot. The pot is put on the other end of the string with a hole and lowered to a bead or knot. Now, stepping back 5-7 cm from it, so that the next pot does not completely cover the previous one, we tie the knot again and fix the bead. We put on the next pot, and so on.
Previously, the pots can be painted in cheerful colors, between them you can attach more cute large beads, which you can use to decorate the string after you put the last clay pot on it. We recommend that you do everything accurately and consistently, hang the smallest pot first, and then, in an upward direction, increase their size.

From pencils and an old ruler
Even a child can do such a product. You only need 10-15 pencils and one ruler. Small holes are punched in the ruler every 1.5-2 cm, it is even possible exactly according to the marking. Further, a strong thread or thin fishing line is pulled through the hole, with which the pencil is tied at a distance of several centimeters from the ruler. By sequentially fixing all the pencils on the ruler, and making a suspension in the middle or on both sides, you get the simplest musical talisman.
At times, it can be difficult to tie the pencil around so that the thread does not slip off. In this case, you can pass the thread through an elastic band, which is often found at the end of the pencil, or you can make shallow notches on the pencil with a knife or blade.

From old keys
The simplest accessory, which is very interesting in appearance, and is able to endow the surrounding space with pleasant sounds during any breath of wind. Create similar accessory to decorate a summer cottage is very simple, you just need to allocate about an hour for this, and put together everything you need. You will need a strong dry twig, 5-7 keys, a strong thread and colorful paints. First, you paint the twig whatever color you want, fun and positive, and while it dries, tie the keys onto pieces of thread that should be the same size. Next, tie the keys with threads to a branch, at the same distance from each other, on the other hand, make a simple suspension, and you're done. It remains only to paint the keys themselves and the threads along which they descend from the branch.

From spoons and forks
In fact, this is generally an unprecedented miracle, the production method of which we have only recently learned. In order to make the wind chime with your own hands from forks and spoons, you need to take a fork and unbend its teeth in different directions, and punch a hole in the handle of the fork for suspension. Now, for each curved clove, we tie the same pieces of thin fishing line, about 10-15 cm each, decorate the fishing line with beads of our favorite color, and tie spoons to the ends of the fishing line that are no longer needed in the household. The result is an extremely original piece that can be hung anywhere.
Wind chime: do it yourself (video)
Original product made of plastic pot and lids
If the house has bottle caps and (and everyone has such), you can quickly, literally within half an hour, make a musical accessory with your own hands, and not only cute and effective, but also making original sounds in the wind.
The production process is quite simple, and to complete it you will need only 30 minutes of time, 5-6 pieces of strong thread or fishing line, 50 cm long, several dozen bottle caps, as well as a plastic flower pot and a piece of string for hanging. First of all, punch holes evenly in the pot, upside down, around the entire circumference, for 4-5-6 or more pieces of fishing line that you have cooked. Further, sequentially put bottle caps on the thread or fishing line (in which there are already holes made by a needle or an awl), 2-3 cm apart, it can be even more chaotic. To prevent the covers from slipping, we tie knots on both sides of each of them. Now that a certain number of threads with lids are ready, carefully thread them through the holes in the plastic flower pot and tie. On the other side of the pot, we make a suspension, for example, from twine.
That's it, the wind music is ready, but you can always dream up a little more, for example, by hanging beads and bells on the edges of the fishing line with lids.

How to create wind chimes from bells and shells
All that is needed to create the next talisman is a small dry and strong twig, shells, bells and threads. Further, everything is done in the same way as in the production of an accessory from keys, only you do not need to paint anything, and on each strong thread we put on not a key, but sequentially shells and bells, or in any other order convenient for you.
The result is an excellent talisman, which can only be distinguished from a store one by quality, since an independent product often turns out much better than store stampings.
How to make wind chimes (video)
Classic version of bamboo
And, finally, the classical bamboo wind music, or our first product made of metal tubes, which was created in the likeness of bamboo.
The creation process is completely identical, and therefore there will be only one description. Of course, it is not easy to get bamboo, but it is quite possible, if you wish. Next, everything else that is useful for creating a classic feng shui element is collected - twine, beads, a wooden washer and slats.
A suspension is immediately created, the base of which will be a wooden cross (for four bamboo tubes) or any other wooden element for the amount of bamboo you need. A suspension of strong twine is tied to it from above, from the bottom, or through special drilled holes, fishing line with bamboo tubes and beads. In the center, you need to hang a wooden washer to the base, on which bamboo tubes will beat during the breeze and make sounds. The whole process takes only a few hours, and then only for the reason that it will be necessary to make holes for the thread or fishing line at the base of the accessory and the wooden washer. Also, while the drill is still in hand, you need to immediately fill the holes in the bamboo elements, but very carefully and with a thin drill. After, only the garter of all the elements and fastening.

Even if you don't believe in positive energy and oriental culture, try to approach work with good mood, the necessary reserve of time, new ideas. This will help with the chime of the wind.
Do-it-yourself wind chime is a reality, and you can be convinced of this already at the moment when you make the first talisman and decorate the dacha with it, be it a gazebo or even a beautiful tree in the garden. Original and very pleasant sounds that will give you pleasure every day, will often remind you of your work, and also attract you to repeat a new achievement and make another accessory.
Wind music at their summer cottage (20 photos)

Our new project has recently started, full of crafts, experiments and experiments and, of course, acquaintance with ecology. One of the creative tasks that some of our participants volunteered to do in the first expedition "Air" was the craft "Music of the Wind". Below you will find several excellent creative ideas and photographs of handicrafts that our enthusiastic mothers and children have, and which you, no doubt, will be able to repeat with your children or use as a starting point for your own imagination.
What kind of materials our ecologists did not use - a constructor, a mosaic, and a variety of waste materials.
Craft "Wind chime" with your own hands from a plastic constructor
This craft was created by Natalya Gorbatenko and her son Yegorka - one of the most experienced participants in the projects of the "Club of Passionate Moms", and now an enthusiastic and tanned boy of 5.5 years old.
Natalya reports: “I was very happy with the new project (which we almost missed because of the rest), since it was the new project that“ cheered up ”me, because the summer relaxed us very much. Egor's grandmother arranged a vacation from the kindergarten for the whole summer, they lived in the village, so I relaxed a lot. But now, reading the "Expeditions" project, I realized how much I missed the lessons.
We decided to make the craft "Music of the Wind" from a plastic construction set, Egor and I went through all the knocking-ringing suitable parts and settled on the construction set. Since there are holes in the constructor, we tied them with a thread, made loops and put them on a sushi skewer, made a loop to hang on the street, but since it is already dark today, we will hang them tomorrow morning. I hope that on the street our craft will ring as pleasantly and loudly as in Yegor's hands. Thank you for such an interesting assignment. "
Craft "Wind chime" from seashells
This craft in nautical style invented by Olga Lunde and daughter Anechka (3 years 3 months) from Krasnoyarsk.

Mom Olga says: “Today, within the framework of the Ecological Expedition project, we made the Wind Music pendant. We got the idea of what it should be right after reading the task. Namely - using our "marine reserves". How beautiful it sounds: "Wind chime" ... Anyuta and I thought and talked about what this wind chime could be, and got down to business.
We needed:
- seashells,
— starfish(we have it dried and brought from the sea),
- gouache paints,
- brushes,
- 5 strips of thread,
- glue or plasticine (we used plasticine).
The first thing we did was cover the floor with a piece of old wallpaper and make ourselves comfortable on the floor with all the working material. Since we decided that our shells should be colored, then:
- The first step in our work was the task of painting the shells. Along the way, I invited my daughter to experiment with color, to which Anyuta readily agreed. We began to see what would happen if we mixed blue and white, red and yellow ... So our shells "put on" their beautiful outfit for a dance with the wind. Some of them turned out to be two-color, dotted (which Anechka liked very much). The shells dried up and we continued.
- The second step in the manufacture of the pendant was cutting the thread into 5 strips in order to further attach shells to them and tie them to the ends of a starfish.
- The third step - we attach "smart" colored shells to the strips of thread using glue or plasticine. Having tried both methods, we made a choice in favor of plasticine. Leaving aside development fine motor skills, I suggested that Anya roll some plasticine balls to attach the shells to the thread. On each strip of thread, we got six shells - a good workout to count.
- The fourth final step is to tie the shell threads to the ends of the starfish. If the shells are small, as in our case, then it is better to tie them closer to the middle of the star so that the distance from the shell to the shell is not too great.
Anechka and I placed our pendant on a horizontal bar, sat down side by side and, blowing on strings, listened to the quiet music of our multi-colored shells ”.
Craft "Wind chime" from pasta
Another wonderful pendant made from available material from Tatiana Dominova and daughter Alisa (2 years 1 month) from St. Petersburg.

Tatiana tells:
“To make a pendant you will need:
- Colored cardboard
- Glue
- Scissors
- Pencil
- Thick threads (we have Iris)
- Thick eye needle
- Pasta Feathers
- 3 large beads
- Bells
- Stickers
- Ring
At home we have a real wind chime, so it was easy for me to explain to my daughter what we were going to do. Alice is now 2.1 years old, and this is our first big joint work, so it didn't work out perfect, but my daughter liked the new toy.
First, with the help of a cup, we circled 2 circles on the cardboard and glued them together to make a colored circle on both sides. My daughter was directly involved in the outline of the circle and cutting (with my help), she glued it herself.

Then, with a pencil, we marked 6 points on a circle in a circle at the same distance, where we subsequently attached the "tubes" of the pendant. We took a thread of Iris with a needle, pierced the first mark, strung 5 "Feathers" pasta on a thread, then returned the thread back to the circle, threading it through 1 pasta, and tied a knot on top of the circle. As a result, we got 6 "tubes" of pasta. To make the drawing more interesting, we strung 5 pasta on the first "tube", and on the second - 3, on the third - 5, etc. The daughter herself stringed the pasta on a string. Of course, her perseverance was not enough for all the "tubes", but she did some of it herself.

Then we threaded in the center of the cardboard circle and strung 1 large bead, which will knock on the "tubes" of the suspension. Having retreated a great distance from the bead, we strung 2 more large beads on which you can pull to make the breeze rustle. Then they returned the thread through the beads to the cardboard circle, tied knots on both sides of the circle, tied a ring at some distance, for which you can hang the pendant.

To make our pendant hang exactly, we made 4 more marks with a pencil in the form of a square on a cardboard circle, through which we passed a thread, put it back and tied it to a ring. To fix the knots that hold the "tubes" on the cardboard circle, my daughter glued on top stickers of flowers: 6 stickers for each knot.

In principle, our suspension was ready, but we decided to add sonority to it and tied a bell with a thread to each "tube".
Tired of the mess in the nursery? Tired of endlessly collecting toys for your child?

I think that our pendant turned out to be a little difficult to make, since we made the "tubes" from pasta, but my daughter was able to practice stringing. Alice happily played with new toy, however, almost immediately confused the suspension. But it quickly confuses the real suspension. "

Craft "Wind chime" with your own hands from shells and beads
This suspension is the result co-creation Shikovs Alena (4.10) and Kolya (4 years old), their grandparents (Chekhov, Moscow region).

Elena Petrovna Kotyashova's grandmother tells:
“To make the pendant, we needed: shells (of any size, shape, color), fishing line, beads, scissors. At first we planned to use a glue gun, but it didn’t come in handy as everything had to be free. We have a starfish to attach the fishing line, or you can use a ring or sticks.
- Cut off the line the right size
- Holes were drilled in the shells.
- Tied a knot on the fishing line.
- They put a shell on top.
- Again a bead.
- This was repeated 4 times.
- Prepared 5 threads with shells.
- A hole was made in the center of the star and a loop was dragged through.
- Threads with shells were tied to the rays of the star.
Put on a bead.
Tip: tie the threads closer friend to a friend, from the touch of shells we get the music ... of nature.
The children built a composition and, under the guidance of their grandmother, strung beads and shells. Grandma tied the knots. Grandpa drilled holes in the shells. Each thread has its own unique pattern - it is more beautiful, the children decided. "
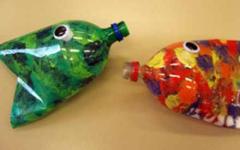
Craft "Wind chime" from glass jars
Anastasia Pavlova and Mikhail (6 years old) created their original pendant from glass jars and presented it to ... a garden scarecrow!

Mom says:
“My eldest son and I spent a long time choosing the material for the suspension, but in the end the choice fell on jars. So, for the manufacture of the pendant, we took 3 small jars (chicory, mustard, baby food), long rope, scissors.
- First, 3 pieces of 20 cm and 3 pieces of 30 cm were cut from the rope.
- Each piece of 30 cm was tied around each piece of 20 cm.
- Then they tied a large piece around the neck of each jar.
- All the ends of the ropes were tied.
Everything, the suspension is ready! The jars can be hung on either one string or a twig. Our pendant has become a scarecrow decoration in the country. And when it started raining, we found it could be used to measure rainfall as well. And you can also pour sand there and light candles, you get a beautiful street candlestick. "
Craft "Wind chime" with your own hands from a disk
This bright craft- the result of the joint work of Natalia Kardashina, Alyosha (5.7 years old) and Danil (2.7 years old) from Yekaterinburg.

Mom Natalya says: “We definitely had sticks from the old“ wind chime ”, but we managed to find only 2 of them, but we found wooden blocks from the construction kit. Dad made holes in them with a thin drill. The basis for the craft was taken from an old CD. Holes were made in it with the help of a heated awl. At this, the preparation ended and the stringing of the elements began.
Along the edge, we hung bells, closer to the middle of the sticks, in the very middle of the disc there is a large hole, with the help of a washer we hung the "Sun Trap" specially purchased in the fixprice from above, and attached the sticks from the old wind chime to the bottom. In the end, all were decorated with a self-adhesive applique. We immediately went to check the wind chime in action. Since the wind outside was strong, everything immediately began to move, rang and rattled. "
Craft "Wind chime" with your own hands from a tin can and buttons
This pendant was made by Natalia Silaeva with her daughters Dasha (4 years old) and Katya (2.5 years old) from Mozhaisk, Moscow Region.

Mom Natalia says: “For the craft you need: a tin can with a key to open the can, buttons, cardboard or transparent plastic from the packaging, a string. A circle with a diameter slightly larger than the bottom of the can needs to be cut out of cardboard. Punch holes along the edges. Cut a hole in the middle and put on the key. Put buttons on the strings. Tie the strings with buttons on a cardboard circle. Tie a string to the can key. A jar with buttons can be hung from a tree. "
Like these ones interesting crafts the crafts are made by our enthusiastic mothers, inspired by the Ecological Expedition project.
Try it too!

Irina Yuryevna
Presentation "Master class" Wind Catcher "for children preschool age»
Master Class
« Catcher of the wind»
for preschool children.
Thinking through the organization and direction of observations children, the educator should take into account age, development specifics and level cognitive activities kids 1.5-4 years old. The attention of babies is unstable, they are attracted by bright, moving objects.
Make for children« Catcher of the wind» I was pushed by his double « Dreamcatcher» ... And so for our "Catcher" we need literally everything that you have at home at hand for handicrafts: wire, threads of different colors (the brighter, the more beautiful the product you get, ribbons, lace, beads, buttons, shells, colored feathers, colored paper The selection of material for making a dream catcher depends on your idea, on what topic you want to make it. If the theme is marine, then it would be appropriate to use shells, etc. Today I propose to make you, dear colleagues, the simplest and most economical option.
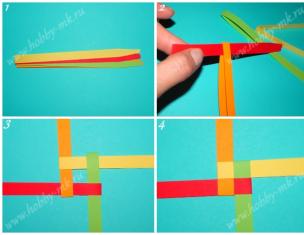
1. First, we cut a ring out of cardboard, (diameter at your discretion, or you can have a heart).
2. Then we braid the ring with thread (you can apply glue to the base).
3. When the ring wakes up ready, weave it inside Cobweb, beads need to be strung on the thread during weaving. We fasten each bead with a double loop.
4. And after the ring is ready, we decorate it "Feathers" made of colored paper that hang from the ring.
Related publications:
Master - class for children of primary preschool age "Testoplasty" This master class on making a gift for May 9 "Star" is intended.
 Dear Parents! How often do we think about what to do with the child in the evening? Maybe not often, but children themselves demand attention to themselves.
 What is health? This is not just the absence of a particular disease. Health is a state of creative dedication, good performance.
 Dear colleagues, good afternoon, I present to your attention, Master Class from felt "Owlets". When meeting with the birds of the forest, we were with the guys.
 Topic: "Chest of the North Wind" Master class (paper construction) for children 6-8 years old was developed by: teacher of additional education.
 This craft is done using waste material, therefore, you can do without special financial costs. Apart from the development of shallow.
 We all know that doing something with our own hands is always pleasant and interesting. Making the fingers obey, strengthening the muscles of the hands helps.
Presentation "Master class on creating an environmental development book for senior preschool children" Master class on creating an environmental development book for older preschool children The purpose of creating a book is to form.
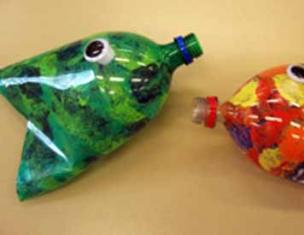
Periodically, while visiting web pages, I came across material on the use of plastic bottles as the sound source. The essence of the question is simple, a long rectangular hole is cut in the bottle and the bottle becomes resonator sound of a certain frequency. Out of sports interest, I decided to repeat this with my own hands.
The music of wind
design. The first experience was unsuccessful... The bottle, mounted on a pole, emitted a soft and short howl in a strong wind. Difficulties were created by an unstable wind - buildings, trees and forests all around. Probably, people living in the steppe or on the coast will have no problems with setting. Going through the forums, I found responses and comments that this thing does not work... How it doesn't work if a whole chorus of bottles sounds on the original site! After carefully reading the materials on the topic and spoiling a lot of plastic bottles, the result was obtained. I share my experience.
How to make wind chimes with your own hands
Finding the angle of incidence of the wind. The wind, as indicated in the primary sources, must blow on the bottle at a certain angle. Determining this angle with an unstable wind in my case was not easy. The solution was found using vehicles. This method was used by me for calibration and characterization of small wind turbines. The method is simple, the bottle is exposed in an open car window and the oncoming air flow must run onto the side of the bottle with a rectangular opening. At different vehicle speeds, for example, 10 km / h, 20 km / h, 30 km / h, slowly rotate the bottle around the axis of symmetry and find the position at which the sound will appear. We memorize this position, for simplicity I used the following memorization scheme. If we imagine the dial of an analogue clock and assume that the wind blows into the slot of the bottle from 9 o'clock, then when the bottle rotates and a sound appears, we remember the position of the slot, for example, 10-30. When making adjustments, you, of course, do not drive and do not interfere with traffic with your measurements. Don't worry if you haven't found the right position, not all bottles sound.
Bottle selection
I made the slots to the recommended sizes, but not all the bottles sounded. The main reason is weak rigidity of the bottle, especially when making long slots. The edges of the slot begin to diverge already during manufacture, and they can slightly deviate in a weak wind and lead to a breakdown of sound. You should try to choose bottles with as thick walls and correct geometric shape as possible. The presence of annular grooves, in addition to the decoration, suggests that with such tricks the manufacturer increases the strength of the bottle while reducing the thickness of its walls.
Making a slot
First, we make a small cut with the sharp end of the scissors, and then we cut out a rectangular hole by marking or by eye with size control. It is better to work on the edges with small nail scissors. I quote the recommendations for the size of the slots. “Different cuts - different sounds: an 8 cm by 10 mm cut produces a low sound. An 11 cm by 9 mm cut gives a mid-frequency sound. The 20cm by 6mm cut produces a high-pitched whistle, but requires a very precise wind angle. The 16cm by 17mm cut gives a hoarse sound. "
Not the fact that there will be exactly the desired sound and whether it will be at all. Exact adherence to the dimensions did not always make the curly-shaped bottle sound. Some slots give a high sound at a high wind speed of ~ 40 km / h and a low sound at a speed of 10-15 km / h.
Bottle holder
At the beginning of the experiments, I simply squeezed the neck of the bottle tightly onto the specially fitted end of the pole or screwed the cap with a self-tapping screw to the end of the pole. I also used a horizontal mounting method. I screwed several bottle caps to the post with self-tapping screws, and then screwed the bottles into the caps all the way and adjusted the position of the slot by rotating the cap with the bottle. But, as you know, such a mount did not allow get a long-lasting and steady sound due to the change in wind direction.
Getting consistent sound
The task is to ensure the correct orientation of the bottle to the wind from any direction. This is done using a special weather vane. I recommend reading it in detail. making homemade weather vane to combat dark forces;). In the design, you can install from one to six bottles (I did not put more, although more is possible). I give an example of manufacturing.
1. Details of a homemade weather vane
As a rocker, a pole 80-120 cm long and a section of 30 by 40 mm was used. To fix the bottles, a piece of dense polystyrene (packing will not work !!!) of a circular cross-section with a diameter of 120mm and a thickness of 50mm was used (of course, you can use a square or rectangular piece). A hole is made in the center of the circle slightly smaller than the cross-section of the pole. For convenience, I grinded off the end of the pole with a knife to a circular cross-section.
2. Assembling the rocker
With an effort we insert the end of the pole into the foam. The circle must be firmly attached to the pole. Let's assemble a weather vane from four bottles. We outline two holes for self-tapping screws in the bottle caps. For better airflow, we will fix the bottles in the shape of the letter "X". First, we fix each cover with only one self-tapping screw. The second self-tapping screw will be screwed after adjusting the position of the slot for the best sound. We screw the bottles into the caps until they stop. If the position of the slot relative to the wind is known in advance, then we mark the working position, unscrew the bottle and fasten the lid with the second self-tapping screw. For greater reliability of fastening, the self-tapping screw can be screwed at an angle to the lid.
We fasten the lid
We mark the position
3. Install a homemade weather vane
Determine the center of gravity of the rocker arm. The bottles must be screwed on. In the center of gravity, we drill a hole for the future axis of rotation. In the construction shown, this is a bicycle spoke. We fix the structure on a pole or pole. Do not forget to put several washers for easy wind vane rotation.
4. Adjust the sound
If necessary, we clarify the position of the bottle relative to the wind. With the best sound from the bottle, mark the position of the lid and, after dismantling the weather vane, finally fix the lid. Ready! .
Water can accumulate in the bottom bottles when it rains. From the top bottles, water will seep through the fastening holes in the caps. It is useful in places where water is collected to make a small hole diameter up to 1mm (does not affect the resonance properties).
The construction of the homemade weather vane is durable, withstood two hurricanes and the winter. In winter, snow is packed into bottles, but in sunny weather it evaporates (dark kvass bottles are useful here :)).
The construction made the greatest effect on relatives in winter (there was little wind and there were no extraneous sounds from the leaves of the trees). The result is something like this. "In a dark dark forest, in a dark dark night, in the corner of the yard, someone was howling."... It cannot be said that the sound from four bottles is strong, but at a distance of several tens of meters in the general noise from the wind it is distinguishable. For greater euphony, I do not recommend getting carried away with high sounds to provoke conflicts with relatives and neighbors. In this part, the design can be attributed to the "dirty trick" section. With mid-frequency sounds, "wind chime" does not get tired and, probably, something close and useful from feng shui in these sounds there is.
There can be many types of designs and sound schemes of a wind vane. Send photos and videos of your solutions.
Everyone forgot to think about unpretentious air cooling. But in vain! One has only to add a grain of originality, as something interesting and promising is obtained from the familiar and seemingly unpromising. That is why today we will talk about a new approach to air cooling - about a simple and affordable way for an ordinary buyer, which will significantly improve the performance of standard coolers.& nbsp
& nbspA bit of theory& nbsp
& nbspFirst, let's imagine standard sizes a radiator, on top of which a cooler is fixed. Or better yet, a large copper heatsink with small needle fins. There is something cooler-like on it, outrageously small and oversized noisy. Giving out a wide range of useless sounds, such a cooler does not help to cool the processor at all.
The first thing that comes to mind is to rip the useless fan off to hell and replace it with a larger one.
|
& nbsp Take it as an axiom that you can redirect the air flow using air trap... The principle of operation of an air trap is akin to the organization of an air duct, the function of which is to bring a stream of air to the base of the radiator. There are advanced modifications of the trap, the task of which is to supply a heated piece of iron with air from the outside, or, conversely, to bring it out of the body. & nbsp
& nbsp To date, a serial copy of an air trap called CPU Tunnel... It has two parts. The first is a corrugated pipe, which on one sideattaches to the heatsink on the processor, and the other to the fan on the back of the case. Thus, air is supplied to the processor "outside", where it is 3-4 degrees colder. The second part of the trap is a plastic duct. Its purpose is obvious (see photo). An air duct hangs from the rear of the PSU fan and removes heated air outside the chassis. & nbsp
& nbspUndoubtedly, such a "tunnel" is indispensable for modding and overclocking. However, the air trap is a "not recommended for purchase" device. There are several reasons for this. Firstly, serial copies can only be installed 80 -mm fans, while preference is given to 92 - and 120 - millimeter samples. Secondly, it is much more pleasant and cheaper to assemble the trap yourself than to be content with the fruits of mass production. From theory to practice
& nbspTranquility, only tranquility! Gluing this miracle will not be difficult.To successfully assemble the trap, you will need two straight arms, as well as:
& nbsp * fan size 80 X 80 mm and more;
& nbsp * solid copper form factor heatsink Socket a(it is assumed that a similar one is already included with your stock cooler);
& nbsp * a sheet of hard cardboard;
& nbsp * pencil, ruler;
& nbsp * breadboard knife or scissors;
& nbsp * some good glue (as an option - "PVA", "Moment", "Super-Glue");
& nbsp * adhesive tape to strengthen the structure;
& nbsp * colored tape, paint, velvet paper to give the trap a more or less decent look.
& nbspStep 1. Cut
& nbspFirst, let's find out the dimensions of the radiator, then - the new cooler. Further, based on the detailed sketch of the part,let's try to figure it out - xy from xy. Numerically dimensions a and b are equal to the linear dimensions of the fan and radiator, respectively. Simply put, for a we take the fan size ( 80 , 92 or 120 mm), and for b- a radiator. And by the way, about the birds! Usually the cooler size is several more size radiator. Therefore, if it turned out that a less b, it makes sense to get a vernier caliper, be patient and measure everything anew. & nbsp
& nbspRegarding the height of the trap. Everything is simple here: the meaning h may vary within 8 -12 centimeters.
& nbspA slightly different approach requires a rectangular radiator.
& nbspStep 2. Glue
& nbspGluing the cut out parts together, we get the frame of the trap. The main thing - do not forget to strengthen the edges of the structure with tape, because cardboard tends to exfoliate in the most inappropriate places.
& nbsp Voila - we have an air trap in our hands! Paying tribute to the style, the trap can be painted with a spray can, pasted over with velvet paper or colored tape.
& nbspStep 3. We fix the cooler
& nbsp 20 X 20 mm.
|
& nbsp
& nbspStep 4. Install
& nbspThe final step is to install the finished structure on the radiator. A well-made trap will hold in place without attachment. Nevertheless, it makes sense to once again hedge and secure it with tape.
& nbspConclusion
& nbspAs you can see from the article, a quiet and "cold" computer with air cooling is not a fairy tale. Using a trap significantly reduces noise and, in most cases, lowers the processor temperature by at least a couple of degrees. Plus, the cost of making the air trap did not even make up half of the cost of the Thermalteykov volcanoes. In a word, hand-made ("with your own hands" - from the English. hand made) was a success.