The celebration of the New Year and Christmas is based on the idea of bringing family members, relatives and close people closer together. General occupation creativity is a good opportunity to interest adults and children, and making Christmas toys from paper with your own hands. On the eve of the holidays, it's nice to spend time with your family and beautifully decorate the house before the clock strikes 12 times.
DIY paper Christmas decorations can be hung on a Christmas tree, walls, ceiling. Bright colors of toys and garlands will fill the house with a festive atmosphere, give good mood v the last days the outgoing 2019.
Christmas decorations made of white paper (master classes)
A simple and accessible material for creativity is white paper. The color is fully consistent with the New Year theme. Decorations are associated with fluffy snow, frosty patterns on the windows, snow-white frost. Snowflakes are cut out of white paper, funny vytynanki, figurines of angels are made, decorations can be used to decorate a room, windows, decorate a Christmas tree. The master class on the manufacture of such products is quite simple, adults and children will successfully cope with the work.
Snowflakes
A classic Christmas decoration is an ordinary bulky snowflake. White products look beautiful on windows, especially if you make snowflakes. different sizes with unequal patterns. The main thing is to fold paper snowflakes correctly.
Manufacturing process:
- Take a sheet of A4 paper, fold in half diagonally.
- Cut off the excess part, leaving a triangle.
- Connect the corners, fold the paper, repeat.
- Wrap a straight corner of the workpiece to the edge.
- Cut off excess paper, transfer the pattern of the pattern.
- Cut out the white snowflake and unfold.


It is more convenient to glue simple white snowflakes on the windows, made like napkins. They are easy to fold, apply a pattern, cut out. You can take circuit ideas from the photo below or come up with your own.
 6 variants of snowflakes with different patterns
 Vytynanka
Volumetric figures of a vytynanka with many holes can be handed over as a cute New Year's present, cling to a Christmas tree, or you can decorate a window with them. To create a craft, you need white paper, a tuck template, a stationery knife, glue, a cutting board (a cutting board is suitable).
How to make a vytynanka:
- You need to print the template of the figurine from the Internet.
- For a volumetric figure, 2 copies are printed.
- The paper is put on the board, all the patterns are cut out with a knife.
- A strip of paper is left at the bottom of the drawing for gluing.
- The cut patterns are glued together at the top.
- The lower strips are formed into a ring-clasp, glued together.

The figurine turns out to be voluminous and stable, such paper decor looks beautiful in the room. You can take the Christmas tree pattern in the photo below as a basis.
 Download this picture and print on a printer
 Angels
New Year's and Christmas themes are ideally matched by paper angels. Traditionally, they are made of white paper flat or bulky.
Several options for how to make angels:
- Print the template using a printer, cut out a figurine, decorate with sparkles, rhinestones, hang on shiny threads.

- Cut out a volumetric angel, paper elements: two truncated cones, a head, a halo, sleeves, wings. The cones are folded, glued, and the rest of the figurine elements are attached to the dress.

- Craft according to your own drawing. The sheet is folded in half, draw on one half the figure of an angel with wings, a halo, cut out the craft, unfold - the figure is ready.

If you thread the strings through the angel's halo and prepare several figures, it will turn out interesting decoration for the chandelier.

Small house
For New Year's decoration, you can prepare fabulous houses and decorate some parts of the craft with glitter. The houses themselves can be made from old postcards, cardboard, unnecessary boxes. There are many options! The template for making New Year's decorations from paper is downloaded and printed.
 Sample Template
 Then the scheme is transferred to paper. Cut out the house according to the template, fold the paper along the fold line (a box is obtained). The roof, smoker, windows are cut out separately. All elements of the craft are glued to the finished box, decorate if desired.

Of these New Years paper decorations you can create a whole composition with your own hands, decorate the windowsill with it, add figures of fairy-tale characters, Santa Claus, Snow Maiden.

Christmas decorations made of colored paper (master classes)
Do-it-yourself beautiful and unusual Christmas decorations made of colored paper can be made for the holiday in advance. Such bright crafts used to decorate a room, hung on a Christmas tree. Even a small child can make a simple garland-chain.
You need to prepare scissors, glue, several sets of colored paper for craft blanks, optionally choose beautiful beads, beads, rhinestones, sparkles, colored ribbons. Simple DIY Christmas decorations made of paper turn out to be interesting and relevant.
Simple garlands
The simplest Christmas garland is a chain. For her, paper of different colors is chosen to alternate the links with each other. Workpieces of any length and thickness are cut, then all the strips are glued - first, the first link is made, a paper strip is threaded into it, glued again and the steps are repeated until a garland of the required length is obtained.
New Year- this is perhaps the most main holiday for adults and children! They prepare for it for a long time: they decorate the home, decorate the Christmas tree, buy gifts. And they celebrate it on a grand scale - by the whole big country and even abroad. Children love to create jewelry on their own or together with adults. In this article we will try to make out the most simple and interesting ways making jewelry from the simple material, which is in every home, is made of paper.

Making decorations for the Christmas tree
Making jewelry with your own hands is not only an exciting experience - joint creativity brings parents and children closer together. Christmas decorations made of paper are good for their lightness: even the smallest branches will not sag under their weight!
The most suitable decoration for a fluffy New Year's beauty, these are volumetric balls. Making them is easy and simple, and under the guidance of adults, even the smallest family members will be able to do it. For this you will need:
- thick paper (you can use watercolor paper, cardboard, colored paper, white, even old postcards);
- stationery glue or glue stick;
- ruler;
- scissors;
- a compass or circle template (you can simply circle a cup or a round lid).


First you need to cut 20 circles out of paper. The size of the future toy will depend on their size. Inside each circle we draw an equilateral triangle, the corners of which must touch the sides of the circle. We make folds along the lines of the triangle - these will be the "edges" of our volumetric ball.
The next stage is assembly. Take five blanks and fold them with the sharp ends of the triangles to the center - we get a circle. We immediately place a loop-thread in the center, on which we will hang our decoration in the future, glue the blanks with the "ribs" outward - we get the top. The bottom of the ball is made in the same way. We glue the remaining 10 blanks into a strip, connect it into a ring, glue the already dried parts of the top and bottom from above and below.
So, it turned out to be a wonderful volumetric ribbed ball! By changing the size of the blanks, the color and texture of the paper, you can get many unique toys for decorating the Christmas tree and interior. It is easy to hide a small souvenir or gift inside the ball, give balls to guests or arrange a fun game.


Another way to make a volumetric ball is similar to the previous one, but much simpler. We cut out several circles or any other shapes from paper or cardboard, for example, stars, hearts, Christmas trees. The figures must be identical and symmetrical. You can print them on a printer or use a template. We bend the figure in half exactly in the center, and do the manipulation with the rest of the details. It remains to glue, for which we smear half of each workpiece with glue and connect with the other half. Thus, we glue all the figures. The latter is combined with the first, and a volumetric toy is obtained.


An exquisite decoration can be made using a foam blank. You will need the following tools and materials:
- coated paper in pastel colors;
- curly hole punches "Flowers" of two sizes: one - larger, the other - smaller;
- bead head pins.
If you don't have hole punchers, it doesn't matter! Draw four-leaf flower patterns on cardboard and cut along them. The flowers should be folded in pairs (a larger blank at the bottom, and a small one at the top), pierce in the center with a pin and attach to foam ball... Repeat the steps until the entire surface of the foam sphere is covered with flowers. Then glue the loop and hang it on the tree.


Christmas tree decor that children will surely like - cones with gifts. Making them is simple but exciting. From a beautiful double-sided paper, for example, origami paper, we cut out an even circle, find its center and cut out a small wedge. We fold the resulting part in the shape of a cone and carefully glue it. With a hole punch we make two holes on the sides opposite each other (they are needed to fix the thread).
The result is a cone with a handle for fastening, similar in shape to a fire bucket. The possibilities of decorating it are literally endless: lace on the edge, beads, sequins, openwork edging and much more. You can put a small souvenir or candy inside and hang it on the tree! It should not be placed very high so that little guests can get a treat or gift.


Paper christmas heroes
One of the most simple decorations New Year's hall or apartment - a paper garland. For New Year and Christmas, it will be relevant to perform it in the form of angels, deer, snowmen, Santa Claus, a Christmas tree or a snowflake. Classic version- little men holding hands. Very pretty garlands come out of colored and corrugated paper, however, for angels and snowflakes, plain white is also suitable.
We will need:
- paper of the selected color or white;
- scissors;
- pencil;
- glue.
We glue several sheets of paper together to get a long strip. The longer the strip, the longer the garland will be, but you should not make the strip too long - it will be difficult to cut the shapes. Then we fold the paper strip with an accordion and draw the selected character on the top sheet (you can use a stencil). Next, we cut out the figure, but not completely, but leaving uncut sections at least 5 millimeters wide on the left and right at the folds.
Now it remains to unfold the accordion and fix the ends of the garland in the chosen place. And now angels flutter under the ceiling, touching their wings, or snowmen lead a round dance!


It is also easy to make unusual toys from paper strips, for example, a snowman. We cut 10 equal strips 15–20 centimeters long and 1–2 cm wide and lay them out in the form of sunbeams, and fasten them with a stapler in the middle. We collect the free ends in the same way and also fasten it with a staple or glue - we get a sphere. We make another smaller one - this will be the head of the snowman. We connect the details and decorate to taste: glue eyes made of paper or beads, put on a hat or glue small paper mittens to the body of a snowman.


You can also make Santa Claus out of paper. To do this, you need to make a cone out of red cardboard - this will be the body of our hero. Then cut out two small ovals from white paper and glue the bottom of the cone - we get feet. We glue a circle of white or cream paper on top of the cone, draw or glue eyes, a nose, a beard from strips of white paper curled with scissors. Next, add details: hands, buttons on the fur coat, a cap on the head.
So the main character of children's is ready winter fairy tales- Santa Claus.


Holiday snowflakes
The New Year is primarily associated with snow. It is customary to decorate the room for the New Year's holiday with snowflakes. Making a window at home is as easy as shelling pears: cut out a stencil of snowflakes from a sheet of office paper, apply it to the window and spray it with artificial snow. The stencil can be used several times, the artificial snow is easily washed off the window glass after the holidays.
Familiar from childhood and beloved by everyone, young and old, a way to decorate a house- cut snowflakes from a napkin or tissue paper. To do this, the square sheets should be folded in half so that a triangle is formed. Repeat the manipulation two more times. Figured off the sharp top, and on the left and right, arbitrarily cut out curved lines without cutting the folds to the end. When unfolded, a whimsical snowflake with a unique pattern is obtained.


An ordinary paper snowflake can be easily transformed into something special if you put it on a template in the form of a ballerina figurine. Draw the silhouette of the dancer on sheet A4 and cut it out. A hole should be made in the center of the pre-made snowflake, through which the template should be threaded. It turned out to be a ballerina in a snowy lace tutu!
If suspended from the ceiling, it will rotate with every movement of the air.


How to make a garland?
Do christmas garland not difficult at all. For the simplest classic method you will need:
- colored paper;
- glue stick;
- ruler;
- regular pencil;
- scissors.
Cut the paper into strips 2 centimeters wide. We close the first strip in a ring and glue it together - it turned out the first link of the chain. We thread the next strip into the resulting link and also glue it together. We do these simple steps in stages, alternating different colored stripes until the chain reaches the desired length. We decorate the Christmas tree with the resulting garland.
Craftswomen engaged in scrapbooking offer to diversify the "old-fashioned way" using modern tools for working with paper: cut the paper with curly scissors, and make holes in the strips in the form of snowflakes with a special hole punch.


There is also a second way. Using a color printer, we print New Year's prints on ordinary office paper. Cut out the rhombuses and fold them in half, resulting in triangular flags. Next, you need to pull a strong thin thread in the place where you would like to place the garland. We coat each rhombus from the inside in the place of the fold with glue and hang it on a thread - the garland is ready!
It is a great, quick and easy way to decorate an office space, but it can also be used for festive decor apartments.

The third way is for ladies who love to sew. You will need:
- thick double-sided paper with a pattern or just colored;
- sewing machine;
- threads;
- scissors.
Cut out the silhouettes of the New Year tree from paper (you can be the same, or you can different). The largest stitch should be set on the sewing machine. Sew the first shape in the center. Without cutting off the threads, we also sew the next Christmas tree in the center and continue this way until the garland reaches the desired length. It turns out very original and stylish decoration!


To make another type of garland, we need:
- strong thread equal to the length of the garland (you can also use fishing line or yarn for lint-free knitting);
- glue;
- thick colored paper or cardboard.
With a hole punch or by hand, you should make a circle with a diameter of 5-7 centimeters from thick paper or thin cardboard. We bend each circle in half and put it on a thread, glue the edges. We glue the next element in a similar way so that the semicircles are located close to each other. You can hang the garland!


The next idea for making a garland is a fan! Fold the rectangular strip like an accordion, bend it in half and connect with glue or a stapler - when unfolding, a semicircular fan is obtained. From two such fans, we collect a circle, glue it, make the required number of such fan circles. We connect the circles to each other with a stapler or fasten to a thread. The magic decoration can be used!


And one more simple corrugated paper garland. To make it, we fold wide strips of corrugated paper and cut a thin fringe on the sides. Twist the strip slightly in a spiral, and the delicate paper decoration is ready!
Making New Year's toys is an exciting activity that will unite the whole family. Moreover, making crafts will require a little patience, inspiration, inexpensive tools and materials: colored paper and cardboard, scissors, glue. Simple techniques will allow even kids to create original and elegant Christmas decorations from paper for the New Year (photos are presented in this material).
Making New Year's decorations from paper: the best ideas
Some holiday crafts are not new and everyone knows how to make them. To add variety, you can use non-standard materials at hand (for example, beads, bright buttons, foil) or use an unusual combination of several techniques.
The simplest and most popular way to decorate an apartment or office is to hang openwork snowflakes. It is easy enough to create a decoration. Here's the instruction:
- A sheet of paper is folded several times.
- A diagram of the pattern is drawn.
- A snowflake is carefully cut with scissors.
The expanded paper pattern is attached with tape to the window or pinned with a thin needle to the wallpaper on the wall. If you have little experience in cutting snowflakes, you can practice on thin notebook leaves.

Snowflakes cut from A4 white paper look fresh and elegant. Interesting idea- stylized patterns. An ornament with golden or silver paint is applied to the sheet beforehand with sharp movements.


New Year's decor from white paper will help to create beautiful “frosty” pictures (or letters) on the window. The main working tools are scissors, knives. Exquisite carvings are made from white or colored paper. The process of making crafts in stages:
- The template is printed (or drawn independently), cut out and applied to paper.
- If the sheets and the stencil are carefully fixed on the plywood with tape, then it will be easier to cut the protrusions.
- Gradually cut through the picture (first of all, the small internal details of the pattern).
- Finish the work by cutting out the outlines.
To make several decorations for the New Year from paper, 3-4 cardboard sheets are immediately put under the template. Fix the crafts on the glass with tape or soapy water.


Gentle paper angels will bring winter magic to the room. With the help of stencils figures it is easy to paint the windows. Magic figurines look beautiful from corrugated paper or in bulk. Crafts are easy to create, even kids will love collecting angels. The scheme is printed on a printer, a figure is cut out, cuts are made and the base is twisted, then the craft is fixed with cuts.

The composition of several Waldorf angels, fixed on a chandelier, looks elegant and easy. It is advisable to cut out large and small figures and hang them on threads of different lengths.


A fashion trend is the creation of crafts that look equally elegant on the tree or under it as a gift. It's easy to create a beautiful house:
- They make a printout of the drawing on a printer or independently draw a blank of a large house on a sheet of Whatman paper.
- The drawing is decorated: tiles are depicted on the roof, they draw
- windows, doors.
- The template is cut and along the dotted lines and folded. The easiest way is to fasten the parts with transparent tape.
The house box can be filled with sweets. Additional decoration will give the craft a magical and original look. Small pieces of cotton wool are usually glued on the roof in the form of snow. With the help of contour paints, it is easy to give the look of a gingerbread house. For this, the tiles are drawn with contours, the windows and the door are outlined. The roof is covered with clear varnish and sprinkled with silver glitter.


The indispensable green attribute of the New Year's holiday gives the interior an elegant look. Using thin napkins, you can make an unusual three-dimensional Christmas tree. Openwork snowflakes of different diameters are cut from the sheets (using the snowflake technique). On pre-prepared sticks strung wood beads and glued with a heat gun. Napkins are put on top of the beads. Thus, a multi-tiered herringbone is created.

A great idea is to collect a small winter forest from Christmas trees of different sizes (crafts are glued to thick cardboard or a piece of plywood). The airy composition is installed on a windowsill or chest of drawers. Pieces of cotton wool between the trees or a layer of small foam balls will give the forest a snow-covered look. You can also lay a garland with small colored lights between the trees.


Paper crafts are a great opportunity to decorate a Christmas tree every year in different style... An unusual look to the green beauty will be given by beautiful New Year's decorations made of paper, which will unite some common sign. Suitable options:
- large and small multi-colored cubes suspended on shiny ribbons;
- pyramids, cubes, cones, paper candy made from the same cardboard (golden, silver) or in a certain color palette(turquoise blue, lavender purple, yellow lemon).
Stylish corrugated paper decorations for the New Year - fluffy circles. To do this, square sheets are folded like an accordion, tightly tied in the center. The accordion is unfolded, and the edges are glued. You can hang crafts on multi-colored satin ribbons.


The New Year's holiday cannot be imagined without sweets. Any child will love making sweet jewelry with their own hands. The deer has become the same symbol winter holidays like Santa Claus and Snow Maiden. Therefore, an unexpected duet sweet candy"Chupa-chups" and a deer face will be very useful.
Moreover, making crafts will not take much time. It is enough to draw the animal's face on a thick sheet of paper, paint it. The template is cut out, a hole for the candy is cut in the center. You can fix the paper blank on a stick with transparent tape.


Corrugated paper is great for creating custom tree decorations. The basis of a funny craft in the form of a snowman is cut out of thick cardboard (two circles of different diameters). Corrugated white paper cut into strips 5-7 cm wide and twisted into tight bundles. The cardboard base is covered with PVA glue and bundles are laid on it in the form of a spiral (starting from the center). An element in the form of a bucket is cut out of black paper, and a carrot nose is cut out of red paper. The details are glued to the smaller circle of the figurine. Eyes are drawn with felt-tip pens. Handles are formed from small twigs and inserted into a corrugated base.


Cones
A great option for Christmas tree crafts is paper cones. Brown paper with gold or silver streaks is a good material for the job. The process of creating a bud is step by step:
- Strips of paper are cut (the first is 20x1.5 cm in size, the second is 16x1.25 cm, the third is 12x1 cm).
- Each ribbon folds into a small accordion.
- The narrow edges of all strips are glued together and form a fan circle.

Simple garlands
The best option to quickly give a festive look to a room of any size is to hang paper garlands for the New Year. It should be borne in mind that you can decorate with everything that is at hand (for example, figurines of roosters, pigs, dogs), therefore it will not be difficult to create an original product.

Crafts from light paper weigh a little, so they can be of any length. Multicolored balls created from stripes look airy and weightless. To collect the ball, 3-5 identical strips are cut. To form a sphere, several stripes are connected, glued in the form of circles.


Garland of flags
Craft familiar to everyone from childhood. To add some novelty, you can modify the shape of the garland. Triangular flags are glued to a ribbon 1-1.5 cm wide. If this ribbon is twisted several times, the garland will acquire an original three-dimensional appearance.
Garland of figures (snowflakes, snowmen, ballerinas)
Custom decorations are obtained by using different materials and New Year's figures. When creating a snow garland, you can string openwork snowflakes on a transparent fishing line - the effect of weightlessness will appear. It is a great idea to fasten on the ribbon figures of ballerinas with voluminous skirts made of thin napkins.
Figures of funny and mischievous snowmen, cut out of thick paper, are best fixed on the ribbon with colored clothespins. This will give the snow-white garland bright accents.
Flower garlands
These crafts look massive, so they should be strung on strong strings. A harmonious look to the New Year's atmosphere will be given by short garlands fixed along the doorway or around the windows. To make the decor have a New Year's look, you can combine snow-white artificial flowers, green twigs and small silver or golden balls.
New Year's lanterns are a win-win, giving the hall a festive look. It is not at all necessary to specially buy fancy decorative lamps. It is enough to make several multi-colored plafonds with your own hands.

Flashlight made of stripes
Probably, many people know this popular craft. Assembling lanterns is a great way to get kids involved in decorating your home. The process of creating a product is very simple: a rectangular sheet of paper is folded in half, cut perpendicular to the fold line. One side is glued together, a light and wonderful New Year's decor is obtained. Lanterns are hung on the tree and garland.
Chinese lantern
A delicate Chinese lantern is created on the same principle as a paper lantern. An important nuance: so that the product long time kept the volume beautiful view, it is recommended to insert inside paper cylinder any length. The bottom and top of the flashlight are glued to the cylinder. The composition of several red or golden lanterns of different sizes, fixed at different levels, looks especially elegant.

sky lattern
An exciting activity on a festive night is the launch of lanterns. It's easy to create a craft with your own hands. You will need cocktail tubes, wire, rice paper, a candle, glue. Work progress:
- Wire is threaded through the straws.
- A cube is formed, the sides of which are pasted over with paper.
- Only the lower edge is left open, on which the wire cross is fixed and a small candle is fixed.
This craft is quite fire hazardous, so it is recommended to experiment with the launch on the street.
A stylish decoration of the New Year's room will be a bright composition of a variety of stars, collected by your own hands.

3D Star
The easiest way is to download a template from the Internet. The layout of the star is cut out, with the help of simple manipulations it is folded along the central ribs. If at the same time you make simple patterns on the workpiece (like a snowflake), you get a volumetric openwork star. The craft is hung near the window opening in any room.
Star of bethlehem
An elegant attribute of Christmas has become Star of bethlehem... It is enough to work with paper or cardboard for 5-10 minutes, and such a symbol of the holiday will exquisitely decorate the room. A star is formed from a square sheet of paper using the origami technique. Four beams are left long and four short. The edges of the workpiece are carefully smoothed from the front side. The star is glued to a thick sheet of paper or cardboard. The surplus is cut off, the craft is hung on a ribbon on the Christmas tree.

Eight pointed star
A voluminous craft is obtained from two parts, which are easy to create in 2-3 minutes. Four-pointed blanks are cut out of two sheets, each beam is folded and glued separately. Then two identical parts are connected to form an eight-pointed star. You can use colored or shiny paper in your work.
Five pointed star
Stylish star is not large sizes, made of thick silvery or golden paper, will decorate postcards or posters in an original way. To create a craft, you need to fold a square sheet in a certain way and cut out pointed rays. If the resulting figure is glued to thick paper and cut along the contour, you get an unusual volumetric decoration for home for the New Year from colored paper.
It takes a little time, imagination and colored paper to create beautiful crafts. The simplicity of the quilling technique allows you to make exquisite jewelry even without experience in needlework. Original compositions from paper spirals turn into exquisite openwork patterns and pictures. To create the details, cut professional paper 30 cm long into strips of different widths (from 0.3 cm to 0.9 cm).

Ded Moroz and Snegurochka
It is not difficult to create an elegant poster with these fabulous characters. Previously, a sketch is made on a sheet of paper, drawing the details of the figures. You will need white, blue, blue, pink paper. If you use more shades, then the picture will visually turn out to be more voluminous. To simplify the work, colored blanks of different shapes are first made.
Separate areas of the drawing with the figures of Santa Claus and the Snow Maiden are smeared with glue and filled with paper spirals. To give the picture expressiveness, a Christmas tree is laid out next to the figures, on which the drawn bullfinches are comfortably settled.
A simple picture with a candle will exquisitely decorate your Christmas card. A child can help make blanks out of paper in lilac-pink shades.
The initial stage - a sketch is drawn on a white paper postcard. The flame of the candle is laid out with oblong spirals of red-pink and lilac shades, so that the pattern becomes expressive. Stylized fir branches are created from strips of fuchsia-colored paper.
To give good New Year spirit the application is very simple: two paper bells of a carnation shade and an openwork metal snowflake are glued to the card.

New year wreath
Spirals using the quilling technique can have not only a round appearance. The Christmas wreath is collected from elements in the form of leaves, berries. In order for the craft to acquire volume, large sheets are made of dark green paper, and small ones are twisted from light green paper.
Berries are made from red cardboard. Collect the wreath on a cardboard circle. First, large green leaves are glued. On the inner side of the circle, on top of the dark green leaves, red berries are fixed. The space between the red elements is filled with light green leaves.
Different shapes of elements, the possibility of their attachment allow you to create custom decorations for a tree, an apartment. Top Christmas products:
- Original openwork snowflakes are cut out of white and blue crepe paper and laid out. To give your crafts a more decorative look, you can glue beads or use shiny paper in your work.
- A Christmas tree pattern is drawn on the sheet. Five blanks are cut out of green paper, which are fastened together with PVA glue. Volumetric herringbone decorated with multi-colored beads, satin bows. Crafts are hung on satin ribbons;
- A bright weightless garland of multi-colored cubes will gently wrap the green beauty. Cubes can be collected in the same size or different. The elements are strung on a ribbon, fixing their position with the help of knots.

These are popular crafts that are easy to create with your own hands.
The New Year holiday is special and bright. Decorating a Christmas tree and housing is an entertaining and joyful activity, children are looking forward to it, especially if the crafts have been independently created the day before. The non-standard decor of the room for the New Year made of paper will become the pride of the family and will be highly appreciated by the guests.
How to make beautiful Christmas decorations with your own hands for Christmas tree and New Year's interior.
These Christmas decorations can be used to decorate classroom in school, kindergarten playroom.
Spiky ball
Cut 14 circles of the same diameter out of paper. Divide each circle with a pencil and compass into 12 identical sectors (Fig. A).
Roll each of them into a small bag and secure with glue (fig. B).
Do the same with all fourteen circles. Fold them in two stacks of 7 face way down. You need to fold it so that each upper petal bag lies between the two lower ones (Fig. C).
.jpg)
Fasten the stacked circles with glue or thread (Fig. D). You get two hemisphere blocks. Glue them, passing a thick thread with a loop between them - the spiky ball is ready.
.jpg)
Spiral of stars
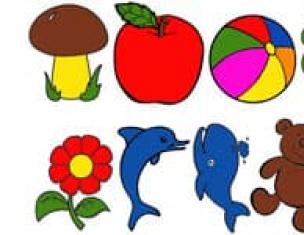
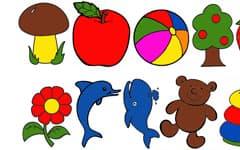
Put a sheet of blue paper on a plate, circle it, cut a circle in a spiral (Fig. A). Make 8 holes. Circle and cut out 8 stars from yellow paper (fig. B).
.jpg)
On each sprocket, make a hole with a needle and thread. Tie the stars to the spiral (fig. C).

Volumetric Christmas tree
On colored paper, draw a pattern for a half of a Christmas tree (fig. A). Using this template, cut out more Christmas trees from four double sheets (Fig. B).
Glue them together with the wrong side. When gluing, put a loop of thread or decorative rope inside so that later the toy can be hung.
.jpg)
The herringbone is ready (Fig. C).
.jpg)
Christmas tree garland
Use colored, silver, or gold paper of the required length. Fold the strip several times. Translate the drawing, cut it out. Decorate the tree with the resulting chain.
Eight pointed star
Fold a square piece of white paper in half, then in half again, cut out a circle. Draw rays with a pencil and cut
Openwork garland
Fold a sheet of paper 4 times, making cuts alternately on both sides. Expand and stretch the garland. It is best done with foil or gold and silver paper.
Christmas boots
Fold the colored paper in half. Cut out the silhouette of a felt boot or boot so that the back line of the boot falls on the fold line.
Cut a narrow strip out of white paper. Expand the postcard and glue it to the very top of the boot. Fold the postcard, cut off any excess white paper. Decorate the boots, thread them in so you can hang them.
Cone
Prepare three strips of 3x15 cm paper. Make cuts on each strip, and small cuts on the two edges of the strips. Roll the strips into a roll, one on top of the other, fixing the ends - the bump is ready.
Christmas trees accordion
Fold a 14x20 cm piece of paper in an accordion manner along or across the sheet. On the workpiece, make a "straight cut with gaps" element. Position the cuts as far as possible to the opposite edge. Turn the strip of paper over so that the cut triangles are on top. Repeating the shape of the triangle, make a straight cut again, leaving the border of the same width. Finished craft unfold and spread.
.jpg)
Rice. Christmas trees accordion
Metallized paper star
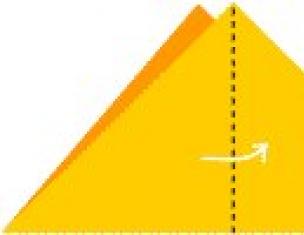
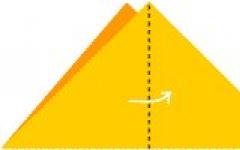
Fold a square sheet in half diagonally metallized paper to make a triangle. Follow the template, attach it to the resulting triangle. Following the dotted lines, bend the right corner of the triangle inward, repeat this again until the next dotted line.
Flip the triangle over and repeat from the other corner. At the same time, make sure that the fold lines on one side pass along the edge of the other. Redraw the pattern onto the folded triangle. Cut along the edges with a cutter, and punch inside with a punch (Fig. A). Expand, smooth out the folds coming from each ray so that they are of the same type - with an inflection. All folds separating one ray from another should be facing in the opposite direction.
Make another star in the same way, using paper of the same or a different color. Cover the craft with 3D paint and sprinkle with glitter while it is still wet.
.jpg)
When the paint is dry, connect the stars with double-sided tape with the back sides (fig. B). Cover the joints with paint. Pull the thread into the hole in the beam (Fig. C).
.jpg)
Rice. Metallized paper star
Pendant "Star"
Draw the outline of a five-pointed star on colored paper, inside it - three more of the same outline. At each contour, mark the lines with a pencil that do not need to be cut (Fig. A). Cut out, excluding the marked areas. The contour of each star will turn out to be linked to the other (Fig. B). Attach the thread.
.jpg)
Paper cascade .jpg)
You will need a cardboard cylinder from food foil, patterned wrapping paper, foil, PVA glue, thin adhesive tape.
Wrap a cardboard cylinder in foil and fold the edges inward. From brown paper, cut a 16x16 cm square and a 10x16 cm rectangle.Then cut out two 14x16 cm rectangles.
Step 2 cm from the edge and draw a line on the sheet. Do the same for all four sheets.
Cut 1 cm wide strips from the opposite edge.Take a 10x16 cm rectangle.
Attach the paper to the cylinder with the right side inward, then glue the wider parts. Turn the cylinder over and shake it slightly so that the paper is turned right-side out (fig.).
Cut out a variety of folded, shiny paper and glue them to the ends of the strips.
Hang the finished decoration where light will fall on it.
Approaching is a joyous event loved by everyone since childhood. The home keepers and the female half of the office workers strive to create a festive atmosphere. The easiest way to decorate your favorite place to stay is by making paper crafts. In this article, readers will find out what paper decorations can be with their own hands for the New Year, a photo for printing is attached.
In families with children, kids need to be involved in decorating the house. Kids will be happy to draw, glue, paint crafts. And how nice it will be for the child to see his work in the house.
Ideas for New Year's decor
Conventionally, holiday decorations can be divided into two categories: for windows and rooms. The main ideas for paper decorations are those listed below.
1. Stencils. This decoration is suitable for both home and work. Just print it out. Then paint and cut. You can attach the decoration to the table, window and enjoy. An example is a stencil on pictures, click on the picture to enlarge and print!


2. Snowflakes. A standard window decoration will brighten any room. Schemes templates for printing:


For the manufacture of a corrugated product, you will need : office paper, scissors, stapler, glue. The first step is to cut an A4 sheet in half. Then fold both sheets of paper like an accordion. Then you need to find the center point on the sheets folded like an accordion. To do this, fold the accordion sheets in half and unfold them back. Fasten the center point with a stapler. The next step is to cut out the pattern. When choosing a pattern, you should be aware that for symmetry it will have to be repeated on the second sheet of paper. Then unfold the sheet and glue the ends with glue to form a semicircle. The final step is to connect the two halves of the snowflakes into a single whole. The finished result is shown in the figure:

3.Quilling snowflakes. The quilling technique involves the use of spirals from narrow strips of paper. An example of such a snowflake is shown in the figure - enlarge and print:


4. Christmas tree toys. Standard children's craft in the form of a flashlight, perfectly decorate not only workplace but also an apartment. The drawing reflects one of the variants of such a toy.

5. Garlands. The easiest option for decorating a room is a simple chain garland. To make it, you will need plain or colored paper, scissors, glue. Cut the paper into strips, glue the ends of the strips together. Can be connected with a stapler. The end result is shown in the figure.


6. Origami.
A Christmas tree made of paper in the figure diagram will look unusual and stylish. 
7. Door decorations. This decor can be done even with a small child. To prepare such a decor, you will need: plain or colored paper, glue, scissors, paints, a flat round plate, a small round saucer.

8. Children's crafts. The most popular children's craft is making Santa Claus. To do this, you will need the following items: cotton sponges, black and red felt-tip pen or small charcoal tablets, scissors, colored and ordinary paper, glue, rope or thread. A circle must be cut out of plain or colored paper. Then, from colored paper of red or blue color, you need to cut out a semicircle, because this will be Santa Claus's hat. You need to stick a thread or rope on the cut out circle. Then glue the semicircle onto the thread. Next, you need to glue a beard from cotton sponges. Then draw the eyes and nose with felt-tip pens. Beautiful craft- The decoration is suitable for a Christmas tree, room, window and office.

9. 3-D decoration. The main feature of this decor is volume. Decorating funny things using 3-D technologies will harmoniously fit into any interior. To prepare such a decor, you will need: glue stick, scissors, paper, a needle and thread, a pencil. At the first stage of making jewelry, you need to cut 10 identical circles out of white paper. Then you need to draw a radius with a pencil on each circle and cut the radius line. In the next step, you need to make 2 cones with glue. The figure shows a diagram of the appearance of the decoration.
Similar actions need to be done with the rest of the circles. Then you need to sew the double cones to each other using a thread and a needle. It must be borne in mind that all the cones must be connected to form a ball. The extra thread will come in handy as a loop for the ball. Appearance product is shown in the figure.

10. Paper panorama.
This decor will perfectly decorate the windows. It is enough to cut out the stencils presented in the figures from paper. Then glue the components of the image onto the windows. 
Stencils for printing: