For New Year's children's matinees and holidays, special elegant, sparkling accessories should be selected. In a ball's dress for the girl, there are never many sequins, rhizes, gold and silver, and it is necessary to place a fabulous crown, worthy of princess. The Kanzashi crown can be made of satin ribbons and golden brocade, a phased master class for the manufacture of an accessory is given in this master class. It looks like a decoration is stylish and not at all in childish, so adult girls, complementing the carnival costume, may well use such a crown.
Consider in detail the components of the canzashi decoration and bring the list of necessary accessories for them. The crown consists of a base - plastic rim, braided atlantic oblique and top. In turn, the upper part of the crown is divided into the lower (triple sharp petals), medium (double convex petals) and the upper (twigs) of the tiers consisting of ripples canzashi of different shapes.
What is needed for needlework:
- - For braid, the rim will need a 0.5 cm satin tape - two segments of 2 m;
- - white plastic rim;
- - for the lower tier of the crown - 19 petals made of white-colored satin ribbon 5 per 5 cm (38 pcs.) And golden broches 5 per 5 cm (19 pcs.);
- - for the middle tier - 18 petals made of white satin ribbon 5 by 5 cm (18 pcs.) And golden broches 5 per 5 cm (18 pcs.);
- - for the upper tier - 9 twigs made of white satin ribbon 4 per 4 cm (36 pcs.) And golden broches 4 per 4 cm (9 pcs.);
- - Additionally, it will take 3 leaflets made of white satin ribbon 5 per 5 cm for decoration (3 pcs.) And 5 cm golden broches (3 pcs.);
- - silver semi-graysins 0.8 cm (11 pcs.);
- - Termoklay.
Crown Kanzashi Phased MK
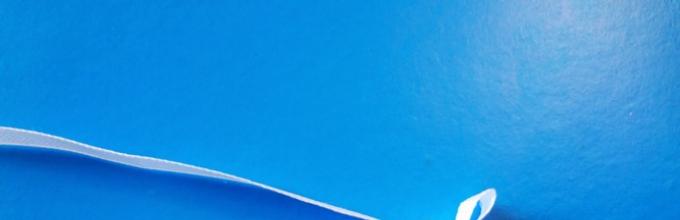
1. Of the 2 meter bands of thin white satin ribbon will be performed braid to decorate the rim. At the ends of each strip do small loops. The width of the kettop should be equal to no more than 0.6 cm, since the white ribbon used has a width of 0.5 cm. The opposite ends of the ribbons should be free to enter the holes.

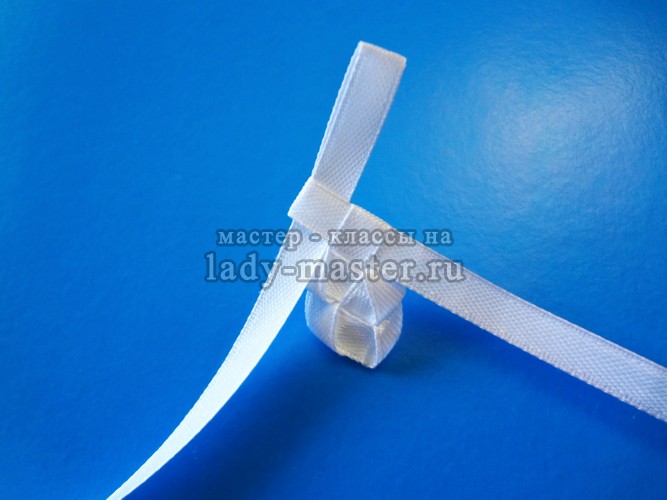
2. Tighten one strip in the second loop. This step is the beginning of the braid weaving.

3. As a result of the first action, two strips will be adopted, and the loop of one band will remain free. Insert the second strip into it, bent into a small loop. This is the second step of forming braids.

5. Continuing weaving, follow the density, each time pulling the edge of the ribbon closely.

6. The length of the braids should be equal to the length of the rim. At the end, stretch the free end of the tape into the last loop, make it up and cut the edge.

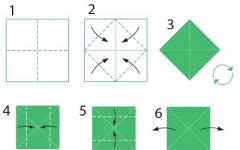
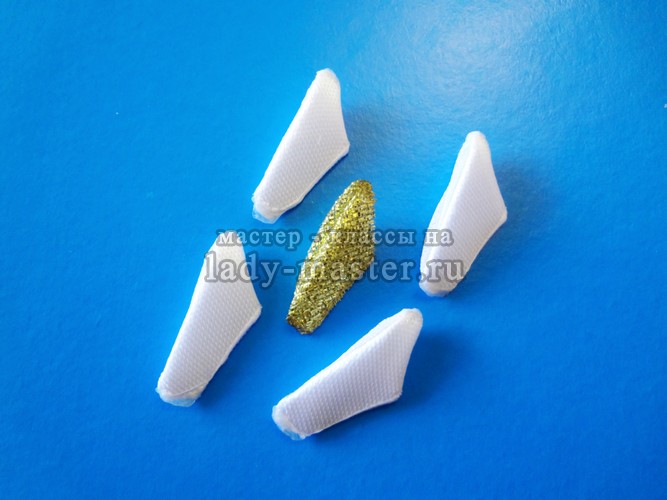
7. For the triple petals of the lower tier, prepare 2 white and one golden square with a side of 5 cm (all billets must be the same size).

8. Bend all squares to one diagonal.

9. Make the second fold in the height of the triangles obtained.

10. Make a sandwich from the obtained quadruple triangles. Place the golden layer between two white. Displays the upper layers relative to the lower per 1-2 mm.

11. Tips Compact and, holding in this position with your fingers, set the corner. Next, press the depressed atlas with your fingers to form the traditional triple sharp petal of Kanzashi. The bottom base of the petal should be cropping the painter to get a flat rear surface.

12. For the petals of the second type (medium tier), prepare the same white and golden squares, but one of each color per item.

13. The beginning of the formation of the petal is the same as in the previous case. First, the squares bend in the middle. Enter the silver triangle on white, but not clearly jack, and turning the upper relative to the lower 180 degrees.
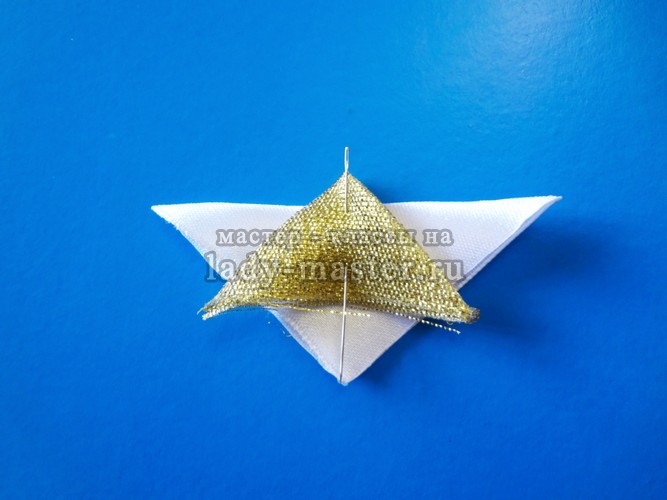
14. Bend two corners of the base-in white triangle symmetrically down. The center will remain a sharp golden tongue.

15. Hold the white parts with your fingers on both sides and cut, then smear the flame.

16. It is necessary to prepare the details of two types: droplets with white edging and gold tongue (18 pcs) and similar droplets, but with gold edging and white tongue (3 pcs.). The elements of the second type are performed by the same scheme, but on the contrary, the white triangle is superimposed on golden.

17. From the reverse side, it is clear to form a drop, you need to solder ends at the base.

18. And the last portion of the squares prepare for the creation of twigs. They will be made of very simple single petals, but are collected in bouquet. Each twig will consist of four white petals and one gold. For a start, bend the squares in half, as the parts for the twigs are performed as a simple sharp petal.


20. The set of details should consist of elongated thin petals. To do this, you should additionally pinch your fingers after the flame processing.
21. Five leaves glider in the form of a twig (golden - in the middle).

22. When all the details and petals are ready, go to the assembly of the decoration. Stick white braid on the hoop. The cropped edge of the tape is also carefully printed.

23. Start glue the lower tier to the hoop. Total will need 19 petals. Position them with a curved edge down.

24. Start the first row along the hoop length.
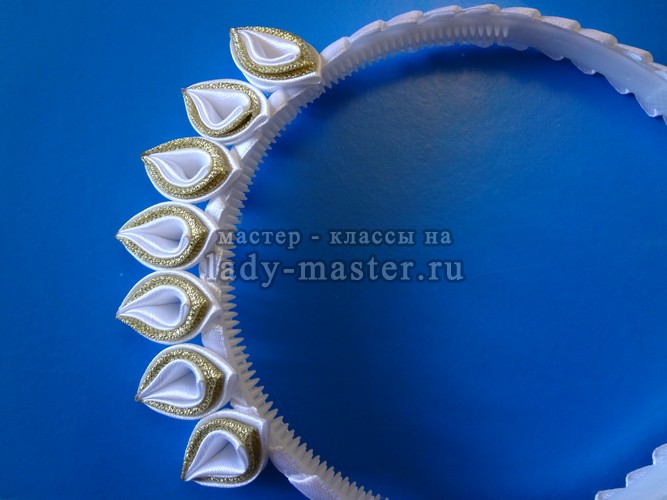
25. The average tier will consist of droplets with silver tongues. Stick them into the gaps between the petals of the first layer, fixing the sharp ends up. Also in three places, glue the remaining droplets with white tongues. Symmetrically position the twigs.
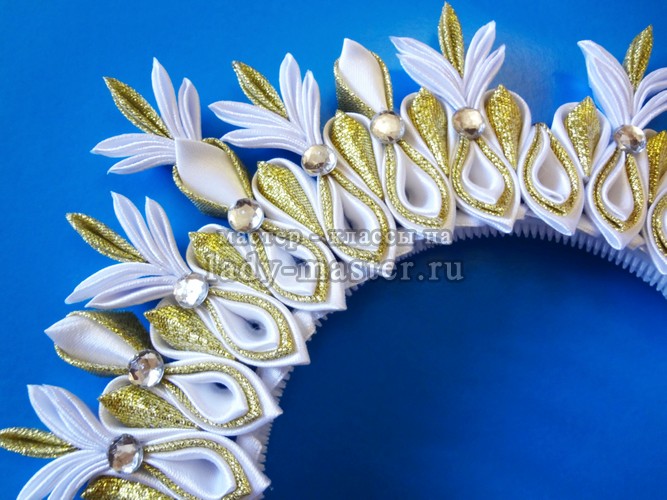
26. 11 semi-graysin with a diameter of 0.8 cm. Start in the right places to hide the compounds of leaves.

The elegant Crown Kanzashi is ready. This is an excellent accessory for the new year. Such a crown is suitable for a snowflake costume, snow maiders or princesses.


The lights are sparkled outside the window, it's time to dress up a Christmas tree, hang garlands and home decorations. Magic holiday is approaching - New Year. It's time to think about the carnival costume to wear a child for a matinee. The image of a young princess will complement the Crown Kanzashi. The master class will help you easily make this exclusive accessory.
Do you need Kanzashi crown for the new year? The master class from experienced needlewomen will help without much effort to make the original and, most importantly, the exclusive attribute.
First, consider the crown design, its size, select a suitable fastening. Do not forget to look into the store of sewing accessories and buy all sorts of decorations, for example, brilliant pebbles, rhinestones, beads, beads.
Before we consider the master class and tell me in stages, how New Year's Crown Crowns are made, let's study the following rules:
- traditionally, satin ribbons and a group are used in Kanzashi technique;
- to connect the edges, you can use a hot adhesive gun or a conventional wax candle;
- the basis for the crown can be made from a conventional hair rim;
- if you need a real crown, make the basis of plastic;
- all the lumens and the distance between the canzashi petals can be closed with a ribbon of the appropriate color scheme, lace or paper;
- so that the crown is more beautiful, it is better to combine several harmonious colors of the satin ribbon;
- we always use small accessories, beads or beads;
- from the beads you can make the core of the petals, but it will take a line or wire.
Attention! If you use natural fabrics for creativity, carefully quit their edges with a candle. Some types of fabrics may not be melted, but burn. It is very dangerous to health. It is better to select an alternative way to process the edge of the tape.
New Year's gift for your princess
Each girl in childhood feels a princess. To create an original image, you will need an accessory - the rim of the Crown Kanzashi. The master class will help you at home to build such a gift for your daughter. Width of the rim can be any. It is better to take a white rim, otherwise it needs to decorate a ribbon.

- hair hoop;
- satin ribbons width of 50 mm;
- parce with a width of 40 mm;
- scissors;
- lighter;
- glue pistol;
- measuring tape or ruler;
- tweezers;
- rhinestones or beads.

Tip: If it seems to you that the design is not too reliable, from the wrong side of the petal can be connected with a dense cardboard, transparent plastic or cloth.
Feel your queen
And what about the New Year's party at work? An adult man also wants fun and a little magic. Your outfit and evening image will complement the original crown of Kanzashi tapes. The master class will help make an extraordinary accessory, which will be appreciated by others. As a basis, you can take the usual hair rim. At any time, such a royal accessory is easy to remove. And you do not spoil the hairstyle.

Required materials and tools:
- satin ribbons of different colors;
- beads or rhinestones;
- hair bezel any width;
- ribbon from the brocade;
- scissors;
- candle;
- adhesive pistol or needle thread;
- line.
Step by step description of the creative process:
- We will mastere this beautiful crown.
- Photo 9.
- You can choose any colors of the tapes, but it is better to give preference to beige, golden or white.
- From the satin ribbon width of 50 mm, cut the desired number of squares.
- Cut the squares and from the ribbon of the brocade, the width of which is 40 mm.
- We still need a satin tape with a width of 25 mm. It also cut out the desired number of squares. We will have triple petals.

- Let's immediately prepare the rim. I wrap it completely pacho.
- Atlas in this case is better not to use because it slides.

- We take one square of a wide satin ribbon and brocade.
- We turn double triangles and fix them with each other with a glue gun.
- Uneven edges gently cut.
- Of the smaller satin square, we also make a double triangle and put it into the center of the petal. Here is such an element with us.

- By analogy, we need to make a couple of dozen such petals to decorate the crown.
- Now we take the pass, we need to make triple branches from it.
- We turn the square diagonally twice.
- Then capture in a straight line triangle tweezers.

- Corner, which protrudes on the left, cut.
- The edges of the broches are falling by a special soldering iron or lighter.
- We make several such sticks.
- Then, with the help of adhesive guns, we connect separate parts into such triple branches.

- In the middle it is better to arrange a twig consisting of five parts.
- Now the base of the rim is completely covered with petals.

- That's what we did.

- We find the center of the crown, we glue a twig between the petals.
- Next, we alternate the elements: we glue a twig and petal in the intervals.
- From the wrong side with the help of an adhesive gun, we attach a translucent tape. For reliability, you can use a dense cardboard.

Crown Kanzashi: ideas

As I was told "Prepare Sani in the summer", so at the request of the craftsmen I prepared the master class of the New Year's crown, although in the yard it is still September! Later I will make MK New Year's Tiara, do not miss.
Let's proceed.
Prepare 5 cm width ribbons, tools and rim.

First, prepare our foundation. We take the rim - wept it () or glit a pigtail from ribbons ().

I decided to make a crown from triple petals. I will not describe how to do, everything is in my MK.
We do about 18-20 petals.

6 petals I cut not much, and I cut the rest strongly to the tip of the petal. I do this in order not to be seen when attaching between the petals.

In general, that I want to say you - the New Year's Crown is a flight of fantasy. Clear petals can be as used, creating unusual patterns.
I will show the easiest way. I took the same 6 petals and glued them with each other.

I stick them in the middle of the rim.

Then between the petals pasted on the petal.
And on the sides, 2 petals were still glued. 1 and 2 level.


Connected 2-3 petals among themselves.

And pasted into the intervals.

Wrong looks not ice. We will invent how to decorate it.

The design of petals turned out to be unstable, so I was glued to start thin cardboard and leveled the crown.


And in a circle glued them. Carefully close the petals. Sometimes I woof without cardboard and close the leaves immediately, it turns out well too. This is in cases where the crowns are not high and not wade in any side.
With the approach of New Year's holidays, the question is sharply arising, how to prepare your child for festive evenings and matinees, namely, to buy a beautiful masquerade suit of a princess or a prince, and most importantly, the crown or diadem, and maybe a hat. Such an integral attribute as a crown is easily done with your own hands, in such an excellent technique of Kanzashi. But you will know that your product is original and unique.
Affordable master class with detailed photos, will make it possible to make a crawl for your princess from a small amount of material, as well as you create such beauty, in just one evening.
As usual, the master class (MK) begins with cutting material into squares. In our case, it will be a white and silver tape. Attach two different squares to each other and roll them in the form of an ear. Connect edges with a needle with a needle or use a glue gun. You have created the most important workpiece, thanks to which the entire crown comes out, and maybe the canzashi tiara.
After you have done all the other petals, we will begin to make rays from them. Fold together several elements and glue them between themselves, as shown in the photo. On the sides, stick a couple more petals. Thus, you should have a blank consisting of five rays. From such five-pointed blanks, the crown will form. So you have to make some more such pieces.
The next stage, which recommends to make a master class (MK), is the manufacture of original ribbon from satin ribbons. The scheme of its weaving is depicted in the photo. After you were able to weave her, see to a simple rim, which will play the role of a frame for the crown, in the style of Kanzashi.


Now, proceed to gluing three blanks consisting of five-pointed elements and two pairs consisting of three petals. They will be located on the sides.
Look at the photo, it looks like not yet finished crown or diadem.
 We approach the completion of the Kanzashi lesson. It remains, only adding several rays from above. Having done so, we will prolong the crown up, and our Kanzashi will become much more beautiful.
 To supplement the full image of the princess or snowflakes, add decorative material that will decorate the crown even more. It can be pearls, beads or dry sparkles.
 As you were able to make sure, Kanzashi crown is done very simply, you can connect your daughter to such work. She will be happy to help you in this process and will be proud to do it with their own hands too. Another option to create a crown can be viewed on the video presented.
Video: Kanzashi Crown Production
Hand on rim kanzashi
Mini Hat, can make every woman, a girl and a girl, beautiful and mysterious. Created by their own hands, a hat will fit on every celebration, as well as the matinee or a carnival. Enter it in the theater, there it will be relevant. Many brides prefer to wear a mini hat with a veil on their wedding.
 You do not need to buy such an accessory in the store, you can make it with your own hand from the tapes. The advantage is that you can choose the color and decorative material at your discretion. So the mini hat must go unique. A master class (MK) will help in this.
In such work, some fittings will need, and more specifically:
- cardboard blanks;
- ribbons from satin material;
- textile glue;
- rim.
Cut out the templates that are shown in the photo from dense cardboard. The ribbon must be cut into thin stripes and glue paper blanks, in a checker order. At first, making it in length, and then in width. Secure them with glue.