Creativity begins with imagination, and not with the purchase of expensive special materials and tools. Little miracle It is quite possible to create from what is at hand, what you have to deal with every day.
Walnut lovers should not rush to throw away the shells. When you connect fantasy and imagination, you can create real masterpieces of any complexity from them.
Crafts made from walnuts are a natural source material that turns into jewelry, miniature doll houses, and even netsuke-style figurines.
What is good about walnut shells?
In natural or artificial material There is beneficial properties, which facilitate the manufacturing process. The halves also have them. walnut:
- the natural form gives rise to a large associative series, since it resembles a shell, a cup, a ball, a pendant, a casket;
- shells are strong and resistant to high temperatures, chemical influences, which allows them to be processed in any way;
- natural color and texture of the shell, i.e. this material does not need to be painted or sanded;
- The material is stored for a long time, is not sensitive to moisture or other destructive factors.
Walnut halves are very easy to work with. It is enough to free them from natural “partitions”, if necessary, wash and dry them, and the material is ready.
It is suitable for both children of any age and adults.
Crafts at the initial stage
What can be made from walnut shells:
- mushrooms with berries;
- vegetables, fruits;
- animals, insects;
- Christmas tree, Easter decorations, wreaths;
- boxes and needle cases;
- doll houses;
- flashlights;
- pendants and pendants;
- miniature wallets;
- candlesticks;
- stands for place cards;
- models of boats and ships.
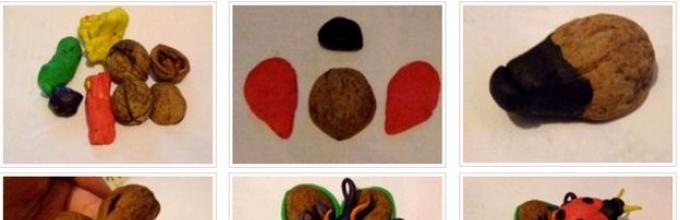
You need to start with something simple that will help you get used to the material and become familiar with it. For starters, it could be a ladybug or a funny caterpillar.
The first step is to divide the shells into halves and peel them. The craft can be made in two versions: in the first, the halves will imitate the petals of a large flower on which a plasticine ladybug will “sit”; in the second, they themselves will be a ladybug.
The bright insect is molded from black and red plasticine. You will need five halves. The core of the flower will be made of yellow plasticine. The ball is rolled, flattened, and five shell petals are attached to it in a circle. In the end, all that remains is to “plant” the ladybug on them.
In the second case, half a nut is taken and insect parts are molded from plasticine: wings (from red plasticine), black specks, head. In the finale, the craft is simply assembled from individual parts: the elytra are glued onto the half, speckles on them, a head, and paws if desired.
To make a funny caterpillar from a shell, you need to take six shells, a sheet of green colored paper, paints, wool thread bright color (red or yellow). A large round sheet is cut out of colored paper, and veins are drawn on it with paints. The six halves of the nut will become the “body” of the caterpillar, so you need to draw multi-colored circles on top of them (yellow-white-green, for example). Next, the halves are glued to a sheet in the shape of a caterpillar. The head is made from a whole nut, on which a funny face is drawn. The colored thread is folded into a bun and glued on top in the form of a tuft or bangs.
Funny little animals
The next stage of creativity for kids can be crafts in the form of animals, birds, sea creatures - mice, penguins, hares, turtles, octopuses.
To create a cheerful animal, halves of a nut are painted in gray. Ears and eyes are cut out of paper, the nose can be made from beads or drawn. You can use a gray woolen thread as a ponytail. All parts are glued to the shells. You can make bunnies in the same way, only the ears should be larger, and for the tail you should use a piece of cotton wool rather than a thread.
You can make a funny octopus from plasticine and walnuts. Take half a nut and paint it bright color(yellow or pink), a muzzle is drawn. For the paws, use bright fluffy wire to match the shell, and the parts are fastened together. The figurine is ready.
You can make another inhabitant of the ocean - a whale. To do this, take half a nut and paint it dark blue. Use black paint to paint eyes and a smiling mouth. A “fountain” of water in any shape is cut out of white paper, and a tail is cut out of dark blue paper. They can be glued to the half or holes can be made in the shell and parts can be inserted. Such a whale can be allowed to swim: the air in the cavity of the shell allows it to confidently float on the water.
Greek masterpieces
When the stage with children's crafts is completed, and interest in the material only grows, “acorns” may be born.
You need to take multi-colored, shiny, gold or silver paint, paint the shells, connect them together, and install a fastener for a wire thread. Upper part“acorns” can be coated with glue and sprinkled with glitter.
Do-it-yourself walnut halves make good salt and pepper shakers, and if you fill them with cotton wool or felt, you can make pincushions. You can also place miniature ones in the halves soft toys, and if you attach a mast, sail, oars and benches to them, you will get boats, sailboats or even entire ships.
Complex technology- this is carving on a walnut or burning drawings on it, not to mention miniature ones doll houses or flashlights. There are no limits to your imagination: crafts made from walnuts can become a room decoration, a funny souvenir or an exclusive gift.
Walnuts, or rather their shells, are one of the most the best materials For interesting crafts. A whole set of special properties of walnut shells (special surface texture, long paint retention, relatively large sizes) allows both adults and children to make crafts from it, and the risk of any injuries during the manufacturing process of the toy is completely eliminated. In our review you will look at several types of crafts from nut shell and we'll tell you how you can make them.
The first step in making all crafts is to clean the nut - you need to peel the nut very carefully, completely removing the nut itself, while leaving the shell completely intact (if you can’t do this, it’s better to ask someone for help - if there are cracks on the shell, the craft will not work).
"Walnut Ladybug"
To make a ladybug, take three walnuts and plasticine different colors. Peel the nuts, divide them into halves and make the face and wings of the future ladybug out of plasticine, then attach the face and wings to one of the halves, after making characteristic dots on the wings (this can be done with a marker or plasticine of a different color). From a piece of plasticine yellow make a ball and attach it to the five remaining halves of the shell - you will get a flower on which you will plant the ladybug you made earlier. The craft is ready!


"Funny little animals"
You can make a lot of funny animals from walnut shells without much effort. Below we will tell you how to do this.
- To make penguins, paint the shells black and white, then draw the eyes and attach the beak and paws pre-made from paper.
- Paint the walnut shells gray and cut them out of paper long tail and characteristic mouse ears, and then attach them to the right places - you will get funny little mice.
- To make turtles, paint half a shell in green, applying characteristic brown spots to the shell, then make a paper base with legs and a muzzle. Attach the base to the shell and your turtle is ready!
- To make bunnies, paint the shells white, attach large ears cut out of paper to the head, attach a tail to the back of the bunny and draw on front side DIY face - the funny bunny is ready!
- You can even make an octopus from the shells! To do this, paint the shell pink and attach eight wire legs covered in pink fabric to it.
- To make frogs, attach legs to the bottom of the shell (you can use pumpkin seeds), paint the shell green and draw funny faces on the front side of the toy.
- To make whales, paint the shell blue, cut out a stream of water and a tail from paper, and then attach them to the shell in the right places.
- Paint the shell with stripes of yellow and black, and attach antennae made of fluffy black wire to the top of the shell - you get funny bees.
- To make crayfish, paint the shell orange and attach a pre-cut paper base with drawn claws and a face to the bottom of the shell.
- Spiders - that's what else you can make from nutshells! To do this, paint the shell black and attach black legs to the base of the shell. fluffy wire.


"Caterpillar on a leaf"
- Take your greens paper sheet, cut out a shape in the shape of a wood leaf.
- Color the six nut halves white and orange as shown.
- Make a light green spot in the upper central part of each shell halves.
- Take a whole nut and draw a smiling face on it - this will be the head of our caterpillar.
- Secure the caterpillar to the leaf using PVA glue (in principle, you can just put the shells on the leaf without fixing them).


"Magic Nuts"
- Divide the nuts into halves and remove the kernel.
- Place a small surprise inside the shell that will easily fit into the shell.
- Glue the halves together with a glue gun and offer a surprise to someone close to you.

"Walnut Athletes"
- Make three whole nuts using a glue gun, attach eyes and a mouth made of paper to the top of the craft - you get an athlete ant.
- Using the same glue gun, attach paws made of wire antennae to the ants, bend the wire and insert sports equipment made from improvised means into the ant’s hands. If you wish, you can make many of these ants - you will get a whole Olympic team.


These are the kind of athletes you can achieve.
Crafts made from walnut shells are one of the most exciting activities for children of different ages who are happy to come up with new images for hemispheres that are pleasant to the touch, durable, and have an attractive force.
As a rule, crafts are made from walnut shells in kindergarten - in groups different ages, and in elementary school. But even older schoolchildren are happy to use this material for creativity.
Figures and toys made from walnut shells
At the beginning academic year Crafts on the theme of autumn are the most relevant - creating them from walnuts is quite simple and interesting. At the same time, if you use your imagination, you can get the most original and unexpected products:
a spider with furry legs on its web, which is already preparing for the onset of cold weather;

a small mouse in a warm cap, sleeping in a cradle suspended from a branch of an autumn tree.

Crafts in the shape of animals are even more diverse. You can create a wide variety of characters with your own hands:
a ladybug, which will be enlivened by three-dimensional toy eyes;

a bird with a yellow felt beak and calico wings;

a charismatic owl with felt wings and ears;

turtles with cardboard heads and legs and turtles with heads and legs made of chenille wire;


Walnut shells are rich soil for creativity. Once you start creating crafts, your imagination will prompt you with many of your own, absolutely unique, images.

whales with cardboard fountains;

a bee with wings made of foam board and antennae made of fluffy wire;

These bees look great even without wings;

You can make a charming ladybug from a walnut shell

the backs of these ladybugs painted with paint, and the wings are made of felt;

crabs with cardboard claws;

mouse with big ears from foam board;

mice with small felt ears;

You can make funny tethered puppies from walnut shells.

If you glue a fleece scarf and ears to a nut and draw a face for it, we will get a cute bear.

Octopus with furry legs.

Funny frogs.

If you coat the nut with glue and cover it with buckwheat, you can make a small forest hedgehog. All that remains is to draw on his eyes and glue on his nose.

A bright butterfly with cardboard wings.

You can create entire compositions - for example, the sun, a flying bee and an elephant, as in our photo.

Another charming character that can be made from a walnut is a penguin. First we paint it. We make the beak and legs from felt, the headphones from fluffy wire, and the wings from seeds. We glue factory eyes on it - the craft is ready!

Another craft that many people will love is mushrooms made from walnuts and plasticine. Such mushrooms turn out very similar to natural ones, and making the craft does not require much work.

You can make a funny dragon from walnuts, sticks, cones and dry leaves.

And the boys will surely love the boats with a toothpick mast and a caton flag.

You can make autumn boats with sails from dried maple leaves (you can cut maple leaf from paper or film).

Look at another version of walnut boats in the video:
Strawberry shell pendant
And everyone will surely love the appetizing strawberry pendant made with green felt and paints.

Box and pincushion made of walnut shell
For example, you can make a small but very cute pincushion from a walnut, a small piece of cotton wool, fabric and glue. We wrap the cotton wool in cloth and sew it up. Place the resulting ball on the glue in the inside of the nut.

How to make a cute box, watch the video:
In these pictures you can see wonderful examples of crafts made from walnut shells.

Master class. Working with natural materials
Subject: Strawberries from walnut shells
Target: teach how to do a craft using natural materials, how to draw a strawberry, how to design a piece of work.
Application: Material designed for 1st grade children, birthday card, craft for an exhibition, room decoration.
Equipment: gouache paints, brushes, Moment glue, colorless varnish, thick cardboard, walnut shell, frame for decoration.
Step-by-step work process
Natural material is a storehouse for development creative thinking, fantasies and imagination in children. All kids love crafts made from walnuts, as well as the nuts themselves. After your child happily eats this tasty and healthy nut, do not throw it away. After all, from a shell you can create many interesting and beautiful crafts. All children love crafts made from walnut shells. This is not only a future toy, but also the development of certain qualities in your baby:
Skills in handling paints and glue;
Accuracy and perseverance;
Imagination and thinking;
The ability to create something from natural material;
The baby's creative potential is revealed.
Crafts made from walnuts come in a wide variety.
1. Advice: When you crack the nut, try to separate it into two equal halves. There is no need to crush it entirely. Remove the nuts and everything else from the shells.
2. Take a thick sheet of cardboard of the size we need. Color the background green. This is our clearing.
3. In the center of the leaf, draw a thin strawberry stalk, a leaf and sepals.
.jpg)
4. Using white paint, draw flowering inflorescences at the top and outline thin brush drawing along the contour, creating volume.
.jpg)
5. Glue the nut shells onto the sheet.
.jpg)
6. Color the shells: red at the top
.jpg)
Below in pink
.jpg)
7. After drying, don’t forget to put small white dots on the strawberries.
.jpg)
8. Paint the ladybugs' heads black and their wings red. We put dots on the body and draw a stripe in the middle along the body.
.jpg)
9. We frame the finished work.
.jpg)
10. If desired, the craft can be painted with colorless varnish. Do not forget that when varnished, the color will change, it will become rich and dark. photo 11
.jpg)
11. Possible options crafts with walnut shells.
.jpg)
.jpg)
Grape
.jpg)
.jpg)
Good luck in your creativity!
If we talk about shells, then everything is simple. It's autumn now and there are a lot of nuts. Another question is, if you live in an apartment, then you will have to buy a kilogram, but if in your own house, then it’s easier. My parents grew a nut in their garden, and if anyone didn’t have nuts, they successfully collected them from their neighbors.
I have already shared my works on the blog, and also posted a lot of photos and descriptions. In addition, we looked at how to make kindergarten or school, now it’s the turn of walnut crafts.
Crafts from walnut shells and plasticine - do it together with children
For crafts we need ordinary plasticine. It can be expensive, it can be the cheapest, ordinary one. We found a box at home, as children leave folders at labor lessons, with all the accessories. And it’s good that there is plasticine at home.
You also need to carefully open the walnuts so that the halves remain intact and undamaged. Open it with a knife, take out the kernel of the nut, we need an empty shell. Or rather, half a shell.
My daughter wanted to make a funny mouse out of a shell. I drew the eyes and nose with a black marker, and the ears from two pieces of plasticine.

My son really liked the owl, but he didn’t make it, he suggested it to me. I got this owl.
To draw the eyes and nose, I used markers that we had at home. They are not expensive and are sold at office supply stores or supermarkets. Children often take them to school.

Well, I remembered how, as a child, my dad taught me to make a turtle from a walnut shell. The legs and head are made of plasticine; I drew dots and a heart on the shell with a marker.
Even a child can make crafts from walnut shells with his own hands. It's very simple, there's nothing complicated.

Eyes can be made from plasticine, I made a smile and eyes with a pencil. The funny turtle came out. Use the color of plasticine brown, gray, green, or even red if you like.

Here is another version of the turtle. Only the shell I already drew with a black marker. The head was made from brown plasticine. Eyes made of black plasticine.

Well, here's a whole company. Simple, fast, easy, everything is ready in twenty minutes. Place the beauty on the leaves and bring it to kindergarten. We get beauty without any problems or costs.
By the way, you can place all this stuff on a piece of thick cardboard, or use a cardboard box.

Of course, these are just ideas and options; you can come up with something more interesting and beautiful. Also do it with your children. You can come up with autumn crafts from walnut shell.
DIY crafts made from walnut shells - autumn crafts for children
The children and I decided to use acrylic paints. We decided to paint halves of nuts. The children did it by applying paint to the shells. I wanted to make an owl, strawberry and frog.

This is what happened. Why so unsuccessful? The children did not wait for each layer of paint to dry, so everything spread a little.
Most importantly, the paint must be applied to the shell in layers, allowing each layer to dry thoroughly. This is important. It is better to use a pair of brushes, thick and thin. We paint the surface with one, and use the other to draw details.

But the children had fun, everyone was involved in creative process, interesting, funny, funny. We had a fun time.
But that’s not all, I decided to pick up some interesting ideas, maybe you’ll like them.
If you have felt, you can make a mouse using the same principle as described above. Using a marker or black felt-tip pen, draw a nose and eyes, and cut out the ears and tail from felt and glue with super glue.

I hope that interesting ideas for walnut crafts will inspire you to do great work. There are more interesting idea, my daughter suggested it to me, you can make a ladybug.
Apply red plasticine over the entire surface of the shell. Black dots made of black plasticine.

You can also make penguins if honor is black acrylic paint, or black plasticine.
Paint the eyes using a thin brush, glue a beak from felt, or from a piece of cardboard. Paws are pumpkin seeds.

If you need something simpler, then I suggest making a spider, legs from twigs. You can attach them with plasticine.

A little New Year's mood, And New Year theme, so, for the future. You can make wonderful crafts beautifully and simply.
The deer is made of walnut shells, felt horns (or brown cardboard), and plasticine nose. You can buy eyes at an office supply store. And a ribbon.

By the way, you can make a Christmas tree toy from walnut shells. We apply paint.

The two halves of the nut can be glued together, and a ribbon can be placed inside and hung on the Christmas tree. Look how beautiful it is, the main thing is that these Christmas tree toys are made from natural material. Take note, it will come in handy.

And finally, I want to plunge into fairy world, dream up. Remember the movie "Three Nuts for Cinderella". Why don't you have three nuts?

Now you have enough ideas for the fall theme; you will have something to take to kindergarten or school. Even the busiest parents can help their children.


