- These are the most popular and beloved flowers. They were often sung and sung by poets in their poems, described by writers in prose, painted and painted by artists. They compose songs about roses, compose fairy tales, their image is used as elements of decor for clothes, shoes and interiors. Needlewomen also work tirelessly to perpetuate the beauty and grandeur of delicate garden flowers in their works. All those who work in must have tried roses at least once to make hair ornaments or other options. You should tirelessly hone your skills, because roses are truly royal flowers, they can be artificial, but not fake.
Master Class
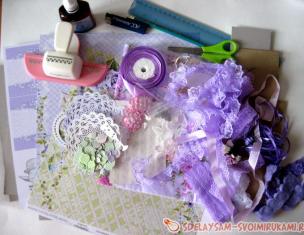
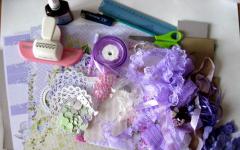
For a composition with three gorgeous roses you will need:
- for the manufacture of the lower part: a basket template, cardboard, felt or deep blue foamiran (3 baskets should be cut using the template: 1 from cardboard and 2 from felt);
- rhinestone splint or thread bright blue color;
- magnet;
- high-quality Chinese foamiran (11 mm) in two colors: blue and white - small pieces to make a bow according to the pattern + a blue half-bead in the middle with a diameter of 8 mm - for the same bow;
- plastic or wooden ladybug big;
- for making roses: 25 pieces of satin ribbon of pale pink, pink and hot pink color - 2.5 * 6 cm;
- 15 pieces of green satin ribbon - 2.5 * 10 cm (the lower part of the buds will consist of 5 petals on each rose), other petals can be used to fill voids,
- glue gun.
What is the value of the offered basket:
1. This is not just a craft, but a unique gift for any woman on March 8 or another holiday.
2. The copy is decorated with delicate, popular colors that absolutely all women like.
3. Having made it, you will learn how to model beautiful rosebuds. This knowledge will be useful for performing festive.
Basket with kanzashi roses in stages
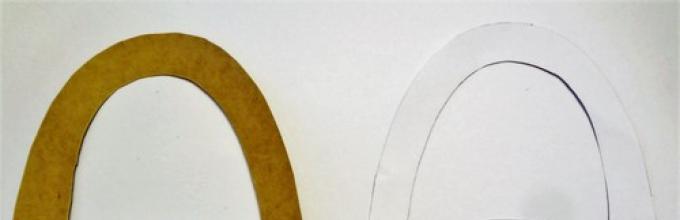
1. Since the article is about a magnet, such a product must be flat. But we will make only the base flat - the basket itself, and the roses, of course, will be lush and believable. Cut out a basket template that is interesting for you, the shape can be any. Decide on your own sizes.

2. Cut out 3 baskets of the same shape: 1 from cardboard, 2 from felt. Glue the 3 parts so that the cardboard remains inside, it is not visible. Run a tire strip along the edge of the composition, singeing protruding threads.

3. Cut out a paper template for a beautiful bow. Using it, make the main blanks from foamiran. On foamiran, it is better not to draw with a pen, they usually draw on a foam surface with the tip of a toothpick.

4. Glue the bow. It must be voluminous. Stick on top of the basket handle, shifting to the side from the center.

5. Now you can move on to the most delicate part of the work - creating rose petals. Singe the prepared pieces of satin in soft pink, pink and hot pink.

6. Now consider in photo 6 how you can model the petals of the desired format.

7. Make 25 petals from pieces of ribbon of each color. Do not stir the petals together, let them be laid out in front of you in portions.

8. Make sharp petals for the bottom of the buds from green satin ribbon. Bend the segments in half, cut with hot metal and open.

9. How to make a rosebud from a satin ribbon. Start twisting the prepared bunches of petals into buds, fastening them with a glue gun.

10. 25 details will be used for each rosette, so they will turn out to be very lush and beautiful.

11. Select pointed leaves from all double green parts and glue 5 pieces on the bottom of each bud. Sharp tips should barely peek out from under the delicate petals.

12. Glue the flower arrangement onto the basket.

13. Add a couple more highlights that won't hurt general view compositions, but, on the contrary, decorate it. To do this, you can use a half-bead on a bow and a bug.
Yet detailed master classes on our site how to make roses from satin ribbons do it yourself:


A slightly different manufacturing technique - petals from ribbons are placed on a thread -

Like the product and want to order the same from the author? Write to us.
More interesting:
See also:
"Warm Flowers"
Master class on making wonderful flowers in technology wet felting from Yulia Valerievna Syomova from...
…A whole basket of roses!!! Agree, this is the dream of every woman) Whether it's fresh flowers or roses from satin ribbons, they always delight and inspire!
Such an original basket is suitable for both birthdays and weddings. On the table of the newlyweds, it will look like bright accent against the backdrop of festive decorations.
For creativity you will need:
- satin ribbon 4 cm wide in white and red;
- wicker basket with a diameter of about 20 cm;
- several sheets of newspaper;
- gun with glue rods;
- toothpicks.
First we make roses
The first step is to twist the roses.
1. Cut the tape into segments of 1 meter.
2. We bend the edge of the tape at an acute angle.

3. We begin to twist the core of the rose, for this we make two tight turns. Periodically apply drops of glue to the base of the tape, for each turn.

The working part of the tape should not be lower than the bud itself.

5. Twisting the ribbon away from you, we form a rose flower from a satin ribbon.
It is important to observe the shape of the flower. The rose should not be convex or sunken.

6. We make the required number of roses, one scarlet for the middle, five white for the first circle and 10 scarlet for the second circle. Another white rose will be needed to decorate the handle of the basket.

7. Turn the roses over and cut off the excess edge of the tape. We burn with a lighter.

8. Glue a toothpick into each rose, except for one white flower, which is prepared for the pen.

basket decor
Now we need to prepare the basket. We fold several sheets of newspaper into a ball the size of a basket.

We form a bouquet
Let's start forming a bouquet:
1. Lubricate the inverted rose with hot glue.

2. We firmly stick a toothpick into the newspaper, press down slightly. The first scarlet rose in the center.

3. We form a circle of five white roses, “plant” them in the same way, using glue.

4. We form the second circle from scarlet roses. It is necessary to glue the edge to the basket.

5. Let's start decorating the handle. We tie the ribbon and form a bow, glue each fold of the bow.

6. Glue a white rose on the bow.
The specificity of this skill
What do you imagine when you hear or read about beautiful flowers satin ribbons? Someone represents unpretentious gerberas, collected from a crossed narrow ribbon, and someone - an imitation of live roses, which is made by hand and collected by petals. As always, the truth is somewhere nearby - few people make a completely realistic copy of fresh flowers, for this there are still artificial ready-made floristic compositions, but it’s not worth learning to make very simple daisies - you can collect them simply by inspiration.Making flowers from ribbons is an interesting process. He attracts me with the fact that despite the apparent complexity, in half an hour you will definitely get a flower. Yes, perhaps a little ridiculous (you won’t look at my first roses without pity). But - it will work. This is not knitting, for which you will kill a couple of days, and not a miniature painting, which obviously needs talent, but here it is enough to look at the master class about creating flowers from ribbons with your own hands and you will get a finished flower.
Almost all silk ribbon flowers are made in such a way that they are durable. Of course, if you plan to make just decorative bouquets, then special strength is not needed, but if you suddenly want to make a beautiful headband as a gift for your child, on which fabric flowers act as a decor, then I advise you to make every effort to ensure that the flowers do not frayed in the first couple of days.


How is it done
I will tell you several ways to make flowers. I must say right away that the methods are basic, on their basis you can make any other flowers that are visually similar to those described by me. By the way, I advise you to try to make fantasy compositions without trying to embody any living flowers - this way you can better feel the technique and its features.Preparing for production
So where do we start preparing? What is required for work? Write down:- ribbons of different widths and different colors, I prefer satin ones, they look very elegant;
- good sharp scissors (I have ordinary tailor's ones);
- needles and threads of different thickness;
- glue gun and several sticks of transparent glue;
- a pair of tweezers (those for eyebrows will do, but it's better to have a good one if you are going to be making flowers seriously).
I prefer to work at a clean table under a table lamp, and I advise you to prepare your workplace- remove all unnecessary, adjust the light.
Kanzashi
My first acquaintance with flowers took place just when I came to the kanzashi master class. This MK became my starting point, and I am grateful to the girls who, in just a few hours, taught me and a bunch of other girls how to make amazing kanzashi flowers from narrow tape, chic kanzashi from satin ribbons of greater width, and gave a deep understanding of this technique and its capabilities.What is kanzashi? This is the art of decorating hairpins, which came to us from Japan. Pieces of fabric were folded into the shape of flower petals, and amazing flowers bloomed on hairpins that could decorate any hairstyle. Now kanzashi is in vogue, so it is not surprising that many girls have mastered this technique.
To work in the kanzashi technique, in addition to the tools described earlier, you will also need a ruler, a chalk pencil for cutting (you can replace it with a simple pencil or a sharpened piece of dry soap) and a candle for singeing.
Some girls use a lighter, but I think a candle gives a more even flame, and you can fold the fabric much more accurately when your hands are free.
In total, three types of petals are used in the kanzashi technique: 
A kanzashi flower from a 5 cm wide ribbon will turn out to be medium in size - you can decorate clothes or a hairpin with it, decorate a headband or make a beautiful home decor.
How to make different petals:
And how to make kanzashi leaves:
Let's start manufacturing 
How to make a kanzashi flower from a 5 cm wide ribbon? The wider the ribbon, the larger your flower will be in diameter.
If you want to make a magnificent flower from ribbons, then I advise you to look at this MK:
And these videos show how to combine different forms petals, make double petals from a satin ribbon with your own hands, and how you can collect not only flowers, but also plants, insects and even small animals using the kanzashi technique. By the way, it is kanzashi that is suitable for making snowflakes - watch the video to make sure.
melted petals
The following method of making flowers from satin ribbons is suitable for those who want to make a large composition at once, for example, I made a basket of flowers for my mother's anniversary using this technique. However, there are some nuances:- melted petals look less neat than kanzashi, so you should not use these flowers next to a formal outfit;
- be prepared for the fact that it will not work right away;
- not every ribbon is suitable for the manufacture of these colors, it turns out only by experience.


Step-by-step instruction
- From cardboard we cut out a pattern in the shape of a plump half-heart (as in the photo below).
- We cut out the petals (you will have to tinker) - at least 6 pieces of large ones and the same number of smaller ones and even less, you can double each size.
- Each petal needs to be processed with the help of fire - the edge will gather a little, and the petal will become voluminous.
- Then the petals are collected on the central thread, arrange them symmetrically, with a slight overlap, so that the flower looks voluminous, and best of all, collect them in a checkerboard pattern (see photo below).
- A few beads are attached to the center on a string to imitate the middle.
- Your flower is ready.
simple flowers
Very simple and at the same time expressive flowers fabric can be made in just a few minutes. If you have never tried to make flowers from ribbons, then this way you will definitely succeed.How to make flowers in five minutes?
- Cut the tape - into pieces of 5-10 centimeters. You can take the same pieces, or you can use segments different lengths, then the flowers will be more natural.
- Slices are carefully melted on a candle - so as not to fray. Make sure that you do not get dark sloppy influxes.
- On the bottom, we make a free line with a strong thread (it is better to take a medium-sized needle so as not to make too large holes.
- We tighten each segment to get a petal.
- From the resulting petals we collect in color - in the middle we use small segments, closer to the edges are larger.
- Glue the middle into the center.
- You can decorate flowers with narrow white ribbons - for example, make stamens or centers.
- The collected flowers are folded into a composition and glued to the base.
A few words about embroidery
Since we are talking about crafts from ribbons, it is worth mentioning such a type of needlework as embroidery with ribbons for beginners. To be honest, before I became interested in this type of needlework, I thought that simple patterns were embroidered from a narrow satin ribbon. No matter how! Embroidery is done not only with the use of thin ribbons, very wide ones are also used - they drape beautifully and allow you to get volume.

What I like about this technique:
- it is easy to achieve the desired result thanks to beautiful materials;
- ribbon embroidery is highly valued among admirers;
- bulk embroidery is obtained very quickly.
Why are schemes good? Despite the fact that all needlewomen embroider the same pictures at first, the embroidery you make will be unique - firstly, because you will choose the colors yourself, and secondly, because ribbons are the material that needs to be draped. Well, see for yourself - there are more than five shades in each picture, and each one will have to be draped in its own way, which means that the volumetric elements will be different. Don't want to do what someone else has done before you? Embroider small flowers according to your own sketches.
Unusually delicate and airy ribbon embroidery wild flowers - I'm sure it's best gift for any holiday, especially if meadow grasses are also added to the wild flowers.
I really like the wild flowers embroidery with ribbons - the pictures are not too large, smaller than a landscape sheet, but very delicate and expressive. And for the first embroidery, I advise you to take a simple pattern and ribbons less than a centimeter.
Lessons and workshops for inspiration
How to make cute flowers from ribbons: a master class for the little ones - according to this master class, we made flowers with our daughter, she really liked it.holiday flowers from satin ribbons: a master class of medium complexity - make chic decorative compositions of flowers for the holiday, decorate your home and gifts for loved ones.
And a few more simple microns: Now you know how to make a flower from a ribbon - even for a headband, even for a dress, even for gift wrapping. Experiment with different techniques, share your results and collect whole hand-made bouquets!
Sometimes it is difficult to correctly and beautifully compose a bouquet, especially if there is no experience. In this case, the simplest basket will help solve the problem - it has always been and remains the best option arrangement of a bouquet of natural or artificial flowers. You don't have to be a florist to make an original one using a simple wicker basket and satin ribbon flowers.
I suggest you try to make such a basket with your own hands. For work, we need the following materials and tools:
Satin ribbons bright colors
Wicker basket
sharp scissors
Cloth clip
Candle or lighter
A piece of green silk or satin fabric
Needle
Green threads
A little foam rubber or cotton wool
Beautiful beads or buttons
Transparent waterproof adhesive.
First you need to make flowers, with which we will then fill the basket. We will make them from satin ribbons using the tsumami technique. Therefore, we will prepare satin ribbons five centimeters wide in different colors: pink, red, burgundy, purple, white or any other to your taste. You can make the same flowers - a basket with white or red flowers looks very interesting. The basis for flowers is sharp kanzashi petals. For each flower, you need to make seven to eight petals.

Prepared petals are glued to a circle of dense fabric. As a basis for a flower, you can take a circle cut out of a satin ribbon. The edges of the mug should be burned with the flame of a candle or lighter so that they do not crumble. A rather large drop of glue is applied to the base, then the petals are distributed on it. After the glue dries and the petals are securely fixed, you need to draw the middle of the flower. To do this, glue a beautiful large bead or button in the center of the flower. Now the flower is ready. For a basket, you need to make at least five of these flowers.

To place flowers in a basket, you need to prepare a special basis. To do this, we need a small piece of green silk fabric and a piece of cotton wool or foam rubber. From foam rubber or cotton wool we will make a ball with a diameter of 5 cm, wrap it with a cloth. We sew the edges of the fabric from below with a green thread.

We place the prepared green ball inside the basket and fix it with threads or glue. This is necessary so that the composition holds securely and does not fall apart over time.

Now that all preparations are completed, you can begin to form the composition. Flowers are arranged in random order on a green ball, which was placed in the center of a wicker basket. First, a little glue is applied to the base of the flower, and then it is placed in a basket directly on a ball of fabric and cotton wool. In this way, all the prepared flowers are placed. Transparent waterproof glue will provide reliable fixation, the composition will hold under any conditions.

Such a basket with flowers will be good gift for any celebration, be it a birthday best friend or the anniversary of a respectable person.
Wedding- a special solemn moment in everyone's life, so I want to carefully prepare and make this day unforgettable. The table of the newlyweds is necessarily decorated with all sorts of flowers. This tutorial describes how to create a basket with bright scarlet and delicate white satin ribbon roses.
To create a basket of roses you will need:
- basket with a diameter of 15 cm;
- several newspapers;
- satin ribbons 5 cm wide in white and scarlet;
- toothpicks;
- warming gun and glue rods;
- silvery petals, they are sold on high branches;
- white thin ribbon (1 cm) for braiding the handle;
- red rhinestones, two of them in the shape of hearts.
At the first stage, we start twisting roses from satin ribbons. To decorate such a small basket, you will need 7 flowers - 3 white roses and 4 scarlet ones. For each kanzashi flower exactly a meter of satin ribbon is spent, so the ribbons must be divided into meter segments.

Lay the piece of satin on a flat surface. wrong side up. Bend the edge at an angle and start twisting inward.

After two twists, glue the bottom of the tape and fix the bud.

Bend the tape constantly up, while moving your hand away from you.

Form layers of petals around the bud, every 2 cm it is necessary to apply a drop of glue and fix the tape to the previous tier.

You need to glue the layers of petals evenly, at the same distance, to get a symmetrical rose.

The edge of the tape must be glued to the back of the scarlet flower.

When all the roses are twisted, turn the flowers over.

Glue toothpicks into the center of the remaining edge of the tape.

They will act as a pedicel and fastening.

An important stage is the decoration of the basket handle. Wrap the handle with a thin tape, the distance between the tours should be about 1 cm.

At the next stage, we fold the newspapers into a tight bundle. Each layer must be crushed, and then "swaddled" in the next newspaper.

Place the paper in the basket and press down on the top so that the sheets fit snugly in the basket.

Gently stick the created roses into the layers of the newspaper, if the toothpick cannot overcome the thick paper layer, then first make holes with a thin knife.

First, decorate the middle of the basket with snow-white roses.

Then add some passion to the bouquet.

Four scarlet roses adorn the edges of the composition and should fall slightly over the edge of the basket.

When the flowers are distributed on top of the basket, insert silver petals between the extreme flowers, fix them with glue.

The edges of the roses are also glued together, otherwise they may rise, and then a gap from the newspapers will be visible.

At the last stage, decorate the handle with red rhinestones.

Two scarlet hearts are pasted on snow-white roses.

Wedding basket of roses in kanzashi technique.
A wedding basket with roses is ready to decorate a solemn feast!

Basket of satin roses for newlyweds.
exquisite basket of satin roses, decorated with rhinestones - original bouquet, which can be presented to the newlyweds. It will not wither, the buds will not crumble, since all the roses are firmly fixed, it is convenient to carry it by the handle, and if you put a fragrant pad between the roses, the bouquet will emit a pleasant aroma.
Especially for the website Lessons of needlework Olesya Anikina.