We continue to build our dollhouse.
This time Anastasia Reznikova shared how by simple means to realize the second floor of the dollhouse and, most importantly, how to climb it. This idea can also come in handy when building a veranda on the second floor. We still need glue, packing cardboard and acrylic paint.
For the construction of the second floor landing and the stairs leading to it, we need a packing corrugated cardboard, scissors, stationery knife, glue and paint.

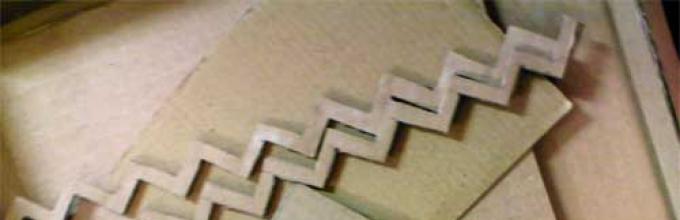
We will make the staircase from two zigzag cardboard strips. These are the guides for our staircase. The steps themselves are ordinary cardboard rectangles across the width of the stairs.


We glue the stairs with the side to one of the walls of the dollhouse in the place where you plan to climb to the second floor.

We make the platform of the second floor from a piece of cardboard and a railing, also from narrow strips of cardboard. In our version, the second floor site is planned to be hinged. Those. the second floor will only partially overlap the first.


It remains to dock our platform and stairs. We glue the platform with its ends to the walls of the dollhouse. Additionally, we install a vertical rack for reliability. We glue the stand to the side wall of the stairs.


Any child dreams of his own house, where he can create an individual atmosphere and enjoy the game. Basically, such houses are divided into two types: intended for the child himself and for dolls. Any house made of cardboard is quite simple to make, since this material is soft and practical. To make a beautiful, correct and neat design, you must adhere to the instructions for their assembly.
Little girls love to play house. Why not build a cardboard teremok for the little hostess, make for him a voluminous ladder along which the dolls could "move" across the floors, and assemble doll furniture from the same cardboard? Making crafts for children is fun and enjoyable, especially if you do it with your child. Drawings with detailed dimensions can be found in one of our videos, you can also download a scan from which the pattern can be washed, and the instructions will help you step by step through the manufacturing process.
Any child dreams of his own house, where he can create an individual atmosphere and enjoy the game
The easiest dollhouse to make is considered to be one made of cardboard.. The best material to create such structures will serve carton boxes from under household appliances or thick art cardboard. This material will allow you to create high-quality, strong structures and will not overshadow the children's gameplay.
While working on the creation of the house you will need:
- cardboard;
- a stationery knife with a new blade;
- scissors;
- glue;
- Scotch;
- decorative materials: the remains of wallpaper, linoleum, self-adhesive paper, fabric;
- paints - gouache or acrylic;
- brushes.
A small house is made according to the following instructions:
- To make a two-story house with 2 rooms on the ground floor, you need to take two boxes of the same thickness, which are connected in series with each other using glue. A smaller box is placed on a more elongated box so that their two sides form a single wall of the house.
- The elongated box that forms the first floor is divided into two parts using a cardboard rectangle that acts as a partition.
- To form a roof, you need to take a rectangle. Using a ruler and a knife, a blind cut is made in its middle. Then the rectangle is "broken" and bent by an angle. Using glue, the corner roof is attached to the upper floor of the house.
- The glued structure is placed on a large sheet of cardboard, outlined with a pencil.
- The resulting figure is cut and glued to the back of the structure, forming the back wall of the house.
- Window openings are cut on the walls.
Gallery: do-it-yourself cardboard house (25 photos)


The easiest dollhouse to make is considered to be one made of cardboard.
Then you need to move on to the decorative interior and exterior decoration of the structure.
Internal and external decoration
To make a house beautiful and interesting, you need to design it correctly. The first step is to strengthen the structure by completing the exterior decoration of the building. To do this, you can use self-adhesive paper or glue the body with plain white paper with double-sided tape. Such wall treatment will strengthen the joints of the structure and extend its durability.

To make the house beautiful and interesting, you need to design it correctly.
After that, you should go to the interior decoration:
- each room is covered with wallpaper;
- on both sides of the window, pieces of fabric are attached to simulate curtains, an openwork strip is cut out of thick paper, which plays the role of a cornice and is glued parallel to the upper side of the window;
- you can put the remains of linoleum on the floor;
- the roof is decorated with carved stripes, imitating the cause; a brush in the shape of a triangle is made in the corner part;
- inside the rooms, you can put furniture for dolls made of cardboard and decorated with the same materials at hand.
Making a dollhouse with your own hands with your child will not only allow you to immerse it in an interesting creative process, intensify his imagination, but also develop neatness and gain skills in working with cardboard, paper and glue.
Staircase with steps in the dollhouse: step by step instructions
In order for the floors in the dollhouse to be interconnected, it is necessary to make a staircase. It is very simple to do this, you just need to measure the height of the room, determine the length of the desired staircase.
In the process of making stairs you will need:
- cardboard;
- glue;
- scissors;
- ruler.

In order for the floors in the dollhouse to be interconnected, it is necessary to make a staircase
Step-by-step instruction:
- A long rectangle is cut out of cardboard, 2-4 centimeters thick. Cut a zigzag from the upper long side of the rectangle. All zigzag elements must be at an angle of 90 degrees.
- Then the second same element is made.
- The width of the stairs is determined.
- Rectangles are cut out, the length of which corresponds to the width of the staircase, and the width to the length of the side of the zigzag. The number of such rectangles is determined by the number of zigzag sides.
- Then each rectangle is glued to the side of the zigzag, fixing both main elements to each other.
- After all the rectangles are glued to the vertical and horizontal sides of the zigzag, you will get steps with an angle of 90 degrees.
Railings can be glued to the stairs if desired, but they will complicate the use of this adjacent element during the game.
DIY dollhouse (video)
How to make a cardboard house for children with your own hands?
Many children dream of their own little house in which they can retire and enjoy the game. Such an object brings a sense of coziness and comfort to the game, which is why it is popular among children. In order not to purchase expensive constructions, a toy Orphanage can be glued from ordinary cardboard.
For this it will come in handy:
- ready-made template or drawn diagram;
- stationery knife;
- ruler;
- PVA glue;
- thermal gun;
- colored paper.
The layout of the play house is assembled according to the following instructions:
- On cardboard material depicts a diagram of a house or its details.
- Then the drawn elements are cut out. If there are fold lines, draw a ruler along them so that grooves are formed. Then the sheet is folded along the grooves.
- All seams are glued. If there are partitions inside the house, they must be glued immediately with a heat gun.
- After assembling the entire structure, it should be strengthened. To do this, on each glued seam is glued paper strip... Such elements should be glued not only from the outside of the building, but also from the inside.
After the complete assembly of the house, you can proceed to decorating it. Home decoration can be done using various materials... Most often, colored paper, paints, fabric, wallpaper are used for this. It is best to put such a house in the corner of the room, since in this place its dimensions will not interfere with free movement around the room.
Scheme
The first step is to draw a diagram of the house. If you skip this step, the design may be sloppy or uneven. As a basis, you need to take a cross scan, in the center of which there will be a base - the floor, and the crosspiece itself will form the walls of the structure. If the child is large and it is necessary to make a house in his full height, it is better to depict each detail separately.

The first step is to draw a diagram of the house.
For the construction of a large orphanage can be used ready-made schemes... The simplest of these is the unfolding of a house with a corner roof. It should be enlarged to the desired size and transferred to cardboard sheets. If desired, each element of the house can be drawn separately, keeping all the proportions presented.
DIY doll house (video)
Making a house out of colored paper
Only a miniature house can be made from colored paper. This design can be used, for example, as a teahouse by placing tea bags in it.
First try:
I did it - I did it. Correctly say, "A bad head does not give rest to the legs." In my case, hands. In general, I did it, and a question from a bearded anecdote "how?" Popped up in my head, only here how to play, and then ... :-) We were distracted. Okay, let's write it off for training.
I approached the second attempt more thoroughly and decided to make a 3D project. Stopped on the products of the Corporation of Good Google called SketchUp. True, before designing the stairs, we had to design the house itself: 
Well, here is actually just such a ladder (in the amount of two pieces) I wanted to make: 
Having developed the ladder and received the drawings, he proceeded to the second attempt. Translated through carbon paper onto plywood: 
Sawed: 
To be honest, it is very tedious to cut it all out with a hacksaw. I realized that without additional tools not enough. A simple solution is to use a mini-machine. Googling, I found several options. I liked these models: W50000, W70000 despite the fact that I need a circular saw more than a jigsaw. I think these machines can be found cheaper where the thread is directly from the Chinese. But since everything depends on money, or rather, in their absence, I began to look for another, cheaper option. After a while, I realized that maybe a mini drill could help me. I chose between a dremel and a hummer. He stopped at the Chinese, since he is cheaper and there were more accessories for him (at the moment he used no more than 4 nozzles out of more than a hundred). In the end, I opted for the Hammer MD170A model (Here's a link to the 220-volt store: http://www.220-volt.ru/catalog-43265/ because the office site www.hammer-pt.ru lies). With the help of the saw blades included in the kit, I cut the details.
Started gluing: 
Yeah ... the second attempt also failed. It turned out to be a frank parasha: 

The only way out is to cut out roughly, and use grinding discs to "finish" the details. There are many attachments, but the grinding discs I needed were not available. Again I had to use my brains. A mathematical mindset and engineering education suggested a solution - to make the necessary grinding discs from sandpaper :-) Isn't it simple? But another problem arises - the grinding disc turns out to be "soft" and it is not very convenient for them to work. The solution is to use a metal saw blade for the "backing". So here we go, using the aforementioned saw blade as a template, draw the sandpaper: 
Mode for neat squares, tk. it’s very inconvenient to cut it right away - after all, not just paper, but sandpaper: 
Remembering Kindergarten, middle group: 
Grinding disc in holder: 
Actually in working order: 
Let's proceed to the third attempt. To begin with, I decided to accurately outline the details: 

After rough sawing, final turning of the first gluing points, after applying the glue and drying, the final turning is obtained: 


So, the bottom half of the ladder is ready. We start making the top. We cut out roughly the details: 
We glue the frame of the upper half: 
Well, by analogy with the lower part, we start the conveyor:


After the final grinding, we glue the resulting parts: 
Lesson for beginners.
Hover over the image to turn on the light. This is how a lit dollhouse wins.
Have you played? Now get to work!
Level: Intermediate
You will need:
- battery box
- small bulb with socket
- microswitch
- wiring
- AA or AAA finger batteries
And where to get all this stuff? In a chain of stores "Chip & Dip".
How to choose parts.
Let's say right away: this tutorial is for beginners, for girls who are not versed in these "electrical wisdom", for pure humanities. Those who have already done lighting in a dollhouse and are thinking about how they can improve something will not find anything interesting here.
What kind of bulbs do you need? Don't get them out of your flashlights, they are too big for doll houses. Here, for comparison, a light bulb from a flashlight and the one we need. See how much less?
Of course, it needs a special cartridge. If you do not know how to solder, then you need a socket with lugs, into which you then insert the wires and twist them. In the store, immediately find out if the bulb exactly fits this cartridge, there are several types of them.
Boxes for AA batteries. They are available for 1, 2, 3, 4 and 8 batteries. We will use AA batteries (they are larger) or AAA (they are smaller). And how many batteries you need depends on how many volts (V) the bulb is.
And now a little educational program.
Without these volt-watts, all the same, nowhere. But we will try to explain everything as simply as possible. It is important to understand that voltages(denoted by the letter V) and wattage(denoted by the letter W) - not the same.
The number of watts is the power, that is, how brightly the light bulb will shine. And volts are voltage, that is, how many batteries you need. For finger-type batteries, either AA or AAA, the voltage (voltage) is 1.5 V. So that you do not get confused, we give this list of how many batteries for which light bulb you need.
- Three volt light bulb - 2 batteries
- Six volt light bulb - 4 batteries
- Light bulb twelve volts - 8 batteries
From this it can be seen that the total amount of volts in the batteries must correspond to the number of volts in the bulb.
Now you know which box you need: for 2, 4 or 8 batteries. We clarify that the box is needed with wires coming out of it.
Didn't you find, say, a box for 8 batteries? It's OK. You can buy for 2 or for 4 and chain them. How? There are 2 wires coming out of the box: one red (this + ), another black (this - ). We clean the ends of the wires and interweave, the red wires of one box with black from the other. We wrap the junction with electrical tape. This is equivalent to a single box.
System assembly.
Postings
We insert one wire, still red or black, coming from the box into the eyelet of the bulb holder, twist it well, close it with electrical tape. Cut off a piece of suitable wiring, insert it into the other eyelet of the bulb holder, fix it in the same way. You can also use a telephone, but, of course, it is advisable to find the wiring as thin as possible.
Microswitch.
Microswitches are sold there. For example, they can look like this.
As a rule, microswitches have three outputs. Therefore, we are looking for the necessary two empirically.
We insert the batteries into the sockets, screw the light bulb into the socket, take two wires: one coming from the box, the other from the light bulb. We put the switch in the "on" position and apply the bare ends of the wires to the different outputs in turn.
The light is on, which means we have found the required two outputs. We pass the wiring, twist, insulate.
It often happens that the switches and sockets of the light bulb do not have eyelets, but pins, you cannot thread the wiring into them. And you can wait for the right ones to be delivered to the store for ages. But here, too, there is a way out. Gently bend the pin into a loop with thin-nose pliers - here is the eyelet!
Location and fastening
Hooray, in your dollhouse or roombox, the lights are on, on and off! But how and where to fix the box, switch, where to hide the wiring?
This is important: you need to immediately decide, even at the stage of planning a dollhouse or roombox, with electricity or not... Where will all this "electrical facilities" be? It is incredibly difficult or even impossible to insert an electrician into a ready-made dollhouse when it was not originally provided for.
I do not recommend placing the battery box in a closet, under a table, under a bed. And not only because batteries can leak and ruin your dollhouse or roombox. Think about how you will change them. They must be easily accessible.
You can put the box on the back of the roombox or attach a separate "attic" for them.
It is necessary to fasten the box very firmly... After all, this is not a decorative element. Batteries are inserted and pulled out with a certain effort.
Can be screwed on with self-tapping screws. The boxes have holes for them. That, by the way, is also why you should not make a base for a roombox or walls of a dollhouse made of cardboard. The screws will not hold in it.
Special mention should be made of the switch attachment. He, too, must hold on very firmly, because he will be used! And its location should be convenient and accessible. Not inside a dollhouse, roombox, but the current, for example. The way of fixing the switch depends on its type: with holes for self-tapping screws, with pins, etc.
Well, you need to hide the wiring as much as possible.
Instead of an afterword
What is described in this lesson is the very, very beginning, the first step. Are there even smaller bulbs, is it possible to use diodes, or maybe you want to master soldering (this is better than twisting wires) - all this will be described in other lessons. In the meantime, you will gain experience by making your first dollhouse or roombox with lighting.
Hello dear friends! A ladder is still a very necessary thing in the house, even if the house is a dollhouse. Climbing up to the top floor of a bunk bed or hammering a nail into a wall - no stairs without a ladder.
This "solid" attached stairs - made of paper, but with a walnut texture. The ladder has been sized just such that it can be used as an alternative to the ladder made of ice cream sticks for the doll's bunk bed (by Timofeevna). However, I think it will be useful not only for dolls and babies. In the toy world of my five-year-old son, the earthworm Uncle Roots, Cheburashka and crocodile Gena enjoy using stairs made of paper and cardboard :)
Well, now about how this is done paper miniature... Yes, in general, nothing complicated, everything is as usual: templates, sweeps, cut, bend, glue ...
Download templates here:
Good textures of wood (and not only wood) can be easily found on the net. Download the texture you like in a graphics editor (for example, Adobe photoshop or Photoshop Elements) overlay it on templates - the paper ladder becomes "wooden". However, you can paint it as you like, and as required by the design of the doll's interior)
We will need:
- a sheet of paper with a density of 120-160 g / m2 (for greater structural strength for vertical posts (or, as they are also called, bowstrings), you can use more thick paper but for steps it is better to use paper in the specified range; I used 120 g / m² Lomond photo paper)
- ruler,
- stationery knife,
- a breadboard knife (or a knife for artistic cutting),
- a tool for scoring (if there is no special one, then - a needle, not a writing rod ballpoint pen etc.),
 (oh, out of habit there were scissors on the table, but later they were not useful to me)
as well as paper glue (eg glue stick) and Super-Moment glue gel. As for the glue, options are possible - you will figure it out in practice.

I'm not talking about a substrate for cutting paper and cardboard - it is clear that the tables must be protected :). A toothpick is also useful.
So, we print out the sweeps and cut them out. I recommend using a stationery knife and a ruler, as well as a breadboard knife - for cutting small parts by hand (scissors are poorly suited for this purpose). And then we bend (push through the fold lines, they are obvious here) the sweep of the bowstrings.
With the help of a breadboard knife, we make cuts along the marks in the places of future holes for the steps.

We make holes with a toothpick on each string.

We glue the bowstrings so that the edge that is closer to the holes is inside.


Then we glue the end flaps, tucking the tips inward.

Now we make the steps. First we wind the cut rectangles on a toothpick, placing it along the short side,

and then, taking out the toothpick, we again twist the pieces of paper, already tighter, so that the diameter of the tube is about 3 mm. Glue the edges of the tubes.


After all the tubes are ready, drop the Super-Moment gel onto the end of the tube and insert it into the hole of the bowstring.


And we do the same with the rest of the steps.

Then again we drip glue onto the ends of the steps and put on the second string.

That's it, the paper ladder is ready.
And our invited master, meanwhile, finished hanging the picture. In my opinion, he was pleased with the stairs :)

Thank you for attention! And see you again in KARTONKINO!