I want to show the result of the work. The idea with a spider interested me, it became interesting for me to try my hand.
We need:
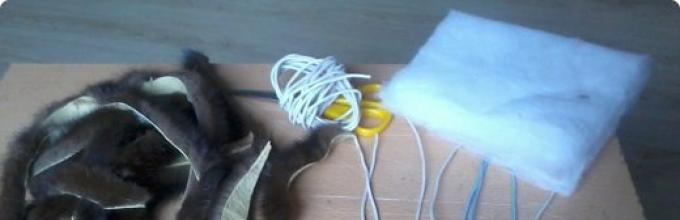
wire, old mink hat, glue moment, stationery knife, wire cutters, I have pliers, synthetic winterizer, cardboard, 2 beads. 
We cut the wire, 4 pieces of 16 cm, 4 pieces of 12 cm, and 4 pieces of 4 cm (2 on the jaw and 2 on the connection of the back to the head). These are our legs and jaws. 
From the skin with a clerical knife, we cut strips 1 cm wide, and make sure that the incision goes in the direction of the pile growth, we only cut the skin along a ruler so as not to damage the fur. 
We spread the strips with glue and glue the wire into it. 
We just bend the fur in half and glue it, as we do with all wire blanks. The paws are ready. 
We make 2 templates on cardboard (I got these sizes) and transfer them to the fur. Do not forget that the pile lies on the back from the neck to the back, and on the head - from the neck to the mouth. I cut 2 back and 1 fur head and 1 leather head. 
We fold the blanks with the fur inside and sew over the edge, leaving the neck not sewn up, make sure that the fur is all tucked in one direction. 
We turn it over the neck. Here I have a blank of the head, from the side of the abdomen - the skin. 
Head from above. 
We fill with synthetic winterizer not very tightly and sew it up with a blind seam. 
We fold the details of the back with the fur inward, make sure that the pile is directed to one side. 
We sew in the same way as the head, leaving a hole on the neck, turn it out, fill it with padding polyester, sew up the hole. 
We connect the head and back. I inserted 2 pieces of wire into the seam, first into the back, glued it with hot glue, and then glued it into my head, and then stitched it together for reliability. 
This is from the side of the abdomen. The wire was inserted in order to make a bend between the head and the back. 
We spread the legs - long at the edges, short in the center. 
Trying on the body and legs, do not forget that the legs are attached to the head, the back remains free. First I sewed the paws to the leather side of the head, created a bend, and then parted the fur and glued it with hot glue. 
Sew on the eyes of the bead. In fact, spiders have 8 eyes, but small ones, mine have 2 large ones, because small minks will not be visible in the pile. 
And as a result, he turned out to be such a handsome man, half of the old mink hat went to him. If measured diagonally, it is approximately 30 cm in size. 
And here he perched on the windshield of the car. 
Well, one more time in the palm of my hand, it’s even a pity to give it back! Probably I'll do the same for myself. True, there is an idea to try hanorika fur. 
I hope you enjoyed my MK. Try to make yourself the same beauty! By the way, I made it in just 3 hours.
We need:
A piece of fur
4 pieces of wire 30 cm each
Black threads
Glue "Moment"
Small pliers
A bit of holofiber
2 black beads for eyes

We take 4 pieces of wire 30 cm each, bend it in half and twist the feet at the ends at the ends.

This is how a pair of legs should stand.

When all the blanks are bent, we fasten them together with a small piece of wire.

Then we start wrapping each foot with black threads, winding it from top to bottom and back, in two layers.

There is no need to break the thread, so we continue to wrap all the legs.

When the winding is finished, we push through the middle, in order to sew the little body there.

We cut out two oval blanks for the calf - 10 cm long, 6 cm wide.

We sew with a blind seam to the middle, then turn it out - we do not break the thread, fill the stitched part with holofiber.

We put the blank on the spider's skeleton and begin to sew in a circle with a blind seam, dividing the legs, without sewing it up to the end - we fill it with holofiber.

It should look like this.

Now it's up to the head, what it will be, large or small, it's up to you to decide - I have circles with a diameter of 3 cm.

We also sew 2/3 of the heads, then turn them out, fill them with holofiber and finish with a blind seam.

Already on the finished head we sew eyes from black beads, after placing them on two small white leather circles.

I thought he was missing a tongue and cut it out of felt.

This fun workshop will help you transform a fluffy pipe cleaning stick into a decorative element.
A chenille wire spider made with your own hands is suitable for interior decoration and children's games. A cute spider can be used to decorate curtains or a picture frame, lampshade or vase. Spiders are believed to bring happiness and well-being to your home. This soft toy will appeal to kids, because the insect knows how to bend its legs, it is difficult to break and ruin it. The craft is designed for adults and children.
A simple set of materials and tools
To make a spider from fluffy wire, prepare a simple set:
- black chenille wire (4 pcs.);
- red chenille (1 pc.);
- scissors;
- felt-tip pen.

Flexible fluffy sticks are pleasant to work with and are ideal for making a spider. If you have never heard of chenille, we recommend this type of needlework and the peculiarities of creating crafts.
Step-by-step manufacturing technique
Take a piece of black chenille and a felt-tip pen that will help create the body of the spider. Clamp one end of the wire.

Hold it with your fingers, and with the other hand begin to wrap the fluffy material tightly around the tool.

Press the rolled chenille on both sides and carefully remove it from the felt-tip pen.

For the spider's legs, take two pieces of black.

Fold in half.

Cut in half at the fold.

Once again, bend all four pieces in half at the same time.

The fold becomes a mark where you need to make two turns for stapling.

Spread all the legs of the spider in different directions.

Cut 2 cm from the red wire.

Take the spring by the two side coils. Press them together.

Pass a piece of red chenille through the opening of the two rings. Connect the two ends together and twist twice. Cut off the excess part with scissors.

Scroll the red part inward.

Place the spiral with the red spot in the middle. Attach two rings to it on the sides.

Press down on the last ring.

Place the wire in the center of the garment between the paws. Leave about 1 cm at the top. Scroll the lower part to the back and let it come out between two pairs of right paws.

Bring the end horizontally opposite, fading into the background. On the underside of the craft, return the wire to the starting point.

Cut off a piece of material.

Secure the end of the new chenille wire under the first leg on the left side of the spider. Go to the right. Scroll twice and move to the lower torso, where you should scroll the material between the last two legs.

On the back side, twist the two ends twice and remove the excess length.

Thread the remaining piece through the hole.

Place this piece at the bottom of the torso. Scroll the top from the right side between the first paw and the horn.

Bring down and place the wire between the red spot. Bend up and move it to the second horn. Fix there. Do the same for the other end.


Bend the legs of the spider up.

Bend the lower ends of the paws again by 1 cm, and remove the excess length with scissors.

A funny chenille spider is ready - you will make such a handsome man with your own hands, following our master class!


Be sure to check out ours, so as not to let boredom settle in the house! We are waiting for you on the site "Women's Hobbies" tomorrow.
Are you weak ?! The spider is hairy. Master Class.I want to show the result of the work. The idea with a spider interested me, it became interesting for me to try my hand.
We need:
wire, old mink hat, glue moment, stationery knife, wire cutters, I have pliers, synthetic winterizer, cardboard, 2 beads. 
We cut the wire, 4 pieces of 16 cm, 4 pieces of 12 cm, and 4 pieces of 4 cm (2 on the jaw and 2 on the connection of the back to the head). These are our legs and jaws. 
From the skin with a clerical knife, we cut strips 1 cm wide, and make sure that the incision goes in the direction of the pile growth, we only cut the skin along a ruler so as not to damage the fur. 
We spread the strips with glue and glue the wire into it. 
We just bend the fur in half and glue it, as we do with all wire blanks. The paws are ready.
We make 2 templates on cardboard (I got these sizes) and transfer them to the fur. Do not forget that the pile lies on the back from the neck to the back, and on the head - from the neck to the mouth. I cut 2 back and 1 fur head and 1 leather head.
We fold the blanks with the fur inside and sew over the edge, leaving the neck not sewn up, make sure that the fur is all tucked in one direction.
We turn it over the neck. Here I have a blank of the head, from the side of the abdomen - the skin.
Head from above. 
We fill with synthetic winterizer not very tightly and sew it up with a blind seam. 
We fold the details of the back with the fur inward, make sure that the pile is directed to one side. 
We sew in the same way as the head, leaving a hole on the neck, turn it out, fill it with padding polyester, sew up the hole.
We connect the head and back. I inserted 2 pieces of wire into the seam, first into the back, glued it with hot glue, and then glued it into my head, and then stitched it together for reliability. 
This is from the side of the abdomen. The wire was inserted in order to make a bend between the head and the back. 
We spread the legs - long at the edges, short in the center. 
Trying on the body and legs, do not forget that the legs are attached to the head, the back remains free. First I sewed the paws to the leather side of the head, created a bend, and then parted the fur and glued it with hot glue. 
Sew on the eyes of the bead. In fact, spiders have 8 eyes, but small ones, mine have 2 large ones, because small minks will not be visible in the pile.
And as a result, he turned out to be such a handsome man, half of the old mink hat went to him. If measured diagonally, it is approximately 30 cm in size. 
And here he perched on the windshield of the car.
Well, one more time in the palm of my hand, it’s even a pity to give it back! Probably I'll do the same for myself. True, there is an idea to try hanorika fur.
I hope you enjoyed my MK. Try to make yourself the same beauty! By the way, I made it in just 3 hours.
The Craftsman's Secret pays a lot of attention to the recycling of various and seemingly waste and useless materials. Let's make a spider toy for Halloween. The spider will be made from materials at hand - a metal bottle cap and pieces of wire. The toy is simple and will not take much time to repeat.
How to make a DIY spider toy
To assemble a spider for Halloween, you will need the actual bottle cap, thin copper or steel wire with a diameter of 0.3 - 0.5 mm. If the wire is soft, then you can immediately fix the pieces of wire with hot glue under the lid and then bend them into the desired shape. If the wire is not very soft, then it is better to bend the legs immediately and glue them ready-made. Legs can be short or long, see photo.
For greater expressiveness, eyes are glued to the toy (see video), although the spider has 8 eyes), but two are enough. With eyes, the spider will fulfill its role when holding pranks, for example, at some lesson on September 1 or Halloween.
SpiderHow to make a movable spider toy
Robot circuitAlthough the dimensions of the toy are small, the availability of some components will make the toy mobile. To do this, you need a battery compartment from a gas lighter with a flashlight, a micro switch and a vibrating alert from a cell phone, exactly the same as in the previously published one. The motion block of a homemade toy is assembled according to the diagram shown in the photo and glued under the lid with hot melt glue. The micro switch will have an additional decorative function.
Tests of the spider toy have shown that the structure works - the robot is moving. The nature of the movement depends on the position of the vibration motor relative to the cover and the supply voltage. A more powerful battery from a 12-volt car alarm key fob was also used for testing. The spider robot showed an amazing speed for a vibrating walker of this design.
Spider Parts Motion Block