Gel polish has revolutionized the beauty industry long ago. This unique material combines the best qualities of varnish and gel. Simple brushing technology combines with the strength and durability of the resin, while the basecoat will provide evenness and good adhesion. But not many people know how to properly apply shellac, so first you need to familiarize yourself with all the rules of this procedure.
Any salon master will make an excellent manicure with shellac without difficulty. But what if you don't have enough funds for a permanent visit to the salon, but you always want beautiful nails? The solution is to use a gel polish manicure at home.
At first glance it seems that salon procedure much cheaper than purchasing the necessary materials and tools, but this is not the case. The coating lasts an average of two weeks, the consumption of the bottle is very small, so a manicure at home will pay off after two or three uses.
There are, of course, other options to make your nails beautiful, for example, four hours to do extensions that are harmful to nails, or paint ordinary varnish redoing it every day. With gel polish, everything is much easier and faster.
What you need for a shellac manicure at home
Choosing a shellac coating, a fashionista gets a two-week manicure in one hour, which does not lose its gloss, does not chip or crack. But such a result is possible only if you know all the subtleties of application. Otherwise, the finish of the socks will come in a few days.
To make the pens beautiful, you need to stock up on time, patience and the necessary materials:
- File with abrasiveness 230 grit
- File for natural nails
- Polishing Buff
- Degreaser
- Lint-free wipes
- Cuticle remover
- Pusher or orange stick
- Primer
- Bonder
- Basic coverage
- Pigmented gel polish
- Finishing coat
- Dispersion Remover
- Cuticle oil
- UV or LED lamp
So that the manicure at home does not disappoint, you need to pay attention to the base and top coat. It is best to choose proven, well-known companies, since in pursuit of a profit, you can stumble upon low-quality material. The consequences of such savings can be not only in a short-lived manicure, but also in harm to marigolds with shellac. The finish and base must be of a uniform consistency, free of lumps and foreign matter. When buying, be sure to check the expiration date of the material.
This is necessary for the nail plate to rest and recover. During this period, it is better at home to influence it with various strengthening agents.
To properly remove a manicure at home, you need a gel polish remover and sponges on foil. To save money at home, you can take ordinary cotton pads and food foil. The top for nails should be cut off before removing, so the coating will go off faster.
Secrets of applying shellac at home


A trip to the salon pleases any female person. Everyone will pleasantly relax in the hands of the master, and trust his experience. This is often relatively expensive, given that this procedure needs to be done twice a month. Unfortunately, not everyone can afford it, some do not have enough finances, some do not have time. The best solution can be a manicure at home, the main thing is to know how to go through these stages correctly.
After preparing the instruments, there is a very important point preparation of hands and nails. This stage determines how long the coating will not peel off:
- The first thing to do is to clean the old coating off your nails, even if it's clear polish.
It is best to do a cleansing manicure with soaking a few days before applying shellac.
- You can also remove the cuticle in advance at home using the circumcision method. This will allow you to save at home on a special tool that softens the cuticle.
- If such a product is already available, you need to apply it to the cuticle area, smoothing with an orange stick, and leave for a few minutes to soften.
It is important to remove all dead tissue from the marigold, otherwise early detachments cannot be avoided.
- There is no need to apply various oils, masks and other products before applying gel polish, the surface of the nail must be absolutely clean and dry
- Next, you need to cut off the shiny layer of the natural nail plate with an abrasive file, and grind it with a buff.
In order not to harm the nails in vain, you need to read the instructions for shellac, since some brands do not need to wash down and sanding.
- Remove the resulting dust with a soft brush, degreaser or cotton swab moistened with water. Be sure to wait until dry
- If your nails are naturally wet, or if your hands were exposed to water prior to application, it is best to use a dehydrant. It deeply dehydrates the surface. But if everything is fine with the nail plate, you can do without it.
Further, at home, many make the mistake of skipping the application of the primer and bonder, or interchanging them. Of course, at home it is difficult to do everything correctly, but, nevertheless, you need to try to do it. Primer is applied first. It protects the natural nail plate from harmful effects and pigmentation, removes moisture and degreases. It dries in a couple of minutes in the air. When using a primer, you do not need to use a degreaser.
After the primer, just before painting the base coat for nails, you need to cover the surface with a bonder. It serves for better adhesion of surfaces. Of course, at home it is not always possible to use it, so you can only do with the base, but the wearing period of such a manicure will not be so long. After careful preparation, you can start applying the gel coatings. This technique is simple:
- The base coat is applied in a very thin layer. It evens out the nail plate and promotes adhesion.
If you paint with too thick a layer, then it may simply not dry out under the lamp.
There will also be problems when removing the manicure, since it will take more time to destroy the layer, therefore, there will be more harm from remover
- Colored shellac also needs to be painted thinly, otherwise the coating will not only not dry out, but will shrink and bubble. Usually, for brightness and good staining, it is simply applied in a couple of layers, each polymerizing. In this case, you do not need to remove the sticky layer, it serves as an additional adhesion
- The finish can be painted with a thicker layer than the first two. The top coat will serve as a shield throughout the wear of the cover. It will protect against tarnishing, scratches and minor damage. Despite the fact that this is the most durable layer, you should not once again check the finish for durability by picking something or using your nails as openers.
It takes a couple of minutes to dry each layer in a UV lamp, and 30-40 seconds in an LED. Upon completion of the drying of the last layer, a dispersion is formed, which is removed with a varnish remover, a special liquid or a degreaser. After removing the sticky layer, the finish will shine with gloss, which means the manicure is ready.
Before starting a manicure, you need to find out the nuances of work. Even self-taught beginners should know some of the subtleties that will help to make a manicure correctly. After all, everyone knows that craftsmanship lies in the details.
- Be sure to apply moisturizing oil to the skin around your nails and cuticles. At home, you can use ordinary vegetable oil.
- If at home, in the process of applying a layer, a substance gets on the skin, you need to carefully remove it. To avoid such troubles, you need to paint the nail, stepping back one millimeter from the skin.
- When lubricating, you can twist your finger to flatten the gel. As a last resort, you can remove the uncured coating with a lint-free cloth and degreaser.
- After preparatory phase do not touch your nails with your fingers, otherwise sebum will return to the surface
- When applying each layer, you need to brush along the edge of the marigold, and a little from the bottom, especially if this is the finish.
Having familiarized yourself with the basics of applying shellac, you can safely start practice. After correct application manicure can become not only a visual complement to the image, but also a source of pride. This coating will surely appeal to any fashionista, and will take possession of a worthy place on the dressing table.

Currently do stylish manicure at home is not difficult. The stores offer a large assortment of special tools for performing manicure: varnishes, gel coatings, stencils, etc. Until recently, home manicure was distinguished by its fragility, the reason for this was the poor durability of the varnish. But now everything has changed, it has become public gel polish, or shellac. Main feature of this material is that it stays on the nails for more than two weeks.
What is gel polish in manicure
The procedure for performing a manicure using gel polish is offered in almost every beauty salon. There are also a huge number of home-based manicure specialists. Recently, many girls began to buy all the necessary equipment for performing a manicure using a gel coating and, accordingly, do it at home. But nevertheless, when already everything necessary materials purchased, the question arises: "How to do a manicure?" We will answer this question by talking in detail about the technology for the correct application of gel polish at home. Before you start creating a manicure, you need to understand what a gel polish (shellac) nail polish is. The gel polish itself is a porous polymer that allows air to pass through. It has a number of advantages:
- It lasts up to 4 weeks, which saves time on manicure, because even the most good varnish does not last more than 5 days.
- It does not require certain skills, it is applied quite simply.
- Variety of color options. Every girl can choose a gel according to her mood.
- Gel polish perfectly evens the surface of the nail plate.
- Does not spoil the structure of the nail itself.
However, such a manicure also has its drawbacks, which, on the whole, do not spoil the overall picture of its merits. For instance:
- The high cost of the procedure, especially if you are doing a manicure in a salon near good master... Coating with gel polish yourself at home also requires the cost of tools and materials (UV lamp, special acetone-containing liquids, etc.)
- Wearing a manicure using shellac for a long time is harmful. Therefore, after 4-5 times of application, the nails must be given time to rest and recover.
- Difficulty in removing gel polish. Regular nail polish remover is not suitable for this. It is necessary to use only acetone-containing liquids and spend a sufficient amount of time on the procedure for removing the gel.
What is needed to create a manicure
To make a durable, high-quality shellac manicure, you must have a certain set of tools and materials. Before coating your nails with shellac, they must be processed well, for this you will need the following tools:
- . They are used to process the free edge of nails and give them the required shape.
- . It is necessary to get rid of the regrown skin at the base of the nails.
- . It is used for polishing the surface of the nail plate, as well as for removing the keratin layer.
- . Used to align the free edge of the nail plate.
- . Used to remove excess cuticles.
- . With their help, you can easily lift and move the cuticle.
After processing the nails with the above set of tools, you will need to directly perform the manicure the following materials: bonds, (acidic, acid-free), dehydrators. All these funds are necessary in order to degrease and remove excess moisture from the nail plate. They also provide better adhesion to the gel-coated nail.
- ... It is used to disinfect nails and prevent the appearance of various fungal diseases.
- . Designed to level the surface of the nail plate, protects against the penetration of gel polish into the structure of the nail, provides good adhesion to artificial materials.
- . It is used directly to create colored manicure.
- . The topcoat, used to fix the colored coating, ensures the durability of the manicure, preventing it from damage and chips.
And the main important tool, without which it is impossible to create a high-quality manicure using shellac, is. Used to polymerize (dry) gel coat. The quality and power of such a lamp will determine how well the gel polish dries and, accordingly, the durability of your manicure. For home use, a 36 watt lamp is perfect.
UV lamp for nail drying
How is a manicure done with gel polish?
The technology for performing the work includes several points:
- To begin with, it is necessary, to soften it, you can first use warm baths. Then it is necessary to give the nails the desired shape, the one that the girl considers the most harmonious.

Stage 1 - Soften the cuticle
- Then take a buff and grind the nail plate, carefully working it out near the base of the nail and at the edge. Remove excess particles under the nails. This procedure will subsequently help the gel polish better "adhere" to the nail.

Stage 2 - Grinding the plate
Important! We do not process natural nail file, even a fine abrasive file.
- Wipe the surface of the nail plate with a cotton pad moistened with degreasing agent.

Stage 3 - Degrease the surface of the nail
- Base application (gel polish base). It is important not to overdo it with quantity, that is, you need to cover the nail plate with a thin layer, giving Special attention edges of the nail, which will provide more long term preservation of manicure in a presentable form. Then place nails under UV or Led - lamp for 30-60 seconds.

Step 4 - Apply a base coat to the nail
Important! By overexposing the nail, you can create a fragile coating that will collapse after 2 days.
- Applying gel polish of the desired color. The coating layer should be thin. If the gel gets on the cuticle, then you need to use an orange stick to remove it. Gently distributing the material over the nail, the girl can send it under the lamp for 1-2 minutes.

Stage 5 - Apply the first thin layer of gel polish

It is important to know how to apply gel polish correctly. Apply as shown in the picture. In the center, at the base of the nail, put a point of varnish, then with a sharp but neat movement, stretch it to the free edge of the nail plate, then brush along the sides of the nail in the same direction (from top to bottom). Next, we carefully pass the brush along the free edge, sealing it (this will extend the period of wearing the manicure). So, the nail is completely painted over.
- Applying another layer of gel polish, but a little thicker. This will give the manicure more saturation, make the color deeper. Then, similar to the first layer, it must be polymerized under an ultraviolet lamp.

Stage 6 - Apply the second coat of gel polish
- Using a top involves applying the product over the gel. Place your nails in the lamp for 40-60 seconds. Its main purpose is to create a protective layer, prevent the appearance of chips, in addition, the top makes the manicure glossy, neat, more beautiful.

Stage 7 - Apply the top coat
- A repetition of the earlier action already taken: treating the nail with a degreasing liquid. It is performed in order to remove the sticky layer.

Stage 8 - Remove the sticky layer with a cotton pad
- At the end of the procedure, it is advisable to soften the skin at the base of the nail using cuticle oil.
Possible errors when applying gel polish
Coating nails with gel polish is famous for its strength and durability, in theory this is true if you know all the subtleties of applying gel polish. However, in practice, due to a lack of knowledge in this area, girls, when doing a manicure at home, make a number of mistakes that can subsequently shorten the period of wearing a manicure, lead to cracks and chips in the coating. To avoid these unpleasant consequences, we will tell you about the mistakes that should not be made when applying shellac:
- Before processing the cuticle, some masters soak their nails with a bath, so it is important not to overdo it here, otherwise this can lead to excessive moisture in the nail plate, and you will have to resort to the help of a dehydrator.
- If the cuticle is poorly treated and it is not enough to cleanse the nail from pterygium well, then air can get under the gel polish, which will further lead to peeling of the artificial coating.
- If it is not enough to sand the nail plate well before applying shellac, especially in the cuticle area and the free edge, this can also lead to premature peeling of the varnish.
- Insufficient degreasing of the nail plate with the help of special tools also shortens the manicure wear period.
- A disdainful attitude to the treatment of the end and sides of the nail with special means (primer, ultrabond), which ensure good adhesion of the gel coating to the nail plate.
- Application of too thick gel polish. Each layer should be thin to avoid insufficient drying.
- It is also important to qualitatively, with each subsequent layer, seal the cut (butt) of the nail. This way the manicure will last longer.
- If your nails are thin and often break, then it is better not to neglect the use of strengthening gel and alignment of the nail plate with a base. It is better to use a soluble gel to avoid filing when removing the manicure.
- It is very important to take seriously the choice of such tools as base and top, because they are responsible for the quality of your manicure and ensure its durability. In no case should you save on these materials.
- The use of single phase coatings is also undesirable. Use three-phase gel polishes, then it will be much easier to avoid premature peeling and chips.
- Avoid using gel polishes that can only be removed by cutting. This procedure can often threaten to damage the nail plate. Use coatings that require soaking.
If you follow these simple rules for applying shellac, you can delight yourself and those around you with your beautiful nails for much longer.
Is it possible to remove gel nail polish at home
Nails coated with gel polish do not require any particular care or maintenance rules. However, getting rid of "overgrown" manicure is more difficult than getting rid of regular varnish. In a specialized cosmetic store, you need to purchase a gel polish remover (Shellac).

Removing gel polish from nails at home
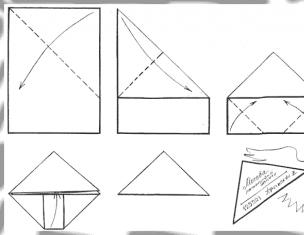
So, they need to moisten the cut cotton pads (Fig. 2), attach them to the nail plate and wrap each nail with foil so that the product does not evaporate (Fig. 3). After waiting about 20 minutes, remove the foil and cotton pads, the gel will come off along with them (Fig. 4), its remnants can be removed with an orange stick and sawing off with a sanding file (Fig. 5).
For more information about removing gel polish, including with an apparatus, you can read the article:
Using gel polish in a manicure is the smartest decision. In order for it to please you for a long time, it is necessary to use rubber gloves for prolonged contact with water and household chemicals.
Video: Technique for applying gel polish at home
Have shared
Every woman wants her nails to look well-groomed. However, it is not always possible to keep the manicure perfect. If not at work, then in everyday life the applied varnish will necessarily be exposed to external influences: cleaning, cooking, washing dishes, etc. As a result, the manicure deteriorates, and it has to be done again and again. But not every woman can afford it. Shellac in such cases is just a godsend.
Shellac is a mixture of gel and nail polish. This hybrid was created by the American manufacturer CND. Today the name "shellac" has become a household name. Many masters call gel varnishes from other manufacturers shellac. However, at present, a complete analogue of Shellac has not appeared. This gel polish does not require additional polishing of the nail plate before manicure, and also does not need to apply a primer (a special liquid that creates a reliable adhesion between the nail and the coating).
Shellac CND is odorless. The labeling on the package "3 free" indicates that the product is hypoallergenic.
The shellac coating stays on the nails of the hands for 2 weeks, and on the legs for 4–5 weeks. After that, the gel polish should be removed, since it loses its "marketable" appearance. In addition, the nails grow back over this period and the coating margin becomes too obvious.
It should be noted that Shellac CND is removed quite easily (unlike many other gel polishes).
What is needed for a shellac manicure
The number of women who want to independently use gel polish for manicure at home is increasing every year. This is understandable. Firstly, there is no particular difficulty in applying the coating to the nails. And secondly, there are significant savings in time and money.
But before starting a manicure with shellac, you need to prepare the following tools and materials:
- a set for manicure (a 220–240 grit abrasive nail file, an orange tree stick, tweezers);
- ultraviolet lamp with a power of 36 watts;
- lint-free napkins;
- cuticle remover cream (CND Cuticle Eraser);
- liquid for degreasing and disinfecting nails before coating (CND Scrub Fresh);
- base base (Shellac Base Coat);
- colored coating (Shellac Color Coat);
- fixer (Shellac Top Coat);
- adhesive remover (CND Cool Blue);
- cuticle oil (CND Solar Oil).
Gallery: Shellac CND manicure products
Cuticle can be easily removed after exposure to CND Cuticle Erase
With the help of a file, the nail can be given the desired shape
Treat the nail plate with Scrab Fresh
After applying the base coat, it should be cured in a lamp.
Colored varnish is applied in two layers
The sticky layer is removed with CND Cool Blue
Advice. After polymerization of the base and colored layers, do not remove the sticky layer from them. This provides a better grip between them.
Video: how to apply shellac at home
Effect of Shellac CND on nails
Shellac manufacturers have taken care that it contains components that have a beneficial effect on the nail plate. As a result, Shellac CND effectively strengthens thin, brittle and flaky nails. Shellac reliably protects the nail plate from external mechanical and chemical influences. For example, when hitting, the coating provides a shock-absorbing effect that prevents nails from breaking off.
Shellac CND does not contain dangerous formaldehydes inherent in conventional varnishes, therefore the coating does not harm not only nails, but also health in general.
Pros and cons of coverage
The obvious advantages of shellac include the following:
The disadvantages of shellac include:
How often can you apply gel polish?
On the Internet, you can find rave reviews about how many women were able to grow their own nails with the help of shellac. And when asked how often you can use gel polish, most consumers write that they do not take any breaks between manicures at all.
My nails are weak and flakey all the time. I covered them with shellac for two years. Base and top CND between them are different varnishes. Hire, manicure and tailor. The nails have grown strong, long, which never existed. I listened to these ladies, I thought I’ll try to walk without shellac. It was like about two weeks, the nails all broke and began to exfoliate…. what else would you advise, counselors? And how can you injure your nails by removing shellac if I don't use a file. Wrap it up, hold it and then wash it with a cotton swab?
Ekhttp://www.woman.ru/beauty/nails/thread/4814894/
On the one hand, the gel coating really protects the nail plate and promotes its growth. But, on the other hand, you need to understand that the constant use of a dense and durable varnish prevents the flow of oxygen to the nail plate, in other words, the nail "does not breathe", and over time it can become very weak.
In addition, the illiterate removal of shellac causes significant damage to the nail plate, since its own protective layer can be violated.
Therefore, experts advise after 2-3 procedures to take a break, during which it is recommended to use masks with lemon or oil tea tree... During this time, the nails will receive nourishment and hydration. This "rest" of nails should last 7-10 days. Masks should be done every other day. They can be alternated with each other.
Lemon mask
Ingredients:
Mix all the ingredients and dip your fingertips into the bath for 10 minutes.
Lemon has always been used to strengthen nails
Tea tree composition
Ingredients:
The components should be combined, the nails should be kept in the resulting solution for 20 minutes.
Shellac Design Ideas
Nail artists are able to create a huge number of original designs using gel polish. However, this requires professional skills and talent. At home, it is not always possible to repeat unusual patterns and ornaments.
But still, there are such designs that it is quite possible to bring to life on your own.
Using multiple shades
A manicure that combines two, three or more colors will look bright and boring. V classic version it is recommended to combine cold tones with cold tones, and warm tones with warm ones. However, more extravagant girls can afford to use varnishes of various shades (at least all the colors of the rainbow). The main thing in all options is the careful application of shellac.
Gallery: designs with different colors
 You can express yourself vividly with the help of sharp contrast between the colors on the nails.
  Young girls can use the rainbow design
  In the classic version, shades of the same spectrum are used - from dark to light
It is interesting. In ancient Egypt, only people with a high position were allowed to wear a bright saturated color of nails. Cleopatra dyed the nail plates with henna, which gave them a reddish-brown tint.
Sequins and rhinestones
A manicure for parties or special occasions can be complemented with sequins or rhinestones. Even a beginner can easily create such a design.
Gallery: the use of shiny elements in manicure
 Small pebbles significantly enliven even the most calm tones
  The combination of a flesh-pink shade of varnish and silver looks equally good at special events and in Everyday life
  Bold design combining different colors and sequins, great for night out
Stickers
Manicurists love to use ready-made stickers in their work. They are transparent, dense, voluminous. At the same time, the variety of patterns and colors is simply impressive. It is not difficult to work with such stickers, and the result is no worse than that of specialists.
Gallery: sticker applications
 Transparent stickers look good on a white background
  You can pick up themed stickers for any holiday
  Stickers can only be used on selected nails
  Floral stickers fit perfectly on turquoise manicure
French manicure
French manicure, or service jacket, is a classic nail design that has been in demand for many years. With its help, it is easy to emphasize the elegance of an evening or cocktail dress, office wear or any other toilet.
In the original version, only pink and white varnishes were required for the jacket, i.e. natural colors... Today, French manicure is done using the most different shades- from dark to ultra-bright. In addition, rhinestones, sequins, stickers and more can be used in the design.
The classic of the genre with a flower sticker looks quite original  The smile line can be painted over with color shades
  The free edge of the nail can be made red and added a shiny element
How to remove Shellac CND by yourself
Removing shellac is not as difficult as it might seem at first glance. However, this should be done correctly.
In no case should the coating be peeled off from the surface of the nail mechanically. This could cause irreparable damage to the plate.
To remove Shellac CND, you need to prepare:
Removing shellac is done in the following sequence:
Video: how to correctly remove shellac at home
For application and removal of Shellac CND it is not necessary to contact nail salons... It is quite possible to do it yourself. It is enough to purchase necessary tools and materials, and beautiful well-groomed nails will become the pride of any woman.
Shellac is a very popular material that modern manicure masters prefer to work with. It is also easy to use at home. For ideal nails, in addition to a gel-based product, you will need a UV lamp and a primer - a substance to improve the adhesion of the material to the surface of the nail plate.

Applying shellac at home is not difficult - it is only important to follow the sequence of actions. The use of low-quality materials can reduce all efforts to zero, the gel will not "lie down" in an even layer, stains and unaesthetic bumps will be observed on it.

Navigation:
The first step to a perfect manicure
Preparing the nail plate is an important step that should not be skipped. First, you need to carefully examine the nails - if there is any old coating left on them. Even a small fragment can affect the final result. Working with the shape of each nail includes the following steps:
- Removal of the free edge (even to shorten the length in accordance with the technology, scissors are not used, only a sapphire or sand fine-abrasive file).
- Cuticle work. It is also not recommended to cut it with a sharp tool. Perfect option - special tool, which helps exfoliate cells, and an orange stick, which can be easily removed at home.

Nail preparation technology step by step
Shellac cannot be applied to a previously untreated nail. The layer of gel will simply not stick to the plate, chipping off for any "reason" - mechanical friction or washing dishes, swimming in the pool or after visiting the sauna.

Observe two stages in the technology of applying shellac.
- The nails need to be processed with a grinder (its soft side) - this simple technique helps to remove the shine.
- The function of degreasing the plate is performed by a special substance, which must be applied only after the grinding stage, strictly observing the sequence of applying shellac. The product should not get on the skin - this threatens with discomfort and burning sensation, an allergic reaction.
Instructions for applying shellac
Degreased nails, according to the rules, cannot be coated with traditional manicure products (for example, colorless varnish). A base is applied in a thin layer, which can be purchased along with a bottle of shellac of the selected manufacturer. The brush must be kept strictly parallel to the surface of the nail plate so that there is no leakage of the product and its contact with the skin.

Shellac application techniques can be adjusted by the master or by the woman herself performing the procedure at home, but the sequence of actions should remain unchanged. Before applying, the excess base is removed from the brush, large drops should not be (this is easy to do by wiping the nap on the neck of the bottle). With special care, they pass the area near the cuticle. Also, according to the rules, the nails must be "sealed" with varnish; for this, a brush is carried out along the cut of the plate.
The final action at this stage is to place a hand or individual fingers in the light of a UV lamp for 1 minute. Applying shellac at home by video simplifies the task for a beginner, it's easier to do everything step by step and correctly.
Applying colored shellac - simple steps
At home, observing the technology of such a manicure step by step requires attention and accuracy. In the photo below you can see how the colored varnish looks on the nail plate in one layer. To apply this type of gel, you need to repeat the procedure with the base exactly, not forgetting to "seal" the slice.
Colored shellac cures in a UV lamp for 2 minutes. If appearance gel in one layer does not suit, the procedure must be repeated until the ideal result is achieved.

Exactly following the instructions, you need to ensure that the application of each layer of shellac is not only neat (not going beyond the plate), but also as thin as possible. The photo shows the perfect manicure in accordance with the described technique, without bubbles and streaks. If in doubt about the correctness of the actions, apply shellac by video.

The last stage: what is its importance
The technique of covering nails with shellac at home means that the final stage of the work will be the application of a top (fixer). The procedure is no different from the previous ones. It must be polymerized in a lamp for at least 2 minutes. It is necessary to apply the top to the shellac as soon as possible. It is advisable to keep your hand strictly horizontal. The time can be increased if the UV bulbs have not been changed for a long time.

The fixer performs the following functions:
- protects the varnish layer from mechanical damage and moisture;
- retains the brightness of the shade;
- gives the shellac-coated nail plate a glossy shine.
After the final hardening of the top, a sticky layer appears on the surface of the nail, which is easily felt when touched. To remove it, you can use either a special degreaser or 99% alcohol. The sponge or napkin must be lint-free, otherwise fiber particles will remain on the surface, spoiling the result.
The shellac application technology, if performed step by step in a strict sequence of stages, will take no more than half an hour.
Manicure is a service that women consider irreplaceable. The main development recent years has become a material like shellac, which has many advantages. However, it is easy to learn how to apply it correctly without visiting a salon.
Shellac, or gel polish, is a type of nail coating that hardens when exposed to ultraviolet light. The very concept of shellac comes from the name of the first gel polish, which was produced by CND.
Shellac (how to apply correctly, it's easy to learn) combines the features of varnish and gel. From the latter, such qualities as durability, strength, plasticity are taken. There are similarities with ordinary varnish: shellac is sold in jars with a brush. However, in the technique of applying shellac, several different means are used at once.
Pros and cons
| pros | Minuses |
| Durability. If the manicure is done well, the coating can last up to a month. | A multi-stage, complex procedure for applying gel polish, which takes about 1.5-2 hours. |
| Protection of the nail from flaking, cracking and breakage. | If shellac is removed carelessly, the structure of the nail can be damaged. |
| Wide color palette... A complex design with shellac is easier to do than regular varnish because it dries faster. | Instability to temperature extremes. Cracks appear on the varnish from moisture and heat. |
| Lack of toxic substances such as formaldehyde and toluene in the composition. | High price. In salons, a manicure with a gel polish coating costs 1000-1200 rubles, and with an ordinary varnish - 700 rubles. |
Is shellac harmful to nails?
The master should know how to follow the correct technology for applying and removing shellac. Then the coating will not spoil the nails. Even the opposite effect takes place: thanks to shellac, thin nails are strengthened and protected from external influences. 
Since the composition of high-quality gel polish is non-toxic, it can even be done by pregnant women. It is not even the coating itself that can cause alarm, but the process of its application.
Some people express their concerns about the dangers of gel polish when, during the drying process, they feel a burning sensation in the area of \ u200b \ u200bthe nails. It's not that the varnish somehow penetrates the nail plate and destroys it. 
This is a natural process: under the influence of ultraviolet rays, certain components of shellac, called photoinitiators, undergo a polymerization reaction, as a result of which the coating hardens. Most often, tingling occurs if too much material is applied to the nails (for example, if the plate alignment procedure is also done).
Thus, the burning sensation does not harm the nails. If you feel it, you just need to pull your hands out of the lamp for a few seconds until the discomfort is no longer felt, and put them back.
If impatient girls begin to remove the shellac coating on their own, without using a special liquid, tearing it off in pieces, then the top layer of the nail plate also leaves with the varnish, which can damage the nails.
In this case, the already thin nails can become thinner even more. This can cause nails to break and flake. Too strong and too long polishing of the nail plate before application is also detrimental.
Shellac varieties
Shellac (how to apply yourself correctly, described below) can be done the multitude different ways, therefore, the whole scope of imagination is given:
- Plain single color coating... In this case, you can make all the nails of the same color or select 1-2 fingers on each hand with a different shade or even design.
- Gradient. In this case, on the nails occurs smooth transition between 2-3 colors.
- French. You can make a classic gentle version French manicure, but you can experiment: for example, make a strip of bright color.
- Moon manicure Is something like reverse jacket... The well at the bottom of the nail can be filled with color or left transparent.
- Marble manicure. In this case, a texture is created on the nail, reminiscent of this material.
- Shellac with pictures: you can draw monograms, geometric patterns and more complex compositions
- Shellac using additional materials: rub, foil, rhinestones.
Shellac materials
Shellac how (it must be applied correctly after practicing) a multi-stage procedure requires various products that can be purchased in specialized stores.

Should I choose a UV or LED lamp?
The UV lamp emits ultraviolet light. During the research, it was found that a 36 W UV lamp (optimal power) polymerizes the coating for about 2-3 minutes, and lamps of lower power take even longer. At the same time, it is highly likely that when shellac is dried in a 9-18 W UV lamp, the coating polymerizes unevenly, of poor quality, matte areas may appear. In addition, you need to periodically change the bulbs.
The LED lamp is powered by LEDs. The radiation spectrum of such a lamp is higher than that of a UV analogue, therefore, it takes only 20-30 seconds to dry one layer of varnish. This saves a lot of time and makes the shellac procedure shorter. 
According to the statements of many manufacturers, LED lamps can work up to 50 thousand hours, that is, almost 5 years. There is no need to replace the LEDs as they will not burn out. At the same time, LED lamps are not capable of drying all varnishes.
Recently, many scientists have expressed their concerns about the safety of ultraviolet radiation, since its excess can lead to the development of various diseases. Of course, the ultraviolet radiation emitted by the lamp is not enough to adversely affect human health.
However, in this regard, it is still much safer to use LED lamps. You can also protect your hands from ultraviolet radiation: for example, use special gloves in which only your nails remain open, or sunscreen.
Preparing nails for the procedure
First you need to do a classic manicure: file the nails to the desired length, shape them, trim and push back the cuticles. Then you need to buff the nail plate with a buff until it stops shining and becomes matte.
Next, you need to wipe your nails with a degreaser using small lint-free wipes. This substance removes dust and excess fat from the surface of the nail. 
Using the following two tools is not always necessary. However, if they are not used, the durability of the coating is called into question. Both of these products are in jars, like varnishes, and are applied with a brush. A primer is needed to dehydrate nails. Bonder is a primer.
First, the primer and bonder create a layer between the nail and the following varnish coatings, that is, as if protecting him. Secondly, thanks to these materials, the varnish adheres more tightly to the nail and adheres to it. This means that the likelihood of further chips and varnish flaking is reduced.
It is important to use an acid-free primer. It is more efficient. In addition, it treats weak, brittle nails more delicately and does not cause skin irritation.
The primer is applied only to the end of the nail, and the bonder is applied to the entire nail plate.
Step-by-step instructions for applying shellac base
Basecoats come in a variety of thicknesses. It is better to use a medium density base, such as a rubber base. Most often, the base is applied in 1 layer. If you plan to align the nail plate, you will need 2 layers. 
- First you need to draw the product on the brush and squeeze it out a little.
- Coating should be started a short distance from the base of the nail. It is necessary to brush a little forward to the cuticle, then paint over the entire nail and "seal" the edge. It is important not to flood the cuticle and side ridges, otherwise the coating will harden. After finishing applying, you need to place your hand in the lamp and polymerize the layer.
- The alignment procedure is done when the nail is thin, weak, flat, and there are irregularities. You need to pick up a brush with enough material and put a drop on the nail, placing it close to the base.
- Without touching the nail plate, it is necessary to easily distribute the resulting drop over the entire nail. It is important to pay attention to the fact that the ideal shape of the nail is preserved, that is, there should be some bulge in its middle.
- If the coating has spread too much, you need to turn your hand over with your fingernail down until you can achieve the desired shape.
- Next, you need to put your hand back into the lamp.
Instructions for applying a color layer
Shellac (how to apply a colored coating correctly, described below) should be done in several layers. Their exact number is difficult to say, since it depends on the shade. Usually a minimum of 2 coats is required. In this case, the color will be rich and pleasing to the eye.
First you need to cover the entire nail with shellac. The layer should be very thin and almost transparent.
 How to apply shellac correctly step-by-step instruction
 It is important to get close to the cuticle, but not flood it, otherwise the manicure will look sloppy. Then the coating is polymerized. The 2nd and subsequent layers are applied in the same way.
Finishing step by step
The top coat is applied at the very end of the manicure, when both the coating and the design are ready. Only 1 dense layer is required without irregularities and bubbles.
First, you need to pick up a little product on the brush and remove the excess from the neck of the package. Further, the coating is evenly spread over the entire nail. At the very end, you need to seal the edge, as it happened when applying the base. To do this, you need to brush along the edge of the nail. If you skip this step, the longevity of the manicure is no longer guaranteed, as the varnish may begin to flake off. 
After polymerization, the so-called sticky layer must be removed. To do this, you need to type a degreaser on a lint-free napkin and blot your nails with it until they become smooth to the touch.
Common mistakes when applying shellac
For beginners typical mistakes, which are carried out when creating a manicure with shellac, seem insignificant. However, these little things affect the quality and how long the coating will last without chipping.
- Insufficient preparation of the nails. For example, no degreaser was used, the nail plate was poorly sanded with a buff, before the manicure, the hands were treated with cuticle oil or nourishing cream.
- Use an acidic primer that will damage your nails.
- Shellac is applied in a thick, not thin layer. In this case, it may polymerize unevenly, swell.
- The base and subsequent funds flowed into the lateral ridges and onto the cuticle. It is important to take into account that when drying, varnishes can expand, spread over the nail.
- Shellac or other packaging was shaken before use. This can cause unwanted bubbles to appear. Before use, the bottle of varnish must be gently rotated between your palms, and not shaken.
- The shellac or other packaging has been left open after use or has been exposed to light or sunlight. In this case, gel polish may lose its properties and deteriorate.
- The end of the nail was not sealed when the base and top were applied. This threatens the coating to peel off.
How to make a French design with shellac?
The beginning of the procedure is standard: the nails are being prepared. Next, you need to apply the base, and on top of it - a nude shade of shellac, camouflage. Light pink tones or skin tones will do. All layers are polymerized. 
The most difficult thing in French design is drawing a strip called a smile. There are special brushes for drawing it, but not every craftswoman finds them convenient. You can also use stencils, but it is not always possible to predict how the varnish will behave: it can flow under the piece of paper or blur when it is torn off. That is why it is better to draw a smile by hand.
To make a smile, draw it starting at each edge. You can rely on the natural smile of the nail. You can also sketch out the path first, and only then fill it with color. At the end of the drawing, the hands are placed in the lamp, then the top is applied.
How to apply a drawing to shellac?
Drawings and patterns are applied separately thin brush or a special tool called dots. Depending on the desired result the drawing can be done on top of the base or a colored layer.
The drawing itself depends on the imagination of the author. You can just dot with dots, you can draw curls, flowers, or even more complex compositions. In any case, you need to carefully think over all the elements so that in the process of work it is already clear what to do. 
You can draw not only with shellac, but also acrylic paints... In this case, after applying the base or colored layer, the nails must be treated with a degreaser.
If drawing by hand seems overly difficult to you, you can use a stamping kit or special stencils. However, you need to act carefully so that the varnish does not spread.
Rubbing design
A rub is a sparkling pigment that, as the name implies, is rubbed into the nails before applying a topcoat. It is better to apply bright colors on a dark substrate, but delicate shades give a pearl shine to a light manicure.
After polymerization of the colored layer, the sticky layer does not wear off. After rubbing a certain amount of rub on a pusher or on a special fan brush, you need to pour the material directly onto your nails. This is followed by using your fingers or an applicator (as for eyeshadow) to rub the pigment into the nails. The main thing is that there are no bulges and irregularities, otherwise they will be visible with rubbing. 
Finally, you need to apply a top coat. Excess rubbing that remains on the skin around the nail can then be washed off with water.
Kamifubuki design
Kamifubuki is large sequins rounded shape. They come in various colors, and in some sets 2-3 are selected at once suitable friend a friend of the shade.
After polymerization of colored shellac, a finish coat is applied, but hands do not fit into the lamp. While the top is still wet, place the kamifubuki on your nails. 
4 They can be moved with a toothpick, needle or dots along the nail plate to create a harmonious composition. After applying sequins, dry the layer. Then another layer of top coat is applied on top of it to secure the design.
Monochrome design
Monochrome manicure is a classic and the simplest type of design. This is the most advantageous option if you want the shellac to look strict and restrained, and not pretentious.
The monochrome design can be diluted with rhinestones and sparkles by decorating one finger on each hand with them. You can also dilute the colors by using a complementary shade, such as on the ring fingers.
Basically, a monochrome design is just a color layer without any extra tweaks. That is why such a manicure is ideal for beginners.
What other simple designs for beginners are there?
Rhinestones and broths
From rhinestones, you can make both a minimalistic design and a voluminous, luxurious composition - a matter of taste. The technology for creating decor with rhinestones or broths is very similar to the design with kamifubuki. 

A top is applied on top of the colored layer, into which the rhinestones are placed. Only after that the manicure is dried. Then the topcoat is again applied on top, which, however, does not "drown" the stones in itself. It is necessary to bypass the rhinestones with a brush. After that, the layer is polymerized.
Foil
Foil for manicure is sold in special rolls or "booklets". It can be applied both to the entire nail and to its individual fragments.
After applying the topcoat, it is not necessary to remove the sticky layer. It is necessary to cut off a small piece of foil and attach it to the nail, press it with your fingers. Then the material comes off, and the drawing had to be transferred to the nail plate. At the end of the procedure, a finishing layer is applied.
Matte finish
Topcoats are not only glossy, but also matte. Matte design will look beautiful both on a monochrome coating and over rubbing and foil.
How to spot fake shellac?
The original shellac can be distinguished from a fake by the external characteristics of the packaging. The print quality on counterfeit material is usually poorer: the label is too glossy, the font is blurry. 
In addition, the composition is not indicated. Counterfeits most often have a very unpleasant odor. It is worthwhile to be on your guard even if the gel polish of a famous brand is sold at a very low price, which does not correspond to the cost in other stores.
How to remove shellac at home?
To remove gel polish, you will need the following materials:
- buff or file;
- 10 lint-free wipes;
- 10 pieces of food foil;
- orange stick;
- shellac remover.
First, you need to go over the nails with a buff or file until the gloss disappears. Then lint-free napkins are placed on the nails, soaked with liquid for removing gel polish. All fingers are tightly wrapped in foil. When 10-15 minutes have elapsed, the foil should be removed. 
By this point, the varnish should have softened and began to flake off. Following the growth of nails, you need to remove the varnish with an orange stick. Finally, you can buff your nails again to remove any remaining shellac.
Causes of nail damage after removing shellac
When removing gel polish, it is very easy to damage your nails if a pusher or any other metal tool is used instead of an orange stick. Such things injure the nail plate.
Moving against the growth of the nails or pressing too hard on the tool while removing the shellac can cause the nails to delaminate.
Treatment for nail restoration after shellac
There are several ways to restore nails after wearing gel polish:

If you follow the above tips for applying shellac correctly, you can achieve an excellent manicure. However, one should not forget how important practice and the use of quality materials and tools are in this matter.
Article formatting: Vladimir the Great
Shellac build-up video
Where to start making shellac: