The modular origami basket is assembled in almost the same way as most crafts in this technique - quite simply. Therefore, both a master and a beginner can do it. We invite you to familiarize yourself with how to make a modular origami "Basket", as well as with the existing options for its design.
Making modules
Before assembling the modular origami "Basket", you will have to make a lot of modules.
We offer you a master class on how to collect them correctly. And to make it more visual will help step by step photo provided in the article.
- Cut identical rectangles out of colored paper.
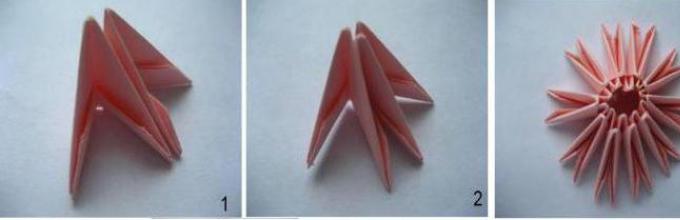
- Take one of them and fold it in half lengthwise (fig. 1).
- Then fold it in half again so that a fold line forms (Figure 2).
- Place the rectangle in front of you, with the convex side of the fold line facing up.
- Bend its right and left sides towards the center to form "wings" (fig. 3).
- Turn the shape over and fold the edges of the "wings" (fig. 4).
- Unscrew the edges and fold one corner on the right and left sides (fig. 5).
- Tuck the edges again (fig. 6).
- Fold the shape in half (Figures 7 and 8).
The part is ready! It remains to make a few dozen more in the same way to get a beautiful modular origami basket.
Putting together the first circle

The modular origami basket starts the same way as most other crafts done with this technique. That is, you put two parts on the edge and put on the third on top. To continue the circle, add the fourth module down and put on the fifth from the top. Thus, collect the entire ring (see how this is done in the proposed photo). To continue assembling, you need to make several rows.
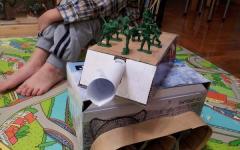
By the way, if you want the modular origami basket to be roomy, then make the first row large enough. True, then the craft will have a bottom with a hole. But it can be closed using ordinary cardboard, from which cut a circle of a suitable diameter and insert it inside.
Modular origami - basket assembly
When the modules are ready, and the first two rows have already been assembled, you can form a basket. To do this, continue to create walls from the triangle pieces. Put on the modules row by row in the order you want. Over time, you will see your basket expanding.

By and large, modular origami schemes "Basket" and "Egg" are assembled in the same way. Only for a basket you only need half a testicle, and the bottom should be wider.
When the craft reaches the desired height, proceed to assembling the handle.
Basket handle
By the way, if you don't make a pen, then you get not a basket, but a vase (for example, for sweets). But since we are making a basket, we offer you a master class on assembling its handle:
- Cover the center of one module with glue and put it on the wall of the basket.
- Put on two more next to them, also greased with PVA glue.
- Continue to slide the modules on top of each other.
- You should have three pieces in each row.
- When assembling the handle, try to bend it into an arc.
- When the handle is completely assembled, grease the last modules with PVA glue and attach to the wall of the basket.
To complete the craft, add a couple more rows of the named parts on the sides of the handle.

If you are going to use the basket as a table decoration, then you do not need to use PVA glue. But if you know that you will need to carry the basket by holding the handle, and there will also be something not weightless inside, then it is best to grease each module of this basket element with glue.
Paper basket design options
The modular origami basket can be absolutely different kind, it all depends on your capabilities, imagination and preferences.
The easiest way to diversify your design is to make a patterned basket. To do this, you should use multi-colored modules and collect them in a specific order (for example, to make rhombuses).
It will be no less beautiful if the edges of the basket are made not even, but zigzag. This is done simply - put on the modules not in a circle, but in sections.
You can assemble a basket in the shape of a swan. It can be a traditional basket with a handle, to one of the walls of which a swan's head is added. It is assembled in the same way as the handle, only at the end one large module is added, which serves as a beak. It can also be a basket, which instead of a handle has the head of a swan and its tail. To do it, you need to assemble modules in the shape of a triangle.
You can also make an origami basket on a stand. The technique is the same as when assembling the "Egg" craft. First, a small plate is folded from modules, then it turns over and the basket itself is assembled on it.

You can also diversify the design of paper baskets with the help of the inner filling. For example, place real candies inside or collect additional flowers using the origami technique.
And to make the craft delight you longer, protect it from moisture and brush off the dust with a dry cloth.
Origami is a recently popular technique for folding a variety of paper figures. This ancient art was born in China in the early Middle Ages. In those days, only people from the upper classes owned origami. The technique became widespread in Western countries after the end of the Second World War. Nowadays, both adults and children are happy to do origami. This art perfectly develops logic and attention. There are several types of it - flat and volumetric. Both of these types are interesting in their own way. We suggest you try your hand at volumetric origami... The figure is usually assembled from a large number modules, that is, identical elements that have been pre-folded. So let's make a modular origami Basket.
How to make a basket out of modules - preparatory stage
Immediately before assembling the basket using the origami technique, you should start making many modules. They come in different forms, but the so-called triangular module is most often used. Fit office paper A4 format. The sheet needs to be cut into 16 identical rectangles.


It has pockets on the sides, where the same modules are then inserted. Due to this, a volumetric origami figure is assembled from modules - a basket.
For our future craft, it is necessary to make 494 triangular modules blue and 168 triangular modules color pink. This process, of course, is laborious and requires patience.
Modular origami "Basket" - master class
When all the necessary modules are made by you, you can proceed to making a basket. Assembly diagram modular origami the basket looks like this:
- Putting together a chain of blue modules. Insert one corner of two modules into both pockets of one module.
- Then the module pocket is put on the free side corners of the upper modules.
- In a similar way, the whole chain of two rows is assembled, each of which should contain 32 modules.
- Then you need to close the circle.
- Next, we build eight rows of the future basket of triangular modules. Each must use 32 blue modules.
- In the next row, you need to use pink modules. The total number of modules is 32, but every two blue modules alternate with two pink ones.
- The next row is laid out as follows: pockets of one pink module are put on the two central corners of two pink modules. We do the same with the blue modules. As a result, we have a row of 16 modules.
- After that we put on two blue modules, and then one more blue module.
- We build new elements in the form of an arch: we string six blue modules with one pocket on top of each other. Then we fasten the upper elements together. We carry out such actions around the entire circle of the basket.
- After that, we lay out a new continuous row of pink modules.
- You need to make a stand for the basket. It consists of 1 row of blue modules and 2 rows of pink modules. In each such row, you need to use 27 elements.
- It remains only to make a handle for the basket. It is composed by alternating 1 pink module with 2 blue ones.
- In total, 79 rows need to be made. Having bent the handle with an arc, we attach it.


The origami paper basket from modules is ready!
Hello dear masters and craftswomen. I present to your attention a master class on making such an origami swan, and I called it "The Swan in Pink". How to origami a swan? We will make a pink drawing, select the swan with pink modules around the perimeter and put it on a round stand, and also glue small eyes. Please watch this video on how to make an origami swan. V […]
Hello dear masters and craftswomen! Today I bring to your attention a master class on making a tricolor Swan from triangular modules. It seems that what else can you think of, what other options are there for making Swans using the modular origami technique. But it turns out that there are still options and this is not the last thing in my arsenal. The tricolor swan is so simple [...]
Hello dear masters and craftswomen! I bring to your attention new master class for making a Swan in black from 3D modules. In the last lesson, you and I did the Swan in red, and now I decided to slightly change the style and perform the Swan in black. The scheme is not complicated and will suit anyone, even a beginner in modular origami. Specially […]
Hello dear masters and craftswomen! I bring to your attention a new master class on making a Swan in red shades. On the Internet, you can meet a huge number of different schemes and master classes on making Swans using the modular origami technique. I’m sure you haven’t seen such a swan before. This scheme is quite simple and even [...]
Swan in blue. Video tutorials and diagram. Part 3. In the third part of the master class, I offer you two video lessons and detailed diagram origami how to make a swan. The first video talks about how to make a swan neck and how to make a small stand. The second video talks about how to glue the swan better and faster. Lesson 6 (neck and [...]
Swan in blue. Video tutorials and diagram. Part 2. In the second part of the mother class "Swans in Blue" we finish making the torso. I have prepared for you two video tutorials and a detailed diagram of the origami swan from the modules. To assemble a swan, you will need 1438 1/16 modules, of which: 317 - purple modules 471 - blue modules 552 - blue [...]
Swan in blue. Video tutorials and diagram. Part 1. I would like to bring to your attention a new master class on making an origami swan out of paper from 3D origami modules. The layout is rather unusual and the wing look is not quite classic. In the photo, you can see small through holes and a mesh pattern. Frankly speaking, the scheme is rather complicated! Especially for this scheme, I [...]
“Rainbow Swan” diagram and video tutorials (part 3). The third part of the "Rainbow Swan" master class consists of three video tutorials on assembling the stand. And I also decided that the video tutorial on gluing "Rainbow Swan" will be very useful to you. Lesson 5 (support part 1) Lesson 6 (support part 2) Lesson 7 (support part 3) [...]
Today we suggest that you try to assemble a paper basket, which, subsequently, you can use in the most different purposes... During the period new year holidays it will be useful for you to beautifully serve small fruits or sweets to the table, and in the summer you can use it as a box for picking berries.
Origami assembly of such a basket is very simple, and even a beginner can do it. For work, you need a square sheet of paper (preferably colored), but if there is none in the house, then you can easily and simply make a square sheet of the size you need from an A4 sheet (by folding the sheet diagonally and cutting off the unnecessary strip at the bottom).
So, let's start assembling right away. The first step is to outline the diagonals of the square, and then, having expanded the sheet, bend the corners inward to the already marked center of the sheet.


Bend the small triangles that you have formed inward. Next, straighten them and bend them again, but already tucking inward. Then wrap up all the remaining triangular pieces.


Bend the ends with right angles to the new center of the craft. Turn the craft over. Bend the ends with right angles to the sides. Turn the workpiece over again.


Now just pull on the inner edges and form a square basket.


The information portal http://testpuls.ru is a very convenient service that will help you choose the diagnostic center or clinic you need to conduct an examination. The site contains all the useful information about diagnostic institutions and medical centers operating in Moscow. This information includes the location of the institution, distance from the metro, opening hours and cost of services. Thanks to this, you can order a diagnostic service directly on the website in the center that suits you.