If you have no time to go to the salon, then learning how to build nails at home is simply necessary. Contrary to beliefs, it is not difficult.
Well-groomed nails are a must for a modern girl. What if they are brittle, exfoliate and do not grow to the desired length? It is necessary to make the extension with a gel. And if you have no time to go to the salon, then you just need to learn how to build nails at home. Contrary to beliefs, it is not difficult. The main thing is constant practice and adherence correct instructions... Today site will tell you how to build nails at home with the help of gel and get the result no worse than in the salon.
The purpose of gel nail extension
- Gel is a tough, hard coating. It helps to strengthen the natural nail plate.
- Together, the gel allows you to lengthen the free edge of the nail.
- With brittle and peeling nails, the edges often break off. Extension or extension allows you to adjust the shape of the nails relative to each other.
- Ability to wear long nails not given to every woman. Some simply cannot grow the length on their own. Then the extension will help to grow the natural plate in order to cover it in the future and not to use the extension with artificial material.
Building methods
There are two ways:
- On tips;
- On forms.
Build-up on tips implies lengthening the nail plate using a plastic overlay - tips. Then the gel itself is applied to the attached bed.
On forms requires more skill. In this case, the result is more natural and accurate. Used in most modern salons. Applicable modeling gel, which is applied to forms made of paper, plastic or metal, attached under the nail. After the procedure, the mold is removed and only the extended nail remains.
Materials (edit)
To build on any of the technologies you will need:
- Antiseptic;
- Classic manicure: pusher or orange stick, tweezers or scissors;
- Hardware manicure: milling cutter, nozzles needle, bullet, ball, cylinder;
- Files 180-240 grit;
- Tips or forms;
- Glue when building on tips;
- Brush bite;
- Degreaser;
- Primer;
- Gel or biogel (with a three-phase system, base gel, modeling gel, final gel);
- Drying lamp;
- Lint-free wipes;
- Brushes.
Gel extension technology at home
First you need to decide on the type of extension: on forms or tips. And also what kind of basic material you will be using. You can use gel or biogel.
The gel has a hard coating, and the biogel is elastic. Biogel is more resistant to bending of the natural nail plate under physical stress. The single-phase system allows for a shorter coating time, but may reduce the duration of wear. A three-phase system is expensive as well as effort.
Regardless of the method and material of use, the general technology can be cited. Only in some stages will there be differences.
Manicure
The initial preparation of the nail plate allows for long wear without chipping and flaking.
Correct and complete removal of excess skin and cuticles is a prerequisite for building up.
- Treat your hands with an antiseptic.
- Using classic manicure push back the cuticle and pterygium with a pusher or orange stick. In hardware, lift the needle up with the cutter.
- Trim the cuticle with scissors / tweezers, or use a ball / bullet cutter to cut it off.
- Carefully remove any remaining pterygium and use a scissors or a cylinder cutter to cut the side ridges.
- Saw off the free edge with a 180-240 grit file to a length of at least 0.5 mm.
- Buff the entire surface of the nail.
- Sweep away any remaining dust with a brush
Preparing the nail plate
Careful preparation is essential to ensure that the artificial turf adheres firmly to the natural nail.
- Wipe the surface of each nail and the free edge with degreaser: use lint-free wipes.
- Apply acid-free for strong nails and acid-free for thin and brittle nails: allow to air dry for at least 1 minute.
Base
In a three-phase system, a base gel is used. It is applied in a thin layer to the nail. In a single-phase system, this point is skipped, since modeling occurs immediately. When building on tips, this stage occurs after installation.
Remember to dry the base in the lamp.
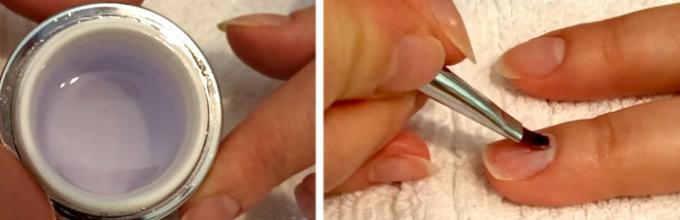
 Apply the gel to the treated nail
 Installation of forms and tips
When building on forms you need to install it under the nail plate as tightly as possible without gaps. Examine the nail with the shape from all sides. It should be flat and, when viewed from the front, have a semicircular bend.
 Fasten the extension form tightly
 Tips are attached for special glue up to 1/3 of the surface natural nail... The shape of the tips with filing is corrected.

Modeling
You can create a natural domed nail from the side using the modeling step. It is one of the most difficult.
The three-phase system uses a 2-stage gel - modeling. In a one-phase system, the gel itself.
The entire surface of the nail is covered 1 time thinly and dried in a lamp. Apply the next layer thicker and create a nice curvature on the side using a brush dipped in degreaser. Dry thoroughly in a lamp.
Remove molds if used. Correct the shape of the nail using nail files. But before that, treat the nail with a degreaser, and then buff it.
On forms:
 Apply the gel to the nail
  Modeling the shape and adding length
  Shaping with a file
 On tips:
 We deny the length of the tips and shape with a file
  Remove the shiny layer from the tips, wipe it off and apply a primer
  We spread the gel
 Colored coating
Apply color gel. Design as desired. Each layer is dried separately in a lamp.
Finishing coating
In a three-phase system, the last layer is used - top gel. It provides durability and long-lasting coverage. In single-phase systems, this stage can be skipped, but it is recommended to additionally cover the last means of a three-phase system.
Apply this layer as thin as possible. Dry in the lamp. Remove the sticky layer with a lint-free cloth soaked in degreaser.
The build-up is ready!
Video "Build-up on forms"
Video "Extension to tips"
Little tricks
These tips will help you avoid common mistakes.
- Use formic alcohol instead of a degreaser and to remove the sticky layer: thanks to it, your nails will shine.
- Apply the coating yourself to each hand separately.
- Extend 4 fingers of one hand at the same time, thumbs covered separately.
- Apply the material as much as possible under the cuticle using a fine brush.
- Prevent the gel from flowing onto the lateral ridges and cuticles.
- Dry the finishing step twice as long as the rest.
Have you tried growing your own nails yet? Give it a try and share with us in the comments!
Beautiful and well-groomed hands Is not a luxury, but a vital necessity... In addition, today there are many opportunities for the perfect manicure, for example, gel nail extension, and this procedure can be done at home. Your main helpers will be professional video tutorials, as well as our useful recommendations.
What kind of woman dreams of long-lasting and beautiful manicure that lasts for several weeks. Of course, you can accelerate the intensity of nail growth. There are a variety of strengthening oils, masks, vitamin enamels to strengthen the nail plate. However, nails cannot grow as fast as you would like. Therefore, experts are tirelessly working on the development of all sorts of ways to build nails at home.
First, let's figure out which materials for nail extension we are offered modern technologies.
- Acrylic.
- Gel.
For beginners more technology is suitable gel nail extension, because this material contains natural components of coniferous resin. In addition, it is much easier to build up nails with gel - the material does not spread over the surface of the nail and does not harden as quickly as acrylic.
However, acrylic nails durable, freeze almost instantly, perfectly keep their shape and are easily removed. Acrylic gives off sharp, bad smell caused by the monomer in the product. Therefore, if you decide to grow acrylic nails at home, make sure that there is a powerful hood near your workplace, and also ventilate the room well before and after the procedure.
Whichever way of building up you would not choose, you will definitely need the following materials:
Disinfectants.
Dehydrator - a substance for drying the nail plate.
Primer - for adhesion of the artificial base to the natural nail.
Top coat for the nail.
Extension of nails: precautions
Many women wonder if pregnancy is a contraindication for nail extension? Really, chemical substances that are part of the material can cause a negative reaction of the body future mom... And even a gel that does not give off a strong odor contains volatile substances such as formaldehyde and toluene. However, in high-quality European and American materials for nail extension, these substances are contained in scanty amounts. Therefore, subject to all precautions, gel or acrylic nails cannot affect the development of the fetus.
Not in vain in previous section we talked about disinfection: after coating with gel or acrylic, your nail will remain virtually "preserved" in this environment, along with all bacteria and microbes. So disinfection should never be ignored, especially at home. If we talk about whether nail extension with gel or acrylic is dangerous, then frequent use detergents and washing powders are much more harmful and traumatic for the nail and skin of the hands.
Extension of nails on forms... The essence of this technology is that special templates are placed under the natural nail, on which the artificial nail plates are modeled.
On tips... Compared to the previous method, this technology is much simpler and clearer. You stick plastic blanks on the surface of your own nails, and after that you give the desired shape. Already after several procedures, nail extension on tips will be obtained quite quickly and easily.
Nail extension technologies
There are 2 main technologies for nail extension applied as in professional salons, and at home.
Extension of nails at home: choosing a shape and design

Both with the first and with the second technology of nail extension you can choose absolutely any shape of nails and absolutely any design.
Basic nail shapes:
classic (oval, almond, square, soft square);
modern and sophisticated (stiletto, pipe, beveled nail, pike).

How to build up your nails with gel at home: step by step instructions
Perhaps we are already ready to tell you how to build up your nails with gel at home: step-by-step instruction will help you complete everything efficiently, quickly and without errors. First, you should list, what is needed to carry out this procedure at home:
Manicure accessories: cuticle spatula and nail file, grit 100 grit.
Forms or tips.
Glue.
Artificial flat brush.
Tweezers.
Bonder or starter drug.
Building gel.
Before proceeding to the extension procedure, prepare your nails, and we will tell you how to do it right.

- We clean the nail plate, cut off the cuticle.
- Remove the shine from the nail with a sanding file, level the surface. Remove dust with a brush.
- Degrease the nail.
And now, you can go directly to the building procedure itself. In our example, we will use the tip extension method, because it is the simplest.

- We glue ready-made tips on nails.
- After the glue dries, remove the excess with a tip cutter. Leave the length with a margin - it will still be adjusted.
- Using a nail file, level the surface of the nail and make an even line of transition from a natural nail to an artificial one. We give shape.
- Degrease the nail, apply the gel.
- Then we keep the finger under a UV lamp for 1-3 minutes.
- A new layer of gel - and already for 3-6 minutes, the nail is sent under the lamp.
- Remove the sticky layer from the nail, apply the gel and keep the nail under the lamp for 6-12 minutes.
- When the gel is completely dry, we correct the shape and apply the sealant.

⭐⭐⭐⭐⭐ Extension of nails with gel: instruction with a photo for beginners. What are the differences between a single-phase and three-phase building system? How to build up nails on forms and tips? The nails are fixed with glue. They are then modeled using a gel. To harden the resulting coating, you need ultraviolet exposure and an ultraviolet lamp will help you with this. Imagine that your favorite French manicure will delight you not for 3-4 days, but for 3 weeks. Just look at the beautiful one for all kinds of events and for every day!

By nature, each person is unique: hair has a specific structure, skin type is strictly individual. More recently, many women signed up for a nail extension procedure at a beauty salon or used the services of private specialists at home.
But today we prefer to independently give our nails the desired shape and length at home, to make a fashionable nail design with beautiful drawings or patterns. Fortunately, prices for starter kits for nail extension have dropped significantly, and with the help of step-by-step video tutorials for beginners, any of you can easily cope with this procedure.


Many young ladies consider house building to be a costly exercise. This is partly true, because buying a set of tools is not cheap. If you do not have the required amount, the site advises to cooperate with friends and purchase a set for the company.
Gel nail extension is a professional nail service that allows you to achieve the effect of dense, strong nails.
If you have all the materials and tools necessary for work at your fingertips and you will strictly adhere to correct technique modeling of nails with gel, then the structure of the natural plate will not suffer, the hardened gel will hide all defects, and the extended nails will not flake off. Do not be discouraged if the procedure takes a long time the first time, as most beginners get the job done in 3-4 hours.
Gel nail extension: features
What is gel nail extension? Not so long ago, many girls, whose nails do not differ in strength, often exfoliate and break, could only dream of a beautiful manicure on short nails. Extension technologies made it possible for everyone who dreamed of long beautiful nails, intricate patterns and designs to finally make your dream come true. Modern methods nail extensions allow this procedure to be carried out not only in salons, but also at home.
Artificial gel nails are obtained by applying a special softened gel, which hardens after a short drying under a UV lamp. A huge advantage gel nails the fact that they can "breathe" and allow moisture to pass through, which brings them closer to natural, which is very desirable.


Even outwardly, they are very similar, so it is not at all necessary to paint them with varnish. And drying the gel under UV will prevent the penetration of various fungi. They hold firmly to the base and are strong enough.
Of course, your natural nails continue to grow under the gel layer, therefore, after a few weeks, you will need a manicure correction. Gel nails last up to 4 months, provided you take proper care of them.
Peculiarities proper care when extending nails with gel:
- After the procedure, do not start your business. Let them dry;
- Please note that you should only build up on a healthy nail plate, otherwise you can only aggravate the situation and simply lose them;
- Household chores (cooking, washing, mopping) should be done only with gloves, otherwise you risk being left without extended nails, because they are quite susceptible to the action of acids and alkalis;
- Forget about ordinary nail files and grinders. It is better to give preference to the gentle;
- The varnish should only be removed with an acetone-free liquid.


Gel nail extension at home for beginners
The gel is suitable for beginners for building, because it has one remarkable quality: when hardened, it evens out and removes minor blemishes. Despite the loyalty to the lack of experience, the tool needs careful handling.
- The first step is to prepare workplace... A regular table will do. An ultraviolet lamp can be freely installed on it, and there is enough space for manipulation;
- The main thing is that there is an outlet near the table, and direct sunlight does not fall on the surface. The gel quickly hardens under the influence of ultraviolet radiation and in daylight the speed of hardening will not allow the nails to form;
- Prepare your natural nails before starting the procedure. Cut them carefully and use a nail file to shape and length. Remove the cuticles and sand the surface with a block. After carrying out these manipulations, remove the pollen from cutting with a napkin or brush;
- The next step involves degreasing. If this is not done, the gel will not adhere well to the nail plates and peel off. Use a special product called a primer. It provides a good preliminary preparation;
- Attach a mold to the prepared nail, which should fit under the edge of the nail plate. To fix it, wrap the free edges with adhesive around the pad and press lightly. The form for building is made in such a way that even a beginner can determine the correct position. The main thing is that there are no holes. The foil template ensures the length and shape of the nail as well as the correct position. If installed incorrectly, extended nails will protrude to the side. Check the position of the mold on top and in profile.
- Once the template is in place, start applying the gel using a small brush. As a result, the nail plate should be covered with a continuous, even layer. Then turn on the lamp and dry the applied gel under violet rays for 30 seconds. Do not use a hair dryer;
- Then take the brush again and continue shaping the nail. Extend it according to the template, guided by the length indicator. Use a mesh to make the length of the nails the same. Then again hold it under the lamp for about a minute to fully fix the gel. When the extended nail becomes hard, remove the template from under it. It is disposable and will no longer be required;
- Use a nail file to smooth out irregularities and correct the length. Perform this procedure immediately or after all nails have been extended. The second option is preferable because it allows you to achieve symmetry;
- We advise you to paint, paint or decorate extended nails. To achieve the effect, craftsmen perform decoration from several types of multi-colored gel. At home, limit yourself to standard staining.
Gel nail extension: step-by-step video instruction
What you need to buy for home gel nail extension: a list
Things from the above list will be needed by those who decided to model their nails on their own. Tools used in the process of nail modeling:
- UV lamp. Without it, gel polish will not set. For the best setting and drying speed, choose a 36 watt lamp. Professional models are even more powerful. Instead of a rare design model with additional features, choose simple model with a timer;
- For the best application of the gel, use high-quality brushes, artificial or natural bristles of which do not fluff and hold well. You may need an oval, square, or fine-tipped brush. When choosing a brush, they pay attention to the consistency of the gel: with a liquid one choose a narrow one, with a thick one - wide;
- Files of different roughness levels. The most popular are fine-grain files - 180/240 grit. They are different forms: straight or curved. Additionally, they purchase a buff - a file in the form of a volumetric rectangle;
- Pusher or some special orange tree sticks to push back the cuticle;
- Regular nail scissors to trim nails, burrs, or nippers to help you do the job better;
- Cutter - nippers for tips;
- A brush designed to sweep away dust after processing with files and buffs;
- Extension of a natural nail plate is carried out using tips or forms. Tips can be of different thicknesses. Initially, they should be tested for elasticity, they should bend easily without forming streaks. Choose a material with a wide glue area - it will stick more firmly. Molds are made of plastic or paper. Plastic ones are used repeatedly, paper ones are disposable;
- The glue with which the tips will be glued;
- Lint-free nail wipes. Available as a roll;
- The lengthening and masking gel, which is called camouflage: single-phase, two-phase or three-phase;
- Primer. An adhesive composition that improves the strength of the connection of materials with the nail. It is acidic and acid-free;
- Finish - will help to achieve shine and smoothness of nails;
- Liquid to help remove the sticky layer. Can be replaced with ordinary alcohol;
- Moisturizer for cuticles;
- Acrylic-based paints, colored gels, rhinestones, glitters and the like are useful for creating nail designs.
It is necessary to choose high-quality materials for gel nail extension, especially at home. Read the reviews before buying. If the materials are of poor quality, the manicure will be short-lived, and its creation will be laborious.


Extension of nails with gel on forms: step by step instructions
- We clean the surface of the nail with a 220 grit file;
- We cover with a degreaser;
- Next, cover with a base and place your hands under the lamp for two minutes;
- We clean the top layer;
- We fix the form;
- Using a brush, apply the gel, while turning your finger downward with your fingernail, so that the gel is evenly distributed;
- Again we put our hands under the lamp for three minutes;
- Cover with gel again, form an "S" bend;
- After the lamp, we clean the sticky layer;
- Getting rid of the form;
- We level the surface with a buff;
- We brush off the dust with a brush and cover with a finishing gel;
- Again we put our hands in the lamp to dry for two minutes. Degrease the surface of the nails and coat the cuticles with oil.

Step-by-step video: gel nail extension on forms
Extension of nails with gel on tips: instructions and technique
- We treat our hands with an antiseptic;
- We prepare the nail surface using an orange stick: detach the cuticle, create the desired shape for the free edge, and polish the area of the nail with a file rectangular 220 / 280grit, it prepares nails for polishing, smoothes and removes scratches;
- We apply a degreasing agent;
- Apply a thin layer of nail tip glue to the free edge of the nail and the contact point of the tips. It is necessary to attach the tips to the nail at an angle of 45 degrees, and let it down so that the line of the tip of the tips and the edge of the nail are aligned;
- Further, without detaching, gently lower the tips on the nail and spread the glue in the same amount over the entire area with smearing movements;
- Again we put the tips at an angle of 45 degrees, bring them to the line of the foot and after the heard crackling, gently lower the tips onto the nail. Hold for about 10 seconds;
- We look at the structure of the client's nail and, at his request, give the desired shape to the tips;
- We get rid of dust particles and degrease;
- Cover simulator on the area of the nail;
- With a slightly damp brush, apply the base gel along the entire length of the future nail and place your finger under the lamp for 1 minute;
- Using a flat brush, apply the sculptor, taking into account the structure of the nail. We leave under the lamp for three minutes;
- Using a lint-free napkin, remove the sticky layer with a clinser;
- With the help of a buff, we palette the area of the nail;
- Degrease and cover with a finishing gel. Again we put our fingers under the lamp for three minutes.

How to build nails on tips: a step-by-step video instruction
Coating nails with gel without extensions: step by step instructions
First, you should treat the cuticles and nails with an antiseptic.
- Grinder or file medium hardness the nail surface is polished and the nail plate is shaped;
- Then a primer should be applied to improve the adhesion of the materials. One minute is enough for it to dry;
- Now the nail is covered with a base thin layer of gel, as long as it is not too close to the cuticle. The hand is placed under ultraviolet rays until the gel is completely dry (2 minutes);
- After that it is necessary to apply a modeling gel layer. It is dried in a lamp - 3-7 minutes;
- It is necessary to carefully process the nail plate with gentle grinding. and remove dust from it with a napkin;
- A finishing coat is applied to the nail. If the topcoat is sticky, degrease and polish it. With a non-sticky coating, these operations are not necessary.
Strengthening natural nails with Cosmoprofi gel
Is it possible for pregnant women to extend nails with gel
A woman always strives to look unsurpassed and the period of bearing a baby is no exception. By and large, this cosmetic procedure during pregnancy is harmless. There are chemical compounds in building materials that theoretically can harm an unborn child, but their concentration is not enough for this.


Pregnant women are not prohibited from performing the procedure using quality materials. They should not contain methyl methacrylate, a substance that is prohibited in America and Europe. At high concentration, it leads to serious disruptions in the development of the fetus. At the same time, Korean and Chinese manufacturers still use it.
Pregnancy is a crucial period. Therefore, we advise you to carry out the procedure in a room with ventilation. Use all kinds of antiseptics. During the procedure expectant mother We recommend that you wear a medical mask, and after completion, wash your hands and rinse your nose.
- During pregnancy, it is not forbidden to use a gel for building. It does not have a strong odor, but it evaporates during hardening. Before admission to the hospital, be sure to remove the extended nails, since doctors will examine nail plates;
- As for acrylic, it is characterized by a pungent odor. Therefore, building should be carried out in conditions of enhanced ventilation. Otherwise, breathe in the fumes, which will not benefit either you or the unborn child.
During pregnancy, the structure of the nails under the influence of hormones changes. As a result, the girl's nail plates become brittle or strong. As for the extended nails, they do not adhere well and are easily rejected.


the site does not advise to build up during this interesting period and wait with beauty until better times. Nail dust causes severe irritation nasal mucosa and leads to an allergic reaction. Due to calcium deficiency, natural nails become brittle, which once again proves the undesirability of the procedure.
Mistakes when building nails with gel at home
Sometimes, seemingly newly extended nails begin to flake or crack in the stress zone. In this case, most likely, the technology was broken at some stage. Some of possible mistakes when building up:
- Perhaps, when polishing a native nail, he was drunk, which made it too thin and all subsequent actions were in vain;
- Air got under the tips during work;
- Using old blunt objects;
- Incorrect removal of the previous coating;
- Unsuitable shapes may have been used and gaps may remain;
- Incorrect formation of the center of gravity on the nails;
- Applying design varnish before the top coat;
- Poor degreasing before the procedure, contact of the primer on the skin;
- Violation of other gel modeling techniques.
Leaving is uncomplicated. Visit a beauty salon periodically and make corrections. The master will easily and quickly correct the length and apply the material to the part that has grown. Take care of your extended nails yourself between visits to the salon. It's easy if you follow the generally accepted rules:
- If there is no acetone-free nail polish remover in your arsenal, be sure to buy it. Acetone is a solvent that can spoil appearance extended nails;
- Wear rubber gloves when using aggressive detergents. They will protect the nail plates and the skin of the hands from the harmful effects of chemistry;
- Often, in between visits to the salon, it becomes necessary to process the edges of the nails. Files used with natural nails will not work due to their high softness. We need files that have low abrasive characteristics;
- Artificial ones seem to be durable, but this does not mean that they cannot be broken. We do not recommend pinching, crushing or gnawing them. Damaging the built-up plate, you will provide the natural nail with a lot of trouble;
- The materials used for building are not friendly with high temperature, the effect of which leads to the appearance of cracks and yellowness. This does not mean that you need to give up the sauna or solarium. The main thing is not to expose them to a sharp change in temperature;
- After extension, the cuticle grows more slowly. Sometimes you need to remove it yourself. It is better not to resort to the mechanical method, damage the nail. Buy a dedicated cuticle remover. Apply it to the skin that is adjacent to the nail, wait a little, and then move it off with a wooden stick;
- Regularly moisturize the skin around your nails with oils. Penetrating deeper, they nourish the nail plate and improve growth.
In conclusion, we add that it is not recommended to remove extended nails on your own. It is better to wait a little and look into the salon than to treat damaged nails for a long time. Gel nail extension requires a lot of experience - this procedure is complicated. To get a flawless manicure and good mood, it takes a lot of time and patience, but the result is worth it. Be wonderful, beautiful and healthy!
Gel nail extension step by step for beginners at home
If you liked the article " Gel nail extension: step-by-step instructions with a photo"share your opinion in the comments. Click on any of the buttons below to save to yourself and share it in social networks... This will be your best "thank you" for the material.
Tips on manicure length, style and design vary from season to season, but fashion trends always stand for well-groomed and beautiful hands... Unfortunately, nature has not awarded every woman with perfect nails. Extension will help hide imperfections in manicure, improve the appearance of nails and increase self-confidence.
The most popular materials for this procedure are acrylic and gel.
Gel extensions make the handles look more natural.
The acrylic method assumes a thick and dense coating, and the gel is applied in a very thin layer, and at the same time the nail looks as natural as possible. In addition, acrylic sometimes causes an allergic reaction.
At master classes and exhibitions, the arched method of modeling is most often demonstrated. With the help of this technology, everything looks natural and elegant. To create this effect, use special clamps that give the nail a perfect bend in the form of an arch. This is a very painstaking work, it is difficult for beginners to complete it.
Gel build-up can be done at home on your own. For best results, it is important to follow certain rules and proceed in stages.
It is worth considering carefully the preparation of the procedure, that is, the acquisition of the necessary materials.
- First you need to choose the right gel. It can be single-phase, two-phase and three-phase. The first is best for beginners at home. High-quality modern material does not have a pungent odor, and its consistency should not be too liquid, or, conversely, too thick. It will be more convenient to apply it to the nails, it does not spread. The cost starts from 200 rubles for 15 grams.
- Gel will not solidify without an ultraviolet lamp. No need to chase design or additional features, a simple lamp for home use will suffice. You can buy it at a price of 1000 rubles.
- Professional degreasers can replace plain rubbing alcohol.
- You will need a primer to improve the adhesion between your nail and the artificial turf. The cost is about 300 rubles.
- Brushes for applying gel, a variety of nail files and other important little things are sold in every store with professional cosmetics... For the first few times of self-build, you won't need a lot of them. There should be several files, with different grinding surfaces, including special polishing sticks.
- Dust brushes or lint-free cloths.
- The question that interests beginners is how to properly make extensions so that the length of the nails and their appearance are perfect. To do this, use tips or forms.
What to choose - tips or forms for building
Tips are made of plastic. Working with them requires some skill, because the tips must be cut down at the point of contact with the nail plate and on the sides to the right size... With this procedure, your nail is also actively cut down and undergoes significant damage.
Build-up on forms is much easier than on tips.
The mold is most often a paper template on which the gel is subsequently applied. It is easy to cut to fit any nail. They are divided into upper and lower, depending on where they are attached. Top molds are preferred.

A roll of disposable forms costs from 200 rubles. Replace finished goods can be done with thick foil, if there are no forms at hand.
How to use the forms for nail extension will be clearly shown in the video, where you will learn how to put the nail extension forms under the classic square.
How you can build up nails using forms
In the nails industry today, there are a huge number of different options for nail manicure.
Please note that the choice of the form for building should be carried out depending on the structure of the natural nail, fingers and palm as a whole.
Below is a list of popular forms of nails for building and how to choose a shape for yourself.
- Oval shape
Suitable for almost everyone, with the exception of owners short toes and wide nails. To achieve oval simple - you need to round off the tips, repeating the lines of their base. The oval is considered a classic. 
- Clear square
For large hands with wide nails, a clear square shape... The corners of the square should not be too sharp, otherwise the finished manicure will not be durable.

- Soft square
This shape fits all nails and is the most comfortable. You need to cut your nails into a square, and round off the tips. The length can be any.

- Round form
The nail is cut along the natural curve of the toe and softens in the corners. This form is suitable for owners of weak and brittle nails, as well as those who work a lot with their hands.

- Oval square
An intermediate option between an oval and a square is the rounded tip of a square with corners at the edges. Visually helps to stretch out the palm, suitable for thick fingers.

- Almond shaped nails
These look great on thin fingers with narrow nails. To round off the nail under this shape should be immediately from the growth line. The main thing is not to overdo it with the length.

- Pointed
This shape is very similar to the previous one, only the tip of the nail is not rounded, but sharp. It is quite difficult to walk with such a triangular manicure every day. Not suitable for large hands.

- Stiletto shape
Very long pointed nails are called stilettos. Such a design is preferred by bold and daring natures.

- Pipe nail shape
Favorite shape for many. Very feminine and neat. The pipe has straight edges and a rounded tip, as in almond-shaped.

- Beveled
In another way, it is called the form of lipstick. The cut end of the marigold at an angle of 45 degrees looks very extravagant. Slices can be directed in different directions.

- Beveled curled nails
One of the most unusual shapes. Difficult to create. Suitable for themed events and parties. Too pretentious for office work.
- Age nail shape
From a distance, it may appear that these are stiletto nails, only the tip is an angle. It is rarely used in everyday life, but manicurists love to use this form as an example of their creativity.

- Trapezoidal shape
This form is becoming very popular. When building, the edge of the nail becomes wider than its base, creating the appearance of a trapezoid. This design is sometimes referred to as "duck feet".

- Ballerina nail shape
The name of this style comes from its external similarity with ballet pointe shoes. The edges of the nail are processed as in the almond shape, and the edge as in the square.

How to extend nails on forms - extension technology at home
The gel extension procedure should be carried out only on healthy nails, without damage, burrs and fungus. Clearly following the instructions - building nails at home will not be difficult.
Building stages:
- Prepare the workplace. A regular table will do, the main thing is that direct sunlight does not fall on it, otherwise the gel will harden too quickly, which will affect the quality of the work results. There should be a socket for an ultraviolet lamp near the table.
- Treat your hands with any antiseptic.
- Trim or push back the cuticle. Give nails a maximum length of 2 millimeters. Too much short nails will not allow you to correctly attach the form.
- Run the file over the surface of the nail so that it becomes slightly rough. The gel will not lie tightly on a smooth nail, and then detachment and air ingress are possible.
- Remove dust from the nail with a tissue or brush.
- Degrease your nails, apply a primer.
- Place the mold for modeling nails under the edge of the nail plate, fix it. Check for gaps.
- Cover the nail with the gel with a continuous, even layer. You should start from the center. Apply a drop of material and spread it to the sides. Try to make sure that most of the gel is in the middle of the nail. This will not make it look flat.
- Give the nail the desired shape.
- Dry for 30 seconds under a lamp.
- Apply the gel again, achieve the desired length according to the divisions on the form.
- Dry under the lamp for about a minute until completely cured.
- Remove the paper blank from under the nail.
- Use a file to smooth out irregularities and correct the length.
- Cover with varnish, create a design, and enjoy the result.
The video below shows how to quickly and easily build nails at home.
Fashion trends every season offer more and more options for coloring nails, new unusual materials are used. Once a classic jacket, it has now become one of the ways to stand out in the crowd.
There are color gels on sale for creating a French manicure. After building up in this way, it will be enough just to cover the nails with transparent varnish or add sparkles.
How to care for extended nails at home
It usually takes about three weeks between corrections. The first correction should be done after two.
To protect marigolds, there are a number of simple recommendations.
- Refuse acetone nail polish remover.
- Use rubber gloves when cleaning and washing dishes using detergents.
- Do not expose your hands to temperature extremes. The building material used may turn yellow and crack.
- Apply special oils to moisturize the nail plate and cuticle.
If you follow all the rules and instructions, prepare and approach the matter thoughtfully, then at home you can do beautiful manicure with nail extension, it is not necessary to go to the salons to the specialists. The technology of using the gel allows you to correct all natural defects, and if you try, then artificial nails will look natural.
Many girls complain that they cannot grow beautiful, long marigolds for themselves. They certainly begin to flake off and you can't get the desired length. This is no longer a problem today. You can build up your nails using ordinary ones made with your own hands from any material for these purposes. The procedure for building on the forms is not complicated, it is enough to put a stencil on the nail plates, then apply the gel in an even layer, wait for solidification and long, pretty nails will not keep you waiting long.
The method is quite effective, it gives the nails not only the desired length, but also strength, it is enough to cover it with gel in several layers. Gel, unlike acrylic, does not penetrate into the deep layers of the nail plate, does not cause allergies, allows air to pass through well, allows nails to breathe, and lays down in an even and smooth layer. It is recommended to use a gel based on polymers that give nails strength, shine and maximum surface leveling.
List of materials and tools
 Forthe forms require a standard set of materials, namely:
- with a built-in timer for drying the gel;
- transparent camouflage gel;
- flat brush with artificial bristles;
- degreaser for nail plates;
- molds for a substrate under the nail;
- gel for shine and fixation;
- nail files in a set, different in hardness;
- nail file buff for polishing;
- disinfectant;
- oil for degreasing cuticles;
- tips cutter in order to remove excess length;
- a brush for polishing the pads of the nail plates;
- sticky layer remover .
Preparing nails
Before the extension procedure, you need:
- Tidy up nails, trim off excess length and sand.
- Choose the right place for the procedure so that there is sufficient lighting.
- Wash your hands with soap and water.
- Treat the cuticles with antiseptics so that the gel does not peel off after hardening.
- Remove all small particles of skin from under the nail plates.
- Sand free edges for extension with gel.
- File with a nail file, starting from the edges towards the center.
- Remove the shine from the nail plates.
- Clean the nails with a brush, file with a hard nail file.
- Degrease.
Next, you can start attaching the stencil, applying the base layer of the gel with a brush, lowering it into an ultraviolet lamp to solidify, then filing the nail, giving it the desired shape and length.
It remains to apply a layer of gel and the desired pattern with paints, varnishes, you can use ready-made stencils.

It is important to make sure that there are no contraindications for a gel procedure or an allergy to gel materials. It is not recommended on the eve of taking antibiotics, other hormonal drugs that can reduce the quality of work, the desired effect.
We must not forget that household chemicals are used, therefore it is necessary to carry out the extension procedure in protective gloves.
In the future, it is necessary to carry out a correction every 2-4 weeks so that the nails look constantly neat and beautiful.
Preparation consists in:
- treating hands with antiseptics;
- removing varnish coating, old gel layer;
- cleansing the surface of the nail so that air bubbles do not form under the new layer due to polymerization from exposure to an ultraviolet lamp;
- applying a fresh layer of gel;
- sawing off unnecessary parts of the stencil to give the desired nail shape.
Stepping up instructions
There are two ways to build up nails: on the lower or on the upper forms.
The technology of building up with gel on the lower forms consists in:
- antiseptic treatment of hands;
- degreasing the nail plates;
- removing the upper shiny layer with a nail file to achieve a matte surface;
- treatment of the nail shaft area, degreasing with a cotton swab dipped in a special solution;
- applying universal remedy as base coat and top coat;
- drying by placing fingertips in an ultraviolet lamp for 2-3 minutes;
- adjusting with a nail file if necessary;
- setting the mold under the nail exactly in relation to the edges of the mold so that the gel layer adheres to the plate evenly;
- applying droplets on the nail with a brush, starting from the tips, while in the center you can make a seal, slightly turning the nail to give a beautiful shape;
- secondary placement of fingertips to dry in a lamp for subsequent application of another layer;
- lifting the nail from the edges of the bend in order to align and form a drop;
- degreasing plates;
- alignment with a nail file to give the desired shape;
- grinding, leveling the surface;
- removing small jags;
- smoothing the top coat;
- removing dust from the nail plate with a cotton swab;
- applying a finishing layer;
- drying up to 3 minutes;
- degreasing special means.
The method of building on the upper forms more simple. Formation on the bends is optional, the marigold is already quite even. You just need to practice a little beforehand and you can do it no worse than a professional one.
When building on top forms, acrylic is not used. We will apply exclusively the gel, but the main thing is to strictly observe all stages of the procedure, to process the nail plates with high quality before building. So, first, the master and the client must treat their hands with disinfectants.
- Prepare the nail plates.
- Remove the top shiny layer.
- Move back the cuticle.
- Remove growths from the surface of the nail plate.
- Choose the top mold for each nail separately.
- Put the gel in the center of the mold for further construction.
- Dry your nails in an ultraviolet lamp.
- Apply the stencil to the cuticle area.
- Apply a layer of gel to the mold.
- Place your finger under the lamp for 20 seconds.
- Remove gels from the inside of the nail.
- Dry under the lamp for another 2-3 minutes.
- Carefully remove the top mold.
- Remove the sticky layer with special means from the inside of the nail.
- Gives the desired shape around the edges.
- Remove dust with a brush if you need to add shine to the nails.
It is the upper forms that are more effective when building up if the plates are thin and small.
In order for a manicure to be of high quality and allow you to enjoy beautiful nails for a long time, some rules and tips must be taken into account

Advantages and disadvantages of gel building on forms
This type of extension makes it possible:
- it is enough to lengthen short nails;
- give them the desired shape and elegance;
- improve the appearance and make it match the natural color;
- to build up wide nails of the pads, although it is difficult to do this on their own, only professionals can cope;
- quickly carry out the process unlike, for example, when building up on chips.
The main thing is to get used to it. For work, disposable paper forms are quite suitable. Although experts advise using Teflon or metal. The main thing is to thoroughly disinfect both materials and marigolds after each procedure.
The method is good because it is not dangerous, does not cause allergies, does not violate the integrity and structure of the nail plates. The gel stays on the nails for quite a long time after building, acquires a natural shade after drying and is odorless.
Nevertheless, artificial extended marigolds require careful handling. They can quickly break down from an accidental blow, do not resist mechanical stress. On the other hand, artificial marigolds can always be restored, it is enough just to change the stencil and carry out the procedure again. The gel will give the nails elasticity, visual similarity in color with natural ones. The main thing is to choose a durable material for adhesion, beautiful stencil, skillfully apply the selected pattern.
Coating nails with gel and building on forms is a simple procedure, but it will take skill and time to achieve a perfect manicure. It is important to prepare the nail plates first, select high-quality materials for work, not to be distracted in the process. In the future, protect marigolds from mechanical damage, contact with abrasive chemical elements.