
They become not only decoration, but also children’s favorite characters. Dolls are made in both human and animal shapes. The monkey toy is very interesting. You can do it yourself in different ways: sew or crochet.
Manufacturing options
Soft toy can be done like this:

As you can see, there are many ways to create a soft toy. Some are very simple and suitable even for inexperienced beginners. Complex patterns and it is better to choose patterns if you already have skills in needlework.

What you need
So, a do-it-yourself monkey toy can be sewn using one of the above methods.

To work you need the following:
- pattern or paper, pencil, eraser for its manufacture;
- scissors;
- textile;
- pins;
- needle and thread;
- sewing machine (you can also use ;
- filler (holofiber, padding polyester, scrap scraps);
- decor (plastic eyes, nose, clothes).
If you knit a toy, you will need a hook and yarn of appropriate sizes, as well as a pattern.
Monkey pillow

This DIY monkey toy is easy to sew into this functional interior decoration. The sequence of work is as follows:
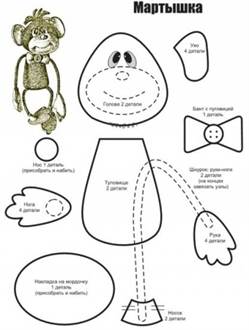
- Make a pattern according to the sample shown in the photo or use the template from the following illustration. If you do not have enough experience, take parts 1 and 2 and combine them into one, although the ears can be sewn on separately, and you can also add a body to the toy with arms and legs.
- We use a simple method: cut out a muzzle with ears from paper.
- Fold the prepared fabric in half right sides inside.
- Pin the pattern from the inside out with pins, trace along the outline with chalk, and make allowances for the seams.
- Cut out the pieces.
- Baste, then stitch along the edge of the garment, leaving an opening for turning and filling.
- Turn the workpiece inside out.
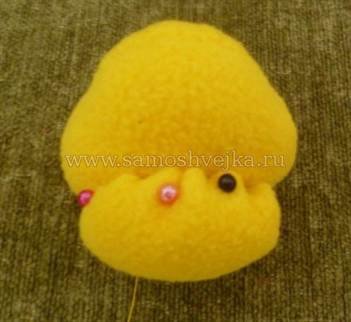
- Stuff the prepared material inside.
- Carefully sew the hole closed with a needle and thread by hand.
- Sew on plastic eyes, a nose, glue or secure before sewing the holes if you bought elements of the corresponding design. Embroider a smile. You can initially provide a volumetric muzzle detail 3 on the pattern above or a flat one that follows the contour of the head.
A very simple do-it-yourself soft monkey toy in the form of a pillow, a small souvenir magnet or a pendant can be made of fleece or felt with the parts sewn together on the right side, when there is no need to turn the product inside out. These materials do not crumble when cut, and small parts made from them can even be glued to the base.

Attic monkey
How to sew a toy monkey with your own hands in the form of a pillow, you learned in previous section. By the same principle, using the most a simple pattern, consisting of two parts, it is easy to sew an original souvenir, which is called an attic or For their production, simplified forms of animals are used. Details are cut out from cotton fabric, pre-colored with a decoction of coffee or tea. Depending on the concentration of the ingredients in the solution and the time spent in it, the fabrics obtain shades from light to dark brown. If you use natural coffee, the fabric will become pleasant aroma. You can also add dried aromatic spices and herbs as a filler.

The inscriptions that decorate the body also add a special flavor to such toys. Clothes for such characters are usually not sewn, and all decor is done with paints, for example, acrylics. In order for the colors to remain bright, the surface where the corresponding elements will be drawn, for example, eyes, is first covered with a layer of PVA.
DIY soft toy monkey: patterns
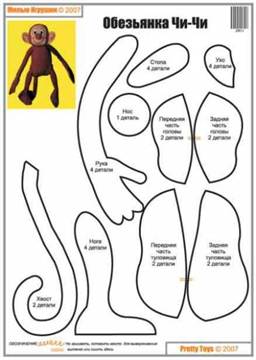
If you have time and enough experience, sew a full-fledged animal, for example, from faux fur. Here you definitely can’t do without patterns. Use the template from the following illustration or make your own version.

The manufacturing process will follow the same technology as for simple product. The difference is that one part, for example, the head, will be made not from two, but from more parts to make it more realistic. Make each element in turn and sew the parts together.
Do-it-yourself soft toy Tilda monkey
You can develop patterns for any monkeys yourself. Tilde dolls are not very difficult to create. These products are very cute and beautiful. For their manufacture, ordinary natural fabrics, not fur. The tilde doll has elongated proportions, elongated arms and legs.
As a rule, a certain emotionally charged character is invented. You can make a monkey boy, girl, princess with a bouquet of flowers, a basket of gifts. Tilde is usually dressed in beautiful clothes and even shoes. The results are humanized animals. You can use pink or light brown fabric as the base material. Clothes are made from any materials: lace and satin are used, sundresses, dresses, and panties are knitted. This is how cute and romantic a soft toy Tilda monkey can be made with your own hands. It’s easy to create patterns yourself, based on the finished product.
Sock monkey
There is another simple way to create cute little animals. In order for you to get a beautiful soft monkey toy, you don’t have to make patterns yourself. Very original and funny characters can be easily made from ordinary golf socks or socks.

It is better to take plain or striped products. Use the diagram from the following illustration or cut out the monkey parts from your existing products yourself.

- The head is made from the front of the sock (where the toes are located). Cut a piece of the sock to the desired size.
- Fill the workpiece with holofiber and pull the free edge together using a thread and a needle in the form of a bag, and then carefully sew up the hole, forming a head.
- From the cut heel of the sock (it’s good if its color is contrasting), make a muzzle, sewing it to the corresponding part of the head and filling it with holofiber.
- Make the body elongated from part of the sock from the foot or elastic in the same way as you did the head, just sew it up on both sides.
- The legs and tail are made in the same way.
- The parts are sewn together.
- Sew on the elements of the muzzle (eyes, nose).
- If desired, make the monkey an outfit from any fabric.
The cheerful striped monkey is ready.
How to crochet a monkey
There are a lot of schemes for. Most a simple toy can be made on the basis of balls and circles.

The diagram for creating a flat circle is shown below. Volumetric ball It is knitted similarly, only the middle part is made with the same number of loops in several rows, and then decreases are made.

The principle of making a monkey will be like this:
- Tie a ball the right size for the head
- Make a ball a little larger size for the torso.
- For the ears, make two flat circles.
- It is also easy to simplify the palms and feet into small balls by attaching them to the body with hanging threads or braided braids. Best option- knit in the form of tubes of the required length based on a ring of air loops corresponding diameter.
- You can decorate the face and the monkey itself in any way, just like a sewn one.
As you can see, a do-it-yourself monkey toy can be made in different ways: from a regular plush product to a cute romantic tilde or a miniature amigurumi monkey. Choose the method you like. Create designer toys to decorate the interior and delight children.
New Year- a long-awaited holiday. It is customary for needlewomen to prepare in advance, so that later, in the New Year’s bustle, they do not waste festive mood for household chores. Practical needlewomen make gifts six months before the onset of any holiday. Since it takes a lot of time to make things with your own hands.


We invite you to sew the symbol of 2016 - a monkey. The pattern has been floating around on the Internet for a long time, but there is no decent description of how to make a fabric monkey using it.

Materials:
- felt - 2 thin sheets;
- sewing threads;
- floss skein;
- sushi stick;
- 2 buttons;
- tailor's scissors;
- a pen or a special stamp for patterns;
- filler (holofiber);
- printed pattern.


Experienced needlewomen can make a monkey from any fabric they like. For beginners, I recommend felt. It does not crumble, the details on it can be cut as you like, and it is easy to sew. I took two colors: yellow for the body and tail, white for the muzzle and paws. The floss picked up yellow. If you are going to give the monkey to a child, you can take a contrasting one to make the toy more interesting and brighter.
It is better to use holofiber for filling. It evenly fills the space inside the fabric and does not create unsightly lumps and “cellulite.” It is very easy to sew such a funny toy with your own hands.
Pattern
Pattern without allowances.
Ideally, you need to cut out as many parts from paper as you need from fabric. If you plan to dress the monkey later, you can sew it without a tail and without an oval belly.

Number of parts:
- body 2 pcs.;
- upper legs 4 pcs.;
- lower legs 4 pcs.;
- tail 2 pcs.;
- face parts 1 pc.;
- ears 4 pcs.;
- belly 1 pc.

All details should be traced taking into account allowances. I left 0.5 cm. If you don’t have enough sewing experience, make allowances of 0.7 cm. Then you can trim off the excess.
Sew a dart on the top of the face.
Connect the upper and lower parts of the muzzle together, baste and secure with pins. Stitch.
Turn out. Carefully straighten the seams.
On the back of the face, attach an oval, baste or secure with pins. Sew, leaving a hole at the bottom for turning inside out.


Carefully cut off the excess.
Turn out the muzzle. Straighten the seams inside, helping with a sushi stick. Stuff the part with holofiber, but not too tightly. This part of the muzzle will be sewn to another part. You will need to hide the excess, so you shouldn’t make it dense.
Using floss threads, sew a buttonhole stitch around the edges of the main part of the muzzle. I overcast the entire piece. This will make it easier to sew it to the body later.
Place the stuffed part on top. Accept or secure with pins. Sew with a hidden seam. Make sure that the parts are not skewed, do not change locations, so as not to redo them several times. Take your time. This is the most difficult stage of sewing a monkey. I sewed the convex part of the face so that the overcast edge protrudes slightly. That is, the hidden seam lay below the buttonhole seam.
Before sewing the muzzle to the body, you need to make a tummy. You can do without a belly. It just makes the monkey look more interesting and fun. First, sew a buttonhole stitch around the edge. Determine the location of the part, secure with pins. Then sew the tummy to the body using an applique stitch. You can put a little bit of filler inside.

Place the muzzle on the body and pin it with pins. Sew with an appliqué stitch. Embroider the eyes with floss threads or make them from small buttons or beads.
Next you need to make the ears. I cut out two pieces each, yellow and white. If, when superimposing the parts, a discrepancy in size is revealed, they need to be adjusted. Then sew a buttonhole stitch over the semicircular part of the ears. They won't turn out.
Place the ears with the white side on the muzzle. Cover the top with the second part of the body. Attach with pins, adjusting the position of the ears.
Sew the body together, leaving a hole at the bottom for turning inside out.
You can start working on the paws and tail. Leave the turning hole on the side of the upper legs. At the lower legs and tail, we leave the place of stitching to the body unsewn.
Turn and straighten the seams, helping with a sushi stick. Please note that fleece is a soft and loose material, it can be easily pierced with a stick. Therefore, be careful when turning it inside out.


The monkey is almost ready. All that remains is to fill it with holofiber and connect everything. Close all holes that were left for turning and stuffing with a hidden seam.
Sew the lower legs to the body in a circle. That is, first on one side of the part and then on the other. It will be more reliable this way.
Attach the upper legs to a button fastening.
Sew the tail in the same way as the lower legs.
The monkey is ready.

It took me almost the whole day. How much time you need depends on your skill and efficiency. It's better not to rush. You can sew such a monkey from fabric of different colors or with a pattern. You can change the scale of the pattern, make it larger or smaller.
Monkey in Russian folk style
No matter how paradoxical it may sound, such toys in the “a la Russe” style look very nice. Moreover, this hand-made tilde is used to bring good news to someone in their pocket.

Textile monkeys look very stylish and interesting both as toys and as sofa cushions. The monkey pattern is not complicated, so in order to get started, the main thing is to have a positive attitude and the desire to get new toy to the collection. Moreover, the monkey is the patron of active and active people, and also brings good luck to those born under its sign, this is an excellent reason to please yourself or your child with a new toy.

This article presents a tutorial on how to sew a monkey with your own hands using a pattern from materials such as felt, fabric and fleece, as well as in Teddy style.
We work with fleece

Fleece - soft and warm material, which is perfect for making a small monkey toy. To make a fleece monkey with your own hands, we will need:
- Directly fleece two different colors;
- Laces to match the material; arms and legs will be made from them;
- Eyes for toys;
- Filler;
- Wire for the tail.
First we have to make the patterns. You can print them or draw them yourself.

The pattern pieces cut out of paper (except for the tail and paws) must be attached to a fleece folded in half, traced, cut out and sewn around the outline with a buttonhole stitch. Don't forget about the hole for filling our monkey. We turn each piece separately inside out, fill it with padding polyester, and sew up the hole for filling.
On the part of the body we embroider the navel in the form of a cross using ordinary black threads, or, while the hole for filling is not yet closed, you can make a small puff in place of the navel.

Next we move on to the head. This part is stitched in the same way as the body, and the ears are made of fleece in different colors (the inner part of the ear is one color, the outer part is the same color as the body). Lightly squash the finished face along the edge, fill it and sew it with small stitches to the already sewn head.

We sew the nose from the same color as the inside of the ears. The nose is a round piece of fabric; it also needs to be filled with padding polyester and sewn to the muzzle, and the ears are sewn to the head. The mouth can be embroidered with red thread.

The next step is to glue the eyes. You can use a glue gun or regular superglue.

When the head has acquired its final form, we sew it to the body. Next, we construct the arms and legs of the future monkey from the laces and paw patterns. You can sew Velcro onto the patterns of these parts so that the monkey can grab each other with its arms and legs, wrapping itself around anything!
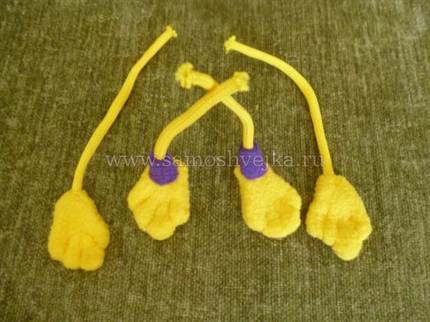
We sew them to the body in place. The tail is made from easily bendable wire sewn into the pattern of the part. We sew it to the body, and our monkey is ready!

Felt craft


Felt very easy to use and also very practical - it does not fray at the edges, it is the same on both sides, and it is also easy to sew and glue, which makes the work very simple. To make a felt monkey we will need:
- Felt in two colors;
- Scissors;
- Filler;
- Ready-made eyes or beads.
Before we start sewing, we will need to make a pattern.


We start with the paws and tail. They need to be sewn with a buttonhole stitch, not forgetting to add filler inside.

We attach the paws to the body that has not yet been sewn, and with a couple of stitches we pin them to the places where they will be located. And only after this we begin to sew together the parts of the body, sewing the legs to the body as if inside it. We fill the body with padding polyester and sew it together until the end.

Now we assemble the muzzle. First, we fix its part on the head part, then sew it along the contour with a buttonhole stitch. Next is the turn of the beaded nose, embroidering a smiling mouth with regular threads. Pink cheeks can be painted with blush, lipstick or regular paints.

When the muzzle is ready, we sew together both parts of the head, don’t forget to insert the ears, and stuff the head with padding polyester. After this, we sew or glue the eyes.

And finally, we sew the head and body, and our charming monkey is ready!

Fabric monkey


Fabric monkeys are very popular as gifts. You can make a monkey with a pocket to convey good news or small gifts. There are a lot of options for making such monkeys, as well as various patterns.
If you want to make a monkey from ordinary fabric, then it is best to take cotton options; they are most suitable for beginner seamstresses.
So, to make a monkey from cotton fabric, we must stock up on:
- Two types of fabric;
- Filler;
- Ready-made eyes or beads.
As in the manufacture of other products, you first need to create a pattern: draw 2 parts for the body, 2 for the head, 4 parts for the paws, two for the tail and ears and 1 part for the muzzle on paper. Next, we cut them out and trace them along the fabric, not forgetting to leave one centimeter for allowances. The details of the muzzle and the inside of the ears should be different in color from the rest of the monkey’s body.
As already mentioned, there are a lot of patterns, so just choose the one that you like the most. You can also add patterns to suit your wishes.


The next step in making a textile monkey is to sew the body parts with wrong side, turn out and stuff with filling. Do the same with the paws, ears and tail. For the muzzle you need to sew four darts and sew the part to the head. Next you need to sew all the details, glue the eyes to the face, draw the nose and mouth with markers or embroider with thread. And the monkey is ready to delight you!
In order to make a large monkey pillow, you need to do the same thing, only in larger sizes.
Video on the topic of the article
For a detailed introduction to the process of making textile monkeys, we offer you a video selection on the topic.
Tilda's toys and dolls have become quite popular recently. They look funny, cozy and arouse interest not only among children. For many, making dolls has become a kind of hobby. The decorative monkey Tilda is very popular in the New Year. The toy pattern is quite simple and does not require any special sewing skills. With a little imagination, you can create a wonderful monkey and no one will have a second one like it.
What to sew a doll from
In order to make Tilda, you can even use old clothes, because it happens that something has not been worn for a long time, but it’s a pity to throw it away because the fabric is of high quality. Surely every housewife has such options. Pieces of chintz, fur, lace - everything will come in handy. The pattern for Tilda's monkey will be based on the original version of traditional dolls.

Tools and materials
First, prepare necessary materials and sewing supplies. You will need the following:
- paper for patterning Tilda's monkey;
- cuts of fabric, you can choose to your taste;
- scissors, needles, pins, threads;
- sewing machine (you can do without it);
- padding polyester for stuffing toys;
- two black beads for eyes.
If you wish, you can make a boy and a girl of monkeys to make it more fun for them. For sewing the base (body), it is good to use knitwear, mainly brown or beige; you will also need a little lighter cotton for the muzzle. The girl will need to sew a dress, chintz with a small cheerful pattern, lace, satin ribbons. For a boy, you will need to sew shorts from soft denim, and a shirt from any bright material.
Preparing for cutting
Now you can arm yourself with a pencil and paper and start creating a pattern. A life-size Tilda monkey is quite bulky, you can make a toy of a size convenient for you, the main thing is to follow the basic proportions. Transfer the pattern suggested in the photo onto paper, you can simply redraw it by hand or print it on a printer in required size. Cutting out a tilde monkey pattern will not cause any trouble; even children can use scissors. It is useful to involve a child in helping; participation in the process develops fine motor skills hands, instills skills in needlework and brings a lot of pleasure.

If you print the diagram on A4 sheet, the doll will be about 35 cm high. There is no need to try to make it a copy of the original, let it be your unique toy.

Tilda (monkey), pattern
Master class with detailed instructions not really necessary, just a little imagination and creative mood is enough. Step by step instructions to transfer patterns from paper to fabric:
- fold the brown fabric in half to make it easier to cut paired pieces;
- lay out the parts of the pattern cut out of paper on it: body 1 piece, arms 2 pieces, legs 2 pieces;
- make the ears one piece at a time dark color, and the inner pieces will look better from a light material, also 1 piece each, also cut out a muzzle pattern from it;
- Trace the elements with chalk and cut them out with a seam allowance of up to 0.5 cm so that the fabric does not fray when sewing.
Fabric tilde is ready. You can move on to the next stage.

Connecting parts
Start with the muzzle, this important point to make your toy look like the original Tilda doll. The monkey will turn out great!
We connect the patterns of the upper and lower parts, having previously stitched a dart on top, thanks to which the face will look voluminous.
Now sew the two halves of the “face” from the wrong side, do not forget to leave a couple of stitches unstitched for turning and filling with padding polyester. Lay the line evenly, otherwise errors will be visible later, since the head will not be covered with anything.
In the same way, connect the details of the ears, dark with light. It is important to iron the parts after turning them inside out, after which all the seams will fall into place, the monkey’s face should already take its shape after smoothing. Also, the circumference of the muzzle can be ironed at a distance of 0.5 cm from the edge for ease of sewing to the head.
Sew the arms and legs together and turn them inside out through the cut left unsewn. Now all the components for the body are ready. All that remains is to put all the parts together.
Mark with chalk on the fabric the places for the ears in accordance with the paper base with the body pattern, bend them inward and secure with pins (there is no need to stuff the ears with filler). Do the same with the arms and legs, previously filled with padding polyester. Now the body is stitched in a circle, removing pins as the stitch progresses. It is important to leave a few centimeters, perhaps somewhere on the side, unsewn for turning inside out and stuffing with padding polyester.
Making a funny face
Well, here we have an almost finished monkey, only without a “face”. Now you need to work with the needle manually. Fill the prepared face with padding polyester and pin it exactly to the base of the face so that when sewing on the monkey does not end up with a crooked mouth. Attach the part by slightly adjusting it if necessary.
The final touch remains. Traditional dolls Tildas have very small beady eyes. Therefore, you can sew small black beads as eyes. Or just make a few stitches with black thread and tint around the seams with a simple pencil or felt-tip pen to give a natural look. Well, now everything is ready. Agree that the Tilda doll is easy to sew. The monkey (the pattern and detailed explanation are given above) turned out as if it were alive! Now we need to take care of her clothes.

Dress for Tilda
No doubt, the children will be delighted with what is happening! At such a moment, they certainly will not leave your side. Together with your child, choose the fabric for the monkey girl’s dress, and decide what kind of lace to trim the edges with.
First, the pattern is drawn on paper, cut out, transferred to the material and cut out on the fabric with seam allowances. It is important to keep the measurements right for your monkey. If you did that, you need to make a larger dress, respecting the proportions.
The outfit is sewn quite simply. Need to stitch side seams, then the shoulder ones. Finish the edges with a hem and sew on lace and ribbons for beauty. You can sew several different outfits for different occasions, then your daughter will definitely not be separated from the toy even for a minute. Putting a dress on Tilda the monkey is not difficult; it is easier to do it through the legs, slightly bending the doll.

Boy's clothes
Dressing a monkey boy is a little more difficult, since you need to sew both shorts and a shirt. For pants, you can form a rectangle of fabric, make an incision at the bottom, and sew the edges. You can sew a narrow elastic band into the belt, especially if the boy will participate in children's games. The shirt can be made using the dress pattern, only a little shorter, in a boyish style - without lace or bows.
The clothing can be detailed and have a small collar or pocket.

Add-ons
And if your imagination runs wild, you can come up with a lot of additional things for the monkeys. Sew winter options clothes, hats, boots, knit a small scarf. Don't be afraid to experiment with your doll's makeup. To make it brighter, you can tint your cheeks with blush or add hair extensions from threads. And you will certainly get the most beautiful monkey Tilda.
A little about Tilda dolls
Tilda doll is an original fabric toy, loved by many for its simplicity and warmth. The first doll appeared at the turn of the 21st century. Very soon Tilda became famous all over the world, and both children and adults adore her. IN recent years Various versions of dolls were invented: (described above), as well as a Scops Owls doll to decorate the bedrooms of little girls.
Distinctive features of the dolls: natural body color with a slight tan, long graceful limbs, small eyes, pink cheeks, elegant clothes made from natural fabrics, like the entire body.

The beauty of the toy is that it is created by hand, and no two dolls are exactly alike. Once you try to create a toy, it is no longer possible to give up this hobby.
If you have an original Tilda (monkey) doll, you can save the patterns for your collection. And try to sew other versions of the toy.
Useful tips
The symbol of 2016 is the fire monkey, which represents fun, inventiveness, activity and unpredictability.
According to tradition, on New Year's Eve it is customary to give souvenirs associated with the symbol of the year. And of course a good gift For friends and family, this could be a DIY monkey craft.
Here are some ideas and workshops for creating such a wonderful souvenir:
DIY sock monkey toy

You will need:
· 1 pair of socks (striped socks are easier to cut)
· White felt
Eyelets or buttons
· Stuffing material
Cotton pad or filter padding
Cut out eyes from felt.
Turn the sock inside out and smooth it with a warm iron

Draw the pattern on the sock using a dry erase marker or fabric chalk.


We secure the parts with pins. We sew the parts together on a sewing machine.
Cut out the details.


There will be a hole between the monkey's legs through which the sock can be turned inside out.
We turn out the legs, torso, arms, ears, with the exception of the tail.


We fill the parts with stuffing material.
We sew up the hole between the legs with a hidden seam. To hide the thread, thread it side by side and pull it out on the other side, cutting off the excess.


Fill the arms with stuffing material and sew the raw edges together, gathering them so that they are on the inside.

We stuff the ears with filler and sew the raw edges together with a blind stitch. Fold each ear vertically.


Cut a piece of cotton lining that will be three times the width of the tail and the length of the tail when stretched.
Fold the lining three times and sew the end to the end of the tail (from the wrong side).


We turn the tail inside out, pushing the lining inside.


All that remains is to sew all the details.
Symbol of 2016: o monkey from a brush with your own hands
You will need:
Chenille wire (fluffy flexible wire)
· Marker (for giving shape to parts)
· Scissors

- Make the shape of the head. Curl your tail.
- Form the body and insert into place.
- Attach the front and back legs and twist to keep them in place.
- Attach the ears to the head, bend the tail.
- From yellow chenille wire cut out the banana.
Paper monkey: DIY craft

This monkey craft can be made to wrap sweet gift, for example, packaging of sweets.

Cut out a monkey from brown construction paper or kraft paper, cutting the tail in a spiral.
Wrap the tail around a banana (or an extra-long package of candy) and secure the legs with a paper clip or tape.
You can also make other monkey crafts from paper and other available materials.


DIY felt monkey
This felt monkey can be a good craft and a gift as a keychain, interior decoration or car decoration.

We cut out the felt parts according to the template.


We glue the white felt pieces to the ears using glue. We sew the parts of the arms, legs and tail with a buttonhole stitch. We put the filling inside.

We attach the parts of the arms, legs and tail to the body, and sew them to the back of the body.

We attach the white felt piece to the muzzle piece and glue it with glue, and then sew it with a buttonhole stitch.
We sew on a beaded nose and also embroider a mouth. Using blush we create cheeks.

We sew the two parts of the head together with a buttonhole stitch, first inserting the ears and a loop so that the toy can be hung. Do not sew up the area at the bottom, filling the head with stuffing.

Then we sew on the beaded eyes.


We put filler into the body and sew the head to the body.
DIY paper monkey mask

You will need:
· dark brown and light brown colored cardboard
· big toy eyes
· black marker
· clothespins
· scissors
· pencil


Start making the monkey's head. Cut a piece of cardboard in half and glue the two halves together. Secure them with clothespins and leave to dry for 15 minutes. You can also use a stapler instead of glue to hold the two halves together.

Cut out the shape of the monkey's mouth and draw a smile on it using a marker.
Cut out monkey ears from light brown cardstock. Fold the ends of the ears over and glue them together. We fasten them with clothespins.
Glue the monkey's eyes and ears to the head and let dry for 30 minutes. Ready!
DIY monkey made from nylon tights
DIY New Year's craft: pencil with a monkey (video)
This monkey souvenir can be easily made from polymer clay. For the craft you will need polymer clay, acrylic paints and tools for modeling from polymer clay.


