We are often accustomed to seeing in films how happy people they take it out from under the Christmas trees or receive some kind of gift as a gift, but the key here is that the gift is packaged in beautiful box. This is done mostly to create intrigue, less often to preserve the integrity of the gift. Of course, it’s much easier and less time-consuming to pack a prepared gift into packaging from a store, but it’s much more interesting to make a box
So, your product will look the way you want, and besides, such boxes are unique in their kind, so you will make them yourself. Making such boxes is not at all difficult, and most likely you yourself will receive indescribable pleasure from the work done with your own hands.
Box in classic style (for small gifts)
First, you'll need to roughly estimate the size of your gift, taking into account several important factors such as height, gift thickness, and gluing allowances. We will take these dimensions as a basis when making boxes for New Year with your own hands.
The sharp ends of the box need to be bent inward, towards the center of the bottom square. Using the remaining uncurved ends, we grab the bent ones and wrap them inward. This will be our cover.
We make the second box using the same principle, and due to the fact that this square is one centimeter smaller, the box will close perfectly. Moreover, if you are thinking about how best to make a beautiful box for a gift, then take a box for your other half thick paper, not cardboard. 
Such a home-made box will fit a gift measuring 5 or 6 cm and up to 3 cm high, i.e. approximately the size that could fit in your palm. If the gift is very small, and you don’t want it to dangle in the box like a rattle filler, then you can put light tissue paper on the bottom, prudently crumpling it.
A more convenient alternative would be simple napkin. As you have seen, making such a small gift box is not at all difficult.
Such a box with a gift inside should be tied with a ribbon or a beautiful ribbon.
And since making such packaging boxes is not difficult, we want to show a few more options.
Box-cone
The bottom of such a gift box will be a piece of foil, which you will use to seal your box. The cone can be beautifully disguised by making a Christmas tree out of it.
Try it - it's great inspiration!
Box in the form of a prism
- A square cut out of thick paper measuring 18x18cm;
- Scissors;
- Ruler;
- Pencil;
- Ribbon and hole punch.
So, we draw the square in half and diagonally. We bend the corners towards the center, and then from the center of the edge into the deflections of the central square you need to draw even arcs. 
After this, use scissors to cut off unnecessary corners, and at the rounded ends we pierce small holes using a hole punch and stretch a thin ribbon into them.
Box with a hiding place
And now we want to suggest making a gift box that will come with a little surprise. The box is a fake - it will fall apart when you remove the lid. By the way, the lid is made according to the same principle as we described in the classic box.
You can decorate the inner surface to your liking, glue pictures of old postcards, beads, and then put the gift in the finished box and pack it.
Don't forget the tape!
Felt box
You can decorate the box according to your preference. This box would be good as a handmade New Year's gift box.
So that's it. These are just the basics, more complex circuits suitable for those who already have experience in creating more simple models boxes.
Good luck and inspiration!
Views: 960
Content
You can wrap a gift in a beautiful and original way with your own hands. The creation process itself will bring you a lot positive emotions, and you will also save money and give a piece of your soul and love. To create a square box with your own hands from cardboard you will need very little effort, imagination, love and some tools and materials:
- cardboard (thin and corrugated);
- PVA glue, glue gun, office glue;
- tape (double-sided and regular);
- scissors and stationery knife;
- ruler;
- a pen that no longer writes;
- all kinds of decor.
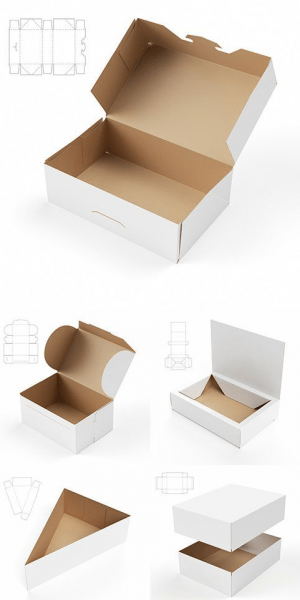
Ready template
Every cardboard box starts with a template. Without it, it will be difficult for you to create beautiful and neat gift packaging. We have prepared several box templates for you that can be used not only as packaging, but also as a box for storing jewelry, threads, needles and other small items. There are a huge number of template variations; you can come up with a design yourself. Our advice to you: first try to build a box from newspaper or thick sheets of magazine, and then take on the final version.

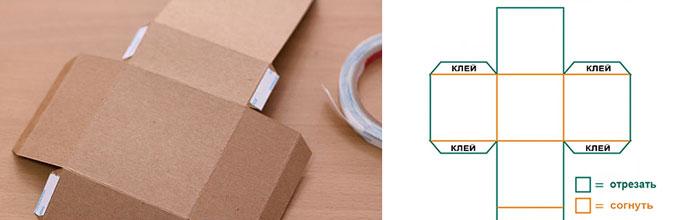
The template needs to be enlarged to the size you want the box to be. Then you need to print it and transfer it to cardboard. The dotted lines are the fold locations. Use a non-writing pen or the thick edge of a pair of scissors to follow these lines and mark where the folds will be so that the cardboard will give in easily and bend exactly the way you want. Making a square cardboard box with your own hands is as easy as shelling pears, especially if you use designs that do not require the use of glue:
We offer several more cardboard box templates that can be created without a single drop of glue.
It's all about special "hooks" with the help of which the structure holds and does not fall apart. Well, now let's get to the decor.
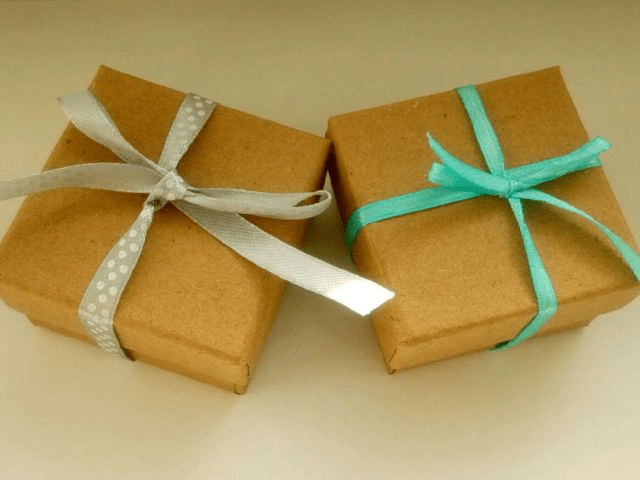
A square box made of cardboard with your own hands (especially if the cardboard is thick) can be decorated in the most different styles and with the use different techniques. It could be decoupage, thick cardboard will withstand this technique, it could be a composition made using the quilling technique, flowers from various materials. You can also use appliques, ribbons, beads, stones, rhinestones and other decor. Try to choose details in the same style so that the design does not look too rough and ugly. It is not necessary to completely decorate the box; sometimes just craft paper or the texture of the cardboard itself and an ordinary delicate satin ribbon are enough.
Don't forget to decorate the inside of the box too. Its finished appearance will depend on this. Inside the box you can put a soft satin pillow, decorate the inside with foil, wallpaper, gift paper and other materials.

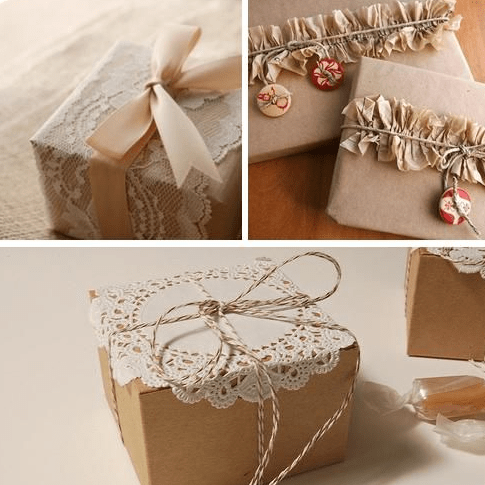
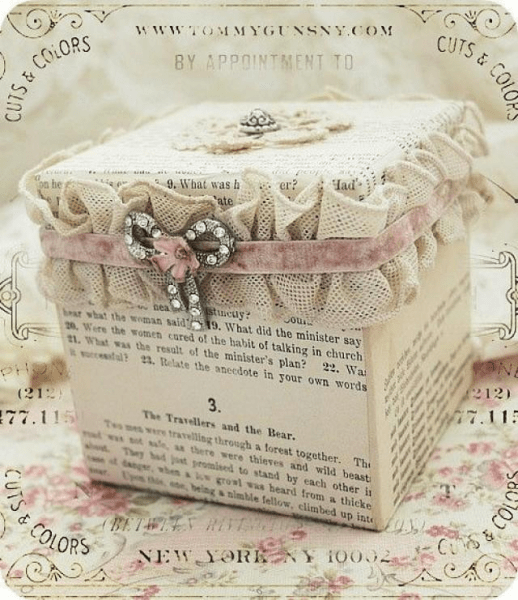
The lace material looks very beautiful in the design of the box - the packaging turns out to be in such a rustic or rustic style.

For decoration, you can also use burlap and thick wallpaper with an interesting print. Such boxes can be used to store things, small parts, and decorations. If you make partitions inside from cardboard, it will turn out to be a real organizer for jewelry, buttons and other small items, which can be presented as a gift.

Think about the hobby that the person for whom the gift is intended is interested in. Maybe he loves traveling and the box can be decorated with stamps, he loves flowers, then use a floral theme, he is a lover of cars and technology, then use some details characteristic of this hobby.
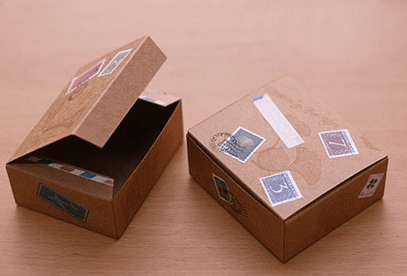
Even ordinary postage stamps can become original design DIY cardboard boxes.
We create a template with our own hands
You can create a template for a square box with your own hands. To do this, you need to draw a square on a sheet of base material required size. Next, from each corner you need to draw straight lines as long as you want the height of the box to be. For the box you also need to make a lid that will be literally 2 mm larger than the packaging itself.
Use double-sided tape, PVA glue or a glue gun to join the cardboard pattern pieces together. You can also use thin multi-colored cardboard if your gift is not too heavy.
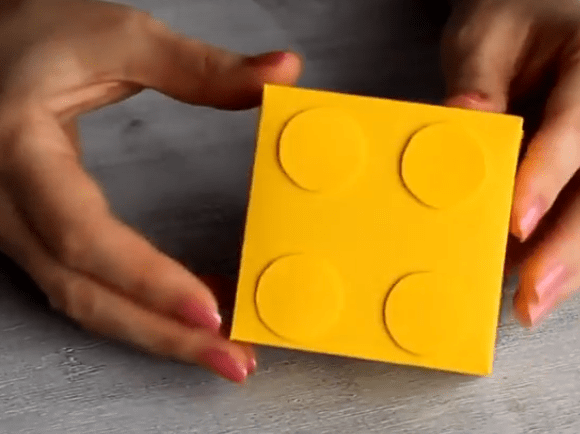
Cardboard box in the shape of a Lego piece
For this square box we will need fairly thin cardboard, which should be colored on both sides. Children will love this packaging; you can hide candy, designer toys, small children's jewelry, collectible cars and other souvenirs in it.
First you need to create a template, print it and transfer it to colored cardboard. By the way, the template can be immediately printed on colored cardboard.

Next, you need to use blunt scissors along the folds so that the cardboard bends beautifully. And then you can start creating interesting packaging. Use regular craft glue to join the pieces together.

Now you need to cut out four identical circles from the same cardboard from which you are making the box. By the way, the size of the box will depend on the size of your gift. You can even make a traditional design: a box within a box. The child will be interested in opening one box and finding a new one in it.
Now you need to take thick adhesive tape or thick double-sided tape on which we will attach our round pieces.
You should end up with something like this interesting box in the form of a Lego constructor.
Quick box
If you need to arrange a gift very quickly, but do not have suitable packaging at hand, then you can quickly make it yourself. In this case, use thin cardboard - it is more convenient to work with and the packaging is more accurate.
First you need to cut out a square from cardboard and draw straight lines from corners to corners.

Now carefully assemble your box and secure it with glue. From a slightly larger sheet (about 5-6 mm) make a lid using the same principle.
All that remains is to decorate our packaging. If the gift is not too heavy, then you can attach a ribbon to the lid, by which you will hold the box and present the gift.
Guys, we put our soul into the site. Thank you for that
that you are discovering this beauty. Thanks for the inspiration and goosebumps.
Join us on Facebook And VKontakte
It's time to start packing gifts for those closest or far away, but loved ones. We do this too, and here are the ways we especially like. Many of them are editorial website took note.
New Year's mail
A package from Santa Claus - isn't this what every child and (to be honest) adult dreams of? A real one, with stamps and a red and white ribbon, like in your favorite movie about the New Year.
For travelers and dreamers
Warm packaging
Finally, there is a worthy use for an old but beloved sweater. The technique is simple, but the originality, coziness and warmth are simply off the charts.
Pompoms
If regular bows aren't your thing, pom poms are a great substitute. They are fluffy, warm, cute and very New Year's. Yes, and they are easy to make.
Natural elements
Going out into the nearest forest or grove, you can find a lot of cute decorations for gifts: these are traditional pine cones, and small twigs that can be painted in any color and decorated with tiny pom-poms.
Made from fabric
Beautiful fabric can serve as excellent gift wrapping - and most importantly, you can make a lot different options. The packaging process itself is very simple:
1. A square of fabric needs to be put front side down, place the gift in the center.
2. Tie two opposite corners of the fabric with a knot.
3. Tie two more opposite corners.
4. One more knot.
5. And one more, final one. Now you can add decorations and you're done.
This is how you can make absolutely unique fabric. With whales, for example, they are fascinating.
Instead of boring tapes
If you want to do something very unusual, you can try embroidering a decoration or wish directly onto the paper. Paper is a malleable material, and this will not be difficult. Another option is to use paint that you can write on with chalk, like on a blackboard. And if you have sewing machine, you can easily do something like this:
Stamps
A method that simply captivates with its simplicity of execution. All you need is a pencil with an eraser, paint and a sponge. A simple and cute polka dot pattern is always appropriate.
Cut it out
Very simple but unusual way decorate almost any packaging. We advise you to first prepare a stencil from thick paper, then trace it on wrapping paper and cut out one half with a paper knife, then bend it back. It's better if under top layer There will be one more - it’s more elegant.
Hand painted
This is where you can let your imagination run wild! Whether it's pastel watercolor stains or dense paint strokes - it's up to you, the result will be amazing in any case. And unique, which is also important.
Paper boxes
In fact, you can find patterns online for paper boxes of almost any shape. Most often they can be printed on a printer in full size and then slowly transfer it to thicker paper.
Salt dough labels
Known since primary school The salt dough recipe will also be useful to us in the difficult but pleasant task of gift wrapping. The most common cookie cutters (and now you can find cookie cutters on New Year theme) and the most simple materials- cute gift tags are ready. Patterns on the dough can be made using any available means, for example, attach knitted napkin and press it, you get a beautiful knitted pattern.
Often there is a need to collect all the small stationery items in one place, place trinkets in a neat box, or even come up with decent gift wrapping without having any special skills. In these cases, a simple set of materials and crazy hands will save you. Handmade boxes with your favorite design are perfect for storing things or a worthy addition to a gift.
There are many ways to make a box from paper or cardboard, we will tell you about some of them and go through everything step by step.

Square box with removable lid
You will need: paper, scissors, everything for decoration. Take printed thick paper in the form of a square of the size you want to make the box.


We mark the diagonals, bend one corner to the center and then fold it again so that the line of the first fold coincides with the diagonal marked parallel. We unfold and repeat all this with other corners.

Having unfolded everything, we get a workpiece along which we make cuts along the lines on both sides of one of the diagonals, not reaching the center of the square. Now we fold the corners of the transverse diagonal towards the center and fold the first fold again, forming the sides.

We connect the free ends of the sides together, and also apply the remaining transverse parts to the center along the previous folds.

For the base, take square plain paper 3-4 mm smaller than the square for the lid and do the same as with the lid. We decorate the box with ribbons, rhinestones, stickers, shells, etc.


Square box with hinged lid
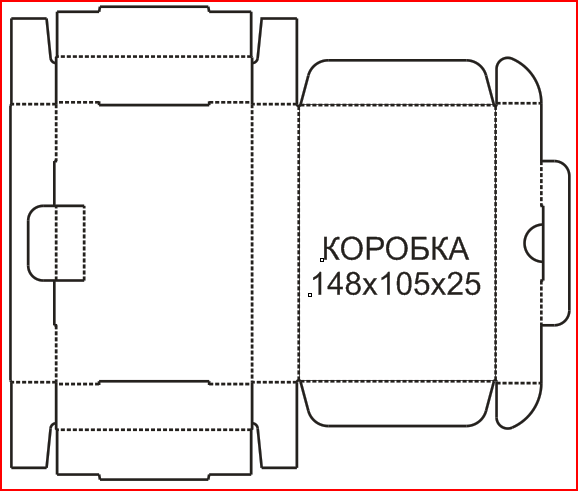
We make markings on cardboard with wrong side according to parameters: length 9 cm, width 7 cm, height 3 cm, cover height 1.5 cm, as shown in the diagram. Now you need to push the folds on the base, you need to do this boldly and carefully, push on the top from the outside of the marked lines, on the bottom from the inside.

If all is well, there will be a small distance between the fold lines and the top will close smoothly. We make folds along the pressed lines and glue pieces of double-sided tape onto special recesses for fastenings. Remove the film from the tape and glue it to the base of the recess. As a result, we get a box like in the photo.

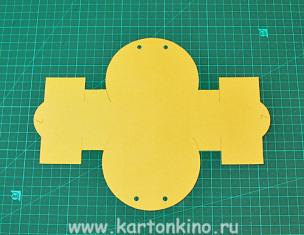
Round box with lid
We select thick cardboard and paper in the desired colors, leaving a thicker one for the bottom and lid. Using a compass, we mark two circles on thicker cardboard, which will become two parts, and the diameter of the lid should be greater than the diameter of the bottom. We cut out the blanks.


Let's proceed to the sides, to do this we cut out a strip equal to the number Pi multiplied by the double radius of the bottom circle. Then we make small cuts on one side of the strip at a distance of 1 cm from the edge and roll the side into a roll.

The same, but narrower side is made for the top. It is important to take into account the difference in the diameters of the lid and bottom so that upper part sat on the base tightly and did not fly off. Then we decorate the box the way your heart desires.


Pyramid box
We find a diagram of a box with our own hands in the form of a pyramid, print it out and carefully cut it out around the perimeter. Now this blank can be used to make other boxes.

We select paper of a suitable color and apply the blank to the sheet, trace it and cut it out. Using a creasing tool and a ruler, press out the fold lines and the central square.

We bend all the punched lines, make holes in each petal of the pyramid using a hole punch and thread the thread or ribbon. The rope should pass crosswise between the petals and its ends should come out next to each other.

Now we tighten the tape and the pyramid will form. A cute addition to this miracle will be a tag with a wish on the same ribbon, as well as decoration with sparkles or voluminous rhinestones.

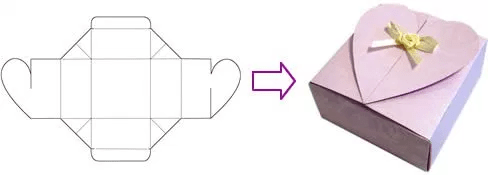
Heart shaped box
This type of box is made by analogy with a round one, but it has its own nuances, so we will tell you how to properly make such a box with your own hands.


Once you have determined the size of the box, you should choose thick cardboard or a lightweight sheet of plywood. Then we draw and cut out heart-shaped templates for the lid and bottom, which we apply to the selected material.


We also cut out sides from the material that correspond to the dimensions of the bottom and lid, and for the lid the side will be twice as narrow. Don’t forget to cut notches along one side of the sides, which will become fasteners to the bases.

We fasten the edges of the sidewalls with glue, tape or a stapler. To decorate the bases, you can use beautiful fabric, decoupage, beads or just paint. The edges can be decorated with an elegant twisted rope or fringe. We fasten the sides and base.

Bonbonniere box
This type is intended for presenting sweets or jewelry, but can become a storage area for small items or office supplies. We print the template on patterned paper, cut out along the lines, being careful not to wrinkle or spoil the base.

Using a utility knife, cut out stripes in two petals. We bend two petals with flowers to the center, and then the rest and press the tips of all the petals to the center, creating a rounding. Squeezing the two flowers tightly, we thread them through the slots.


All master classes on how to make a box are also available to children and can serve as the basis for a technology lesson or home practice.

There are schemes by which you can make boxes in the form of a house, cake, boot, star, Christmas tree and even snowflakes without spending a lot of time and resources. This approach to gift wrapping for loved ones will always evoke pleasant emotions and be remembered for a long time, and you can make the gift individual.

Photos of boxes


Large and small, rectangular and round, open and with lids - there are hundreds of options for cardboard boxes. They are original and stylish decoration interior, add a special charm to any gift. And most importantly, even a child can solve the problem of how to make a box out of cardboard!
Principles of making cardboard boxes
Before you start making a cardboard box, you need to decide for what purpose it will be used. The size will depend on this finished crafts. And accordingly, the material depends on the dimensions. For large boxes, it is better to use thick cardboard. These products are suitable for storing clothes, books or home decoration. And for boxes for all sorts of little things (photos, jewelry, memorable trinkets, etc.), thick wrapping paper or fabric is suitable. Depending on the material, you can choose the decor of the item. These could be:
- fabric flowers;
- applications;
- ribbons;
- brooches;
- lace;
- origami;
- stickers, etc.
How to make a cardboard box with your own hands?
Of course, now there are many options for purchased cardboard gift boxes. But it’s much more pleasant to make such a thing with your own hands! Moreover, it will take a minimum of time, but you will get a lot of pleasure.

Materials:
- cardboard;
- scissors;
- pencil;
- glue.
Instructions:
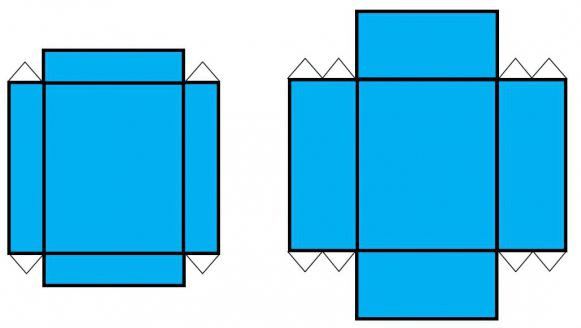
- Draw a rectangle on the cardboard (the bottom of our box).
- We draw the same rectangle at the top and bottom - this is the depth of the craft.
- On the left and right we also draw a rectangle, the width of which is equal to the previous ones, and the length corresponds to the sides of the original rectangle.
- Next, on the adjacent sides of the completed parts, we put aside a small segment, which we connect to the main line at an angle of 45 degrees (these are the ears with which we will glue the box).
- We cut out the blank and glue it together.
- If you need a lid, then we follow the same pattern, only we make the main rectangle a centimeter larger than the first one so that the lid can be put on the box.
This craft can be decorated, painted, or left in a minimalist design.
How to make a small cardboard box?
Small boxes are a cute option gift packaging. And if she also round shape, then such a gift will definitely win the heart of the owner.

Materials:
- cardboard roll of paper towels;
- pencil;
- PVA glue;
- wrapping paper;
- a sheet of thin cardboard;
- breadboard knife
Instructions:
- Using a breadboard knife, cut the required height of the box from the roll.
- We cut off the second cylinder - this is the lid for the box.
- We trace the circumference of the roll on cardboard and make 2 blanks.
- We cut out circles from cardboard, leaving a couple of millimeters of allowance.
- We cut out the same circles from paper, glue the cardboard and paper together.
- We make 2 more circles of paper for the inside of the lid and bottom.
- Glue the circles to the bottom and to the lid, cut off the excess with a knife.
- On paper we cut out the wrapper for the box and lid. To do this, measure the circumference and plot it on the drawing, adding 0.5 cm; We make an allowance of 2-3 cm to the height segment (depending on the height of the craft), cut this allowance into cloves.
- Cover the box and lid with paper, bending the teeth inward.
- We also cut out the wrapper for the inside of the box (we do not make allowances for the cloves).
- We put the lining in the box and glue the joining seam. The round box is ready. You can decorate it at your discretion by matching the decoration to the style of the wrapping paper.
How to make a cardboard gift box with your own hands?
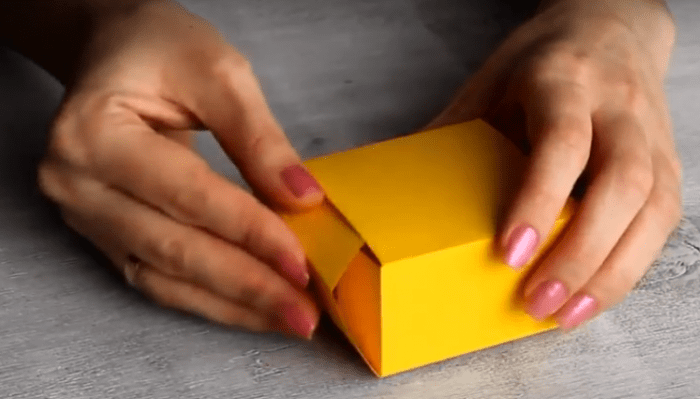
For threads, needles, or simply for storing necessary small items, a small item made of thin cardboard will be useful. To make a cardboard box, you can look for diagrams in the arsenal of origami techniques. It will take about 10 minutes to make, and we will only need 2 sheets of cardboard (one a little larger).

Instructions:
- Take 1 sheet and fold it in half.
- Unfold and fold diagonally.
- Let's expand. We bend the corners towards the center.
- We bend the fourth part of the long side towards the middle.
- We do the same with the opposite side.
- Now we bend the short sides towards the middle.
- We unfold all the folds of the short side, lift it along the fold and fold it inward.
- Repeat the previous step on the second side.
- Glue the tails of the bases together.
- Repeat steps 1-9 for the lid. The box is ready.
How to make a cardboard box with a lid?
An original box for baked goods or small souvenirs is easily and simply made from cardboard egg packaging.

Materials:
- egg carton;
- scissors;
- PVA glue;
- applique from an old postcard;
- satin ribbon.
Instructions:
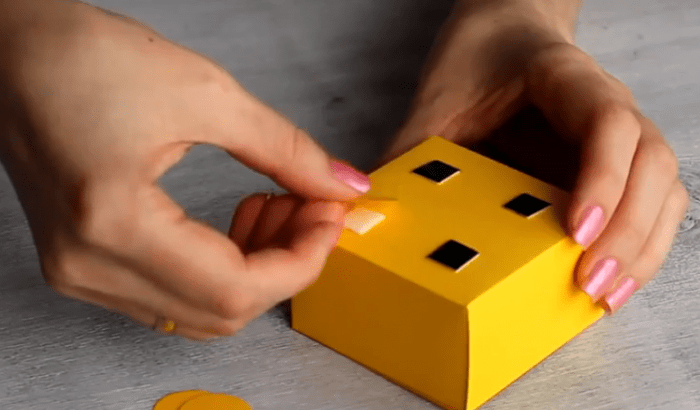
- Cut out the required size box from the bottom of the workpiece.
- We cut out the lid in the same format.
- Use scissors to make 4 symmetrical holes in the base and lid.
- We thread the ribbon through the holes and tie it nicely.
- We glue an applique from a postcard onto the lid. The box is ready.
DIY cardboard boxes: diagrams

Knowing how to make a cardboard box, you can give any gift profitably. In addition, all the little things in your home will always be in their place, and cardboard crafts will become wonderful decorative elements. And it is very important that no special skills are needed for such practical creativity.