At a more conscious age, it is impossible to tear the child away from the TV or computer screens if there are favorite cartoons. The presence of bright, interesting, colorful, funny cartoons in our time makes parents increasingly come up with various activities and entertainment for their children, so long as they do not sit for hours in front of the TV. One of the most popular children's cartoons is Smeshariki. Funny characters always make kids laugh out loud, so why not combine business with pleasure and make paper smeshariki yourself? This is a great joint activity for the child and the parents.
In this master class, we will tell you how to make such funny crafts with our own hands, we will provide schemes for the formation of little ones.
We will create our cartoon characters from colored paper or cardboard. You will also need scissors and a pencil.

Laughing we make Malysharikov
First, let's get acquainted with the characters of our cartoon:
- Krosh;
- Nyushenka;
- Hedgehog;
- Lamb;
- Losyash;
- Aunt Sovunya;
- Kar Karych;
- Kopatych.
We decide on our favorite characters and get to work.

The ideal option would be printed blanks of images of our heroes. Well, if there is no way to print, you can simply transfer them to paper to get templates. And already with the help of them we cut out of cardboard. The auxiliary parts, highlighted in black, also need to be cut out.
The cut out workpiece must be glued. We form a square, on the auxiliary parts there are special letters that will help you fold the parts in the desired direction.
Don't apply too much a large number of glue, cardboard material may get wet, after which it will tear.
Add the final touches to our character, glue the legs, arms, horns. Draw with the baby the face of his favorite hero together. So our Barash is ready.
To make it easier for you to come up with fun game with the baby, consider the rest of the cartoon characters.

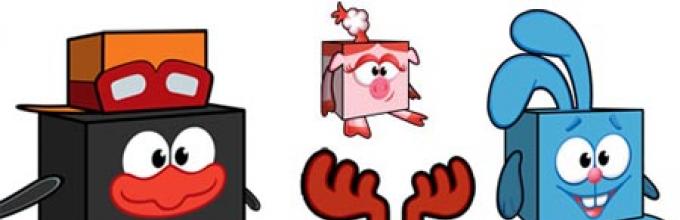
Meet this Krosh. We make it in the same way as the previous one. The kid will be happy to make a fun adventure lover.

Sweet Nyushenka looks like this:

Ping's inventor can also keep you company:

As you can see, making such cute characters is not difficult at all. Such an exciting work will bring a lot of laughter and pleasure for you and your children. And this despite the fact that the costs are the lowest.
Spend a little time for your baby and grateful smiles, and laughter will not keep you waiting.
Related videos
For ease of doing the work, we provide a selection of videos on this topic.
Learn how to make Smesharikov out of paper, plasticine, discs and show this process to children. Sew a backpack for your child in the form of your favorite cartoon character.
How to make Smesharikov out of paper?
This very accessible material will help you make interesting crafts with your children. If you want, craft all the heroes so that the child has complete collection... But first, let's remember what each smesharik has a name. Here are the acting characters of the three age groups... Teenagers include:
- Nyusha;
- Hedgehog;
- Krosh;
- Barash.
- Losyash.
- Sovunya;
- Kar Karych;
- Kopatych.

We will make them in the form of cubes. To do this, take:
- colored cardboard;
- pencil;
- scissors.
- If you have the opportunity to print the presented image on a color printer, do so. If not, then transfer it to paper that will become templates. And already with it, cut out blanks from cardboard.
- The auxiliary places are marked in black, which also need to be cut out.
- By folding a square, you will apply glue on them, matching the same letters, first create the base of the hero.
- Then it remains to glue the horns on top of it, down the legs, on the sides of the arms. Let the child draw the face of the hero, stick it on his face.
It is made of lilac cardboard or paper according to the same principle as the previous hero. The next will be Krosh - a cheerful and optimistic rabbit, an adventure lover. We cut it out of cardboard or paper blue... With the help of parents, using glue, the child will quickly assemble this cartoon hero.

Of course, you can't do without romantic Nyusha here. Cut it out of pink cardboard, on which you need to apply some details with red paint.

As always, Pin will invent something like that, and nothing that he says with an accent, the kids understand him perfectly.

From next material they will be able to create on their own. Adults will only show you how to make Smesharikov.
Smeshariki do it yourself - figurines from plasticine
This activity will be interesting and exciting for children. But here's what you need to prepare first:
- plasticine;
- plastic knife;
- modeling mat;
- a soft cloth to dry your hands.

For Kopatych, an economic good-natured bear, you will need plasticine of the following colors:
- Orange;
- yellow;
- White;
- black.

The main color of this hedgehog is red. From this plasticine, make his body, legs, arms, ears. After plasticine white whites will be created for the eyes, let the child roll thin sausages from the black mass, frame the character's eyes with them to turn them into glasses. You need to make pupils, nose, hedgehog needles from black plasticine.

For the following plasticine figurine, you will need material:
- purple;
- white;
- black;
- Red.

Let the children mold the dreamy Barash from pink plasticine.
- First, the base of the body and head of a round shape is created, then you need to make many small balls from the same plasticine.
- They are attached to the back of the animal, simultaneously flattening it a little with a finger, then the lamb will put on its fluffy coat.
- To make horns, you need to roll 2 small sausages out of black plasticine, attach them to the head, and bend them.
- From the same plasticine, it is necessary to make hooves, which are attached to the bottom of the arms and legs.
- It remains to blind the nose, thin lips, piercing eyes and rejoice at what wonderful plasticine figures are obtained.

How to make Smesharikov others can be seen in the next photo.

Smesharik from CD
This is also not difficult to do. So that soon funny Nyusha will settle in your house, take:
- old SD;
- colored paper;
- double-sided tape or glue.
Crochet is created from blue, white and red paper. Make it the same as in the photo. The child will be delighted, he will ask to make other cartoon characters from the disks.
After Smesharik Krosh and Nyusha have chosen a place for themselves in your apartment, create their friends. Let the Hedgehog also live here.

You can create them in the same technique or in a different way.

If you want to close the center hole in the disc, then see how to make the following crafts. Take:
- CD disks;
- glue;
- plastic bottle caps;
- hacksaw for metal.
- For each character, at the beginning, we act in almost the same way. Place the disc on colored paper of the desired color, outline it, cut it out.
- Now you need to make eyes for each character. In the hedgehog, they are framed with glasses, in Nyusha they are slightly narrowed, and the rest are wide open.
- Having created the facial features, go to the hairstyle and ears, which are also different for Smeshariki. But they have the same stand.
- Using a hacksaw, cut a hole in it into which you could insert a disc with the character's image.
How to sew funny animals with your own hands?

Such toys will certainly fall in love with children, with them they will fall asleep better, it will be easier to wake up. Even those mothers who do not have sewing machine, everything will certainly work out. After all, such toys can be created without it, sew them on your hands.
Here is a list of those used:
- fleece of different colors;
- scissors;
- filler;
- threads.

- His body consists of 6 parts, they need to be sewn sequentially, grinding the side of one with the side of the other workpiece. Then you need to sweep the sidewalls first and last. You will get a circle. Fill it with padding polyester through the upper hole.
- For each ear, you need to carve out 2 parts in a mirror image. Sew them in pairs, stitch them on the hands to the hare's head, at the same time stitching up the hole that remains here.
- The tail is made in the form of a flower; it will need two identical parts. They are grinded, leaving a small area not yet closed in order to put a little padding polyester there. Sew up this hole while also pinning the tail into place.
- Each arm and leg is made up of the same mirrored cut pieces. They are also sewn in pairs, stuffed with padding polyester, then attached in place.
- Based on the picture, cut out the whites for the eyes out of white felt, you need to glue eyes for toys or small black pupil circles on them. Sew them onto the character's face.
- Make a nose out of pink fabric by cutting a circle out of it. Gathering its edges on a thread, put a little filler inside, tightening the thread, sew on the muzzle. Make the teeth out of white felt, attach them with blue thread, at the same time embroider the rabbit's mouth.
How to sew a backpack in the form of a Smesharik?
He will also be devoted to this topic.

Children will be happy to carry their things in Kindergarten in such a shoulder bag. To sew a backpack in the form of Smesharik Nyusha, take:
- light pink, hot pink, pink fleece;
- white fleece;
- some black fabric;
- 2 meters of belt belt;
- coarse calico;
- strap adjusters - 2 pcs.;
- polyethylene foam;
- holofiber filler;
- snake lock;
- threads;
- scissors.
In order to keep the backpack in shape, use polyethylene foam. In this case, a foil-coated one was taken, which can be bought at a hardware store.

Print the patterns of the face, legs, pens, ears on a printer.

Making the base of the backpack out of pink fleece. You will need a circle with a diameter of 25 cm, which you can draw with a compass or, for example, attach such a large plate to a canvas folded in half to cut out two circles.

Two more such blanks will be needed from polyethylene foam, cut them out in the same pattern, but also do not forget to leave allowances for the seams.

Two more circles need to be drawn on a piece of coarse calico, cut out. Now, without seam allowances, cut out the blanks of Smesharik's eyes from white fleece, make eyelids and hair from dark pink, and her nose from pink.

Complete the image with pink hearts and black pupils.

Here's how to sew the backpack next. Fold together a circle of fleece, polyethylene, calico, sew them along the edge to connect.

Now sew the facial features here one by one. The whites of the eyes and nose first.

Then the eyelids and hearts on the cheeks.

Next, you need to attach the hair and pupils, make the nostrils on the nose using a zigzag stitch.

Make the eyelashes and mouth of Nyusha with the same seam. From coarse calico, polyethylene foam, light pink fleece, cut a strip of 54x6 cm in size, cut it out, do not forget to add to the seams.

Mark with a crayon where the hearts will be located, sew a strip of these three materials. Use a zigzag seam to attach the hearts here.

Now take coarse calico, polyethylene foam and dark pink fleece. From each material, you need to cut a rectangle 25x2.5 cm in size, cut it out by adding seam allowances.

You will need two of these pieces, each of which needs to be sewn around the edges to connect all three layers.

Sew a zipper to the blanks.

Now you need to cut out the arms, legs and ears of Nyusha from light and pink fabric. Sew the parts in pairs to make the body parts double.

Fill them with filler, more should be placed closer to the holofiber's hooves, and less on the other side.

Cut a strip of 20x13 cm from dark pink fleece.Fold it in half, sew on one side, wrap the edges with blanks inward, attach this future pigtail to the part with a lock. Sew in a zigzag stitch in a circle.

The pattern helped you to sew a backpack. She also made it possible to make body parts the way they should be in this fabulous character. Put them on the body and on the head of Nyusha, sew them on.
On the wrong side, this one-color circle must also be sewn to the strip with a lock and to the one-color one so that the two halves of the backpack are connected.

Turn the backpack inside out, this is what you get at the front and back.

Remember, Nyusha's hairstyle is a pigtail. It needs to be filled with holofiber, stitched in two places with a thread, cut into thin strips the tip, tie an elastic band here.

For lining, the coarse calico needs to be folded in half, on the other hand, make the edge semicircular.

Insert this lining into the backpack, sew to it at the top of your arms.

This is a wonderful shoulder bag.

For a boy, you can sew it according to the same principle, but using the image of another character, for example, Baby. The presented pattern will help with this.

Here's how to sew a backpack with your own hands so that the child can carry his personal belongings and toys, using the image of his favorite cartoon characters.
Smeshariki from tires
Smeshariki made of tires will decorate a summer cottage or the courtyard of a city house. For such crafts you will need:
- tires from wheels;
- acrylic paints;
- plywood;
- drill;
- self-tapping screws;
- brushes.
Their paws, ears, hairstyle for Nyusha are also made of plywood, then they are attached to the rubber using self-tapping screws.

You can cut the limbs of animals from the conveyor belt, also paint it, fix it on the base.

If you want to show children how to make Smesharikov from plasticine, then let them watch the next story. It shows how to blind Krosh.
A young video blogger will tell his peers how to make it from disks.
Smeshariki are favorite cartoon characters of modern children. A distinctive feature of this cartoon is great humor, which will appeal to adults too. And since parents can watch this animated series with their children, then they can build beautiful craft with their own hands, it will not be difficult for them together. From this article you will learn how to make Smesharik out of paper. Such a joint pastime will be a great reason to get even closer and have a great evening.
How to make a smesharika out of paper and CDs
Since all smeshariki are round, you can experiment a lot with the base for their torso. Children and their parents create these heroes from fruits and vegetables, from balls of yarn, from balloons and even from CDs. In order to make such a craft, you need to have a couple of CDs, colored paper and glue stick.
First, think about the composition: how your smesharik will stand, what will be in his hands, then cut out the hero's arms and legs, then the details of the image. Place all the pieces on the disc and glue them. You can complicate the craft and add other materials besides paper: Nyusha make a nose out of a button, and glue it on his head artificial flower, Sovunye stick a voluminous pompom on the hat. Experiment!
Smeshariki masks
Another idea for paper crafts for Smeshariki lovers is masks that you will like not only to make, but also then have fun playing with them. In order to please your child with such a mask, you need to save the picture, which will be located at the bottom, and simply print it on a color printer. Then cut out the mask you like, stick it on thick cardboard and glue a thin elastic band to it. Ready! Now you can arrange a whole theater where you can transform into any hero. If you don't have a color printer, it doesn't matter! Just redraw the mask onto a white piece of thick paper and repeat the process with an eraser!

How to make a smesharika out of paper with your own hands: applications of heroes
In order to create a funny applique in the shape of a Smesharik with your child, you also need to print the templates already given below on a color printer. It is best to stick them on thick paper or cardboard with glue stick. When working with PVA glue, the drawing may be smeared.

Such work develops thinking, as it resembles collecting puzzles. You are at the moment of creating a work next to your child and help him find the desired element!
And here are some more templates for other Smeshariki! Create together!

Come up with your interesting ideas to create paper crafts-Smeshariki! Try to create voluminous works, give your child full scope in this exciting form of creativity.
Smeshariki are favorite cartoon characters of modern children. A distinctive feature of this cartoon is great humor, which will appeal to adults too. And since parents can watch this animated series together with their children, then it will not be difficult for them to build a beautiful craft with their own hands together. From this article you will learn how to make Smesharik out of paper. Such a joint pastime will be a great reason to get even closer and have a great evening.
How to make a smesharika out of paper and CDs
Since all smeshariki are round, you can experiment a lot with the base for their torso. Children and their parents create these characters from fruits and vegetables, balls of yarn, balloons and even CDs. In order to make such a craft, you need to have a couple of CDs, colored paper and glue stick.
First, think about the composition: how your smesharik will stand, what will be in his hands, then cut out the hero's arms and legs, then the details of the image. Place all the pieces on the disc and glue them. You can complicate the craft and add other materials besides paper: Nyusha make a nose out of a button, and glue an artificial flower on her head, Sovunye stick a voluminous pompom on a hat. Experiment!
Smeshariki masks
Another idea for paper crafts for Smeshariki lovers is masks that you will like not only to make, but also then have fun playing with them. In order to please your child with such a mask, you need to save the picture, which will be located at the bottom, and simply print it on a color printer. Then cut out the mask you like, stick it on thick cardboard and glue a thin elastic band to it. Ready! Now you can arrange a whole theater where you can transform into any hero. If you don't have a color printer, it doesn't matter! Just redraw the mask onto a white piece of thick paper and repeat the process with an eraser!

How to make a smesharika out of paper with your own hands: applications of heroes
In order to create a funny applique in the shape of a Smesharik with your child, you also need to print the templates already given below on a color printer. It is best to stick them on thick paper or cardboard with a glue stick. When working with PVA glue, the drawing may be smeared.

Such work develops thinking, as it resembles collecting puzzles. You are at the moment of creating a work next to your child and help him find the desired element!
And here are some more templates for other Smeshariki! Create together!

Come up with your own interesting ideas for creating paper crafts-Smeshariki! Try to create voluminous works, give your child full scope in this exciting form of creativity.
On sale today you can see a lot of new products for children's creativity, offers all kinds of kits for creating interesting crafts... But such a pleasure is not cheap. Sometimes parents are looking for more rational ways to have fun. You can spend leisure time with children almost free of charge, if you show a little imagination. Any one is suitable for creating crafts. waste material to be recycled. One such example is the old ones. They are sure to be found in every home with a computer. Today these media are becoming obsolete, but they should not be thrown away.
When going through old things in a table or locker, mom and dad throw away all unnecessary things. But spoiled CDs will be turned in their hands and folded back, hoping that these products will come in handy someday. If a child has an interest in creating all kinds of handicrafts with his own hands, then it is time to use the mirror surface of these outdated media for creativity.
Craft Smesharik Nyusha from a CD disk and colored paper:
By supplementing the disc with colored paper, you can create any character from the Smeshariki cartoon. Pretty Nyusha is a lively animal who loves love novels and outdoor games. Pink color and daisies will help to reproduce this heroine.
1. Red, pink, or purple paper is suitable for the job. If whole leaves are not available, then it is quite possible to use segments, since all the details will be small, and the disk will form the basis.
 2. Cut out all the elements for Nyusha's face: eyes, nose and mouth.
 3. Paste the black dots onto the white circles, then attach the pink crescents. These will be Nyusha's eyes, to the corners of which fluffy pink eyelashes should still be added. Glue the nose-patch to the central point of the disc, and position the thin mouth obliquely.
 4. Cut out two small red ears and glue on the head. Decorate the crown of the head with a wreath of daisies, because Nyusha loves flowers.
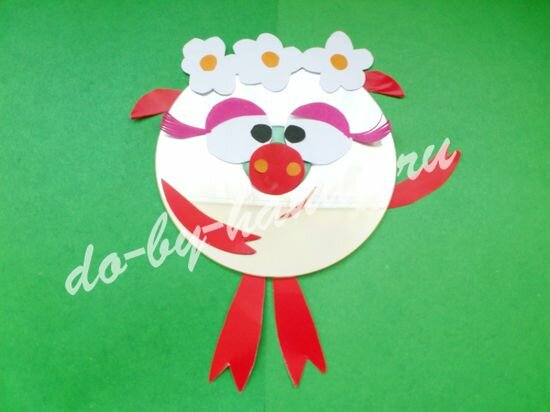 5. It remains to make the upper and lower hooves and attach them with glue in any order. Nyusha's craft from the CD is ready.
Craft Smesharik Barash with his own hands from a CD disk and paper:
To create Barash, you will need a lot of round parts and a little patience. Using sharp scissors, you need to cut out the required number of small spirals. They can fill the entire surface of the disc or only process the edge. It all depends on the availability of free time and the perseverance of the child.
 1. Prepare the disk for use.
 2. Draw many circles on the back of the purple paper. Use a compass or some kind of cap to create even details. Cut out the circles and try on if there are enough of them to fill the entire circumference around the perimeter. Create a spiral from each circle by cutting it out with scissors.
 3. Having prepared all the spirals, glue them on the mirror side of the disc. This is not difficult at all, just glue the edge of the disc with glue, and then attach the spiral and press it down with your finger.
 4. While the glue is drying, cut out the rest of the pieces to create the Ramb. These will be the horns. The most rational way is to draw one curved horn on a sheet of blue paper, then bend it in half and cut out two elements at once, which will be a mirror image of each other. You will also need white and black circles for the eyes, wide nose and a small red mouth.
 5. Glue all the received blanks on the disk to get Barash's face.
 6. It remains to attach the arms and legs. Cut them out of purple paper and the hooves out of blue. Smesharik Barash from the CD is ready.
Craft smesharik Losyash. With your own hands from the CD disk:
Smeshariki from a disc is one of the ways to use these mirror products for crafts. Funny cartoon characters have their own distinctive features so they can be easily copied, only you need some colored paper. Losyash has large horns, hooves and a wide nose. This must be taken into account when creating crafts from a disk and paper.
 1. It is advisable to use yellow and brown paper for the product to make Losyash more realistic. You cannot do this work without glue, scissors and a simple pencil.
 2. Cut out two round pieces to make the eyes, glue the orange eyelids and attach the black pupil dots. Cut a wide nose out of brown paper, shaped like a drop.
 3. Glue the resulting elements to the disc, covering its central part.
 4. Cut the horns out of brown paper. Moose should have branched antlers. Draw a beautiful sketch on the back of the paper, then fold the sheet and cut out two parts of the same shape at once. Cut out small ears from orange paper.
 5. Glue the horns and ears to the disc.
 6. To add a little character to the image will help a small mouth, glued obliquely, and eyebrows.
 7. Cut out the upper and lower limbs from orange or brown paper, shape them into hooves.
 8. Glue to Losyash's body.
Hand-made Smeshariki crafts will decorate the children's room and give good emotions to the child.
In the same way, you can make all Smeshariki from a CD disk and colored paper. Such a unique collection of smeshariki will become the pride of the child.