Crocheting for the home is becoming more and more popular. And if earlier our grandmothers and mothers knitted mainly napkins and tablecloths, now we can even knit vegetables, fruits and berries! Voluminous crocheted "sweets" will be a wonderful decoration for your kitchen, and will also serve as wonderful toys for a little hostess) And if you think about a filler for knitted "food", it will also become an educational toy for a small child.
In this master class we will master crocheting grapes.
For knitting we need:
- 100% cotton yarn in two colors - purple and green
- filler - synthetic winterizer
- wooden beads with a diameter of 1.8 mm
- hook number 1.5
- scissors
- needle
I have purple yarn - "Vita Pelican", I knitted it in two strands,
and green - CHARM (Vita Cotton)
Legend:
vp - air loop
ss - connecting post
psbn - half-column
sc - single crochet
ssn - double crochet
ss2n - a column with two crochets
increase - we knit 2 columns from one loop of the previous row
decrease - we knit 2 columns together. We begin to knit a column and, without completing it (there should be 2 loops on the hook), we knit the next one - there are already 3 loops on the hook. Then we grab the working thread and knit these 3 loops together.
The number of loops that should be obtained after the row is knitted is indicated in brackets.
"Hard" grape or crochet beads
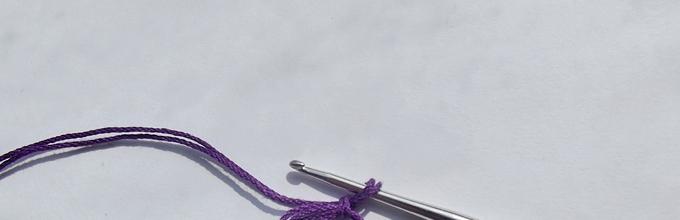
We start knitting grapes.
We make a ring on the index finger of the left hand and knit 6 sbn into it.


We close the ring tightly by pulling on the short end of the thread. This will be the 1st row.
Such a ring is also called a sliding or magic amigurumi ring.
Now we knit in a spiral without turning the product. Further, we evenly make 6 increments in each row.
2 row - 6 increments (12)

3 row - (1 sbn, increase) - repeat 6 times (18)

4-7 row - knit without increments (18)
Now insert the bead and start making the deductions.

8 row - (1 sbn, decrease) - repeat 6 times (12)


Cut the thread and fasten, hide the tail inward. And voila, the first grape is ready!


This is how we tied the bead. And now I will show you a variant with a padding polyester.
We knit a "soft" grape
If you have a synthetic winterizer instead of a bead, then you should knit eight rows in the same way (that is, make the first row of decreases) and only then fill with a synthetic winterizer. And then again we make the half-columns to the end.

Thus, we knit the right amount of grapes. I will make a small bunch, for this 15 pieces are quite enough for me.
I knitted 10 pieces with beads and 5 with padding polyester, because I knit for little kids. And they really need to develop tactile sensations. Some of the grapes are hard, some are soft - that's work for little fingers, sorting out and looking for the berries you need.
If you are thinking about crocheting for the kitchen, then all the berries can be made the same in terms of filling.
We collect grapes in a bunch
Now we combine our berries into a bunch. To do this, take a green thread and knit a chain of 10 VP:

We knit 9 psbn on it, starting from the second loop from the hook. This is the tip of the brush.

If you have more berries than me, then you should knit a chain more authentic.
Now we take one grape, hook it with a crochet hook, stretch the thread and knit sbn.

We knit 4 psbn along the base of a chain of 20 VP.

Then 4 VP, grab 1 berry, knit sbn and 4 psbn along the base of a chain of 4 VP and 1 psbn on a long chain.

And again 4 VP, grab the berry, knit sbn, 4 psbn, 3 psbn on a long chain. We pick up a half-loop in the middle and knit 1 psbn


Thus, we form a bunch in random order, changing the length of the branches (the number of bp) and the number of knitted psbn on a long chain.


So the bunch of grapes is ready.
Grape leaf
And now I will teach you how to crochet leaves. In general, the sheet can be knitted in two ways, it all depends on the size of the sheet you need.
Option 1: small leaf
My bunch came out small, so for it I will knit such a sheet, it will just fit it in size:

Tie a chain of 5 VP, close in a ring with ss. Then knit according to the scheme:

You can also tie a twig. We knit a chain of 10 VP, starting from the second loop from the hook, we knit 9 psbn.


Option 2: large sheet
Such a leaf is suitable for a large bunch of grapes.
![]()
We knit a chain of 10 VP, close it in a ring and knit according to the scheme:

After the sheet is tied and the thread is secured and hidden, it can be slightly steamed.
That's all, done. You can set the table and invite guests.

In this master class, a napkin under the interesting name "Grape bunch" will be created using a crochet hook, a diagram and description in which will be attached along the way. This article will act as the so-called instructions for knitting napkins, which will be an excellent decorative element for a dining table under a vase of fruit or bread.
How to crochet a napkin "Grape bunch": a diagram with a description
To work, you will need the following tools and materials:
- Acrylic yarn in white, blue and green;
- Hook number 3.
Let's get to work. Let's start knitting with a chain set of 10 air loops, which we will close into a ring using a connecting post. We will perform the next row with a single crochet, two columns in each loop of the bottom row. A total of 20 columns should come out.

Next, we will tie a chain of 10 air loops and attach the last loop through one column of the previous row with a column with two crochets. Thus, we get an arch. We knit 9 more of the same, but we knit not 10, but 7 air loops in a chain. The next row will consist of arches in which two columns with one crochet are knitted. It is necessary to knit 4 air loops between the columns.
The next row is knitted in the same way, but we make 6 loops over the arch. In the next rows we will add two columns in each arch.
When 10 columns are tied over the arches, you should begin to decrease the loops of the columns in the resulting petals. In order for the canvas not to pull, you need to make new petals.
The photo shows a napkin before tying bunches of grapes.

Now let's take an acrylic thread of blue color for knitting grapes. Attach the thread to the arch and wind 7-10 elongated loops on the hook. The number of these loops directly depends on the thickness of the thread. We will pull all the loops through the hook and secure with a half-column. Next, we knit 3 air loops and move on to knitting a new grape berry.

So you need to tie 9 berries. Cut off the thread and secure it. In a circle, on all fans, we will tie the first tier of bunches of berries.
Let's start knitting the leaves. To do this, first we connect 3 columns with one crochet, two air loops and again 3 columns with one crochet. We will knit 3 air loops in order to move on to a new bunch. With the help of connecting posts, we will tie the bunch itself. We tie three connecting posts between the berries.
After the row has been completely knitted with green thread, you can start tying the second tier of berries on each bunch.
The next row must be knitted with the addition of two columns for the leaves in one loop of the lower row on each side of the arches. The green part of the knit should be wide enough. You should knit like this until the end of the bunch.
When knitting with color is completed, it is necessary to cut off all the ends of the threads, tuck them in and tie the napkin in a circle with arches of 6 air loops. The hook must be injected into each loop of the previous row. As a result, we get such a wonderful napkin with grapes.

The "Grape Bunch" or "Grape Vine" motif can be used both when crocheting and knitting. Do it like napkins, ornaments in the form of brooches, collars, or use such motifs to decorate hats or jackets. This motif also looks good on shawls, dresses and skirts.
The motive "Grapevine" can be knitted with a completely different version of the napkin than that described above. This option is more delicate, delicate and even elegant.
This napkin is made of round openwork motives, embossed leaves and bunches of grapes from motives according to the scheme presented below.

Veins between the leaves appear after knitting with a single crochet behind the back wall.
In knitting this type of napkin, it is better to adhere to the following knitting principle: first, one round motif is knitted according to the scheme 10a, then 14 motifs "grapes" according to the scheme 10c, which are attached to the round motive. We knit 12 leaves according to the scheme 10b. Now we will connect 22 grapes, of which, using a needle and thread, we will collect two bunches as in diagram 10. The branches with a bunch are connected using a cutting. When the center of the napkin is tied, we will tie the product with a net. Next, we will knit 14 openwork motifs, according to scheme 10a and connect them to each other and simultaneously with the mesh. This is done in the process of knitting the extreme row with the help of pico.
We conclude the master class with several videos on this topic. We hope you will find in them for yourself useful tips, take notes and try to knit beautiful napkins do it yourself. Of course, this job is not easy. To knit such a napkin, you need to train, develop skills. The main thing is to try, experiment, learn, because the result will definitely please.
Video selection on the topic of the article


The "Grape Bunch" or "Grape Vine" motif is used for crocheting and knitting. These can be napkins or decorations in the form of brooches, collars or trim details for hats, jackets, etc. This motif is used for knitting and crocheting shawls, dresses, skirts, etc.


Napkin "Grape bunch"
The size of the napkin is 41 cm in diameter.
For knitting, you need a steel hook number 7
MID-NAPKINS
Start in the center with a white thread, 8VP. SS for ring shape.
1 circle: 3VP, 15 CCHs in the ring. Join.
2 circle: 4ВП, 2 С2Н in the same place as the SS; 3 C2H in each CCH around. Join.
3 circle: 4 VP, 4 C2H in the same place as the SS. * skip 2 C2H, 5 C2H in the next C2H. Repeat from * around. Join.
4 circle: CC in the next 2 C2H, 4 VP, 3 C2H in the same place as the last CC, * skip 4C2H, 7 C2H in the next C2H. Repeat from * around, finish 3 C2H in the same spot where the first 3 C2H were made. Join.
5 circle: 4VP, 3 C2H in the same place as CC, 7 C2H in the central C2H of each group of C2H around, finish 3 C2H in the same place where the first 3 C2H were made. Join. 6 circle: 4VP, 4 C2H in the same place as CC, 9 C2H in the central C2H of each group in a circle, finish 4 C2H in the same place where the first 4 C2H were made. Join.
7 circle: 4VP, 5 C2H in the same place as the CC, 11 C2H in the center C2H of each group in a circle, finish 5 C2H in the same place where the first 5 C2H were made Join and break.
8 circle: Attach the green thread, in the same place SS, 6 VP, * in the same place do (C2H, 2VP) 6 times and C2H; 5ВП, skip 3 С2Н of the next group, 5 С2Н in the next С2Н, 3ВП Skip 3 С2Н, 5С2Н in the next С2Н, 5ВП, С2Н into the central С2Н of the next group, 2ВП. Repeat from * around, join and break.
Scheme


Video MK napkins:
And here's another Napkin with the same fragments, but how delicate! 


Napkin with grape bunches.

The product is assembled from round openwork motifs (sk. 10a), embossed leaves(sk. 106) and bunches of "grapes" from motifs after sk. 10c, which are connected in the knitting process. Leaf veins are formed as a result of tying RLS behind the back wall.
When starting to knit napkins, it is advisable to adhere to the following sequence: first, knit 1 round motif according to scheme 10a, then 14 motifs "grapes" (cx. 10c), attaching them to a round motif (7 on the left and on the right)
Next, make 12 leaves (cx. 106), connect them together according to scheme 10 using a crochet (or needle). Next, tie 22 "grapes" and collect two bunches of them using a needle and thread according to scheme 10. Sew two more "grapes" into the middle of the branch of leaves. Connect the branches to the bunch using a cutting (caterpillar cord). After the central part of the composition is finished, tie with a net according to the scheme of 10 g. Next, knit 14 openwork motifs (sk. 10a). connecting them together and at the same time with the net during the last row with the help of "pico".

"We knit grapes."
Special attention I would like to devote to the technique of performing "grapes". The work is done on a bourdon, which is obtained by winding 10-20 turns of thread around a pencil. Carefully remove the bourdon and, grabbing the working thread, secure it with the VP. Then tie the RLS ring. The 2nd row is performed with "rococo" or twisted columns in the following order: pull the loop by how many mm, wind it evenly (not very tight), holding it with your middle finger right hand on the hook 15-20 turns of thread, stick the hook into the nearest RLS ring, grab the working thread, pull the loop and pull it through all the turns on the hook. Make a yarn over and pull it through the loop on the hook. Repeat the algorithm 13-15 more times. Attention! For knitting rococo columns, a cone-shaped crochet hook is recommended, which thickens towards the handle, but you can also use a regular one. The execution of such columns requires a lot of experience, attention, accuracy and patience. The most difficult stage in this process is pulling the hook and thread through the "tunnel" of the turns. This can be done different ways- with one dexterous movement or gradual pulling through each loop, but you can choose the most acceptable option for yourself only as a result of long-term practice of skills when knitting rococo columns.


To
Grapes represent


To crochet a bunch of grapes you need purple and green yarn. You can use cotton thread or thin wool yarn, select the hook according to the thickness of the thread.
Grapes represent bulky bumps crocheted and connected in a bunch. Such knobs are also used as an independent decorative element, sometimes as buttons.
To knit a bump, cast on 4 air loops and fold the chain into a ring with a connecting post. Next, insert your hook into the center of this small starter ring and knit st. b / n, while laying the end of the thread under the posts. In the first row in the ring, knit 12 tbsp. b / n.

Continue to knit the third row of st. b / n, while pulling the working thread up to the height of the second row. In the third row, work about 20-22 stitches in a circle. At the end, make a connecting post into a nearby loop, cut the working thread, secure the tip by pulling it through the loop and thread it by pulling the bumps under the extended loops.


The connected round knob does not have a hole in the center, on the one hand it is flat and a series of loops runs along its circumference, and on the other it is bulky and convex.

When knitting the second and next berries, tying a bump, immediately connect it into a bunch. To do this, insert the hook into the half-loops of two knobs and knit a connecting post. Connect the edges of the two knobs by knitting two connecting posts. If it is necessary to connect the bump with the third berry, then continue to knit connecting posts along its edge until the next junction. Then cut the thread, secure and thread the tip.


We connect a bunch of berries in the shape of a pyramid. In total, you need to tie 10 berries.

Crochet grape leaf follow the following pattern with green yarn.

As a twig, knit a chain of air loops of any length and knit a row of st. b / n, then form in the form of a loop.

Lay a knitted bunch of berries, a twig, a leaf on the product and sew as an applique. The knitted vine will not only adorn garments, it can also be used as an element in Irish lace or to create beautiful panel for the interior.
"Bunch of grapes"

"Hard" grape or crochet beads.MK in photos:

We make a sliding loop and knit 6 SBN into it

We knit in a spiral without turning the product. In the 2nd row, make 6 increments (my remark: the author, apparently, by increments, means to knit 2 SBN from one loop of the base).
In the 3rd row - 1СбН, increase, so on to the end of the row. From the 4th to the 7th row we knit without increments. Next, insert the bead:

8th row: 1Sbn, 1 decrease (my remark: the decrease, apparently, is 2 unconnected SBN with a common top). Repeat 6 times.
Next, we make decreases, but with half-columns without a crochet. That is, when there are 3 loops on the hook, then, without grabbing the working thread, pull the first loop through the next two. When we knit a ball, cut the thread and hide the tip inside.

Video MK knitting balls for a bunch:
Option with padding polyester

Combining berries into a bunch.
We knit 10 VP with a green thread. We knit 9PSbN on it.


We grab another berry, etc. 


1 Leaf option: 


2nd version of the leaf


More about grapes: 


May 10th, 2014  Elena Tsvetkova

Grape- a real gift of nature. Who does not like to feast on its delicious berries, savor various varieties of wine, admire this beautiful plant with an intricate weaving of branches and outlandish carved leaves.
Nature did its best by creating a grape bush. In its shade, you can relax in the summer heat, and closer to autumn, fruits ripen - bright, increasing vitality berries.
Many artists have depicted grapes, but here is how to recreate grapes from beads, as they did Valery Smyk, is by no means easy. But we will try, especially since we have detailed instructions... So let's get started!
To create this natural masterpiece, we need to prepare:
- small beads in blue and green;
- thin wire for weaving, thicker wire for forming the frame of leaves and berries, thick wire for the stem;
- filler (cotton wool, threads, synthetic winterizer);
- florenta;
- materials for decoration (plaster, paint, pot, stones).
Since this beaded composition is rather complex, in this master class we will take a closer look at the technique of making grapes and form a bunch of grapes for our composition.
To keep our berries in shape, we will shape them on a special frame. To complete it, we need 2 pieces of wire. We put them together and intercept them in the middle with a long wire, on which we will subsequently perform weaving.
 We straighten all 4 ends of the base wire - a kind of cross is obtained. Our berry will be held on it.
 We collect 1 blue bead on the working wire, and fix it between the first and second sections, which were formed between the axes of the cross.
 We repeat a similar action in the second section.
 In the third and fourth sections we fix 2 beads each. This will make the first circle.
 In the second round, we increase the number of beads when weaving.
 This is what the weaving looks like from the back.
 When performing the following rows, we begin to gradually form a volumetric circle.
 This is achieved by tightening the working wire and gradually bending the base of the cross.

 Now half of the grapes are ready.
 At this stage, the void formed inside should be filled with filler so that the berry does not lose its shape during work.
 You can use cotton wool, synthetic winterizer, or matching threads (as in our case) for these purposes.
 After that, in each subsequent row, the number of beads is gradually reduced until there are 2-3 of them. in each section.
 Now we twist the ends of the wire and wrap it with floor tape.
 The first berry is ready. We do the rest in the same way. For one bunch of grapes, we make 25-27 berries of different diameters.
 Then we form a bunch by placing the smaller berries on a thick wire-rod, and the largest ones closer to the top of the bunch.
 For weaving berries, you should stock up on time and patience. So get to work, dear needlewomen, and how to weave openwork leaves grapes and form a finished composition - in our next master class.
There are more and more requests on the Internet on how to crochet a "Grape bunch" napkin, a diagram with a description of which you can find in today's article. We decided to deal with all the intricacies of the work in detail, so that in the future it would be much easier and more pleasant for you to work, since most other articles offer only one scheme, which is difficult for a novice craftswoman to understand.


Let's go to the lesson
The description of the whole process of making a grape bunch napkin crocheted can be followed by the example of a master class with step by step photos... For this work, you will need to stock up on a little patience, and you will also need a few free evenings. If you are a professional craftswoman, then we are sure that such work will not take more than two evenings.
Stock up on yarn, it is best to choose acrylic in three colors - white, green, and purple or blue, and crochet number three.

In order not to waste your time, we will quickly move on to making the napkin itself. At the first step, you need to knit a chain of ten air loops from white yarn, which we close into a ring using a connecting post. The second row is knitted with simple single crochets. You must knit two new stitches in each stitch of the previous row. In total, we got twenty loops in the second row. Well, this is certainly too simple and easy.

After that, knit a chain of ten air loops and secure it with a double crochet into the second loop of the previous row, that is, through one. As a result, you should get a small arch. In order to completely finish the third line, you need to knit nine more arches, but the number of air loops in them should not be ten, but seven. In the fourth row, we knit two double crochets in each arch, but at the same time, it is necessary to knit four air loops between the columns. And in the next row, we knit two columns with the same one crochet from each double crochet. In total, there should be four columns above each arch. And we also knit four air loops between the posts.

The sixth row is knitted in the same way as the previous one, only in this case it is necessary to knit six loops over the arch (of which two double crochets are considered extreme) and also four air loops. In further rows, it is necessary to add two columns in each arch.

In the event that there are already ten columns in one line, we proceed to the process of decreasing. To do this, you need to make new petals so that the canvas does not pull in the future. Instead of 10, knit eight double crochets, and above the arch, first knit three air loops instead of 4. After that, a single crochet and again three air loops.

A new row is knitted according to the following pattern: six double crochet over a large petal, then three VP, over the arch we knit three single crochet stitches again three air loops. We continue to knit like this until the end of the row.

Then we do this: over the large petal, we already knit four double crochets, after that we make three air loops, then we knit 6 PRSs over the arch (we knit two columns in each loop) and again 3 VP. We repeat this scheme until the end of the circle.

Next row: three ssn and the same number of air loops, then 12 double crochet over the arch, and three VP.

The photo shows what the napkin looks like at this stage before we started to knit the base under the bunches.

We knit the next row in the same way as the previous one, but in this case we knit not 12, but six single crochet over the arch.

In the next row, in place of the fan, ten arches of five air loops are knitted, attaching the last loop to the arch is with the help of a column with two crochets. Cut off the white thread.

Only then take the yarn of the color of grape berries, attach it to the arch and wind eight elongated loops. Pull a hook through them and secure with a half-column. Knit a couple of air loops and move on to knitting a new berry.

 We knit nine berries for just one bunch. Cut off and fasten the thread.

We knit the first tier of berries on each fan. Then knit three double crochets, two stitches, three double crochets with green thread.