Ministry of Education and Science Russian Federation
Federal State Educational Institution
higher professional education
"East Siberian State Academy of Education"
Faculty of Technology and Entrepreneurship
Department of Technology, Entrepreneurship and Teaching Methods
Direction: 050100
Teacher Education
Profile: Technology
Form of study: part-time
Grebenyuk Larisa Anatolievna
Technological features of the manufacture of skirts.
Course work
Head: N. G. Mamaenko
(full name, academic degree, title)
The work is approved for defense ________________
(date, signature)
Head of Department ___________________
(full name, signature)
Date of protection _______________________
Mark___________________________
Irkutsk, 2014
Content
Doing
Chapter 1. Rationale for the choice of model and manufacture of the product
Skirt fashion direction for 2013……………………………………5
1.2 Skirt……………………………………………………………………….7
1.3 Characteristics of materials, tools and fixtures for the manufacture of the product………………………………………………………………8
Chapter 2. Product manufacturing technology
2.1 Organization of the workplace, taking into account safety requirements…………………………………………………………………….11
2.2 Skirt manufacturing technology…………………………………………………………………………………………………………………………………………………………………………………………………………………………………………………………………………………………………………………….
Conclusion………………………………………………………………..24
List of used literature and sources……………………25
Appendix
Introduction
For almost several millennia, people did not even think of dividing clothes into women's and men's. For our ancestors, a loincloth, an apron, a kind of skirt served as a cover, regardless of their gender, age and social status. However, over time, ideas about clothing have changed. In ancient civilizations, the skirt was part of menswear, moreover, among representatives of the nobility it was longer than among ordinary young men. That is, with the help of a skirt, men tried to emphasize their importance and social status. Women wore even more long skirts. And in Ancient Greece and ancient Rome, women generally did without skirts - the basis of their wardrobe was tunics and raincoats. Everyone knows that gradually, the skirt became the subject of exclusively women's wardrobe the only exception, perhaps, is the Scottish kilt.
The skirt, according to the method of wearing, belongs to the belt products. It can serve as an independent type of clothing, or be part of a set. By appointment, skirts are everyday, home, sports, uniform, for relaxation and for a special occasion.
By cut, they can be straight, flared (or conical) and wedge, by the number of seams - single-seam, double-seam, multi-seam. Skirts are sewn from cotton, linen, woolen, silk fabrics. The choice of fabric depends on the style, the purpose of the skirt, the season. The skirt has changed its shape more than once over the centuries.
Theme of the course work: "Skirt manufacturing technology".
The aim of the course work is: Develop technological documentation and produce a skirt.
Coursework object: Manufacturing technology garments.
The subject of the course work: The technological process of making a skirt.
To fully achieve this goal, the following tasks:
1. Analysis of the literature on the topic of the term paper.
2. Develop technological documentation for the manufacture of a skirt.
3.Perform a graphical representation of the node processing of the skirt.
4. Make a skirt.
During the course work, the following methods:
Analysis, generalization, synthesis.
Chapter 1. Rationale for the choice of model
For real fashionistas and just lovers of dressing beautifully, it is interesting to learn about fashion trends 2014.
Skirts of an extraordinary style will be popular: a skirt - a bell, a tulip and a pencil; also A-line skirts and small "school" skirts. The hit of the summer will be maxi skirts (long skirts) and pleated skirts. Skirts will be very diverse.
At the pinnacle of success in 2014 will be models of the most unusual skirts in terms of color, style and fabric texture.
Mini skirts They have been and will continue to be popular. Short skirts may be classical and bright colors. When choosing a mini skirt, you need to be sure that it will show the features of the figure well and favorably.
Retro style skirts . “Everything new is a well-forgotten old”, here the long-forgotten retro is back in fashion. In 2014, tight jersey skirts will be relevant. Retro skirts 2014 can be made from various fabrics, but the most fashion options- retro skirts made of velor, shiny thick silk, leather-look fabric. The colors of retro skirts 2014 can be different: these are monochromatic options, and monochrome, and a cheerful, bright, juicy print.
Floor length skirts- another trend of 2014. Such skirts are suitable for almost all girls. Summer option long skirts to the floor - these are things made of cotton or linen, they can consist of tiers, with frills and decorative trims of tiers. Floor-length skirts can be straight in silhouette and favorably fit a female figure, or they can be wide, flying, and light. Even advanced style experts sometimes find it difficult to say what balloon skirt differs from the model called "tulip" - it seems that both here and there there is a voluminous cut and oval shape. Nevertheless, a compromise was found: in a shortened form, the skirt should be called a “tulip”, and in cases where its length goes below the knee, it becomes a “balloon”. Black, white or colored, short or long - pleated skirts good in any form, they are allowed to be worn by everyone and without restrictions.
Perfect for a party pencil skirt which is made of leather. Knitwear will be relevant for spring and autumn. And in summer you can treat yourself to translucent skirts, also skirts made of satin, chiffon and silk.
Classic straight skirts. Skirts of the most ingenuous cut, sewn from rectangular panels and not designed for a snug fit to the figure, come into fashion.
In the 2014 season, a wide variety of skirt models are in fashion, for all tastes and shapes. Every woman can choose a wardrobe of those things that suit her best. From the desire of people to improve clothes, make them more beautiful, more comfortable.
Changes in fashion occur constantly, the period of existence of certain fashion trends in clothing is very short, 2-3 years. Creation fashion clothes subject to the laws of beauty, convenience and elegance. (Appendix, pp. 3-4)
Model description
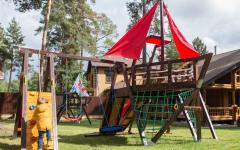
Straight-cut skirt for everyday wear in a classic style, made of wool blend fabric, tapered at the bottom. The upper section is processed with a stitched belt, a zipper in the left side seam, a closed slot on the back panel.
Fig.1 Skirt model sketch
1.2.Characteristics of materials, equipment, tools and fixtures
The choice of fabric depends on the direction of fashion, the season, the environment, the style of the intended model, the purpose and nature of the work.
The fabric must have the following hygienic properties: air permeability, hygroscopicity, heat-shielding properties, wear resistance, certain strength, washing resistance, ability to form during wet heat treatment.
Therefore, the skirt must meet hygienic, operational, aesthetic, functional, technological requirements. That is, the skirt should protect a person from the effects of adverse environmental factors; ensure the normal functioning of the body (skin respiration, gas exchange), ventilation of the underwear layer.
Each time of the year corresponds to a certain material. In winter, velvet, tweed and woolen skirts will be fashionable. Knitwear will be relevant for spring and autumn. And in summer you can treat yourself to translucent skirts, also skirts made of satin, chiffon and silk. Translucent fabrics will be very popular this season. When making a skirt, the following types of fabric are most suitable:
Velvet
Silk or cotton fabric with a soft dense vertical pile (1.5-3mm long) on the front side. Used for tailoring women's dresses, skirts, etc., as well as for decoration, for decorative purposes. Velvet was originally made from 100% silk, but is now also made from cotton, viscose and man-made fibres. It is produced by adding additional yarn to the base in the form of loops up to 3 mm high, forming a pile. When sewing from velvet, you need to follow the direction of the pile. Iron very carefully. Velvet should be bought of high quality with a dense pile that will not split and fall out.
Chiffon
Thin, silky, heavy-duty plain weave cotton fabric (Appendix, page 5)
Woolen fabrics
Woolen fabrics are produced in pure wool and half wool. Pure wool fabrics made of fine wool are highly valued, which have the best appearance, hygienic and heat-shielding properties, softness and good roll. Fabrics made from coarse wool are inferior in quality to fabrics made from fine wool: they are less wearable, less elastic, and hard to the touch. Some disadvantage of woolen fabrics is their increased dust capacity, which makes it necessary to clean these fabrics frequently.
Pure wool fabrics also include fabrics containing up to 10% of chemical fibers introduced in order to improve the appearance of the fabric.
According to the nature of the coloring, woolen fabrics are produced in one-colored, multi-colored, melange and printed.
Semi-woolen fabrics, in addition to wool, may contain cotton yarn, viscose threads, textured threads (melan, crimplen, profiled threads), chemical staple fibers (viscose, nylon, lavsan, nitron).
In the production of semi-woolen fabrics, two-, three- and more-component mixtures are widely used, for example, 35% wool and 65% lavsan; 40% wool, 40% lavsan and 20% viscose fiber.
For sewing a straight skirt, you can use dense narrow and wide fabrics.. For the presented product, a wool blend fabric was chosen.
Semi-woolen fabrics containing synthetic fibers are characterized by low surface density, low shrinkage, high elastic properties, good fixation of folds (pleats) during wet-heat treatment, which remain when worn and do not disappear after washing and dry cleaning. (Appendix, p.5)
Skirt making equipment
Household sewing machine "Chaika" class 142M with electric drive
The machine is designed for stitching parts in the manufacture of products from cotton, linen, synthetic, wool and silk fabrics.
On it, you can perform 12 types of different stitches: straight and zigzag, decorative (finishing) stitches, as well as embroider and darn.
The machine can sew with single needle and duplex needles. With this machine, you can sew on buttons, hooks, snaps, sew buttonholes, overcast seam sections and perform other operations. The speed of the machine is 1000 rpm. (Appendix, p.6)
Overlock
Universal Janome 784/744d overlock, characterized by the presence of a presser foot pressure regulator and the versatility of making seams.
Trimming, overcasting the edges of materials and finishing a seam in one work step! On the finest silks and satins or thick denims, thick t-shirts and stretch fabrics. And all this with amazing ease. (Appendix, p.6)
Iron Philips GC2840
Power 2200 W, water tank volume 300 ml, working surface (sole) steamglide, adjustable steam. Mode functions: dry ironing, vertical steam, steam boost, self-cleaning function, spray function. Opportunities: protection against scale, automatic shutdown. (Appendix, p.6)
Tools and fixtures
1. Hand needles - from No. 1 to No. 12
2.Thimble - must be metal or plastic.
3. Scissors - must be well sharpened along the entire length of the blade, the ends of the scissors must be completely closed.
4.Measurement tape - must be elastic with well-marked divisions and numbers.
5. Chalk comes in different colors, the edge of the chalk must be sharpened to 0.1.
6. The ruler should be even and clean, with well-marked divisions and numbers.
7. Pins are used to fold the details of the skirt group when transferring lines from one half to the other.
8. The pencil must be hard and well sharpened.
9. The needle pad should be soft, well pierced.
(Appendix, p.6)
Chapter 2
2.1.Organization of the workplace, taking into account safety requirements
1. When working on sewing equipment and performing wet-heat work, it is necessary to properly organize work and the workplace. It should be clean, well lit, the light should fall from the left side. The worker sits in a comfortable chair with a back.
2. When performing manual operations, it is good to place a bench under your feet.
3. Each tool is located in its place so that time and effort are not wasted on unnecessary movements. Needles, pins, scissors, a thimble are placed on the right. Threads, buttons and other accessories that you may need are on the left. The entire middle of the table is free, the product is laid out on it.
When organizing a workplace, one should not forget about the precautionary measures:
1. All needles and pins must be in special boxes intended for them or be stuck in special pads.
2. Having finished sewing, the needle must immediately be pricked into a pad or into a piece of foam, laid on the bottom of any small box. In no case should you stick needles and pins into the side of your clothes, pocket, and even more so keep them in your lips.
3. When trying on, it is very convenient to put on a bracelet-strip of foam on the left wrist, to which an elastic band is sewn on both sides, and stick a few pins into it. Bent, blunt or broken needles and pins should be thrown away immediately..
Safety precautions when working on an electric sewing machine
- The electric sewing machine must be grounded.
-Before work: remove the hair under the scarf.
- The ends of ties and scarves should not hang down.
- Do not lean close to the moving parts of the machine and do not keep your fingers near the foot to avoid needle puncture.
- Place your feet on the pedal so that the right foot is pushed forward a little and starts the machine.
- Straighten your back and sit straight on the entire surface of the chair.
- Place the product from the eyes by 30-40 cm.
- Arrange items: which are used more often - closer to themselves, which are taken with the right hand on the right, and those that are taken with the left - on the left.
-Before sewing, make sure that there are no pins or needles on the seam line and in the product.
- Break the threads on the product when the machine is completely stopped.
- Remove items that are not required for the task.
- Do not be distracted from work while the machine is running.
During work:
-Turn on the motor to make sure it runs smoothly.
- When starting and stopping the machine, put your right hand on top of the flywheel.
-Both hands evenly load the work.
-Products to move, sliding hands on the surface of the table.
- Do not thread the machine, change the needle, clean or lubricate the machine by turning it on.
-Keep your working posture, do not lean low towards the machine.
- If the belt has come off the pulley, stop the machine by turning off the motor.
-If you smell burning rubber, stop the car quickly.
Upon completion of work:
- Turn off the electric motor and stop the machine by pressing the pedal;
- Clean up your workspace.
Iron safety rules
-Monitor the serviceability of the plug, socket, so that there are no knots on the cord.
- Do not connect the device to the network through extension cords and adapters.
- Switch off appliances only by the plug and only with dry hands.
-Work on a rubber mat.
-Do not drop the device.
- In case of overheating, allow to cool down.
- The iron must stand on a special stand.
- Do not touch the heated surface of the device, do not check the degree of heating by touching your hand.
- After completing work, turn off the device from the network.
Safety precautions when working with a needle, scissors and pins
- Put scissors on the right, blades.
They should be closed, rings towards themselves, so that when moving they do not prick themselves on their sharp ends.
-Make sure that the scissors do not fall on the floor.
- Pass the scissors rings forward, closing their blades.
-Do not put the scissors near the moving parts of the machine.
-Keep scissors in a specific place (box).
-Sew with a thimble.
-Keep needles and pins in a certain place (special box, pad, etc.) and do not leave them at the workplace (table).
-It is forbidden to take needles, pins into your mouth and stick into clothes, as well as sew with a rusty needle.
- Attach patterns to the fabric with pins directed with a sharp end from the worker.
- Do not bite the thread with your teeth.
-Collect pieces of a broken needle and throw them into a specially designated container.
2.2. Skirt manufacturing technology
Preparing fabric for cutting
When starting to cut, look at the piece of fabric to identify possible weaving or printing defects. They should not get on the parts of the product. Determine the right side of the fabric. Check the nature and direction of the pattern or pile.
On plain fabrics and fabrics with an indefinite pattern, patterns of skirt details can be laid out in different directions. But if the pattern is directed in one direction, then the patterns have the upper cuts in one direction. When cutting fabrics into a strip or a cage, make sure that they match in color, width, pattern and pass strictly in the middle of the front and back panels of the skirt.
On fleecy fabrics, the patterns are placed in one direction. For example, in a velveteen or velvet skirt, the pile should go from top to bottom.
There are two ways to lay the fabric: in the fold and in the turn.
When laying in a fold, the fabric is folded lengthwise, with the front side inward, while combining the edges. This method is used when cutting wide fabrics.
When laying in a turn, the fabric is laid out expanded in full width,
face down, or in two layers, face in. This method is used when cutting fabrics of different widths.
Layout of patterns of skirt details on fabric and cutting
1. Identify fabric defects.
2. Determine the front and back sides of the fabric.
3. Determine the direction of the warp thread in the fabric.
4. Iron the fabric from the wrong side in the direction of the warp thread (remove folds and folds using wet heat treatment).
5. Fold the fabric for cutting on the worktable.
6. Lay out the patterns of the skirt details on the fabric.
7. Outline the contours of the patterns of the details of the skirt and baste the allowances for the seams.
8. Remove the patterns and chip off the skirts with pins.
9. Cut out the skirt. Trim the edges of the fabric and fold them together with the details of the cut. The edges will be needed when preparing the skirt for fitting.
(Appendix, p.7)
Technological sequence of skirt manufacturing
1. Preparation of cut details for basting.
2. Preparing a skirt for fitting.
3. Carrying out a fitting. Correction of defects.
4. Processing the skirt after fitting.
Preparing cut details for basting
1. Transfer the contour lines from one side of the part to the other side or to paired parts using copy stitches.
2. Baste with small lines the middle of the front and back panels of the skirt. On the wrong sides of the parts, lay straight running stitches 1.5-2 cm long along the marked lines.
3. Cut out two squares 4x4 cm from paper and write on them the names of the details of the skirt: the front panel and the back panel.
4. Sew them alternately with straight running stitches on the front side of the parts. (Appendix, p.7)
Preparing the skirt for fitting
1. Sweep the side sections of the front and back panels of the skirt along the marked lines, while leaving an unswept section 16-18 cm long in the left side seam.
3. Connect the two edges with an open seam.
4. Baste the hem to the upper cut of the skirt from the wrong side with straight running stitches 0.7-1 cm long.
5. Fold the bottom edge of the skirt along the intended hem line and sweep it up.
6. Check the quality of the sour cream skirt.
Conducting a sample. Correction of defects
Fitting:
1. Put on a skirt. Pin the zipper slit in the left side seam of the skirt with pins.
2. Refine the balance of the product.
3. Check the width of the skirt at the waist, hips and hem.
4. Specify the length and location of the tucks.
5. Check the location of the top cut of the skirt.
6. Specify the length of the skirt.
After trying on all the chalk lines, lay straight running stitches, transfer the changes from the right side of the skirt to the left using a cutter or copy stitches. Lay out the product on the table and check whether the lines are evenly laid on all the details. If the skirt was not subjected to changes during the fitting, then proceed to the step-by-step machining.
Processing the skirt after fitting
Dart processing
1. Determine the middle of the part. From the wrong side, draw a small line in the middle of the part. Lay straight running stitches along it. Stitch length 2-1.5 cm.
2. On the wrong side, mark the tucks in turn with three lines: middle, side and transverse, limiting the end of the tuck. Choose the length and opening of the tuck arbitrarily. For example: tuck length 10 cm, solution 3 cm.
3. Fold the part right side inward along the center line of the tuck.
4. Sweep next to the side line of the tuck, starting from the top cut to the end of the tuck, securing the thread at the beginning and end of the stitch.
5. Stitch along the side line in symmetrical tucks - one from top to bottom and the other from bottom to top. When sewing at the top, fasten the tuck with a length of 0.7-1 cm. At the end, gradually reduce the line to nothing, leaving the ends of the threads 5-6 cm long and tying them into a knot. Trim the ends of the threads. Process the second tuck in the same sequence. Remove basting threads.
6. Press the darts first, then iron them to the middle of the part.
7. Cut off the slack at the end of the tuck, moving the iron from one place to another. (Appendix, p.9)
Side cut processing
1. Fold the details of the front and back panels of the skirt right side inward, equalizing the cuts.
2. Sweep the details of the front and back panels of the skirt along the marked lines.
3. Stitch. Remove basting threads. Iron the seams.
4. Process the cuts of the allowances with buttonhole stitches.
5. Iron the side seams.
(Appendix, page 10)
Processing the fastener in the side seam of the skirt with a braid-zipper
Fold the two pieces right side inward.
Draw a small line of the side seam at a distance of 2 cm from the cut of the parts.
Sweep the panel along the side line along the entire length.
Set aside 16 cm from the top cut of the part and draw a horizontal line limiting the length of the fastener. Sew a side seam from the horizontal line to the bottom line.
Iron the fabric in place of the seam. Then carefully smooth out the seam allowances along the entire length. Remove basting threads.
Direct the opened braid-zipper under the fold of the cut for the fastener on the back panel so that 1 cm remains from the top of the skirt cut to the beginning of the links, and on the side the fold line approaches the edge of the links. Baste the zipper braid from top to bottom to the end of the fastener at a distance of 0.2-0.3 cm from the fold with straight stitches 0.5 cm long.
Close the lace-zipper. Baste its second side, directing the fold of the front panel to the fold of the back panel so that they match.
Stitch the zipper on the front side from the upper cut of the front panel to the upper cut of the back panel, laying a line along the front panel at a distance of 0.8-1 cm from the fold, and along the back panel, retreating 0.2 cm from the fold. Delete note.
Quality control: the machine line is even, laid at the distance indicated above from the folds of the front and back panels. (Appendix, p.11)
Processing the belt, processing the upper cut of the skirt with a stitched belt
Belt Processing
Duplicate the belt with an adhesive pad.
On the wrong side along the entire length of the belt, outline the fold line, it is located in the middle of the width of the belt. (Appendix page)
(Appendix, p.)
The connection of the belt with the upper cut of the skirt. (Appendix page)
Slot processing.
Closed slots are processed by turning or a crease allowance. The width of the allowance is 3 -7 cm.
In the section from the end of the fastener down, we sew the middle seam of the back panel of the skirt, finishing the line 1 cm below the upper cut of the allowance for processing the slots, fixing the beginning and end of the line with bartacks and sweeping in the allowance for the slot to the lower cut of the skirt.
Overcast the allowances of the middle seam of the skirt and the allowances for the slot from the waistline to the bottom of the skirt. On the middle seam of the skirt at the top there are slots of the upper panel carefully make a notch. Iron the seam, at the same time iron the edges of the slots along the sour cream seam.
Bend the right (upper) side of the part, straightening the seam and slot, iron. The lower corner of the upper side of the slots must be stitched from the inside along the bottom line of the product. The seam allowance in the corner is cut out, leaving 0.7-1 cm. Turn the corner, straighten, iron. Hem the seam allowance to the bottom hem allowance. Bend the bottom of the product, hem, making the lower part of the slots shorter than the upper by 1-2 mm. (Appendix, p.)
Processing the bottom cut of the skirt
To process the lower section of the skirt after trying on a seam in a hem with a closed section.
To process the bottom cut of the skirt manually:
On the wrong side of the part, draw two small lines:
A) the first - retreating from the cut of the part 5 cm (allowance for lower hem; cut 4 cm + allowance for seam processing 1 cm);
B) the second - retreating 1 cm from the lower cut.
2. Lay straight running stitches 1-1.5 cm long along the marked lines.
3. Note the allowance for processing the lower cut along the intended line, retreating 0.5-1 cm from the folded edge.
Quality control: the width of the allowance for processing the lower cut must be the same along its entire length. After quality control, iron the swept allowance.
4. Bend the allowance by 1 cm and sweep it along the second marked line 0.1-0.2 cm from the fold.
Quality control: the width of the hem allowance of the lower cut must be the same along its entire length. After quality control, iron the swept allowance for the hem of the lower cut of the part.
5. Unfold the part so that the hemmed edge is directed away from you.
6. Sew blind hemming stitches with a frequency of two to three stitches per 1 cm with cotton threads No. 50-60 in the color of the main fabric. Insert the needle into the fabric, retreating 0.2-0.3 cm from the fold of the hem allowance, and at the level of this puncture behind the main fabric by half its thickness. When performing the following stitches, insert the needle into the fabric at the point where it exits the fabric from the previous stitch.
7. Remove note. Iron the hemmed edge of the part.
(Appendix, p.)
Sewing a buttonhole and sewing on a button
Loop processing
Mark the location of the loop at the front end of the belt on the front side with a small mark (Appendix page) in the following sequence:
A) Two transverse lines limiting the length of the loop.
B) A cut line that determines the direction of the loop.
2. Cut the hole for the hinge along the marked line.
3. Overcast loop sections with buttonhole stitches with a frequency of 10-15 stitches per 1 cm. The distance from the puncture of the needle to the cut of the loop depends on the shedding of the fabric and is equal to 0.1-0.3 cm. Place the stitches at the same distance from the cut and from each other, tightening the thread with the same force. At the ends of the loop, perform manual backtacks with two or three stitches, placing them across the cut line.
Button sewing:
1.Close the zipper.
2. Put the front end of the belt on the back and mark with chalk through the hole in the buttonhole the place for sewing on the button.
3.Sew on a button.
Conclusion
In the course of the course work, the literature was studied. The direction of fashion in 2014 is considered, the characteristics of materials are analyzed. All materials fully comply with the requirements for the product: hygienic, aesthetic, operational.
Considered the organization of the workplace, taking into account safety requirements, the equipment used in the manufacture of skirts and developed technological documentation on the topic of the course work.
As a result, a straight classic skirt was made, taking into account the properties and requirements for processing the product.
The tasks of the course work are completed, the goal is achieved.
Bibliography
1. Glozman E.S., Stavrova O.B. and others, ed. Khotuntseva Yu.L. Technology. Technical labor. - Mnemoznina, 2004 va.-2nd ed., Ster.-M.: Academy. 2004.- 434 p. Il.
2. Egorova R.I.; Monastyrnaya V.P. Learn to sew: Book. For students Wednesdays. school age [Text]: / R.I.Monastyrnaya - M.; Enlightenment, 1988-158s.;
3. Sasova I.A., Marchenko A.V. Technology: Grades 5-8: Program. - M.: Ventana-Graf, 2006. - 96 p.
4. Simonenko V.D. Technology for 6, 7 classes. - Publishing Center, 2007
5. Trukhanova A.T. Technology of women's and children's clothing [Text]: textbook / A.T. Trukhanova.-4th ed., ster-M: Higher School, 2005.-416s.
6. Chernyakova V.N. Fabric processing technology: A textbook for grades 6-9 general education. institutions. - M.: Enlightenment, 2004
1. General characteristics of the product
2. Design and modeling
3. Equipment selection
4. History of the skirt
5 Styles and trends in fashion
6. Materials and their properties in accordance with and purpose of the shape of the skirt
7. Color and personality
9 Fabric Safety
10. Results of the work
Bibliography
Applications
Introduction
Working with fabric, making clothes, doing work with your own hands is one of the means of self-expression, developing creative thinking, which makes it possible to realize your ideas in the manufacture of a particular garment.
The purpose of this work is to develop and implement a project for independent tailoring of a skirt under the guidance of a teacher. As well as the formation of such qualities as the ability to independently solve creative and technological problems, make informed decisions, apply and use the acquired skills, knowledge, skills and information in practice in later life.
The task is to summarize the theoretical knowledge, skills and abilities gained in the lessons "Technology" to create a garment (skirt).
In the process of manufacturing garments on an industrial scale, many people of various professions take part: a fashion designer, designer, technologist, sewing equipment operator, clothing demonstrator. These professionals put a piece of themselves, their individuality for the people who will wear the things they have created. In the lessons there is an opportunity to combine the work of various professions and bring your ideas to life.
For the manufacture of any garment, certain steps are applied. Firstly, this is drawing up a sketch, secondly, cutting out the product, and thirdly, completing the tailoring of the product, taking into account the available material and the features of the figure according to an individual plan. At the same time, strict adherence to this scheme: sketch - drawing - design - technology - ready product, contributes to the acquisition of practical skills for independent sewing of a product - from an idea to a finished product.
1. General characteristics of the product
Skirt (fr. jupe) - a piece of clothing covering the lower part of the body. Evolved from a loincloth.
There are many various kinds skirts related to different styles. These are skirts such as: straight skirt, wedge skirt (Appendix 1); pleated skirt, yoke skirt (Appendix 2); gode skirt; half-sun skirt (appendix 3), etc.
My model is a straight skirt that fits around the hips, with darts at the waistline, without a belt. The skirt consists of several identical wedges, expanding downwards. With an odd number of wedges, the seam with the fastener is located at the back, in the middle of the back, and a slot is processed at the bottom. The bottom of the product is stitched on a sewing machine. A sketch of the model is presented in Appendix 1.
2. Design and modeling
Design is the construction of a product pattern drawing. My skirt model consists of three wedges. The width of the skirt is calculated according to the circumference of the hips. To build a drawing of the base of such a skirt, measurements are needed:
St (half circumference of the waist);
Sat (half circumference of the hips);
Di (product length).
A three-piece skirt can be different lengths(from mini to maxi, but I chose average length- just above the knees) and is made of denser fabrics (for example: gabardine). When calculating the amount of fabric, it is necessary to add 10 cm to the measurement of the length of the skirt (Di) for processing the upper and lower sections, aligning the cross section. For example: with a fabric width of 140 cm, the length of the tailoring of the skirt will be equal to Di + 10 cm; With fabric width
Modeling is the process of modifying a pattern drawing in accordance with the selected model. The term "modeling" comes from the word "model", that is, a pattern created by artists, fashion designers and designers. Skirt base drawing (Appendix 4).
3. Choice equipment
In the process of cutting, I needed: scissors; chalk or remnant with a thin edge; tape measure; tailor's pins; cutter line. In the process of sweeping, I needed: chalk; cutter; tracing paper; tailor's pins; sweeping needle; scissors; threads. In the process of grinding, I needed: a sewing machine; scissors; ripper; crayon; scissors.
4. History of the skirt
Skirts have been known since the dawn of mankind and were worn by both women and men.
In the southern regions, men wore loincloths, skirts and aprons made of palm leaves. The main garment of the ancient Egyptians was the skhenti apron, which consisted of a strip of fabric wrapped around the hips and fastened at the waist with a cord. Shenti of commoners and pharaohs differed only in the quality of the fabric, their style remained unchanged. The Assyrians wore a shirt-skirt made of wool, cotton, or linen, called a kandi. By the length of this type of clothing, one could determine the degree of nobility of its owner. in pure form women's clothing the so-called gothic skirt appeared only in the 15th century. It was from this time that the bodice with side lacing began to be worn separately from the actual skirt in the modern sense. In the 16th century, wealthy women dressed in massive, heavy clothes, which were sewn from cloth, expensive brocade and velvet fabrics. In the last third of this century, figs appear, encircling the waist with a flat wheel. This was achieved by putting on a quilted roller under a skirt and a cutter assembled from the fabric of the dress, located at the waist. In the 17th century, women wear vertugadens - a special kind of "barrel" hoops around the waist. In the 18th century, mostly smooth skirts appeared with a lot of decorations: frills, flower garlands, lace, draperies. Until the 40s of the 19th century, the skirt was cut from 3 or 5 panels. Stretches at the front and slightly gathers at the sides. The side seams are bevelled and go to the back. In the middle of the 19th century, skirts with crinolines appeared, decorated with flounces and cloves, embroidered with braid, galloon and lace. In its second half, the crinoline is replaced by a petticoat with frills and a bustle pillow. At the end of the last century, women were pulled into a corset to the hips, and the camp smoothly turns into a draped tren at the back, so part of the skirt lies on the floor. At the beginning of the 20th century, with the advent of the "modern" silhouette, the skirt was cut flared at the back with an elongated front. In the 1920s, skirts went up to the knee again. Nowadays, a variety of forms of skirts are characteristic: straight and extended downwards, wide and narrow, pleated, wedges, short and long trouser skirts and others.
5. Styles and trends in fashion
In the 1970s, fundamental changes took place in the nature of mass fashion. Determining the fashionability of clothes, they began to talk not only about styles, length, but also style. The features of each style are created by cut, shape, fabric finishing, a set of clothing items, as well as various accessories, jewelry and cosmetics. Currently the main styles are:
Classical;
Youth;
Sports;
denim;
Folklore;
My style is classic. It suits my inner state the most. There are things in fashion that, despite all the changes in tastes, passions, attachments, remain unchanged to a certain extent. The general opinion recognizes them as excellent, exemplary, exemplary. The proportions of classical style clothing correspond to the natural proportions of the human figure, the lines of forms and details are simple and concise.
6 . materialsand their properties in accordancefromskirt style
I thought about the color scheme of the skirt, choosing black - the color of refined taste, which is at the top of fashion at all times, concealing figure flaws. The beginning of the image is the color, and the beginning of the style is the fabric. It is necessary to take into account the properties of each type of fabric:
Cotton fabrics have a large shrinkage during soaking, which is their main drawback. Cotton fabrics are beautiful, iron well, crumble little and are relatively durable;
Linen fabrics shrink when soaked, wash well, stretch a little, crumble, and are hard to iron, which is the main drawback. Relatively durable. They look very nice and neat;
Woolen fabrics wrinkle a little, when soaked they have a large shrinkage, they are hard to iron, they hold their shape well after ironing;
Viscose fabrics are beautiful, solid, shrink when soaked, the structure of these fabrics is very mobile, which makes it difficult to work with them;
Synthetic fabrics have almost no shrinkage, are durable, elastic.
However, these tissues are treated differently high temperatures and when ironing require caution. My choice is gabardine fabric. Fabric properties: gabardine is a fabric made from the highest grades of carded yarn. The weave is diagonal.
7. Color and personality
Color plays a huge role in human life. It has a deep emotional impact on a person and is a means of expression in the composition of clothing. Colors are divided into two groups: chromatic and achromatic. Chromatic colors are conditionally divided into warm and cold. TO warm tones include colors associated with ideas about fire, the sun - red, orange, yellow. Cold tones include colors associated with a feeling of coolness, snow and ice - blue, blue, purple. I like the black color, which I chose. Black color is universal, it is combined with almost all colors and a skirt of this color can be combined with any color scheme in clothes. Black is the color of intuition. Nothing should interfere - complete concentration, purity and spirituality, inspiration, wisdom. For the Japanese, black is the color of joy. Pay attention to how expressive the face of a man in a black robe becomes. Like a picture in a frame, especially the eyes are the mirror of the soul. The contrasts with this color are very spectacular. Both in white and in black, you can rejoice and grieve, and it will be natural. Contrasts in clothes, contrasts in life - they allow you to develop intuition and spiritual qualities of a person.
8. Technological sequence of skirt manufacturing
1. Model development. Sketch.
2. Taking measurements.
3. Construction of a drawing of the base of the skirt.
4. Modeling the base drawing.
5. Preparing the pattern for cutting.
6. Preparing the fabric for cutting:
Ironing fabric;
Lay out the patterns on the fabric;
Perform trimming of patterns;
Set aside seam allowances;
Make a cut.
7. Preparing the product for fitting:
Laying control stitches;
Sweeping tucks;
Basting the middle seam of the back panel of the skirt;
Sweeping side seams;
Baste the bottom of the product.
8. Carrying out the first fitting:
Troubleshooting;
Mark the length of the item.
9. Processing the product after trying it on a sewing machine:
Grinding tucks;
Stitching side seams;
Processing sections with a zigzag stitch;
Stitching a zipper into the middle seam of the back panel of the skirt;
Stitching the middle seam of the back panel of the skirt;
Processing slots in the middle seam of the back panel of the skirt.
10. Processing the bottom cut of the skirt:
Cut the cut with a zigzag stitch;
Sweep and process the bottom of the product.
13. Evaluation of the finished product.
14. Self-control.
9. Safety precautions when working with fabric
To avoid any accidents during work, you must follow the safety rules when working with fabric.
1. Safety requirements before starting work:
Put on overalls, put your hair under a scarf;
Check for rusty needles and pins;
Prepare workplace to work, remove all unnecessary;
Make sure that the protective grounding of the body of the electric sewing machine is available and in good condition, that there is a dielectric mat on the floor near the machine.
2. Safety requirements during operation:
Keep needles and pins in a certain place, do not leave them at the workplace;
Do not use rusty needles and pins when working, do not take needles and pins in your mouth;
When working with needles, use a thimble;
Attach patterns and fabrics with the sharp ends of the pins away from you;
Keep scissors in a certain place, put them with closed ends away from you, pass them to each other with rings forward;
Do not lean close to the moving parts of the sewing machine;
Do not keep your fingers near the foot of the sewing machine to avoid piercing them with a needle;
Before sewing the product on the sewing machine, make sure that there are no pins or needles on the seam line;
Do not bite off the thread with your teeth, but cut it off with scissors;
Only one person can operate the machine.
Safety precautions when working with an electric iron:
1. Check the serviceability of the plug and the insulation of the electric cord of the iron;
2. Make sure there is a heat-resistant iron stand and a dielectric mat on the floor near the ironing area;
3. Before turning on the electric iron, stand on a dielectric mat;
4. Turn on and off the electric iron in the network only with dry hands;
5. For short breaks in operation, put the electric iron on a heat-insulating stand;
6. During operation, make sure that the hot soleplate of the iron does not touch the electric cord;
7. To avoid burning your hands, do not touch the hot metal parts of the iron and do not moisten the material with plenty of water;
8. To avoid fire, do not leave the electric iron plugged in unattended;
9. Monitor the normal operation of the iron, do not let it overheat;
10. After working with the iron, unplug the power cord.
10. Results of the work
Need. I sewed this skirt in order to wear it at any time of the year, to dress for the holidays. Since my skirt belongs to the classic style, it is convenient for outdoor activities and a variety of work. This skirt is multifunctional.
Self-Esteem and Economic Calculation. I think I did my job quite neatly, and most importantly, I like it. Although it took more time than expected, I am not upset, because I remember very well all the stages of the work that I performed. And to evaluate, as it seems, the surrounding people should, because from the outside, all the shortcomings are more visible. I like the result. Due to the fact that I sewed the skirt myself, no one else will have one.
Difficulties. Sewing this skirt for me was more of a pleasure than a task, although I had some difficulties in sewing the product. The hardest part was chalking and sewing in the zipper as this job is completely new to me.
I saw a similar skirt in stores for 460 rubles, my version is more profitable, since I did everything with my own hands. Thus, I saved 305 rubles, and for the remaining amount I have the opportunity to sew 2 more skirts.
In general, I got what I wanted. Now, thanks to my knowledge, I can remake my wardrobe into the best one, to my taste. If you walk in what you like, in what is comfortable, then you will feel comfortable and confident, and this is important for every person!
Literature
1. Glozman E.S., Stavrova O.B. and others, ed. Khotuntseva Yu.L. Technology. Technical labor. – Mnemosine, 2004
Municipal budgetary educational institution
"Average comprehensive school№1"
Khanymey settlement, Purovsky district
Lesson
Teacher
Khanymey
Lesson topic: Process sequence making a straight skirt.
Processing the fastener in the side seam of the skirt with braid - a zipper.
Lesson Objectives: To introduce students to the sequence of making a straight skirt.
Teach the correct processing of the fastener in one of the ways, observing the processing technology.
Contribute to the education of aesthetic taste, mindfulness.
To instill the skills of a culture of work and accuracy.
Develop coordination of hand movements, performing skills.
Lesson time: 90 minutes.
Lesson type: combined.
Main forms of work: frontal, individual
Teaching methods: verbal, visual, practical.
Equipment and materials:
- Tools for personal use Textbook, workbook Scraps of fabric, zipper tape
During the classes
1 . Organizational part (2 min.)
Greetings;
Checking the students present;
Check readiness for the lesson.
2. Repetition of the material covered (25 min.).
Game - competition "The art of cutting and sewing"
1.Preparatory moment: (3 min)
Students are divided into two teams, come up with a team name that should contain a technological term (needle, pin, thread, thimble, ....) and choose a commander who will record the number of correct answers.
2. Blitz tournament (7 min)
The teacher takes turns asking the teams questions to which they must quickly answer. One point is awarded for each correct answer. If the team answers incorrectly, the right to answer passes to the opponents.
Questions of the blitz tournament for the Needle team
Which side of the machine needle is threaded on?
(From the side of the thread guide and the long groove; depending on the sewing machine, the long groove of the needle and the thread guide may be on different sides.)
In what cases is a seam seam used?
(A seam is used to connect two or more parts).
What is the name of the thread that runs along the edge?
(Wash threads or equity threads).
How far should the sewing machine be when threading?
(On the job).
What is the meaning of copy lines?
(They serve to transfer lines from one part to another).
Blitz tournament questions for the Nitochka team
Why is it necessary to change the stitch length when using a sewing machine?
(The stitch length is changed because thin fabrics sew with small, short stitches, and thick and dense ones with longer ones).
What are the threads that run across the edge called?
(Duck threads).
From which side should the light fall when working on a sewing machine?
(Left side or front).
4. In what position should the presser foot be after finishing work on the sewing machine?
(At the end of the work, the presser foot should be in the down position).
What is a reverse sewing machine used for?
(For machine bartacking).
Competition "What is it?" (3 min)According to the verbal description, you need to guess the type of clothing.
Assignment to the team "Needle"
The product belongs to the shoulder group. Sewn mainly from cotton fabric. When sewing, the following seams are used: double, edging, hem seam with a closed cut. This thing makes our sleep ... rest more enjoyable.
(Nightshirt).
Assignment to the "Thread" team
The product belongs to the belt group. It is sewn from all types of fabric. It can be part of a costume or an independent product. Worn by both men and women. (Trousers).
Competition "The Fourth Extra" (3 min)Schoolchildren are read words, one of which is outside the logical series. The task is to find the odd word.. One point is awarded for each correct answer.
1. Sheet, pillowcase, tablecloth, duvet cover. (Tablecloth).
2. Foot drive, hand drive, electric drive, hydraulic drive. (Hydraulic drive).
3. centimeter, square, scissors, ruler . (Scissors).
4. Stochny, tuning, consignment note, estimating. (estimating)
5. Contest "What's Behind This?" (3 min)
Schoolchildren should name products, objects that make up generalizing concepts (generalizing words) proposed by the teacher orally. For each correct and possibly more complete answer, 3 points are awarded.
1. Fittings (buttons, buttons, buckles, fasteners…….)
2. Sewing tools (needle, thimble, scissors, measuring tape….)
6. Competition "Finish the proverb" (3 min)
Did the deed ... (walk boldly).
The work of the master ... .. ( fears).
What will you sow . .(you will reap).
I make time... (fun hour).
Patience and hard work... (everything will be crushed).
Hurry up people ... (laugh).
Measure seven times …(cut once).
The forest is cut ... ( chips fly).
Teams receive one point for each correctly continued proverb.
On modesty:
Boast - do not mow, your back will not hurt.
I call a lot, but little sense.
Words here and there, but nowhere in deeds.
Weaving lace with the tongue.
Do not hurry with your tongue - hurry with your deeds.
Mutual assistance and fellowship:
Who soon helped, he helped twice.
Advice is good, action is better.
Road spoon to dinner.
Friendship is stronger than stone walls.
A smart interlocutor is half the road.
Where there is harmony, there is a treasure.
7. As we know the rules of safe work. (3 min)
The students answer the questions proposed by the students by raising their hand, yes or no:
In case of an emergency, turn off the sewing machine immediately.
The platform of the sewing machine must be free of foreign objects.
The iron is turned on and off with dry hands, holding on to the body of the plug.
The thread for threading the needle can be measured to any length.
The thread is not bitten off with teeth.
Pins and needles must be stored in the pad.
The hot soleplate of the iron may be touching the electrical cord.
In the process, you can damage your fingers with a needle or pin.
Before starting work, tools and fixtures must be put in the place provided for them.
Put the scissors on the right with closed blades pointing away from you.
(Group leaders count the number of points scored by the team)
Teacher: Everyone accepted Active participation in the proposed game, which contributed to the consolidation of the acquired knowledge.
PHYSICAL MINUTE
(Several simple exercises which are recommended to be done in technology lessons)
Vigorous walking in place, in which you need to swing your arms wide and raise your knees as high as possible. Duration 1-1.5 min. This exercise tones the major muscle groups while increasing blood circulation. From the starting position, standing, arms lowered along the body, legs shoulder-width apart, rising on tiptoe, at the same time unbend and strain your back, and put your hands behind your head with your palms and spread your elbows to the sides while tilting your head back. Repeat 4-5 times within one minute. This exercise tones the back muscles, relieves congestion in the occipital region, and increases blood flow. Standing, hands on the waist, turns of the torso are performed with the spreading of the arms to the sides. When turning - inhale, return to the starting position - exhale. Repeat 5-6 times within 1 min. This exercise tones the oblique muscles of the back, increases blood circulation in them. In the initial standing position, energetic swings of the arms are performed from behind the back through the sides behind the head and back. Hands are relaxed. Duration 1-1.5 min. This exercise increases blood flow and relieves tension in the upper extremities.
3. Communication of informative information (7 min)
(On the skirt image screen)
Initially, in the Middle Ages, a robe usually girdled at the throat was called a skirt. It was worn by both men and women. And only in the 15th century did a women's skirt appear. The length of the skirt was practically unchanged until the beginning of the 20th century.
Each nation had its own traditions in wearing skirts. Yes, Russians married women usually worn over a shirt ponyuvu - a skirt not sewn, but wrapped around the figure and fastened around the waist with a cord - damper. Poneva was often sewn from colorful fabrics and decorated with embroidery or braid.
As long as there are women's skirts, there are so many disputes about their length. Women wore long skirts that completely covered their legs until the 20th century, when the skirts began to be gradually shortened, at first only opening the toe of the boot.
In the 60s, a skirt barely covering the legs appeared in fashion.
Mid-calf midi skirts came into fashion in the 1970s.
Types of modern skirts: skirt - trousers, pleated skirt, skirt with straps, briefcase skirt, tulip skirt. The most relevant and fashionable is the classic straight skirt, which, depending on the length, suits every type of figure. We will make it, studying this section.
4. Presentation of the program material.
4.1.Technological sequence of manufacturing a straight skirt (presentation 5 min). Students write down the technological sequence for making a straight skirt in a notebook.
Preparing cut details for basting. Preparing a skirt for fitting. Conducting a sample. Correction of defects. Cutout processing. Side cut processing. Processing the fastener in the side seam of the skirt with a braid-zipper. Processing the belt, processing the upper cut of the skirt with a stitched belt. Processing the bottom cut of the skirt. Processing the buttonhole and sewing on the button.
2nd lesson - processing the fastener in the side seam of the skirt with a zipper braid.
Zipper Information ( 2 minutes) (the teacher shows lightning).
In a skirt, the zipper can be located in the left side seam, the seam on the back or front panel of the skirt. The zipper consists of a braid to which small teeth (links or a spiral) are attached, a lock with a ring and three metal rivets located at the top and bottom.
The zipper replaces a button, snap or hook closure and serves as decorative trim in certain types of clothing.
Zipper Benefits: (slide and writing in a notebook)
Reduced processing time;
Nice appearance;
Speed and ease of use.
Demonstration of samples of zipper processing in the side and middle seam, finished skirt.
4.2. Algorithm for processing the fastener in the side seam of the skirt with a braid-zipper ( presentation, 5 min).
In order to properly process the fastener with a zipper braid, it is necessary to distinguish the main details of the skirt. To do this, they need to be marked (signed)
1. Fold the two pieces right side inward.
2. Draw a side seam line with chalk or pencil at a distance of 2 cm from the cuts of the parts.
3. Set aside 16 cm (zipper length) from the upper sections of the part and draw a horizontal line limiting the length of the fastener.
4. Sweep the side cuts of the panels from the boundary line to the bottom.
5. Lay out the seam allowances in the basting area in different directions.
6. Braid - zipper attach to wrong side panels so that the beginning of the links is at a distance of 1 cm from the upper cut of the skirt (sample)
7. Baste the zipper, starting from the top cut of the skirt down, closing the braid to the middle of the links. Perform this operation on the other side.
The inset zipper should be closed with seam allowances.
The teacher demonstrates how to do the work. (7 min)
Reminder to follow the rules during practical work TB.
5. Practical work(15 minutes) students on throwing lightning.
Targeted visits by the teacher to students' workplaces in order to monitor compliance with technology and safety.
6. Final part (5 min.).
Questions to consolidate new material:
1. What new did we learn in the lesson? ( Skirt processing sequence, zipper processing methods)
2. What does it mean to label?
3. Benefits of a zipper (reduction of processing time, beautiful appearance, fast and easy to use)
An analysis of the mistakes made during the implementation of practical work is carried out.
Grading the journal.
Homework - § 11, bring cotton fabric for making a skirt in M 1: 2, tools for personal use.
Workplace cleaning.
References:
Simonenko “Technology” Grade 6 A guide for a teacher to study technology in Grade 6. Additional literature.
Based on the technical drawing, technical description and selected textile materials, as well as methods for processing the main nodes, a technological sequence for processing the model was compiled. women's skirt. The technological sequence of processing is presented in table 2.
Table 2 - Technological sequence of skirt manufacturing
| No. p / p | content of indivisible operations |
| Harvesting section | |
| Checking the presence of details of the cut of the skirt according to the route sheet | |
| Duplicate skirt details | |
| Duplication of the inside of the belt | |
| Duplication of the allowance for the hem of the bottom of the front panel of the skirt | |
| Duplication of the allowance for the hem of the bottom and the allowance in the area of the fastener of the back panel of the skirt | |
| Belt Processing | |
| Turning the outer edge and ends of the belt | |
| Notching the corners of the belt | |
| Turning the belt out front side, straightening corners | |
| Ironing the belt while straightening the piping along the outer edge and the ends of the belt | |
| Processing the front panel of the skirt | |
| Stitching the ribbed sections of the front panel of the skirt | |
| Overcasting the seam allowance | |
| Pressing darts | |
| Processing the back of the skirt | |
| Sewing darts on the back of the skirt | |
| Pressing darts | |
| Stitching the middle cut to the notch for the zip fastener | |
| Overcasting the middle seam allowances | |
| Ironing the middle seam allowances | |
| Attaching a “zipper braid” to the allowance of the middle seam of the left half of the back panel of the skirt | |
| Attaching a “zipper braid” to the allowance of the middle seam of the right half of the back panel of the skirt | |
| Ironing fastener allowances | |
| Attaching the finishing stitch of the fastener along the edge of the fastener | |
| Ironing the middle seam of the skirt | |
| Skirt lining treatment | |
| Sewing the front and back panels of the skirt along the side cuts | |
| Overcasting the side seam allowances | |
| Ironing the allowances of the side seam of the skirt | |
| Stitching the middle cut of the back panel of the skirt to the notch for the fastener | |
| Overcasting seam allowance | |
| Ironing the seam allowance | |
| Drawing the hem line of the bottom of the lining | |
| End of table 2 | |
| Undercutting irregularities | |
| Sewing in the hem allowance of the bottom of the lining of the skirt with a seam in the hem with a closed cut | |
| Ironing the lining of a skirt | |
| Mounting section | |
| Stitching the side skirts | |
| Overcasting the allowances of the side seam of the skirt | |
| Ironing allowances | |
| chip off side seams skirts, check the symmetry of the darts. Drawing the waistline and hem of the bottom of the skirt. Trim irregularities. | |
| Attaching the lining along the waistline with simultaneous laying of folds along the notches in the area of the front and back darts | |
| Attaching the outer part of the belt to the waist line while inserting the hanger along the side seams | |
| Ironing the seam of attaching the belt | |
| Attaching the finishing stitch along the inside of the waistband while simultaneously folding the cut inward into the seam Attaching the outer waistband | |
| Belt ironing | |
| Drawing the location of the loop on the belt | |
| Buttonhole | |
| Overcasting the hem allowance of the bottom of the skirt | |
| Hemming the bottom hem allowance | |
| Ironing the bottom of the skirt | |
| Finishing section | |
| Cleaning the product from industrial waste, removing chalk lines | |
| Belt ironing | |
| Ironing the back of the skirt | |
| Ironing the front panel of the skirt | |
| Drawing the location of the button on the belt | |
| Sewing on a button |
Output
According to the task of the control work, a model of a women's skirt was developed, which meets modern fashion trends. Made technical drawing with accurate black and white graphic reproduction of the main lines. The technical description corresponds to the design lines and technological seams.
The choice of materials is substantiated, taking into account all the requirements for the product and materials that make up the package for a women's skirt intended for the spring-autumn period of wear. As the main material, it is proposed - suit wool blend fabric. lining material is matched to the color of the base material. As a gasket material, a hot-melt adhesive gasket material with an adhesive point coating was used, which makes it possible to maintain the shape of the skirt belt during operation. The confection card shows samples of materials that make up the package.
Technological processing The main nodes of the skirt reflect the latest developments in technology, based on the technical drawing, the technical description compiled the technological sequence of processing the model of the women's skirt.
Bibliography
1. Materials science in the production of light industry products / Buzov B.A., Alymenkova N.D. Textbook for students. higher textbook establishments. - M.: Publishing Center "Academy", 2004. -448 p.
2. Operational machine-automated clothing technology / P.P. Koketkin. - Smolensk, 2003. - 232 p.
3. Classification and range of materials used for the manufacture of clothing. Determination of the nomenclature of indicators of their quality: method. decree. to the lab. work / Kazan. state technol. un-t, in-t of technologies of light industry, fashion and design; comp. L.G. Khisamieva, E.R. Khairullin. - Kazan: Publishing House of KSTU, 2005. - 19 p.
4. Technology of garments. / Savostitsky A.V., Melikov E.Kh. Textbook - 2nd ed. revised and add., - M .: Easy and food industry, 1982. - 440 p.
5. Illustrated manual on the technology of light clothing / A.T. Trukhanov. - M .: Higher school, 2000. - 176 p.
6. Fundamentals of sewing technology / A.T. Trukhanov. - M.: Higher school, 2001. - 336 p.
7. Tailoring products for individual orders / Textbook M.: IRPO: Izdat. Center "Academy", 2002. - 528 p.
- 1. It is better to cut the fabric on a large table
- 2. Fold the fabric in half, right side in, align the edges. So that the fabric does not move when cutting, you can chop it with needles inside the contour of the parts
- 3. First, lay out large parts on the fabric (shelf, back, sleeves), then small parts (cuffs, collars, belt, etc.). Achieve an economical layout of patterns on fabric
- 4. To the fold of the fabric, place the details that are given on the pattern in half size. After cutting out, you get a solid part

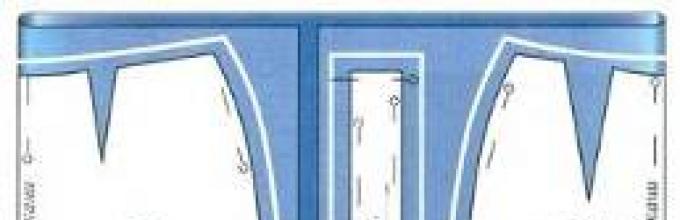
Pattern layout of a straight skirt on fabric with a directional pattern
Layout of a pattern of a straight skirt on a fabric 140 cm wide without a seam on the back panel
Pattern layout of a straight skirt on a fabric 140 cm wide with a seam on the back panel
Laying out a wedge skirt pattern on fabric
Laying out a pattern of a single-seam conical skirt on fabric
Laying out a two-seam conical skirt pattern on fabric


- 1. Pin the patterns of details with needles to the fabric and start chalking
- 2. Draw long lines first, then short and oval ones. The lines must be straight. You can use rulers and patterns to trace the lines accurately and evenly.
- 3. Smooth, slippery fabrics (silk, chiffon, etc.) can warp during trimming and cutting. Be sure to pin them with pins. When tracing the contours of parts, do not press hard on the remnant
- 4. After chalking the contour of the parts, mark on the fabric the location of the lines of the middle of the part, the half-slip line, the location of the first loop, pockets, darts, folds
- 5. Once again check the correct layout and edging, and only then proceed to cutting the fabric
- 6. After chalking the parts, mark the seam allowances
- 7. If you have little experience, not a very good eye and you are not sure that you can set the desired amount of seam allowance throughout the cut by eye, set aside the amount of seam allowance using a ruler or a special template that you can make from cardboard. Mark the amount of allowances on the fabric with chalk or soap
- 8. Cut the fabric strictly according to the seam allowances! Make no mistake!
- 9. Do not forget that when cutting loose fabrics, the size of the seam allowances must be increased!