Anyone can crochet these booties, even you! Moreover, it will take a little time, but you will experience pleasure and give the baby not only an item but also your invested energy. The baby's feet will be warm, and he will feel especially comfortable and cozy in them. And so we begin to gnaw on the science of crochet. 🙂
Determine the size of future booties quite simple. To do this, you need to know 2 leg sizes - the length and width of the foot. The width of the foot is subtracted from the length to obtain the length of the base for the sole of the booties.
Usually the basis is a chain of air loops. It is precisely the length of this chain that is the starting point.
Next, you need to trace according to the pattern which knitting elements are used to tie a series of air loops. The size of the sole also depends on the height of these elements. For 1 level, single crochets increase the sole less than single crochets.
Also the choice of yarn affects the size of the sole. The dependence is as follows - the thicker the yarn, the higher the height of the knitting elements of the sole, and therefore with thick yarn you need to be more careful when calculating the size of the booties.
For convenience, you can tie a series of air loops with the elements indicated in the diagram in the initial level of the binding. Next, you should measure the size of the intermediate product. After this, it’s easy to estimate how the sole will increase after knitting the next rows.
For knitting booties I used hook No. 2. Yarn – Alize Baby Wool: 350 Meters or 100 g of yarn. I knitted with 1 thread. Foot length it worked out - 9 cm, for the baby from 0 to 3 months.
If you make the thread in 2 layers, the booties will be larger size(from 3 to 6 months), thicker and will keep their shape better.
The sole of the booties is knitted according to pattern No. 1.
1. Cast on 16 chain stitches.

2. The first double crochet needs to be knitted into the fifth loop.

3. We knit double crochets to the end of the chain.

4. In the last loop you need to knit five double crochets and continue knitting along the second side of the chain.

5. We start each row with three chain stitches and end with a connecting stitch. Don't knit in the round! We knit the second row with double crochets, in those places where we knitted 5 loops into one, we knit 2 more.

6. In the third row we again knit 2 loops in the ones added earlier.

7. At the beginning of the row we knit one lifting loop and single crochets. At the end of this row there is a connecting post, 3 lifting loops. We knit without additions.

8. We knit 2 rows with double crochets without additions.

9. Fold the booties in half, count 15 stitches from the middle of the toe, and mark with thread. We do the same on the other side.

10. Fasten the thread.

11. Knit the toe according to pattern No. 2


12. Turn the work left side up. Following the pattern, we complete the knitting of incomplete double crochets (those that have a common top). We knit the remaining double crochets. We start the working thread on the left side.

13. We knit 1 row of double crochets. In the second row we knit alternating double crochets and chain stitches (loin mesh). Next we knit the rows in accordance with the diagram.

14. We continue to knit according to pattern No. 3.


15. We tie the bottom of the booties along the row where single crochets were knitted. Connecting stitch, 1 chain stitch, 3 double crochets, chain stitch. We knit through a column.

16. We tie the top of the bootie along the row where we tied it new thread and started knitting the toe. Five air loops, connecting post. Insert the hook through the post.

17. We knit a chain of air loops. I knitted 120 loops, you can make a chain of a different length.

18. We thread the lace into the fillet row.

Great! Isn't it true?! Guided by the scheme and step by step photos Crochet booties for a newborn are almost ready. Or rather, the main part of them is ready. All that's left is the small matter of forming. We want the child to be not only warm, but also beautiful. Let this beauty please those around you.
19. We begin knitting a flower. Tie 6 chain stitches and close them into a ring.

20. Tie with 6 single crochets, connecting them with a connecting stitch.

21. Now we knit 5 chain stitches and secure them with a connecting post. Thus we knit a petal in each column (6 petals)

22. In each petal we knit 1 single crochet, three with 1 crochet, 1 single crochet. We tie all the petals like this.

23. Sew the flower to the booties.

24. The booties are ready. Warm your baby's feet and enjoy your creation!

Skilled hands using thread, a hook and a pattern can create a real masterpiece, so if you want to know how to knit baby booties, you should start with the basics. Although the modern clothing market provides an abundance of many models of socks, sandals and boots, nevertheless, buying a high-quality item that is safe for children is not so easy. Some women started knitting out of concern for the well-being and development of their child. This is quite natural, because who, except dear mother, will be able to better take care of the comfort of her offspring.
How to crochet booties
For those who are just starting to master knitting, it is recommended to carry out their first projects using a crochet hook. This device will make it easier to understand the basics, and in a short period of time you will be able to figure out how to knit baby booties. The method is very simple, does not require special training, and the finished products are perfect for both boys and girls aged three months and older. In such shoes, the baby will be comfortable and warm to walk around the house, which eliminates the need for additional expenses.
To knit a product you will need a hook and a skein of thread: it is advisable to buy high-quality yarn to prevent possible health problems for the child. The most the best material for beginners, it is 100% acrylic; it will not chip and cause discomfort to the baby. The threads are very soft to the touch, so crocheting booties will not be difficult. The most important thing is to learn to navigate diagrams and photos.
Which threads are best to choose for a newborn?
In the process of knitting, one of the most important decisions made by a needlewoman is considered correct selection consumables. Experienced craftswomen It is advised to give preference to yarn created specifically for newborns. Such threads undergo additional quality control, which guarantees the safety of the material for children. Acrylic is very popular because this yarn holds its shape well and does not cause allergic reactions in children:
- naturalness: synthetic wool substitute;
- color: white;
- thread thickness: 50 g/ 130 m;
- hook size: No. 1.6.
Another popular thread that can be used to knit or crochet booties is mercerized cotton. Externally, this material resembles viscose due to its slight sheen, however, thanks to good torsion, the thread has proven itself to be excellent in creating complex and elaborate knitting. Cotton yarn is ideal for lace and formal christening items; light spring and summer socks are often made from cotton:
- naturalness: natural material;
- color: pink;
- thread thickness: 50 g / 125 m;
- hook size: No. 1.6-2.
Microfiber is rightfully considered the favorite of millions of women around the world, because this yarn is very convenient to work and use. The thread is hypoallergenic and does not stretch even after many washes. The material is suitable for those who do not yet know how to knit baby booties and are just trying to learn it. Microfiber helps to produce off-season shoe models that can be worn all year round:
- naturalness: the fabric consists of polymer and natural fibers;
- color: blue;
- thread thickness: 100 g/ 225 m;
- hook size: No. 2 and 2.5.
How to determine the size of booties
Before you start working, you should decide on the size. This parameter can be easily found using ordinary subtraction, the initial values of which are the width and length of the child’s foot. The resulting number will indicate the number of air loops that need to be made for a given distance. Let's take as a guide one centimeter of yarn, which can accommodate two loops, then with a difference of five centimeters it is necessary to weave ten loops for the sole.
Crochet booties for beginners
It is best to start practicing on such an important task as knitting baby booties by performing the most basic tasks. Once the size of the child's sole is determined, you can begin. When working, you should take into account the dependence of the thickness of the air loops on the selected material, so you should not skimp on yarn. To crochet fashionable, beautiful sneakers, first take acrylic in any two colors. Contrasting shades such as white and blue combine perfectly with each other, which will make the finished item an object of admiration for others.
The blank for knitting the sole of a bootie consists of a certain number of air loops, the number of which depends on the size of the foot of a little fashionista or fashionista. First, the base of the shoe is assembled, which has the shape of an oval. To do this, you need to knit the first chain of air loops, making a double crochet stitch along the entire length of the binding. To complete each row, a connecting column is made.
Crochet booties - step-by-step master class
Crocheting booties for a newborn is a very enjoyable activity that women love. A bootie-boot is suitable as a variety; you can try making a model using acrylic in two colors and a hook number 2.5. Additionally, ribbons, beautiful beads, lace, and embroidery are inserted, which will serve for decorative purposes. Detailed instructions How to cast on loops on the soles of children's shoes:
- We knit a chain of air loops (the number depends on the size of the sole).
- We count the fourth and move the hook there, knitting two double crochets (dc).
- For the next ten loops we make one dc each.
- Six dcs should be made in the last loop.
- After this, ten symmetrical CHs are knitted, placing one half-column in each loop.
- We return to the very first loop and add three more dcs there.
- The row should be completed using a connecting loop, which we knit through the third lifting air loop.
We continue to knit according to this pattern until the desired height is obtained, then we can pull back the main thread. At the very end, the finished booties are tied with a material of a different color. To do this, use single crochets, after which you should hide the ends of the yarn by securing them. Finished product decorated with a satin ribbon-tie, lacing or a simple fastener on the side, a hole is first made in the yarn.

Crochet openwork booties
Openwork knitting looks very gentle, which is why this type of soft shoe is popular. You can knit shoes yourself if you devote enough time to this activity. The yarn must be purchased hypoallergenic and soft so that the child is comfortable; it is better to choose cotton threads or acrylic:
- If the shoes are intended for a newborn, then ten air loops and three lifting loops are cast.
- Then we count the fifth loop and knit double crochets, after which a row of openwork knitting on both sides is tied with four double crochets.
- At the end of each chain you need to make a connecting loop, and start a new one with three lifting air loops.
- Once this is done, you can move on to the purl row, after completing which you must pull out the loop.
Knitted booties for beginners with step-by-step description
Knitting booties for newborns is a little more difficult than crocheting. However, if you get used to it, it’s quite possible to make beautiful children’s shoes in a couple of hours. We begin work with the main part of the bootie - the sole, for which we put two knitting needles together and make from eight to twelve loops, depending on the size of the child’s foot. Please note that the purl stitch should go last, while the first stitch should be skipped:
- We knit about ten centimeters of facial loops.
- To cast on the required number of loops around the perimeter of the sole, use two extra knitting needles as a supporting frame. They can be secured using special plastic tips and will not slip out of the yarn.
- Further work consists of knitting a circular blank for the upper part of children's shoes, after which they move on to the toe rows. At this stage, you should be careful not to jump to the inside so as not to spoil the drawing.
- We switch to two knitting needles and continue knitting the toe. The first loop is simply removed, and the last one is transferred to the side knitting needle, the resulting loops are knitted together.
- Once the main row is completed, cross the top of the bootie onto the knitting needle. Here holes are knitted for future ties, for which three yarn overs and two knit stitches are made together (decrease).
- The second row of the toe is cast on using knit stitches.
- The final row is knitted with purl stitches, and at the end the thread of the finished toe is cut.
- Finished socks are decorated with ruffles; a satin ribbon tie is acceptable.

Seamless
This model differs from others in the absence of a seam on the heel. The shoes are knitted very quickly and do not require any additional calculations regarding the number of loops. The yarn is selected in accordance with the time of year: cotton threads are best suited for the warm period, and wool is the best choice in winter. Children's shoes are knitted using stocking needles, having first folded the thread in half. The work begins with making a cuff consisting of thirty-two loops. The yarn is distributed over four knitting needles and closed in a circle.
Booties and socks
The simplest model of booties is socks, so it is recommended to start learning knitting with them. Yarn and knitting needles are selected according to personal preferences, the main thing is to make sure that the material is safe for the baby’s health. The first step is to cast on a chain of ten stitches and perform garter stitch. Add one loop on each side, then continue the shawl pattern. When you reach the thirtieth row, remove the loops along the edges, for which the hook should be placed under the base of the posts.
How to knit booties on two knitting needles - diagrams and descriptions of models
There are a huge number of patterns that can be knitted using two knitting needles. Warm shoes with embossed cuffs they are made for the winter so that the baby is always warm. Elegant shoes, decorated with various ribbons and lace frills, are the most popular models. Shoes with a herringbone pattern are very practical and comfortable to wear, and products with stripes hold tightly to the child’s feet due to the thick cuffs.
Shoes with animal faces will look great on any child, and classic openwork models are suitable for important events. For girls, you can knit shoes with hearts and lace cuffs; shoes with a pattern in the form of large leaves. Although socks are considered a simple model, they cope with their main task no worse than other types of booties - ensuring the comfort of the baby.
Knitted booties-sneakers
A fashionable bootie-sneaker for babies is original alternative all known knitted shoes and socks. Surprising everyone you know with an interesting design of children's shoes is not as difficult as it might seem, even if you have only recently learned to knit. To complete the work you will need threads, a pattern, a hook or knitting needles. The sole is knitted in the form of a familiar round piece, after which you can begin making the nose using the front and back rows.
The beginning of the tongue is closely connected with the spout, so we continue to knit in the same way, changing only the color of the thread. Next, we move on to the sides of the sneakers and use single crochets to work them out to get a more prominent edge. After this, we align the yarn using connecting posts and tie the previous rows with a thread of a different color. At the final stage, we thread the ends of the strap into the holes formed by the double crochets and tie them beautifully.

Simple booties with an openwork pattern
Beautiful openwork shoes for a baby are the dream of any mother. But sometimes the patterns proposed for knitting seem too complicated, so many women do not dare to start bringing their ideas to life. To make simple openwork shoes, you first need to tie the sole with air loops. As soon as the base of the bootie is completed, you should start knitting the sides, alternating loops with and without crochet. Next, the toe is cast on, the third row of the toe is the last, after which all that remains is to knit only the upper part of the shoe.
Marshmallow booties
This model can be knitted in one evening without straining; you just need to stock up on threads, knitting needles and patience. You will need much less yarn for the shoes than usual, only twenty-five grams of acrylic. Traditional socks use two colors - primary and secondary. Often contrasting shades are chosen, such as pink and white, for example. The manufacturing process is similar to the familiar pattern of children's shoes, but there are slight differences. At the final stage, a fundamentally new form, using a needle, the upper part of the shoe is pulled together.
Ugg boots with knitting needles for baby
Shoes such as Ugg boots appeared in our country several years ago, but have already managed to win an entire army of ardent admirers. There is nothing strange in this, because the shoes are extremely comfortable and easy to wear, which is beneficial in winter time year. Some mothers want to pamper their babies with original things, so knitted sneakers, shoes, sandals and even uggs are used.
Using knitting needles, you can actually make a model similar to everyone’s favorite ankle boots, using patterns from the Internet. Only natural wool is suitable for manufacturing, so before you begin, make sure that your child tolerates this material normally. Ugg boots consist of the same standard parts as other products, the only difference is in the knitting method. At the end, it is very important to pull out all the protruding threads and hide the ends and tie the booties.
Socks with braids for newborns
Warm socks with pigtails, although considered outdated, are still popular when it comes to young children. Large knitting with a pattern helps prevent the baby's feet from getting cold and does not slip off during sleep. These properties are very useful when it comes to caring for a child. Knitting socks with pigtails is not at all difficult, especially since it is posted on the Internet large number various schemes set of booties.
Summer booties for girls
In the warm season, you especially want to dress up your baby beautifully, but just a dress and a bow is not enough. Mothers of little fashionistas need a lot of attention to their wardrobe, because the girl must be stylishly dressed from head to toe. Shoes play an important role in the process of creating the image of a young princess, which gives a serious reason for the mother to get down to business on her own. You don’t need a lot of time or money to knit summer shoes for your beloved daughter. Buy yarn and constantly delight your children with new fashion products!
Video
Knitting booties - 18 best models. Schemes, description of work
Booties - crocheting and knitting
Booties are very easy to knit, especially, in my opinion, crocheted. And they are decorated in more different ways: lace, pleats, straps, and ribbons are crocheted. Now there is a huge opportunity to use satin ribbons (the shiny surface of the satin harmonizes perfectly with the yarn), pearl beads, and rhinestones.On this page below there are examples of such decoration, taken from the vast expanses of the Internet. The design fantasies of modern knitters have led to the creation of booties - shoes, booties - sandals, sneakers. The simplicity and speed of knitting booties, the abundance of various materials for knitting make it possible to equip a little person’s wardrobe with booties, so to speak, for every romper.
How to crochet booties
Unlike the various options for knitting booties with knitting needles, when crocheting, two parts clearly stand out in the product - the sole and the top. And knitting begins from the sole.
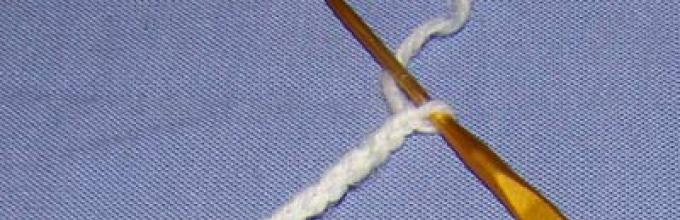
The beginning of knitting is shown in the diagram with a red arrow - 15 air loops plus one for lifting the row. The length of the chain is approximately from the base of the fingers to the middle of the child’s heel.
Next are half stitches (very tight knitting, ideal for soles), single crochets and single crochets. Single crochet stitches, drawn as a fan in the diagram - these are two stitches knitted from one loop. The last row of the sole is tied with a row of half-columns (60 half-columns).
The sole can also be knitted with single crochets. In the diagram, in the places where the sole is rounded, 7 double crochets are knitted from one air loop (see explanations below).
Knitting the top of the booties is the most fun part of the job. Here are several options for the design of the top (photo from the Internet, free translation by the author):
You can link it like this:
Here in the pattern, the top of the booties is knitted from the top, from the ankle to the sole, and then sewn (or tied) to it; start - red arrow. Single crochets. In the middle part of the top there is an increase to widen the toe, from one column - two on both sides of the center front. The knitting ends with the same 60 stitches, which is equal to the perimeter of the blue sole in Fig. above.
The booties are tied with a border of single crochet stitches and air loops (light blue in the diagram).
In practice, they usually knit from the sole upwards: without tearing off the thread, on 60 loops of the sole, knitting the top in a circle begins: 6 rows of 60 stitches, 10 rows with a decrease in the central part of the top on both sides of the middle, two loops together. Next, 2 rows with single crochets, 1 row - three tbsp. double crochet, 1 chain (this is a row with holes for pulling the lace), 2 rows with single crochets, the last row is a border.
You can knit the following shoes:
Knit from the sole in the round (in the diagram - double-sided knitting, front and back. In this case, the back is then sewn together. The pattern is taken from a French magazine, but for some reason in the West they don’t like to knit in the round). Decrements on the toe are made evenly along the entire front according to the pattern (out of two single crochets - one).
To add height to the back of the shoe, several additional rows are knitted. The strap is a side chain of air loops and 1-2 rows of single crochets.
Tie the shoes with contrasting thread
Let's look at the principle of knitting another booties:
The diagram above shows the front part of the booties. red arrow and air loops- the beginning of knitting, located at the instep of the leg.
There are generally 3 ways of knitting:
Knit the parts according to the pattern, all separately, then sew (tie, knit);
Knit according to the pattern, but at the end of each row, decrease a column and pick up the corresponding column of the sole. Thus, the toe of the shoe will be immediately tied;
Finish the last row of the sole in the middle of the front plus three columns. Turn the knitting and knit 6 stitches. Turn the knitting, air loop to lift the row, knit two stitches from one stitch, then 5 more stitches to the end of the row - a total of 7 stitches in the row. When knitting the last stitch, pick up the fourth loop of the sole from the center. Turn knitting. Again 1 column for lifting, 2 columns from one, etc.
As a result, when you knit until the leg is raised, you should get 20 loops. We break the thread.
The back of the shoe is knitted with a set of stitches around the perimeter of the sole - bottom pattern. Upper part the heel is reduced by 4 columns for a better fit to the heel.
Some useful tips crochet technique:
How to knit 7 double crochets from an air loop to round the sole
How to knit two double crochets from one
How to knit one single crochet out of three (can be used to tighten the tops of shoes, traces in the center of the front part)
One double crochet out of five
Knitting the top of the bootie sock will look something like this:
The first row of the side of the booties is knitted in columns, inserting the hook not under both “braids” of the previous row, but only under the “back” (the face of the work is looking at you). The remaining part of the braid will be needed when finishing.
If you want the sidewall to be at an angle of 90 degrees to the sole, then the hook is inserted under the very column of the last row of the sole.
Now that we have figured out the principles of crocheting booties, I hope you will not be scared by this “Chinese letter”:
Do you recognize the oval below in the diagram? This is the sole. On the top left is the front of the shoes, on the right is the back, the strap goes to the top.
The main thing here is to combine the letter designations: we have tied the sole and to point D we continue knitting according to the pattern of the toe of the shoe (point C is the middle of the front). The back is knitted in single crochets from the point opposite D to point A.
But these are knitted from four squares:
The squares are knitted separately, then sewn together, or, as when knitting shawls, they are picked up together when knitting the last row of the square.
At the bottom of the diagram is the binding of the upper part of the booties - a place for pulling the lace. The booties are tied after the final assembly of the squares.
Please note that the dimensions of the sole are indicated: 4.5 - a chain of air loops, 1.5 - heel, toes - 2 units. The length of the sole corresponds to the length of 2.5 squares. When increasing the size of the booties, it is necessary to increase the squares.
Another model:
From top to bottom: sole, heel. Bottom left is a strap.
And finally, the most interesting part is the sock. It begins with a set of air loops (there are 14 of them in the diagram). Knitting with single crochets.
1 row (number 1 at the very bottom of the picture) - 14 columns, 1 v/p for raising the row. We turn the knitting over.
2nd row - 12 stitches, on the thirteenth we knit two from one, 1 stitch, 1 v/p for lifting the row.
3rd row - 1 tbsp., from one tbsp. two, 2 stitches, attached with a half-column to the fifth loop of the second row, 1 ch, turn the knitting over.
4th row - one half-column, 2 columns, two from one column, 1 column, 1 v/p for lifting.
In the diagram, black circles are half-columns, white circles are air loops.
Row 11 - we knit fifteen stitches until connected to the first row (as if we were collecting all the shortened rows 3-10), 5 chain stitches for pulling the strap, 2 stitches.
Rows 12-20 - 22 columns each. In the 20th row, don’t forget to make 5 chain stitches for the second hole for the strap.
Rows 21-28 - shortened rows with a decrease in the number of columns.
21 rows - 1 columns, 1 half-column. We turn the knitting over.
Row 22 - 1 single stitch, 1 half stitch, 3 double stitches, 2 double stitches together, 1 double stitch.
We turn the knitting over, etc. according to the scheme.
Row 29 - 1 single stitch, 1 stitch, 2 stitches together, 12 stitches. Turn the knitting over.
Row 30 - 14 columns.
The toe of the bootie is finished, we sew it to the sole.
The back of the booties - we collect stitches along the rest of the sole and knit, like the blue booties on this page above.
A few more options for crocheting booties:
The booties are crocheted with double crochets and decreases on the toe according to the pattern
We knit sandals:
Now the Internet is full of all sorts of unusual ideas knitting booties!
Knitting pattern for crosshairs on booties-sandals from three straps. The thread does not break from the beginning to the end of knitting the straps.
A few more knitting options:
When knitting these booties, the sole was first tied with lace from a contrasting thread, then the top of the booties was continued to be knitted with a thread of the main color (2-3 rows, depending on the double crochet or single crochet you knit, along the entire perimeter of the sole without decreasing or adding, then 3 rows with decreases on both sides of the front part - two loops in each row). The top of the sock should be located at an angle of 90 degrees to the sides of the booties, so it is knitted, making one out of 5 or 7 stitches in front, then try it on so as not to fall apart. You can knit it separately and sew on an oval rosette. The number of columns used under the toe is approximately 1/3 of the sidewall. Finally, from the stitches of the back of the bootie and the sock, a bootleg is knitted in the round and decorated with knitted lace. The last thing is sewing on beads, satin flowers, and ribbons.
Pink booties:
For the top, a round rosette in the shape of a flower is knitted (you can pick it up on the page about knitting shawls) with a diameter slightly larger than the width of the sole. This circle is tied (or sewn) with a slight shirring to the front of the sole, then the back of the bootie is knitted. If desired, you can tie the shin higher. It turns out to be an openwork bootie with a round toe, which is comfortable for the baby’s foot. And beautiful.
Knitting
There are a great many ways of knitting with knitting needles: on five knitting needles, on two, in the round, without seams, knitted on top, bottom, stitched along the sole, etc. My attempt to collect all the options was clearly not crowned with success. Therefore, as "discovery" original ways and the receipt of letters from readers with photos and descriptions of “their” knitting of booties, this section will be updated.
(according to N. Svezhentseva, “Peasant Woman” magazine, 6/1988)
Materials: thin wool yarn - 25-30 g, any colors or combinations thereof will do.
Job description:
The model consists of two parts: a shoe and a sole. Let's start with the shoe. Cast on 72 stitches (including 2 edge stitches), knit 6 rows in garter stitch (knit and purl - knit stitches) and 8 rows in stocking stitch (knit stitch - knit stitches, purl stitches). - purl loops). Now distribute all the loops into three parts: two side panels (28 loops each) and a central one (14 loops). We continue stocking knitting: in the front row, knit 28 loops of the right side and 13 loops of the central part, knit the last 14 loop together with the first loop of the left side.
Turn the job wrong side. Now: in the purl row, purl 13 stitches, and purl the 14th and 15th stitches together; in the front row - 13 loops are knitted, and the 14th and 15th loops are knitted together. Continue this descent until you have knitted half of the sidewalls - there should be 14 loops left in the work. The number of loops in the central part remains unchanged.
Work 8 rows in stockinette stitch. In the front row you need to make an openwork pattern for the lace (ribbon), which you will thread into the holes of the openwork - these will be the ties. To do this, alternate 2 stitches together along the entire row, knitting and yarn over. In the purl row, purl all the loops and yarn overs. After 10-14 rows, repeat the openwork row. Knit the last 6 rows in stockinette stitch, cast off the stitches.
We knit the sole in stocking stitch. Cast on 5 stitches and knit the first row. At the end of each of the next four rows we add 2 loops, making 13 loops in the work. We knit 20 rows evenly, then add one loop at the beginning and end of the front row. We repeat the increase through the front row and knit 6 rows exactly, there are 17 loops in the work. We start decreasing at the beginning of each row: 2 times one loop and 2 times two loops. We close the last 5 loops in a row.
Assembly: We iron the parts, sew the shoe, connect it to the sole, crocheting it along front side crochet We thread a lace or ribbon or braid into the holes of the openwork row.
“Sports”: clothes for legs
Cast on 40 stitches on needles size 2.5 with purple thread and knit 6 rows. main pattern, 1 r. purl loops (fold line) and 6 r. main pattern. Continue working in stripes (alternately 4 rows of lilac and white). Having knitted 6 p. with the main pattern using lilac thread, perform 1 openwork row (* knit 2 stitches, knit 2 stitches together, 1 yarn over, repeat from *) and 2 r. with the main pattern using purple thread, then leave 14 stitches on each side.
On medium 12 sts, knit 14 r. purple thread. From edge loops in the middle part, cast on 7 p. and continue working along with the left loops (= 54 p.), while the 1st r. knit with purl loops. Knit in stripes (alternately 4 rows of lilac and white). Then knit 2 rows for the sole. Using garter stitch purple thread, bind off all stitches loosely.
Make seams. Turn the folds over and sew them on. Twist the cord (approx. 45 cm) and thread it through the holes in the openwork row.
An interesting option - “Suns”: (description and photo sent by site reader, needlewoman Varvara from Chelyabinsk.)
You will need approximately 25-30 grams of “Children’s” or “Moskvichka” type yarn, a 1.2 m thin satin ribbon, 2.5 mm knitting needles.
I made this work on 2 knitting needles, but you can do it on 4 knitting needles.
Cast on 40-42 loops, knit 4 rows purl, 4 knit and 4 more purl.
12 rows - elastic band 1*1.
In the center of the knitting we select 10 loops and knit 14 rows in front of the booties in garter stitch. We collect 7 loops from the edges of the knitted square, and from one to three on the corners of the sock (k1, n, k1).
We repeat knitting the top, 4 rows - purl, 4 rows - knit, 4 - purl.
Again we continue knitting in the center, highlighting 10 loops, knitting approximately 32 rows in garter stitch (all rows of knits or all rows). At the beginning of each row we close off the side loops.
We make the remaining loops (5-6 on each side) into the heel and sew the back seam.
We stretch the satin ribbon through every third loop (if you knit a lace, you should make holes at the end of the elastic). Sew on bombs.
Dimensionless - description and photo sent by site reader, needlewoman Varvara from Chelyabinsk.
They are good because they are knitted on 2 needles and do not have a specific size, that is, they can stretch as the child’s legs grow. You can knit with different finishes on the top, the main thing is that the lower part is knitted with English or semi-English elastic. Upper part and trace: knit on 1.5-2 mm knitting needles, semi-English rib on 2.5 mm knitting needles
Main part. Cast on 41-45 stitches, knit 3-5 cm with 1x1 rib. In the middle part, select 9-11 stitches and knit a rectangle with garter stitch, approximately 2x3cm (16 rows)
On the sides of the rectangle, continue knitting from the edge loops. In the corners of the front part, for the required volume, knit 3 loops from one. We knit 1-2 rows with an elastic band 1*1, switch to 2.5 cm knitting needles and knit 3 cm (-14 rows) with a semi-ant line and an elastic band (1 row - 1 l, 1 yarn over, 1 slip without knitting, 2 row - 1 purl, knit 1 l together with the yarn over).
We knit the last 6-7 rows with a 1x1 elastic band, moving from the 3rd - 4th row to thin knitting needles. We collect open loops, starting from the middle of the knitting thread, alternating one on the right and on the left. We tighten it approximately halfway and sew the back seam. Insert a ribbon (for thin satin ribbon It is not necessary to knit the holes).
Trim 1. Pink lace: Already on tied booties cast on loops along the top of the knitting and knit lace (1 row - 1 l, 1 yarn over, 2 row - back and forth, repeat 2 times and close with knit stitches)
Finish 2. We start knitting turquoise booties with finishing: We knit 4 rows of teeth - stockinette stitch, 5th row - 1k, 2 knits together, 1 yarn over, 6th row - purl, 4 rows - stockinette stitch. For the pattern - 1 row of purl, 7 rows of stockinette stitch with white thread, 2 rows of purl.
On a white stripe, the design is embroidered with colored thread, imitating knitting loops.
A simple option - knitting from the sole:
Size: 13-14.
Threads: Tenderness (100 gr. 300 m), 50% wool, 50% goat down.
Knitting needles: No. 2.
Cast on 15 loops. Knit 10 rows in stocking stitch, in the 10th row decrease one loop at the beginning of the row and at the end. Knit 24 rows. This will be the sole. Leave these 13 loops on one knitting needle. On the other three sides of the rectangle, cast on 3 more needles 24 sts on one side, 15 sts on the toe, 24 sts for the other side of the bootie (Fig. 1). Continue knitting on 5 needles: purl one row, knit the second, alternating white and blue threads in every 3rd row.
Having knitted the bootie to the desired height (12-15 rows), we will continue to knit only 15 sock loops - this will be the top of the front part of the bootie. We knit on two needles in stockinette stitch, knitting the first and last loop of the row together with the loop from the adjacent needle (Fig. 2). Knit until there are 14 loops left on the side knitting needles, that is, there are 3 knitting needles with 14 loops each and one knitting needle with 15 loops. On 5 knitting needles we continue to knit the bootie cuffs.
First, we knit 2 rows with yarn overs to form holes for the lace: 1st row - two knit stitches together, yarn over. 2nd row - elastic band (1 front, 1 purl). Knit a 9 cm elastic band. Bind off the loops using the Italian method. Insert laces or an elastic band into the resulting holes.
Here's another very interesting model- (from http://forum.forumok.ru/)
Size: 62-68
Materials: yarn (75% sheep wool, 25% polyamide, 125 m/50 g) - 50 g purple melange yarn. 5 knitting needles No. 4; hook No. 4; 2 buttons
Basic pattern, needles No. 4: garter stitch = knit. and out. rows - persons. loops; when knitting in circles - alternately 1 r. persons., 1 rub. purl loops.
Elastic band, knitting needles No. 4: knit alternately knit 1, purl 1.
Left bootie: start with the sole. Cast on 32 stitches, distribute the stitches onto 4 needles and knit in garter stitch. The transition from one row to another is located on the back line of the middle. In the 3rd row, after the 1st stitch of the 1st and 3rd knitting needles and before the last loop of the 2nd and 4th knitting needles, add 1 knit each from the broach. crossed loop. Repeat these increases 3 more times in every 2nd row, while increasing for the 1st and 3rd needles after and for the 2nd and 4th needles before the last added loop = 48 sts.
Knit 6 cm with elastic band.
Continue working with garter stitch again, and in the 1st row. On the loops of the 2nd and 3rd knitting needles, knit 2 stitches together. = 36 p. In addition, in the 3rd p. decrease the loops as follows: for the 2nd knitting needle, remove the last 3rd stitch as a knit stitch, knit 1 stitch and pull the removed loop through it. Repeat these decreases 2 more times in every 2nd r. = 30 p.
Then knit the first 8 sts of the 1st knitting needle, close the next 14 sts and knit the last 8 sts of the 4-1 knitting needles. On these loops, knit in forward and reverse directions another 2 cm in garter stitch, while at the end of the 1st purl. row for the fastener, cast on new 14 sts = 30 sts.
Assembly: sew the sole seam. Tie the upper edge of the bootie and the edge of the fastener with 1 p. Art. b/n, at the same time at the end of the fastener from 4 ch. make a buttonhole. Sew on a button.
Any woman, having become a mother, wants to show her love and care for her newborn child. I want to create comfort and make my baby stand out from the crowd of children. Often, it is the birth of a child that prompts you to take up handicrafts. In addition, this activity allows you to relax, and the baby’s mood directly depends on the psycho-emotional state of his mother. So try to make a wonderful new thing for your little one - knit her some comfortable and beautiful booties with your own hands.
The main thing in the article
Knit booties with your own hands: what will you need?
You can knit booties knitting needles or crochet . This is quite an interesting thing - after knitting one pair of such shoes, you will no longer be able to stop, and you will try to try many more options. Moreover, there are patterns for knitting children's shoes two or four knitting needles , the choice of size will depend on:
- yarn thickness,
- season,
- the main thing depends on the chosen model.
If you are used to knitting crochet , then the Internet is full of such samples.
Very important: pairs of shoes for newborns should not have seams, or their number should be reduced to a minimum. Connect existing joints with satin ribbons or use knitted seam as shown in the picture. A baby should feel comfortable in new clothes.

- Booties can be knitted “for going out”, that is, elegant, or for every day. TO ready knitting You can sew on a sole made of leather or leatherette, then the little one can stomp around the yard in such shoes. It is not recommended to use small parts to decorate booties, which the baby can tear off or swallow.
- Of course, threads for knitting children's clothing should consist of natural materials - acrylic, cotton, wool. Each season has its own yarn: in winter - wool and acrylic for insulation, in summer - cotton for normal thermoregulation in hot weather.
- Be careful when choosing wool threads - many models can prick and thus cause irritation.
- Sellers in handicraft stores do not advise purchasing angora wool yarn for knitting children's clothing. Small children constantly put their hands in their mouths, so it is important to avoid getting angora into the mouth through the baby's wet hands. Merino wool is better suited for these purposes. Even children with allergies can wear acrylic yarn without fear.
The most suitable accessories for decorating booties can be:
- satin braid,
- applications,
- lace,
- beads,
- embroidery.
- The decorations need to be attached very firmly so that the child cannot tear them off and inadvertently choke.
- When choosing threads, check with your consultant how durable the yarn is and how it behaves when washed and worn.
- Try to knit bright booties - this will allow the child to explore the world in colorful colors, instill a taste for beauty and influence the formation of character.
How to knit baby booties for beginners: step-by-step instructions and patterns
This pattern is knitted on five needles without seams. It is perfect for a child of any gender; it’s just a matter of design and selection of the right color of thread.
The design of these booties is designed for a foot of approximately one year old baby. Select acrylic yarn and knitting needles of the appropriate size. This model is made from the cuff of the booties.


How to knit baby booties with knitting needles with a description of the knitting stages
Take wool threads and size 2 knitting needles, begin knitting the first row of rib in the round.
Rubber. First row - 1 front loop (KL), 1 purl loop (IP), and so on until the end. Knit this way from the first to the fourth rows. Using size 4 needles, knit another 7 rows using the base color of the booties.
Toe.
- First row: 20 RL, cast off 9 stitches (21 stitches should remain).
- Second row: Cast off the starting stitch of the row, fasten a pin in this place, cast off 8 more stitches, knit 11 stitches (12 stitches remain).
- Knit 9 rows stocking stitch, alternating one row with knit stitches and the other with purl stitches.
- Tenth row: 1 LP, 2 LP together with a tilt to the left, 6 LP, 2 LP along with a tilt to the right, 1 LP.
- Eleventh row: purl loops.
- Twelfth and thirteenth rows knit identically to the tenth and eleventh, there will be 8 loops left on the knitting needle.
- Fourteenth row knit like the tenth.
- Bind off the remaining 6 stitches purlwise.
Sole.
- Using 4 knitting needles and contrasting thread, cast on 9 stitches to the left of the secured pin from closed loops.
- On both sides, cast on 28 loops from the closed loops of the toe, and also cast on 9 loops to the right of the pin from the elastic loops that were closed earlier. You should have 41 stitches, divide them into three needles.
- Knit three rows, alternating purl stitches with knit stitches.


 Decorate the booties with embroidery on knitted fabric. This is how you can knit three completely different pairs of shoes from three colors of thread.

How to knit booties: the easiest way

- First row: Cast on 27 stitches on the knitting needles.
- Second row: first front loop, add 1 more loop, 12 LP, add 1 more loop, 1 LP, add 1 loop, 12 LP, add 1 loop, knit the last loop, 31 loops in total.
- Fourth row: knit like the second row, only instead of 12, knit 14 loops, for a total of 35 loops.
- Sixth row: knit like the second and fourth row, only knitting 16 loops, for a total of 39 loops.
- Work 11 rows in garter stitch.
- First row: 15 knit stitches (KL), decrease with knit stitches, 5 knit stitches, slip 1 loop, 1 KL, pull through the slipped loop, slip 1 loop, bring out the thread before work, turn the knitting over.
- Second row: decrease with knit, 5 LP, slip 1 loop, 1 LP, pull through the removed loop, bring the thread to the front of the work, remove the last loop as a purl (IP), unfold the knitting.
- Third row: Decrease with knit stitches, 5 RS, slip 1 loop, 1 RS, pull through the removed loop, slip 1 loop, bring out the thread before work, turn the knitting over.
- Fourth row: knit, identical to the second row.
- Fifth row: Decrease with knit stitches, 5 LP, slip 1 loop, 1 LP, pull through the removed loop, slip 1 loop, unfold the fabric.
- Sixth row: decrease with a crossed purl, 5 IP, decrease with a purl, remove the last loop, unfold the fabric.
- Seventh and eighth rows knit like the fifth and sixth.
- Ninth row: decrease knit, 5 LP, slip 1 loop, 1 LP, pull through the removed loop. Knit the remaining stitches, there should be 21 stitches left.
- Tenth row: All loops are purl.
- Knit another 5-6 cm in garter stitch, purl the last row, close the knitting.
- Sew the sole and turn up the cuff.
Marshmallow booties: knitting instructions
“Marshmallows” look very elegant and at first glance it seems that they are connected in a very complex technology, but that's not true. Below is detailed diagram and a description of knitting such booties on two knitting needles, which even a beginner can handle.
- To do this, prepare two colors of thread in contrasting colors.
- Cast on 45 stitches using dark thread.
- Knit the next eight rows in garter stitch - this means that only the front rows need to be knitted all the time. Before starting this stage, you can insert a thread - an elastic band so that the cuff of the finished bootie stretches well.
In order to knitted fabric had straight edges, remove the first loop without knitting, and always knit the last loop purlwise.
- If there is an elastic band, cut it and tie it tightly into knots, knit another 8 rows with just yarn.
- Now cut the burgundy thread.
- Such booties can be knitted with or without a seam; in the latter case, the baby’s foot will be most comfortable. Insert a lighter thread.
- Move the initial 15 stitches onto the knitting needle you are working with, and continue to knit the other 15 stitches in garter stitch with a light thread.
- Unfold the knitting and repeat the same action, knitting the last light stitch with the darker stitch together.

Remember, if you are working on the front side, knit two loops with a purl stitch, and if on the wrong side, then knit.
- Continue knitting until there are only 15 loops left on the knitting needle with a light thread, the dark loops should be hidden by knitting. Close the knitting and the bootie heel is ready.
- Count the middle of the 15 closed loops, from here start casting on the front loops to the elastic band, there should be 16 loops on the knitting needle.
- Thread light color knit 4 stocking rows.
- Then, with a dark thread, perform again stockinette stitch, only knitting it the other way around - from the inside out.
- Change the thread to a light one. Knit according to this pattern until you get 6 stripes of dark color, the last strip of light color should remain, bind off the loops.
- Fold the bootie as shown in the picture and sew the stripes to the heel.
- Use thread to pull the top of the booties together and secure firmly.
- Decorate the finished bootie with a bow or pompom, it’s so easy to hide all the working moments in knitting.
 The knitting algorithm is simple, but how many varieties of these wonderful “marshmallows” can you come up with!

How to knit booties-socks for little ones?
These booties-socks can be crocheted from leftover yarn, which would be a pity to throw away, and you can no longer make anything bulky from it.


How to knit baby booties and sneakers?


Crocheted baby booties: photos and diagrams
Booties can also be crocheted.
Remember! At the beginning of each row, knit lifting chain stitches - one or three, depending on whether the row is made with or without double crochets.
Tie the sole as shown in the diagram.

Photo ideas for knitted baby booties
Here they are various ideas will help you get inspired and start crafting!

 There have already been booties-sneakers, but booties-sneakers are an unusual design.


How to knit baby booties with knitting needles and crochet: video tutorials
The booties you knit will delight others, and your baby will be given coziness and comfort!
In this article you will find detailed step by step wizard class for those who want to knit fishnet booties using a hook, a knitting pattern with a description and a link to video lessons on this topic.
Booties are the first shoes a baby gets. This is an important wardrobe item that will warm the baby’s feet and prevent rompers and tights from sliding down. Knitting booties with your own hands opens up a lot of scope for imagination and the result can become a whole work of art!
We will start our step-by-step master class with a story about what is needed to knit openwork booties.
How to crochet openwork booties in a step-by-step master class with your own hands
So, we will need:- Cotton threads or acrylic yarn. Since these are shoes for a newborn baby, choose your yarn as carefully as possible. It should be hypoallergenic, soft and pleasant to the skin.
- Hook No. 1.5
- Satin ribbon
- Beads
- Art. b/n – single crochet
- Art. s/n – double crochet
- air loop - air loop
Many people believe that yarn must be natural. It's up to you to decide, of course. But natural wool often causes allergies in children and this can become a serious problem.
Hypoallergenic yarns that are suitable for any baby include cotton, acrylic and microfiber.
It is better to knit summer and spring booties from cotton for warm weather and models for special occasions. Mercerized cotton has good thread twist and a pleasant shine.
Microfiber is modern look yarn, the threads of which consist of many individual fibers. These threads are soft and smooth to the touch, do not deform after washing and have a noble appearance. Such products will perfectly keep you warm in cold weather and cool in hot weather, so they are suitable for any season.
Acrylic is a synthetic analogue wool yarn. There is no need to worry that these threads are not natural. They are much softer than wool and will definitely not cause allergies, unlike wool. Acrylic is suitable for autumn and winter booties.
Let's start working on the booties.If your baby is a newborn:
We dial 10 v/p and 3 more v/p lifts. Then from the 5th loop of the chain we knit st. s/n. Around the chain on both sides we knit 4 rows of st. s/n.
If your baby is already a little older:
You need to measure the length and width of your child's feet. Then subtract the width from the length. The resulting number shows how long the chain of chains for the foot of future booties should be. If you are knitting a product for everyday wear, allow a small increase for the baby's height.
We knit the bootie sole according to the pattern below. At the end of each row there is a connecting loop, and the next row begins with three lifting chain loops.
Then you need to knit a series of purl stitches. b/n. To make them embossed, we insert a hook under the trunk of the posts, as shown in this photo:
The next step is to yarn over and pull out a loop.

Two loops have formed on the hook, we knit them together.
We finish the row according to the same pattern.
Let's start knitting openwork pattern according to the diagrams.In the 1st row we type in / p, st. s/n, military, art. s/n into the same loop of the bottom row, skip two loops of the bottom row and continue knitting according to the same pattern.
Knit the second and third row in the same way as the 1st.
We begin to form the toe. Mark the center of the side of the bootie. We knit a connecting post and three high rises to the center.
In the next 3 loops of the bottom row we knit according to st. s/n and knit them together.
We knit in the same way to the end of the row. Let's start the work again.
We cast on 2 high rises, yarn over, insert the hook under the loops of the bottom row. Yarn over again, pull out the loop and yarn over again.

We repeat this pattern until the end of the row.
We knit all the loops on the hook at one time and cast on three more chain stitches.
We knit one row with openwork knitting.
We knit the next row into which the ribbon will be pulled like this: st. s/n, v/p, skip one loop of the bottom row, st. s/n in the next stitch and so on.
We unfold the product and continue working from the inside. In Art. s/n of the bottom row we knit two tbsp. s/n with v/p between them. The top edge should expand.
Let's knit st. b/n in arc
In the next arc - 3 tbsp. s/n, pico from 3 VP and 3 more tbsp. s/n.
In the next arc again st b/n.
We repeat the last three points until the end of the row (st. b/n in an arc, in the next arc - 3 tbsp. s/n, pico from 3 v/p and another 3 tbsp. s/n, and so on).
Sew on the beads, insert ribbons, as shown in the photo:

Booties for your baby are ready!
Let's look at another example of knitting, which will pleasantly surprise novice needlewomen with its simplicity of execution, and such booties will look no less impressive than in the previous example.
Let's try to make beautiful two-color openwork booties

All diagrams of this example are given with detailed descriptions, so understanding them will not be difficult.
For this model we will need acrylic yarn in 2 colors (in our example, pink and white), a satin ribbon and the same hook No. 1.5.
We knit the sole according to the same pattern and description given at the beginning of the previous example.
We knit the side of the booties.Knit 1 row of st b/n and increases, grabbing not by the base loop, but wrapping around the column of the previous row (the hook is inserted from the inside from right to left, wrapping around the st. of the previous row, the thread is picked up and pulled out on the wrong side, knitted st. b/n ).
Next we knit three rows of st. s/n without adding loops.
The bootie toe pattern looks like this:

We fold our work in half lengthwise and find the center of the cape. To the left and right of it we put 19 loops and mark with a thread.
- We knit the top of the cape according to the pattern from the previously marked loop in the middle of the side part:
- For 1st row: 3 in/p on rise, 7 tbsp. s/n, (2 tbsp. s/n, knitted together, tbsp. s/n) - repeat 8 times, 7 tbsp. s/n. Grab the back wall of the loop. Unfold the knitting.
- For row 2: 3 ch on the rise, (1 ch, 1 treble s/n in the second loop) - repeat 15 times. Unfold the knitting.
- For row 3: 3 single rises, 7 tbsp. s/n, (2 tbsp. s/n, knitted together) - repeat 7 times, 9 tbsp. s/n. Unfold the knitting.
- For row 4: 3 single rises, 8 tbsp. s/n, 7 tbsp. s/n knit together, 8 tbsp. s/n.
- Fold the left and right parts of the toe and the wrong side. Knit the 8 outermost loops that are not closed together with connecting stitches.
For 1st row: 3 high rises and then in a circle st. s/n. When moving from the toe to the side of the bootie, we knit 2 tbsp. s/n together (with one vertex). We close the row with a connecting loop.
For row 2: 3 ch raises, (1 ch, 1 treble s/n in the second loop) - repeat to the end of the row. We close the row with a connecting loop. We will insert a lace into this row or satin ribbon.
For row 3: 3 high rises and then in a circle, st. s/n. We close the row with a connecting loop.
For the 4th row: v/p for lifting, (1 v/p, 1 st. s/n in the second loop) - repeat to the end of the row. We close the row with a connecting loop.
Tie the sole and toe of the bootie around the perimeter with white yarn: (3 chain stitches, 2 connecting loops).
We tie the cuff with white threads, as shown in the diagram:

Knit 4 tbsp. s/n along each side marked with an arrow.
Insert a white satin ribbon and tie it in a bow.
For those who want to analyze this topic more clearly and learn something new, we have prepared a selection of video tutorials on crocheting booties.
Video on the topic of the article


