In order to create a cozy atmosphere in your home, every detail intended to decorate the interior must clearly fit into its overall style. Decorative sound will help to emphasize the dignity of the interior, highlighting the advantages and hiding the disadvantages. various accessories. One of these creations of home art are handicrafts made from natural materials. From our article you will learn how, with the help of simple things that surround us, you can create exquisite jewelry and original decorative items. The master classes below with photos and step by step guide, and also different ideas for home, garden, school and kindergarten, will help you cope with this task with ease.
Beautiful crafts: do it quickly and easily (photo)
Kanzashi, topiary, decoupage, flower pots, origami - the world of handmade art tirelessly excites the imagination of needlewomen.
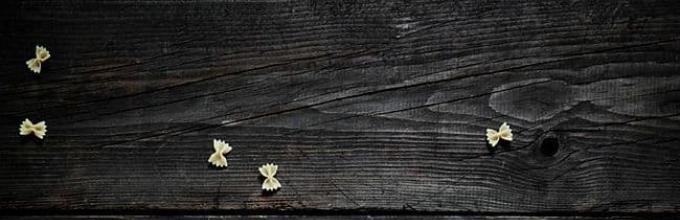
A variety of crafts made from wood, glass, shells, cereals, coffee beans, pasta, paper, stones, pebbles and more natural material will help create a unique comfort and light romantic mood in any interior.
Advice! You can create a variety of supplies for making crafts from natural materials from absolutely anything, just look around, you probably have a lot of things suitable for this at home.


Hazelnuts and pine nuts, beans, buckwheat, peas, coriander, pepper are excellent materials for creativity.

Advice! So that handicraft creativity brings you exceptional positive emotions, and the process of material procurement has turned into a real holiday, you can combine business with pleasure.
- When you're at sea in the summer, stock up on beautiful shells and small pebbles. They make excellent wall hangings for the home.
- While walking through the autumn park, give your child the task of collecting acorns, chestnuts, and colorful fallen leaves. Products made from natural materials made by children's hands are endowed with special warmth and love.
- When caring for your own garden, don’t be lazy to sow dried flower seeds. They store well in winter and are an ideal tool for creative work.

Crafts made from natural wood
Tree- a beautiful and pliable material that has gained popularity among designers, architects and ordinary amateurs. Natural solid wood can be easily combined with metal, glass, plastic and stone decor.
Wooden crafts will harmoniously fit into a cozy country-style room, set the tone for the brutal loft style, and will favorably change the classic, Scandinavian, minimalist decor.


We invite you to view a universal selection of interesting wood products that can transform the design of any interior, becoming its beautiful and bright accent:
tree branches
– a sophisticated natural material that allows you to create many original things for your home with your own hands: chandeliers, wall lamps, candlesticks, photo frames, hangers, headboards and much more.
- Painted dry branches with many branches will add special charm to the living room, kitchen, and bathroom.
- Tables, lamps, shelves, vases finished with sawn wood look nice.
- A romantic mood will be set by decorative panels in the shape of a heart, a bird, or a star.
- Gold, silver, white, and black rods placed in a transparent vase with stones attract attention.


Wood cuts
Tree cuts help create larger crafts: vases, clocks, frames, stylized wreaths. Wooden flower pots, shelves, and hot stands will fit harmoniously into the interior.
With a little imagination, it will not be difficult for craftsmen to build an unusual tabletop from these round pieces by fixing the wood cuts on a plywood sheet, filling the voids with shavings and opening them with varnish.


Tree bark
Bark is a natural and affordable material. Modern craftsmen use birch bark to create unique paintings and appliques. Mugs, baskets, tues and boxes made of birch bark will last for decades.
Crafts made from natural materials will help you not only unleash your creative potential, but also turn your interior ideas into reality.


Decorative stone and pebbles
- Decorative stone- the unbridled power of the elements, which has a strong charge, which affects the overall concept of the design of personal plots and interior decoration.
Chests, caskets, vases filled with pebbles will dilute the routine furnishings of city apartments and office premises. Small stones will decorate walls, mirrors, door handles, stands for installations, and bottles. Look at the examples in the photo.

An interesting solution would be glass bottle candle holder filled with shells and colorful pebbles. Beautiful ones will look no less beautiful pebbles glued to the wall.
A decorative rug covered with flat pebbles mounted on silicone or special glue looks unusual and elegant. It will make your porch look stylish and beautiful.
Even children can create original compositions from stones. Just before that, you need to conduct a step-by-step master class for them.


Mosaic, painting, stone cutting- a great way to entertain children by creating magnets, flower arrangements, trees, cacti in decorated pots.
Advice! It is best to paint sea pebbles in one tone using special spray cans, but you need to apply drawings and fine lines on them using liner brushes.


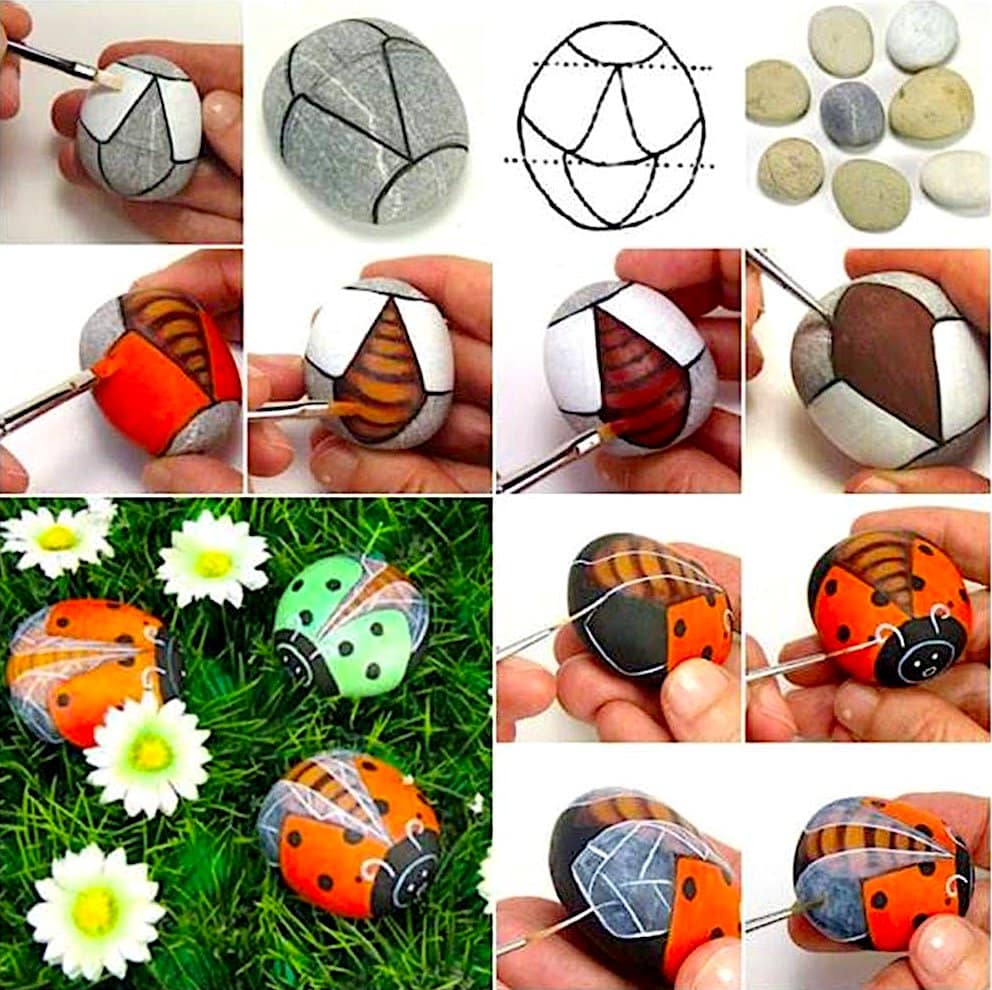
- From colorful stones they make decorative panels and figurines. Pebble cladding of walls, floors, fireplaces and window sills - the basis of kitchens and toilets.

A picture made of stones is a unique interior item

Summer crafts from fruits, leaves and flowers
Formation of a caring and caring attitude towards environment form activities with natural materials. An important stage of the work is the collection, processing and preparation for use of summer gifts.
You can make beautiful and original home accessories with your children’s hands from:
- leaves;
- poplar fluff;
- flowers;
- seeds
Dry grass, fruits, flowers, tree fruits and plant seeds allow you to create complex volumetric applications, unique and colorful compositions and other original art objects on autumn and summer themes.


Advice! If wood (cuts, logs, bark, twigs) is used to create crafts from natural materials, it should be thoroughly dried before starting work. Using damp wood will significantly shorten the life of your homemade masterpieces.
Ideas for creating autumn crafts
Autumn - best time for collecting fruits, seeds, vegetables, as well as acorns, cones and chestnuts. Fallen leaves, dried flowers, grass will serve to create extraordinary bouquets, wreaths, and appliqués.


Natural compositions look good in ordinary vases, watermelon peels, coconut shells, and pumpkin shells. Original master class You can teach children how to create crafts from natural materials with their own hands.
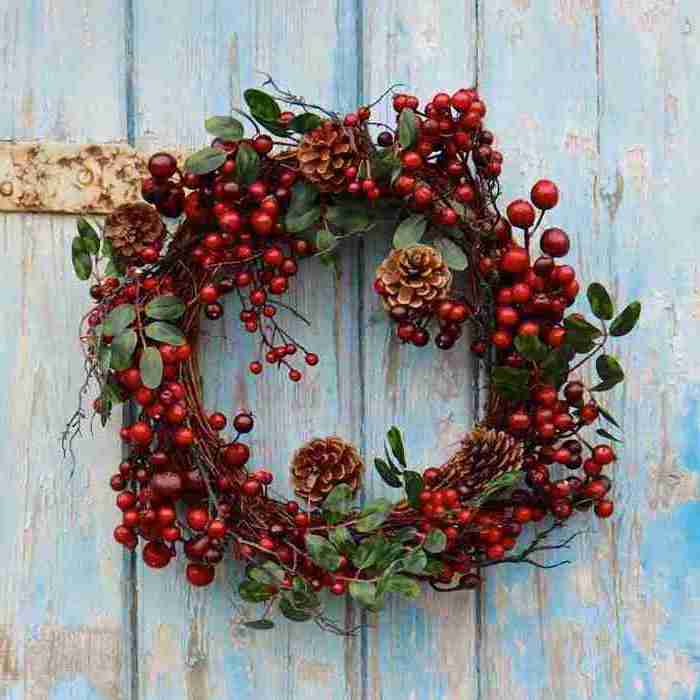
- The pine cones will make a cozy basket or wreath that can be hung on the front door.
- Zucchini decorated with berries and flowers will become the main character of the garden plot.
- Kaleidoscope bright colors pumpkins, potatoes, and eggplants will decorate your yard landscape if you come up with a worthy use for them.


Advice! When looking for ideas for creating crafts for kindergarten, pay attention to the wonderful houses made from bark and tree branches.


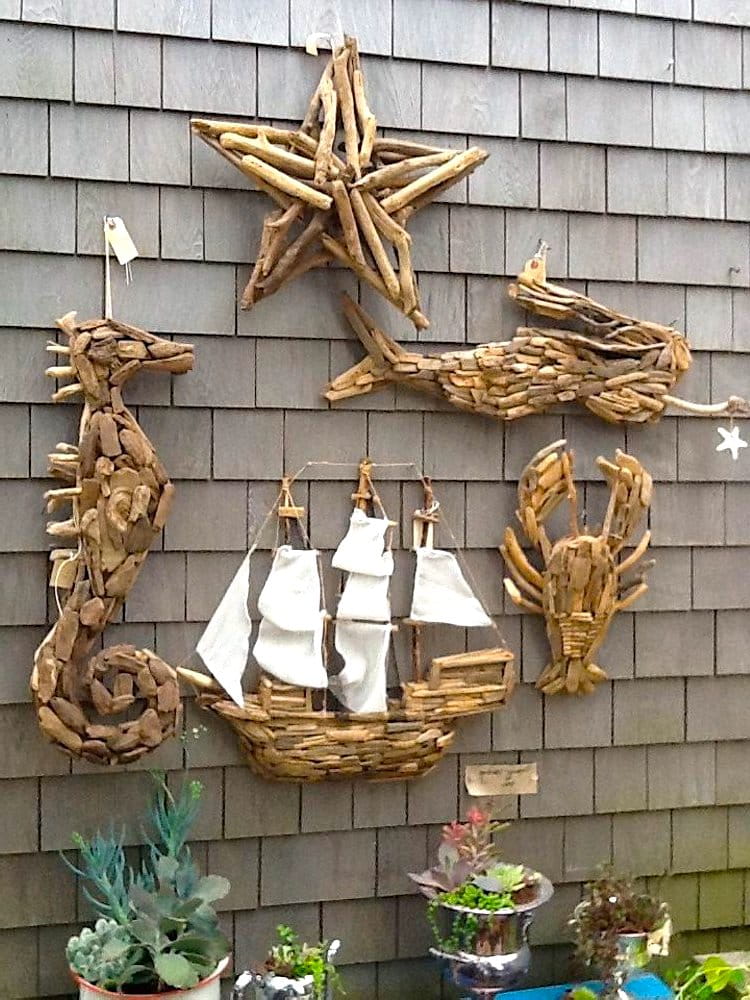
Crafts on the theme: “Sea and underwater world”
Marine crafts are given bright emotions and even a rosy mood cold winter. If you are lucky enough to collect a collection of shells while on vacation, hurry up to become authors volumetric applications, paintings, frames, marine theater or aquarium.
- Sea treasures are easily transformed into beads, pendants and pendants.
- Cold porcelain, salt dough will help complement the composition with starfish, corals, and colored pebbles.
- The ocean in a bottle is an entire underwater world that allows you to come up with different stories and study marine life.
- On a cool day, boats made from scrap materials will also give you warm memories of summer.
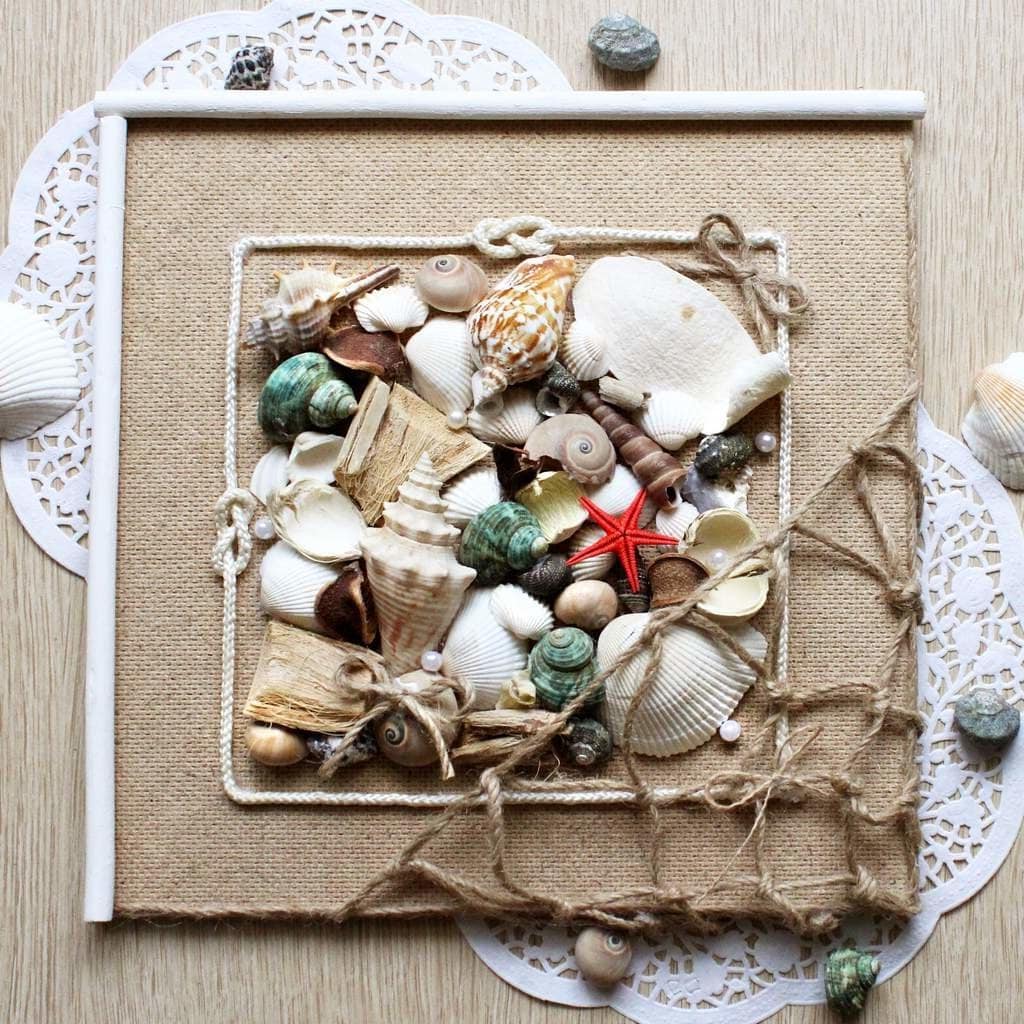

When making marine-themed decor, don’t limit yourself to anything - create, try, dare

When making products with a “sea” theme, you can use absolutely any natural material.
Feathers for needlework
- Bird feathers- used by craftswomen to create soft pillows, warm feather beds, decorations for hats, toys, and unusual souvenirs.
They also decorate the interior, complementing crafts with sequins, glitter, small ribbon bows and other decor.


Despite the fact that the pen is a very capricious material, working with it is quite simple and easy

Dreamcatcher - a magical talisman that attracts good luck


Important! Bird feathers can cause a severe allergic reaction in humans, so be careful when using them as decorative decorations for your home.
DIY crafts (step by step)
It’s easy to create crafts from natural materials with your own hands - the main thing is to get necessary tool and material. Listed below step by step instructions on creating universal decor for your home and garden will help you cope with this simple task.
Colorful panel
Panel - decorative, facades. Currently, three main genres are used for its production: sculptural, mosaic and applique.
An interesting solution is an artistic panel made from natural materials: dry leaves, straw, nut shells, dried flowers. Its production takes place in 3 simple steps:
- First you need to make a base. It can be made from wooden boards knocked together into a board or a piece of plywood.
- Next, you need to cover the base with burlap material or make a straw lattice on top of it, on which the applique will be applied. You can make an applique from flat elements (leaves, grains, seeds), or get a relief surface by combining three-dimensional parts. An unusual solution would be to weave dried citrus fruits, moss and leaves into a straw net.
- The final stage is to create a rope or wire loop for attaching the panel to the wall. Check out the result in the photo!
Advice! If desired, you can add a frame of driftwood or vine branches to the resulting composition. It will make your work more elegant


Eggshells for indoor plants
Creating small flowerpots from eggshells requires special care, since the shell itself is a rather fragile material and can easily be damaged if moved carelessly.
Procedure:
- Prick top part raw egg and pour the contents into a container.
- Process the edges until you get an even cut or leave them chipped.
- Stabilize your vases by using a stand or egg carton. An alternative option could be a plasticine flagellum that complements the bottom of the shell.
- The resulting container is ready for seedlings of wildflowers, greenery, moss, and small succulents.
Interesting to know! Eggshell can also become an elegant candlestick, Easter craft or a miniature flower bed.


To create your own mini-garden, you will need very little time, the main thing is to do everything carefully and adhere to the rules described above.


Candlesticks made from sawn wood
Preparing an exclusive candlestick from a stump or wood cut will take a minimum of time and effort. Ensure necessary material and tools to perform the following actions:
- Impregnate the wooden base with compounds that prevent the formation of rot and insect pests.
- Using a drill and a special attachment, make a shallow hole in the center of the stump to install a standard candle. To ensure that the edges do not pose a danger, sand them with sandpaper.
- Decorate the item with burlap, tied with jute rope or a beautiful ribbon.
A wooden stand for 2-3 candles, made from simple driftwood attached to a wall, pendants or supports, will look unusual. Such an interesting handmade product will be the best attribute for romantic evenings.


Kitchen clock
A kitchen clock made from cutlery is very quick and easy to make. For this we need:
- clock mechanism with a beautiful dial;
- disposable plastic spoons and forks;
- glue gun.

Step-by-step master class
- First you need to disassemble the watch, separating the mechanism from the dial;
- Next, using a glue gun, we glue improvised arrows opposite each number so that the spoons and forks alternate and go one after the other. This way the watch will look much nicer;
- All that remains is to let the glue dry, install the dial in place and insert the battery into the watch. Original and useful is ready!

Let's sum it up
It’s not difficult to make decor for your home, cottage, school, or kindergarten with your own hands, especially if you use natural material for this, which is a pleasure to work with.


You just need to enlist the help of your family and friends, use your imagination, and boldly create! Try, experiment, find your own!
Good afternoon, today we will talk about autumn crafts. And we will make these crafts from natural materials with our own hands. Autumn is rich in a variety of materials. And so we will do with A variety of crafts on the theme of Autumn- from leaves, branches, acorns, chestnuts, straw, moss, dried flowers and other natural materials. I'll show you interesting ways create autumn crafts with your own hands using ordinary natural materials in an unusual design way. In this article you will find fresh ideas, that will inspire you to get creative this fall. So let's go on a quiet hunt for ideas. best crafts season autumn 2017.
Autumn natural material is rich in ideas various crafts for children. Let's see what ideas you can implement this fall.
Leaf compositions
and natural material.
Who said that autumn crafts from natural materials should be done while sitting indoors. Golden autumn beckons warm sunshine, the smell of rotten leaves - and we don’t want to sit within four walls. We go outside with the children to catch a little more warmth and warm our eyes with the yellow fire of autumn leaves.
Crafts on the theme AUTUMN from natural materials can be made right on the street. In my yard, next to the entrance. All you need to do is find a quiet, windless place. Instruct the children to collect a stack of bright leaves and a bucket of dry pebbles.
And now an interesting game begins - laying out crafts from autumn natural material. For novice craftsmen, this can be a simple tree. Heavy pebbles press down the yellow leaves and prevent them from flying away from the wind. The craft can be saved as a keepsake in the form of a photograph.

If there is a whole pile of pebbles near the place where you walk, then you can make a craft from natural material on a larger scale (as in the photo below).

If you are observant, you may notice that different trees have different colored foliage. If we collect yellow leaves from an ash or birch tree in a separate bag, red leaves from an aspen or Canadian maple in another bag, and a little more brown, blackened leaves, then we can make a Winnie Bear like this on our porch.

Any silhouette picture can be laid out from a colored mosaic of nature itself. The main thing is to find a place without strong wind. And have time to photograph this beauty before it flutters from the wind and flies away like a bird.

The natural materials of autumn themselves will give you ideas for collages - gray branches (like the gray plumage of a wing and tail), yellow leaves (like yellow fluff on a chest). And here you are, the tit bird.

You don't have to be an artist, you don't have to have a lot of leaves. Even the smallest piles of leaves can be used to create beautiful autumn crafts. The most simple craft with your own hands, arranging the foliage according to the colors of the spectrum looks like real magic.

You become little wizards. Secret gnomes-assistants of Queen Autumn. You misbehave secretly, leaving good signs, funny symbols autumn time year.

And some crafts can be made using a tree trunk as a base. Make the tree smile. The nose is a bump, two eyes are cut from a wood log, and a smile is made from physalis fruits strung on a thread.

Do you know what mandalas are? In the east, mandalas are sacred patterns closed in a circle. A harmonious pattern repeating in a circle is like a map of the universe. Mandalas are painted or laid out from mosaics, colored sand, and flower petals. Mandalas are a spiritual practice that allows you to touch the divine principle within yourself. You need to make mandalas in a special state of mind - pure, serene, enlightened.
We can also make beautiful harmonious mandala patterns with our own hands in the form of crafts from natural material – bright, beautiful autumn material.

Your autumn mandala craft can be very small (as in the photo below).

Or a very large one, consisting of many circles in a cyclic pattern.

Mosaic applications
on the theme AUTUMN.
All children love mosaics. Why don't we make it from autumn natural material.
Since the leaves are too large for mosaics (and suitable for laying out large paintings in the yard), for small indoor works we can cut an ordinary succulent maple leaf into small squares. Place them in bowls - yellow, green, red separately. And let the children themselves lay out a bright mosaic craft from such a natural material that is pleasant to the touch.

You can use cereals or seeds as an ornamental material. A very good natural material for autumn children's crafts is yellow corn kernels or large pumpkin seeds painted with gouache.

And a mosaic of whole leaves can become the crown of a tree - simple and quick crafts made of natural material, which is suitable for kindergarten children. You can stick the leaves on paper, or on a transparent office file - and then such a craft can be mounted on a window, the leaves will shine in the sun. Beautiful children's craft for younger age.

Crafts on the theme AUTUMN.
Natural material STONE.
Here’s another wonderful idea for crafts made from natural materials in an autumn theme. Ordinary flat river stones can become a canvas for autumn paintings. You can paint stones with a brush, but it is better to apply the design using dots technique - round wooden sticks or special dots sticks (metal devices with a round ball at the end) are suitable for this. They are sold in the manicure department as they are intended for painting on nails. The ball tips on dots sticks have different sizes, which allows you to draw even points of any size.

You can also draw owls on the stones - this is the simplest drawing - the main thing here is expressive eyes, pointed beak, and oval wings with even rows of feathers. First we draw with paints, then we outline each painted element with a contour (white, as in the left photo or black, as in the right photo below). And a thin contour outline of the elements will make the craft-drawings clearer and more expressive.
Such owl crafts made from natural material will look good on driftwood with scraps of moss inside wooden frame, glued to the cut of the log.

And it’s even cooler to put such an owl inside a hole cut in a thick round cut of a tree trunk.

Autumn crafts
with tree branches.
Ordinary tree branches can also become the source of an interesting DIY autumn collage. This natural material is lying around completely unused. You can give children the task of collecting beautiful, non-dirty twigs in a bag while on a walk, disassembling them at home, clearing them of debris and breaking them into small pieces.
Next, on a sheet of paper, draw the outlines of a basket with handles. And either we give the child plasticine, or we arm ourselves with a glue gun and begin to assemble our basket from sticks. Then all that remains is to put the fruit in it (cut it out of cardboard, draw it and then cut it out, or use the cut-out applique technique).
And if, together with the chopsticks, you collected beautiful leaves, then you can make a children’s craft tree from natural materials.

Long sticks found in the park can not be broken, but put aside to make them a new craft-panel made from natural materials(as in the photo below). The principle is simple. The sticks are laid in the shape of the sides of a square - we tie the junction of the sticks with twine (wire, thread). And then we decorate such a frame using natural materials and colored paper.

You can place a canvas inside a frame of branches - we tint a sheet of cardboard with paints, make holes on its sides with a hole punch - and tie the sheet with threads to the branch frame, pulling the thread through the holes and around the branch (as was done in the left photo below). And then on this canvas we make an application from natural material on the theme of autumn.
Or you can simply decorate the frame along its perimeter - at the bottom of the square we attach a bush, mushrooms, pieces of moss, bark, and a cardboard hedgehog to the plasticine. On the top of our panel made of natural material we hang a garland of autumn leaves cut out of colored paper, sun, clouds, kite.
From the branches you can lay out large applique in the form of an owl , a children's craft, which is entirely made from natural materials that autumn is rich in. Branches, dry and fresh pine needles, withered fir legs. You can lay out the applique on a sheet of plywood and secure everything with glue - or make a temporary mosaic on a walk right on the ground or stump.

Looks very nice DIY HEDGEHOG made from natural material . This fall craft is my favorite in this post. Let me even tell you in detail how to simply and easily make such a hedgehog with your own hands. It's really very easy. Now you will see this.

First, we find beautiful thick twigs from a bush or birch branches - we cut them with scissors or a knife into segments with long oblique cuts (as in the photo of the hedgehog below).
For this autumn craft you will need plasticine - a large piece. Where can I get it? I never throw away used plasticine from children's crafts, I put it in one common pile - then I soak this multi-colored pile in hot water - it becomes soft like fresh dough, and easily and simply I knead this whole lump into a homogeneous mass with my hands - I get a large piece of fresh brown plasticine of excellent quality. You can make a variety of crafts from it for a long time
We form the body of a hedgehog from plasticine- drop-shaped. And row by row we stick pieces of branches into the thick part of the hedgehog - the oblique cuts should all point in one direction.
2 ways to design a hedgehog's face.
1 way. I wrap the hedgehog’s plasticine nose with a piece of burlap or a piece of gauze (bandage) soaked in a solution of iodine and water.
Method 2. The hedgehog's face can be coated with PVA glue and covered with pieces paper napkins, coat it with glue again, again a layer of napkins, put glue on top and let it dry - you get a layer of papier-mâché. We cover it with paint - draw eyes and a nose on it
Craft-web from branches and leaves.
You can also make beautiful decorative pendants on the AUTUMN theme from natural materials. We will need straight, even branches - like willow. We look at the photo, and below I give detailed step by step description this children's craft.

A detailed master class on this craft made from natural materials.
Take a lump of plasticine and divide it into 2 small pellets. On the first cake we place the branches in a circle (that is, radially from this plasticine center) - so that the tips of the branches meet in the middle of the plasticine cake. Lightly press each branch so that it sinks into the plasticine. Cover the top with a second piece of plasticine, also pressing it onto the branches. It turns out to be a splay with rays of branches.
Now we need coarse threads - the ones that are used in the store to tie up packages with purchases. So thick like canvas and paper gray threads. With them we begin to weave a web between the branches - starting from the plasticine center and gradually moving towards the outer edge, until our web rests against the edge of the maple leaf.
Craft autumn kaleidoscope.
Also you can do colored kaleido made from natural material – from branches and leaves (as in the photo below).

For this craft we will need hot glue (or the ability to weave threads between crossed branches). Now I'll give detailed master class to create this craft with your own hands.
Step 1 Cut 4 rods of equal size. Two of them we cross cross over cross - fasten with glue or thread. Two others we cross in the same way. We now have two crosses made of branches.
Step 2 We place these 2 crosses on top of each other diagonally - so that they form snowflake figure. We fasten the middle of this clutch with glue (or fix it with threads).
Step 3 We make a round ring from a flexible willow rod (fresh or soaked in water). We attach this ring to our “snowflake” made of twigs - so that the edges of the ring are at the same distance from the center - along each rod(we measure with a tape measure). If the distances are the same, then the ring will be even and not crooked.
Step 4 As a result, we got a circle from the branches, divided into triangular sectors. And all that remains is to find large maple leaves different colors– pure yellow, pure red, pure green, pure orange. From them you need to cut out triangles that are suitable in size to the hole sector on the future kaleidoscope. Cut out the triangle like this: so that the central vein on the maple leaf passes through the middle of such a triangle– divided it in half like a bisector from geometry. And we attach all these multi-colored triangles made of maple leaves with a glue gun to the sectors of our structure made of natural material.
Autumn applications
Made from natural material.
And of course, all children love to make appliques from autumn natural materials. Small and large paintings of leaves and dried flowers. The most favorite children's crafts on the theme of autumn.

The symbol of autumn made from natural material is, of course, a hedgehog. What can it be made from, from leaves, from flowers, from twigs, from maple or ash seeds.

The simplest hedgehog is made like this. Cut out the silhouette of a hedgehog from cardboard. We give children plasticine and maple seeds. We begin to attach rows of seeds to the cardboard with plasticine - you need to start from the back of the hedgehog. Children try to start with the muzzle - explain to them that this is not correct, that it is not convenient to do the back rows of needles when the front needles stick out back and get in the way.
Using the same principle, a hedgehog is made from flat natural material - leaves and dried flowers. Also starting from the butt, we attach it to plasticine or glue. This is the most common children's craft on the theme of Autumn.

Children also love making fall turkeys. This is also a simple bird craft that doesn’t require much natural material. The body and head of the bird can be cut out of cardboard. Or the head and body can be cut out with scissors from the same maple leaf (as in the photo of the craft below).


YOU can do crafts without using colored paper, but by cutting out all the parts necessary for the picture from natural material, in the event that you do not find a leaf of a suitable shape.


Here's a great idea. Great craft LION. It can be made from real natural leaves. Or you can design it as a collective paper craft. In the kindergarten group, we distribute sheets of paper with a maple leaf drawn on it. The children's task is to cut out the contour of this sheet. At the end of the lesson, all children attach their leaves to the lion's mane. Good idea crafts on the theme “autumn” - for middle group kindergarten, when children are in their first year of learning how to cut out contours with scissors - they will cut out a maple leaf for about 10 minutes, and puff with zeal like steam locomotives.

If you work in a large group of children (as a kindergarten teacher or a teacher, or a circle leader), then you can make one large collective craft. For example, this bird is made from natural material. We cut out parts of the bird from cardboard - the left wing separately, the right wing separately, the body separately and the tail separately. Divide the team by 4 creative groups . Each group of children receives their own piece and begins to place leaves on glue or plasticine. After completing the work of each team - we combine the details into one common bird craft made from a natural material as bright as autumn itself.

Autumn crafts-paintings
Made from natural material.
And of course from autumn material You get beautiful, bright collage crafts in the form of natural landscapes. In the photo below we see how different materials- paper, leaves, herbs to make a painting-panel.

You can dry many flower petals. And make a big collage with the children with a blue sky and a blue river. Stretch a bridge across the river, cut out of a blackened autumn leaf (in order for the leaf to turn black, it must be ironed with a hot iron through a newspaper).

And if you don’t have enough dry natural material, then you can paint a picture in gouache or watercolor and lay out only individual elements of the landscape from leaves and herbs (as in this craft below).

Autumn crafts
from natural material.
Autumn nature is rich in a wide variety of ornamental materials - hawthorn berries, rose hips, pine cones, fluffy moss. After a walk in the forest, you can make an elegant autumn composition with a candle. And arrange romantic dinner by candlelight with an autumn theme.

Thick cut logs, round birch logs and shells from walnuts– this poor natural material can become a source of inspiration for such a craft in the form of a mushroom clearing.

From the found cones you can make a variety of characters with your own hands. And place them in the form of a single autumn composition, made with your own hands from natural materials (wood, leaves, moss, wood chips, etc.).

Fresh oak branches plucked by a hurricane can be dried in the shade of a shed, under the roof. Oak leaves do not lose their juiciness when dried green. And then they can take part in interesting crafts made with your own hands from autumn natural material.

A wreath - a symbol of autumn - made from natural material in all shades of bright foliage will delight your whole family. It is so interesting to collect leaves - to select only the most beautiful ones. You need to weave a wreath with your own hands from willow twigs and weave autumn leaves into it with threads, plant pine cones on wire or glue. On our website we have a special educational article on weaving wreaths from twigs and branches -

The bright fruit boxes of physalis, twigs with hawthorn fruits, and immemorial flowers look beautiful in autumn wreaths.

But even if you don't have bright natural material to make an autumn wreath, don't worry. You can do bright wreath of gray pine cones. You just need to take more gouache. Paint each pine cone in shades of fall foliage. Spray with hairspray (to make the color richer and not stain your hands). And then collect all this colorful splendor of autumn into a rich wreath with your own hands.

The cones in the wreath can be placed with their butts forward (as in the photo above), or with their noses forward (as in the craft below).

You can make decorative autumn wreaths from one natural material. Only from rose hips - string red fruits onto copper wire and bend it into a heart shape.

Or yours autumn wreath can be made from cuts from a log found in a woodpile.

In the same woodshed you can find natural material suitable for making a composition with owls.

Yours autumn compositions may look like cheerful little men made from birch cuts, decorated with various natural materials, which autumn is rich in.

And tufts of mown grass can turn into a hedgehog if you (or good neighbors) have physalis blooming profusely. Its boxes can be sewn with thread to a straw bale. Wrap the sharp edge of the bale with twine and glue on the nose and eyes.

You can also make it from natural autumn material beautiful candlestick . We will need the bottom part of any white bottle of household liquid (washing balm, etc.).

We unroll transparent wide tape on the table. On its sticky surface we place beautiful small leaves, seeds and other flat natural material, wrong side up. We place it so that between the elements there are empty seats sticky tape (so that there is a sticky space).
These are the new ideas for this fall - made from natural materials. You've found inspiration here. You fell in love with some crafts. And that means this fall will not pass by your skillful hands. All that remains is to collect natural material, of which there is plenty everywhere, and, fortunately, it is free. Like in that poem...
Autumn is coming in our park,
Autumn gives gifts to everyone.
And we give you even more other articles on the topic of autumn crafts.
Olga Klishevskaya, especially for the site.
Interior decor – exciting activity, especially if you know how to do something with your own hands. The wall panel will become a real decoration of the living room, kitchen or bedroom. Depending on the time of year, you can change the subject of your painting. In this article you will learn how to make a leaf panel on an autumn theme.
Materials:
- leaves of different trees;
- foil;
— aerosol paint;
- a base for a panel made of laminated chipboard or canvas stretched over a frame;
Panel of autumn leaves, step-by-step master class
Collect fallen leaves from the street and clean them of dirt and dust. After this, wipe them well from moisture with a napkin. Prepare the base for the panel and attach the leaves to it. Immediately figure out what your composition should look like.


Take some black spray paint and apply it on top of the foil. After the paint has dried, you can begin to create shades. To do this, start wiping off the paint with a scraper. Try not to damage the foil itself, but don’t worry too much, you can fix everything with a black felt-tip pen or marker. The autumn panel is ready.

See photo of a panel of leaves:


An autumn panel made of leaves will harmoniously fit into any interior and become an original gift for loved ones. Using the same principle, you can try to make a winter panel using Christmas tree needles. Modern needlewomen create real masterpieces with their own hands, but why are you worse? Experiment and you too will get beautiful handmade decorative items.
Panels made from natural materials are widely used to decorate walls. These can be coffee beans, cereals, dried flowers, slices of fruits or vegetables, autumn leaves.
Making panels is very convenient with children: creative activity develops imagination and the ability to think creatively. Working with small materials promotes development fine motor skills, which is useful for young children. And most importantly, there are many ideas for this activity that you want to bring to life.
Coffee bean panel
A coffee panel is ideal for the kitchen or room where you are used to relaxing. It is believed that the smell of coffee, like the drink itself, tones the body and gives a boost of energy.
Scientists have proven that at the same time, the smell of coffee beans has an anti-stress effect. The more often you inhale their aroma, the less susceptible you will be to external irritants.
View options for panels made from coffee beans - video:
To make a simple coffee bean wall hanging, you will need the following materials:
- Coffee beans of one or more varieties, differing in color, size and smell.
- Basis for the panel. It can be made from scrap materials: burlap, other durable fabric, cardboard, paper, wood.
- PVA glue, or better yet, “Titan”.
- Drawing.
- Carbon paper.
- Pencil.
- Frame.
This is the minimum list of materials you will need. But you can make a panel from beans and coffee.  A panel of cereals, diluted with coffee beans, looks like a real painting, since here you can assemble the entire palette of colors:
- Coffee – green, brown, other shades of brown.
- Peas are orange.
- Beans – red, white.
- Semolina is white. It is perfect for a winter-themed mural.
- Rice – brown, white.
- Corn is yellow.
- Wheat – beige.
- Pearl barley – beige.
- Oatmeal – creamy.
- Rye – light brown, dark beige.
- Poppy seeds – black.
- Buckwheat – brown shades.
- Lentils – yellow, orange, green.
- Millet – yellow.
How to make a panel from grains:

To paste crumbly grains such as corn or semolina, ground spices and instant coffee, you need to smear glue on a part of the picture and cover it generously with the desired grain or spice. After some time, the excess residue is blown off.
Large shells are an independent decoration. And small ones become excellent materials for creating wall paintings in the form of panels.

The simplest option for a panel with shells is to glue shells of various shapes and sizes onto the base in a chaotic manner or in the form of a specific pattern.
In addition to shells, rocks and dried starfish are great options. The panels created with them are great for the bathroom: they help you imagine that you are in seabed and consider the sea relief. 
If made from shells, starfish and stones into a picture, and then cover it with gold or silver paint, you can achieve such a dazzling effect.
This is a master class on creating panels from shells on a fabric basis - on burlap. It is very easy to make: it will take no more than a couple of hours to make.
You need the following materials:
- Smooth and thin branches from trees for the frame.
- Sackcloth.
- Strong twine.
- Cardboard.
- Brown wrapping paper.
- Gypsy needle.
- One large bead for fish eye.
- PVA glue;.
- Glue gun.
- Pebbles, shells.
- Seahorse or starfish.
- "Chicken God"

First, cut out a fish shape from cardboard and carefully cover it with burlap. Wrap the body of the fish, with the exception of the head and tail, tightly with twine. Then prepare the base:
- Hem the burlap from the edges, forming an even square.
- Make a square frame from the twigs, tying them at the ends with twine.
- Using twine, using an over-seam technique, secure the burlap to the frame.
Now tear the wrapping paper so that the edges are jagged. This will achieve greater effect. Using a glue gun, glue a fish, a large pebble and a starfish onto the paper.
Then glue the pebbles and small shells. As a result, you will get the same wonderful panel as in the photo.
A service such as making stone panels is offered by many construction companies. Usually specialists put together a mosaic of natural stone by cutting it, creating a variety of patterns and even paintings.

Because natural stones painted in various colors, the panel can be made on either a summer or spring theme. If you use stones white, you will get an excellent winter panel. In the photographs you can see what beautiful mosaic panels are in stores.

But you can make a stone panel with your own hands. Pebbles collected from the bottom of the river or from the seashore are suitable for this. The more varied the shape of the stones, the more interesting the picture will be. Examples of hand-made stone panels:

Stones can be laid in a mosaic fashion to create a picture.

To do this you will need colored pebbles. They can be arranged in a pattern. You can do with them whatever your imagination is ready for!
For creative people wood is one of the best materials. It would seem, how can you make a wooden panel? To do this, do you need to know at least the basics of wood carving? Not at all: the panel is not necessarily decorated with carvings.
Subject to availability the right tools You can make a beautiful panel without special knowledge and experience. The effect is given by the natural texture of the tree, its shape.
We will make a similar wooden panel:

The following materials will be required:
- A sheet of dimensions 170 by 80 cm made of very durable and multi-layer plywood.
- Wooden slats for the panel frame. To accentuate rough branches, the slats should be large. Even bars 10 centimeters wide and 6 centimeters thick are suitable for this. Two bars should be 150 cm long, the other pair of bars should be 80 cm. The outer side of the bars should be rough, as if sawn. They require light processing so that there are no splinters upon contact with the skin.
- Three types of sawn branches. Each “stump” should have a diameter of 4 to 5 cm. Several dozen stumps should stand out with a large diameter (from 6 to 7 cm). Several units can be made with a diameter of even 7-8 cm.
Garden species are ideal as branches: apple and cherry with preserved bark. Before work, the branches are dried well so that they do not crack or become deformed during work.
- Stain for painting wood.
- Varnish for woodworking. Stop choosing matte varnish, which does not clog the natural texture of wood. It is absorbed into the structure of the stumps and remains invisible. But it protects perfectly from splinters, dirt and dust.
- Hot glue gun with pencils.
- Brushes for painting wood with varnish and stain.

Master class on making a wooden wall panel:
- Nail the frame and glue it to the base. It is better to entrust this task to a man.
- Place hemp cut from branches onto the finished frame for testing.
- Clean the stumps and the base for the plywood panels from sawdust and dust using a vacuum cleaner.
- Paint the base and frame with stain using a brush. It will take 2-3 layers.
- Leave the base to dry.
- Using a hot gun, glue the stumps in the same way as you laid them out during fitting.
- Let the panel dry for a whole day.
- Apply varnish to the resulting decoration.
 Then let the product dry for another two days. Now the panel can be hung on the wall. If desired, you can decorate it using other materials.
Leaves panel
A panel of autumn leaves is suitable for working with children. For kids, it is real happiness to spend time with their parents and do common things.
First, you can take a walk with your child in the park or along an autumn alley, through the forest, to pick bouquets of various leaves, as in the photo below.

Flowers dried in summer are also used. If a panel of leaves is suitable for decorating with an autumn theme, then a panel of flowers is reminiscent of summer.
On the theme of summer, a panel can be made using leaves decorated in the form of flowers. Flowers can be made with applique, as in the photo below:

Or you can make voluminous roses from several leaves, like here:

There is freedom for imagination here. Each leaf can be associated with something. Yes, maple leaves yellow reminiscent of cartoon fox faces.  It remains to supplement them with some elements to get full picture. From a variety of leaves you can create an original dragonfly.

How to make a rose from autumn leaves?
One of the most original elements For a wall panel, a rose made from a maple leaf can be used. It can be made without a stem by attaching the base to canvas or cardboard onto sepals of dried green leaves. But we will look at an example of how to make a rose on a stem. You can make a whole bouquet from such roses and strengthen it on the basis of a panel.
To make one rose you will need:

- A few maple leaves for the petals.
- Thin branches for stems.
- Green electrical tape.
- Scissors.
There is no need to describe the entire process of making a flower, since everything becomes clear if you look at the master class on making a rose from leaves below.
1. 
2. 
3. 
4. 
5. 
6. 
7.  The most last photo- the result of the finished work. It is unlikely that you will succeed the first time. It will take some time to practice, so stock up on a whole armful of leaves.
Leather panel
Leather is a noble material. A leather panel is ideal as a solid wall decoration. Such decor can decorate a study, hall, living room or hallway. And you can make a leather panel with your own hands.

Let's look at a master class on making leather panels using the example, the photo of which is located above. In exactly the same way, you can make a wall decoration using any other design. For work you will need the following materials:
- Leather of different colors.
- PVA glue, but Moment is better.
- Cardboard.
- Tracing paper.
- Pencil;
- Basis for the panel.
- Acrylic paint.
- Paint brush.
- Scissors.
- Brush for applying glue.
Step by step instructions:
- Paint the big picture.

- Transfer all the details onto tracing paper, numbering them to quickly find what you need.

- Transfer the pieces onto cardboard and cut them out.

- Using a brush, coat each piece with glue.

- Glue the cardboard to the skin.

- Trim the leather, leaving allowances that will need to be folded in order to front side the part turned out to be covered with leather.

- Glue the seam allowances onto wrong side cardboard

- Cover the entire base with a large piece of leather.
- Recreate the pattern on the base using leather pieces.

- Cut strips of leather - flagella - to form roofs for the houses.

- Glue the “roofs” to the houses.

- Moisten the pieces of leather, spread with glue and glue, forming a “road”.


- You can decorate the frame in the same way (moisten and glue).

- Paint a leather painting acrylic paint at your own discretion.

Here are some more ideas for leather panels.


