Good day!
And again about napkins. If last time I imagined creative ideas, then today I offer you classic very beautiful two-color crochet napkins with patterns.
Besides, in last days I was engaged in the selection of interesting crochet napkins and posted several new patterns:
- in the corresponding article "",
- as well as a new large one with a simple scheme,
- found a mysterious scheme,
- added a few.
So, who loves to knit napkins and tablecloths, you can look and knit something new.
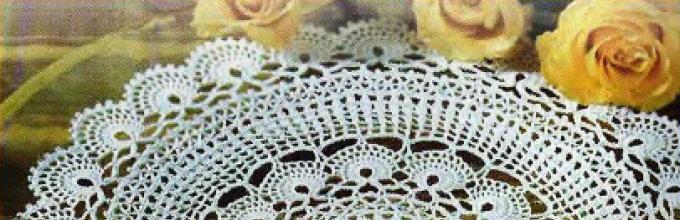
Crochet pink doily
For this delicate two-color napkin, you need 10 grams pink yarn Iris, 5 grams of white yarn Iris, hook number 2.
We start knitting with a white thread with a set of 8 VPs, we close it in a ring.
1st row: 3VP, 19 S1N.
2nd row: 5VP, * 1С2Н, 1 VP *.
3rd row: 4VP, 1S2N, 1 VP, * 2S2N, 1VP *.
4th - 10th rows: we continue knitting according to the scheme with a white thread.
11th - 14th We knit the rows with a pink thread according to the pattern.
The scheme of the napkin is not very clear, but I found only one in the magazine, so I placed another scheme of a similar napkin, in which all the rows are knitted in the same way, only they seem to be repeated twice. By the way, such a white napkin is also very effective, but you can also knit it with the addition of pink yarn.

I continue the description according to scheme 1 for a pink napkin.
11th row: fasten a pink thread into an arch of 3 VPs of the 10th row, 20VP, connect the 20th loop with the 8th, 7VP, RLS into an arch of 3 VPs of the 10th row, * 9VP, RLS into an arch of 3 -x VP of the 10th row, 19VP, connect the 19th and 7th loops, 7VP, RLS into an arch of 3 VPs of the 10th row *, 9 VP, finish with a connecting column.
12th row: 1 connecting post for the transition to the arch of 6 VPs (the beginning of the loop) of the 11th row, 1VP of lifting, 4SBN to the arch of 6 VPs of the 11th row, 17S2N to the loop, 5SBN to the arch of 6 VPs 11th row, * 11 RLS in the arch of 9 VPs of the 11th row, 5SBN in the arch of 6 VPs of the 11th row, 17S2N in the loop, 5SBN in the arch of 6 VPs of the 11th row * , 11СБН in an arch of 9 VPs of the 11th row, finish with a connecting column.
13th row: connecting posts for the transition to the 1st S2N of the 12th row, 4VP lift instead of the first S2N, 1VP of the arch, * 17S2N, between S2N by 1 VP, 2VP of the transition, 1SBN in the 6th RLS of the arch from 11 RLS of the 12th row *, 2VP, connecting column with the top of the first C2H of three VPs.
14th row: connecting posts for the transition to the 2nd C2H of the 13th row, 4VP of lifting instead of the first C2H, 1VP of the arch, * 14 C2H, between the columns of 1VP *, finish with a connecting column at the top of the first C2H of their 4 VP.
15th row: fasten the thread white color at the top of the second С2Н of the 14th row, * 4VP (2VP instead of the first С1Н, 2VP - arch between С1Н), * 13С1Н, between the columns of the 2VP arch *, 2VP, finish with a connecting column at the top of the first С1Н from 2VP.
16th row we knit with a pink thread: connecting posts to the top of the first C1H of the 15th row, 1ch lift instead of the first sc, pico from 3ch to the top of the first c1h of the 15th row, 2sc into the arch from 2 ch of the 15th row, * 1sc to the top С1Н of the 15th row, pico, 2СБН in an arch of 2 VPs of the 15th row *, 2VP, finish with a connecting column in the first RLS of 2 VPs.
Additionally, decorate the napkin with knitted flowers with leaves.
You can use the following scheme:

Crochet green doily

Materials for a two-color napkin with predominant green: green and white Iris yarn and hook number 2.
Knitting such a napkin consists of several parts.
Part A.
First, we knit a ring in two rows of green.
In the 3rd row we attach a white thread and knit the 3rd - 10th rows in a circle according to the scheme.
Separately, with a green thread, we knit 12 leaves according to the scheme in reverse rows and attach them in the process of knitting to each other and to the round white part of the napkin.
Knitting a leaf
Dial 9 air loops.
- 1st row: 7СБН (we knit the first column on the 3rd loop of the chain), 4CH, then we turn knitting and we knit 6СБН on the same chain on the other side.
- 2nd row: 2CH, 5СБН under each column of the previous row and 2СБН under the arch of air loops, 3VP, and in the reverse order: 2СБН under the arch of air loops, 6СБН under each column of the previous row. One column of the 1st row was not knitted.
- In the 3rd - 10th rows, knitting is similar to the 2nd row. See the diagram for the location of the columns in relation to the previous row: in each row, the number of columns increases by one, while the column of the previous row is not tied on the outside of the leaf.
In the 10th row, between the two halves of the leaves, not 3, but 1VP.
Separately, we knit 12 green circles, attaching them to the leaves.
Part B.
We knit a green transverse path according to the scheme, attaching it to the leaves and circles.
Part C.
We attach a white thread and in the 11-12th rows we finish knitting a napkin.
If you like two-color crochet doilies, write in the comments.
Yulia Vyrskaya sent her wonderful work, she even crocheted 2 such beautiful two-color napkins and made adjustments to the knitting description, since in the process of knitting it turned out that the magazine description somewhat did not match the photo of the napkin. I am very grateful to Julia for her attentiveness and for sharing her experience with us.
Legend:
Work description:
Tie 8 air loops and close in a ring with a half-column. Next, knit according to the pattern. At the end of the work, lightly starch the napkin, smooth it and lay it out on a flat surface until it dries completely.
Knitting pattern:

Napkin №2

Knitting pattern:

Napkin №3

Knitting pattern:

Napkin №4

Napkin with rays.
Openwork knitting.
The size: diameter 55 cm. Materials: Lily yarn
(100% cotton), approx. 60 g white, hook No. 1.25.
Job description: chain of 10
v. close in a circle with the help of the connection. Art.
1st p.: 1 in. lifting item. 15 art. b / n in the resulting ring.
Finish the row with the sole of the connecting column. 2nd p.: 4 c. n. (3 v. p. lifting + 1 v. p.), * 1 tbsp. s / n in the next art. b / n of the previous row, 1 c. n. repeat from * to * 14 times. There are 16 arches in total. Finish the row with the help of the connection. Art. 3rd p.: 5 c. p. (3 v. p. lifting + 2 v. p.), * 1 tbsp. s / n in the next art. s / n of the previous row, 1 ch *, repeat from * to * 14 times. There are 16 arches in total. Finish the row with the sole of the connecting column.
Then continue the work according to the scheme for the 29th row inclusive.
Starch the finished napkin, stretch to size and leave to dry.
Knitting pattern:

Napkin №5

The size:diameter approx. 60 cm
Napkin materials: iris yarn, approx. 75 g pink, hook No. 1.25.
Knitting napkins: a chain of 10 c. n. close in a circle conn. Art. 1st p.: 3 c. n. lift, 4 unfinished, art. s / n, connected together, in the 1st century. lifting point, 6th c. p., * 5 incomplete, Art. s / n, connected together, for 1 p. of the base, in a ring, 6 c. *, repeat from * to * 4 times. There are 8 arches in total. Finish the row with the help of the connection. Art. 2nd river: go to the beginning of the row with the help of the connection. Art., 7th century. n. (1 v. p. lift + 6 v. p.), 1 tbsp. b / n to the next arch from the 6th c. n. of the previous row, 3 c. p., * 1 tbsp. b / n in the same arch from the 6th c. n. of the previous row, 6 c. p, I st. s / n to the next arch from the 6th c. n. of the previous row, 3 c. *, repeat from * to * 4 times. Only 6 times. Finish the row with a connecting post. Next, knit according to the scheme for the 33rd row inclusive.
Starch the napkin, stretch in shape.
Napkin pattern:

OPENWORK NAPKIN SCHEME №6

will always make your home cozier and more desirable for the arrival of guests. It brings us childhood, as if we were visiting our grandmother. In order not to get bored watching TV on winter evenings, knit such an openwork napkin.Size: 54 cm.
You will need:
100 g of white yarn Violet Yarn Art (100% cotton, thread length 280/50 g).
hook No. 1.25-1.5.
Dial 8 air. n. and close in a ring. Next, knit in a circle according to the pattern. At the beginning, instead of st b / n, knit 1 lifting loop. Finish a series of connections. Art. or as shown in the diagram. Continue the pattern on all p. = 16 reports to 4 p., 8 reports to 14 p., 48 reports to 16 p., 24 reports to 19 p., then 16 reports. ready product wash, stretch on a horizontal surface and dry. Starch, iron.
Napkin pattern:

Taken from http://kniti.ru
Napkin №7
The magic pattern of feathers on a napkin is knitted with the help of complex "bumps", which consist of columns with a different number of crochets from 1 to 4.

Crochet napkin pattern:

Napkin №8
Beautiful napkin with a pattern of spikelets.

Scheme

Napkin №9
The napkin pattern is formed by long chains of air loops.

Knitting pattern for napkins

Napkin №10
Airy openwork napkin with flowers

Crochet pattern

Napkin №11


Napkin №12


Napkin №13
Craftswomen prefer to start their crochet training with the implementation of simple napkin patterns. Unfortunately, in the future, such ideas do not find application at home - well, let it be, but a napkin made with love can become great gift a person who will be delighted with tenderness. In the crochet article, doilies are presented in abundance. Here are not only ready-made schemes, but also instructions on how to put together this divine beauty with the help of your own imagination.
Simple napkins for beginners
It is necessary to take care of newcomers in this craft and offer more simple options napkins. Better than any description, schemes will follow - these are visual material will help you solve the most difficult task.
A selection of simple napkins with descriptions and diagrams:


Napkin "Poppies"

Now you can complicate the task and tie a product that is difficult at first glance, but simple in execution. This is the "Poppies" napkin shown in the photo. You should not complain about the complexity of combining colors - the entire napkin is presented in the form of a round cloth, where white and green thread are used, while poppies are knitted separately and simply sewn on with a thread using a needle. Experienced craftswomen make crochet connections, which will also be easy for beginners to do in the future.
So, for starters, according to the scheme, a white circle is knitted.

In the future, the white thread changes to green and knitting continues to the end.

The scheme for poppies is presented by hand. The first row is knitted with a yellow thread, the second is knitted with black - this is the core of the flower. Next, the knitting of the petals begins, so from the third row the thread is changed with a red tint. Knit each petal separately - all you need is 5 petals and 6 flowers per napkin.

Napkins with swans are very attractive, which will decorate any work - it is important not to be afraid to combine the birds with the canvas and arrange them correctly. The diagram shows the knitting of birds.
The first scheme is presented as a base in the form of a cup - first knit an oval, and then carefully “arrange” the bird’s wings. The thread can be torn off or continue knitting the neck a single product. The neck is presented in the form of a tube, which gradually decreases. The last two rows are knitted with a red or orange thread - this is a beak.

The second scheme represents a different knitting of swans: the wings of a bird are a detail with four petals. In the future, the knitting of the neck is also formed here in a similar way.


Napkin "Sunflower"

This napkin option is also suitable for beginners. There is no need to look for a special description here - just use a similar pattern and two shades of thread - black and yellow. For example, the following schemes for knitting a sunflower are given.


Napkins with bumps

The photo shows original napkin with cones, but when looking for a scheme, difficulties may arise. The fact is that there are practically no special schemes for knitting such products. But experienced craftswomen create a masterpiece with the help of a standard - to knit napkins, you need to take the usual options with the presence of "pineapples". Instead of pineapples, cones are just tied out. The main thing is to choose schemes with a suitable density. Although the fantasies of craftswomen are limitless, therefore, there are no rules to follow in crocheting.
A selection of schemes with pineapples, replaced by cones.


Combined wipes
With a simple fantasy and a few shades of thread, you can create a real embodiment of art. For napkins, it is enough to collect several motifs crocheted separately. It may seem difficult to someone, but experienced craftswomen resort to just this method of knitting for napkins with flowers.
A selection of combined napkins.


A selection of schemes for combining.


Schemes for independent work
Now you should present some patterns for self-knitting - this will allow you to show your imagination in terms of skill and experience. Use different threads, sew on flowers tied separately - enjoy knitting and the embodiment of beauty. Only your hands can create such grace, and your eyes and the admiring glances of loved ones will appreciate the work. 


Crocheted napkins can be a great addition to an existing interior. They are often used to create large products - tablecloths and even curtains. It is enough just not to be lazy and choose the right threads. By the way, cotton threads are selected for napkins - they hold the canvas in a given shape. If necessary, napkins are starched - so they take on the appearance of a full-fledged product.
Arrangement of comfort in the house - important task for women. Today, knitted openwork napkins for home or summer cottages are returning to fashion. They will add a touch of sophistication and tenderness to any interior. The napkin may not necessarily be white, the choice of color and shape is always in the hands of the needlewoman. In the article we will look at crocheting napkins with patterns and give a description of fabulously beautiful napkins for home and garden. It is important to choose the right thread for knitting and a suitable pattern in order to realize the idea.
Usually napkins are knitted from thin cotton. Traditional option- This is white cotton, with a footage of at least 300 meters per 100 grams.
But today it is not necessary to choose a white or milky color for crocheting a fabulously beautiful napkin, patterns and descriptions of such napkins later in the article.
Many manufacturers of hand knitting threads offer fine cotton different shades. Among Russian companies, you can choose Pekhorka "Children's Cotton", "Summer", iris of any company. The thread from the company Vita "Pelican", "Iris", the company Alize "Miss", the company YarnArt "Violet" is good at work.
Choose the color yourself, according to the interior and to your taste. universal, classic options will be white, milky, cream, pale pink.
Today, microfiber napkins are also knitted. For napkins from this thread, thin yarn is used. It can be Tulip yarn from YarnArt, viscose silk from Gazal and others.
For knitting napkins, you should choose a thin thread and a small hook. A hook number from 1 to 2 is quite suitable, depending on the thickness of the yarn and the idea.
The finished cotton or microfiber cloth should be washed and dried horizontally, laid out on a flat surface on a towel or any fabric. After you can iron. Some people starch napkins, but today you can choose not to do this, or make a weak starch solution to give the napkin a clear shape.
Patterns for crochet napkins with a description
One of traditional forms for a napkin, a circle is considered. Let us consider in detail several models and patterns of crocheted round napkins, they are all fabulously beautiful and airy, such napkins will decorate any interior.

Option 1
A napkin with rays radiating from the center is a very delicate and pretty option. It is not difficult to knit such a model, even a novice needlewoman can handle it. But the result will amaze with its beauty. For this napkin, you need to take thin cotton and a small hook.

Start knitting from the center, like all round napkins. We do this:
- We collect 6 air loops and close in a circle. We knit three lifting air loops for the next row. Thus, we will each time move to the next row.
- In the resulting circle, we knit another 19 columns with a crochet and close it in a circle with lifting loops. In total, we get 20 columns in a circle.
- Next, we knit according to the pattern below.
When the napkin is tied, we tie it with openwork arches from air loops with pico. Pico do this: thread the thread into the loop of the previous row and knit 3 air loops. We fix the pico in the same loop of the previous row. It turns out a small loop.
Option 2
Very interesting option napkins with knitted feathers. This pattern is obtained as a result of alternating arches from air loops and double crochets.

We start knitting:
- We close 3 air loops in a circle and knit 3 lifting loops for the next row.
- We make 11 double crochets in a circle and close with lifting loops.
- Next, we knit strictly according to the above pattern.
- The last row of the napkin, according to the diagram, consists of arches of air loops. If desired, they can be made with pico.
Option 3
A napkin with spikelets is a great option for decorating a country room. For its implementation, the scheme is given below. We start knitting with a set of 12 air loops and closing them into a ring. Next, we knit 3 lifting air loops and another 27 double crochets into a ring. Next, follow the diagram.

Option 4
An amazing airy napkin with an unusual pattern can decorate your interior. It knits easily and quickly, the main thing is not to stray from the count of air loops. It is the air loops and chains of them that form this mysterious and unusual air pattern of the napkin.

To get started you need:
- Dial 12 air loops and close them into a ring.
- Tie the resulting ring with 22 single crochets.
- The next two rows we knit the same number of columns without a crochet.
- Next, go to a row of chains of 21 air loops. We knit the last arch in the row from a chain of 10 air loops and a column with 9 crochets. The next row goes to the top of the resulting chains.
- Next, we knit according to the scheme.
Option 5
A crocheted napkin made of the finest gossamer with knitted flowers is an unusual and fabulously beautiful version of a napkin, the scheme of which is given below.
For its execution, very thin cotton is required. You can take a regular bobbin thread and the thinnest hook No. 0.5 or 0.25.

Option 6
Very beautiful napkin with a pattern of lush columns. They are made as 3 double crochets from one loop of the previous row with a common top. We knit according to the scheme, starting from a ring of air loops.

Option 7
Napkin with an asterisk from the center, which consists of lush columns. On the edges of openwork fans. Knitting also from the center from a circle of air loops.

Option 8
Napkin in the shape of a sunflower. Very beautiful and delicate. Knit according to the pattern given below.

Option 9
Another openwork beautiful flower. Maybe a sunflower, it is made of double crochets and arches of air loops. Knit according to the pattern given below.

Option 10
An amazingly beautiful napkin with bunches of grapes radiating from the center. Each berry in the bunch is knitted from lush double crochets.
They are made from one loop of the previous row. We knit 5 columns with a crochet with a common top. So we get a magnificent column. We knit according to the scheme from the center.

Option 11
Very pretty white cotton napkin. Its highlight is in rounded fans, which are located closer to the center and along the edges of the napkin.
For knitting this napkin, it is better to use thin mercerized cotton, which keeps its shape well.
We start knitting from the center and follow the pattern, which is given below.

Oval napkins with patterns
Oval napkins look no less interesting and beautiful than openwork round napkins. They are knitted from the center according to the scheme.
But then they diverge at the edges with an increase in volume and stretching of the pattern.
Napkins may contain the same elements as round ones: fans, arches from air loops, lush columns, pineapples and so on.

It is important to follow the scheme for each specific model. Several schemes for oval napkins are given below.
A very interesting version of the napkin - oval napkin, consisting of their circles, interconnected by a cobweb of air loops.
In order to make such a beautiful and interesting napkin, you need to knit three large circles according to the patterns below or according to any patterns of openwork circles.
After we tie the napkin with a wide border according to the above scheme.
Napkin from elements
A napkin made of interconnected hexagonal elements looks stylish, beautiful and gentle.
To perform such a fabulous job, we need to connect the first hexagonal element according to the above pattern.

After all the number of hexagons needed for the napkin is connected, we tie the edges of the napkin according to the scheme given below.
Napkins in the technique of fillet knitting
Fillet knitting is a special crochet technique, the principle of which is to knit empty or filled cells.
The filled cells form a pattern. It could be floral pattern, animals, graphic pattern, people and so on.
Fillet technique can be used to knit any thing, including beautiful napkins.
The main thing is to understand the principle of loin knitting. We start with a set of chains of air loops, the length we need. After we knit the cells.
The classic version is an empty cell from a double crochet, 2 air loops and another double crochet. A filled cell is 4 double crochets.
The last double crochet of one cell is the first double crochet from the next cell.
Fillet knitting patterns are usually drawn with cells, the pattern is painted over dark color and the cells read the picture and knit the pattern.
Basically, napkins in sirloin technique are knitted in the shape of a square or rectangle from a set of air loops. Knitting from the bottom up. But there are patterns that allow you to knit a sirloin napkin in a circle from the center.
We start knitting as for a regular napkin with a ring of air loops and several double crochets of the second row, knitted into this ring.
The article has diagrams for such napkins. In loin knitting, the main thing is to observe the exact number of empty and filled cells. Using the fillet knitting technique, you can also make a border for fabric napkins.
Good afternoon, dear needlewomen!
Crocheting doilies for beginners is not at all difficult, as it might seem at first glance.
Crochet is exciting an exciting activity, especially if you see photos and diagrams of very beautiful openwork napkins in magazines, and on the Internet, you just want to knit such beauty with your own hands! Often these ideas are published without detailed description and it is not always clear how to knit.
Today we will learn how to knit napkins and read patterns using a simple small napkin as an example. I have prepared for you a detailed step-by-step description with a photo.
Crochet napkins for beginners - the choice of yarn
It is best for beginners to use thicker threads (but not very thick) so as not to get tangled in them. For example, acrylic or cotton is a skein, in 50 grams of which there are approximately 240 meters.
The hook is selected according to the thickness of the thread. This is done by trial: if you take a very thin hook, then knitting with thick yarn will be difficult, almost impossible. A crochet with a very large number will turn out to be too full of holes in the napkin.
For knitting a thick napkin, a hook with number 2 - 2.5 is suitable. But, again, I repeat, do not strictly follow what is written. Try it, choose the option that seems more convenient to you.
It is better to start with the simplest knitting patterns.
Small napkins can be used as. White or multi-colored napkins will look good in table setting.
Well, in the future, for knitting openwork napkins, it is better to use thin cotton bobbin threads, such as those used for sewing (No. 0-10). From them, the product will turn out gentle and airy.
The hook in this case should also be taken with the smallest number 0.5 or 1.
You can also knit napkins from thicker cotton yarn such as Iris, Rose and others, the hook will fit with the number 1.2-1.5.
So, how to crochet a doily?
Crochet Doilies Lesson for Beginners
Here is our napkin pattern. I chose specially small and a simple circuit for beginners.
On the corresponding page you can always find those used in diagrams and text descriptions.

So, let's begin! I will make a description, and you will knit a napkin and ask questions in the comments.
1 . V napkin swiping begins always from its center: from a set of chains of air loops. (Conventionally designated VP). In the diagram, air loops are indicated as a small loop or a small circle (dot).
For this napkin, we knit a chain of 12 air loops.
Then we connect the first and last loops with a half-column to make a ring.
We knit a napkin in a circle in one direction from right to left.
2 . Knitting of each row usually begins with a set of several stitches, this is necessary to raise the row so that it is even, and not beveled and crooked. . The required number of loops is indicated in the diagram.
In this case, in the first row we knit 3 air loops (VP) for lifting.

The icon following the VP in the diagram indicates a column with 1 crochet. But I decided to knit two crochets, so further my description will differ slightly from the scheme. But this is not important, you can knit with one or two crochets. And the designation C2H means two columns with two crochets.

We tie the ring according to the scheme with 32 columns with two crochets. Insert the hook into the ring.

We connect the last column with a chain of 3 air loops (VP), dialed at the beginning of the row, with a half-column (PS).

3 . We knit the remaining rows, looking at the diagram.
In the second row: 3 air loops (VP), 4 columns with two crochets (С2Н) in each column of the previous row and so on.
I made a little mistake here and at the beginning of the row I knitted only three columns.


It is not necessary here to connect the last loop of the row with the first, as is usually the case when knitting napkins. Starting from the third row to the 6th in this napkin, the air loops at the beginning of the row perform not only the role of lifting the row, but also are an element of the pattern, i.e. going on smooth transition from the previous row to the next.

3rd row: we alternate 4 air loops (VP) and 6 columns with 2 crochets (С2Н). We look at the diagram that when knitting the middle 4 columns, the hook must be inserted into the base of the columns of the previous row, and we knit the first and sixth columns, introducing the hook under the chain of air loops of the previous row.


4th row: we alternate 5 air loops (VP) and 8 columns with 2 crochets (С2Н).
5th row: we alternate 9 air loops (VP) and 10 columns with 2 crochets (С2Н).
6th row: alternate
11 air loops (VP),
4 columns with 2 crochets (С2Н) at the base of the columns of the previous row, 11 VP,
skip 2 columns of the previous row and knit 4 С2Н ( remember the notation - four columns with two crochets) at the base of the last four columns of the rapport of the previous row ( rapport - a repeating part of the pattern),


at the end of row 5 VP, we connect the latter with an arc from the VP, connected at the beginning of the row, with a single crochet.

7th row:
* 5 VP,
15 columns with 2 crochets (С2Н) under the arch from the air loops of the previous row ( those. we introduce the hook under the arch from the VP),

single crochet under the arch from the VP of the previous row * .
At the end of the row, knit 6 VP and connect them to the beginning of the row with a single crochet.

Pay attention to the sign * in recording? This means that the rapport knitting described between two * , you need to repeat several times (instead of the word "alternate", which I used in the description of knitting the 3rd-6th rows).
8th row:
a column with two crochets (С2Н) at the base of the first column of the previous row,
pico from 4 VP (in we knit a chain of four air loops, then we connect the first and last loop together with a single crochet, we get a small ring, or rather not even a ring, but a small lump),
For clarity, watch the video tutorial from

С2Н to the base of the third column of the previous row (we skip the second column of the previous row) and so on ( look at the diagram).

In total, you get 8 columns with a pico in between.

a single crochet under the arch from the VP of the sixth row *.
4 .We cut off and fasten the thread, from the inside we carefully hide the tip of the thread, stretching it with a hook under the posts.