"Zigzag lines and its use in products"
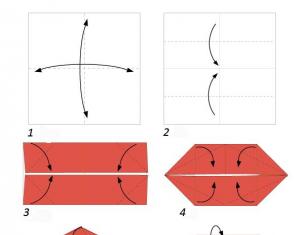
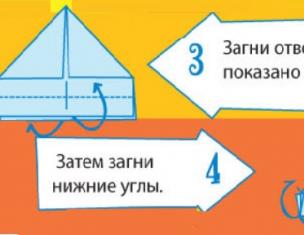
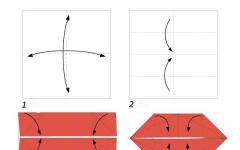
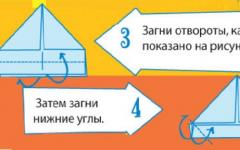
Module "Small Mechanization Adaptations".
Section "Work on a universal sewing machine."
The purpose of the lesson - teach students to apply a zigzag line whenprocessing sewing products, Make an applique.
Tasks:
educational:facilitate the formation of the skill and skills of working on the sewing machine and the use of a zigzag lines in the processing of sewing products; Make appliqué. Using a zigzag line; repeat PBB when working on a sewing machine; ensure the assimilation of the material on the topic;
developing: instilling skills and skills; Develop the ability to put a goal to memorize the material; develop the culture of oral and written speech; develop the ability to work rationally with instruction cards; Teach students to analyze and identify the features of fixtures to sewing machines;
educational: form accuracy and discipline in operation; form in students love for labor and readiness to work in good faith; Learning to keep the material and technical base of the school; educate the ability to comply with labor and life hygiene rules; form elementary skills of homeowers; bring up, feelings of mutual assistance;
Type of lesson: combined.
Classes:
- explanatory - illustrative (story, conversation, work with didactic material, demonstration),
Reproductive (instruction; practical work, independent
work);
Means of education:
subjectual objects, visual benefits;
practically labor activity;
emotionally - creative interest, satisfaction in work;
Equipment and clarity:textbook "Technology" Grade 7; Presentation "Application of a zigzag lines in garments";visual benefits (small mechanization devices for sewing machines); Samples of the use of a zigzag lines Machine, threads, scissors, cotton flap, ruler, chalk.
Object of labor: sewing machines, adaptations of small mechanization
Material - technical equipment:
Student workshops equipment:student desks, chairs, tools and fixtures.
Routing:"Applique".
TSO : computer, screen, projector, flash drive (the lesson is compiled in the POWER POINT program)
Safety:« Safety regulations when working on a sewing machine. "
Literature for teachers:methodological manual Grade 7, didactic material
Literature for extracurricular reading of students:school Encyclopedia, Textbook Technology 7 Clacs.
During the classes
1.Ganization part.
- Preparation of students for the beginning of work in the lesson.
- Greeting.
- Check the working form of clothing.
- Mark absent.
- Setting the goals and objectives of the lesson.
2. Receiving material and PTB.Students repeat safety regulations when working with sewing machines. Teacher asks questions:
- What are the devices for the sewing machine?
- List and show, what adaptations of small mechanization do you know?
- What are the rules safe work Need to observe when installing various paws - devices?
- What pb should be observed when working on a sewing machine with an electrical drive?
- What lines can be installed on the Janome electric sewing machine?
3. Actualization of knowledge. On modern sewing machines, you can install different lines. They have a set of devices that allow you to quickly and efficiently perform many operations. Devices to sewing machines allow you to improve labor productivity, improve product handling. But the main line is straight line.
Question. What kind of line can be installed using which you can perform many operations when processing sewing products?
4. Displays a teacher of a new material.
On domestic sewing machines, forming a zigzag line, you can make cutting of sections, sweeping loops, buttons sewing and other works. Execution that manually requires a lot of time. Spelling seamstress using a zigzag lines can perform an imperious pattern or applique.
Installing a zig stitch on a universal sewing machine.
Apply the instruction manual for the sewing machine.
stitch lengths from2-5; , Line widths 0.5-4.
Apply a zigzag lines.
Cutting cuts.Zigzag cutting cuts
stitch - the most common way
speed \u200b\u200bprotection. Selection stitch depends
from the type of fabric. For bulk fabric choose wide
stitches and not sick distance between them. For incompatible
stitches are narrower, and the distance between them is more.
The line is paved along the edge of the cut.
Recovery stitch - C-2-5 on the sewing machineJanome.
Treatment of edges is used for
processing the edges of the product, Ryush.
Install the stitch selection knob on C. Regulator
stitch lengths on -1, stitch widths-3. (C-1-3).
The needle passes along the edge of the adjacent cut.
Cozy loops.Weekly loop,
fabric fold twice. Install
regulators in position (C-1-3)
Stitching tissues. Stitching among themselves
strips of dense tissues, drape, leather. Putting
line so that it is symmetrical about
butt fabrics.
Failing lace to the product.
Lace sewed at the top edge
zigzag lines. Before
how to sew a lace need to be joined.
Prapping braid to the product.
We can sew two parallel
lines or one zigzag line.
Seving buttons.
Install the width of the zigzag lines equal
the distance between the holes and sew.
Decorating products.
Zigzag lines is an element of decorating and finishing products. (The teacher shows products with a zigzag stitching trim).
Addition of gum to the product.Rubber or elastic cord
try to the product with a zigzag line, pulling it.
Applique execution.
For the manufacture of appliqués, any fabric is suitable.
The choice depends on the purpose of the product. Performed
applications on pillowcases, curtains, garments.
Applique means applying. A drawing is applied to the main fabric and is attached by a zigzag line.
5. Reflowing knowledge of students.
- Which line can be coated with slices?
- Which machine can be performed a zigzag line?
- How do we install a zigzag lock on the sewing machine?
- Name the use of a zigzag lines in the manufacture of sewing products.
6. Fizkultminutka. 1-2 minutes.
Gymnastics for eyes. Perform without voltage, slowly, each exercise is 5-7 times.
1.Theverctic movements through the eyes up (count to three), down.
2.Gorizontal movements through the eyes to the right, left.
3. Rubbed movements with eyes clockwise. Then counterclockwise.
7. Practical work. Applique execution.
Induction training.
1. For practical work, we need to make fabric, drawing for appliqué, needle, thread, scissors.
2. Install a zigzag line on the sewing machine.
3. To know with the technological card of applique.
Routing.
1. Fill the drawing on paper, clap paper on the fabric, cut the fabric in the drawing.
2. Receive the resulting item to the product.
3. Create open sections by a frequent zigzag line.
Attention! Working with a heated iron it is necessary to follow TB rules;
Before working, check the maintenance of the cord.
Iron Turn on and off with dry hands, taking only for the plug body.
Put iron on the stand.
To ensure that the sole of the iron does not touch the cord.
At the end of the Iron turn off.
Attention! Working with a needle, pins and scissors observe TB:
Needles and pins Store in a pad - needle.
Sew with a thimble.
Broken needle does not throw, and put in a specially designated box.
Scissors lay closer blades from working, passing to keep them for closed blades.
Attention! Working on the sewing machine, follow TB rules:
Gently stuck hair.
Items should not be lying on the machine.
Before working, check if it was left in the product pin or needles.
Do not bend close to moving parts of the machine.
Follow the right position of hands.
Performance of independent work learning.
Current briefing:
- Check the organization of jobs;
- Check the correctness of the execution of labor techniques;
- Check adherence to PTB.
Give additional tasks to the most successful student
Final instruction
Analysis of the work performed
Summing up the lesson.
For self-assessment, I offer each of you to answer questions:
Reflection:
today I learned ...
it was interesting…
it was difficult…
i performed tasks ...
i understand that…
now I can…
i purchased ...
i learned…
i managed …
i could…
i'll try…
i was surprised ...
the lesson gave me for life ...
i wanted…
When we sew the product, then you must handle the sprinkled tissue cuts - saw slices. For this exist different methods Processing. With the advent of modern cars - this problem was solved and facilitated as much as possible. Of course, professional tailors and at home have these wonderful special cars. But not everyone who sews themselves on their own clothes, have Overlock.
How else can you spend slices? Treatment of Zigzag edge - Alternative method of cohesing cuts.
In the middle of the last century, in domestic sewing machines, the designers invented the mechanism of the needle deviation from their axis, which made it possible to sew the stitching "Zigzag". It was a revolution in the history of creating machines, since Zigzag not only facilitated and accelerated, but also made the possibility of manufacturing a loop with a machine manner. Of course, you do not need to forget about the superiority of the quality of the zigzag stitch over the manual method of cozy.
Treatment of Zigzag edge — the most common method of treating sections at home. It should be noted that this line is quite tough. On dense tissues, it has an excellent look. But in the drawing materials - on the oblique thread or on the knitwear - it strongly stretches the fabric. To reduce this effect, you need to increase the stitch length. One more minus - thin fabrics gives rigidity. On the other hand, the stitching zigzag is quite elastic, flexible, which is important for pulling fabrics: it does not burst.
To reduce rigidity, a new line was invented in modern machines, the so-called overlock. It does not have anything to do with Overlock and differs fundamentally from it. The difference and advantage of it before Zigzag is that there is a deviation of the needle takes place as one to three, that is, two stitches are straight and one with a deviation, which reduces the zigzag stitching stiffness. But, in my opinion, and worsens the appearance. We will consider this line later in an article about small mechanization.
Since still more old cars and not everyone has the opportunity to perform an "overlock" line, then in this article we will consider treatment of edge by simple zigzag,which is, both in modern and old machine type "Seagulls".
How to spend slices? The seam in oguluzhka.
Seams in ogujku are processed by a zigzag stitching together. After the stratching of the parts, the allowances are needed, and then start the seam in the desired side and only after that it is possible to spend. After cozy, with further processing, the seams will also need to try. Before charging, in order for the edge to be clean, it is necessary to trim all shrinking threads and irregularities, and after cozy, also remove all stitching threads. The stitch step needs to be adjusted according to the thickness of the tissue. It is not necessary to coach often as a loop - in one place, but also not to do stitch too large. This not only worsens the quality of the line, but does not attach tidy View. Zigzag width put at least 3 mm. Since the line should keep the filament of the fabric. The stronger the cloth crepts, the wider there should be a zigzag and more often a line.
ABOUTbumping cuts. Seam in an irip.
The seams in the irip suite are usually applied either in products with large allowances or in thick tissues. If the fabric is thin, then the edge of the allowance during cozy, I slightly threaten to the wrong one. Thus, I will attach the strength of the ropted line and a beautiful appearance. Pre-seams also need to operate and cut the cut for the purity of processing.
Zigzag prefix to a Podolskaya typewriter.
Most a large number of Rights on the channel refers to the Podolsk straight-string 2M class machine, simple hand machine Based on Zingerovskaya. Of course, subscribers are interested in how it is possible to spend the sections on this machine? I worked all the uses of this typewriter to the maximum - "What can a podolsk machine?", And this affected the form of series of articles and master classes. In this article, I want to show how you can spend slices on a straight-string typewriter using a zigzag fixture. In the video, I describe this adaptation very detailed, so I will not repeat.


In conclusion, I want to say that "Overlock's prefix" does not suit the Podolsk rented sewing machine 2M class, although it looks like a zigzag console. Prefix "Overlock" is designed to deviate the needle, that is, it is for cars with a zigzag. The jigsag adaptation to the Podolskaya typewriter is based on the fact that no needle deviates from the axis, and the ribbed foot, clinging the cloth, moves it along a zigzag trajectory.
Therefore, it is important: do not press the fabric to the type platform, and do not use very thick fabrics such as drapes.
Zigzag edge coatingin the classification of seams according to GOST, it refers to a ropted line, and in the classification by purpose - to the edge seams: the seam in the bending with an open slice. Most often, this is the processing of inner sections: side, shoulder, reliefs and others. This technique is shown in the video. "Cutting cuts.Seam in the irip. " But when processing edges of flutes, rocks, lifts, etc., apply like seam in the bending with an open section and seam with a closed slice. In the second case, the adhesive foot is applied - the snail, which narrowly spins the edge, and then it is fixed with a stitching zigzag. Such seam is called a "twist". We will consider it later in the article about the small mechanization.
Today we reviewed the way the edge of the Zigzag. Somehow, on the Internet, I read a comment of one woman: "Unfortunately, I have no overlock. Only Sig Zig Zag (the quality is very mediocre, the wash will not survive), is provided on the sewing machine. If you fulfill it correctly, as I advised you today, then this seam "will survive" the product itself, this is when the product has already broken, and the line remained unchanged. Checked by experience.
Was it a useful article for you? Write me in the comments, share your experience in the processing of sections of the product.
Waiting for your comments and questions. If the article was useful, share it with friends, put like, subscribe to news and get a book as a gift "Sewing machine of home use."
With love, Olga Zlobin
Municipal General Education
secondary school number 2 Spassk
Public lesson.
Apply a zigzag lines.
(conducted in 7A class).
Prepared and spent:
teacher technology
Polezhaeva V.P.
2008-2009 Uch
Theme lesson:
"Application zigzag lines."
The purpose of the lesson: familiarize students with the use of a zigzag lines; with the peculiarities of thick and thin tissues; teach to process a longitudinal slice with a zigzag lines; repeat the rules of safe work; educate accuracy in work; Perform the practical work "Applique".
Visual aids: Safety Table; Samples treated with a zigzag line; products with applications; samples of the stages of practical work "Application"; Flyselin fabric samples and phlizophiks.
Tools and equipment: Work box, fabric, scissors, iron, sewing machine, pear and leaf patterns.
During the classes.
Repetition of safety regulations.
Making samples of connecting and edge seams.
Organizing time.
Check your homework.
What groups share machine seams?
Name the connecting seams and where do they apply?
Name the edge seams and where they apply?
What are you knowing the finishing seams, their use?
Practical work on options.
1 Option: make a sample sample.
2 Option: Make a sample sample.
3 Option: Make a dual seam sample.
4 Option: Make a sample of the overall seam.
Solid rebus.
Main part.
Modern sewing machines allow you to easily and quickly perform various operations for the manufacture of sewing products. Using the machine, the skillful seamstress snaps down with light cuts, make a loop and sew buttons, fit the product with a secret seam, performs lines of various types and even kills an imperious pattern. Wellowing a sewing machine, you can completely refuse to work manually.
ABOUT  meeting sections with a zigzag line - the most common way to prevent cutting cuts. The selection of the length and width of the zigzag stitch stitch depends on the type of fabric: for very rash tissue, wide stitches and a small distance between them choose, for not very rash - stitches are narrower, and the distance between them may be more. When working with very thin tissues, a large interval between stitches is installed. Reduce the width of the stitch and use threads for machine embroidery and ducts so that the intake edge is not tough.
P  the processing of thin tissues of sections, enveloped by a zigzag line, are obtained in non-accurant, the fabric is moving. To avoid this, the zigzag line is paved at a distance of 5 mm from the cut, and then cut the allowances on the seams to the stitches.
Teacher showing a zigzag lines.
Applique execution.
Application is called a drawing or decoration made from nastetled or braided flasks of fabric.
For the manufacture of appliqués, any fabric is suitable - the choice depends on the purpose of the product. For appliqués on pillowcases, clothes, curtains that you often wash, you should take fabrics whose sections are not very creepy. This fabric property will not matter if the application is performed on the panel - any tissue is suitable here. Applique to embroidery threads. Their color is selected in tone tissue. Track and pencil are also needed. Good to have a flizophyx (fliseline with double-sided adhesive coating).
Show samples.

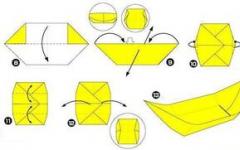
Applique execution technology: Translate with copy paper and sharply sharpened simple pencil drawing for appliqués on pour park The main fabric in the mirror image. We will circle a pattern of pears and leaves.
On the involving side of the application (color) fabric, the adhesive gasket, phlizelin. Impose this cloth with a laying down on facial The main fabric over the contour line and occupy. Make a small zigzag line along the contour of the pattern from the wrong side.
Cut the applicated fabric on the edges from the front side close to the line. Then spread a tight zigzag line clearly along the contour of the pattern from the front side.

If the application consists of several elements and they overlap each other, it is necessary to start working with the prolonged of the lower element.
If you want to use a ready-made print pattern from the fabric to appliqué, you need to cut it with a lot of letters, strengthen the phlizelin, it is necessary to start a zigzag line along the contour. Cut extra fabric close to the line and spread a tight zigzag line again.
It is easier and faster to execute the application using the flusophyx gasket with a double-sided adhesive coating.
Teacher Show Stages of appliqué.
Practical work "Application of a zigzag lines."
Exercise 1.
Damage one longitudinal sample slice, laying a zigzag line along the edge.
Discover the second longitudinal sample slice, laying a zigzag line based on 5mm from the edge. Cut the seam allowance close to the line.
Run sample.
Compare two lines.
Task 2.
Translate the drawing to applix on the wrong side of the main fabric in the right place.
Relieve the adhesive gasket on the wrong side of the applixation tissue of yellow color.
Take this cloth with a gasket down on the front side of the main fabric over the contour line and proceed.
Rign down a small zigzag line along the contour of a pear pattern from the wrong side.
Cut appliqué fabrics from the front side close to the line.
Route again a dense zigzag line along the contour of the pattern from the front side.
Repeat for green cloth, sewing sheet as well as a pear.
Mustive work.
Repetition studied.
Where is the zigzag line applied?
What is needed to waste cut parts cuts?
What is the peculiarity of the grossing of thick and thin tissues?
What is the applique and where is it applied?
How to execute applications?
The outcome of the lesson.
Note for practical work.
Homework page 65-69.
Order No. from 2011 Working program for the training course "Technology" Grade 5 Basic level
Lesson40 Practical work. Zigzag line Sphere applications zigzago-like strits. « Application zigzago-like strits»Know the principle of receipt zigzago-like strits Performing practical work ...
The program is implemented: in 6-7 classes 2 hours a week, 70 hours per year in 8 classes 1 hour per week, 35 hours per year. The working program is adapted for students Maou Sosh№6 with WEOP
ProgramHygienic and operational properties. Machine studies. Application zigzago-like strits To waste cuts and execution of applications ... and handle loops zigzago-like stitching; work with mod logs, read and build Drawing, shoot and ...
The purpose of the Working Program: Planning, Organization and Management of the educational process on the "Technology" educational discipline to prepare students for independent labor life in a market economy. Tasks of the work program
Working programmHousehold sewing machine 2 h. 33 Application zigzago-like strits For decoration of products. 34 ... Sewing machine. Treatment of slices zigzago-like
Section: Machine Science 7 Class
Topic: "Application zigzag lines"
Purpose: Teach the applique using a zigzag lines
Tasks:
Find out the use of a zigzag line, with the concept of "Applique", with the methods of appliqués; Teach customize the sewing machine on a zigzag line, adjust the length and width of the zigzag lines;
Repeat the safety technique when working on a sewing machine, when working with cruel-cutting tools;
Develop logical thinking cognitive activity, creative imagination;
Rail up attentiveness, aesthetic taste, accurate skills.
Equipment: tutorial, notebook, needle, threads, scissors, fliseline, pieces different materials, Sewing Machine, Visual Application Samples, Presentation (Personal Development)
Time: 2 lessons for 40 minutes.
Teaching methods:
problem
verbal
communication
method of practical exercise
heavily saving
During the classes:
I. .Organizing time
Greeting students.
Check availability to the lesson.
Set up a job.
II. . Setting the problem (actualization of knowledge)
Each person at least once in his life came across a problem. Favorite jeans broke out. How to be? Suggest troubleshooting options.
Children put forward their ideas.
The teacher on the board sketches the scheme
III . Message Topics lesson
- Today in the lesson we will learn to execute the application using a zigzag lines. Theme of the lesson: "Application of a zigzag lines"
IV Effective new material is accompanied by a demonstration of slides from the presentation
To begin with, consider the concept of "Applique" (2 slide)
Application is an artistic image obtained by sticking or stripping on the basis (tissue, paper, etc.) of multi-colored pieces from various materials.
Types of Appliques:
A simple application is such an applique, all the elements of which are nasty to some common background. As a rule, it is single, small compositions. (3 slide)
The volumetric application is an application using the pattern elements, partially recorded on the background. Part of the applique is freely located above the background, giving the figure volume. (4 slide)
Semi-compound applique. To give the volume of separate parts of the application between the basis and the part lay the syntheps, batting, batting or some other volumetric material (5 sludd)
Removable applique. The finished application is cut along the contour and use as an independent product (on Vilcro tape, thermoapplication) (6 slide)
Multilayer Applique Such an applique is used when creating landscape or plot compositions. The framework of the foundation gradually closes the details of the pattern, creating a single whole. (7 slide)
Let's remember what methods can I fix the applique of fixing the applique on the fabric? (Application elements are fixed to the base: with the help of glue, with a needle (smooth, looped, tambourous or other decorative lines) (8 slide)
In addition, the application can be fixed on the sewing machine with a zigzag line. Let's look at how on a sewing machine to install a zigzag line and how to adjust it. (9 slide)
(The teacher demonstrates the lines knobs on the sewing machine, on the samples shows which length and frequency is a zigzag lines)
Let's think why you can still use a zigzag line? (for decorative finish And for cutting cutting cuts) (10 slide)
Selecting the length and width of the stitch zigzag lines depends on the properties of the tissue:
if the cloth is very creepy, use wide and short stitches for processing
for low-speeded fabric, on the contrary, - narrower and long stitches (11 slide)
When processing thin tissues, sections, crushed by a zigzag line, tighten the tissue and are obtained inactive. To avoid this, the zigzag line is paved at a distance of 5mm from the cut, and then cut the allowances on the seams close to the stitches. (12 slide)
V. . Fizkultminutka (Appendix 1) (13 slide)
VI . Performing practical work.
The teacher shows the finished applique of the elephant and asks questions:
From how many details is the applique?
What needs to be done with the details of the applique, so that their edges do not appear?
What part will we sew the first, and what kind of second?
Children respond (of 2 parts, you need to duplicate parts using flieseline, we first sew 1-point (torso), and then the 2nd item)
The teacher welcomes the sequence of practical work: "The execution of the application using a zigzag lines" (14 slide)
Children ask questions if something is not clear.
Children
be proceed to perform practical work.
The teacher watches practical work. Helps, if there is a need.
VII . Summing up and reflection.
Questions for repetition:
What is needed to coach cut parts cut?
What is the feature of the cozy and thin tissues?
What is applique?
What types of applications are there?
Where do applicion apply?
Reflection: Is the lesson information useful? The practical skills of the execution of the application will be useful to you in your future life?
The teacher issues an estimate for the lesson and issues homework.
Children lead order
Attachment 1
Gymnastics for eyes
Eye movement along the horizontal line to the right and left.
Eye movement over vertical line up-down.
Circular movements with open eyes clockwise and counterclockwise.
Minding the eye to the bridge, then look into the distance.
Minding the eye to the tip of the nose, then look into the distance.
Minding the eye to the forehead, then look into the distance.
Exercise for accommodation.
Put the palms on closed eyes, make a sharp deep breath through the nose, then perform a slow exhale through the mouth, after 20-30 seconds we remove the palms and open your eyes.
Exercises for the cervical spine
Each exercise to perform 6 - 8 times.
Sliding chin on the chest down.
"Turtle": the slopes of the head forward-back.
Head slopes to the right and left.
"Doggy": the rotation of the head around the imaginary axis passing through the nose and the back.
Owl: Rotate the head to the right and left.
"Pumpkin": circular motions Head in the same way.
Appendix 2.
Practical work:
"Applique with a zigzag lines"
Move the drawing to appliques on the tracker sharply sharpened pencil
Choose a cloth for appliqué (for an elephant body and for the ear).
Cut glue gasket flap suitable size.
Sharpen glue gasket flap on the wrong side of the applixation fabric.
Move the drawing to applix to the wrong side of the reinforced phlizelin colored fabric in the mirror image using a copy paper and a sharp simple pencil.
Cut the details from the fabric with small sharp scissors.
First the 1st Detail of the gasket down on the front side of the main fabric on the preloaded place and notice. Then impose the 2nd Detail by gasket down on the front side of the 1st part on the preloaded place and notify.
Choose a color (in tone tissue or contrasting color) and the thickness of the thread for appliqué. Pick up the fabric flaps suitable lines width, stitch length and thread tension. Route a zigzag line along the edges first 1st part, and then the 2nd items.
Remove the ends of the thread on the wrong side and make them. Plug work.
At the place of the eye to sew an intention.
Appendix 3.
Template for appliqué
2nd Detail
1st Detail
Questions for self-test
1. What are the advantages and disadvantages of a two-dimensional chain stitch?
2. How does the nickname affect the performance of the main points of the stitch formation process?
3. What types of sewing machines of a double-speed chain stitch do you know?
4. What is the purpose of the stamp machines in the manufacture of sewing
and knitwear?
16. Sewing Machines Zigzag Stitch
Features of the formation of zigzag lines.
The zigzag lines shown in Figure 51 is widely used in the clothing industry. Such a line can be performed on a shuttle and chain interlacing machine. Zigzag lines are used to perform stale and hearing works, for sewing lace, applications, to connect the details of the jack, to perform the simplest embroidery lines with a periodically repeated pattern, for the manufacture of loops, etc.
When performing a zigzag line of the shuttle interlacing needle, except for vertical movements, performs movements across the line (along the platform), in connection with which the shuttle is deployed so that its plane is parallel to the needle deviation plane.
The principle of the formation of a zigzag stitching of a shuttle interlacing is as follows: The needle makes the left puncture and with a lift from the extreme lower position forms a loop from the top thread, which the shuttle sprawl is captured and drives around the bobbin; The needle comes out of the materials, turns across the line (the rail moves the material to the distance equal to the stitching step) and makes the right puncture 2. Next, the process is repeated.
Fig. 51. Varieties of zigzag lines

On the finishing operations for a particularly durable fastening of parts, multicolous zigzag lines of shuttle interlacing are performed. These lines can be performed on one-needle and two-chigolous machines. Such lines are shown in Figure 51, b. As can be seen from these drawings (if you look at them from left to right), Multicolor lines consist of three, six, twelve and two sequentially repeated stitches.
To perform two-line lines, two needles that interact with one shuttle are installed in a special needle holder. The programming element that reports horizontal deviations of the needlem is a copier.
The 26th grade machine is produced by a Podolsky mechanical plant. M. I. Kalinina and is intended for processing details of cotton clothing and woolen materials zigzag lines of shuttle interlacing (type 304). The rotational speed of the main shaft is up to 2500 min. "1, the stitch length is adjustable to 5 mm, the width of the line is up to 9 mm. Needles 0203 No. 100-130 (GOST 22249-82 E).
The machine uses a crank-connecting rod needle mechanism with its horizontal deviations across the line, a central-bobbing, uniformly rotating shuttle, a hinged-rod pitch, the mechanism of moving the material of the rush type. The machine does not have a fixing device.
Fig. 52. Appearance Machines 26 cl.
Refueling threads. The upper thread with reels or coils are carried out through two holes of the niteen-level rod 16 (see Figure 52), administer from top to bottom in the loop of the wire niteenther 15, driven between the washers 14 of the additional tension controller, between the washers 19 of the main tension regulator and right to be left into the loop of the pitch Springs 11. Then on the right to left, the threads are filled into the ear of the pylide-tightener, closed by the safety screw, are carried out from top to bottom through the loops of two

wire nitential - 12 and 10, fixed on the front board, are carried out through a nitential slot in the needle divider 9 and from the working needle to be introduced into the Ishko.
The lower thread from the bobbin / is carried out into the slot of the 4-punk cap and roll under the lamellar spring 3, from under which the outwards are taken out, it is raised into the slot 5 and through it - into the nithelnast hole 6. Then the thread is carried out inside the bobbing cap and through the slot 7 output . Take a bobbing cap in the left hand and pull the thread, while the bobbin inside the bobbin should rotate clockwise. Left move the fitting plate, open the lever of the bobbin lock and wear it on the center holder centep. Then check whether locking the lock correctly occurred and the bottom thread is wounded from the bobbin (it should be wedged without jerks and jams).
The needle 8 is inserted from the bottom into the hole of the needle class 9 with a long groove to the running and fix in it with screw 20.
Needle mechanism. Due to the fact that the needle has deviations across the line (along the platform), the needle mechanism can be viewed as consisting of two nodes: vertical and horizontal needle movements.
Fig.53. Needle mechanism 26 cl.
Vertical movement knot. At the left end of the main shaft 2 (see Figure 53), crank 1 is fixed, on the inner shoulder of the finger 23, the upper head of the connecting rod 21, its lower head is inserted into the groove 13 attached by two screws to the machine body. In the hole of the bottom head of the rod, the finger of the leash 20 is inserted. The leash is made in the form of a cube; The cylinder 19 is inserted into its side hole, in which the screw 18 is fixed in the screw 17. The top and bottom hole in the leash have a diameter greater than the diameter of the needle product, therefore, with the needle deviations, the needle a needle, together with the cylinder, will be rotated relative to the transmitting leash. The needleor moves in two guide frames 22, put
on the hinge finger 24. The second hinge finger 16 is inserted from the side slot, which is the director of the frame during its horizontal displacements and eliminates the movement of the frame to the running. Fingers 24, 16 in the machine housing are fixed with screws.
Knot of horizontal movements. On the main shaft 2 screws 4, the gear 3 is attached, which is in engagement with gears 5 (T \u003d 2: 1), made at the same time with a cam 6. The cam is integrated so that he reports the needle of deviation only in the upper position. The cam covers the plug of the connecting rod 12, its left head with the help of the hinge eccentric finger 15 connects with the frame 22 and is fixed in it with a screw 14. On the pin of the connecting rod 12, the slide 11, inserted into the groove of the lever 9, the lines width regulator. The axis 10 of the lever is inserted into the cover of the cover (not shown in Figure 53) attached to four screws to the sleeve of the machine. The threaded part of the lever 9 was removed into the slot of this cover, the puzzle-pointer 7, spring and screwed nut 8 for fixing the lever 9 in a certain position.
Under the action of a cam 6 plug of connecting rod 12 will move down and up. For example, if it is lowered, the slider 11 moves down and simultaneously to the right along the tilted groove of the lever 9. Consequently, the connecting rod will get the right to the right, the frame 22 will turn on the finger 24 counterclockwise and the needle will make the right puncture.
The lifting width is adjustable by turning the lever 9 after weakening the nut 8. If the lever is rotated clockwise, the lifting width will decrease; If the groove of the lever 9 is vertically, the connecting rod 12 will not report the frame 22 of horizontal deviations - the straight line is obtained.
The timeliness of the needle deviations is regulated by turning the main shaft 2 after weakening the screws 4. The needle should deviate over the materials.
The position of the needle in the rosters of the needle plate is regulated by the rotation of the hinge eccentric thumb 15 after weakening the screw 14.
Stitch length (pitch) is regulated by moving the lever relative to the slot 18 after loosening the nut 17. If the lever is moved up, the stitch length will decrease.
Other main adjustments associated with needle heights, thread tension, rack lifting height, foot, etc., are performed in the same way as in other straight-string machines.
Lubrication machine. All conjugates of the parts of the machine mechanisms are lubricated individually with the help of oil. For lubrication, oil I-20A (GOST 20799-75) is used. Cleaning and lubrication techniques are the same as on other straight-string machines.
The class 335 is designed to perform a zigzag line of shuttle interlacing and is available in two versions: 335-121 CL- for processing sewing products from costume and palm materials and 335-221 CL. - For processing knitting products and products from lightweight materials. The frequency of rotation of the main shaft of the machine in the first version up to 4000 minutes "1, in the second - up to 4200 minutes" 1, the stitch length from 0 to 5 mm, the lines width
![]()
in the first version of 0 to 10 mm, in the second - from 0 to b mm. Needles
135x5 (CHHSR) or 0203 No. 75-120 (GOST 22249-82 E).
The machine has a crank needle mechanism with horizontal deviations across a stitch, a central-bobbin rotating shuttle, equipped with a wanted, hinged-rod pitch, a mechanism for moving a roll type, a device for fixing the lines. In addition, the machines of the first option have a device to shift the zigzag lines to the right or left relative to the center of the needle plate. The shuttle has automatic lubrication, and the shuttle shaft rotates inside the oil crankcase.
Fig. 54. Appearance of the machine 335 CL.
Refueling threads. The upper thread with reels or coils are carried out through the hole in the rod 7 (see Figure 54), in three holes of the nithelnastor governmental 6 are sequentially injected into three holes, they will be reduced between the washers 14 of the tension of the upper thread; And on the right to be left into the ear of the pyruchybigivator 5. Then the thread from top to bottom is carried out in the loop of the wire niteenastor 13, injected into the hole of the needle holder 2 and in the direction from the working needle 7.
The lower thread from the bobbin 7 (see Figure 55) is carried out into the slot of the 4-punk cap and roll under the plate 3, from under which
displays outward, hardened in the slot 5 and through it into the nitheredstream hole 6. Then the thread is carried out inside the bobbin cap and through the slot 7 is output. The tension of the lower thread is regulated by screw 2.
Main adjustments. The width of the lines is adjusted by pressing the handle 8 and turn it relative to the graded scale 9. If the handle 8 is rotated clockwise, the lifting width will increase.
The change in the position of the zigzag lines relative to the center of the needle plate is performed by pressing the handle 10 and its turn to certain labels ("P", S "," L ") on a graduated scale 9. The first label corresponds to the right position of the zigzag lines, the second - central and third - left. The stitch length is adjusted by turning the handle 11 relative to the tag applied on the rack of the machine sleeves. If the handle 11 is turned clockwise, the stitch length will increase.
The line is fixed by starting on the handle 12.
The remaining major adjustments are performed in the same way as in other rapid machines.
Car care. To lubricate the mating mechanisms of the machine, it is recommended to use oil I-8A, I-12A (GOST 20799-75). In Figure 54, the arrows show the mating lubrication sites (on the sewing machine they are marked with red paint). In addition, it is necessary to check the availability of oil in the crankcase under the platform of the machine tags on the sight glass and as the oil consumes it, focusing on the top label.
Cleaning the car needs to be performed daily, turning special attention On the shuttle kit and details located under the needle plate.
Questions for self-test
1. For what operations are the zigzag shuttle interlacing machines apply?
2. What movements to get a zigzag row gets a needle?
3. What is the difference between cars 26 and 335 grade from each other?
4. What is the scope of a modified machine 335 machine?