The manufacture of paper craft is a wonderful way to spend time with children. Making a classic boat, or a boat - this is one of the easiest tasks in the origami. At the end of the manufacture, this exercise may be lowered into water. Most likely, in childhood you will be launched similar ships in puddles and streams. To create a paper boat, you will need a rectangular paper leaf, which has any shape and texture. Well, the guide about how to make a boat from paper, if suddenly you do not remember how it is done.
We make a boat from paper
For making a paper ship you will need to make such actions:
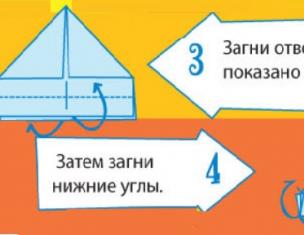
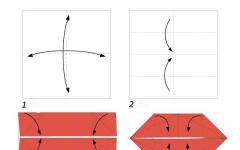
To begin with, stocking suitable rectangular paper sheet.
The resulting workpiece should be folded again in half, but in another direction, and turn back. The result of these actions will be the resulting central line of folding.

Now you need to flexing the bottom strip to the top in the points where the angles are connected, which was discussed in the previous step.


The next step in the manual how to make a boat to make a boat is bending up the remaining bottom strip. The result of these actions should be the fact that the workpiece will acquire the view of an equally chained triangle.
Now you should put thumbs in the resulting triangle and dilute them around. The result of such actions will be the fact that the leaf of the triangle is converted into a square.

After that, on the left and right side, it is necessary to flexing the lower corners of the square to the top so that the workpiece is again triangular.

Well, the last action is the breeding of angles in this square in the opposite direction. The resulting handicraft should be stripped. Paper boat ready.
Let your child perform the decor of the resulting crafts at its discretion. The child will gladly decorate the boat, with the help of markers or color pencils. Each vessel must have its own flag. For its manufacture, you can use toothpick and a piece of paper.
Video instruction how to make a boat from paper
Well, that's all when you know how to make a boat from paper, you will only have to realize these knowledge of life and send it into swimming in a stream, or at least in the bathroom. To make paper turning in water slower, the bottom of the ship can be treated with molten wax or paraffin.
Creating something with your own hands is always a creative and interesting process for both children and adults. Let's talk about origami. This type of creativity came to us from Japan. Origami is an amazing technique, familiar to us since childhood. Well, who, still being a completely child, did not turn out of the paper of funny jumping frog, boats and steamers, airplanes, did not make a cap or hat from the newspaper? All did, although even the word "origami" at that age did not always hear. The art of origami is real magic, when the figures come from the paper sheet and seem to come to life. Circuit options for origami set, we will look at the simplest and most popular in step-by-step instructions.
 Creating a paper design of paper is a creative process. The main thing is to make it gradually. You can draw details or add items at your discretion and omitted. Below are given step-by-step boat creation:
The original sheet, A4 format, fold in half, taking for long edges, swing the folding line. Expand, do the same, but already taking over the narrow edges, leave folded. You are lying in a folded sheet with narrow edges on the right and left. Take it for "non-swollen" corners and roll them into the center where the fold line is passed from the first action, leave them folded. Swinging and folding the free edges of the paper: one to the long side of the triangle obtained by the previous action, otherwise deploy to the opposite side, similar to the first. A triangle is located in a rectangle. The edges of the rectangle adjacent to the sides of the triangle, wrap inward so that the bends coincide with the side of the triangle.
Now pull out the centers of the hypotenuses outside, so the ends will come closer and fold the square. Swipe the free ends of the square in opposite sides diagonally. Expand as well as when receiving the previous square. Pull out for those ends that we were folded from the first square, the corner will appear between them, repent the ends down. Get origami boat with corner at the top.
This technique can be performed not only a boat - both yacht, and a two-pipe steamer, and an intricate paper or cardboard submarine, even an old paper card can be used as a girlfriend, such a boat will look original.
In the gallery you will find a template and drawing for folding the boat in the Origami technique.
Gallery: Boat Origami Paper (25 photos)


Build a steamer origami from paper with your own hands
 In working with the construction of a steamer, a sheet with straight corners and the same parties is used. Fold a sheet diagonally, there are two of them, and expand. Fold four end to the central point where the bends of diagonals are intersect. Lift up a smooth side, without free corners in the middle, put for convenience. Also minimize four end to the center. Turning the origami blank, start the ends again. Remove the opposite Rhombies to make two rectangles. They will stand out from the square. Cut the rectangles among themselves, while raising untouched rhombies from the center. Get a steamer origami.
How to make a boat from paper with your own hands
Place the sheet in front of yourself so that the left and left of the leaf's long edges. Now fold, alternately, sharp ends to the sides of the sheet diagonally: the right angle to the left side, swipe the line with your finger, the left edge to the right, swipe. When folding, the narrow edge of the sheet coincides with the long one. Leave the left left corner to the right side. Outside the triangle, there was not a touch of a piece of paper, put it halfway so that the leaf unused the edge lay down to the side of the triangle, without crossing it. Do not put the rectangle angles also fold to the original, large triangle, without overlapping it.
From a large triangle you need to do less so that the middle of the long side of the original, has become the top of the small one. To do this, expand it into the source sheet and fold half, the narrow edge of the sheet will touch the rectangle with curved corners, swipe on the collar. Expand the sheet. You see three lines: two diagonally, crossed each other, and one travelers crossing the diagonal in the center. Further actions how to make a boat from paper:
- Raising the transverse fold, twist the left corner of the sheet with the left side of the rectangle, without crossing it, and the right one - with the right. It turned out a small triangle.
- Turn over the workpiece. If you visually draw a line from the top of the triangle perpendicular to the base, then two symmetric halves will be. Bend the workpiece along this line.
- Expand, and, to the resulting fold line, fold the two sides of the triangle, it turns out a sharp triangle, the bent angles of the first rectangle must coincide with the short side.
- The same triangle corners fold to the visual line, lowered from the third angle perpendicular to the short side.
 You made a quadril with two stupid and two sharp corners. The sharp angle formed by the long sides will be the bow of the boat, and the other will become the feed. Stupid angles need to be folded to the line from the previous step, and on this line, lay the workpiece in half to the other side of the movement when folding stupid angles. Raise the paper blank and deploy a bit, you will see five long folds along the workpiece. It remains quite a bit follow the instructions:
- Deep grades, having the sides of the middle external bend, turn out the outside so that the inner bends become the longitudinal edges of the bottom of the boat, and send the guide corners from the stern.
- Between them, straighten the top of the stern.
- Fold the edge of the boat inside and the figure is like a quadricle with stupid and sharp corners, only blunt angles are bevelled, expand the edges of the boat perpendicular to the bottom.
- Put a boat from paper on the bottom and raise the "windshield" from the bottom.
- Make all edges of the product smooth. Origami boat ready.
Step-by-step instructions, how to make a paper yacht origami do it yourself
Use the sheet with the same sides. Two opposite corners and press the fold. Fold the triangle, minimize two identical angle together. It turned out a smaller triangle. Expand it and fold the same sides of a large triangle to the fold line. It turned out a quadricle with two sharp and two stupid corners. Put the product with a long sharp corner "from yourself." Deploy the ends from themselves, forming the second sharp corner, to the sides.
You will see the basis of a large triangle, the vertices of triangles formed by the previous action will be added to it. The long sides of the triangles will be perpendicular to the line passing in the center of a long acute angle lying "from you". Expand the origami product slightly and split the sharp, long corner. One of the sharp corners, which will be removed from the second, fold to the left so that the fold line continues one of the same side of the right triangle. Further scheme
You want to do something with children, but do not know what exactly? You can figure out how to make a boat from paper. Such an occupation can develop logical thinking and motility of hands. Thanks to the origami classes, the child will be calmer and focused. The process of creating a boat from paper is completely simple and will delight any generation.
Paper boat can be made in different ways. Perhaps it is easier to find or depict the pattern with your own hands, cut it out of paper and glue with the help of ordinary adhesive, in order to color it. The second method is to fold a beautiful boat, working on the principles of old Japanese art, which gets becoming increasingly demanding. Origami gives the opportunity to create excellent, different models with minimal financial costs.
So, how to make a paper boat - a step-by-step description:


 Square paper leaf, color or white takes. The corners will have to bend it to each other, and then reconcile, so that the folds of the folds, which are moving along the material. Next, the leaf bend 2 times 2 times - vertically and horizontally to create 2 more lines, and after that, for the same purposes, the beggars must be done at all corners (that is, all the angles fold to the central part of the leaf, to come out the square, and then fix everything).
The main part of the work. Initially, the right, and then the left half of the leaf vertically adds to the central part. Then the lower part from the top half is caught in the same way. The next step, which is difficult to many novice origami fans, is pulling the corners on both sides outside.
All - your boat layout can be turned upstairs. The created model is slowly driving diagonally. The angle below needs to raise and strengthen. Cute ship made. You can decorate the body in one color scheme, the sail - in the other, and start playing.
 First, paper is taken, it should be a square with even sides. Next bends in half to get a triangle. The same triangle is then bend in half again, so that the leaf is similar to four schematic, but uniform geometric shapes.
One of the parts of the inflection and bend one of the corners to the middle. Then you need to make an angle to the middle, but that he does not take the entire volume. Bend is performed from the open side to the center.
Twips back, and a cap is created. Standard paper yacht created. But this handicraft cannot withstand the strong effect of water. It can not even be launched by the flow of the stream.
Many are thinking how to make a paper ship. Such an exercise is considered a standard origami figure. In fact, make a ship fairly easy, but you need to follow the instructions.
The work process, how to make a pair of paper:

In order for it to look even better, you can depict the portholes, and also color certain places. Such a paper boat can be an excellent application for any postcard created by your chal. To quickly and easily make a pair of paper, the folding scheme is simply necessary.
ATTENTION, only today!
Wait for the offensive of spring and, having shutting up into rubber boots, run on the snow. And it is better to go to launch ships to the nearest crime. So they did our parents, and our grandparents. And the technology of their manufacturing is familiar to everyone for a long time. In our article we will introduce readers with the equipment assembly of a boat from paper. And if you like this occupation, you can make a whole fleet.
This article presents 10 ways - how to make a boat of paper with your own hands with step-by-step unique photos and videos.
Ships made from paper will enjoy all children. This is an old fun, but, despite this, who has not lost its relevance today. Probably, each in childhood was fond of their manufacturing, attracting friends and parents to this session. And then they fled to launch it in the nearest river - you probably still remember these sensations. Please make your baby with it a whole paper flotilla with it. You will see, it will please him!
How to make a paper boat with your own hands
Probably there are no such parents who are not familiar with the technology of manufacturing ships. But perhaps she erased a little from your memory. Now, when you have a baby preschool or younger school age, it's time to refresh the memory of this occupation. Make this beautiful spring craft together with the child.
A boat made out of paper is an excellent handicraft. This lesson will help to develop a small motorcy, is an excellent exercise on spatial thinking.
Among other things, you will get an entertaining toy. And the baby will be able to play by calling friends and relatives with him. There are a lot of options for the game, for example, you can arrange a race or an expedition. And you can give a grandfather or dad in quality.
They can be made of colored paper, as well as paint or paint. You can pick up a whole crew for the ship using small soldiers. If the weather is not too good on the street, you can play, putting them to swim in the bathroom. And at the cottage you can use for this pelvis. In a word, it is an extremely fascinating occupation.
- Applying one-sided colored paper, you will get a unique toy, because the boat will be partially painted in a specific color.
- The sailboat can be made using ordinary toothpicks, and the sail is made of fabric, color cardboard, foil, leaves, colored napkins and much more.
- This toy can be made using office paper. And in order for the boat not too much floating floating, it can be made of a coated journal sheet.
- If you dip the toy in molten wax or paraffin, it will become waterproof.
- Using a white sheet, you can show fantasy - decorate and paint it into any color.
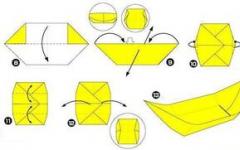
Simple boat in Origami technique
Options for addition Ship from paper There are many. But among them you can allocate one, which is probably a sign of many. According to such a scheme, our parents folded, so they need to introduce children with it. A distinctive feature of such a boat is its ability to stay on the water, and the duration of swimming depends largely on the density of the material used. Step-by-step creation of such a boat in Origami technique is shown in this master class.

For its manufacture, there will be enough any rectangular sheet.

First we fold it in half, and on the side with the fold we plan the middle.

Now, focusing on this mark, bend the sides in the form of triangles.

Speakers from the bottom you need to get up. First we do on the one hand.

Turning the workpiece, perform the same fold up.

Over the sides there are corners that need to be fed. First, bend the corner, located on top, the crying of it for the main part of our craft.

Now on the other hand (bottom corner) you need to perform the same.

Repeating on both sides of the triangle, we got such a workpiece of the future boat.

At this stage, our exercise is similar to a hat that is performed according to the same scheme.


She needs to give the shape of the square.

The bottom corner at the top layer of the square we are touched up.

We turn over the workpiece and make the same fold of the corner upstairs.

Again our workpiece must be repaid.

And fold it in the form of a square.

Now neatly starting to pull over the top corners to the sides.

As a result, we get a ship that remains a little to finish.

It is necessary to straighten it the bottom and board for greater stability. Our boat in Origami technique is ready for children's games.

Sailboat do it yourself
Origami technique involves the transformation of a simple paper sheet into various crafts. As a rule, the square is used for this. That is such a form we need to take to create the next craft.
This master class shows the step-by-step manufacture of a ship with a sail.

Prepare for work:
- square sheet;
- adhesive pencil.

Let's start making a boat with the addition of square in half in two directions. So we will make the necessary bends for further work.

Now to the midline, bend the lower and upper parts of the workpiece.

Side sides also need to bend to the middle.

To create sides, you must boot a corner and give them another form. We start straightening the upper right corner, its lower fold will be diagonally.

Inciphe the top of the workpiece. So we formed one of the corners.

Similarly, lay down the lower right corner.

On the left side you need to do the same way. So we formed onboard.

In order for our exercise to become like a ship, it is required to take her hands and pull the halves in different directions - the left from herself, and the right to itself. As a result, the workpiece should take the following form.

The lower protruding corner is subject to the right and position horizontally.

In the nasal part, it takes a little reclining by connecting together the right and left side.

Our boat with a sail is ready!


You can go swimming under the sail not only in reality, but also in your fantasies. This is especially true of children who are easily immersed in the game, imagining themselves with various heroes. If a child dreams of the sea and represents himself a sailor, then to support his fantasy, do not do without a boat with white sails made in the Origami technique. In this master class we will show its manufacture.

To create such a boat with sails, only a square sheet of colored single-sided paper will be required, we used the blue.

First we put the square in half.

After that, we perform another transverse fold. As a result, our squared bends turned out to be divided into 4 equal parts.

Now we turn over the workpiece with the other side and make adding diagonally.

Then we fold the square on the other diagonal and turn it onto the front side.

Again invert the workpiece with white side up and run to the center of the opposite corners.

Now we need to start forming sails. To do this, begin to be folded inside on the one hand.

It is necessary to fold it so that the vertically located white triangle is formed from above.

Similarly, we do on the other side. In the end, we see that 2 white sails have become noticeable.

But one of them needs to be slightly reduced. For this right sail bend down.

After that, we flex it up, while at the same time forming a small fold.

The resulting fold refuel inside. Now our boat has white sails.

Its lower part it is necessary to bend on the opposite direction.

From the front side, our sailboat looks like this.

Our boat with white sails in Origami's technique is ready.


How to make boat manigami from paper bills
The model of the ship presented in this master class is quite simple. What is it noteworthy in the first place? Crafts made from the present monetary bill. This is a boat manigami. The proposed article will help you remember how to fold the origami boat. This is an old good way of folding, very popular who should know every child. The resulting boat can even swim around the water, but only if you do not feel sorry for bills. Consider phased stages of modeling.

Materials necessary for work:
- banknote;
- line for smoothing paper.
How to fold a boat out of the money stages
The money bill prepared by you must be added twice in altitude, that is, bend the rectangle in half, first combining longer sides, then shorter. Scroll paper and expand. The central cruciform line is a label for further work.

Bend the workpiece across so that the front part remains inside. Now the one of the side where the fold is seen, bend the house, shoes in the center two top corners.

Turn the received back of the reverse side to yourself. Leave the top corner (a peculiar roof) in the future, it is necessary to work with the rest of the paper (with peculiar walls). Bottom layer lift up, combining with the base of an equally traded triangle.

Raise the second side in the same way. Two square parts of the bills will be symmetrically bent, and an equifiable triangle will remain inside.

Top layer Beg the initial position and start processing the bottom layer. Olive first one corner down, we combine the bend line with a side of an equifiable triangle.

Then bend the second corner, combining with the second same side of the triangle (you work precisely with an equilibried geometric figure).

Do the same with the bottom. Now the bill is 2 identical isceived triangles connected by the grounds.

Bend the workpiece in half to get a multi-layer triangle. It can be broken down with your fingers. This is a kind of paper model of a triangle, which is known to everyone.

Get your fingers from the bottom and stretch so that the resulting triangle again has become like a square. At the same time, the model will become less and less larger.

Turn away a bit lateral corners, straightening bills.

Bend the resulting square again so that the square becomes even smaller.

The last time the sharp corners in the billet obtained stretch to the sides so that the boat is. The center will be seen the straight angle of an equifiable triangle. This is the roof of the house, folded earlier.

Ship manigami ready. You can repeat the entire folding procedure and on ordinary paper, if you need to make a craft of another color.


Now you know how to make an interesting souvenir with your own hands from real money. You can also buy souvenir bills to make only imitation by manigami.
Boat for beginners with her own hands
The paper boat is an excellent solution if a boy grows up in your family. In particular, if he is fond of marine theme! It creates such a handicraft very easily, you will need only paper and 5-7 minutes of free time.

For the manufacture of this boat, you will need the following materials and tools:
- square sheet of colored paper with a side of 15-20 cm;
- scissors.
Step 1: Make the first bend
Cut from the sheet a neat square. If your sheet is originally square shape, you can skip this stage.

Bend your square twice horizontally.

Expand. Now fold the bottom of the sheet to the central line.

The top of the sheet also bend to the center line.

Fold the craft on the center line to the other side. You must form a figure in the form of harmonica with 4 longitudinal folds.


Step 2: Fold the corners. Open one side.

Upper left corner. Bend to the central fold.

Right corner also fold to the central fold, symmetrically left.

On the other hand, also start the corners to the middle line.

Step 3: Expand. Now fold the craft twice.


Open it. You got a boat, but it still needs to be fired.

To do this, the "nasal part" of the boat on one side wrap to the central fold. Fogly fake.

The "nasal part" on the other side also wrap to the central line. You must have a figure in the form of a hexagon.

Opposite corners of this hexagon. Bend symmetrically approximately 0.5 cm.

Open the cradle.

"On-board" part on the one hand fold to the central fold. Repeat on the other hand.

Well sell corners inside the boat from all four sides. Due to this, the lower part of the crafts will look very carefully.

Open. Align and disappear in those places where it is required.

Your boat from paper in the Origami technique is ready!


Boat in Origami
How to make this boat? Actually very easy! You will need only a square sheet and 10-12 minutes of free time.
Such cute origami is remarkably suitable for crafts with children of junior and middle school age.

Materials and tools:
- square sheet 15-18 cm;
- scissors.
Cut out a sheet of format a 4 square.

Fold twice horizontally.

Expand. Bend one half of the sheet to the central fold and open.

Wide the second half of the sheet also wrap to the center line.

Gently, follow the fold, then lift the paper and attach it to the next, third-party third. Make a neat bend.

Put the craft vertically.

Top right corner fold to vertical fold.

Upper left corner Also bend to vertical fold.

Wrap the left corner again. Gently join the fold with your fingers.

On the right side also wrap the corner forward another time.

Change the position. Fold the entire bottom edge to the horizontal line of the middle.

Remember again. Bottom right corner. Bend to the horizontal line of the middle.

Wrap down the entire top in the area of \u200b\u200borigami, where you are working now.

Turn over the other side.

Harmonic fold papers on the area being worked in two times. You must stop exactly in the central line of your square.


Put the workpiece in front of yourself so that all the formed bends are lower on the right side.

Upper left corner. Bend to the previously made vertical fold.

Upper right corner also bend to vertical folds.

Once again, wrap the corner from the upper right side, and once again - from the upper left side.

Change the position. On the opposite side, bend the lower corner to the middle line.

The top side also fold down to the line of the middle.

Fold down the entire top of the middle.

Open one side.

Get the corner symmetrically angle in the back of the craft. Return the paper in her place.

On the other hand, also expand one chance. Wrap the second corner of a symmetrically existing corner.

Close paper. Expand the crawl in its middle.

Origami boat from paper with your own hands ready!


Colored paper boat
This very popular handicraft for summer theme can be made not only in the Origami technique. In this master class, I will show how to make such a bright colored paper sailboat.

Necessary materials:
- color semi-cardon of red, yellow and blue tone;
- skeletal;
- glue;
- scissors;
- line;
- marker;
- pencil.

Create a sailboat frame. For this, we take half a caroton of blue and cut out two identical strips with dimensions of 18 x 2.5 cm. 
We divide each strip using a ruler and a pencil into three equal parts. Severate in those places.

We glue two parts of the base of the boat together on the sides.

Then create a small part of the deck of the ship. We use again Blue Pol Carton.
Cut out a small rectangle. From the side of the sides of 1.5 cm for gluing.

Bend along the vertical lines and glue the item in the middle of the ship between the bases.

Now prepare a wooden skeleton and two segments of yellow paper of different lengths to create sails.

Each rectangle creates small holes. Insert a skeleton through them.

Cut the small square of the red sheet. We glue it to the deck. We make a small hole on the diameter of a wide stem. Insert.

Now the red paper cut out a beautiful flag that will develop in the wind. Black marker underline contour line.

We glue the flag to the upper point of the sailboat.

The black marker is drawing the portholes and other important details on a paper boat.

Wonderful boat from paper ready for sea travel! On the deck you can place small toys of pirates, sailors and captain of the ship.


How to make an applique - paper boat
Another version of crafts.


How to make such a look here.
Original Folding Vehicle - Video Tutorials
Sailing ship in Origami
How to make a boat from paper
Original sailing boat
Video lesson for the folding of the ship
Almost all the schemes for assembling ship's boats are not complex. And a little exercised, you can make them and without a scheme. To date, there is a great many diverse options for the assembly of sailboats, which will master the child of any age. To do this, you need various learning materials that are represented today in the form of schemes, instructions and video.
This fascinating occupation will delight not only kids, but also adults. With the onset of spring, the children quickly run to the street, in order to play, launching their paper fleet in swimming. Made of simple materials, they become a simple and accessible game.
How to do read here.
Origami is not only educational art, but also an excellent opportunity to captivate a child engaging with paper figures. If the baby still does not know how to make a boat out of paper, you will certainly teach it to fold such a toy. A further scenario of the game The child will develop himself: Paper Ladium can roll animals from Kinder Surprise, and the "present" canoe is simply indispensable to every Indian for hunting and examining mysterious rocky grottoes.
How do you call the boat? Canoeing and flat-bottomed paper.
The origami boat is easy and to cope with the task in a couple of minutes you will help you with a detailed step-by-step instruction. Having mastered the proposed schemes, show them in practice kids. For children, the first origami skills will be very useful: this is a developing game, and training accuracy, and an exercise on the concentration of attention. We will consider it in step bypass how the boat is made of paper with your own hands, relying on 2 elementary schemes.
Option 1 "Plot"
 We make a boat-flat house from a sheet of paper
This paper toy for kids is particularly interesting to the fact that it is quite realistic to sit down small passengers and send them to a real river cruise - miniature crafts and small toys this origami boat will easily hold on true water. Scheme is simple:
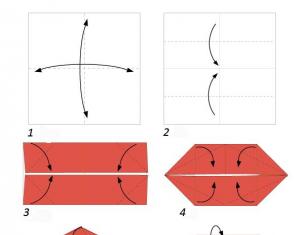
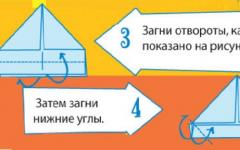
- Rectangular (can be plugged in half along, then across (for the convenience of orientation to the center), then return it to its original state;
- Wrap the top edge of the sheet inside the middle of the top edge, repeat the operation with the bottom side. Note that the rectangular (not square) sheet is folded similarly from the horizontal orientation;
- Continuing to add a paper boat, smoothly inside every corner of the workpiece (as in Fig. 1);
- Welcome to the sharpness of the conical parts of the workpiece from the paper to go to the final toy folding step - again adjust the corners, as shown in the diagram;
- Fold the product from yourself along the centerpiece of the workpiece, and then carefully remove the design, opening the central cleft (take the fatty paper, it may not work out of cardboard);
- Carefully straighten the toy, wear the inner bends - your origami boat is ready for water descent.
Option 2 "Canoe"
We make a canoe from a sheet of paper
You can add other boat from paper with your own hands without spending extra time. Indian canoe will require a little more close attention due to its design features - closed nasal parts of the toy. Pie is better made of paper, because it may not work out of the cardboard. It is a canoe by analogy with a flat house. Consider a Read more:
- Square sheet to fold in half and from top to bottom, and from left to right - the central crossing of the workpiece is formed;
- Then, each angle evenly wrap the inside, focusing on the center - it will be a neat square of a smaller size;
- Expand the sheet to the original state and again, get inside each corner, but now the top of the angle is to the nearest edge (see Fig. 2);
- It turns out that every angle will now be bent inside twice - the TV is formed "(square in a neat" frame ");
- Turn the folded boat down the boat down the "face" and move the upper quarter of the workpiece, focusing on the center. Similarly, do and with the bottom quarter;
- Bend inside the corner of the received rectangle - the boat is practically ready;
- Aggravate the sharpness of the conical protrusions, additionally bending the inside of the corner (as in Fig. 2), stupid angles also "gall" to yourself;
- Carefully open the workpiece and, holding the fold, remove it inside out, then straighten the noses canoe from the inside.
Not immediately, but your child also gets to fold the original boat from a simple sheet of paper. It is possible that soon the growing member of the family will surpass you in the skills of the Origami technique. After a couple of months, do not be surprised if the child is suitable for you and show how to fold the submarine or, and maybe it is more complicated - real! Origami - fascinating art, it is only one day to get carried away. Why not start already with a small paper boat?