Hello! Today you will find a very interesting article on the topic of creating voluminous Christmas trees with your own hands from paper. You will learn how easy and simple it is to create a forest beauty using templates and stencils. I will also provide detailed diagrams with descriptions and step-by-step master classes for your creativity.
I’ll say right away that this activity is very exciting, so be sure to involve your children. And don't forget to make and cut. After all, putting everything together, you will get something great. christmas decoration your home (you can decorate a window or any corner in the room). You can also make such crafts for your family and friends. Or take part in school and kindergarten exhibitions.
But if you want to make a Christmas tree from a different material, then go here, they are collected there creative models from all sorts of available materials.
Well, right now I suggest you familiarize yourself with all the technologies for working with paper in order to make a Christmas tree. Study the proposed options carefully and choose what you like. And then begin the process of making a New Year's souvenir. And don’t forget to bring your great mood with you!
So, let's go! The easiest option in such creativity is to take a ready-made template and translate it into colored paper, cut, if necessary, glue the parts, and then decorate.
Let's take a closer look at this matter. I will show you the diagrams and stencils, and of course I will explain how to handle them.
To get started, choose a template. Then save it to your computer and print it out. Next, transfer it to colored paper. Cut out the workpiece. A total of 4 of these parts are needed. Then glue them together wrong side, and put a decorative loop inside. You got not just a three-dimensional tree, but a whole one.


Or here’s another easier option, so to speak, for the creativity of our kids. Take white paper, print the template on it. Give it to your child and let him color the picture with colored pencils or paints. You can also do without coloring and leave the white version.

Then cut out the parts and fasten them together. If you wish, decorate the craft further.

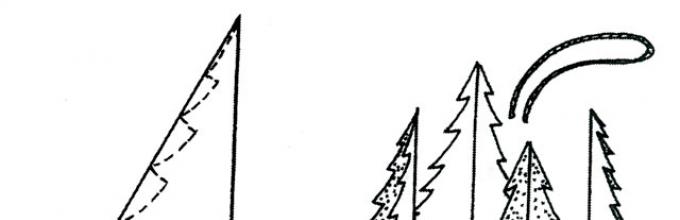
By the way, it is not necessary to make the contours of the Christmas tree triangular shape, or you can round it off.
Now print out the following product diagram. Fold a sheet of paper with a pattern in half, cut out a forest beauty.

Make cuts from the center to the periphery.

If you are good at carving small details, then this next carved beauty is definitely for you. The operating principle is identical. Print the template, cut out the parts (several pieces), glue or sew them together.

Now I’ll send you more diagrams for cutting out and creating such crafts. Hold it!


Such souvenirs can also be made from bent circles. Print and cut out the templates. Then transfer them to paper and cut them out.

Fold the ends as shown in the diagram. And then place all the parts from largest to smallest on a base of thick wire.

You can also use circles according to the following pattern.

Or make a product from ordinary colored stripes. Create three-dimensionality using cardboard and a long wooden stick on which you attach the craft. And it is advisable to make another stand.

Here is another option made from paper strips. This Christmas tree is ideal for decoration. Take a rectangular green piece of paper. Make it into a square. Cut the strips as shown in the photo below. Unfold the workpiece. Start gluing the resulting strips slightly overlapping each other.

Decorate the tree with any materials.

Or simply gluing strips onto a cone.


- Take paper with a variety of New Year's themed designs;
- Cut 4 circles of different diameters from it;
- On all circles, perform addition as shown in the diagram;
- Turn the circle with the white side, continue folding until you can divide it into 8 equal wedges;

- Continue folding the circle in half, dividing each of your 1/8 wedges in half so you have a total of 16 wedges;
- Next, put each layer on the lace in order;
- For the tree trunk, use wooden thread spools. Decorate the top with a large bead.

And one more interesting idea. It's very simple, but the souvenirs come out great.
Take office paper green, roll the sheet like an accordion. Pierce the middle of the workpiece with a hole punch. Insert a wooden stick into the hole, fluff the tree and decorate.


And a cool idea for making a voluminous souvenir from old newspapers. Look how beautiful it turns out.

Also try your hand at the quilling technique. For you simple circuit and a sample of the finished product.

You can also roll a cone out of thick paper and decorate it with figures made of colored cardboard or shiny paper.


And finally, a product made from small bags. Make the base from cardboard, twisting the sheet into a tube and fixing the edges with glue. Next, roll up a lot of green paper and secure the edges with tape. Glue the bags onto a cardboard base and decorate the top with a bow.

Paper Christmas tree using origami technique. Simple diagrams with descriptions for children
Now let’s take a closer look at everyone’s favorite origami technique. With its help, you can create a very large number, and most importantly diverse, of winter forest dwellers. 😀
Let's start with simple folding, but really not with classic version, since the parts will also need to be processed with scissors.
Take a square of double-sided paper 20 by 20 cm. Fold it in half, connecting the opposite corners. Next, complete the basic design - a triangle with folded internal corners. The product will be octagonal. Then make cuts and make sure that all the folds are in one direction.
AND detailed diagram with a description of how to fold the basic structure.


This is what a souvenir can look like.

Now a more complex version of modular components.
First, fold the modules.

Work all the folds well.
Then start building branches and modular rings.


Well, a good example.

And now I offer you simple origami patterns for children's creativity.


How to make a Christmas tree from corrugated paper for the New Year
To give it more volume, it’s great to use corrugated paper instead of regular paper. Moreover, the process itself remains as easy and simple.
First you need to create a cardboard cone and secure its edges. Then cut strips of corrugated paper and glue them with a “skirt” in a circle to the base. Then, using different decorative elements, decorate the product.

Or here’s an option for making such an elegant craft.


If you cut the corrugated strips further, you will get fluffy branches.


Or twist “roses”, you get interesting things too.

I think you understand what the principle of work is, so the main thing is not to be lazy and everything will work out! Also, be sure to use all your imagination to make truly creative products. For example, here are some.


Stencils for cutting out a Christmas tree from paper (can be printed)
Then I thought, and it seemed to me that I gave you few templates according to which you can cut out forest trees and make real masterpieces out of them. Therefore, I correct myself and give even more stencils.


And try to do this easy thing volumetric decoration, which is offered by the author of the video below.
Large Christmas tree made from paper napkins
And now I’ll show you a way to make a New Year’s souvenir from ordinary napkins. You can take colored or white napkins. Choose everything to match the tone of your interior.

You will need:
- packaging of three-layer paper napkins;
- glue;
- item round shape;
- pencil;
- scissors;
- stapler;
- cardboard or thick paper.
Manufacturing process:
1. Prepare napkins and scissors.

2. Take one napkin and trace a small round object on it.

3. Cut out a circle.

4. Staple the resulting circle in the middle with a stapler.

5. Now start folding one leaf at a time.

6. And twist them in the center.

7. You will repeat this procedure 12 times.

8. The end result will be a rose. You can fluff it up a little.

9. Make a lot of these “roses”, preferably of different sizes.

10. Roll a cone out of cardboard and secure it with tape or glue. Start gluing “roses” of larger diameter onto it in a circle.

11. Then a little less, etc.

12. Tape the cone to the top of your head and admire your creation. Of course, any decorations wouldn't hurt.
And as always, I’m throwing out ready-made options so that you have something to build on.


Video on how to make a voluminous Christmas tree on the wall with your own hands
In addition to the fact that such products are made as window decorations, Christmas decorations, souvenirs for gifts, they also decorate entire walls and doors.
This decor is especially relevant for children's rooms and educational institutions. That's why I picked up a couple of stories on creating large accessories for the walls. I hope you check out ideas like these.
For example, a whole teamwork. You can also make such a miracle with your child at home.
I liked the wicker tree made from scrap A4 paper.
Or choose crafts from the options already proposed and mount them on a wall or door. I also recommend placing small items on shelves.
Or make a decoration according to the suggested photo master class.

By the way, you can also use large coloring pages in the form of our tree. At the same time, you also involve the children. Let them color and then you can mount their creation on the wall.

I think everything looks very beautiful and festive!
Master class on making a cone-shaped Christmas tree from paper and cotton pads
And finally, I propose to make a white beauty, 30 cm high and 15 cm in diameter at the bottom. And as a material we will use not only paper, but also cotton pads.

You will need:
- thick paper or cardboard;
- cotton pads - 180 pcs.;
- scissors;
- scotch;
- glue gun;
- stapler;
- beads;
- ball.

Manufacturing process:
1. Cut out a base-cone from thick paper. Roll up the piece and secure everything with tape. The bottom can be additionally cut out of round cardboard and glued to it.

2. Roll the cotton pads into triangles and secure with a stapler. Measure 3 cm from the base of the cone and begin gluing blanks from cotton pads. From this row, measure 3 cm again and then glue the disks. Repeat the steps until the very top.

3. Glue a ball to the top of the head, and glue beads to cotton pads.
If you paint the wheels in advance, you will get not a snow-white, but a green beauty.

As you can see, the discs do not need to be rolled up, but rather glued onto a cone in a round form.

For such a product, you can additionally make angels from the same cotton pads. They will only decorate your craft.

All products made using this technique are certainly very impressive and bright. The kids can easily make them. Therefore, schools and kindergartens can make just such crafts this year.

That's all, actually. As always, I wish you creative inspiration and positive communication, and as a result, good mood. And yes, be sure to create a paper Christmas tree. May it bring you happiness this year!
To celebrate the New Year and holidays, you can make several small voluminous ones. To work you will need cardboard, glue, additional decor and creative fantasy. Today the craftswomen of the site editor will introduce you to different techniques making winter beauties with which you can decorate a postcard or. If it is not possible to put up a real Christmas tree, small handmade Christmas trees will create magic and festive mood in your home.
How nice it is to remember the past and wish your loved ones a Happy New Year with a Christmas tree made with your own hands from paper. It will keep your hands warm for a long time and will beautiful decoration New Year's Eve
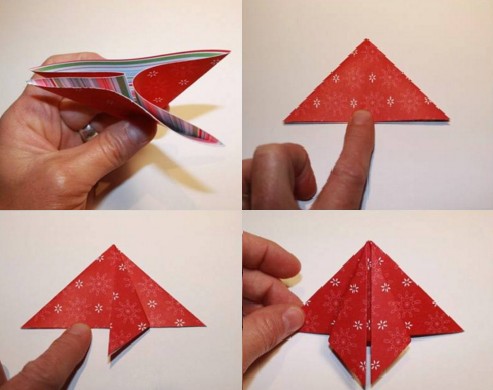
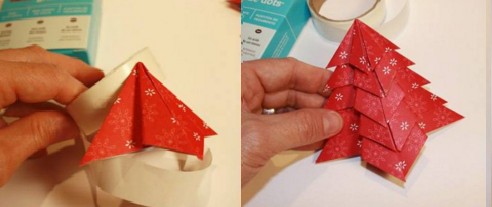
How to make a Christmas tree using origami technique
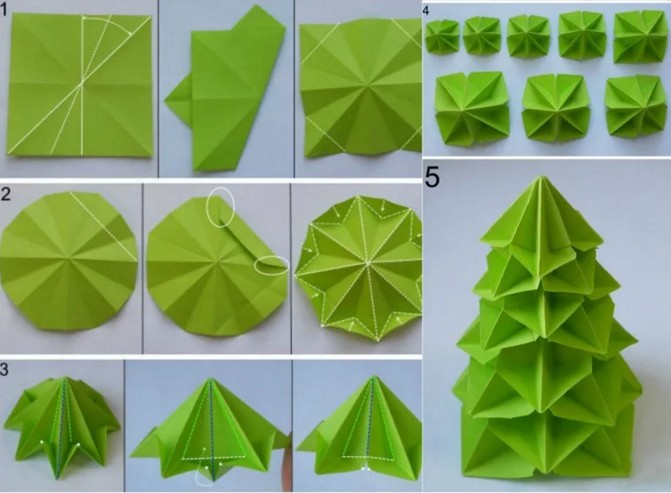
For a voluminous Christmas tree made using the technique, you need to prepare three squares with side sizes of 4, 6 and 8 cm. You can make the product larger, just increase the parameters proportionally.
| Illustration | Description of action |
 | Fold the square in half, unfold it and fold it in half again on the other side. Unfold and fold diagonally, first on one side, then on the other. Thus, the workpiece will be divided into 8 segments. |
 | Fold the two corners inward to form a triangle. Perform similar actions on the opposite side. As a result, the square will take the shape of a double triangle. |
 | Fold the top two corners of the triangle inward towards the center line. |
 | Perform similar actions with the remaining blanks. |
 | Insert the blanks into each other and glue them onto a sheet of paper. You can additionally decorate the card with a congratulatory inscription and. |
Show your imagination in designing a New Year's card, this will please and surprise your loved ones at the same time.

You can watch the master class on making an origami Christmas tree in more detail in the video:
Christmas tree postcard made of triangles and rectangles
To make a volumetric one with your own hands Christmas tree, you need to prepare three types of paper with beautiful patterns and a blank for a postcard.

Then all the blanks must be folded in half and glued in pairs different patterns. Then you can glue them to the card for decoration.

You can make something unusual volumetric Christmas tree, which will open in a double-sided postcard. To do this, you need to cut several rectangles 1-1.5 cm wide, fold them like an accordion and glue them to both sides.

Christmas tree made from newspaper or magazine tubes
Glossy magazines with bright pictures or . Several tubes need to be wound different lengths, their width depends on your imagination. After this, you can begin assembling the colorful tree. Need to take thick paper and glue the blanks. The shortest tube should be on top, the longest one on the bottom.
Additionally, you need to make a trunk out of two sticks and wrap it with twine.

Christmas tree card with a riddle
To make a Christmas tree card we will need:
- white paper, but it’s better to use pastels;
- corrugated sheet of cardboard;
- double-sided tape;
- spray paint;
- scissors, stationery knife;
- golden lace;
- beads or rhinestones;
- glue gun;
- pencil;
- ruler.
To make a postcard, you should prepare and cut out a template; pastel paper is suitable for this.


The work progress is as follows.


On the cover in the shape of a rectangle you can stick favorite photo or write congratulatory wishes.

How to make an unusual gift: a box in the shape of a Christmas tree made of cardboard
New Year's paper crafts using quilling technique: pendant tree and tree on a rod
First, we’ll try to make a small Christmas tree pendant using the quilling technique, and then we’ll show how you can attach the parts to a rod. For work we will need:
- quilling strips;
- cardboard painted with gold paint;
- round and triangular templates;
- beads;
- silk ribbons;
- toothpick and glue;
- scissors and thin wire.
| Illustration | Description of action |
 | Secure the ribbon to a toothpick, then wrap it completely, and then place it in the template. |
 | Remove the roll-shaped tape from the template, glue the free tail and place it in the triangle template. Prepare all the details in the same way. |
 | Glue one module to the cardboard, glue 2 yellow beads under it. |
 | Glue 2 modules below, then green beads. |
 | Glue 5 rows of modules in the same way, then cut out the outline of the tree from cardboard. |
 | Glue the bow decor to the Christmas tree. |
 | Attach the ribbon to the bottom module and tie a bead. Repeat similar steps along the entire bottom row. |
 | Pendants are used in decorating the New Year tree |
You can watch the master class in more detail in the video:
All patterns are made using the quilling technique in a similar way. You can prepare parts in the form of droplets of different sizes and make a hexagonal Christmas tree with your own hands. They are glued to the rod or simply strung on it through the free holes.

How to make a Christmas tree from paper circles
To make a multi-tiered Christmas tree, colored paper is used. Cut several circles of the same size, fold each one 4 times and cut off the top. Then you need to form folds in the form of an accordion. Then string all the parts onto the rod. You can use a coil or cork as a base.

Technique for making a fan for decorating a Christmas tree
To make this Christmas tree, be sure to involve your child. At first glance, the work is not difficult, but perseverance and patience are important here. You should first prepare several circles in the form of a fan, which are then strung on a thin rod. You can simply glue each circle to the previous one without a rod, the structure will still be strong.
To make a Christmas tree, all work is performed as follows.
- Cut a long strip of paper or magazine, fold it into an accordion, cut the corners and the middle.
- Roll it into a ring, glue the ends together, and pull the thread and needle through the middle.
- Gently pulling the thread together, place the workpiece in a flat circle. To get convex edges, place a small object in the middle, it could be a spool of thread.

Each tier should be slightly smaller than the previous one; for this it is necessary to make the strips narrower.

Christmas trees made from cardboard toilet paper rolls
In making this New Year's tree, there may be only one difficulty - finding required quantity bushings from toilet paper. If this question does not bother you, all the cylinders should first be painted with green paint and installed in the shape of a tree. You can secure them with double-sided tape or a glue gun. Additionally, you can put in each part Christmas tree decoration and decorate finished product tinsel and .

Conclusion
These are the ones we propose to make for Christmas and New Year. Our craftswomen have selected the most interesting and available techniques, use them as a base, but be sure to add something of your own. These can be Christmas trees made from small newspaper bags or decorated with unusual garlands, which you can also make with your own hands.
Tell us in the comments which version of the Christmas tree you liked best and you will definitely make it for the holiday.
In conclusion, we suggest watching a master class on decorating a Christmas tree with flowers from foamiran and natural materials:
YOU MAY ALSO BE INTERESTED IN:
Hello!
Today, on the eve of the New Year, I would like to offer you another wonderful craft that we will make from paper. This volumetric herringbone, which you can easily do with your own hands right now. Because you will have everything you need, these are diagrams and the necessary templates. The forest beauty will turn out lush and fluffy.
Well, if you want to do a more complicated job, you can take a look, there we created products from various available materials, and even made a stomp.
Don't forget to decorate your apartment with others.
Well, let's start looking at and choosing the works we like and roll up our sleeves to create and surprise everyone. I wish everyone good luck and patience.
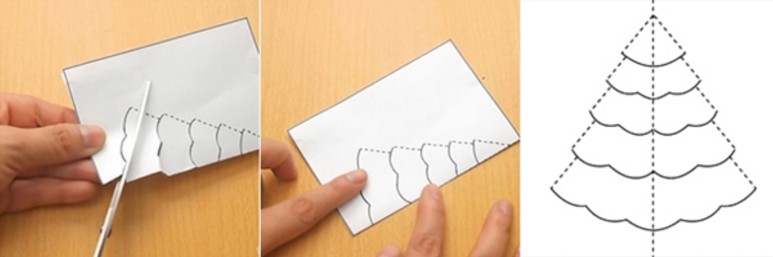
You always want to make this kind of decoration yourself, because it will look original and at the same time beautiful. All you need is a piece of paper from which you can easily create a stunning Christmas tree craft.
In addition, such work can captivate your child and he will be happy to sit and bother. Well, take a white sheet or perhaps a green one, but then double-sided. Bend it in half with its short side. And draw a Christmas tree symbol. Here are examples of templates that you can use.

Then start cutting along the lines, and then make cuts and fold them as shown in these pictures. You need to make the blank in triplicate, and then glue them together. It will come out stylish and very delicate, but also, of course, voluminous, which will undoubtedly please everyone.

The next option is no less interesting and charming in its simplicity. Take these stencils and print them on a printer, and then you will receive the work in the form of a PO.


Where you see the main outline, take it and cut it out with scissors, but in the recesses, make only notches so that you can then turn it out, as shown in the photo. Two blanks of the same shape are then glued to each other.

And if you want to really surprise or amaze everyone, then make a whole composition, that is, a forest beauty, and not just one, but with a fawn.


And one more version of a 3D craft, which I propose to cut out on a simple landscape or office sheet, and then paint it with gouache paints to make a real masterpiece.
You can use a can of glow-in-the-dark spray paint to create a shimmering effect.

Just look with what zeal and desire the child does such work.

And this is what we have in the end. The beauty is indescribable.

The next option is also quite interesting, the Christmas tree is made from green paper in the form of loops, read these instructions and create with me. This year we made such a charm with my son. It turned out great.


Well, if you still have any questions, then I will be happy to share with you this video, which shows this master class.
Christmas tree using origami technique (simple diagram for children with description)
I think that in childhood everyone was fond of such an activity as origami. All because, it would seem, from an ordinary sheet of paper, an amazing result emerges. Preparing for this article, I didn’t even suspect that such a decoration as a Christmas tree can also be made using this technique. Imagine, this is what I was lucky enough to find.

Any old book without thick binding or a notebook will do. And the sequence of folding actions will be like this. Fold all the pages of the book from the left corner to the middle.

And then make a bag, that is, another fold.

Cut off all excess, do it carefully and efficiently, take your time.

Then unfold the product on the table and sprinkle with tinsel or glitter.

If you decide to make the work a little more complicated, for example, if your children are already going to school, then you can invite them to create such a forest beauty.


The following work, which is done in labor lessons in elementary school or classes are held in kindergarten. The description and all folding steps are presented in this illustration. Let's get down to business.

If you love modular origami, and you own this technique, then make a souvenir like this.

How to make a three-dimensional Christmas tree from corrugated paper for the New Year

We will need:
- cardboard or thick paper
- green corrugated paper
- any glue
- scissors;
- bows, red paper, beads
Stages:
1. Make a cone from ordinary cardboard, then cover it with corrugated paper.

2. Now all that remains is to build twigs, like needles, for the future product. To do this, cut the corrugated paper into strips, cut the edges to make a fringe and twist each onto a wooden stick into a bobbin. The result will be something resembling a flower.

3. And glue the blanks to the cone using the trimming method. For a spruce tree 15 cm high, you will need 120 small blanks in the form of lush flowers. You can take a ready-made bow for decoration, or make it yourself from the same corrugated paper. Also use cotton wool with glitter, this will give the tree a chic and elegant look.

The next option is no less intriguing, as if the Christmas tree was made in a spiral, also based on an ordinary paper cone.

Make a base for the tree to create the following. Use glue, scissors and thick paper or cardboard.

2. Corrugated paper take a width of 18 cm, but the length should be about 2 m. Fold the strip in half with the long side. Apply glue from the edge, leaving a gap of 1 cm.

3. And start pulling it a little to make a skirt.

4. Wrap the product with such a prepared strip, drip glue here and there so that everything sticks tightly.
Wind it only in a spiral to make the work voluminous.

Here's another wonderful option.

Forest beauty made of colored paper and cardboard
The next beauty will be made of colored cardboard, but make the decorations from colored paper. The Christmas tree is folded using such a simple technique that in a couple of minutes you will create this magnificent gift or souvenir that can be kept for a long time. for a long time on the shelf.

You will need three blanks in the form of semicircles of different diameters, on which you can make a fringe like this. Then roll and glue each sample to form a cone. Then put a little less on top of the largest cone and then smaller ones.


There is another option, which is made from one paper cone and pasted over with circles. He looks wonderful, you can’t take your eyes off him.

By the way, I found a similar work in this story, who needs it, go for it. There the author came up with the idea of making mugs using one little thing, in general, see for yourself.
In addition, you can still fold the Christmas tree in this way, using circles as a base, and use wooden caps instead of a stand.


If you have wrapping paper lying around, roll it into a ball, trim the edges so that they become round at the base and decorate.

Moreover, you can make a huge craft in this way by gluing together several sheets of cardboard.

Then decorate the cone with packaging and glue the edges to the base.

Trim off everything you don't need and decorate with stars or balls.

Now let's do the craft using cardboard, which we will fold.

To create such a product, print out this stencil.

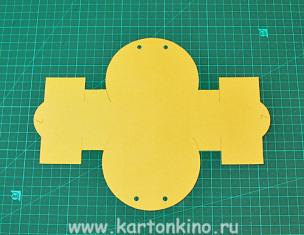
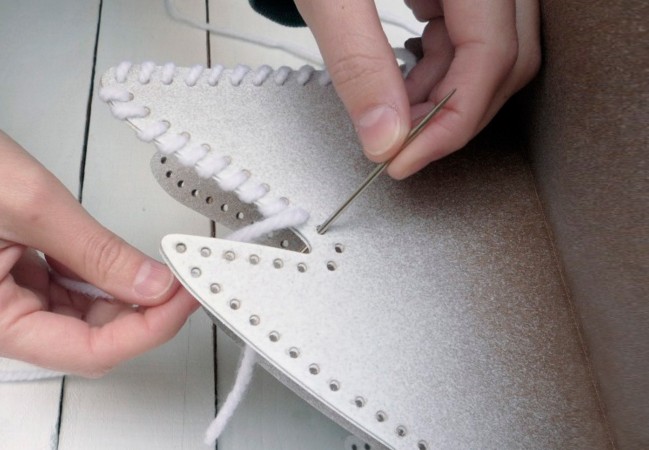
Then place it on cardboard, trace the stencil, and cut it out. And fold the workpiece in half. Make 8 of these products.

Go through the edges of each Christmas tree with a hole punch, and then, where the middle is, go along the fold line that you made before with double-sided tape.

Now all that remains is to sew the edges where the holes are.

Apply glitter or artificial snow from an aerosol and attach a star to the top.

Next job, take a cardboard base and stick a stick into it and secure it with glue. And then cut out circles from old postcards different sizes and stick it on a stick.

Something similar can also be made from candy wrappers or just newspaper or magazine sheets.

Or you can create a souvenir from children's palms. It looks good too, especially since schoolchildren or preschoolers are always happy to do such work.

By the way, here is another idea from a newspaper or magazine.


Can you make a green tree out of an accordion? Fold a salad-colored office leaf into an accordion shape and use a hole punch to pierce the center. Insert a stick into the resulting hole.


Among other things, I saw such a lovely composition on the Internet.

Whoever is good at anything, there are so many ideas, take them and do them, friends.

A simple toy can even be made from ordinary ribbons, which you cut, then fold into a snake and connect.

Here are a couple more ideas, write your suggestions or corrections on how and what else you make such cute Christmas trees from.


Even from notes for writing, they managed to create a real masterpiece.

For children kindergarten This kind of work will do, take thick cardboard and cut it in the shape of a triangle. A base will come out, onto which you ask the child to stick stripes.

Well, in conclusion to this chapter, here is another invention, this is a quilling-style Christmas tree.

Master class on making a New Year tree from napkins
It turns out that you can also quickly build a Christmas tree from ordinary napkins, and if you get creative with the colors, it will turn out absolutely unique.

Such a masterpiece is made in this way: circles are drawn on a napkin, and then the middle of each figure is connected with a stapler. Then cut along the contours of the workpiece.

And right towards the middle, start crumpling the edges, lifting them up. To make a flower. And then glue it to the conical base, which you made in advance. You can even arrange it in the form of a topiary. Now decide for yourself.

In more detail, if you are interested in this work, you can also use this step by step instructions in pictures:


Christmas tree stencils for cutting and printing
For those who love masterpieces in the style of vytynanka, they will take these stencils as a basis. Using a regular stationery knife, cut out the Christmas tree, or you can take a special tool that the masters of this craft have.

Cut two blanks at once, cut a strip on top of one, and on the bottom of the other.


Here are a couple more ideas about what beauty can appear, see for yourself. Delicate and white forest beauties that are so attractive.

Take a leaf and crumple it in half, draw patterns and the outline of the spruce. Cut out all the parts with a cutter.

Take your time, this work does not require fuss.

You can print the template without folding it and draw the tree yourself. Don't forget to also leave gaps of paper at the bottom so that you can roll and glue them later.

That's what I mean. As soon as you make these two blanks, connect them together.


I suggest you download the stencils right now from my blog:


By the way, you can create a whole composition with a hut. These are known to everyone. Wow, it will be beautiful! Request templates via comments if you like the house.

Volumetric Christmas tree for a New Year's card (step-by-step instructions)
Of course, on New Year's Eve we give everything to each other, and we do it together with the children, and of course. I propose that you also design them unexpectedly, namely, use the origami technique. This can be done using ordinary triangles, which are obtained by folding ordinary squares.

The next work, to complete it you will need two sheets. On one, you print out a Christmas tree and make cuts along the dotted lines, and then glue this blank to the background.


Anyone who doesn’t understand the stages of work in this photo can easily use the video hint.
Another masterpiece, using the same origami technique you will get a cool little thing that you can give to your mother or loved one. Watch the instructions and repeat step by step.


These are the work ideas you can use as a basis.


Paper Christmas tree on the wall
For a long time I couldn't find suitable option, but then I still came across these ideas. It turns out there is nothing difficult in creating such a huge and huge Christmas tree. See it all for yourself and be amazed, because it’s so great when you and your family are together.

Besides everything, I also found an awesome paper beauty that can be glued to any wall.
This decor can be used to decorate any children's room or kindergarten. I was blown away by this idea and am sharing it with you. You need to download the templates (you can request them from me, I send them free of charge to your email address). And voila, let your imagination run wild and color with your children. The file will contain 22 stencils that need to be printed on a large A4 sheet and then decorated.

This is what can happen, go for it. By the way, there are other options for New Year coloring pages for children, go ahead and take note.


That's all, the article has come to an end. I enjoyed sharing everything I found. I hope you were completely delighted after scrolling through this page.
Everyone have a nice day and sunny mood. Bye!
Best regards, Ekaterina
Today you will learn how to make a three-dimensional Christmas tree out of paper with your own hands. This master class describes not just one voluminous paper Christmas tree, but several at once. different options crafts. Our ready-made templates will help you make them.
Tools and materials Time: 20-30 minutes Difficulty: 2/10
- printed Christmas tree templates on A4 paper;
- scissors;
- glue;
- acrylic paint and brushes;
- fluorescent paint (optional);
- sparkles, decorative snowflakes and other decor at your discretion.
Volumetric Christmas tree made of paper - simple and very original way Decorate your home on the eve of Christmas and New Year!

These crafts are so simple that you can get your preschoolers and toddlers involved with no problem. school age to make them! Surely, you will all have fun creating various compositions from 3D Christmas trees!
Detailed description with photo
We offer you four options for making a voluminous paper Christmas tree with your own hands, but if they are still not enough for you, you can experiment with the size of the trees or create your own own template. The possibilities here are endless!
Option 1. Christmas trees with stars
The first option includes a large number of trees, so we suggest starting with it.
Initially print the templates below on A4 paper.
Template 1
Template 2
The first option assumes that you simply cut out the trees along the contour, and then cut recesses into them along the drawn lines.
Then you need to bend these strips in opposite directions through one. Thus, you have a finished three-dimensional paper Christmas tree in your hands!
For the second option, also cut out the trees along the contour. There are no drawn lines inside, which gives you the opportunity to experiment!
Here you can cut out arbitrary lines at the top and put stars below using a curly stapler. Or cut out thick lines and put stars between them, or cut out curved lines, or…. In general, your imagination will tell you, and in the photo below you can see what we came up with!
Option 2. Christmas tree with a fawn
If you want to move on to more complex compositions, try cutting out the Christmas tree with a fawn, the template for which is provided below!
Template 3
To make this Christmas tree, first cut out the fawn, then fold the Christmas tree paper in the middle and cut it out. After this, fold the paper for a small tree from the right edge and also cut it along the contour.
If desired, glue decorative stars and snowflakes on the tree, decorate with glitter, etc.
Option 3. Glowing volumetric Christmas tree
Print the template below on standard A4 paper.
Template 4
- Cut out the stars and use them as a template for the stars.
- Invite your child to cut out the Christmas tree. Let him cut out the tree along the contour and internal lines. Depending on your age, you may need a little help.
- Make sure all the lines inside are cut.
- Using green or any other paint you wish, paint the craft in 2 layers. Let it dry well both times between stainings.
- Fold paper strips inside the tree in opposite directions to create a 3D look.
Stars: In this tutorial, we used glow-in-the-dark spray paint we found at our local craft store to make a 3D paper Christmas tree with a glowing effect. We simply sprayed paint onto paper and cut out stars from it.
Alternatively, you can buy already finished paper, which glows in the dark, and cut out stars from it.
Glue stars onto your Christmas tree.
Your handmade voluminous paper Christmas tree is ready! We hope our step-by-step master class with the templates you liked.
Subsequently, you can use this craft as a small night light, but be prepared for the fact that it will not last you long!
And as a little surprise, we include it with the master class. interesting video, in which a professional decorator will tell you how to make a slightly different, but no less beautiful version of a three-dimensional paper Christmas tree with your own hands.
Christmas tree stencils for cutting out of paper are an economical way to decorate not only your windows, but also the walls of your house, but even the Christmas tree itself, because it is impossible to imagine the New Year without its main attribute - a Christmas tree, even if it is a paper version. By cutting out just a few details using a template, you can create a luxurious composition that will create the atmosphere of a real fairy tale. You can find many examples of beautiful, simple and complex paper Christmas tree stencils, as well as how to use them correctly, in our material.
History of vytynanki
Carving a Christmas tree on New Year made of paper is similar to the art of weaving, which has interesting story and has roots since ancient times. The essence of this art is to cut out openwork figures and silhouettes, both the simplest and more complex; you can even make entire compositions at one time (solid vytynanka). The peculiarity of the vytynankas is that they turn out to be very sophisticated and beautiful, they can be hung on the window (and previously window shutters were decorated this way), framed and attached to the walls.


This technique was first used in Ancient China, if we talk about a specific period of time, then this is the seventh century. As soon as paper became an accessible material, it began to be used not only for writing, but also as decoration. Only in the 20th century did the art of vytynanka begin to be used both in Russia and in Europe. So, gradually such jewelry began to be popularized and actively used to create festive atmosphere. Vytynankas were carved for Easter, and for weddings, and for kalyads.

Nowadays, the shape of a New Year tree has become especially popular. And if earlier you had to come up with designs and patterns yourself, now ready-made sketches can be found on the Internet and printed on a printer.


If you like the idea of decorating your office or home using protrusions, then many stencil templates (mainly in the form of the main symbol of the year - the Christmas tree) can be found at this link - https://yadi.sk/d/4n9pWVAL34dsoN. These examples of openwork figures can be downloaded for free and then used for your creativity.
What you need to have to cut out Christmas trees using stencils and how to do it

Using ready-made New Year's stencils in the form of Christmas trees saves the creator’s time, but the option of creating the protrusions yourself is not excluded. For these purposes the following will be useful:
A4 sheets of paper, if the protrusion will be attached to the window;
Thick cardboard for creating figures that will be hung;
Manicure scissors;
Stationery knife;
Soap solution.
Advice! Those who love handicrafts should definitely look into specialized shops and find special kits for creating vytynankas, which include everything you need for this creativity.
Making a vytynanka is very simple: you should download a stencil and print it, or draw your own individual sketch on paper, then, using scissors and a stationery knife, start cutting out patterns and a figure. When the finished Christmas trees or other New Year attributes are cut out, all that remains is to secure them in the right place. If this is a window, then it is best to use a soap solution for fastening. It holds the product firmly on the window, and when the holidays are over, the decoration can be easily disposed of, and you don’t even have to wash the windows.

To hang the vytynanka, you need to make a small hole at the top of the figurine and thread a thread through it. A garland of vytynankas is created and broadcast in a similar way, only the thread is threaded through all the links of the garland. There is an easier way to create a garland - this is to glue the figures together.