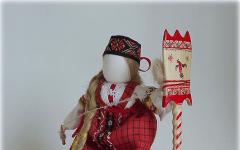
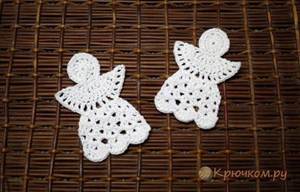
Christmas Angel – symbol of New Year and Christmas... Such a figurine can become not only a gift for, but also a talisman for a loved one, if you connect it with the soul.
Volumetric angel
Crochet angel is very beautiful and delicate. In this master class we will crochet a beautiful volumetric angel. It will perfectly fit into the interior or become good gift for someone close. Detailed step by step description works from the craftswoman Anna.
- Yarn "Iris" white;
- Yarn "Children's novelty" for hair;
- Hook 0.95;
- Sintepon;
- Needle.
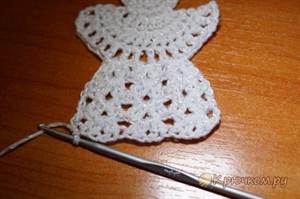
The angel fits from the head. We collect 2 VP and start knitting in the 2nd loop from the hook.
1p: 6 sc.
9 - 12p: RLS without increments.
13p: 6 PRS, decrease - we repeat all this further.
14p: 5 PRS, decrease - we repeat all this further.
15p: 4 sc, decrease - we repeat all this further.
16p: 3 PRS, decrease - we repeat all this further.
Fill the detail with padding polyester.
17p: 2 PRS, decrease - we repeat all this further.
18p: 1 sc, decrease - we repeat all this further.
19 - 22p: no deductions.

We continue knitting.
23p: 1 RLS, we make an addition - we repeat all this further.
24p: 2 RLS, we make an addition - we repeat all this further.
25p: 3 RLS, we make an addition - we repeat all this further.
26p: 4 RLS, we make an addition - we repeat all this further.
26-36r: no increments.
We knit the bottom separately. We collect 2 VP.
1p: we knit into the 2nd loop from the hook 6 sc.
2p: add to all loops.
3p: 1 RLS, we make an addition - we repeat all this further.
4p: 2 RLS, we make an addition - we repeat all this further.
5p: 3 RLS, we make an addition - we repeat all this further.
6p: 4 RLS, we make an addition - we repeat all this further.
7p: 5 RLS, we make an addition - we repeat all this further.
8p: 6 RLS, we make an addition - we repeat all this further.
 We fill the body of the angel with a padding polyester and sew the bottom with a crochet hook RLS.
  We knit further the dress. We knit directly from the body. At the end of the row, we always make a connection and at the beginning, instead of the CCH, we perform 3 VPs.
1p: 1 CCH in each loop and make 1 VP between them. 
2p: we knit under VP 1 CCH, 1 VP and 1 more CCH. Skip the next VP and knit the same element. So all over the row.  3p: we got check marks in the previous row. We knit in 1 and 2 checkboxes on the same new checkbox from 1 CCH, 1 VP and 1 CCH. Next is the next checkbox. But we knit a new check mark between it and the previous check mark (which we have already knitted). So we carry out the increase. We repeat everything again along the entire row.
  4p: we knit only 1 increase in this row, as in the previous one. At the very beginning of the row. And then we just knit the checkboxes in the checkboxes of the bottom row.
And we knit further down another 9 rows. That is, we just knit under VP 1 CH, 1 VP and 1 more CCH. 
We knit a border for the dress.
1p: we make 5 VP and knit 1 RLS under the VP of the lower row (that is, in the middle of the checkmark).

2p: we knit under the arch 9 CCH. We knit 1 RLS under the next arch. We make 5 VP and knit 1 RLS under the next arch. Again we perform 5 VP and 1 RLS under the next arch. And then along the row we repeat everything again.
 3p: we knit over each CCH 1 CCH and 1 VP between these columns. A total of 9 CCHs. Then we knit under the arch 1 RLS. We make 5 VP and under the next arch we knit 1 RLS again. Then we repeat the knitting.
  4p: and knit the last row of the border. We knit 1 sc in each loop. We knit CH under the first VP of the previous row and make a picot of 3 VP. Then we knit RLS under the next VP. Next, we knit RLS under the next VP and make a picot. So we alternate the picot over the fan. There will be 5 picot over the fan in total. Under an arch of 5 VP, we knit 5 RLS.


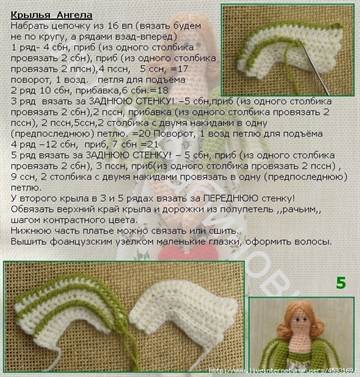
We knit the wings.
1p: knit 6 CCH in a sliding loop.
2p: 1 CCH, we make an addition - we repeat all this further.
3p: in each CCH we knit 1 CCH and make 1 VP.
4p: we knit a check mark in the first CCH, that is, 1 CCH (3 VP instead), 1 VP and 1 more CCH. Next, we knit the same checkmarks under the VP of the lower row. And we will also knit a tick in the very last CCH of the bottom row. In total, we get 10 checkmarks.
5p: we knit a new checkmark in each checkbox.
6p: we do 5 VP and 1 RLS in the middle of the checkbox under the VP - we repeat all this further.
7p: under the arch 9 CCH. We knit 1 RLS under the next arch. We make 5 VP and knit 1 RLS under the next arch. Again we perform 5 VP and 1 RLS under the next arch - we repeat all this further.
8p: above each CCH, 1 CCH and 1 VP between these columns. A total of 9 CCHs. Then we knit under the arch 1 RLS. We make 5 VP and under the next arch we again knit 1 RLS, we repeat all this further.
9p: 1 sc in each loop. We knit CH under the first VP of the previous row and make a picot of 3 VP. Then we knit RLS under the next VP. Next, we knit RLS under the next VP and make a picot. So we alternate picot over the fans. There will be 5 picots above the fan in total. Under an arch of 5 VP, we knit 5 RLS.
We knit 2 of these wings. 
And it remains to tie pens.
We collect 2 VP. We knit 9 RLS into the 2nd loop. And we knit 16 rows in a circle of sc. 
Now let's make an angel hair... You can knit a small garter stitch and let it lie down for a day, and then dissolve it. Then the hair will be wavy and beautiful.
We cut the yarn and sew in the middle to the angel's head.
The side strands can be pulled back and secured there with a thread. 
Sew on handles and wings. And good starch. The angel must be firm.
You can decorate it with artificial flowers.
A charming angel, isn't that so?

A similar angel from Anna, just as cute:

Angel with a halo
Christmas Angel Figurine knitted with "Children's" yarn, height 9 cm.
Legend:
v \ p - air loop,
c \ b - single crochet,
s \ n - double crochet.
Head
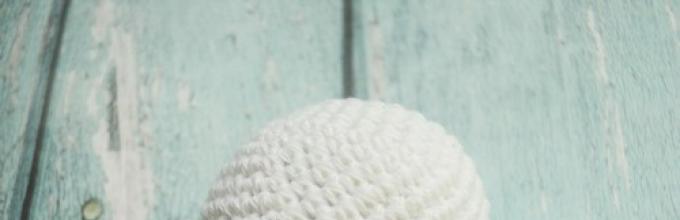
We knit a ball:
- make a ring, into it 6 s / b, pull the thread, connect a row with loops,
- in each column we knit 2 s / b, the loops will be 12 (f1),

- the next row we go with a rapport * 1 s / b, 2 s / b in one column *, connecting, you get 18 loops (f2),

- We do 4 rows in a circle without additions (f3),

- we start decreasing, for which we knit with a rapport * 1 s / b, then 2 loops together *, 12 (f4) will remain in a circle of loops,

- then every 2 loops we knit together, loops 6 (f5),

- put a filler (f6) into the ball.

- we do 2 v / n, and in the same loop 1 s / n, then in each loop 2 s / n (f7),
- we also knit the next row (f8).

Wings:
- 5 v / n, yarn, insert the hook behind the front wall of the next loop, knit 1 s / n, then repeat * 2 v / n, 1 s / n behind the front wall of the next loop *, at the end we connect the row with loops (f9),

- for the first wing, we introduce a hook under each arch from air loops, and knit 6 times with a rapport * 1s / b, 4 s / n, 1s / b * (f10, 11),


- further under each chain 5 times with a rapport * 1s / b, 2 w / n 1 s / b * (f12),

- we knit the second wing,
- we knit the rest of the arches to the end of the row with a rapport * 1s / b, 2 v / n, 1s / b *,
- we connect the last loop with the first (f13).

Skirt
- From the wrong side of the work for the back walls of the loops between the wings (f14) we knit 7 s / b, skip 4 loops, and in the fifth we do 1 s / b, then 6 more times in each loop 1 s / b, at the end connecting.
- There will be 14 loops in a row (ф15).

- 2 in \ n, and at the same point we do 2 s / n, then we go with a rapport * 2 in \ n, skip 1 loop, in the next 3 s / n *, at the end 2 in \ n, connecting (f16).

- 2 v / n, in the next loop 1 s / n, then another 1 s / n, then rapport to the end of the row * 2 v / n, skip the loop, 1 s / n, 1 s / n, 1 s / n into the chain *, 2 vop, connecting (f17).
- 2 v / n, 1 s / n, 1 s / n, then rapport * 3 v / n, skip the loop, 1s / n, 1s / n, 1s / n *, 3 v / n, connecting,
- 2 in / n, in the next loop 2s / n, then 1 s / n, and in the air chain we do another 1 s / n, * 3 in \ n, 1 s / n to the top of the second column, then 2 s / n in the next column and in a chain 1 s / n *, 3 in \ p, close the row (f18).
- 2 s / n, in the next we knit at one point 2 s / n, then 1 s / n, in the next 1 s / n, and we knit 1 s / n into the chain, then with a rapport * 3 wp, at the top of the second column 1 s / n, in the next loop 2 s / n, then 1s / n and 1s / n in a chain *, we knit 3 in \ p, and connect a row with a loop (f19).

We tie the edge of the skirt at our discretion.
Halo overhead:
We knit a chain of air loops,
we close it with a ring,
we tightly knit single crochet into it,
close the row.
Ours is ready! May he bring you happiness!
And two more master classes from Anna.
Little angel

To knit an angel we need:
- Yarn "Pekhorka high volume" or similar white;
- Hook;
- Needle;
- A little padding polyester.
Let's start knitting an angel from the head. And we will pick up 2 air loops. Now we will knit 6 columns into the loop that is further from the hook. We knit the head with single crochet.
Having knitted the first 6 columns, we perform the increments. And we knit 2 columns in each of the loops.
This will create 12 new columns.
Then we will knit the increments again. But now not in every loop, but through one. After that, we will perform 4 more rows. In them we knit 1 column in a loop.
Let's make the deductions. Knit 2 stitches together. Then we knit 1 loop. And further along the row we repeat knitting. Having finished the row, we knit a new one and in it we knit the first 2 loops together. Then we will tie 4 columns. And we will knit the next 2 together again. And we end the row with single crochet.
We will fill this detail with padding polyester.
Let's run 1 row. This will be the neck of the angel. 
Now let's move on to the wings and dress. We knit with double crochets.
The first column will be replaced by 3 air loops. We knit with an increase through the loop. That is, 1 column, then 2 columns in a loop. And so this whole series.
Next, we will knit a row, where we will perform 2 columns in a loop.

In a new row we knit a double crochet, 2 air loops. Skip the loop further and then knit a double crochet. So on, we repeat in a row.
Then we knit 1 column with a crochet over each underlying column and make 3 air loops between them.

Now we need to tie 5 windows, which we got. We pass under the chain of loops. And we knit 5 double crochets. In the next window we knit a single crochet and again 5 double crochets. And so we will tie only 5 windows.
Let's skip 2 windows and knit 5 windows again, like the previous ones.

Now we knit 3 single crochet into an empty window. We will also knit a single crochet and into a double crochet of the previous row. And repeat in the next window 3 single crochet.
Immediately move on to knitting on the other side in the empty windows. We knit them in the same way.
We linked in two places the angel dress.

We knit further in a circle. We carry out double crochets with increments through the loop.

Next, we knit a double crochet in a new row, then we make 2 air loops and in the same place we knit 1 more double crochet. We will again perform 2 air loops and skip the loop at the base. And in the next we will tie 1 column with a crochet. And again we will perform 2 air loops. We will repeat all this further down the row.

Now, in the resulting slingshots, we will knit 2 double crochets, 2 air loops and again 2 double crochets. We make 2 air loops. And in the next lower column we knit a new double crochet. We again perform 2 air loops. And then we repeat knitting to the end of the row.

Then, in a new row, we knit 3 double crochets and 2 air loops into a slingshot. Then again 3 double crochets. Repeat 2 stitches and crochet into the next stitch. Then we repeat everything.
The next row is exactly the same. But instead of 2 air loops, we knit 3 loops everywhere.
We will make a strapping of the edge of the dress. We knit according to our elements (slingshots) in each loop on a single crochet. We knit 3 columns under the air loops. And we have 2 windows between the elements. They are separated by a double crochet. In the first window we knit a single crochet. And in a column with a crochet, we will perform 5 columns with a crochet. And in the next window we will knit a single crochet. Then again we knit only single crochet columns to the first window. And we repeat.

We will link bezel on the head of an angel. In a sliding loop, we need to complete 12 double crochets. We tighten so that we get a semicircle.

Expand and knit 6 loops. We skip the loop at the base, in the next we perform a single crochet. We repeat such arches to the end of the row.

And sew on the back of the bezel.
White and pink angel
Beautiful crochet angels look great in the interior. Especially at Christmas. In this master class we will crochet an openwork Christmas angel.

To knit an angel we need:
- White and pink yarn ("Pekhorka" high volume);
- Hook;
- A little padding polyester;
- Needle.
To tie the head, cast on 2 loops and knit the first row in 1 loop. We knit a total of 6 single crochet.
Then in each of these 6 loops we knit 2 columns. And in the next row we knit a single crochet into a loop. In the next we will perform 2 columns. So we will knit this row.
Next, we will knit 3 more rows in a circle. And we will make reductions for narrowing. We knit a column and we knit the next 2 together. So we will execute the entire given series.
Let's arbitrarily make 2 more reductions.
photo 1

Now we turn to knitting double crochets. We knit a row of such columns. Each loop has 2 columns.
photo 2

Then we will knit 3 loops and 2 more. Skip 1 loop at the base. Then we knit a column with a crochet. And again we do 2 air. Skip the base loop and knit a double crochet. That is, we knit the double crochet through the loop. And between them we perform 2 air loops.
photo 3

In a new row, under each air loop, we knit 3 double crochets. And then we make 1 air and again knit 3 columns under the next loop.
photo 4

The next rows will be the same. We knit 3 double crochets under each air loop and make 1 air loop. We knit only 5 rows.
photo 5, 6

We will make the strapping of the dress pink yarn... We attach the thread under the air loop and knit 3 double crochets under it. And in columns with a crochet we knit 1 column without a crochet.
photo 7
 To tie the wing, let's make a sliding loop. And in it we will perform 4 double crochets. The first post will be 3 air loops for lifting. We will make 1 air loop between each column.
photo 8
 Now, in the interval between the columns, unfolding the knitting, we will perform 2 columns with a crochet, 1 air loop and 2 more columns with a crochet.
photo 9
 We unfold knitting again. And we collect 4 air. We knit a single crochet under the air loop of the bottom row. And we repeat. We knit the last column into the extreme column with a crochet of the bottom row.
photo 10
 And we will make the binding with pink yarn.
We knit in arches 2 single crochet, 3 air loops and 2 more single crochet.
photo 11
 We knit the second wing for the angel. And we sew them.
photo 12 Do you also make beautiful crafts? Send photos of your work. Best photos we will publish and send you the diploma of the participant of the competition.
How can you decorate a Christmas tree beautifully? You can buy beautiful toys, garlands, bright firecrackers and others original jewelry... Or you can go the other way - make them with your own hands, involving the whole family in this activity. For example, children can do interesting jewelry made of paper, plastic boxes and other materials at hand, and mom can knit a beautiful angel. The work, however, is quite painstaking, but the result will exceed all expectations. The master class and the scheme described in detail will help to make the work of an angel crochet pleasant and exciting. This cute product can be not only a decoration for the Christmas tree and at home, but also an excellent souvenir that can be presented as a gift. Christmas holidays will be even warmer with these beautiful crafts, schemes of which even a novice needlewoman can understand. Angels are the most beautiful knitted Christmas symbol.
Openwork weightless angel
Tied toys have some kind of special magnetism, they charm and warm. And this cute, airy angel will appeal to everyone who sees him. It is not difficult to tie it, but such work will bring a lot of pleasure. A master class with a detailed description will simplify knitting of this openwork and light decoration for a Christmas tree or just for the interior.
Materials (edit)
This cute Christmas angel can be knitted with white yarn for a light blue product. Iris yarn is best suited, you should not take synthetic yarn, but better - linen, cotton. Also needed crochet hook No. 1 - 1.5. You will need a synthetic winterizer or any other filler, pins, PVA glue, cling film, plasticine, decorative tape.
Description
Head
Such cute Christmas angels are knitted from the top of the head. You need to start with a chain of air loops enclosed in a ring. The chain must be tied in a circle, increasing the number of loops. And in this way form a knitted ball (this will be the head), and when it is almost ready, then it must be filled with padding polyester. Reduce the number of loops to the initial set of the edge. There is no need to break the thread.
Torso
Knit the torso without lifting the thread from the head. Detailed master class not needed here, since you need to make the body in the form of a cone with any arbitrary pattern. Experienced needlewomen can use their favorite patterns or come up with something unusual, and beginners can be advised to knit crochet stitches.
Sleeves and arms, wings
The Christmas angel is almost ready, now we need to make knitted sleeves and arms. It is important to place them symmetrically.
Separately make knitted butterfly-shaped wings (no need to sew them yet).
Toy shaping
Take plasticine and mold a cone out of it, which will fit in size to the tied body. Wrap the prepared cone with cling film. On this base, put on the body of an angel and secure it with pins at the bottom. Take glue and generously lubricate the body of the toy with it. It is imperative to saturate the head, but you do not need to be zealous. Knitted hands and the sleeves should also be moistened with glue and shaped to the desired shape. Do the same with the wings, only you need to fix them with pins, leveling them on a piece of film.
When everything is dry, then everything related details can be connected. Sew on the wings, additionally fixing with glue. When the toy is completely dry, it can be tied decorative cord to the back of an angel and hang it on a Christmas tree or somewhere else.
Such a simple master class is convenient because each knitter can choose what she likes best, use her favorite patterns and patterns.
Christmas angel: video master class
Angel knitted with a "grandmother's square" pattern
Hands
When 1 loop remains at the end of knitting the ball, you can proceed to creating handles.
Dial 14 vp, then in the 8th loop from the beginning, make 1 tbsp. b / n, tie 7 vp Connect to the start of the chain. Do the same for the second handle.
Nimbus
Now there will be a master class for knitting a halo for a toy.
1 p .: 20 v.p .;
2 p .: rise, 1 st. b / n, in the next 2 loops, tie 2 tbsp. b / n, and then in each - 2 ss2n. In 3 loops, knit 2 cc3n each, then make 2 yarns, etc. in mirror order.
Connect the ends of the headband, leaving threads so that it can be sewn to the head.
Grandma's squares
A master class on creating a grandmother's square will allow you to learn how to create this simple but beautiful knitted pattern. It will take 3 squares. The classic grandmother's square is knitted like this:
6 vp - into the ring;
1 p .: 3 vp, 2 st. s / n, 2 vp, 3 st. s / n., repeat twice;
2-4 p.: Knit under vp. 3 tbsp. s / n, and between them do 2 VP;
The corners of the square are as follows: 3 tbsp. s / n, 2 vp, 3 st. s / n.
Tie 2 colored squares with white yarn, connect them. Sew all details.
Knitted angel crystal on the Christmas tree is ready!
The master class was created two years ago, since then I have imposed many angels, so I made some additions and changes along the way. I will add this information to the master class with the icon
Here are samples of angels related to this master class.
The master class has been prepared for the Charity Action "".
Angel turns out about 12 cm high, quite a bit of yarn goes to it (I think, less than 8-10 g, but it's hard to say for sure). In time, knitting one angel takes 2-3 hours.
Knitting materials:
- YarnArt Violet yarn or its analogues: Lanoso Gelincik, Altin Basak MAXI, etc. (100g / 565m)
- SOSO yarn from Vita - it is easier to knit from it, the angel is less airy, but more "white", elegant
- hook number 2
- for finishing: Violet or Iris colored and with lurex, YarnArt Camellia with lurex (20g / 190 m, for her - hook number 1.5)
- ribbons, beads
UPDATED:
Knitted from various yarns:
MAXI (like Violeta) - I liked it, it is even whiter than Violet (it is yellowish against the background of Maxi), but rather thin - it turns out, of course, very gentle and airy.
SOSO - I liked it too, very white, smooth, not mercerized, but slightly shiny due to its smoothness, not so thin, so it's easier to knit
Iris - colored, for finishing the wings in the company of Maxi
Begonia - a little fat, not suitable for angels
YarnArt Camellia is very thin, therefore it was used either for wings, or in conjunction with thin cotton Vita Daisy (then Soso was adequate in thickness)
Lurex from www.uzelok.by/lurex/ - as an additive to white yarn, I didn't really like it (it gave a slight grayishness to the canvas), but it suited well for finishing colored wings.
Vita Cristal - thin 100% acrylic, I didn’t like it: it seemed to shine, and at the same time "hairy", these "shaggy", fixed with starch, were unpleasant both visually and to the touch. Moreover, it is not white, but yellowish; no matter what I tried to interrupt this yellowness, but in the end, regretfully postponed it for other projects
Vita Baby is 100% acrylic. At first I really liked it to the touch, but still I did not keep my shape, so I starch - I stretched out and began to look rude. It was these angels that I spoiled in the oven and decorated with sequins. The yarn is too thick for angels, although for other things, its velvety is fine.
Conclusion: acrylic for starching in general is categorically not suitable for any.
=============================================
HEAD
Before starting knitting, cut off 40-50 cm of thread, it will come in handy a little later (if the angel is with beads, then you can not cut it off).
We knit the head in a spiral, without connecting the rows. Since knitting with single crochets in a circle slightly mows to the right, from time to time you need to knit 1-2 columns to align the row in length. In order to see the beginning of the rows, place a contrasting thread between the first column of the new row.
UPDATED:
In the future, I began to knit a more rounded head: less by one row (up to 10 rows straight, then from 11 rows - decreases), and for the neck only 1 row of 12 tbsp. without a crochet.
=====================================================
Head knitting pattern:
Increases and decreases can be placed not one above the other, but shifted, then they will be less noticeable and knitting will not turn into a pentagon.
1 row - 5 tbsp. without crochet in a ring amigurumi
2nd row - V 5 times = 10 tbsp. without crochet
3 row - V | 5 times = 15 tbsp. without crochet
4 row - V || 5 times = 20 tbsp. without crochet
5 row - V ||| 5 times = 25 tbsp. without crochet
6, 7, 8, 9, 10, 11 rows - 25 st. without crochet
12 row - / \ ||| 5 times = 20 tbsp. without crochet
13 row - / \ || 5 times = 15 tbsp. without crochet
14 row - / \ ||| 3 (three) times = 12 tbsp. without crochet
15 row - 12 tbsp. without crochet
16 row - 12 tbsp. single crochet, 1-2 connecting posts to align the row in length and height
Row 15 and 16 - this is the neck (if it seems to you long, then you can get by with one row for the neck). Let's check that the "face" of the angel looks good, if there are any flaws, then you can knit (or dissolve) several columns to get neat. the front of the head. 

SHOULDERS
UPDATED:
If beads are tied into the hangers, then the thread after the head can be cut off, leaving long tail(will be needed to mend the hole and make the eyelet). And on the second end of the thread, string 18 beads (number 6) or 36 beads (number 8) and continue knitting.
==========================================================
We knit the shoulders with double crochets, in each row we make 2 air loops for lifting (in fact, 3 c.p. is usually recommended, but in this case I get holes that attract attention to the beginning of the row, so I do 2 c.p. )
Knitting hanger pattern: 
1 row - | V Art. with a crochet 6 times in the neck loops = 18 tbsp. with crochet
2nd row - | V Art. with n. 9 (nine) times = 27 tbsp. with n.
3 row - || V 9 times = 36 st. with n.
4 row - * 1 tbsp. with n. in the column of the previous row, 1 in. n. * repeat 36 times = 36 cells
5 row - 1 connecting st .. under v. item of the previous row, * 1 tbsp. with n., 2 c. n. * repeat 36 times = 36 cells 

You can knit beads in columns in the 3rd row. A master class on knitting beads here: http://stranamasterov.ru/node/93646
Here are the angels with beads (Czech beads # 6). Perhaps you should take smaller beads, otherwise you get "beads". 
We stuff the head with tweezers. I bought half a kilogram of Fibertek (it costs about 50 thousand Belarusian rubles).
The amount of filler in the photo turned out to be even superfluous. 

After that, so that the filler does not fall out, I mend the hole with the same thread 40-50 cm long that we left at the very beginning of knitting (or with the tail of the thread left after the head).
First stitches "horizontally", then "vertically" 

We do not cut off the long tail of the thread, it will be useful to us for making the loop for hanging. In order not to interfere with further knitting, you can pull it out through one of the wings (when it appears).
After a certain number of angels, you will already see where the loop for hanging should be located and it will be possible to do it at this stage - this is much more convenient than on a ready-made angel.
WINGS
Wings are the most difficult material to explain, although there is nothing complicated in knitting them.
So, the basic diagram for understanding the wings:
The beginning of knitting the rows of the skirt will be in the middle of the back, so the last knitting loop shows us exactly the center of the back. The back itself will consist of 5 cells, in front - also of 5 cells. Accordingly, there are 13 cells for each wing, we will tie 6 scallops on them.
We attach the thread to the air loops of the 4th cell from the hook (from the end of the knitting of the hangers), we knit 6 scallops in accordance with the pink arrows.
We attach the last scallop with a connecting post, knit 3 air loops and a connecting post under the beginning of the wing (this green arrow). Thus, our wing folded in half.
Next, we knit the second row of the wing strap in accordance with the orange dotted arrows. We attach the connection. column, cut off the thread (you can not cut it off, but this option is later).
Then we count 5 full cells for the breast, attach the thread to the 6th cell and knit another wing.
This is how it looks "on the ground" 


Then you can knit a row for pulling in the ribbon (this row is shown in lilac in the diagram):
1 connection st. under 2 century. p. (which are the center of the back), 2 in. n. for lifting, 2 in. NS.,
further * 1 tbsp. with n. under 2 century. p. of the previous row, 2 c. n. * in this way:
2 tbsp. with n. on the back
1 tbsp. with n. under the wing
5 tbsp. with n. on the chest
1 tbsp. with n. under the second wing
2 tbsp. with n. on the back
then 2 c. n., 1 connection. Art. to complete the series. It turned out 12 cells = 36 loops 

If there is no desire to make an angel with a ribbon, then you can do it differently.
We do not tear off the thread after the first wing, but we knit 16 tbsp. without crochet on 5 breast cells (do not tighten the columns so as not to tighten the knitting), then we knit the second wing and 16 tbsp. without crochet on 5 back cells. 
You can knit another row with single crochet: 2 tbsp. under the wing, 16 Art. on the breast, 2 tbsp. under the second wing, 16 st. on the back = 36 tbsp. without a crochet. Tear off the thread.
We will get such a finish between top angel and petticoat 
And one more "general note" on knitting wings.
If the second row of the wing is knitted with a "crustacean step", that is, from left to right (as it is connected in the last picture), then the knitting pattern will be slightly different:
- attach thread
- knit the first row of wings to the left (marked in pink)
- knit orange row - strapping "crustacean step" to the right
- 3 c. n., conn. a column to the second edge of the wing (green arrow)
- tear off the thread or 16 tbsp. without crochet on the breast
- second wing
- tear off the thread or 16 tbsp. without a crochet on the back.
WING DIAGRAMS
I offer 4 wing options. They differ both in pattern and in the degree of "splendor" (so to speak, "spread out").
I would be glad to see other options as well. 


Option 4. Wings with small teeth of medium splendor. 

1 row - under the first connection chain. column
under the next chain * 1 c. p., art. with n. * 4 times
1 c. n., conn. column for the next chain
2nd row - conn. column to joint column, 1 in. NS.
* under V. n. between Art. with n. the previous row - Art. without n., 2 c. p., art. without n., 2 c. n. * 3 times
but for the 3rd time - only 1 c. p .. connect the column under the trace. chain
UPDATED:
I knitted most of the angels with this particular stitch, only a little differently in the first row: Art. with a crochet, two tbsp. with 2 yarns, st. with a crochet.
============================================
Option 1. Silver wings are knitted with YarnArt Camellia yarn (it comes in various shades http://www.kudel.ru/published/publicdata/KUDELRUBD/attachments/SC/products_pictures/camellia-big.jpg), but it is much thinner than Violet (190m / 20g) , so I took a hook number 1.5 and knitted without lace, so that there was more shine))
True, I have not tried starching this yarn yet, there are doubts, since it consists of polyester and metallic. Well, then we'll see. 

1 row - st. without n. under the first chain from 2 to. p. of the previous row,
under the following chain: 2 tbsp. with 1 yarn over, 4 tbsp. with 2 yarns, 2 tbsp. with 1 yarn,
under the next chain - Art. without a crochet.
2nd row - conn. column in st. without n .; Art. without n.
in the first st. with 1 n., half-column with a crochet in the 2nd tbsp. with n.,
2 tbsp. with n. in four st. from 2 n. (= 8 tbsp. With n.),
half double crochet in st. from 1 n., art. without n. in the second art. from 1 n .;
connect. column in st. without crochet
Option 2.... This is a slightly modified method from the mammy3 master class on Osinka (http://club.osinka.ru/topic-130913?p=10764028#10764028). 

1 row - under the first chain of Art. without crochet, 1 in. NS.,
under the next chain * 2 c. p., art. with 2 yarns * repeat 2 times,
2 c. p., art. from 1 n., 1 c. NS.
under the trace the chain of Art. without n.
2 row - without turning knitting, from left to right "rachis step": 1 tbsp. without a crochet under each c. p. (2 columns under 2 v. p.)
Option 3 Quite lush wings. It seems to me that an angel with such wings would look better completely in white, maybe with trimming only with a ribbon or beads. 

1 row - under the first chain of Art. without n., 1 c. NS.
under the next chain of Art. from 1 n., 2 c. NS.,
* Art. from 2 n., 2 c. n. * 3 times
Art. from 1 n., 1 c. NS.
under the next chain of Art. without n.
2nd row - st. without n. over 1 century. NS.
* under 2 in. item of the previous row - Art. without n., 3 c. p., art. without n. * 4 times
Art. without n. under 1 century. NS.
As I wrote above, the connection of the top and the skirt of the angel can be arranged in different ways - one next to the holes for retracting the ribbon (silver angel), or a row of single crochet (yellow angel), or two rows of single crochet (pink and blue angels).
The main thing is that the total number of loops is 36. This number will allow us to knit different patterns skirt - with a report for 3,4,5 (skip one loop), 6, 7, 9 loops.
SKIRT
I like this skirt pattern, because it is not too delicate (it does not show through), it is interesting due to embossed columns, and yet calm, not too distracting from the top of the angel.
But I want to experiment with other patterns in the future.
The diagram shows knitting of a skirt, if a row is connected to it for pulling in a ribbon. Please note that we start the pattern of the skirt above the loops for raising the previous row, then in front of the angel the pattern will lie symmetrically.
If the previous row was a row of single crochet, then we start the skirt over the loops to raise the last row of hangers (white), then the pattern in the front will shift by 2 loops, but it will also lie symmetrically (see pink and blue angels - they are connected in different ways in this place, but in front of both there and there is symmetrical).
In any case, after the first row of the skirt, we check that the front of the skirt looks symmetrical and neat.
UPDATED:
When knitting according to the pattern below, in rows 4 and 7, there is a sharp expansion by 18 loops. Therefore, over time, I began to knit a little differently: in the 3rd and 6th rows we make increments similar to the 4th and 7th rows (1 st.p. before the "tick" and after), BUT only after one track - this will give an increase of 10 loops, and in rows 4 and 7, another 8 will be added - it will turn out much more accurately.
======================================

0 row - a row for pulling in the ribbon, for more details see the scheme "WINGS" in lilac color
1 row - 2 in. n. for lifting, 2 in. n. pattern, art. with n. into the same loop where the lifting loops come out,
skip 1 loop of the base, art. with n.
* skip 1 loop of the base, "checkmark" (1 tbsp. with n, 2 v. p., 1 tbsp. with n. in the same loop of the base), skip the loop of the base, art. with n. * repeat to the end of the row
conn. Art. in lifting loops
2, 3 row - connect the column under the chain, repeat to the end of the row * "check mark", convex column with a crochet * (at the beginning of the row - a check mark with loops for lifting, similar to the 1st row)
4, 5, 6 row - repeat * "check mark", 1 c. n., convex st. with n., 1 century. NS.*
7, 8, 9 row - repeat * "check mark", 2 v. n., convex st. with n., 2 c. NS.*
10 row - trimming with finishing color: 8 tbsp. with n. under the chain "check marks", 1 convex st. without a crochet under the convex column of the previous row.
NIMBUS
UPDATED:
In the future, I began to knit nibm differently, closer to its Catholic version: a chain from the 12th century. etc., tightly tie with single crochet columns (about 22 columns fit). You can knit, if desired, one more row of columns (like this: * 2 tbsp. Without crochet, increase *). Sew on a halo from the back-top so that it is visible, but not as clearly as in the master class. It is not even necessary to starch it, it comes out so tightly.
It turns out like this
I will also leave the option from the master class. Maybe someone will like just such a halo.
=================================================
Close 5 v. n. in a ring
1 row - 12 tbsp. with n. in a ring
2 row - * 1 tbsp. with n., 2 c. NS.*
3 row - * 1 tbsp. without n., 3 c. NS.*
Leave the long end of the thread for sewing. 
I like to sew so that the halo is behind the head, as it looks on the icons.
We apply a halo to the back of the angel's head, look from the face to make it beautiful and symmetrical, and then sew it from the inside out, approximately the same triangle as I marked with a contrasting thread. 
The side view is like this 
THE FINAL STROKES
From the thread left after darning the filling hole, we make a loop. It is located approximately in the first row of knitting hangers. (But whoever likes it, you can do it on the top of the head, or on the back of the head, behind the halo). 
To do this, we fold the angel exactly in half, drive the needle from the inside to the outside slightly away from the center, and vice versa, so that it turns out symmetrically. It is convenient to work hard, either by wrapping the wing up, or turning the angel inside out of the skirt outward. We fasten the thread from the inside out and get a loop, one thread thick, which is not visible when the angel is standing. 

We thread all the ends of the threads with a needle.
We admire. Our angel is ready!
STARCH
I know what gives shape to knitting different ways: starch, sugar, gelatin, PVA.
I tried only with starch: for 2 cups of water 1 tablespoon of starch, bring to a boil and transparency in a water bath. Dip the angel into the paste, leaving a dry head, soak, squeeze. If it does not wring out well, you can lightly blot it with a clean towel.
To dry the angels, I glued cardboard cones. I rolled a bag out of cardboard, put an angel on top, fitted the cone in the shape and size of an angel, glued it with tape. 

I dress on a thin cone plastic bag corner, pull the wet angel on top, spread the wings (I don't fix them with anything, only, maybe, I correct them several times during drying, and they themselves hold well), check that the bottom line of the skirt is horizontal. So they dry on a cone.
And once I was in a hurry - there were more angels than cones, so I removed slightly dried angels from the cones, put them on a cutting board (of course, tucked into a bag) and dried them over a radiator. And she dressed the following angels on the cones. Everything is fine too.
I also repeatedly dried it in the oven at the lowest temperature with the door ajar. Dry in about 3 hours, but you need to monitor the temperature so that the beads and lurex do not cloud.
While I was composing a master class and knitting angels, many ideas arose that I would like to try to implement: stretch the yarn Grass into the wings of an already starched angel or make separate sewn wings from plush yarn or Grass (possibly with monofilament or fishing line to hold the shape), attach sequins and sew-on decorations such as sequins in the form of flowers, leaves, stars (after all, our angels will be summer ones, different cheerful colors and decorations are permissible, it seems to me), sew on flowers - from a ribbon or tied (I saw here in the Land of Mothers "Flower Angels" ); or maybe make completely white angels with bright ribbons for decoration - a lot of beauty and ideas for inspiration are found on the Internet, on Osinka, in the Land of Mothers.
Hope my master class will be helpful. This is my first MK, so I am very grateful for the plus and the approval.
I will be very glad to see your incarnations.
Good luck!
Crocheted decor has become familiar in the everyday life of many knitters. Pillowcases, blankets, hot coasters, pot holders - the list is endless. Among the cute decorative crafts is and fishnet angels, crocheted... Schemes for their manufacture can be easily found or developed independently.
Scope of Angels
Most often, these products are used for decoration. Christmas trees or as the main decorative element for Valentine's Day. Depending on the style, performance and size, several angels are hung in a row from a ribbon, one by one or in groups, placed on tables and windowsills.
The graceful angel of which can be very different, is great for a gift. And especially these little things delight children.
Selection of yarn and manufacturing features
To preserve an elegant style when knitting, it is advisable to avoid using bright colors and colorful figurines. Traditionally, angels are depicted in white robes. You can also use any other pastel shades: peach, yellow, pink, blue.
Thin is best suited for making the named figurines. However, a thread that is too thin makes crocheting angels much more difficult. Schemes are often focused on a thread with a thickness of 400 m / 100 grams. The larger the length in the skein, the thinner the yarn. The optimal thread thickness for the named product is 550 m / 100 grams.
In addition to cotton, you can use linen, rayon, silk, polyamide or microfiber. Acrylic is absolutely not good. There are always villi on its threads, and this figure needs a perfectly smooth material.
To get a really high-quality angel, the hook, knitting pattern and yarn must match. It is better to choose a thinner tool - from 0.9 mm. Then the density of the canvas will be high. A tight canvas is characterized by neat uniform loops and rigidity.
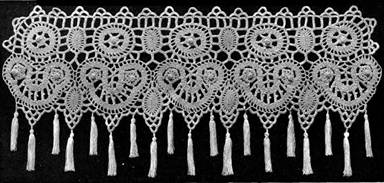
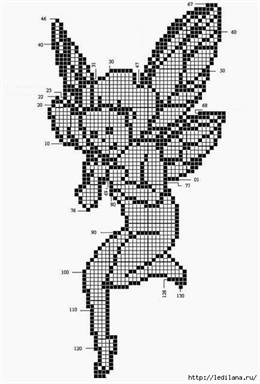
The simplest crochet angel: diagram and description
The easiest way is to make a flat decorative figurine. This will require very little time, effort and material. In addition, this type of work is within the power of knitters with any length of service and experience.


The angel (hook) depicted in this photo knits extremely quickly. The knitting pattern clearly demonstrates that the beginning of the product is the center of the head. As you can see, it can be knitted with a solid round piece, and with wooden rings suitable size as shown in the photo. Hair in this case is performed using pico from air loops.
The body and two wings are connected by one canvas, after which they begin to make the dress. At the end, they knit an openwork border for the wings and a halo to make a real crochet angel. The scheme suggests performing these actions in the process of knitting a circular strapping. It goes along the edge of the dress to the wing, then to the shoulder, forms a halo and then goes to the second wing.
Pattern adaptation
For knitting a flat angel, you can use any familiar circular pattern. The principle of expanding the canvas is the same as in any napkin. To get a figurine from a round fragment, you need to do the following:
- Count the number of rapports in the motive.
- Start knitting according to the pattern. In the first row, knit half of the loops indicated in the diagram.
- Turn the canvas over and proceed to the third row. The goal is to get a neat semicircle.
- Run as many rows as necessary to form the wings.
- Mentally divide the canvas into three parts and then knit only the middle third.
When all the rows of the pattern are knitted, you can make a circular strapping of the figure.
Volumetric angel crochet: diagram and description
The next type of figurine requires more skill of the craftswoman. Its knitting is complicated by the fact that you need to carefully observe the proportions.

Carried away by knitting individual parts, you can find, for example, that the wings are prohibitively large, and the head is too small.
When making the body of such a figure, you can also apply a circular motif pattern or develop a scheme yourself. In any case, you get an original and distinctive angel. The hook, knitting pattern and yarn should be selected based on the recommendations outlined above.
The head can be tied by anyone in a convenient way... It is permissible to tie a wooden ring, large bead or use a synthetic winterizer as packing.
To bind the body, you can use a circular openwork scheme, but it needs to be changed a little.

The principle of expanding the circular blade will lead to the formation of a perfectly round flat part. However, in order for the cone to come out and the angel to be crocheted, the scheme must be 50% or 25% complete. This means that when knitting the first row, the number of knitted columns should be reduced. Next, you should close the knitting in a ring and perform only part of the rapports to the end of the pattern.
How to tie wings
The main thing of an angel is wings. They should look light and airy. Therefore, they should be performed with particular care.
All types of grids are great as a pattern and very openwork fragments wedge-shaped. As an example, consider the rather popular pineapple pattern.

The diagram offers several options for openwork elements, any of which is suitable for knitting wings. To give additional decorativeness, you can use a strapping containing a picot of air loops.
When all the details are ready, they need to be sewn and stiffened.
Final processing
As a result of the actions described above, soft workpieces are obtained. But it's still crocheted. Patterns, pattern and yarn slightly affect the degree of rigidity of the canvas, but you can get a really stable figure only after special processing of the workpiece. Knitted fabric it is required to soak with a solution containing gelatin, starch or PVA glue. The concentration of the binder in the solution must be high.
The workpiece is immersed in a container with a solution, all sections of the canvas are impregnated and the excess is squeezed out. Then they put the workpiece on a previously prepared form, stretch and pin all the edges of the canvas with pins.
The mold for drying the blank is made of cardboard. Roll it up into a cone and secure the edges. To prevent the wet canvas from soaking the cardboard and taking on its color, put a bag on the mold and only then put on the blank.
The final decoration of the angel should be done after it has dried.
Guided by the instructions described above, any craftswoman will be able to crochet angels (the diagrams, descriptions and photos given in the article will help with this).
The painstaking work of needlewomen allows you to create wonderful things. Among them, the most valuable are souvenirs that will appeal to both children and adults of all ages. Using crochet angel patterns, you can create wonderful toys that will bring a touch of comfort to your home and become wonderful gift for a loved one.
Origin of technology
The emergence of this type of creativity as crocheting was greatly influenced by the industrial revolution. The invention of various mechanisms by people made it possible to significantly facilitate the processing of resources for the production of yarn. Up to this point, all stages of processing were carried out using manual labor, which made the process laborious and influenced the final price of the product. The threads cost prohibitively high, and only noble people could afford to purchase them. If a relatively small amount of yarn is required for knitting, then when using a hook, its consumption increases by 1.5-2 times. The more openwork pattern, the higher the thread consumption.
The needlewomen fell in love with this type of creativity so much that they began to create the most complex patterns and diagrams with descriptions. Gradually appeared openwork knitting, which underlies most crochet products. Simple canvases were replaced by openwork and lace. Hand-knitted lace was especially popular; it allowed the poor to earn good money.
A huge plus of needlework is that it is very easy to learn it. Both an assiduous schoolboy and an adult who have never held this instrument in their hands can handle the crochet. And the created products will certainly delight their creator, because you can create fantastically beautiful things with crochet.

Angel 2D
If you know a little about crocheting, try making a 2D angel, this is a great option for beginners. A detailed description will definitely help you with this.
To complete the craft, you will need:
- cotton yarn;
- hook of a suitable size.
For crafts that need to be starch, it is better to use cotton yarn. It keeps its shape remarkably after this procedure and looks great.
Note! Do not use acrylic yarn, as its fluff coarsens and makes the garment look unsightly.
To get started, complete the amigurumi ring. Work 12 double crochets in the center. Close the circle with a connecting loop.


In the second row, you need to expand the circle with increments. To do this, complete 1 lifting loop. In each column of the previous row, or rather, under its loops, knit 2 single crochets. To complete the row, close the ring with a half-column. The angel's head is ready.

The third row begins with a one-loop lift. Subsequent knitting is performed in rotary rows. In the first 4 loops, knit an increase of two double crochets. Finish the row with three air loops. After that, the canvas needs to be expanded.

Expand the fabric with the additions knitted in each loop of the previous row. You will have 16 stitches.

In the fifth row, alternate the crochet and double crochet rapport to the end of the row. As a result, you should get 16 arches, consisting of 5 air loops. Secure and cut the thread.

We turn to the formation of the skirt. Count 5 arches from the edge of the product. Secure the thread in the sixth and sew 3 lifting loops. In the 7th arch, knit 2 double crochets, 2 air loops and 2 double crochets. Skip one arch and in the next follow the same sequence of columns. Skip again and repeat the rapport. At the end of the row, lift with 3 loops and unfold the knitting.

Complete 3 pivoting rows with the rapport described above.

In the tenth row, go up one loop. Work 5 double crochets into a scallop. It should be attached to the arches of the previous row with a single crochet.


Repeat 2 more times. Secure and cut the thread. The flat angel is ready!

When you make a hanging loop, it makes a great Christmas tree decoration or just a cute gift.

Don't forget to starch the piece to shape it.
Selection of ideas
We invite you to familiarize yourself with a selection of easy-to-use schemes for making plane angels.


Even if you only know how to knit simple posts, you can create these beautiful angels.
Volumetric tilde
Very beautiful voluminous figures of angels can be crocheted. A detailed master class with a description in the pictures will help you in making crafts.


Such a doll can be a wonderful gift for a girl. The angel will help the child cope with fears and will become a kind of amulet.