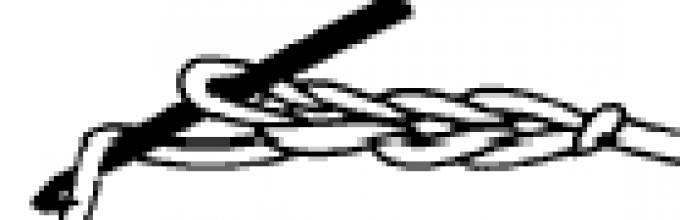
Lifting loop
- Air loop
- Half column
- Column without crochet
- Column with crochet
- Column with 2 yarns
- Column with 3 yarns
- Column with 4 yarns
- Concave double crochet - embossed column (at work).
- Convex double crochet - embossed column (before work).
- Slingshot of 2 double crochet
- Slingshot of 2 double crochet through air loop
- Scale from columns with crochets
- Double cut crochet
- Triple cut crochet
- Double cropped column with 4 crochets
- Double double crochet
- Triple double crochet
- Triple column with 2 yarns
- Triple crocheted stitch
- Double crocheted stitch
- Lush column
- Lush loose-knit column
- Crossed double crochet
- Crossed double crochet
- Pico (normal)
- Pico down
Crochet in one direction or in rows back and forth. Knitting in
one direction goes round. Any crochet
starts with knitting a chain. 
Knitting with a chain, or air loops
Place the end of the thread on the index finger of your left hand (Fig. 1).
V
grab the hook with your right hand so that the folded part is facing you.
Pass the hook under the thread located on the index finger of the left
hands, hook it and turn the hook with the thread counterclockwise,
so that a complete revolution is completed. The resulting cross hairs
hold back thumb left hand. Pass the hook under
thread lying on the index finger of the left hand (Fig. 2).
Hook the thread, pass it through the crosshairs and tighten. The first loop of the chain is ready.
For
knitting subsequent loops, pass the hook under the thread lying on
index finger of your left hand, hook it and drag it through the first
loop and so on (Fig. 3). 


Single crochet
Half columns
without crochet are used to knit a tight and even edge of the product, and
also for connecting the chain in a circle and individual parts to each other.
The half-column corresponds to 1 lift loop.
Knitting a half-column:
Chain
Knit one stitch, then insert the crochet into the third stitch from
the beginning of the row, starting the count from the chain loop, and hold the hook under
thread on the index finger of the left hand. Crochet the thread and
pull it through the loop of the chain (Fig. 4). Now there are two loops on the hook.
Pull the loop on the left hook through the loop that
more to the right. It turned out a half-column without a crochet. 
Column without crochet
Column
without a crochet knits just like a half-crochet without a crochet. See description
above. The difference is that when two loops are formed on the hook
as in (Fig. 4), insert the hook again under the thread on the index finger
left hand and hook the thread (Fig. 5). Pull it through the two loops.
The single crochet is ready (Fig. 6).
For knitting a second
single crochet, insert the hook into the next one after the first single crochet
loop and slide it under the thread on the index finger of your left hand.
Hook the thread and pull it through the loop, thus obtaining two
loops on the hook. Slip the hook under the thread on your index finger again
left hand, hook it and pull it through the two loops. So it turned out
the second single crochet. So continue on. 

Column with crochet
Chain
from the air loops, put the front finger on the index finger of the left hand
side to you. Hold the chain with your left thumb.
Knit two lifting stitches and yarn over. For this
slide the hook under the thread on the index finger of your left hand and grab
thread (Fig. 7.)
Hook with loop and crochet insert into the fourth loop
chains, grab the thread and pull it through this loop. On hook
a loop, yarn and another loop are formed, that is, three loops (Fig. 8).
Knit
two times these three loops. First, knit the loop and yarn together to
To do this, grab the thread with your crochet hook and pull it through the crochet loop.
The hook now has two loops (Fig. 9). Grab the thread again with the crochet hook and
pull it through these two loops. So we got a double crochet. 


Half double crochet
Half-column
knit with a crochet in the same way as a double crochet. See description
above. The difference is that when you got three loops on the hook: the loop,
yarn, loop as in (Fig. 8), then you need to knit these three loops
together once. To do this, grab the thread and pull it straight through
three loops (Fig. 10). 
Column with two crochets
Column
with two crochets is also knitted like a column with one crochet. Difference in
the fact that for lifting, knit three air loops and instead of one
nakida make two so that four loops are formed on the hook: a loop,
yarn over, yarn over, loop (Fig. 11). These four loops need to be knitted in
three receptions. First, slide the hook under the thread on your index finger
left hand, hook it and drag it through the loop and the second yarn, then
again pass the hook under the thread, hook it and pull it through the loop
and the first yarn. After that, two loops will remain on the hook, which
need to be knitted together. 
Convex and concave columns
Convex and concave stitches are the same crochet stitches.
What is their difference? When knitting convex and concave columns, the hook is passed not through the loop, but between the columns of the row.
Convex
rows from the front surface and at the same time bend around the post from behind (Fig. 12).
Concave
the column is obtained when the hook is held between the columns of the previous
row with seamy side and at the same time bend around the column in front (Fig. 13). 
Dog loops
For
finishing the edge is often used the reception "step" or "crustacean" loops,
giving the edge strength and good appearance. Unlike everyone else
other crochet weaves, this type of knitting is performed from left to right.
Insert the hook under the loop away from you, pry the thread from the bottom and pull it out
so that it is in front of the loop that is on the hook, then
knit both stitches together (Fig. 14). 
Long loops
Long
or elongated loops are knitted as follows: Tie a chain, and on
her a row of single crochet. Twist knitting. Before knitting
long loop, take knitting in your right hand, bring thumb
left hand under the main thread and pull it towards you, pulling out a long
loop. Now take knitting in your left hand, so that the thread lies on
index finger of the left hand. Insert the hook into the loop of the row lying
to the left of the extended loop. Hook the hook under the thread lying on
the index finger of your left hand and knit a single crochet (Figure 15).
Free your thumb. Now you can knit the next loop.
The next row, after the row with extended loops, knit in columns without
yarn over to secure the extended loops. To continue the ranks you need
alternate. 
Knitting a circle
For
fulfillment of most knitted toys you need to be able to crochet
a half-column without a crochet in a ringlet. To do this, pass the hook through
the first loop of the chain, hook the thread and pull it through the two loops
(Fig. 16). Tie the ring with single crochets, passing the hook to the center
rings. In total, you need to knit one air loop for lifting and 7
single crochet to make 8. After completing the eighth
column, insert the hook into the chain loop with which you started the row. On
the hook forms two loops. Place the hook under the thread on the index
finger of your left hand, hook it and drag it through these two loops, closing
thus the first row of the circle. The second row and all subsequent ones begin
also with an air loop. In the second row, tie one chain stitch and
15 single crochet, that is, a total of 16 columns, knitting on
each loop has two columns. Finish the second row with a half-column without
nakida, connecting a loop from the 15th column with an air loop of the beginning of the second
row. All subsequent rows also start with one chain stitch and
end with a single crochet.
The number of columns in each row
is equal to the number of columns of the previous row plus 8 columns, taking into account that
the first column in each row is an air loop. Circle knitting pattern
and legend on (Fig. 17):
1 row 8 columns
2 row 16 columns
3 row 24 columns
4 row 32 columns
5 row 40 columns
The interval between additions also increases gradually:
2 row - in each loop, knit 2 columns
3 row - in every second loop, knit 2 columns
4 row - in every third loop, knit 2 columns
5 row - in every fourth loop, knit 2 columns and so on.


Loop structure
Air loop
Chain
Crochet is based on single crochet and crochet.
Air loop
(Fig. 1, 2) serves as the beginning of knitting, forming a chain of air loops,
which is a preparatory series and is used in knitting all
patterns. 
To chain
did not tighten the knitted fabric, it can be done with a thicker crochet
and thickened threads. The hook is taken in the right hand, like a pencil, between
thumb and forefinger, turning the beard of the hook towards you. Thread
from the ball put on the index finger of the left hand, with the end towards itself,
holding it with your thumb. The hook is inserted from right to left under the working
thread on the index finger of the left hand, then turn the hook
counterclockwise 360 degrees and, without tightening the loop,
formed on it, with a movement from themselves, throw the thread on the hook. For
this, the head of the hook is brought from left to right under the thread on the index
finger, grab it and pull it out through the loop on the hook.
Having knitted the first loop of the chain, put the thread on the hook and stretch
through the loop on it. So knit a base chain of the required length.
Starting the first row of the pattern, make several
chain air loops, which are called lifting loops. They
replace the 1st column of the new row. The number of lifting loops depends on
column height: the higher the column, the more lifting loops.
Now consider loop structure crocheted: 
At
crochet, the loops of the knitted columns are fixed and shaped
pigtails, which is the basis for knitting the next row.
The pigtail loop consists of the back and front walls (Fig. 3). A loop
located on the shaft of the hook is called the leading loop and in the calculation
loops it is not included. If the description of the 1st row of the pattern says "knit
column in the 5th loop of the chain ", this means that you need to count from
loops on the hook 4 loops of the chain and insert the hook into the next loop.
Half-column
Half-column
(1 lifting loop corresponds to it) It is used when knitting an edge
products so that it is even and dense, and when connecting figures. Knit
it is like this: the hook is inserted into the loop of the previous row, grabbed by the hook
working thread and pull it directly through the loop of the row
(chains) and a loop lying on the hook. 
Column without crochet
Column
without a crochet is also called a short column (2 loops correspond to it
lifting). The hook is inserted into the loop of the previous row or chain (then in
2nd loop, not counting the loop on the hook), grab the thread and pull
loop. The hook has 2 loops. They grab the thread again and
pull it through 2 loops on the hook. 
Column with crochet
Column
with a crochet (3 lifting loops correspond to it). Throw a thread on
hook away from you, insert the hook into the loop of the previous row or chain
(then in the 3rd loop from the hook, not counting the loop on the hook), grab
thread and pull the loop to the level of the loop lying on the hook. On hook
3 loops are formed - an elongated loop, a yarn and a leading loop)
(Figure 1a). Then they put the thread on the hook again and pull it through
2 first loops on the hook (extended loop and yarn), grab again
thread and pull it through the last 2 loops on the hook (Figure 1b). On
the hook remains 1 leading loop.
to be continued... 

Rice. 16
Column with 2 yarns
Column
with two yarns (4 lifting loops correspond to it). Make two yarns
on the hook (2 turns of the thread), insert the hook into the loop of the previous row (or
4th loop of the chain), grab the thread and pull the loop. On hook
4 loops formed. Grab the thread and pull it through the first 2
the loops (loop and yarn) lying on the hook again grab the thread and
pull it through the next 2 loops on the hook, grab it again
thread and pull the thread through the last 2 loops on the hook. 
Column with three crochets
Column
with three yarns (5 lifting loops correspond to it). Perform by
the principle of a double column, only make 3 yarns and knit them
sequentially, 2 loops in 4 steps.
Column with 4 yarns
Column
with 4 yarns (6 lifting loops correspond to it). Perform by
the principle of a double column, only 4 yarns are thrown on the hook and
knit them sequentially in 2 loops in 5 steps.
Concave (falling) double crochet.
Hook
with a crochet is not inserted into the loop of the base, but carried out in front of the column
the previous row. Having captured the working thread, they knit a double crochet.

Convex double crochet.
The crochet hook is inserted behind the column of the previous row and the crochet is knitted. 
Slingshot of 2 double crochet.
At first
knit the 1st double crochet, and then the 2nd in the same base loop.
Slingshots can also be made from 2 single crochet posts. 
Slingshot of 2 double crochets through an air loop.
Knit
double crochet, then make an air loop and 1 more double crochet
yarn over in the same loop of the base. Slingshots can be knitted in 2 or
3 air loops. 
Scale from columns with crochets.
V
one loop of the base is knitted from 2 to 9 double crochets. How
the more columns are knitted, the larger and more prominent the scales. Scales
can be done from columns with 2 crochets. 
Double cut crochet.
On
2 base loops perform 2 loose double crochets, and then
knit them together. To do this, having made 2 yarns, the hook is inserted into the loop
the previous row, pull the thread, make the 2nd yarn and knit 2
loops (loop and yarn) together (on the hook 2 loops). On the next loop
the bases perform the 2nd untied column. Make a yarn over and in one
reception knit all three loops on the hook. Throw the thread on again
hook and knit loops, securing the top of the column. 
Triple cut crochet.
It is carried out on three base loops according to the principle of knitting a double shortened column. 
Double cropped column with 4 crochets.
Perform
according to the principle of knitting a double shortened column with a crochet,
only make four yarns and knit them sequentially in 2 loops
in 5 steps.
Double crochet.
By making
yarn, the hook is inserted into the loop of the previous row, grabbed and pulled
thread (as when knitting a double crochet), put the thread on the hook and
knit two loops (loop and yarn) together (2 loops on the hook).
The result is an untied double crochet. Again they make a yarn over and through that
the same loop of the base is knitted with the second untied column. Then another
once make a yarn over and knit all 3 loops on the hook. 
Triple double crochet.
Perform
according to the principle of a double double crochet, only in 1 loop of the base
knit not 2, but 3 loose crochet stitches. Vertical
the line shows where the hook should be inserted. 
Triple column with 2 yarns.
They are performed as a triple column with one crochet, only they do not one, but two crochets and knit the columns with two crochets.
Triple crochet crochet.
Use
v flower patterns for tying the core of the flower. One loop
bases perform sequentially 3 unconnected double crochets (
on the hook 4 loops). Then they knit 2-4 more loose crochet stitches
(the number of loops remaining on the hook from the untied stitches,
will increase), after which they put the thread on the hook and in 1 step
knit all the loops on the hook. You can perform triple unconnected
columns and with 2 yarns.
Double crocheted stitch.
They are carried out according to the principle of a triple untied column with a crochet.
Lush column
Lush
a column (3 or 4 lifting loops correspond to it) - make a yarn,
the hook is inserted into the chain of the previous row and the loop is pulled out long
1-1.5 cm (this is repeated 3-5 times in the same loop of the previous row). How
more yarns, the more magnificent column... Having made the last yarn over, stretch
thread through all loops and yarns on the hook. To secure the lush
the column is thrown over the hook and a loop is knitted on the hook.
The vertical line shows where the hook should be inserted. 
Lush, loose-knit column.
Use
in floral patterns for knitting the core of a flower. As well as in
a lush column pull out long loops through 1 loop of the base and
make yarn overs between them. The loops on the hook are not knitted.
Then, after completing 2-4 lush untied columns, throw the thread on
hook and in 1 step knit all the loops on the hook.
Crossed double crochet.
Knit 2 double crochet crosswise: first on the 2nd loop of the base, then on the 1st. 
Crossed double crochet
(his
corresponds to 5 lifting loops). Having made 2 yarns, insert the hook into the 6th
loop of the chain, pick up the working thread and pull it through this
loop (4 loops on the hook). Pick up the working thread (fig. 20a) and
knit 2 loops (3 loops on the hook). Without knitting the loops on the hook,
make a yarn over, insert the hook into the loop of the base through one loop to the left of
1st column, pick up the working thread and pull it through this
loop (on the hook 5 loops). Further, picking up the working thread (Fig. 20b),
alternately knit 2 loops 4 times (1 loop remains on the hook).
Make 1 air loop, yarn over and insert the hook into the center of the column,
grabbing 2 threads (Fig. 20c), pick up the working thread and stretch
it through 2 threads of the center of the column (3 loops on the hook). Picking up
working thread, 2 times knit 2 loops each (Fig. 20d).
These columns can form an independent pattern and be combined with other columns. 
Pico (normal).
Do
4 air loops, then insert the hook into the 2nd chain loop,
grab and pull the thread, then put the thread on the hook and
knit 1 more air loop.
Pico down.
Perform
like a normal pico, only the chain of air loops is turned down.
To do this, tying a chain of 4 air loops, grab it with a large
and the index finger of the left hand, pulling slightly downward, and the hook
with a movement away from themselves, they are introduced into the 2nd loop of the chain, grabbing and pulling
a thread. Next, knit another 1 air loop.
Closed loop of air loops.
A simple chain of air loops is knitted, then the loop on the hook is connected with a half-column to the first air loop of the chain.
The number of closed loops is usually put down on the diagrams in a ringlet. Such
a closed ring is usually the beginning of knitting round motifs,
napkins. 
Long loops.
Bind
chain, and on it a row of single crochet. Twist knitting, before
by knitting the second loop of the chain, intercept the fabric right hand, a
put your left thumb under the working thread and pull it back a little
her on yourself. Grip the canvas with your left hand so that the end of the loop is
on the thumb, was brought to the hook, and knit
single crochet, then release your thumb from the loop. On
the canvas will be fixed with a long loop. Then pick up the canvas
with your right hand, pull the working thread with your left thumb,
forming a loop out of it, and secure it by knitting the next
single crochet. So knit to the end of the row.
Tie the next row with single crochets - this is a securing row. Next, alternate these rows. 
Knitting in a circle.
For
most crochet toys need to be able to knit
circle. First, tie a chain of four chain stitches and connect
half-column into the ring. Then, inserting the hook into the ring and picking up
thread, tie 8 single crochets. Connect the first and the last
columns by half-column. In each next row, increase evenly
the number of stitches to be sewn so that their number is equal to the number
indicated in the diagram.
Each closed line in the diagram represents a row, and the number indicates the number of columns in this row. 
Rachy step.
A single crochet is knitted from left to right. 
Pattern rapport
Drawing
a patterned canvas usually consists of repeating identical elements.
The part of a pattern that repeats is called a motif or rapport.
pattern. On the diagrams, the rapport is highlighted with * ... * - asterisks.
For
so that the elements of the pattern are located symmetrically and for the edge, usually
at the beginning or at the end of the row, perform columns in additional loops
(the number of these loops is given in the description of each pattern, edge loops
are included in this number).
To write a pattern, you can use not only
text, but also a diagram. Consider the diagram from bottom to top. All odd
rows (1, 3, 5th, etc.) are read from right to left, all even rows (2, 4,
6th, etc.) - from left to right. Having finished knitting the motive in height,
continue to knit, reading the pattern from the 1st row (from bottom to top). Sometimes the pattern
repeated from the 2nd, 3rd or 4th row.
For example:
Pattern 1 In this pattern, the number of loops should be a multiple of 9 (pattern motif) plus 2 additional loops.
If
in the sample the motive of the pattern is repeated 2 times, then the number of loops in the motive
multiply by 2 and add 2 loops. The sample is knitted according to the scheme: from the 4th row
the pattern is repeated from the 2nd row.
How to knit different embossed crochet posts + patterns and master classes
Very often in the diagram and descriptions of patterns there are embossed or concave columns. I am often asked what it is and what it is eaten with. From this lesson you will learn how to crochet embossed columns.
The name of the column speaks for itself - these columns are used to create a relief knitted fabric, with the help of them they often knit an elastic band or braids. The difference between the embossed double crochet and the usual double crochet in the method of attachment relative to the columns of the previous row. With the help of embossed columns, you can change the texture of the main loops, create beautiful relief patterns on your knitted products.
There are two types of relief posts:
- embossed facial or "convex"
- embossed purl or "concave"
Let's consider both options with examples:
It is important to note that embossed columns cannot be knitted into a chain of air loops, initial row must be tied with any other loops. The columns are not knitted by the loops of the previous row, the hook is inserted under the columns themselves.
I have already prepared a sample and knitted two rows of regular double crochets. Let's start knitting a relief front column, so, we make a crochet on a hook,

we insert the hook from the front side from right to left, under the double crochet of the previous row

grab the thread
and pull out a new loop (there will be three loops on the hook),

With the method of knitting a double crochet "before work", such a column is called a relief facial or "convex"
 Its designation in the diagrams:
Consider knitting a raised purl ("concave") double crochet. We make a yarn,


clasping the leg of the double crochet of the previous row,
grab the thread
and pull out a new loop.

We knit the loops in pairs in two steps, as when knitting a regular double crochet, i.e. grab the thread and knit 2 loops, grab the thread again and knit the remaining 2 loops.

With the method of knitting a double crochet "at work" such a column is called embossed purl or "concave".
 Its designation in the diagrams:
Similarly, they knit embossed single crochet, embossed half crochet, etc.
Concave single crochet for faces.
To perform a concave double crochet, the crochet hook is not inserted into the loop of the base, but carried out in front of the column of the previous row. Having grabbed the working thread, they knit a single crochet.

Convex single crochet out.
To perform a convex double crochet, a crochet hook is inserted behind the column of the previous row and a single crochet is knitted.

|
In order to start knitting an embossed elastic, follow a chain of air loops and tie the first row with double crochets. Next, make 3 lifting air loops and turn over the knitting. Let's start knitting a raised elastic band. Knit one front embossed column with a crochet (fig. 1): Rice. 1. Knit one crochet stitch. Next, tie one purl of the embossed column with a crochet (Fig. 2):
Rice. 2. Work one purl of the embossed double crochet stitch. Rice. 3. One row, knitted with a raised elastic band. To move to the next row, sew three lifting air loops and turn over the knitting.
Rice. 4. Embossed elastic band. |
 Embossed elastic is performed by alternating the front embossed column with a crochet and the purl of the embossed column with a crochet.

The relief of this pattern is formed by convex (embossed) columns. For the sample, the number of loops of the initial chain is a multiple of 3, plus 2 loops for the symmetry of the pattern.
1 row: columns with a crochet, the first column is knitted in the 5th loop from the hook;
2nd row: 3 lifting loops, 1 embossed post with one crochet before work, * 1 post with a crochet, 2 embossed posts with one crochet before work *, 1 post with a crochet in the air loop of the previous row;
3rd row: 3 lifting loops, * 2 double crochets, 1 embossed single crochet before work *, 2 single crochets.
Knitting pattern

|
Legend for the knitting pattern
|
Air loop. 8. 9. 10. 11. 12. 13. 14. 15. |


In this lesson, you will learn how to knit embossed columns crochet. The name of the column speaks for itself - these columns are used to create a knitted fabric relief, they are often used to knit an elastic band or braids. The difference between the embossed double crochet and the usual double crochet in the method of attachment relative to the columns of the previous row. With the help of embossed columns, you can change the texture of the main loops, create beautiful embossed patterns on your knitted products.
There are two types of relief posts:
- embossed facial or "convex"
- embossed purl or "concave"
Let's consider both options with examples:
It is important to note that the embossed columns cannot be knitted into a chain of air loops, the initial row must be connected with any other loops. The columns are not knitted by the loops of the previous row, the hook is inserted under the columns themselves.
I have already prepared a sample and knitted two rows of regular double crochets. Let's start knitting a relief front column, so, we make a crochet on a hook,
we insert the hook from the front side from right to left, under the double crochet of the previous row

grab the thread

and pull out a new loop (there will be three loops on the hook),


With the method of knitting a double crochet "before work", such a column is called a relief facial or "convex"

Its designation in the diagrams:
Consider knitting a raised purl ("concave") double crochet. We make a yarn,


clasping the leg of the double crochet of the previous row,

grab the thread

and pull out a new loop.

We knit the loops in pairs in two steps, as when knitting a regular double crochet, i.e. grab the thread and knit 2 loops, grab the thread again and knit the remaining 2 loops.

With the method of knitting a double crochet "at work" such a column is called embossed purl or "concave".

Its designation in the diagrams:
Similarly, they knit embossed single crochet, embossed half crochet, etc.
In the next lesson, we will practice knitting. embossed double crochet and crochet the elastic.
If you want to receive fresh articles, lessons and master classes from the site to your mailbox, then enter your name and e-mail in the form below. As soon as a new post is added to the site, you will be the first to know about it!
The embossed column is one of the volumetric types of crochet. The result is not a flat surface, but a convex one. Distinguish between front and back embossed columns, which can be without crochet and with crochets.
Purl embossed columns and facial relief columns are used to create beautiful patterns. Both complex and simple.
What is the difference and how to knit a relief column? The point is that the columns are not knitted by the loops of the previous row, but by the very base of the column.
Facial embossed columns without crochet
1. It is impossible to knit embossed posts in, so I previously completed a row of. The execution of a row with single crochet columns is not essential. If you try with me, then you can also do single crochets, I need single crochets for clarity

3. And now the most important thing! We insert the hook into the gap between the columns of the previous row and it comes out with us wrapping around the column. Please note that we do not thread through the loops on the top of the column, but between the columns, if you pull the knitting strongly (do not overdo it) in different directions, then you will see these holes


6. We hook up the working thread and pull it through two loops on the hook, as when doing a regular single crochet, ready


Purl embossed columns without crochet
1. We insert the hook from the seamy side into the hole between the current and the next column


Alternating the front embossed single crochet and the back embossed single crochet, you get such a pattern, it can be used as an elastic band! 🙂

Please note that the previous row takes the form of the above and also forms one part of the elastic. But it is wider, so with this kind of knitting with an elastic band it is better to finish! We knit the third row in the same way, alternating, and watch out, if you have a closed knitting and just climb to the next row without turning, then above each front embossed column of the previous row there will be front in the current one, and above the purl of the purl. If, as in my case, we turn the knitting and perform the next row, then above the front embossed column of the previous row there will be a purl in the current one and vice versa. It is easy to get confused in the description, it is easier in practice, we just look, if the column around which we are knitting the current embossed column is fed to us - we knit the front one, if it hides back, then the purl one.

Thank you for the attention!
You are great!
Be always up to date! Be the first to know about new lessons!

They also have the name of embossed columns, as well as the people most often call them front and back embossed columns. The name itself already suggests that such columns differ from ordinary ones in their shape. With the help of these columns, one obtains beautiful patterns, braids, elastic bands. These posts are attached differently than regular posts. This is what we will discuss below.
Video master class on knitting concave and convex crochet columns:
Description of the process of knitting embossed crochet posts:
There are two types of embossed posts:
- Convex or raised "facial";
- Concave or embossed purl.
Important! In the case of knitting an elastic band, these columns cannot be knitted into a chain of air loops, they are knitted only from the second row. The first row is usually knitted with crochets. The embossed columns themselves are knitted not by the loop, but by the columns of the previous row themselves. You can learn more about this from the lesson.
How to knit a convex (front) column
The next row begins to knit embossed columns. We do not knit in a base loop. We stick a crochet hook on front side(from right to left), by the double crochet of the previous row, we pick up the thread, and, pulling the loop, we knit the double crochet. We have knitted the first raised double crochet.
How to knit a concave (purl) column
The 1st row needs to be knitted with double crochets.
The next row begins to knit embossed columns. We do not knit in a base loop. We stick in the hook from the seamy side of the canvas (from right to left), in front of the double crochet of the previous row, pick up the thread, and, pulling the loop, we knit the double crochet. We have knitted the first concave double crochet.
In the same way, they knit embossed single crochet, embossed half crochet and others.