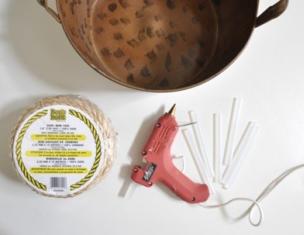
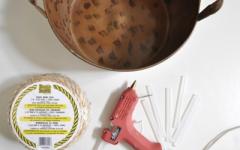
Materials: 50% yarn wool, 50% acrylic, 392 m / 100 g thick, 2 beads for eyes, 2 buttons;
Tools: Hook No. 2.5 and Spokes No. 2 Knitted and sewing needle;
Size: the height of the toy is about 20 cm.
We bring to your attention a scheme of knitting a snowman with crochet. Snowman hurries on new Year's celebration With bag of gifts.
Sequence of work
Snowman ties below. The body is associated with a single detail. Hands - separately. Additional elements: Hood, scarf and bags with gifts are knitted. All the details of the columns without a nakid, without lift loops. Do not stuff the details of the toy filler too tight. They should be pleasant elasticity, but not stone. As a filler fit well. In brackets - the number of columns in the specified row.

Start knitting from the bottom
1 row : 6 loops in the initial ring (6);
2 rows : * 2 columns without a nakid 1 loop * - repeat 6 times (12);
3 row: * 2 columns without Caida in 1 loop, 1 column without a nakid * - repeat 6 times (18);
4 row:
5 row:
6 row:
7 row:
8 row:
9 row:
10 row: * 2 columns without an inlets in 1 loop, 8 columns without Nakid * - repeat 6 times (60);
11 row: * 2 columns without nakid 1 loop, 7 columns without Nakid * - repeat 6 times (66);
from 12 to 22 row: Knit without add-ons, in each row 66 columns without Nakid.
23 row: * 9 columns without Nakida, 2 columns without a nakid with one vertex * - repeat 6 times (60);
24 row: * 8 columns without Nakida, 2 columns without a nakid with one vertex * - repeat 6 times (54);
25 row: * 7 columns without Nakid, 2 columns without a nakid with one vertex * - repeat 6 times (48);
26 row: * 6 columns without Caida, 2 columns without a nakid with one vertex * - repeat 6 times (42);
27 row: * 5 columns without Caida, 2 columns without a nakid with one vertex * - repeat 6 times (36);
28 row: * 4 columns without Caida, 2 columns without an attachment with one vertex * - repeat 6 times (30);
The middle part of the snowman
We start to add loops.
29 row: * 2 columns without an inlets in 1 loop, 4 columns without a Nakid * - repeat 6 times (36);
30 row: * 2 columns without an inlets in 1 loop, 5 columns without Nakid * - repeat 6 times (42);
31 row: * 2 columns without an inlets in 1 loop, 6 columns without Nakid * - repeat 6 times (48);
32 row: * 2 columns without Caida in 1 loop, 7 columns without Nakid * - repeat 6 times (54);
from 33 to 41 row: We knit without add-ons, in each row 54 columns without Nakid.
We feed the bottom of the snowman with filler.
We start to subscribe loops.
42 row: * 7 columns without Nakida, 2 columns without a Nakid with one vertex * (48) - repeat 6 times;
43 row: * 6 columns without Nakid, 2 columns without an inlet with one vertex * (42) - repeat 6 times;
44 row: * 5 columns without Nakid, 2 columns without a Nakid with one vertex * (36) - repeat 6 times;
45 row: * 4 columns without Caida, 2 columns without an onset with one vertex * (30) - repeat 6 times;
46 row: * 3 columns without Nakida, 2 columns without a nakid with one vertex * (24) - repeat 6 times;
47 row: * 2 columns without Nakid, 2 columns without a Nakid with one vertex * (18) - repeat 6 times;
Add a loop
48 row: * 2 columns without a cape in 1 loop, 2 columns without a nakid * - repeat 6 times (24);
49 row: * 2 columns without an inlection in 1 loop, 3 columns without a nakid * - repeat 6 times (30);
50 row: * 2 columns without an inlets in 1 loop, 4 columns without a Nakid * - repeat 6 times (36);
51 row: * 2 columns without an inlets in 1 loop, 5 columns without Nakid * - repeat 6 times (42);
from 52 to 58 row: Knit without add-ons, in each row 42 columns without Nakid.
Put the middle part of the snowman with filler.
The upper part is pinching the filler as knitting.
We reduce the loop
59 row: * 5 columns without Caida, 2 columns without a nakid with one vertex * - repeat 6 times (36);
60 row: * 4 columns without Caida, 2 columns without an attachment with one vertex * - repeat 6 times (30);
61 row: * 3 columns without Nakida, 2 columns without a nakid with one vertex * - repeat 6 times (24);
62 row: * 2 Stake without Nakid, 2 Stakes without a Nakid with one vertex * - Repeat 6 times (18);
63 row: * 1 Stage without a Nakida, 2 columns without a nakid with one vertex * - repeat 6 times (12);
64 row: * 2 columns without a nakid with one vertex * - repeat 6 times (6).
The remaining loops are tightened on the thread, fix and close the tips.
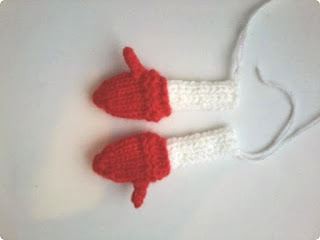
Hands
Knitting begins to bottom, from mittens, red thread.
1 row: 6 columns without a nakid to a sliding loop (6);
2 row: * 2 columns without an inch in each loop * - repeat 6 times (12);
3 row: knit without add-ons (12);
4 row: * 5 columns without Nakid, 2 columns without an inlets in one loop * - repeat 2 times (14);
5, 6, 7 row: knit without add-ons, in each row 14 columns without Nakid (14);
Red thread cut, white attach.
8, 9, 10 row: in each row of 14 columns without Caida (14);
11 row: * 5 columns without Nakida, 2 columns without a Nakid with a total vertex * - repeat 2 times (12);
12, 13 row: In each row of 12 columns without Nakid (12);
14 row: * 4 columns without Nakid, 2 columns without Nakid with a total vertex * - repeat 2 times (10)
15, 16, 17 row: 10 columns (10)
Cut the thread, leaving the end of about 20 cm for the sewing of the hands to the body. Hands stuck in the bottom (mittens) is not too tight. The top is not screwed up. We sew hole. Make a few stitches with red thread, indicating thumb On mittens. We attach your hands to the body or sew.
Nose
Tailing threads leave a larger (about 20 cm) to sew the nose. Knit a chain of 6 air loops. Close it with a connecting column. We knit on the helix with a tube with a length of about 2 cm with a length of about 2 cm. Then reducing the loop, tieting 2 columns without a nakid with one vertex. We collect the remaining loops on the thread and tighten. The nose is sewn to the head oblique stitches. No need to fill the nose.
Hood
Hood knit needles in a circle. We gain 44 loops and knit 1.5 cm to sweating (6 rows). Next, 2.5 cm (10 rows) - a bug. We reflect 8 loops in a row, tissing 2 loops together (4 slotting in a row), through a row.When there are 12 loops, the loops are tightened and sewn pompon.
Scarf
Scarf knit spokes with rubber band 1x1. We recruit 8 loops (along with the edge). Knit 32 cm. Attach the fringe. The scarf width is slightly less than 2 cm.
Pouch with gifts
Stops from above in a circle. We recruit 46 loops and knit blue yarn 3 cm (12 rows). Next, in the Scheme knit jacquard pattern. After the pattern, knit 2 cm (10 rows) of the blue yarn and connect the soup side with 3 knitting or sewn. Put the bag with a filler or put in it a New Year's gift.

We present a pretty and fairly simple in knitting a toy that you can give as a souvenir for the new year. A cute knitted snowman crochet in a hat and mittens will appeal to both adults and children, and will take her honorable place under the Christmas tree! To create such a bright snowman you will need the usual acrylic yarn of different colors and a suitable hook (2-2.5 mm).
The scheme of a knitted snowman is created on the motives of the Scheme of ASID. Snowman presented in the photo, tied the needlewoman Yana Paw.

Knitted snowman crochet:
Diagram and description toy amigurumi
Materials:
- Yarn "Children's novelty" 50g / 200m, 100% acrylic, hook 2.5 mm
- Some Alize Softy Yarn for Cap Edge
- Eyes on safe mount or beads
- Tight Cardboard Scotch
- Beads and Buttons for Decoration
- Scissors
Head
Row 1: 2 VP, in the second loop from the hook 6 scan
Series 2: in each loop of 2 fails \u003d 12
Row 3:
Series 4:
Row 5:
Row 6:
Row 7:
Row 8:
Row 9:
Row 10-12:1 scan without add
Row 13:
Row 14: 1 TB to each loop in a circle \u003d 48
Row 15:
Row 16:
Row 17:
Row 18:
Row 19: Every 3 and 4 loops to check together \u003d 18
Row 20:
Row 21: Fabulov in each loop \u003d 6
Secure the thread, leaving the tail for the sewing.
Insert eyes between 12 and 13 rows. Fill the detail.
Body knitted snowman
Row 1: VP, in the second from the hook 6 fail
Series 2: in each loop of 2 fails \u003d 12
Row 3: In each 2 loop 2SBN \u003d 18
Series 4: In every 3rd loop of 2 fails \u003d 24
Row 5: In each 4th loop of 2 fails \u003d 30
Row 6: In each 5th loop of 2 fails \u003d 36
Row 7: in each 6th loop of 2 fails \u003d 42
Row 8: In each 7th loop of 2 fails \u003d 48
Row 9: In each 8th loop of 2 fails \u003d 54
Row 10: in each 9th loop of 2 fails \u003d 60
Row 11: In each 10th loop of 2 fails \u003d 66
A number 12-16: 1 scan without add-ons \u003d 66
Row 17: Every 10 and 11 loops to prick together \u003d 60
Row 18: Every 9 and 10 loops to lie together \u003d 54
Row 19:every 8 and 9 loops to check together \u003d 48
Row 20: Every 7 and 8 loops to check together \u003d 42
Row 21: Every 6 and 7 loops to check together \u003d 36
Row 22: Every 5 and 6 loops to check together \u003d 30
Row 23: Every 4 and 5 loops to check together \u003d 24
Fade
Series 24: Every 3 and 4 loops to check together \u003d 18
Series 25: Every 2 and 3 loops to check together \u003d 12
Row 26:fabulov in each loop \u003d 6
Pull the hole, fasten the thread and trim.
Mittens
Row 1: 2 VP, in the second loop from the hook knit 6 fail \u003d 6
Series 2: in each loop of 2 fails \u003d 12
Row 3-4: Knit on 1 failure in a circle \u003d 12
Row 5: Slip 5 failures and knit lush column (It will be a finger on the mittens), then they are tied up 6 yarn \u003d 12
Row 6: Every 3 and 4 loops to lie together \u003d 9
Row 7: Knit for the front wall of the loop: additions to each loop in a circle. It turns out the cuff mittens.
Change the thread on white and begin to knit the handle for the rear walls of the hinges of the sixth row \u003d 9
Do not forget to fix the thread when moving from the mittens to the handle so that the knitting then did not break.
Row 8-16: 1 fails in a circle \u003d 9
Row 17: every 2 and 3 loops to stick together
To pull (before that, do not forget to fill the handle) and fasten the thread, trim and hide the ends.
Legs
Cooking cardboard for the base of the feet, tape and scissors.
Row 1: We recruit the chain of 6 VP, in the second loop from the hook, we will prone 3 fails, then in each loop one by one ISP and in the extreme loop 3 will again be a bit, and one after the following 3 loops \u003d 12
Series 2: In the three next loops, knit 2 fails, in the three following - one by one, in the three following - again 2 fails, in the last three in this circle - one after a bit, it turns out oval \u003d 18
Row 3: In the 6 following loops, alternating, check 2 failures, 1 fail (3 times), in the three following loops, insert one after a bit, in six next loops, repeat the alternation of 2 fails, 1 fail (3 times); In the three next hinges knit one after a bit \u003d 24
Series 4: at nine next loops knit 1 fail-test, 2 fails, 1 fail (3 times), three next hinges knit one after a bit; In nine the next loops, check 1 fails, 2 fails, 1 fail (3 times); In the three next hinges knit one after a bit \u003d 30
Row 5: Knit without add-ons in a circle of 30 fails for the rear walls of the loop \u003d 30
Row 6: Again in a circle without adding for both walls loops \u003d 30
Row 7: 7 grains in a row, 5 fails one by one knitting and on the heel three slotting, and 5 will be pronounced further.
Now cut out the oval in the size of the soles from the cards, trying on it inside the boot. If not suitable, cut or convert.
It is necessary that the cardboard is ideal - size in size, otherwise it will be written, or will eat and the snowman will not be stable. Happened? Great, immediately cut out one more cardboard and glue the tape carefully and laid in the boots.
Row 8: Three slugs and knit to the heel one after a bit, fix the thread. Put.
Nose-carrot
Row 1: 2 VP to the second from the hook 6 scan
Series 2: one sample \u003d 6
Row 3: In every 3rd loop of 2 fails \u003d 9
Row 4-5: one without adding \u003d 9
Row 6:in each 4th loop of 2 fails \u003d 11
You can make your nose shorter or longer at your discretion.
Secure the thread, leave the tail for the sewing.
Head and body sew holes to each other. Seafood sticks and legs. Easy smile.
Scarf It knits to right left, every time new color. You dial the chain from the VP, at the end of the thread attach and cut. And on the new on the right, a new series is new. It turns out beautifully - on the one hand, the front rows, on the other - the involves.
Hood
Color hats and her strips choose at their discretion.
Row 1: Dial the chain of air loops and connect so that it turns out 56 loops. Scroll to the snowman, if necessary, reduce or add 1 loop.
Row 2-8: Knit 1 BTF in a circle
Row 9: Every 8 and 9 loops are tied together
Row 10:knit 1 BTF in a circle
Row 11: every 7 and 8 loops are tied together
A number 12:knit 1 BTF in a circle
Row 13:every 6 and 7 hinges are tied together
Row 14: every 5 and 6 hinges are tied together
Row 15: every 4 and 5 hinges are tied together
Row 16: Every 3 and 4 hinges are tied together.
Row 17: every 2 and 3 hinges are tied together
Row 18: Rent into each loop, pull the loops
Make a pompon and sew to the header.
Wear a knitted snowman and toy ready!
If you have questions about the scheme of knitting a snowman with a crochet, write them in the comments to the post! All success in preparing for the new year!

In the yard, the end of November. In this gray, cold and dreary temper, so you want to plunge into the world of fairy tales and magic! Today we will help you with this: Check out our MK and you will learn how one of the main symbols of the new year, the beloved holiday of both adults and children - a snowman crochet! Reserve the remains of the yarn, with the help of which in just a couple of hours you can do original gift To friends, close, children and just festively decorate the house.
Mini Snowman for a keychain do it yourself: master class
For MK we will need:
- the remains of the yarn of white, black, green, red and orange colors;
- kr. № 2, № 3;
- filler for your taste.
Master class and description
Main part
1 r. (White thread, cr. No. 3): 6 s. without n. in the ring amigurum \u003d 6 p.
2 r. 2 s. without n. in 1 p. x 6 \u003d 12 p.
3-5 PR.: 12 p. without n ..
6 R.: 2 s. without n. VM. x 6 \u003d 6 p ..
7 R.: 2 s. without n. in 1 p. x 6 \u003d 12 p.
8 R.: * 2 s. without n. in 1 p., 1 s. without n *, from * to * x 6 \u003d 18 p ..
9-12 PR.: 18 s. without n ..
13 R.: * 2 s. without n. Vm., 1 s. without n *, from * to * stick to the scheme 6 times \u003d 12 p.
Put the detail of the filler.
14 R.: 2 s. without n. VM. x 6 \u003d 6 p ..
Cut the thread, hide the tip.
Nose-carrot
Orange thread and kr. № 2 We type 3rd. p., 1 ss. In the 2nd and 1st century. p., cut the thread, leaving the tail.
Hood
We use red and green, cr. Number 3.
1 R.: 6 s. without n. in the ring amigurum \u003d 6 p.
2-3 PR.: 6 s. without n ..
4 R.: * 2 s. without n. in 1 p., 2 s. without n. * x 2 \u003d 8 p ..
5 R.: * 3 s. without n. in 1 p., 2 s. without n. * x 2 \u003d 10 p.
6 R.: * 4 s. without n. in 1 p., 2 s. without n. * x 2 \u003d 12 p.
7 R.: * 5 s. without n. in 1 p., 2 s. without n. * x 2 \u003d 14 p.
Hat
Black thread and kr. Number 3.
3 R.: 12 s. without n. Behind the rear wall p. \u003d 12 p.
4-6 pp.: 12 s. without n ..
7 R.: * 2 s. without n. in 1 p., 1 s. without n. * Adherence the scheme 6 times \u003d 18 p ..
Headphones
Green thread and kr. Number 3.
1 R.: 6 s. without n. in the ring amigurum \u003d 6 p.
Connect 2 headphones using in. P..
Scarf
Knit chain out of 30 V. P., Make one nodule on each of the edges.
Assembly
Embroide the brown thread of the handle, in the 3rd p. - Eye, sew the carrot-carrot, make butchers from beads. Snowman crochet with their own hands ready!
Snowman for beginners: video MK
Snowman under the Christmas tree with her own hands: master class
For MK we will need:
- yarn (100% cotton, 50 grams 180 meters) 40 grams;
- residues orange, green, red yarn;
- black beads;
- kr. Number 3;
- spokes number 3;
- filler.
Master class and description
Main part
Knit with. without n. Spiral.
1 R.: We recruit 2 V. p., Say in the 1st 6 s. without n ..
2 p.: Adjust 6 s. without n. (from everyone with. without n. Pr. r. knitting 2) \u003d 12 s. without n ..
3 R.: I add 6 s. without n. After one \u003d 18 p. without n ..
Knit in a circle, evenly adding 6 s. without n., 12 p. \u003d 72 S. BEZ N ..
The latter addition is noting a marker, then 12 p. without add-ons.
Now we begin to uniformly subsidize P: In each r. 6 s. without n. In the end we will get 30 s. without n ..
We make another 3-4 circle (neck), then again add 6 s. without n. In each r. until we receive 66 p. without n ..
Now another 4-5 circles and again we reduce 6 s. without n. For the head, several r. We leave open for packing.
After the snowman is filled, proceed to the upbutters in each r., Through the remaining 2-3 s. without n. We stretch the thread, tighten, hide the tail.
Pens
We recruit 2 in. p., 6 s. without n., in cl. R. add 6 s. without n. \u003d 12 s. without n ..
Knit 4-5 r., In cl. 2 r. We reflect 1 s. without n. \u003d 10 s. without n ..
Again 4-5 p .. In the same way, we do and the second handle, fill the items.
Mittens
The red thread is gaining a few steps with a step. without n., capturing immediately and the front and rear wall of the handle \u003d 6 s. without n ..
In the opposite direction - 6 s. without n., Rotate, 5 s. without n., then 4 s. Without n., fix the thread, hide the tail and repeat the same with the second handle.
Nose
We note that a plot where we will make a nose, we recruit a few s. without n. orange thread, then in a circle with. without n. With gradual gradation, clutch. thread hiding her.
Embroidery with your own hands
We work with a needle with black thread. We introduce it into the top and we take it in a place where the right eye will be stretching and hiding the knot inside the head, we dress the bead, ingested the thread with a needle in the head and "naming" at the place of the second eye, sew a bead. Embroide the brow and mouth (4-5 stitches are enough).
Fix the string and cut.
Buttons
We make two mugs from p. Without n., Tails hide in exaggeration.
Scarf
Here we already use the needles, we alternate 2 liters. p. 2 and. p., Schef's width - 14 p., Length - at your discretion. Ends can be made with tassels of contrasting threads.
Hood
We also use the needles.
We recruit 42 p., Rubber 2 x 2 somewhat p .. in persons. R. We enter a contrast. Thread and further - persons. Sling (persons. r. l. p., Iz. r. - and. p.), In each individuals. R. on both sides of the Ubaul. 1 p. after chrom. n. And in front of the chr. P .. We continue work until 8 p ...
We close them, do not cut the thread. The cap is turned inside out, fasten it with a tambourine with the help of cr. From the crown down, we enter the cr. under the chrome n. on both sides, fix the thread and cut.
Assembly
Send Butt Cross, then the handles.
We dress the scarf and attach it with a needle with a thread from behind between l. p. Screw so that the thread is inconspicuous.
Now we sew a hat, after having finished it with a small amount of hollofiber, we make a nodule and hide the tail of the string. The master class is over - a snowman with a crochet is ready!
Funny snowman amigurum with her own hands: master class
For MK, you will need:
- velor Yarn (100 grams of 120 meters) white color;
- cotton yarn of red, green, white color for cap and sweater, orange - for nose and a bit pink for cheeks;
- kr. % 5 and No. 15;
- marker;
- two beads for the eyes;
- buttons for a sweater;
- filler.
Master class and description
Head
1 R.: 6 s. without n. In the ring Amigurumi.
2 R.: 2 s. without n. in 1 p. x 6 \u003d 12 p.
3 R.: 1 s. without n., * 2 s. without n. in 1 p. *, hold the scheme from * to * x 6 \u003d 18 p.
4 R.: 2 s. without n., * 2 s. without n. in 1 p. *, hold the scheme from * to * x 6 \u003d 24 p.
5-7 PR.: 24 s. without n ..
Cut the string, fill the item.
Torchishche
1 R.: S. without n. In the ring Amigurumi.
2 R.: 2 s. without n. in 1 p. x 6 \u003d 12 p.
5 R.: 3 s. without n., 2 s. without n. in 1 p. x 6 \u003d 30 p.
6-10 pp.: 30 s. without n ..
11 R.: 3 s. without n., 2 s. without n. VM. x 6 \u003d 24 p.
12 R.: 2 s. without n., 2 s. without n. VM. x 6 \u003d 18 p ..
13 R.: 18 s. without n ..
14 R.: 1 s. without n., 2 s. without n. VM. x 6 \u003d 12 p.
15 R.: 12 s. without n ..
Hands
1 R.: 5 s. without n. In the ring Amigurumi.
2-7 PR.: 5 s. without n ..
We fold the edges together, prov. 2 s. without n ..
Nose
Orange thread and kr. No. 1.5.
1 R.: 6 s. without n. In the ring Amigurumi.
2 p.: 1 s. without n., 2 s. without n. in 1 p. x 3 \u003d 9 p.
3-5 pp.: 9 s. without n ..
6 R.: 2 s. without n., 2 s. without n. in 1 p. x 3 \u003d 12 p.
7-8 PR.: 12 p. without n ..
Leave a long string for stitching, fill.
Sweater
Knit in a circle.
1 R.: 3 in. p., 60 s. with n., ss ..
2 p.: 1 c. p., 10 s. without n., 3 s. without n. In 1 p. (hereinafter - Rlange), 8 s. without n., Raglan, 20 s. without n., Raglan, 8 s. without n., Raglan, 10 s. without n., Raglan.
3 R.: 1 in. p. p., 11 s. without n., Raglan, 10 s. without n., Raglan, 22 s. without n., Raglan, 10 s. without n., Raglan (hereinafter - P), 11 s. without n., SS ..
4 R.: 1 in. p. p. 12 s. without n., P, 12 s. without n., p, 24 s. without n., P, 12 s. without n., P, 12 s. without n., SS ..
5 R.: 1 in. p. p. 13 s. without n., p, 14 p. without n., P, 26 p. without n., P, 14 s. without n., P, 13 p. without n., SS ..
6 R.: 1 V. p., 16 s. without n., P, 16 s. without n., P, 28 s. without n., p, 14 s. without n., P, 14 s. without n., SS ..
7 R.: 1 V. p. p. 15 s. without n., P, 18 s. without n., p, 30 s. without n., P, 18 s. without n., P, 15 s. without n., SS ..
8 R.: 1 in. p. p., 20 s. without n., P, 14 p. without n., P, 32 s. without n., P, 14 p. without n., p, 20 s. without n., SS ..
We connect before and back, leaving the place for the sleevers.
9-11 PR.: 1 in. p., 68 p. without n., SS ..
Sweepers
9-13 pp.: 1 c. p. p. 24 s. without n., SS ..
14 R.: 1 in. p., 2 s. without n., 2 s. without n. VM. x 6, ss.
We dress a sweater to the bottom ball of a snowman, sew your head and make out the face. Send a spout, beads-eyes, knit cheeks n. Pink colors (10 extended with. without n. In the ring of Amig.), Embroide the brow and mouth.
The sweater make up the applique (we tied up the Christmas tree from the village without n.), Send buttons.
Cap
We work below up.
We recruit a chain out of 60 V. p., ss ..
1-2 PR.: 2 V. p., 60 elongated with. without n., SS ..
3-12 pp.: 1 c. p., 60 s. without n., SS ..
13 R.: 1 in. p. p., 8 s. without n., 2 s. without n. VM. x 6, ss ..
14 R.: 1 in. p. p., 54 p. without n., SS ..
15 R.: 1 in. p., 7 s. without n., 2 s. without n. VM. x 6, ss ..
16 R.: 1 V. p. p., 48 p. without n., SS ..
17 R.: 1 in. p. p., 6 s. without n., 2 s. without n. VM. x 6, ss ..
18 R.: 1 in. p., 42 p. without n., SS ..
19 R.: 1 c. p. p., 5 s. without n., 2 s. without n. VM. x 6, ss ..
20 R.: 1 in. p. p., 36 s. without n., SS ..
21 R.: 1 c. p. p., 4 s. without n., 2 s. without n. VM. x 6, ss ..
22 R.: 1 in. p. p. 30 s. without n., SS ..
23 R.: 1 in. p. p. 3 s. without n., 2 s. without n. VM. x 6, ss ..
24 R.: 1 in. p. p. 24 s. without n., SS ..
25 R.: 1 in. p., 2 s. without n., 2 s. without n. VM. x 6, ss ..
26-48 PR.: 1 V. p., 18 s. without n., SS ..
49 R.: 1 in. p. 1 s. without n., 2 s. without n. VM. x 6, ss ..
50-59 pp.: 1 c. p. p. 12 s. without n., SS ..
60 R.: 1 in. p., 2 s. without n. VM. x 6, ss ..
Pompon
1 R.: 6 s. without n. In the ring of Amig ..
2 R.: 2 s. without n. in 1 p. x 6 \u003d 12 p.
3 R.: 1 s. without n., 2 s. without n. in 1 p. x 6 \u003d 18 p.
4 R.: 2 s. without n., 2 s. without n. in 1 p. x 6 \u003d 24 p.
5-7 PR.: 24 s. without n ..
8 R.: 2 s. without n., 2 s. without n. VM. x 6 \u003d 18 p ..
9 R.: 1 s. without n., 2 s. without n. VM. x 6 \u003d 12 p.
10 R.: 2 s. without n. VM. x 6.
Knitted snowman DIY ready!
Snowman Amigurumi: Detailed video MK
Funny snowmen hats do it yourself: master class
For MK we will need:
- yarn kartoru kristal # 150; Yarnart Diamond # 01; Alize Forever # 336; ZUMRUT ETAMIN # 438;
- microfiber for a hat;
- 2 eye beads;
- super glue;
- bead-berry for a hat;
- kr. № 3 and № 1.75;
- filler;
- 1 meter copper wire for hands.
Master class and description
Torchishche
Kr. No. 3, white yarn.
1 R.: 6 s. without n. In the ring.
2 R.: 2 s. without n. in 1 p. x 6 \u003d 12 p.
3 R.: * 2 s. without n. in 1 p., 1 s.bez n. * x 6 \u003d 18 p.
4 R.: * 2 s. without n. in 1 p., 2 s.bez n. * x 6 \u003d 24 p.
5 R.: * 2 s. without n. in 1 p., 3 s.bez n. * x 6 \u003d 30 p.
6 R.: * 2 s. without n. in 1 p., 4 s.bez n. * x 6 \u003d 36 p.
7 R.: * 2 s. without n. in 1 p., 5 s.bez n. * x 6 \u003d 42 p.
8-15 pp.: 42c. without n. \u003d 42 p.
16 R.: (2 s. Without n. Vm, 5 s. Without n.) X 6 \u003d 36 p.
17 R.: 36 s. without n. \u003d 36 p.
18 R.: (2 s. Without n. Vm., 4 s. Without n.) X 6 \u003d 30 p.
19-20 pp.: 30 s. without n. \u003d 30 p.
21 R.: (2 s. Without n. Vm., 3 s. Without n.) X 6 \u003d 24 p.
22 p.: (2 p. Without n. In 1 p., 3 s. Without n.) X 6 \u003d 30 p.
23-24 PR.: 30 s. without n. \u003d 30 p.
We prepare the frame from the wire: twist a twig with a length of 7 cm, with the help of glue, we attach to it n. And wind up. We conceal two points on the torso, insert into the first hand, we draw the wire through the workpiece and take it out, we twist it, making the "twig" for hand, wind up ... twist the wire with each other and insert the little piece horizontally between them so that your hands are not scrolled .


Now it is very popular to give souvenirs in the style of Hand-Made. Types of needlework quite a lot: some more, others are less expensive both by materials and time. For example, it is easy to fit a snowman crochet. The scheme and description of the work are shown below.
New Year souvenirs-snowmen
Eve winter holidays - Always a pleasant time to prepare gifts and surprises for relatives and friends. For those who love needleed or only begins to master this direction, there is a great opportunity to make lovely winter decorations, crocheted in the form of snowmen. You can make such options:
- Flat figurine of circles as christmas toys, garlands or magnet element.
- Functional items for the kitchen (tap, or a warm cup decor).
- Volumetric figures - from a miniature size to a full-fledged interior soft toy.
Choose the option you like, follow the instructions, and you will get a very beautiful snowman crochet. The scheme and description is quite simple, so it will be easy to understand the sequence of work. A gift made in the form of a cute winter character will accurately take a worthy place among the jewelry for the house with your friends and relatives.

Simple souvenir (flat object)
The most elementary crochet can be made of conventional circles (one or more). So that the circle is not pulled and without angles, it is important to properly and evenly distribute the increase. Any circle fit on the spiral.

Work like this:
Perform 6 air loops as a chain.
- Connect the element into the ring.
- 1 row: Run 6 columns without Nakid.
- 2 row: in each loop of the previous row, insert two columns without a nakid (\u003d 12).
- 3 row: evenly distribute the freight from 6 columns without an inlet (\u003d 18).
- 4 row: Knit columns without a nakid, also distributing a uniform increase in the form of 6 columns (\u003d 24).
The work continues along the same diagram to the desired diameter of the circle. So that the figure does not work with the angles, the gain in each row should not go perfectly in one place.

For a snowman, you can connect two or three mug of one or different sizes, and then sew them into a single object, which is easy to decorate the embroidered sheet and additional details in the form of a scream and caps.
Volumeful toy: how to tie the body
Knitting a snowman with a crochet can be made by separate elements or as a whole. In the second case, it will not be necessary to sew balls, but it will be necessary to fill the form by syntheps in the knitting process. For the manufacture of the body, use the hook number 2. Work will look like this:
1 row: begins with an amiguri ring. To do this, wrap the working thread around the index finger of the left hand and pull the working thread through the loop with crocheting. Check out 8 columns without Caida and torn in the ring. Before you - accurate start of work.
- 2-7 row: Knit in a circle with bars without a nakid, evenly distributing the addition, so that it turns out a flat flat, not an average circle.
- 8-15 row: Knit the columns without an attachment without performing additions.
- 16-22 Row: Uniformly reduce the loops, performing columns with a total vertex, or in any other way you begin to make a drop in an equal number of columns. You should have a narrowing form, a kind of "waist" of a snowman.
- 23 row: now perform an increase (a pair of columns in one loop).
- 24 row: after every two columns, perform an increase.
- 25-28 row: performed without additives and lubricants by columns without Nakid.
- 29-34 row: Equally distribute the accumulation in a circle to form the transition to the head, that is, the neck.
- 35 row: how did the transition in the waist area, check the pair of columns into one loop.
- 36 row: Perform an increase in 2 columns.
- 37-47 row: Knit columns without a nakid without add-ons or lifting. Do not forget to fill the product with existing material;
- 48-55 row: Perform the accumulation until the ring is closed. Cut and secure the thread.
Interior toy
If you need a big snowman, the crochet to tie it too easy, only much more time and yarn will be required. Depending on the desired size, you can take threads and hooks thicker or, understood the principle of working on a small product, correctly adjust the presented scheme, increasing the number of loops, rows of additives, lifting and parts of the object without them.

How to tie legs
The bulk snowman should be the most realistic and detailed, so the legs must also be performed in addition to the body. Each item knits separately (two pieces, respectively), and then sewn to the base. Define the location of the legs themselves. If the snowman will stand on the table, then it is better to lift them on the front plane of the bottom ball. If the product is supposed to hang on the Christmas tree, then the legs will perfectly look and the attached at the bottom.
1 row: Perform as for the previous part. Insert 8 columns in it without a nakid and pull into a dense neat item.
- 2-3 row: Slip the columns without a nakid, evenly distributing the addition.
- 4-5 row: Also perform the columns without a Nakid, but without additives.
- 6-7 row: after two columns without a Caida make one gravel.
Fill out the part of the Sintepona, and the remaining small hole simply roll up and squeeze the needle. Tie the second leg along the same scheme. Sewing both legs to the body.
So, as you can see, there is nothing complicated.
How to tie a handle
Without legs, you can still do, if you do not want to do or not time, but without a handle exactly nowhere. Any real salted snowman is always performed with hands, to one of which, as a rule, is fixed with a broom. Although you will have only a toy-snowman crochet, but realistic is important. So, to link the hand of the character, work according to the following scheme:
1 row: Perform a ring with amigurums and check 8 columns in it without Nakid. Tighten the ring.
- 2 row: make an increase (on a pair of columns in one loop).
- 3-12 row: Permanently performed by columns without Nakid. Fill out the detail of the Sintepsum.
- 13-15 row: Uniformly distribute the accumulation until the circle closes.
Make the second handle in the same way. Sew elements in the appropriate places of torso.
Your snowman has already acquired realistic outlines!
How to make a face
Focusing on the object created from snow in the yard, decorating his head with details that form a certain image, facial expressions and emotions, fulfill the face. Eye easily embroider or sewing small beads. The mouth is easier to make the first way. The nose is traditionally made from carrots. To yours snowman Different from natural just sizes, take the orange yarn and make the appropriate item. Hook better use №1. Work like this:
1 row: Perform 14 air loops and secure the chain in the form of a ring.
- 2-5 row: Knit in a circle without additives and lubricants with columns without Nakid.
- 6-8 row: Do uniformly accurate until the circle is clicked.
Fill out the resulting cone with syntheps. Sew detail to the head.

How to tie a headdress
Create a cute image of the winter hero will also help correctly selected additional attributes, in particular, clothing elements. They can be made the same or different in color. If you want your new Year's snowman Crochet was in a hat, work like this:
Perform a ring amigurum and check 10 columns in it without Nakida:
1 row: Perform columns without an ingredient, making a uniform increase of 5 columns to get 15 in a row.
- 2 row: Check 15 columns without an inlets for the back wall of the loop.
- 3-4 row: Perform columns without Nakid.
- 5 row: form the fields of the hats, while sticking into each loop of the previous row two columns without a nakid for the front wall of the loop. It turned out 30 columns. Cut the thread and secure.
Hood hat.
How to make a scarf
To make a scarf, follow these steps:
- Type 60 air loops and 1 lifting loop.
- In the second loop, check the column without Nakid.
- Knit columns without Nakid to the end of the row.
- Cut the working thread and secure.
And this accessory is completed. You can dress the hero.
Snowman crochet: scheme and description of the manufacture of tack
This product will be the size of 22x30 cm. For its manufacture, it will take 50 g of white and 30 g of black yarn, as well as a bit of an apricot color thread and hook №2.5.

The work is performed as follows:
- For the torso, type 8 air loops from white yarn and 1 semi-solitary without a nakid to a ring.
- Knit in a circle replacing 1 column with an inlet of each circle with 3 air hinges and ending with each circle 1 semi-solitary without an insert in the upper replaced air loop. In addition, in the 2nd - 6th circles, enter the hook only for the rear wall of the loops.
Package "Snowman" will look like this:
1 Circle - 12 columns with Nakud.
2 Circle - plus evenly 6 columns with nakid (\u003d 18 columns with Nakud).
3 Circle - plus evenly 6 columns (\u003d 24 column).
4-6 Circles - plus evenly in each circle of 12 columns (\u003d 60 columns).
7-15 Circles - plus evenly in each circle of 7 columns with Nakud (\u003d 123 columns).
Now let's knite facial and involving rows:
16 row: Only 64 columns of the previous row to peck with columns with Nakud.
17-20 rows: columns with Nakud.
The face and cap knit according to the scheme of the facial and involve rows on average 22 loops as follows:
In the first 21 loop, pass the semi-solids without an ingredient, then by middle 22 loops knit according to the scheme.
After the 9th row, the working thread cut off.

Arrows re-start black yarn and knit according to the scheme.
For buttons and eye to type 6 air loops and 1 semi-solol without a nakid to close into the ring.
Run 2. aerial loops Instead of 1 column without Nakid.
Then another 7 columns without a nakid in a circle.
Finish 1 semi-solitary without an attachment in the first initial air loop.
2nd Circle: From each loop, knit 2 columns without an attachment (\u003d 16 columns without Nakid). Total to associate 5 such motifs.
Eyes and three buttons sew.
Roth to embroider with black threads, and the nose with smooth apricot.
So, you studied how the snowman crochet knives. Scheme and Description are provided for several options for executing the object. Choose favorite. Produce interesting winter souvenirs with your own hands.
Manufacture soft toys And the figurines opens the fans of knitting endless possibilities for self-expression. Due to small sizes and simple patterns Such work is very quick and easy to perform. In addition, this is an excellent opportunity to utilize the accumulated remains of yarn of different colors and textures.
They are not harder than hook) can serve as an interior decoration, new Year tree or table. They are also often used as small presents or in addition to a gift.
What materials are required
The yarn can be used literally any. That is, it can be a fluffy or smooth thread, thin or thoroughly (maximum 200 m / 100 grams). Of course, the main thread should be white or very bright, for example, bluish, pinkish or with a peach shade.
Knitted snowmen (many craftsmen own the needles and will be able to perform such a crawl)) they will not be able to do without nose-carrot and eyes, so you need to stock orange thread and the sewn decor. We also need a packing material (sinter or cotton). The remaining elements that decorate the figures in the photo can have completely any color, shape and pattern. Them appearance Depends solely on the desire of the knitter.
Spokes for work should be chosen taking into account the thickness of the yarn. It is better to give preference to thinner tools, as they will allow creating a dense canvas. In order for all the details of the snowman to have the correct shape, did not stretch and not shone, they should be made quite tight.
Knitted snowmen (knitting knitting): master class
All instructions regarding the number of loops belong to the thread of a thickness of about 400 m / 100 grams. If the selected yarn is thinner, then the sizes finished product Will be less. For their correction, a method of proportional increase in the number of loops and rows should be applied. For example, multiply by 30%. For thick threads, the same approach is used to reduce the dimensions of a snowman.
First of all, you need to make a torso and head. They knit in one long canvas. You should dial 18 loops, close them into the ring and start knitting in a circle. To do this, you can use as many spokes as convenient to the master, from two to four. To give the details the right form, it must be consistently expanded by uniform addition of six loops in the row. Expanded each row from the first eighth.
An important point remains to preserve the density of the canvas. The additions should be performed not by the formation of nakidov, but by checking new loops from the breakdown between the available loops.
Thus, in the eighth row it turns out 42 loops. Next to the 39th row inclusive need to knit exactly.
In the 40th row, the canvas should be slightly cut, as the head has a little smaller size than the body of a snowman. For this, it is evenly removed six loops (two facial to penetrate one).
Until the 60th river knit unchanged. Then for four rows you need to cut six loops in each row. The basis for the manufacture of snowman figurines is ready.

Filling the main part of Sintepun
This procedure should be done carefully, so as not to stretch the edges of the holes. Singry procession is pushed in small portions inside the base and form two lumps on both sides, and the holes are tightened with the thread and gently sew. It is impossible to allow the packing material to be not enough, as this will lead to sloppy all the figurines.
At the next stage, a knitted snowman will receive a formed silhouette. To separate your head from the torso and create the impression of two balls set on each other, you need to flash the basics of the basics around the perimeter with a solid thread. This work should be performed along one row, as in the photo.

After tightening and fixing the thread, the figure is shown in the photo below.

Snowman, with description: Hand making
The knobs fit quite simply, you need to dial six loops on the needles and perform 26 rows and then all loops close or pull into the bundle.

Another method of manufacturing parts is to knitting a web of six loops, it is performed as follows: one facial loop (LP) is pronounced, the second is removed undueled. It is necessary to ensure that the thread broach is from the front side of the canvase (before work). Thus, all 26 rows knit. The resulting item is obtained flat, neat, and it is not necessary to sew it.
Mittens for snowman
This decorative element knives in a circle. 12 loops are gaining and divided into such a number of spokes that is convenient to master. The first two rows should be knitted with weed mate, the following 3 - boilers. Further, all rows up to the 13th are inclusive are performed with socks.
In the 14th row, the canvas need to cut into three loops. Refractices should be performed evenly, through the same number of loops. Actions are repeated when knitting the 15th and 16th rows. The loops remaining on the spoke neatly tighten the thread. Finished mittens needed with big fingers, while knitted snowmen (needles, as you see, all stages of work are performed) will receive a more believable and detailed appearance. They are knitting from two hinges with a bullshit to a height of 3-4 rows. Then stitched by facial side. Fingers are sewn to mittens in the appropriate places.

Sew hands with mittens can be used after placing a small amount of synthesis inside parts.
Nose-carrot
It is difficult to introduce such a toy like a knitted snowman (with your knitting needles with your own hands), without a characteristic orange nose. To perform it, you must bind the part of the circular method (on two or three spokes). Initial row Includes six loops. The canvas knit exactly to the height of five rows, hereinafter, in 6th, three loops are reduced, and the remaining tighteners.

At this stage, you can already collect related details and see what it turns out.

If you wish, inside the details of the hands can be inserted wire. Eye bought in the store of fittings and sow on glue, the mouth line is formed by embroidery.
Making feet
Flat wide boots are needed to give the figurine of proportionality and stability. A knitted snowman (performs step by step each step of work) is equipped with legs connected, as the only difference - a small scale.
Start work on two spokes from the bottom edge of the part. It is required to dial six loops and penetrate two rows of sweating viscous. Next you need to add four loops in each row. However, the expansion is not evenly done, but only in the central part. To comply with symmetry, you need to designate the center of the canvas and add two loops on each side of the label (with an interval in one loop). Thus knit 15 rows.
From the 16th to the 28th row, the canvas should be knitted with a bug. The upper part of the steps fit on the contrary: the canvas will be reduced in the same way as it expanded. In each row, the part is reduced by four loops (only in front).
In the process of knitting the last two rows, it should evenly reduce six loops, and the remaining closure.

Finished foot shoes need to sew a back and fill with a synthetic tubercide. Now they can be sewed to a snowman.
Decorating figures
Knitted snowmen are decorated with any accessories at the discretion and wishes of the craftsmen. These are berets, scarves, hats, knitted buckets or something else. Also look good figurines with sour snowflakes, sequins, beads and other fittings.
Takes, which will go on snowmen in the photo, is associated as follows:
- Puck 40 loops.
- From the 1st to the 4th row knit a rubber band.
- In the 5th row increase the number of hinge loops. For this, each of each is given one ordinary and one crossed loop (so that there are no openwork holes).
- Until the 30th rod knit exactly facial stroke.
- All loops are riveted on a solid thread and tighten the cloth.
- Perform side seams and sewn pompon.
It can be done not with a simple stroke, but by some pattern, such as braises or an openwork.

Custom-made knitted snowman can be an independent unit of decor or composition element. As a rule, the scenes with the participation of such figures are very familiar with children.