Nowadays, boots are an integral part of women's wardrobe. For winter colds there are warm models leather, with fur and embossed soles. Autumn models save women's legs from getting wet, while summer boots become just a beautiful and stylish accessory.
When did boots appear? According to archaeological data, the appearance of shoes dates back to about 25 - 30 thousand years ago in North America. There are also a few samples discovered later in the territory of ancient Egypt, in Africa.
In those days, shoes were highly dependent on climatic conditions. In hot countries, the Greeks, Romans and Egyptians of antiquity wore mostly sandals, while the northern peoples preferred warm leather shoes and boots.
The Scythians preferred soft, narrow and high leather boots in which the pants were tucked in. They resembled a stocking and were attached to the leg with special straps. Such products were decorated with embroidery and fur. At that time, both women and men wore boots, while female models were with short tops, and they were made of red leather. This color was considered the most beautiful. Often they were embroidered with ornamental patterns.
In Europe, boots are first mentioned in the 15th century. They served primarily men's shoes riding. They were very long, above the hips of the model. During the time of the French king Louis XIV, over the knee boots with square socks, high heels and spurs were very popular. In the middle of the 18th century, bright and pointed models became fashionable. TO XIX century it is gradually replaced by the popularity of low shoes trimmed with fur.
Like many other things, boots at the very beginning were an indicator of the social level and level of wealth of a person. For example, in Russia, only the upper classes flaunted in morocco boots, while ordinary people had bast shoes and pistons on their feet. During the reign of Peter I, the popularity of boots became much less, but by the end of the 19th - beginning of the 20th centuries, almost all men in Russia wore boots. IN female version there was a shortened shaft and trimmed with red morocco or cloth. The twentieth century was also marked by the creation of an asymmetric insole, which repeated the outlines of the foot; before that, shoes were not divided into right and left boots.
Now you can find a model for every taste, from the most different materials, with heels, wedges or flat soles. Like any accessory that affects the whole image, handmade boots will always be out of competition. One of the varieties of such products will be boots, crocheted.
In this article, we will offer several options for crocheted boots. They will all have one thing in common - a finished sole. And then there are options.
The first one is to give a second life old shoes. It is quite possible that you have a pair of shoes, boots or even ballet flats lying around, the top of which is damaged. It may have been dirty, torn, or just worn out, but this pair has a very comfortable last. Then your new boots will under no circumstances rub your legs and will be a great new one, beautiful accessory in wardrobe.
The second option is a new sole. There is also room for creative activity and fantasies of needlewomen. For example, you can make a knitted part, and then take the boots to a shoe shop and entrust the attachment of the sole to a specialist. Another option would be to buy comfortable slippers, perhaps even homemade ones, and turn them into beautiful boots. Typically, such shoes have a comfortable, soft and very often rubberized sole. Boots on this basis will perfectly withstand the street weather.
The next step is to choose threads. Everything will depend on what season you will be knitting boots for. If you want to make tight boots for fall or spring, use a wool-acrylic blend. The latter should be more, it is due to the artificial acrylic component that the product will be non-prickly, pleasant to wear and durable. For summer models, choose cotton or mixed threads with the addition of the same acrylic, viscose. Lightweight and breathable, these threads are perfect for warm weather, and the legs will be comfortable in them.
Crochet boots
Option 1
You will need:
- Yarn 80% acrylic, 20% wool (in this master class black and yellow, but of course you can choose other colors) 135 m / 50 g;
- Yarn "grass" yellow color;
- Hook number 3;
- Slippers with a comfortable sole without a back;
- Awl.
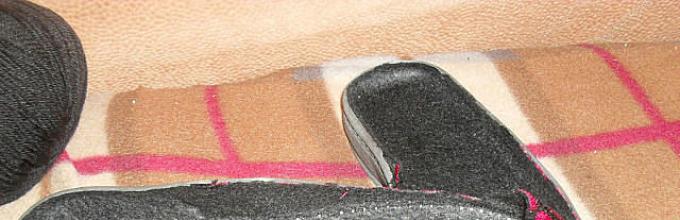
We will knit with a thread in two additions. The fabric part of the nose of the slipper must be cut off, leaving the very tip. We do not throw it away, it will come in handy later.

Now you need to make holes with an awl at an equal distance around the perimeter of the slipper. We pierce with an awl from the side in such a way as to capture part of the rubberized sole and insole. Now you need to make stitches with black yarn, as in the photo. We fix the thread, but do not tear it off.


We knit 1 row with connecting posts. The number of loops in each stitch will depend on the width of the stitch and the thickness of the yarn.

We knit the next row. s / n threads of yellow color.


To do this, you need the fabric part, which was cut off earlier. On paper, you need to make a spout pattern using the dimensions of the cut out part.

According to them, we perform the calculation of loops and knit the nose of Art. s / n.

Advice! Record all your actions and performed calculations. This will help when knitting the second boot.
Now you need to sew or tie the s.s. spout to harness. Try on the product, you may need to adjust the number of loops.

The next step is knitting the heels. We carry out Art. s / n. We attach to the sides of the spout with the help of s.s. It will take about 2-3 rows.


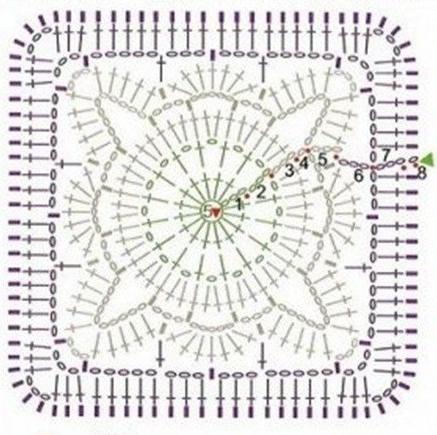
According to the scheme below, we knit the bootleg.

First r. 3 v.p.p. 1 vp, 3 tbsp. s / n in the same loop of the base, * 1 ch, skip 3 loops, 1 tbsp. b / n, 1 ch, skip 3 loops, knit in the 4th (3 tbsp. s / n, 1 ch, 3 tbsp. s / n) *, continue from *, finish row 2 tbsp . s / n in the first loop and 2 s.s.
Second r. 1 vp, * 3 vp, now we knit 3 tbsp. s / n with a common base and top in art. b / n of the first row, again 3 ch, 1 tbsp. b / n in 1 cp between triplets. s / n from one base *. We continue from *, we finish 1 s.s.
We knit all subsequent odd rows, like the first, even - like the second. The pattern will go in a checkerboard pattern, shifting every two rows.

Shaft length - individual. We knit the last two rows of the pattern with a contrasting thread.

Then we tie with two rows of Art. s / n yarn of the second color. Now you need to tie the yarn "grass". For her, you can take a hook of a larger number.

Now we knit a strap for decoration with a yellow thread. First row st. b/n. second row st. s / n and the third row of art. b/n. The length will depend on the circumference of the ankle. Now we need to connect the chain of cp. black yarn of the same length as the strap, and insert it between st. s / n.

Sew on the strap. On the outside we decorate with a button. It remains to knit a pair of boots.
Option 2
For those who prefer refined and elegant simplicity, we offer the following options.


The principle of attaching to the sole and knitting is the same. You can use different colors as a decor by tying the boot tops with stripes or decorate with flowers.
Option 3
Crochet boots with scales pattern

This knitting option is also called "crocodile skin". Not a single animal will suffer, and you will become the owner of "crocodile skin" boots.
In this model, it will be necessary to attach the sole after knitting, since here we also make the insole with a hook. Of course you can take finished sole and do the manipulations described above for its strapping. Then knit according to the spout pattern suggested below. Try, experiment.
We start knitting from the sole. The work will take place in a circle (or rather an oval, but the principle is the same). In order to calculate the number of air loops in the set, it is necessary to measure the length of the foot and its width. Now subtract the second from the first value. The resulting digit* will be the length of the initial chain. We knit a sample of 10 x 10 cm and calculate the number of loops * in one centimeter. We multiply two numbers with * and get the number of loops in the typesetting row.
So, a chain of c.e. recruited.

First r. 3 v.p.p. and another 5 st. s / n in the same base loop. Now we knit st. s / n. in the last loop we knit 6 tbsp. s / n and go to knitting on the second side of the typesetting row. We finish 1 s.s. in the 3rd v.p.p.
Second r. 3 v.p.p. + 1 tbsp. s / n in the same loop, in the next five loops we knit 2 tbsp. s / n with a common basis, then 1 tbsp. s / n. In 6 st. s / n knitted from a common base we knit 2 tbsp. s / n. on the second side of the oval we continue to knit st. s / n. We finish 1 s.s. in the 3rd v.p.p.
Third r. We already have a small oval. The narrow sides consist of twos of Art. s / n, knitted from one base, 12 loops from each edge. In these loops we knit 2 tbsp. s / n with a common base, alternating with 1 tbsp. s / n. It turns out 18 loops. Next, knit 1 tbsp. s / n on the side wide sides.
In the fourth row, along the edges on 18 loops, we knit 2 tbsp. s / n with a common base, alternating with 2 tbsp. s / n. It turns out 24 loops. We knit the wide sides, as usual, without increments.
The size of the sole is determined individually. You can make a drawing of the foot and periodically try on the work.
When the sole is finished, we continue to knit the toe and heel without breaking the thread. Thanks to the rubber band pattern relief columns, the finished boot will sit tightly on the leg.
Below is an example knitting pattern. The pattern will be saved, only the number of loops in the rows will change.

We knit one (first) row with simple st. s / n without increments.
Second r. we knit in a circle with embossed purl (concave) st. s / n. Please note that in the diagram the wider rows are the heel and nose.
Third r. We knit alternating convex and concave columns. It turns out an elastic band 1 x 1. Follow the pattern. Periodically try on the boot to adjust the number of loops.
To move on to knitting the bootleg, it is necessary to knit 1-2 rows of simple sts. s / n.
We begin to knit the bootleg with a “scales” pattern. Work is done in a circle. Below is a diagram.

First r. 3 v.p.p. + 1 tbsp. s / n in the same loop, * 2 ch, skip 2 loops, 2 tbsp. s / n with a common base *, continue from *.
Second r. we knit in the opposite direction, using the bodies of twos of columns with a crochet as a basis. 3 v.p.p., 4 tbsp. s / n (we introduce a hook between two st. s / n. and the right column serves as the base) + 1 ch. + 5 tbsp. s / n (we introduce a hook between two st. s / n, and the left column serves as the base). For convenience, we turn knitting upside down. Every first 2 tbsp. s / n with a common base serve as an arch for (5 st. s / n + 1 VP + 5 st. s / n). Every second 2 tbsp. we don’t knit s / n with a common base, when moving between scales we perform 1 ch.
Third r. Turn knitting back. We knit similarly to the first row. Fourth r. we knit "scales" in a checkerboard pattern relative to the second row.
The height of the top will depend only on your desire. The last row to perform art. b/n.
As an additional decor, you can sew on the outer edge of the button.
Option 4
Crochet boots with funny pom-poms

We also carry out this model with a knitted sole.
You will need:
- Thin and thick acrylic yarn;
- Hooks No. 4.5 and No. 5.
The sole is knitted similarly to the previous model. You can choose any other oval scheme on the Internet.
We knit the last row without increments of art. b/n.
We knit the upper part not from the bottom up, but along one long and narrow canvas. With hook No. 5 we collect a chain of 17 ch. thread in two additions (thick + thin). We knit in return rows with a crochet No. 4.5 half-st. s / n for the back half-loop. When the length of the fabric reaches the length of the leg circumference (this is about 30 rows), we finish knitting. We connect the resulting tape into a ring. We fix the thread, cut it off and hide it.
We will knit the bootleg from the top of the boot, fixing the loops of the first row into the side stitches. s / n, they act as a set of rows. We knit in return rows.
First r. we knit, alternating 2 tbsp. s / n in 1 lateral semist. s / n and 1 tbsp. s / n in 1 lateral semist. s / n.
The second, third and fourth rows are performed with embossed st. s / n.
Starting from the fifth row, we perform the narrowing of the bootleg. To do this, select 4 symmetrical loops at an equal distance from each other. We knit this row. s / n, in the marked loop we perform 2 tbsp. s / n with a common top. We knit for the back wall.
From the 6th to the 9th rows we knit with embossed st. s / n.
10th p. We knit similarly to the 5th, reducing four loops at an equal distance.
The 11th and 12th rows are performed with embossed st. s / n.
We begin to knit the rise of the boot.
The beginning of the 13th row is the central point of the future heel. Select the opposite central point of the future spout. We also mark the loop before and after it. Now we knit st. b / n to the loop in front of the middle loop of the spout. Here we knit 10 ch. and knit in them 3 v.p.p. and further a number of Art. s / n.
We got a branch for the spout.
We fix this strip from Art. s / n on the shaft in the loop located after the third marked. We knit further Art. b/n. We finish 1 s.s.
The next rows will be performed in a circle. s / n.
14th p. At 3 v.p.p. we knit branches for the spout 5 tbsp. s / n. finish row 1 s.s. in the 3rd v.p.p.
15th p. performed similarly to the 14th, in 5 tbsp. s / n, knitted in an arch of 3 ch spout, we knit 2 tbsp. s / n with a common base. Now the width of the spout is already 10 loops.
We knit rows 16 and 17 without increments of art. s / n.
We turn the work and knit the 18th row of semist. s / n. we fix the thread.
Now you need to connect the parts using 1 row of s.s. The line will be embossed.
The seam of the connection of the upper part of the boot (it is located across the rest of the knitting) is located at the back. It is necessary to tie a chain of ch with a thread in two additions. about 1 meter long. Mark its center and fasten on this seam.
Attach 1 pom-pom to each end.
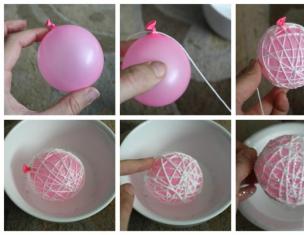
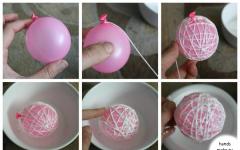
How to make pom poms
To create pompoms, you will need two cardboard circles. They need to cut out the central round part and a small piece along the radius.

We fold the circles so that all the cut parts match. Now we begin to wind the thread without breaking away from the ball. The larger and denser the winding, the fluffier and more magnificent the pompom will turn out. When you consider the number of turns sufficient, you need to cut the wound threads along the circle with scissors. Now you need to slightly separate one cardboard from the other, place a piece of thread in the resulting hole. Now we tie it around a bunch of threads, align the cut ends and remove the cardboard. Shake and get a cute pom-pom.
We attach them to the ends of the chains and tie them beautifully by making several turns around the leg.
Knitting boots for the house or the street is not so difficult, especially if you do not use when creating them intricate patterns. How to crochet boots for beginners step by step description and diagrams, see below.
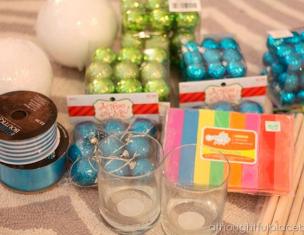
We prepare materials
First you need to prepare necessary materials. Yarn can be woolen, half-woolen, acrylic, cotton, mixed. It is selected depending on the season for which boots are knitted, their patterns and models. The hook should be the same thickness as the thread, or 1.5 times larger.
Pattern scheme may be different. There are also very difficult experienced craftswomen and very simple - for beginners.
The more yarns in the pattern, the more openwork the product will turn out. Such models are better to choose for the summer.
Boots can be made from ready-made motifs, for example, from grandmother's squares. For them, you need to pre-impose the required number of fragments and connect them to the sole and to each other with a thread and a needle or connecting posts.
The sole can be simply knitted. But you can use denser materials. For example, leather, felt, rubber.

For boots with an insole, they must be purchased one size larger than the desired size. With an awl, make holes at a distance of 0.5 cm from the edge of the insole and from each other. Through the holes obtained, tie the entire insole around the edge with single crochets. At the same time, knit 2 columns in each hole. The insole can be tied with yarn on top to make it softer and denser. You can also add a synthetic winterizer between the skin and the knitted layer. This is especially true in boots for the baby.
More often for these purposes, not a leather insole, but a felt insole is used. It is also selected one size larger and tied in the same way. For boots with felt soles, a synthetic winterizer can not be used.

If shoes are knitted for the street, then the sole can be borrowed from sneakers or slippers. It is desirable that it be rubberized. Then it is easy to pierce with an awl and tie it.

For the little ones
knitted boots for the baby are called booties. They can be thin and openwork for summer or dense and warm for winter. Such shoes are especially suitable for newborns - warm, comfortable, light. The sole can be simply knitted or felt. The yarn is as natural as possible, but not prickly, but soft.
Step by step description with photo:

Dial 15 air loops (VP). Insert hook into 4th st from hook and work 3 rows as follows:

With a different color, knit a single crochet loop in each column. As a result, there should be 56 loops. In the same way, knit the fifth row.


With the color that was used to knit the sole, start knitting bumps (2 VP, 2 unfinished columns, 1 VP).

Skip 1 stitch and knit another stitch. Link 1 ch. And thus complete the entire series.

Also tie the 7th row.


Having marked the middle, start knitting with white yarn toes. Insert your hook into the back wall of the loop and knit a white bump from 2 unfinished loops. Next, knit them from 3 unfinished loops to the middle. Should be 14 pcs. Knit the last bump from 2 unfinished loops.

Expand knitting and continue knitting bumps (7 pcs.). Connect them.


Tie 4 cones. Finish the row in the same way.

In this way, knit 2 more rows and change color. Knit 3 VPs in each column.


For adults
In this master class, knitting boots from hexagons is considered. Boots are suitable for adults. The size can be changed by increasing or decreasing the hook number.

Scheme and description of knitting motif:

Scheme and description of knitting soles:

Assembly and scheme of the upper bar:

This model can be any desired height. Depending on the number of motifs, footprints or boots are obtained.
Grandma's way
Another way to knit motif boots is to use granny squares. Schemes for their knitting can be any complex and simple, plain and multi-colored.

First you need to tie a felt insole. Knit 3-4 rows of single crochets.

According to the pattern you like, knit 26 motifs. For each boot you will need 13 pcs. For 37 foot size, the squares should have a side of 8 cm. Examples of schemes:


In this master class, 8 pink and 18 gray motifs are connected. For two gray squares, tie 2 sides with an additional row of double crochets.

Decompose the motives, as in the figure:

Sew the squares into stripes, and then the strips - among themselves. Between motifs 9 and 12, sew one of the squares with an additional row of double crochets.
If suddenly the boots are a little small, they can be increased in the same square by adding rows of double crochets.

Sew the boot to the sole with an overcast seam from the wrong side. Tie the top of the boot with a reverse row of single crochets.
Beautiful and fashionable knitted boots are the trend of the last few years. Not only do they look amazing, but they are also very easy to use. But the price of such shoes for many fashionistas seems sky-high. Therefore, you need to connect them yourself.
Types of knitted shoes
We are all used to the fact that crocheted knitted boots are a kind of substitute for indoor slippers: simple, comfortable, fun, but not smart. In fact, indoor boots are a small part of a huge number of elegant knitted shoes.
Craftswomen have long learned how to make warm autumn boots that protect their feet well from the first cold weather. But you need to wear them in dry weather, so as not to get wet.
Knitted summer boots also look beautiful. They emphasize the slimness of the legs and hide their minor flaws. At the same time, there are several styles of such shoes. The most common - with a wide top and high stocking boots.
Just look unsurpassed on the legs of openwork boots on high heels. They are great for everyday wear to work, and as a highlight of an evening outfit.

All this wealth of models and styles opens up great opportunities for craftswomen who seek to improve their creations, focusing on someone else's experience.
Sole preparation
No knitted boots can do without a sole, whether it be indoor shoes or a model for the street. Therefore, it is necessary to properly prepare it, so that later the boots serve as long as possible.
Consider the option with a felt insole, and then we will clarify the nuances for the street sole.

At the beginning of work in the insole, it is necessary to make holes around the entire perimeter. We choose an arbitrary distance between them, depending on the thickness of the thread and the size of the hook. Holes can be punched both with an ordinary awl, which will complicate further work a little, and with a special device that many craftswomen working with fabrics and leather have.
We begin to braid our sole. For these purposes, a single crochet is ideal. We do everything very carefully, because this is how the base for our boots is formed. And the further service life of the product depends on its quality.
If you take the sole for street shoes, then it is better to punch holes in it not from below, but from the side. This will extend the life of the threads, which are quickly frayed from contact with hard road surfaces.
Indoor knitted boots
When the sole is ready, we can get to work. To begin with, let's pay attention to the fact that boots can be knitted both immediately from the sole, and then sewed on or tied when the main work is completed.
The model shown in the photo is made completely with single crochets, so that the shoes turn out to be moderately warm and light.

We carry out 4-5 rows, starting to knit from the first row, which we made on a felt insole. At the same time, we do not add loops to get a good and high side.
The next step is knitting the top. First, we make 2-3 rows in a circle, and then another 1-2 rows only in front of the future boot. When the desired width is reached, close both edges and connect them together to make a knitted slipper.
We will get a boot if we knit a few more rows of single crochets around the formed armhole for the leg. Their number depends only on the desired height of the "freebie" of our shoes.
Simple summer boots
Here is another simple knitted boots. The description of the work on them is a bit similar to the previous model, but there are some nuances.
They are also knitted with single crochets. Only now initially shoes are divided into three parts: toe, heel and shaft. First of all, we knit a sock, starting from the edge of the tied sole. We cling to each new row for the previously prepared edge. Here it is very important to add the right number of loops at the beginning of work so that the foot can fit freely in the shoes.

Having knitted up to half of the sole, we proceed to work on its back part. Here the direction of knitting changes. We hook each new row not at the base, because we started knitting from it, but at the front, as if connecting them together. It is important not to forget to leave an armhole through which the foot will be inserted into the shoe.
And the last stage is knitting in a circle, as in indoor boots, until the shaft reaches the desired height.
Motif Boots
For some models, the description of crocheted knitted boots suggests that these shoes can also be made from individual motifs. It is squares that are best suited for these purposes, since it is easy to add them ready product.
The motive for such boots is better to take not very large, so that it is easier to collect them all together. The next square is ideal for these purposes. We start knitting with a ring of 5 air loops. On their basis, 15 double crochets and one lifting chain of 3 v / p are made.

In the next row, the same number of double crochets are made, but between them there should be an intermediate air loop. Then 1 more row of double crochets is knitted. In the next row, there is a transition from a round shape to a square one. The diagram shows all the stages of work. An oblique cross indicates crossed double crochets, the second of which is knitted behind the first.
For one boot, you need to knit about 13 squares. Their specific number depends on the size of the shoe and the motive itself.
Collecting motives
It's not enough just to make the right amount square motifs. We still need to put together knitted boots. The photo of the finished product gives a rough idea of how this is done.
For starters, stitch into single canvas 12 motives. It turns out 3 squares in height and 4 in width. Then they are sewn together into a continuous pipe, but the two lower motifs remain free. This is exactly the place where the 13th square is inserted
This is done quite simply. We put the unfinished canvas on the surface, push the squares apart and insert a free motive between them. When it is sewn on one side, turn it 45 degrees and sew not the opposite side, but adjacent to the one that was sewn earlier.

If you figure it out, it turns out that we inserted the last motive into the boot at the corner. Thus, the sock turned out. Now it remains only to sew the finished product to the sole.
Don't forget to decorate
Any footwear should be not only practical, but also beautiful. This is confirmed by many photos of crocheted knitted boots. It is extremely important to give Special attention their decor. But this issue should be approached carefully.
The thing is that the number and brightness of decorative elements depend on the chosen pattern. If a lot of openwork elements are used, then heavy decor can "steal" the positive effect. In this case, it is better to prefer a light organza bow, which will only add airiness to the product.

If the pattern is practically absent, then you can experiment a little. In the example with street boots with a single crochet, the author added a maximum of colors. From this, the boring pattern is practically not noticeable, but bright juicy stripes are striking.
Lush pompoms can be added to autumn boots of this type. They will not only decorate the shoes, but also help control the width of the bootleg if they are passed around the circumference of the boot.
Combined boots
We looked at how to make crocheted knitted boots from individual motifs and a solid product from the sole. The last option left is the combined one. In this model, the lower part is made from separate motifs. This helps to create better legroom. But the stocking itself is knitted differently openwork pattern, already after the lower part is sewn to the sole.

This approach provides a more accurate fit of the product to the size of the foot, since the stocking boot must fit perfectly. Any pattern can be selected openwork scheme. Therefore, it makes no sense to describe specifically this model. Moreover, the scheme here is designed for a high level of skill, which can prevent novice craftswomen from correctly fitting the stocking to the right size. To prevent the top from slipping during wearing, you can knit a rubber band at the top or sew on a silicone ribbon.
Proper Care
Any footwear requires a careful attitude. This is very important, because it is constantly in contact with pollution: dust, grass, resin, berry juices. Knitted boots are especially sensitive to this. That is why they need to be properly looked after.
Wash them in lukewarm soapy water only, try to twist them as little as possible, and dry them on the surface, not hanging.
And best of all - wear these boots as an exclusive addition to your festive outfit to feel like a real queen at any celebration.
Knitted clothes and shoes are at the peak of popularity today. Because it is predominantly handwork, then such products cost a lot. At the same time, crocheting boots is not such a difficult task. It is available even for beginners.
Crochet home boots
As a workout, you can start with slippers. In this case, the most suitable simple techniques and patterns.
Knitting should start from the sole. You can take it ready-made from old slippers, or crochet a blank, or adapt a felt insole. The last option is the easiest to prepare. Felt is not difficult to break through with an awl and serves for a long time at home. To increase its wear resistance, leatherette or leather can be sewn to the bottom.
So, we take the insole and oblige it in a circle with columns without a crochet. We reach the beginning of knitting, make a lifting chain of air loops and continue to knit with columns a couple of centimeters in height.
And then in how to crochet boots, there are options. Having measured the desired length from the toe of the sole, you can continue knitting, reducing the number of loops in each row, so that at the end you get the front of the boot.
You can tie this part separately, and then sew. The second option is a little simpler, but looks less aesthetically pleasing.
Knitting freebies
When the lower part is completed, you can move on to the freebie - the bootleg. crochet are made the same or without, as the bottom of the product. If there is a desire, the top can also be knitted with a more interesting pattern, which you can choose from the catalog or use your own experience.
For search beautiful patterns It makes sense to look into needlework magazines. The designations on all diagrams are the same, and the database of patterns in popular sources is much larger.
When the desired height is reached, and the homework is almost completed, do not forget about the decorations. It can be pompoms, buttons, beads, or crocheted leafy flowers. The flight of fancy in this matter is not limited to anything.
Ceremonial boots
You can also crochet boots for the street. The scheme described above is also suitable for them. Only the work should be more subtle and accurate. First you need to prepare the sole. It, like the insole, needs to be tied up to make the base for the future product. It is necessary to work carefully, without piercing the bottom of the sole, otherwise the leg will get wet even from the slightest dew, and the threads will rub off on the asphalt very quickly, and the boots will have to be repaired.

For the off-season, you can continue knitting boots with columns, but crocheted patterned boots look more interesting. The pattern of the pattern you like should not have a very large report in order to change the width of the freebie if possible.
Square motifs
You can crochet boots in a different way. A master class of such a product from motives is also found more than once. For such boots, you need a multiple of 4 square motifs, plus 1 motif for the front. On average, 13-17 squares are enough for beautiful openwork shoes. On size 38, the side of the motif should be approximately 10 cm.
Approximately from such motives we begin to crochet boots. The scheme of the square is given as an example and can be replaced by any other suitable size.
The most interesting thing in this method is the assembly. Squares can be connected by tying them to each other, but in this case, a bulging relief seam will turn out at the junction. You can just sew the finished product.
Collecting squares
From ready-made motives we make a canvas 3 * 4 or 4 * 4 squares. We connect them into a tube, leaving the 2 lower motives not sewn. An odd square is inserted into this place with a blade. Thus, its protruding triangular part is obtained. In total, this ends the crochet boots. The master class for further actions is related to sewing.
We take the blank of the sole and the blank of the boot and grab them with a thread in 4 places so that the finished product does not warp during the sewing process.
The last step is decoration. It depends only on the purpose of the boots and the aesthetic taste of the master.

And finally, a little advice: in order for the boots to keep their shape well, it is better to take and crochet it 1-2 sizes smaller so that the fabric is more dense. Otherwise, the boots will have to be constantly starched.
African motif
Those who love to knit from motifs know exactly the pattern of the 6-sided African motif. It is colorful and easy to knit. It is also a universal constructor that can pass any form.
From these motifs, the most beautiful crocheted home boots are obtained. 6-sided blanks are assembled in such a way that slippers are formed. For this, 4 pieces are enough. If you need high boots, you can sew 2 more motifs on the sides.
The advantage of this method is that it is a great way to dispose of leftover yarn. Each motive can be unique, not repetitive.
Sizes of motifs can also vary. As a result, the product itself is obtained from small children's slippers to large home shoes of the 46th size.
Such slippers will give not only warmth, but also positive emotions to their owner.
Openwork or dense?
The hook gives a variety of possibilities for implementing the same idea. At the same time, it complicates the answer to the question of how to crochet boots. The choice of knitting method depends on the goals and materials with which to work.
A dense knit of motifs and columns is ideal for indoor shoes. In this case, grace and finesse of work are not as important as warmth and comfort. You can decorate such slippers with separate elements, pompons. You can knit this product from the remnants of yarn and “play a trick” a little with the asymmetry of the boots.

Lace products are perfect for summer. In them, the leg does not get tired and does not overheat. At the same time, these boots look very rich and elegant. They are suitable for everyday wear, as well as for combination with cocktail and evening dresses.
Particular attention should be paid to the pattern with which the boots will be crocheted. Its scheme should be combined with the main dress. Ideally, if the pattern is a little repeated in both parts of the costume.
Regarding fishnet boots, there is a small nuance: make sure that there are a minimum of holes in the area of \u200b\u200bthe fingers, otherwise they will not stick out quite nicely, creating the effect of small shoes.
Sole choice
For indoor boots, we have already mentioned the sole options. With street shoes, things are a little more complicated. It is not always possible to buy a new sole. You have to come up with something from the options already available.
Ideally, if the basis on which the boots are crocheted is shoes. They do not need to be cut if you feel comfortable in them. By tying the bottom part, you will get the perfect shape of the bottom of the boots, which cannot be achieved in any other way.

If you do need to remove the base of the shoe, try to keep the toe and back. In these places, most often deformed and lose their appearance.
If we take the sole from an old shoe, you need to make sure that it is in excellent condition. The sole must be intact, without cracks and large abrasions. If there are heels, replace them before sewing on the boot so that the shoemaker does not accidentally stain it.
Yarn features
Of considerable importance is the yarn itself, from which the shoes are knitted. The durability of operation depends on its quality. It is difficult to say unequivocally which is better: synthetics or natural fabrics. For home slippers, cotton and wool are more suitable, for street shoes it makes sense to pay attention to acrylic.
Remember, outdoor shoes get dirty pretty quickly and require frequent cleanings. Therefore, it makes sense to take yarn that is resistant to repeated washing.

At the same time, synthetics are poorly tolerated in hot weather. It does not breathe and creates a greenhouse effect in the boot. And this is a number of problems and the risk of fungal infections.
In summary, we note that crocheted boots, the scheme of which you have already chosen and are ready for implementation, should be knitted from high-quality expensive yarn that holds its shape well and is easy to clean. Having saved on the quality of threads, do not be surprised if in a week or two you cannot look at your masterpiece without tears because the boots have become like old footcloths.
Knitting boots in a step-by-step selection with a description and interesting photos It's not that hard to connect. Such needlework is on the shoulder for beginner craftswomen. And how many options for the implementation of this product - do not count. This type of shoe is deservedly popular because it knits quite easily and quickly, allows you to recycle leftover threads and yarn, and makes it possible to experiment with colors and patterns. Not to mention that it is a nice alternative to other home shoes- rubber slippers, or greasy slippers.
The only disadvantage of such shoes is water permeability, and if, having stepped on small splashes of water in rubber, and any other slippers, you don’t even notice it, then in knitted boots you will know about it instantly. Yes, one could say so, not knowing that the sole of the boots is not knitted at all, but made of felt. That is, it is a thick shoe insole, which is rather difficult to get wet through.
Such boots with soles are equally well suited for both children and adults, and there are no disadvantages to these shoes as such.
We knit stylish boots with knitting needles with a description and photo of options
The first option involves knitting.

For work you will need:
- Yarn (pure wool) - 300 gr
- Knitting needles straight No. 6 and hosiery
- Buttons - to decorate boots 6 pcs
- Awl and hook No. 4 or No. 3.5
- Felt insoles, size 39-40 (this is important, insoles should be one size larger)
Boots are knitted in the most common, perhaps, size 38-39, in stockinette stitch and garter stitch. The boot consists of 4 components - ankles, feet, lower legs and insoles. The pattern is knitted according to the following pattern:

knitting density, facial surface: 13 p. x 17 p. = 10 x 10 cm.
The working process.First part. Start knitting from the ankle. Cast on 38 sts on double needle and work in garter st in the round until measures 4 cm. Finish the last circular row with purl stitches.
The second part. The foot is knitted as follows - the first 11 loops of the circular row remain on the knitting needle, and the remaining 27 go to the auxiliary thread. And already on straight knitting needles, knit with a garter stitch on 11 loops. But in the first row, get an additional loop on both sides, that is, you get 13 loops. At a height of 5-10 cm, close one at a time edge loop on each side - that is, it becomes 11 loops again. Next, turn the loops on the auxiliary thread. Pick up 14 sts on each side of the middle part, this will be 66 sts on the needles. Put a mark in this place so as not to go astray. The second mark must be placed in the middle of the back, on the heel. And knit in a circle with a garter stitch, but at a height of two centimeters, knit two loops together front side. This should be done on both sides of both markers, in every second circular row (that is, it will become 4 loops less in a circular row), continue to decrease to a height of 5 cm. After that, close the loops. Sew the edges in the middle, while, in order to avoid tightness of the seam, grab the extreme arcs of the loops.
The third part. To knit the lower leg, cast on 22 loops on straight needles, knit the hem with a garter stitch, but in the last row add 6 loops evenly, that is, in the end, there will be 28 loops. Next, knit according to the braid pattern, up to a height of 33 cm, but in the last row subtract three loops on each braid. Work 1 rib in garter st and cast off.
Fourth part. To assemble the boot, lay the cast-on edge over the closed one and sew on three buttons. put on upper part 2 cm deep on the part of the ankle, with buttons on the outside and on the side and sew on the inlaid edge on the boot along wrong side elastic blind stitches to the top. In the insole, make holes with an awl at a distance of half a centimeter from the edge and from each other. Crochet through the holes with double crochets - two in each hole. Connect the insole to the boot using the same double crochet, or sew with a needle.
A pair of boots is knitted in the same way, while the buttons should be symmetrical.
Let's try to crochet boots with a step-by-step master class
You can also crochet these boots. The most convenient motif for this is hexagonal. The motifs are knitted separately from each other, then folded according to the scheme and connected to each other with a needle or double crochets. In total, for each boot you need five fragments.

The sole is connected to the rest of the boot in the same way as in previous description. Make holes, tie with double crochets, and connect with the rest of the boot. If you follow the second pattern and tie the boot together with the insole, then the knitted part will be inside, the insole will be outside - as a result, you will get a very warm and wear-resistant product. Or you can do without felt soles, but then it’s better not to walk on the floor in such shoes - such a sole will be wiped out in just one to two weeks.
Clear and detailed video material will help to better understand the intricacies of knitting or crocheting boots.
Video on the topic of the article