We offer you a cool selection of crafts, cards, valentines for children and adults. Arm yourself with scissors, paper, glue and a wonderful holiday spirit.
Ready-made Valentine's card
(just print and sign)
The fastest and easiest way to make a Valentine card with your children is to print a ready-made template. So to speak, an option for lazy or busy people. Just print, sign and give to your loved ones.
Valentine's Day card. Folds in half. We sign the card inside.
Craft postcard for February 14
 Crafts for Valentine's Day - February 14
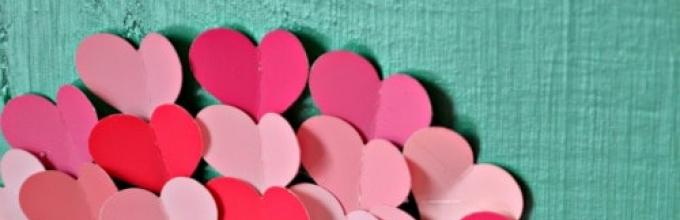
 This is a craft you can do with children or with students at school. The hearts were cut out using a figured hole punch. If you don't have one, you'll have to do everything manually. So, take cardboard (painted wood in the photo) and glue the hearts. In order to give the craft lightness and a sense of flight, you need to fold the hearts in half and coat them with glue in the center and glue them. Add a basket (it can be of any shape and color) and colored thread.
Valentine's cards with a sweet surprise
 Valentine cards with a sweet surprise - m&ms candies inside
 Beautiful hearts with inscriptions, and chocolates inside. Such a gift for Valentine's Day will be universal, because it can be given to children, adults, boys and girls.

You can make a wide variety of inscriptions on heart bags: love, love, for you, heart, for... . You can write with a pen, paints, markers, or you can glue an inscription.
DIY thread valentines with children
 DIY Valentine card made with the children from paper and thread. Bright and unusual.
 To make such a card for Valentine's Day, we will need bright thick threads, a needle, paper, a heart template, a pencil, and an eraser.

We take album sheets and make blanks for a postcard from them. We draw a heart in the center, for this we take a ready-made template, you can circle the heart yourself, but it’s better if the children do it. Next, we make holes in the album sheet. We erase the contours of the pencil with an eraser. 
Next, thread the needle, roll up your sleeves and get to work. After the work is almost finished, we tie a knot on the reverse side. That's all, the super thread heart is ready. You can sign the front side of the card if you wish.
 Holiday card DIY for Valentine's Day.
 Valentines emoticons for Valentine's Day
 Valentine's emoticons for children and adults for Valentine's Day.
 Hearts with funny faces will appeal to children and adults. They are very similar to regular emojis, but are shaped like a heart. Crazy, funny, playful and sad. Choose any to suit your mood. You can download the templates on the page of the creator of such funny hearts.
Valentines Minions for kids
 DIY bright valentines Minions for children
 Here are more valentines for kids who love Minions. They are made using the same principle as heart emoticons.
Watercolor Valentine's Day card for children
 Valentine's card for children made of wax crayon and watercolor
 Children really like this kind of work. On a landscape sheet of paper we draw with wax crayons or with a wax candle we draw hearts. Then fill the entire sheet with watercolors. And the places drawn with wax crayons will remain untouched. This is such beauty! And how much creativity!
Valentines made using acrylic paints
 Valentine's Day card made with acrylic paints
 If not acrylic paints, then you can use gouache or watercolor. Cover the blank sheet with a pre-cut heart. We paint the rest of the part with paints.
Wreath of hearts
A wreath of hearts for Valentine's Day will decorate your interior, and can also be used as a gift.
 Wreath for Valentine's Day made of hearts.
 This is a children's wreath, i.e. it was made by a child, the parents' help is to prepare the base and tie the ribbon. The child can do the rest himself.
 Photo instructions for making a wreath for February 14th.
 Here are some more festive heart wreath ideas for Valentine's Day.
DIY bookmarks with hearts
For book lovers, for creative people and children, for schoolchildren and preschoolers - a bookmark with hearts will become both a valentine and a practical gift.
 Bookmarks for books and notepads with hearts. For beauty and practicality, the bookmark can be glued to colored cardboard or thick paper.
And here is the template itself, click on it and save it to your computer.
 Bookmark template with hearts.
 Paper 3D heart
 Volumetric heart from paper for Valentine's Day. Detailed instructions and see templates
 Related articles
Master class “Carved Valentines”
Description: this master class is intended for younger children school age, teachers additional education, educators.
Purpose: gift for "Valentine's Day".
Target: to form creativity students by creating conditions for personal self-realization in technology lessons.
Tasks:
deepen and expand students' knowledge about working with paper;
to form certain specific labor skills and knowledge of technological techniques;
develop imaginative thinking and creative abilities;
to form aesthetic and artistic taste;
promote the formation of a comprehensively developed personality;
bring up moral qualities children;
develop a sense of self-control and mutual assistance.
Preface to the work
In this master class, we will make a gift for your loved ones for Valentine's Day.
Work sequence
1. At the first stage, we prepare the tools ( scissors, glue, cardboard cutter, stapler) and materials ( colored paper for printer, thick cardboard), we print out the ready-made templates and distribute them to the children (2 for each):
Valentine card template


2. We staple the blanks with the drawings facing up:

3. Make slits in the templates.
Rules for working with a cardboard knife:
Store the knife with the blade closed.
Do not use a dull or faulty knife.
Do not hold the knife with the blade facing up.
Hand the knife to your friend with the handle forward or closed.
When working, place a board or thick cardboard to avoid damaging the surface of the desk.

4. Cut out the “Valentine” card.
Safety precautions when working with scissors:
When cutting, open the scissors wide and keep the ends away from you.
Be careful not to hurt the fingers of your left hand.
Turn the paper when cutting out the part.
Pass the scissors only closed, rings first.
When working, do not hold the scissors with the ends up.
Don't leave them open.
Do not use loose scissors.
Use scissors only in your own workplace.


5. Glue the “hearts” together by inserting a ribbon pendant inside:

6. Bend back the bodies and wings of dragonflies:

7. Gifts for loved ones are ready.

Templates for cutting out Valentine cards


Valentine's card - butterfly. Sample

Happy holiday, beloved ones!
Valentine's Day is one of the first holidays of the year. On this day, lovers traditionally give each other paper valentines. In anticipation of the holiday, these cute cards can be bought in almost any store, but they are all pretty standard. Instead of buying something ordinary, you can make your own Valentine card. There are many options for making paper hearts, from the simplest to the complex and original.
Where to start?
Having decided on a specific idea, you need to find a suitable template on the Internet or make it yourself. If you decide to make a complex Valentine card, you may also need additional templates for small parts of the card.
In order not to spoil the outline of the template, it is worth cutting it out with a stationery knife or small scissors.
Simple valentine
 The simplest version of a Valentine's card is a heart cut out of paper or cardboard. Anyone can make such a card and it requires minimal time. If the red paper heart seems something simple, you can diversify it a little by taking, for example, printed paper. It is better to avoid using foil and wrapping paper, as it is too thin to serve as a base for a card.
There is another way to make a card more interesting: you can cut out any card in the middle of a paper heart. geometric figure or a smaller heart. Such a valentine will look very unusual.
Do-it-yourself multilayer valentines made from paper also have their own zest. To make them, you need to cut out several blanks of the same size, and then fasten them together in the center. All kind words and wishes can be written on the back, flat side of the valentine. At the front, the heart will be voluminous.
Use of seals
 There are still many ideas on how to make a truly original postcard. For example, you can use signets instead of ordinary decorative elements. You can buy them at one of the office supply stores or make them yourself.
A cork from a bottle of wine or champagne is perfect as a base for a stamp. The main thing is that it is made from natural materials, not plastic. To make a signet, you need to draw the shape you want on the cork (for example, a heart) and then cut it out using a stationery knife. Before using the stamp, you should test it: using a sponge, apply a little paint to the resulting workpiece and try to leave an impression. If everything was done correctly and you managed to make an even print, then the homemade stamp is completely ready for use. Such prints will look very cute and original.
Postcard with imprint
 Another interesting way decorate valentine - handprints. This card will constantly remind your other half of you. In addition, this option does not require any additional actions. You just need to dip your hand in the paint and leave your imprint on the paper. It's easy to do and looks very unusual. You definitely can’t buy cards like this in a store.
Composite cards
 Some composite postcards look quite complicated, but in fact they are very simple to make with your own hands. For example, you can make a lot of small hearts and then make a Valentine card out of them. Or make a big heart out of small ones paper flowers. Anyone can make paper roses: just cut out thin strips and twist them to form a bud. This is somewhat similar to the quilling technique, but anyone can do it. Even if you don’t tighten all the details completely, the card will look very neat.
 Another simple option is a layered heart. For example, you could cut out three hearts (large, medium, and small) and then glue them together. How the postcard will look depends only on your imagination, because you can add decorative elements to it. The main thing when creating such an application is to be careful when working with glue. It is best to first squeeze it onto a brush and only then apply it to the desired part. This will avoid streaks appearing on the postcard.
Volumetric hearts
You can also make voluminous valentines with your own hands from paper, cardboard and other materials. Making them is quite simple, although it will take a little more time than making flat valentines. 
For the first option you will need: colored corrugated paper, cardboard (used as a base), toothpick, glue, scissors. The first step is to cut out a cardboard base according to a template, or draw a heart of any size. Then you need to apply glue to it, evenly distributing it throughout the entire future Valentine. You need to cut out a few small squares from corrugated paper. In order to connect the resulting blanks to the base, you will need a toothpick: you must first insert it into the center of the corrugated paper square and then attach it to the cardboard base. This must be done with all the squares. The result should be a voluminous postcard.
Scented Valentines
Lately, the question of how to make a valentine out of paper has been fading into the background. A paper heart made from cardboard doesn’t surprise anyone anymore. But figures from natural materials. For example, you can give your significant other a heart made from whole coffee beans. The main advantage of such a gift is that it gives a wonderful, unobtrusive aroma. For it you will need: a wooden stick, cardboard, scissors, packaging cotton pads, glue, threads, coffee beans. Everything is done very simply:
- First, two medium-sized hearts are cut out of cardboard. The blanks are glued onto a stick.
- Then cotton pads are glued layer by layer onto the cardboard base. The result should be a fairly voluminous figure. You need to let it dry.
- When the glue has dried, the workpiece is wrapped with threads so that they completely cover all the cotton pads.
- Then all that remains is to glue aromatic coffee beans onto the threads.
 When the heart itself is ready, you can move on to decorating: usually such a heart is given in a flower pot. If desired, you can decorate the leg with ribbons or add a little glitter.
Knitted card
You can use other interesting materials when making valentines. For example, yarn, beads or buttons. With their help you can do a lot original postcards. Beads and buttons will be excellent decorative elements, but yarn in this case has a wider application.
One of the most simple options Making valentines from yarn will not cause any difficulties for anyone. First you need to cut out the base from cardboard. Then the inner part is removed from the center of the workpiece. The remaining side part, about two cm thick, must be wrapped with thread. The resulting card can be decorated to your own taste. Also, if you wish, you can use a pin to pin a text with declarations of love to such a heart. 
The yarn can also be used to create a loop or cord, which is commonly used on tags. These supporting elements will turn your Valentine's card into a themed gift tag.
Fabric Valentines
This version of Valentine's card is for those who know how to sew or are at least a little familiar with the theory of this process. The easiest way to demonstrate your sewing talent is to make a felt heart with your own hands. This is a very affordable material that is quite easy to work with. In addition, today you can buy felt in almost any color, which gives large field for creativity. 
As a filling for felt valentines, padding polyester is usually used. The parts of the figurine can be fastened using glue or sutures. The first method is perfect for those who are not very good with thread and needle. Children are also advised to work only with glue, avoiding sharp objects.
The main thing in the seamless method is to work very carefully. Most often, such products are decorated with an applique, which is attached to the workpiece using glue.
It is best to sew product parts on sewing machine. It's much easier and faster than doing everything manually. And machine seams are more durable and look much more neat.
Hearts sewn from scraps of various fabrics look interesting. It is best to use natural materials with similar textures. In this case, sewing the flaps together will be much easier. Instead of cotton wool or other soft filler, you can put various herbs in such a valentine, for example, lavender, which has a calming effect. 
Heart composition
 If one valentine and other materials still seem somewhat trivial, you can try making a small garland of hearts. To do this, you need to make several simple or composite paper blanks, and then connect them together using braided rope or tape. Each heart has a wish written on it. Such a valentine will delight the eye for a long time, because every time you can find new warm words addressed to you on it.
You can diversify the garland by adding, for example, candy. What could be more enjoyable than reading funny greetings and enjoying chocolate? In this case, it is no longer just a postcard, but a full-fledged gift.
Dear friends! Valentine's Day is coming soon, and valentines are an integral part of it. exchange them at school, lovers send them to each other to express their tender feelings. I suggest you approach this romantic moment creatively and not buy ready-made cards, but make other materials at hand. Little cute heart cards can be a gift not only for Valentine's Day, but also for any other holiday or even not for a holiday.
My son, at the age of 5-6 years, when he learned to cut out hearts, would give them to me every day, and inside it would always be written: “Mom, I love you!” Is there a more valuable gift for mom? Why don't we give each other such sweet reminders of our love more than once a year? It's so nice! Do DIY paper valentines just see for yourself. Arm yourself with scissors, glue, paper, cardboard, various small things for decoration, call your kids and get creative! Everyone will be happy!
DIY Valentines made from paper and more – ideas for creativity with children
We have already done different ones and shared our experience with you. How to make valentines with your own hands? Yes, very simple. There are a lot of options.
1. The simplest option is to cut out a heart from a sheet of cardboard folded in half, decorate the colored side, and write a message inside. Here everything depends on the author’s imagination and available materials.

You can decorate with paper, lace, cord, sequins, various designs, stones, anything!

2. A very cute valentine is made if you glue small hearts made of accordion-folded paper inside the heart.


3. You can make a traditional card rectangular shape from cardboard and decorate it with hearts of various sizes from different materials. Cute valentines are made using the quilling technique.

For example, this Valentine card with cats just touches me! Everything was so well thought out!

4. Valentine cards with clasps, ties, and ribbons look beautiful. So romantic, the message is hidden from prying eyes.

5. There can be many different colored hearts on a postcard, or there can be just one, it’s a matter of taste.


6. Small DIY paper valentinescan be made by cutting out heart-shaped windows and attaching fabric of different colors to the bottom.

7. A wonderful valentine is created if you attach a voluminous heart inside the card.

To make it, you need to cut out a blank for the postcard itself, measuring approximately 15 X 18 cm, and bend it in the middle. Cut out a heart according to the template, make folds where indicated by the dash-dotted line. A large heart should have an outward fold, and a small inner heart should have an inward fold. Now you need to glue it to the inside of the postcard, and the side parts and front side arrange, arbitrarily with available materials.

8. This version of Valentine’s card will be very impressive.

You need to carefully cut out the hearts along the contour using a stationery knife from paper white, and where shown by the arrow, do not make cuts. Glue the main part onto paper of a contrasting color, for example red. There is no need to glue the cut out parts; they need to be fastened along the cuts shown on the template. When opening such a valentine, the hearts form a three-dimensional composition. It turns out very beautiful.

9. A wonderful valentine is made with birds. It’s easy to do; the stencil for the birds can be downloaded below. Decorate the card with available materials. A very romantic option!


10. Beautiful woven valentine leaves also look original.

To make them, you need to cut out two identical blanks from paper of two colors. Variants of such blanks can be printed, the template is located below. Make cuts as shown on the template and carefully interweave the strips in a checkerboard pattern. The finished heart can be glued onto paper or cardboard, and a congratulation can be written on the reverse side.

But here is a slightly simpler option.

11. Volumetric valentines- This is a full-length gift.

To make such a three-dimensional valentine you will need cardboard, you can take foil for the heart itself, scissors, thread or fishing line. Cut out blanks from cardboard, as shown in the figure, make cuts, and fasten them together. Hang a heart made of foil or cardboard on a thread or fishing line. That's it! The Valentine card can be folded, it will be flat, you can unfold it and place it on the table. Such a gift can be made together with the child for grandparents.
12. Valentine cards with buttons look very creative. Such bright cards it's quite simple to do. Surely, many people have stocks of torn buttons. Now you can apply them by decorating a card for Valentine's Day.

13. It will be interesting for children to make animal figures from hearts. For example, mice in love. They are easy to make; you will need red or pink, scissors, glue, a small pompom for the nose and thick threads or fishing line for the antennae. We cut out the hearts, glue them, decorate, everything is ready. In a similar way you can make an elephant, an owl, ladybug. Makes a cute gift.


Since 1800, when mass production of valentines began, there has, of course, been no need to do so. On the eve of Valentine's Day, the shelves of many stores are filled with them. But it’s always more pleasant to receive a sincere love message written on a heart made with your own hands from the bottom of your heart. Lots of options! All you have to do is choose what is closest to you.

I hope you found in this article suitable option and make it to your loved ones, family and friends DIY paper valentines, cardboard or other materials!
We will definitely return to the topic of handmade gifts for Valentine's Day! Have a creative day and creative inspiration!
If you want to keep abreast of our news, subscribe to the “Our Kids” news! Fill out the form below and receive them in your email!
Good afternoon, in this article I have collected the most interesting ways to make valentines with your own hands. You can give heart crafts to your loved ones and loved ones for Valentine's Day. After all, how nice it is to receive gifts made by YOUR OWN HANDS. For each craft, I will try to make a drawing (if there are no ready-made templates) and explain in detail what and how to do step by step. We will cut out valentines from paper, from cardboard, put them in the form of boxes, and make valentine envelopes and other crafts for Valentine's Day. Here are the most interesting ideas make a paper heart using different volumetric techniques.
So let's begin our matters of the heart...
Paper Valentines
IN CARVED TECHNIQUE.
Here is the simplest craft. Which even children can do kindergarten. Middle group or the eldest, when they are already quite good at cutting with scissors (without trembling hands and a sweaty forehead), they can easily make this valentine with their own hands.

Everything is simple here. Flatten the sheet in half. Draw half a heart and horizontal lines on it. Cut the lines and cut out the heart itself. Unfold the heart and place it on the table fold edge down. And then the most interesting thing for children. You need to pull the strips UP with your fingers - but not all of them, but after one - leave one, pull out the second, skip one, pull the second up (changing the fold to the opposite one). We get a ribbed heart. Below we see a visual blank template for this paper crafts volumetric heart. A simple and quick DIY Valentine card for children in kindergarten.

You will find many other ideas for simple children's Valentine crafts in a special review article
And here is another beautiful craft for children - in the form of a puff valentine. Where the layers of the heart are located in different planes.
Fold the sheet in half. Draw the outline of a heart on a piece of paper. And we highlight with bold lines the places where you can cut with scissors, and with dotted weak lines the places that do not need to be cut. We explain to the children which lines to cut.
And then with our fingers we bend the inner heart forward with the fold edge, and the outer heart with the central fold edge back, and the card itself becomes the fold edge forward. It turns out like in the photo below. Quick Valentine from paper - just in 20 minutes of kindergarten class.

THIS IDEA does not have to be copied exactly. You can change it, play with it. For example, change the cut zone and fold zone on the same contours (as the drawing above).
That is, change the FLEX ZONE of such a heart contour (the zone that is indicated by a dotted line in the diagram) and get a new three-dimensional craft-postcard, where the heart is already protruding from the other side.

Take a closer look at the photo above. This Valentine's card has a large heart that is held together by an UNCUT BOTTOM OUTLINE. And the inner little heart is held on by uncut apex and tip on both sides of the center line. Here's what these changes look like on the diagram.

The most interesting thing is that you yourself can continue EXPERIMENTING IN THIS TECHNIQUE. Make slits in the shape of a heart or half-heart and bend them in different directions. And one day you will receive a cool designer craft.
For example, if you arrange the half-hearts IN A CIRCLE - then cut through the contours of the half-hearts and bend these contours - then we will get such an interesting round craft as a HEART ROUND DANCE.

This is what the intended drawing looks like – drawing a half-circle.

Such an openwork layered applique can be pasted onto a card for Valentine's Day. You will get a beautiful DIY Valentine's card.
Even more ideas for greeting cards for Valentine's Day you will find in our special article
DIY VALENTINES
WITH NOTES.
On Valentine's Day, we say warm words to our halves. Declarations of love cannot be said in words (after all, at a solemn moment, all the most tender phrases can fly out of a lover’s head). Therefore, your mur-mur-phrases can be written on notes– roll these notes into rolls and hide them in buds paper roses on this valentine craft below.
See how beautiful it is - each twisted paper bud contains a small white a rolled up note. This craft with notes for Valentine's Day is easy and simple to make with your own hands. Now I’ll tell you exactly how to quickly and conveniently do this kind of work with your own hands...

Take a piece of thick cardboard (for example, a lid from a pizza box, it’s just big). We buy from stationery red packaging office paper (it’s just double-sided and dense – that’s what you need).
We cut the paper into wide stripes. We fold each strip in half LONGWAY(so that it is doubled - this will make the rose thicker and more magnificent). And then we twist this double strip into a roll (around the pencil). We remove the twist from the pencil, loosen it slightly, let it unwind a little and secure the tail of the twist with glue(so as not to stick out).
We make a whole lot of these paper rosettes so that they all tightly fill our cardboard heart. And then we attach them to a cardboard base - maybe with glue. A better with double sided tape– holds up remarkably well – cover the entire surface of the cardboard heart with strips of adhesive tape, remove the protective film and this sticky base poke our roses. Then we put a note in each bud with warm words, promises, confessions, heartfelt vows and intimate hints...
Second craft with a note.
HEART WITH A SECRET.
You can also put a love confession inside a PAPER HEART with a gap in the middle.

Here detailed master class for making such a VALENTINE WITH A SECRET.
Take a square sheet of paper and fold it in half, lengthwise and crosswise. So that it spreads out along the folds - cross to cross (as in the first photo).
We bend the bottom edge of the square upward towards the middle horizontal fold line (photo 2).
Turn the sheet over, with this fold down (photo 3). Then we bend the right and left corners to the vertical midline (photo 4).

We turn the sheet over again with the other side up, corner down (as in photo 5). And bend the upper corners to the middle vertical line (photos 6 and 7).
And again we bend the same upper corners to the middle vertical line (photo 8).

And now we bend our module (which has the shape of a hexagon) in half. That is, the upper corner of the hexagon lies on its lower corner. And then these ends appear at the top (photo 9).
These protruding ear ends need to be folded (as shown in photo 10) - that is, we place our finger on the corner of the ear (the one where the fold angle is) and press this edge of the fold to the edge line of the module. And as a result, our ear was flattened (as in photo 11).

Now look, our module has 2 layers - 2 triangular halves lying one on top of the other. We take the upper triangular half and put it into the POCKET on the lower triangular half (there is just such a wonderful pocket there (photo 12, 13).

There's just a little bit left. Change the shape of the ears sticking out at the top of the module - so that the ears look like rounded hills at the top of the heart.
First, we bend the rectangular ends of the ears - so that the ears become terangular in shape (photo 14)
And now that the ears have become triangular, you need to smooth out the sharp corners of these triangles. That is, bend them down (as in photo 15). And the whole valentine with your own hands is already ready - we turn it over to the front side.

You will find even more techniques for folding a paper heart on our website in a special article
And we continue...
VALENTINES-ENVELOPS
Do it yourself from paper.
And here you will find ways to make a heart-shaped envelope from thick paper or cardboard.
On a sheet of cardboard we draw a template for the future valentine, as in the photo below. You can copy the picture or draw it yourself based on the sample. The sizes can be any (to suit your task) - the main thing is to maintain the proportions. That is, the width of half the heart should coincide with half the width of the central rectangle of the envelope itself. All other sizes can be any size to suit your letter.
In such a valentine envelope you can put small gift– for example, earrings. Pin the earrings onto a cardboard in the shape of a heart (for example, beautiful velvet cardboard) - make two holes and insert the earrings into them. And put this velvet heart with earrings inside such an envelope. Healthy and beautiful.

You can make the envelope simpler. Here it is. From cardboard or thick gift paper cut out the heart. Draw a rectangle inside the heart - so that the HEIGHT rectangle and HEIGHT zones above m were EQUAL.
That is it is not necessary to copy this template exactly from your computer– you can draw a heart of any size and shape yourself (thick or elongated – it doesn’t matter). The main thing is that the height of the rectangle is equal to the height of the zone that is located above this rectangle. And nothing else matters. You will get an envelope in any case.

You can also make a valentine letter with your own hands inside closed paper boats. Fold a sheet of pink (or beige) paper in half. And we place the palm stencil so that the fold line falls on the back edge of the palm. We trace the stencil - cut out two layers of paper along the contour at once, without unfolding. And when the silhouette is cut out, we unbend the folded stencil - and we get two open palms. And we glue a paper heart inside (folded). On paper heart We write a love note or warm words to a loved one.

And when we want to give a gift for Valentine’s Day, then an envelope will not be enough. We need a whole box so that we can put a voluminous item (souvenir or gift) in it.
So let's see what simple Valentine boxes we can cut out and fold from a sheet of cardboard or flat paper
VALENTINE BOXES
How to make it yourself
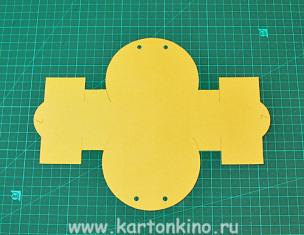
Boxes in the shape of a heart.
Here is the first version of a simple heart-shaped box that you can easily make with your own hands from cardboard. You can see a stencil template for such a craft for Valentine’s Day in the diagram below.


And if this same template is slightly changed. Then you can make a valentine like this in the form of a box - with double entry of one box into another. The stencil will be exactly the same - with only one nuance - in it the lower corner of the heart should be STRAIGHT - that is, have 90 degrees. And the intermediate walls (between the hearts) should not have a point at the bottom - but instead they should have the same straight walls as at the top). Now I will try to draw such a diagram for this template so that it is easy and understandable for everyone.

To make everything clear, I drew a diagram below. You can see for yourself that the stencil differs little from the previous template - only the walls between the hearts are rectangular (not triangular) and the hearts themselves have an angle of 90 degrees (so that you can close them by pushing them into each other).


So head to this feature article to learn how to make these boxes with your own hands quickly and easily.
And since I started about heart boxes, I need to tell you a little about what you can put in them. Here below beautiful ideas original CRAFTS FILLINGS for these Valentine boxes.
You can put toy hearts in the box crocheted. For example, in the form of delicious plump donuts decorated with knitted icing and beaded sprinkles. Such toys can be used as pendants on christmas tree- that is, they will serve your family faithfully and faithfully for a long time on every New Year’s celebration.


You can bake real Gingerbread HEARTS from dough, cover them with jelly red icing and decorate with white icing from egg white and powdered sugar

Any gingerbread dough recipe will work for these sweet Valentines. We bake gingerbread cookies in the shape of a heart. Let cool. In a saucepan we dilute red jelly azure. Gelatin 40 grams soaked in cold water 100 grams, into which 1 package was thrown food coloring. After the gelatin swells, heat the mixture in a water bath, but not to a boil. Dip the whole gingerbread into this glaze using tweezers and place it on a dish in the refrigerator to harden.

And if you don't like to bake. You can buy ready-made square cookies in the store and decorate them with sweet fondant. Mastic dough is made in 1 minute - we buy Marmeloshow marshmallows in the store, heat them in the microwave - we get a sticky mass similar to plasticine. Sprinkle powdered sugar on the table - and in this powder (as if in flour) we knead our marshmallow dough. We get ready-made sweet fondant, from which you can make decor for cookies for Valentine's Day

Take part of the mastic dough and roll it out with a rolling pin - cut out squares from the rolled sheet to the size of the cookies. Glue the squares onto the cookies. We roll part of the dough into thin sausages - these will be the seams of the envelope. And we mix part of the dough with red food coloring - we make hearts from it and decorate our sweet envelope. If there is no food coloring, no problem.– hearts can be cut out from red marmalade.
These sweet Valentines can be made with your own hands using waffles, cookies, and cupcakes. We buy ready-made flour products and decorate them with sweet mastic made from Marmeloshow marshmallows melted in the microwave (our Soviet marshmallows are not suitable - only bourgeois rubber ones).
Valentines BRAIDS
With my own hands.
Here is a classic school craft - a paper heart. A woven valentine in the form of a checkerboard weave of strips threaded one through the other.

This is how such a heart is made. Fold a white sheet of paper in half and use scissors to cut out HALF OF THE OVAL. We cut three or four or five cuts at the oval - from the fold line and deep into the oval without going into the area of its round top with scissors. We do the same with the red sheet of paper. And then we insert two modules alternating its strips, as shown in the diagram below.

This simple classic craft has many creative interpretations. Depending on the curvature of the strip, we can get different pattern weaving...

Let's see how this happens. If we modify the braiding module like this with rounded bumps, we will get a wicker heart with a pattern in the form of many small hearts.

If on the four lines of our module we make recesses in the form of 2 round ears on the left and 2 ears on the right. Then, when we fold a valentine with our own hands, we will get a flower with four petals in the center.

And if there is only ONE tubercle - and only in one direction - then we will get a HEART SILHOUETTE in the center (as in the photo below).

We can try to be creative creators ourselves and draw our own braided lines at random. Assemble a Valentine craft and see what unexpected pattern comes out in the end.
Moreover, we can decorate not only the wicker part of such a valentine with our own hands - we can also decorate the round EARS of the heart with curly carvings (as is done in the photo below).

DIY Valentines
TIERED ABUNDANCE.
Here is a Valentine craft that I really like. She looks very chic and rich. And it's very easy to do. Therefore, this valentine can be a theme for an activity in kindergarten or a craft for a class at school.


Below I show the module for valentines-ladders in three tiers.

Take a sheet of cardboard. And we fold it in three layers - that is, in a triple fold. Then we unfold this sheet. And cut it in half - diagonally. The angle of inclination can be any (this will not affect the essence of the craft). And then we supplement each such oblique strip with cuts. In each of the three folding parts of the strip, we cut EXACTLY IN THE CENTER, reaching with scissors somewhere to the middle of the thickness of the strip.
The cuts on the strips are different - please note - on one strip the cuts alternate between bottom, top, bottom. And in the second strip, on the contrary, the cuts alternate like this - top, bottom, top.

Then our walls fit each other with these slits. And we get the basis and backbone of the future DIY Valentine’s card. And on this wicker base we glue hearts, flowers, lace, rhinestones and other decor made of paper and cardboard.
And it is not necessary to make three folds on this module. An accordion can have as many walls as you like - 4, 5, 6. What more topics This ladder craft will have more tiers with heart-shaped decor.
Valentine pendant
Framed with your own hands.
You can do a lot simple craft for Valentine's Day. Fold a sheet of white cardboard in half like a postcard. We cut a square window in one half so that the half becomes a frame for the future Valentine craft. And now we hang a double heart made of cardboard inside such a vertical postcard.

We cut out two hearts from cardboard and hang them on a thread, piercing one and the other heart with two stitches.

Crafts Valentines
Made from cardboard with paper flowers.
These are the ideas for DIY Valentine’s cards that we have collected for you in this article. Good luck with your creativity, you will end up with original crafts.
Olga Klishevska, especially for the site
If you liked this article
And you want to encourage our author, then you can send any amount convenient for you
to his personal wallet YaD wallet - 410012568032614