The main goal of the feeding of the product is obtaining a neatly treated edge. Typically, the bottom of the niza sweep fell on pour park Products. However, in some cases, the intake of the bend is sweeping on the front side of the product or not bended at all. The bending makes the edge of the product more dense, thereby improving appearance Products. If the intake of the nose of the product is laid correctly, then it is immelled with the front side of the product, with the exception of special decorative treatment cases.
The value of the nose of the product is usually specified during the last fitting, after all changes and the product is revealed. Products with skirt tella, "Sun" -Klesh or with a skirt, cut out on a slanting thread, should hang at least a day before it is possible to finally determine the width of the intake of the nose.
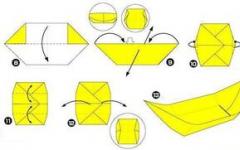
The sequence of feeding for a bending of the nose is the same for all products:
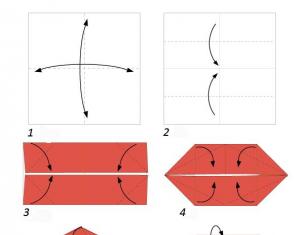
1. Mark on the product of the fold line.
2. Seat the edge of the product on the wrong side, combining the line of the middle and line of the seams of the product and the bending allowance.
3. Printed pins or notify the bequeatted edge to the product at a distance of 5 mm from the fold line.
4. Place a piece of wrapping paper or paper for countable decisive devices between the adjacent edge and the product. It helps to avoid the appearance of the print edge of the adjacent edge and shrinkage of the product of the product when they are affected on the front of the product.
5. Slightly affect the stuck edge in the direction of the share thread. Be careful not to accidentally put the iron on the pins. Try to, as far as possible, sustaining the surplus of the fabric of the adjacent edge. Difficultization can lead to the fact that in some places the battery width will increase (Fig. 107a).
6. Using a cardboard template or measuring tape, measure the width of the bending width. Melt the desired width (Fig. 107b) with a chalk or knead.
7. At the slaughtered skirts, select a bending battery in one of the following ways:
a) Continue on the scapping on the bending line with a seeding "in stitch".
b) Load the machine line with a reinforced tension of the upper thread. Sapt the battery by pulling the top thread.
c) Machine a zigzag lock over the cord. Select the battery by pulling the cord.
8. If the tiss fabric, cut the seams on the subheading section, as shown in Fig. 107V.
9. Treat the sequence of the intake of the bending method most suitable for the tissue and this product.
10. Side the wake-up edge to the product manually, on the machine or glue it to the product.
11. Mustive a fitted edge.
It is easier to mark the folding line between the legs than using a special device for applying a skirt niza line. At the same time, such a ruler is quite long, and it can also be marked with a fusion line on jackets and blouses.
Stand on the table, put on the product and ask someone to help you note the fold line below. You must stand motionless, and your assistant is to walk around you. Mark the folding line should be as soon as possible so that the person standing on the table is not tired and has not changed the pose during measurements.
Pins go into the product in the future fold line parallel to the floor at a distance of 10-12 cm from each other. By chalifting the fold line, adjust the bottom and stick it before removing the product. The line of the product should look like a strict horizontal. Correct the position of the fold line so that it seems to be horizontally, even if it does not actually be so.
Using a wooden line of one meter long, mark on the product of the fold line. Using a line of meter long,
Remove the product and decompose it on the table. facial side up. Correct small deviations in the mutual position of the pin so that they all be on the same line (Fig. 108a).

Mark the folding line on the front side of the tissue using a pin, a wash, chalk, or residue stitches (Fig. 1086).
To accurately measure the distance from the bottom of the product to the floor is usually not easy. The method described below can be applied to any product if it does not remain traces from pin or needles.
1. Slide the pins across the entire circumference of the skirt at a distance of 25 cm from the floor (Fig. 109a).

For thin tissues, it is better to use thin needles.
2. Remove the product and mark the fold line at a distance of 24 cm down from each
Claws. Then the distance from the lower edge of the skirt to the floor will be 1 cm (Fig. 109b).

3. If you want the skirt to be up to the ankle, adjust the distance measured from the pin down.
After the prevalence on the involnee side of the nose of the skirt of the glue or the "sun" -Klash is formed by overwhelming fabric of the adjacent edge in relation to the skirt. This excess fabric needs to be removed so that the marked edge lay on the wrong side of the skirt smoothly, without folds.
There are several ways to make it. Which of these methods it is better to choose - depends on the properties of the tissue and the product. This or that method will allow you to get the desired result.
Reducing the bending width
The magnitude of the tissue of the adjacent edge is the greater the greater the wider point of the bending. If the intake of the bending is narrow, then the excess fabric will be small.
1. Seat the edge of the skirt on the wrong side.
2. Squeeze the bending width from 1.5 cm to 3 cm.
3. Treat Skirt Cut, Send and Side the Edge.
This quick and simple method is used in the processing of the bottom of casual products, as well as in cases where the product must be sewn. With this method, it is possible to remove the excess fabric of the adjacent edge in such products in which all the excess tissue is localized in the vertical seam area, such as in the skirt of the A-shaped silhouette or in the bell-shaped pants. We must move the lines of the seams on the site of the adjacent edge to remove all the excess fabric. If the product needs to be lengthened, the vertical seams should be strained and re-stroke.
The first way.
If the final position of the fold line can be noted along the pattern, mark the new position of the lines of the side seams immediately, before their overall.
1. Mark on the lines of vertical seams of their intersection with the fold line.
2. At the marks, adjust the edge of the product on the wrong side and delete (Fig. 110a).

3. Cut the scap to the bending to the desired width (Fig. 110b).

4. Still side seams (Fig. 110v).

5. Outbreak seams.
6. Seat the edge of the product on the wrong side.
7. Process the seal of the adjacent edge. Switch it to the product.
The second way.
If you need to assemble the product to make the fitting, first draw the side seams and only then change their position.
1. Mark on the product of the fold line.
2. Reflect the edge of the product on the front of the marked fold line (Fig. 111a).
3. Scaliate the product part of the product along the side of the side seam on the subheading area so as to pick up the excess fabric in the seam (Fig. 111b). Wrap up the bending allowance in the place where the slotted pin of the side seam passes.


4. Still side seams from cutting sections and continue a 2.5 cm line to secure the seams (Fig. 111b).
5. If you are not going to lengthen the product, cut the seam allowances on the section of the adjacent edge.
6. Repair the remains of the initial side seams on the section of the adjacent edge so that the allowances of the new side seams can be opened.
7. Outbreak of seams.
8. Select the edge of the product line on the purl side and affect.
9. Cut the cut of the adjacent edge and susht it to the product.
Surplus the fabric of the adjacent edge is not difficult to remove if the product is not at all cooled or a little wasted, or if the fabric is easily charged. Mustle the stuck edge or process it with a steamotrier to reduce the bend thickness.
1. Seat the edge of the product on the wrong side.
2. Propinate a bezed edge of the pins or notice it to a 5 mm product above the fold line.
3. Place a sheet between the adjacent edge and the leaf product. dense paper or light cardboard to avoid shrinkage of the product fabric and form an imprint of the adjacent edge on the product.
4. Using a steamotrier, affect the bent edge from the bend to the slice along the direction of the share thread. Do not put iron on the pin.
5. Mark the width of the bending width.
6. Cut the cutting edge slice and susht it to the product.
Niza bending - This is the processing of the bottom cut of the product. After the layout of the length, the allowance is turned off on the wrong side, type, fit and cut off parallel, leaving the desired width. The main rule: 4 cm - for a straight line, 2 cm - for rounded bending. An unscrewed battery is sewn or dodged by car. The following types of bending are distinguished: "Open section", that is, unscrewed the fabric on the wrong side only once, and with a double slicer fog. Squeege is noticeable and imperceptible with the front side of the product. With all the methods of the bending "in the open" first handle the cutting cut. The type of treatment of the product depends on the fabric, patterns, and, ultimately, from the desired appearance of the model.
Secret bending niza
It is applied in cases where the stitch dresses should be invisible. Unscrew a screwdriver to open 1 cm on the front side and sew along. In order for the front side there was not a single stitch, capture the needle for 1-2 filaments of the fabric. Stitches on the allowance can be longer. Thread tight not tighten (1).
With a special foot for a secret line, you can damage the battery on the machine. For this, the allowance must be noted 2 cm below the cut. Screenshot wrap and damage (2). Relating attention to that. To the line on the front side captured only 1-2 filaments of the fabric. To do this, you need to increase the length of the stitch and weaken the tension of the thread. Detailed instructions can be found in the instructions for your sewing machine.
Pogging "Rulk"

The bending of products from very thin tissues is performed by hand "Rulk". This requires a thin needle and thin threads for machine embroidery. Squeegement on the bending - 1 cm. The "Ruttle" bending can be performed in two ways. Pasting to be 1 cm. Alternately enhance the needle, then in the seal, then close to the cutting cut, while capturing no more than 1-2 tissue threads. By making several stitches, carefully pull the thread, while the resulting slice is twisted (3). You can also, twisting the bottom of the niza between the index and thumbs, sew the resulting knot-end seam (4).
Frigs by car

First unscrew the allowance on the wrong side, it is screwed once. Then to turn up to the desired width, pinch, root and tumble in the edge (5). At the bending with an open slice, you must first spend the cut, then notify, root and dangle from the front side.
Sigzag stitching bending

In pleated sun skirts. Ruffle, swarns Sleeping bending tighten the dense zigzag stitching. For this, the feed on the niza bending need to be found on the wrong side and shifted with a tight zigzag stitch according to the collar, then the excessive breakdown fabric cut down to the stitches (6). If the bottom edge of the product is not straight, but should fall soft "waves", then when shooting, pulling the edge and grab the stitches with a lined pon-thread (for example, a fishing line).
Fake frink

If the length of the fabric lacks on the bottom of the nose of the dress, and also if the dress is sewn from the tissue sequins, then use the "fake" bending from the suitable or finishing fabric. To do this, cut off the tissue band of OK.6 cm width and. Having applied it to the front side of the main fabric, to be pulled along the planted line of the dresses (7). SPU lap irriguity. Then notice the "fake" bending, the edge is resting. Pasting to access and sew manual or damage.
Rounded bending

When fogging the nose of the skirt of the teller, the rounded shelves of the jacket or the slots of the warmed edge should lie flat. For this, an excessive width of the rounded area must be added. The upper cut cutting cut into two rows with a long stitch line. The allowance, unscrewing on the wrong side, notice, while throwing the thread of the bottom line until the allowance is lying smoothly. The fabric is evenly distributed and maintained (8). Sleep of the allowance to spend and sew a manually secret stitches or damage by car.
Treatment of bending angles
There are three options for performing the corner of the slot or the cut and the fastener cut.
Handling angles manually

First, perform the niza bending, then the linse or slot, the slot, cut or slice of the fasteners to take place on the wrong side, root and sew on the bottom of the Niza (9). If you have a product of very thick fabric, pre-cut the allowance for the bottom of the bottom to the width of 1 cm (10).
Purely pull out the corner
First you need to outline the length of the product. Punches on the bottom of the niza and the weld or the slot cover or the cutting of the fasteners. Cutting (welded) and dummy feeding on the front side and stop along the intended line of the lower edge. Bringing to cut to width 1 cm (11). Afterverting on the wrong side, the stems of the slot / fastener, the weld and the bottom edge to take place. The edges are rooted, then sunmove the bottom edge. Clamp or weld to sew to the bottom of Niza (12).
The angle of "envelope" - This is the most beautiful, but also time-consuming handling of corners. It is performed as follows: Niza bending lines and edges of the cut must be outlined with membrane threads. Punching on the bending to the wrong side and its edge to mark with chalk on the point or cutting of the cut (13). Replenish. Locking the slot / wrapper to turn off the wrong side and the edge to mark with chalk on the bottom of the niza bending. Two outlined points to connect the line passing through the angle formed by the lines of the backbone (14). The cloth must be added to the face side inside, combining the segments of the chalk line. Start cabinets on the chalk line and cut along a line to a width of 0.5 cm (15),
on the corner to cut the painter. Internal batteries. Remove the allowance for the bottom of the niza and the slot on the wrong side, come down (16), sew the secret stitches or dangle.
Printed swinding

This is the easiest and quick type of treatment of lower cuts. Sing the allowance to wash and root on the collar. Remove the residual threads. Gasket of a wampix with a double-sided adhesive coating. Putting haftfliz put under the allowance. The tape should not be wider than the allowance, otherwise it sticks to the iron. Room (17).
IMPORTANT: Before sticking to gluing, read the gasket application guide and perform trial roasting on the flap of the fabric.
Each person is independent of age and gender, sooner or later there is a desire to visit the bath. The best option will be the Russian bath. From a long time, the bath was used not only to remove fatigue and voltage, but also as a means against many diseases.
For processing Slices nizasewing Product And the following methods of treatment are used by the following methods:
Processing Niza product seam
 Bottom sections of dresses, skirts, female trousers, jackets, as well as, olods, ruffles, sleeves made of thin, halftone bulk tissues are treated with editive suture with a closed slice.
 Bottom sections of dresses, skirts, female trousers, jackets, as well as, flute, frill, sleeves made of thick, semi-fat, incomprehensible and low-power fabrics are treated with an open-seamless cut.
 Bottom sections of dresses, skirts, female trousers, jackets, as well as, swords, frills, sleeves made of thick, semi-fat, incomprehensible and low-slip tissues are cut off by "cloth" on a special adaptation or special scissors.
Then he is laid by manual stitches or on special. car.
Processing Niza product on a zigzag stitch machine:
 Bottom sections of dresses, skirts, as well as, fuse, frill, jabs, chill, carved out the base, or in a circle of thin, halftone, transparent bulk and low-duct fabrics are processed by car with a zigzag lines.
To perform a zigzag lines first adjust the zigzag line on the sewing machine: the height of the zigzag is 0.1-0.3 cm, the width is 0.1-0.2 cm. Zigzag width is the length of the stitch on the sewing machine.
To perform a zigzag lines on bulk tissues, stitches are longer, the width is less.
To perform a zigzag lines on low-slip fabrics, make the height of stitches less, width - more.
To perform a zigzag lines, the slice is sweeping on the wrong side by 0.5-0.7 cm and pave a zigzag line by 0.05 cm from the bend or under the edge. Then the excess fabric is cut off.
Threads for the treatment of the edge with a zigzag line are very thin, so that the edge does not get rigid.
Processing Niza Product "Moscow Swam":
Bottom sections of dresses, skirts, as well as, flocks, frills, jabs, Kokil, carved under the oblique filament of the bases from thin, halftone bulk and elastic fabrics are treated with the edge suture of the supplement, the so-called "Moscow" suture or, for some reason, "American ".
 To fulfill the "Moscow" seam, the slice is sweeping on the wrong side by 0.5-0.7 cm and lay a machine line by 0.2-0.3 cm from the bend. Then the excess fabric is cut off.
 Penit once again by 0.3-0.4 cm and laid a machine line by 0.2-0.3 cm from the first fold.
Processing Niza product with an edged cut:
 Bottom sections of dresses, skirts, jackets, as well as sleeves, expensive, thick, bulk and low-slip tissues edged with a strip of lining tissue with an open cut with an open slice. Then, the allowance for the treatment of nose is filled with an involve, slightly fit and stitched with manual secret stitches.
All craftsmen, without exception, dream of acquiring an overlock, with which you can quickly coach the seams. However, there are also more sophisticated and elegant methods for treating inner sections of products, not inferior, and in some cases superior overlocked seams. We offer you a hit parade of methods, with which you can qualitatively handle the seams without overlock and give your products the perfect look.
1. Scroll by scissors Zig-knocked. The easiest way to prevent squeezing is treated with scissors with zigzag blades. Such trimming will avoid squeezing, however, this method is not recommended to be used on thin silk and transparent tissues, as well as on tissues with a loose texture, such as Channel twisted.
Fig. 1. Scroll by scissors Zig Zag
2. Racking seam zigzag. This very available way For all Shvent, because almost all sewing machines can perform a zig zag. Gently crimp the allowances along the seams, set the desired length and width of the stitch (2.5 mm for light tissues and 3 mm for dense tissues) and wash the allowances along the edge.
Fig. 2. Machine seam Zig Zag
3. Imitation of overlock seam. If your sewing machine is imitation of an overlocked seam, firing the allowances and wash them like a zigzag seam. The difference is only in the originality of the line.
Fig. 3. Imitation of overlock seam
4. Processing of points in the irip. This method of processing of spaces is recommended to use the tremendors who want to ensure that the product wear looks perfect.
Fig. 4a. Skipping in the irip
Fig. 4b. Dock
Fig. 4C. Introduction
5. Scope of spaces of oblique baker. Beautiful wear - business card This method. It can be used when sewing clothes made of light, medium and thick tissues.
Before starting to work, it is necessary to measure the length of all allowances with an increase of 20 cm and buy an oblique beyk with a bending on both sides of 15 mm wide. Kosya Beyk can be purchased at any accessories store or make independently. Selecting the color of the beaks, keep in mind that a special breadpage of fashion designers is considered to pull the allowances of contrasting in the color of the baker.
Beach jump in half in such a way that the bottom half was a little wider than the top (by 1-2 mm), ironing or taking faces not necessary. Wrap the baker's battery. Put the place exactly to the edge, slightly pulling the plain so that folds or wrinkles are not formed. Make sure that the lower edge of the beaks is valid in the seam. Consistently catch all sections, shiver. See more detail
Fig. 5a. Edging of baker's allowances
Fig. 5b. Lower control
Fig. 5C. Orange allowance in the finished form
6. Double linen seam (French seam). In the products of thin and transparent tissues of the allowance, through the cloth, therefore, their processing should be given particularly important, because all the shortcomings of the involve side will be visible in this case, and this may not only worsen the appearance, but also completely spoil the product. That is why when sewing models made of transparent tissues, double linen seams are often used. Drinking dual sutures (second name - French seam) allows you to take seams inside the seam. In this way, we get a pure purple side and aesthetic look of the product from the outside.
Fig. 6D. Seam from the wrong side of the product in the finished form
7. Light version of the French seam. This method of treatment can be used when sewing products from thin cotton fabrics. Still on the allowances on the width of 1.5 cm. Each allowance to overcap in half to the seam and shut down. Then both scapups fold together, sweep and stack. Squeeze the allowances for one of the details.
Fig. 7. Ring of points to the center
Fig. 7b. Connection connection

The bottom of the product is aligned on the figure, noting with chalk or pins the desired length from the floor using a ruler. In the arched marks, produced every 5-10 cm, and in direct - in the middle of the back, and the sides. Bringing on the bottom of the niza to adjust on the planned line on the wrong side, to take place by retreating from the fold line by 1-2 cm, and it is restarted.
Niza bending width can be different, for example, in skirts 2-4 cm tellers (depending on the magnitude of the culbage), in direct skirts 2-5 cm. The noticed fogging of the skirt of the glue usually lies with the waves, so you need to collect on the thread over the slice Short stitches, evenly distribute the sinking areas of the bending and sustay through the moistened path in the direction of the fold to the slice. So that the bending break is not imprinted on the front side of the product, inside the bending of a strip of thick paper. If the slack is impossible, it is impossible to label, lay folding and slightly come down. Then, measure the bending width plus 1 cm on the seam (Figure 46a) and cut the tissue.
Depending on the properties of the tissue, the bottom of the product is stroke different ways. In products made of cotton and bulk fabrics, the allowance must be previously treated with an open slice (Figure 8B). To do this, the bottom of the product is to bendled inside by 0.7-1 cm, to take and fascinate with an invalible side with thin threads at a distance of 0.1-0.2 cm from the bending of the fabric. Processed cut cut, and then apply a bench for manual stitches.
In products from thin silk tissues, the bottom can be used on the machine with a narrow seam (Figure 8D) or secret hearing stitches (Figure 4B, B), in products made of dense tissues - cross-shaped firmware stitches (Figure 4G) or stitching the edge of an open slice (drawing 8B) and strip secret stitches. Sing of bending can be closed with a braid, one side of which to be pulled to the bending, and another to sew the secret stitches to the product (Figure 46b). You can also edit the slice of oblique or transverse bay width of 2-2.5 cm from thin fabric to the tone of the product (Figure 46B).
In the products with seams in the inner folds of the folds for better singing them, the stratification is not allowed to produce a product. First you need to strip the bottom of the product, the bevels of the bending of the heating seaming inside, and then become the residue of the seam (Figure 46g).
If the seams are roasted in one direction, then at a distance equal to the twin width of the niza bending, one of the seams will thread, not attense the machine lines by 0.2 cm. The seams on the bending sections. The folds are slightly rooted from the front side through the path, and then again with the involving, strongly pressing the iron.
The bottom of the product is finally rooted on a softer bedding. ironing board. So that the seams of the bending is not imprinted on the front side, harvesting the gasket of several layers of the tissue of the same thickness as the bent edge edge. Attach the gasket from the wrong side of the product close to the edge of the bending and ironing through the path, moving the iron along the product.
Products made of thin and synthetic fabrics, velvet ironing not very hot iron without moisture. Wool fabric products should be ironed slightly wet. When ironing dense woolen fabrics, the iron must be lowered to the fabric, slightly pressing it, after which it is further rearranged, but in no case move back and forth several times in the same place as it is done when the linen is done. If the product is braided with the front side, it is necessary to use the retreat. In case of appearance on the front of the printing of prints (LAS), to remove them under the pull, fold, etc. From the wrong side to put a moistened path, and with a facial under a more moistened path - gasket of wool fabric and, slightly touching the path of the carp of a strongly heated iron, ironing to the incomplete drying of the wool tissue gasket.
Substitutional entry refers to those operations with which even those who do not like to sew. Of course, tailoring curtains or fit the trousers in growth can be trusted by professionals, but almost every woman had to deal with the problem of the healing hemp or need to shorten too long skirt. Make it is quite simple, and possibly having mastered these simple operations, you love to sew yourself.
How to align the bottom?
When it comes to sewing a curtain, then most often the line of the binder is flat. If we are talking about the skirt, especially the broken, then the line of the Niza is aligned directly on the figure, while the belt and the fastener must be well adjacent.
To carry out this operation, they become a flat surface in that shoes with which it is expected to wear this thing. In this case, an assistant with a vertical wooden line, one end of which is placed on the floor, marks the appropriate level across the entire circumference of the hem.
However, this operation can be done independently, if in the doorway, fix the rope at the desired height, densely in chalk (Fig. 1). To the marked line, it is necessary to add an allowance for a bending and seams whose width will depend on the method of processing Niza.
How to independently note the lines of the pent of the skirt
Processing without poda
Most. simple waywhich does not require the use of special techniques, is the processing of edge overlock. In some cases, such a line, for example, made by a contrasting thread, looks very attractive (Fig. 2).

The processing of a slice of a zigzag or roller overlock, in which a neat rutter is formed, well suited for thin tissues (Fig. 3). After processing, sticking tissue threads need to be trimmed. Even more beautiful sow It turns out if the zigzag is laying at some distance from the edge, and then neatly cut off the extra material.

Beautiful and neat stitching is obtained by using oblique bey. For thin tissues, it is admonished in the form of edging. For this, the oblique beyk (better to take ready) is folded in half and affix, then the edge of the fabric is inserted inside the edge (Fig. 4). The same method is well suited for the processing of the inner seams of the bulk material.

So that it is thus the dense material, it is necessary to need a bending of about 0.5 cm. The fabric and bay are folded by the front sides and paste along the lower edge. Then, the beaks are rejected on the wrong side, they are roaring and paste through its upper edge (Fig. 5). This layer method is well suited when the skirt length is insufficient for a standard pent.

Treatment of the edge
The standard width of the swelling of the skirt is 3-4 cm, for thin tissues, this value may be less. To make a neat subheading line with a straight face, it is convenient to use a sheet of paper with a horizontal line with the desired distance. Bend the edge of the hemp for this distance and endure the iron - you will get a perfectly smooth line, and then the bend is not printed on the front side (Fig. 6).

In the folded lines fold, it is much more complicated. To facilitate this operation on the bottom of the product, two parallel lines are parallel (Fig. 7). Then the lower line is a little donate, the fabric is inside out along the top line, pushed the pins and smooth.

Most. simple method Treatment of the adjacent edge, with which even those who do not know how to sew, is to use the adhesive tape. It is embedded in fold and processed by a hot iron (Fig. 8). For heavy textiles, it is recommended to invest two such tapes.
Professional dressmakers do not recommend using in this way of fixing the hem, considering that it makes tissue tougher. In addition, the adhesive tape after washing is likely to be glued again. During our grandmothers for products from costume and fingertips, traditional sedatives (Fig. 9) and a goat (Fig. 10) are used, which to date are performed in an expensive studio.

Beautiful execution of such a binder requires a skill and considerable time. With professional clothing manufacture, this operation is most often performed by a secret machine line. A simpler decision is a simple rejection of twice bent edges (Fig. 11), which is well suited for sport style clothes.

In a narrow step, this line can be performed using a special bump foot. For thin fabric, as well as for the broken models more suitable option It is the processing of the edge overlock, and then it is 0.21 cm. So that the upper edge does not scroll, two parallel lines can be made with a wide pod.

One of the most beautiful, although complex methods of binder subtle materials is the so-called Moscow seam. Its width is about 3 mm, while on the involving side there are 2 lines, and on the facial - one. And they are performed in such a sequence (Fig. 13):
- Leaving with 1 cm with a string point, the bending is made by no more than 4 mm, they are revealed and sting the fold as close as possible to the edge.
- Gently cut the fabric from the edge to the line, leaving for more than 1 mm.
- Once again, we turn the bending to the wrong side so that the line is around in the middle, and stroke it.
- Collect the bending from the inside as close as possible to the first line. Experienced Master Make the first handing over with a contrasting thread, and then remove it to get one seam from the face and with an inside.