Surely, in the fall, when the weather is warm and sunny, you and your child come home from a walk with an armful of colorful autumn leaves. This is an excellent interior decoration that can simply be placed in a vase. But it is also raw material for wonderful and interesting crafts. And children will be happy to come up with and bring to life some kind of picture - an applique of leaves.
In autumn there is a lot around not only sunlight, but also the golden tints of leaves. It is from them that you can make wonderful autumn applications with your own hands. We invite you to engage in exciting creative activities with your children in your spare time. Hand-made applications from autumn and bright leaves and grass turn out to be truly cozy, beautiful, warm and, of course, original and unique.
In this tutorial I will show you how to make appliques from autumn leaves with your own hands step by step photos. Such paintings will fit perfectly into any design and will decorate your home. Anyone can make an applique from leaves, the main thing here is not to rush. Before creating autumn applications, leaves and flowers must be dried, then the painting will last a long time.
Slowly and quietly, golden and crimson colors fall from the trees autumn leaves-boats, and it’s so interesting to walk in the park at this time, collect whole bouquets.


Autumn leaves - DIY applications
Painting “Girl under an umbrella” made of autumn leaves
In this master class we will make the application “Girl under an umbrella”.

- white cardboard;
- glue gun;
- PVA glue or pencil;
- black felt-tip pen;
- dry leaves of different colors;
- bark;
- scissors;
- dry blades of grass.
First we need to outline the silhouette of the girl under the umbrella. We draw it on white cardboard.

Now the silhouette needs to be completely painted over with black. And for this we will use a regular felt-tip pen. You can also use paint instead.

This concludes the work with the drawings, and then we will glue the autumn leaves and tree bark.
Let's make a tree on the side of the girl. And to begin with, we cut out a trunk and then several branches from the bark with scissors. You shouldn't make a lot of branches. Three or four will be enough.
Glue the trunk and branches near the girl. It is better to glue these parts with hot glue. Regular glue will not hold the bark. The base for the tree is also ready.

Now you need to take colorful leaves. They must be dried first. And we break these leaves into small parts. Let them be different sizes and colors. The more colorful the autumn leaves are, the better.
From these small parts we will form the crown. And here you need to use PVA glue or a pencil. Lubricate a small part with glue. And sprinkle it generously with our torn leaves.

Then we apply glue to the other part and do the same. That is, we glue the leaves until the crown of the tree becomes quite fluffy and lush. It is important that there are as few gaps as possible.

You need to glue blades of grass along the bottom. You can take small and thin elongated autumn leaves. Also, fluffy blades of grass that grow everywhere are perfect here. They can be glued with hot glue.

Further from the crown down on both sides of the tree you need to glue a few more leaves, which we shredded, so that it seems that the leaves are falling from the tree into the grass. There is no need to glue a lot of leaves so as not to clutter the application.

Using the same hot glue, you can make a couple of drops on the umbrella, as if it had been wet by rain.

The leaf applique is ready! It can be covered with glass, framed and hung on the wall.

Beautiful crafts from autumn leaves
Read here.
Application of autumn leaves “Sunny Leva”
This lesson is provided to help creative parents. Make an applique of leaves with the image of a lion. Since both the autumn leaves and the paper face itself look bright, you can call your experiment “Sunny Leva”. Thus, you won’t have to spend money on today’s expensive creative materials.

Materials for autumn crafts:
- dry autumn leaves;
- sheet of paper;
- PVA glue;
- yellow paper;
- black and red markers;
- eyes made of plastic or cut out of paper.
How to make an applique of autumn leaves step by step
Dry the leaves between the leaves of a magazine or under the press of books, then they will not wrinkle in finished craft. Although freshly picked leaves will begin to curl over time, this will give the lion a fuller coat.

Glue the raw material in the center of the paper around the circumference. 2-3 sizing points are enough, let the resulting ring remain voluminous.

Using a black marker, draw the outline of a lion's face with a wide nose on yellow paper.

Select the black nose and paint the mouth red.

Cut the blank along the contour. Separately, make round ears with red centers. Attach eyes to the muzzle.

The ring of leaves previously pasted onto paper needs to be turned into the lush mane of the king of beasts. To do this, simply stick the yellow part in the center. Preliminarily focus on the size, cutting out the workpiece so that the head fits in the center of the hair.

A mustache for a cat breed can be made from cuttings of the same leaves that were used for the main craft. Glue them with a more reliable compound.

The bright sunny application of leaves is ready. Fallen autumn leaves from any tree are suitable for this craft.
DIY application "Autumn"
A picture of leaves is a very interesting and unusual craft. It turns out beautiful and bright. And in this master class we will make such a picture. You can decorate your home with it or even give it to someone.

To make an applique from leaves we will need:
- leaves;
- hot glue;
- white cardboard or sheet of paper;
- black felt-tip pen.
First we need to draw the silhouette of the girl. Our girl will hold a flower in her hand and blow on it like a dandelion.

And then color it in a little with a black felt-tip pen. There is no need to completely paint over this, since we will be making a dress and hair for her from autumn leaves.

For the dress we take reddish leaves and they should not be too large. It’s better to take ones that are a little elongated, but not too much.
We glue one such leaf with hot glue instead of a bodice. The tip of the leaf should point down. From this flower we will make a skirt or hem.


Now we glue another four or five of the same leaves along the bottom. They should peek out from under the first three leaves. Here it is beautiful dress it turns out. Now we can move on to the hair.

For the girl's hair you need to take long yellow leaves. Willow leaves are perfect. First glue three leaves.

And then you can correct the hairstyle by gluing a couple more leaves to the places where there are gaps. Decorate your hair with a hairpin made of small red leaves. Here you can take a sprig of decorative barberry or any other suitable plant.

We will make a sleeve from a small leaf. You can take some kind of wavy leaf. This way the dress will look even more beautiful and festive.

From another such flower you need to tear off several petals. And we glue them as if a girl is blowing on a flower and the petals are flying from it. You shouldn't glue a lot of petals.

To make the picture brighter, you can make a frame for it from the same dried autumn leaves. Just glue them around the edges.

This is an applique made from flowers and leaves!

Read how to do it here.
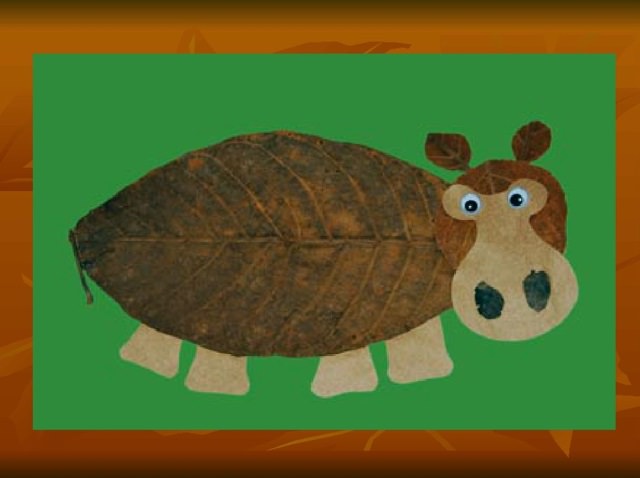
DIY hedgehog made from leaves
Children's applications in the form of funny little animals can be made from autumn leaves; for example, this master class shows how to make a forest dweller, a hedgehog. The craft is completed quite quickly, so it is suitable for kindergarten or for elementary school. All children know what a hedgehog looks like. He is prickly, small and very cute. Most often we see only a small nose from under the thick thorns. Using leaves, you should show the outlines of this animal, then you will get beautiful picture. We invite you to make this autumn craft with your children.

What you need for modeling autumn applique:
- dry herbarium;
- glue stick or PVA;
- sheet of paper;
- plastic eye;
- pink or black half bead.
How to make a hedgehog from leaves step by step
Prepare leaves and paper. One sheet used for modeling must be sharp, for example, linden, in order to make a muzzle out of it. The rest will go to the prickly back. This could be maple trees or the cover of any other tree.
If the herbarium is dry enough, handle it carefully so that the material does not crumble. It is very important to pay attention to the carved tips, because it is these protrusions that imitate spines. Remember that raw leaves will curl and become curly in a couple of days.

First glue the muzzle onto the paper and start gluing the leaves intended for the prickly back to it from behind.

Glue on as many leaves as you like. Be sure to keep the pointed nose on the outside.

Now glue a pink or black half-bead onto the sharp tip and add a doll’s eye. The hedgehog figurine is ready. Made from leaves.

You can complement your autumn applique with yellow and orange leaves cut out of paper using a figured hole punch or cut out by hand. Also, these leaves are easy to draw. With them, the application will sparkle with new colors.

The autumn picture is lively and fragrant, because the natural material exudes a subtle scent, and it is especially pleasant to hold it in your hands.
Children's applique - sun made of autumn leaves
The sun warms the earth, caresses us with its rays, revives everything around, it shines so brightly and cheerfully. And even in autumn it still pampers us with warm days. We invite you to make a cute and smiling sun from yellowed leaves and paper. The leaves will become warm rays, and the paper circle with eyes, nose and mouth will become a face.

To perform the autumn application, prepare:
- well-dried leaves of any size and shape;
- yellow paper;
- dark blue paper;
- white, orange and pink paper;
- glue;
- black and yellow pen with glitter.
How to make an applique of autumn leaves in the shape of a sun
Prepare the leaves - details for the rays of the sun. Since the rays must be sharp and long, it is better to use material that has fallen from willow or ash. But in general, all possible options will do.
It is better to dry the herbarium first so that the autumn leaves become even, subsequently they will not curl, wrinkle and will remain the same, in their original form.
Also, a dark blue background was used to complete the craft. It was chosen well because it looks like a rich autumn sky.

From prepared paper yellow cut out a circle - this is the face of the sun, so warm, sweet and smiling. Make the eyes out of white paper in the form of rounds, and also cut out the mouth and nose from pink and orange paper. Select the dimensions of the workpieces in accordance with the size of the circle so that everything is proportional.

Glue the eyes, nose and mouth in the center. Draw the pupils with a pen - radiant and glowing. Use a yellow pen to draw freckles. Red spots appear on the faces of those whom the sun loves and kisses. But the sun itself, warm and dear, also has freckles. We will draw them with our pens.

Start gluing the leaf rays around the circumference, creating a lush border.

Fill one circle with dense autumn leaves. It is advisable to use parts of approximately the same length for the first layer. Now we see the dimensions of the central object.


We received a bright and warm autumn craft that will become an applique painting for interior decoration or for an exhibition. Such a product will definitely come in handy and will find its rightful place.

In the same way, figures of any animals can be made, for example, a hedgehog, an owl or a peacock.
Application of autumn leaves “Girl in the garden”
The autumn garden is always beautiful and bright. And I want to imprint it in my memory for a long time. Can you make it beautiful? autumn picture from leaves, which will remind you of bright autumn for a long time. In this master class we will make a painting from leaves “Girl in the Garden”.

To make the picture we will need:
- paints (watercolor or gouache);
- brush;
- dry leaves;
- black felt-tip pen;
- petals of yellow and lilac flowers;
- yellow satin ribbon;
- glue;
- white cardboard.
We start with a couple of small bushes, which we will paint using paints and a leaf. Take a large leaf. And with a brush we paint it on one side with red paint.

Then we print it on the left side of the cardboard. And we’ll repeat this again, but make the second shrub yellow. And let's print it a little further into the red.

Let's draw the silhouette of a girl in fluffy dress. She should seem to be looking at the bush. It is best to draw with a pencil first so that you can erase unnecessary strokes and lines. And then circle the lady with a black felt-tip pen.

You only need to glue it on top, because we will also glue other leaves under the bottom. Any glue can be used. But hot glue holds the leaves better and stronger.

Take a small leaf with five petals. And we glue it on top of the skirt right at the very beginning.

Then we continue to form the bottom of the skirt. And for this, let's take beautiful yellow flower petals. They should be large enough. For example, these could be petals from rudbeckia. We glue them to the bottom of the dress.


Let's take a thin satin ribbon yellow color. You can take lilac color. And we'll tie a bow. Glue it to the very top of the dress (skirt). Now the dress has become even more beautiful and festive. And it's completely ready.
Glue a leaf onto the girl's hairstyle. It should be wavy or needle-like. The hair was decorated.

And now let's complete the picture with a few drops of paint. First dip the brush in red and spray it onto the picture. And then dip it in yellow or green. Splashes can be made either a little or more. Whoever likes it.

The applique of autumn leaves “Girl in the Garden” is ready!
How to make a portrait from autumn leaves
You can make beautiful and varied paintings from leaves and flowers. Close-up portraits of girls look beautiful. In this master class we will make such a portrait. This painting is not difficult to complete. The main thing is to prepare leaves and flowers in advance, drying them with any in a convenient way. This can be done using a press and books, as well as an iron.

To make a portrait of a girl we will need:
- leaves of oak, birch, barberry and any small green and red leaves;
- Virginia aster (September) flowers;
- barberry berries;
- spruce needles;
- glue;
- black felt-tip pen;
- white cardboard.
First you need to draw the base of the girl’s portrait on white cardboard with a felt-tip pen. We draw all the main elements of the face: eyes, nose and lips. We also draw the neck and smooth transition to the shoulder. The basis of the portrait is ready and now you can move on to working with the leaves.

And then we begin to design the face. You need to glue a small red or burgundy piece of paper onto your lips. You can take a barberry leaf or a leaf of any other plant. You can glue it using either hot glue or PVA.

Then we will make arrows on the eyes of the girl or shadow. And to do this you need to take an oblong leaf of any color. You can even take the green one. And glue the leaf to the eyes. We do not glue it onto the entire eyelid, but only along the bottom and slightly backing off from the beginning of the eye at the nose.

Cut off the ends of the spruce needles. And glue them on like eyelashes. It is enough to glue three eyelashes at the edge of one eye. We glue at approximately the same distance from each other.

Shaping the hair. And to do this, take a couple of large oak leaves and one small one. First we glue one leaf, then a little higher the second one. And we glue the smallest one on top. Thanks to the shape of oak leaves, the girl’s hair turns out wavy and voluminous.

And from a birch leaf we will make a crown. Glue the leaf to the head so that its sharp part is on top. This is what the crown will look like.

You can decorate the crown with three barberries or rowan berries. But you can leave it like that.

Along the bottom, where the neckline is, we glue small red leaves, as if outlining the dress.

Then we take the September cards and glue them a little on top of these leaves. This is how we decorated the girl’s dress. And it became more interesting and elegant. Instead of September flowers, you can also use other small flowers. See how to do it here.

The portrait of a girl made of autumn leaves and flowers is ready! The portrait can be framed and used to decorate your home.

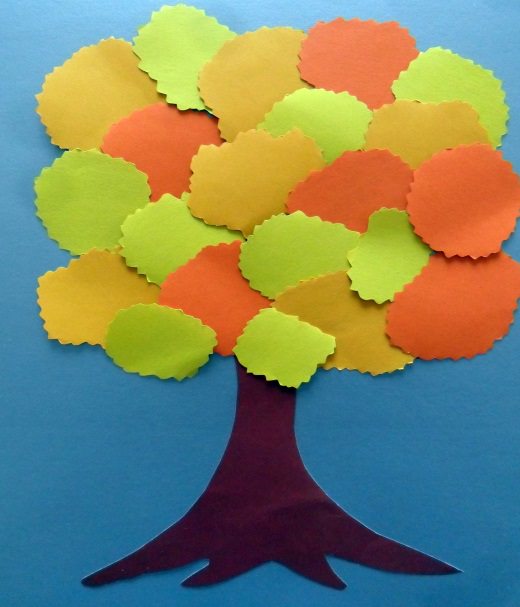
A lush and elegant tree made of leaves looks like a real one. Try to find a few differences? This is difficult to do, because the raw materials for making the craft are real autumn leaves. Children have a clear idea of exactly what a tree looks like, and therefore they can easily make a more or less believable craft. All you need is a whole fan of fallen leaves that you collect on a walk, as well as reliable glue that will stick these leaves to the paper and to each other.
The leaves can be fresh or dried; this will not make the craft better or worse. If you make an application from fresh leaves, then you have a double opportunity to dry your wonderful tree in the future. You can put the applique under pressure for a couple of days. The leaves will dry and remain flat. Or just leave the painting in the air. During the process of drying and evaporation of moisture, the leaves will begin to curl, but this will make the tree even more beautiful, and the craft will be voluminous.

To make an interesting autumn application of leaves, prepare:
- sheet of cardboard or thick paper blue or light blue;
- a fan of maple and other yellowed leaves (freshly picked or dried);
- dragon glue or another that will glue the leaves to the paper;
- brown corrugated paper(or crinkled fabric) to make the stem and scissors.
How to make an autumn tree applique
You can easily make a similar craft for a kindergarten exhibition of crafts. This is not a complex topiary that will take a lot of time, effort and materials, but just a flat applique. Every child can make such a beautiful tree.
The crown needs to be created from real yellowed or brown leaves, it is advisable to immediately come up with a way to attach them to cardboard. The simplest is to use reliable glue. The tree trunk should be rough. To imitate it, prepare corrugated paper or crinkled fabric.

Cut a wide tree trunk from a brown piece of corrugated paper, widening towards the bottom. Glue it at the base of the picture. Smooth out the paper. When the trunk is ready, proceed to modeling a lush crown.

Start gluing the leaves. It is better to move in a circle or place it in a fan shape. Gently drip with dragon glue or a glue gun, then press down on the leaf. There is no need to completely lubricate the entire back surface of the leaf, the main thing is that it sticks to the paper.

Make the first round layer, filling the ring very thickly with leaves. If you have natural material of different sizes, you can make the bottom layers larger, and then gradually reduce the size of the parts used.

Fill the crown completely without gaps. It will work out beautiful craft, which looks sunny and fresh.

Finish the craft with small details. For example, you can add helicopters - ash seeds - to the leaves, and also glue a few small details at the bottom, showing that in the fall the plants shed their clothes.

An unusual autumn craft made from living yellowed leaves is ready.

Autumn applique “Girl in a dress made of leaves”
Autumn is the time for crafts made from natural materials. On the street you can find cones, acorns, colorful leaves, and even flowers. In this master class we will make a beautiful applique of leaves in the form of a dancing girl in a fluffy and bright dress. Such an applique can become a real painting or postcard. The application is not difficult to do. The main thing is to select flowers and leaves and prepare them.

To make the application we will need:
- birch and elm leaves;
- cosmos and rudbeckia flower;
- black felt-tip pen;
- white sheet of paper;
- hot glue.
For this craft, leaves and flowers are prepared in advance. They need to be dried. There are two ways. The first is to iron it through the paper. And the second is to put it between the pages of books and press down. Leave it like this for several days.
First you need to draw the silhouette of a dancing girl. And all you need to do is draw top part body up to the waist. There is no point in drawing further, since the dress will be below.

Use a black felt-tip pen to completely paint over this silhouette. And this is what happens. This is the basis and guideline. Next we will work with leaves and flowers.

Now we move on to the formation of the girl’s flower-leaf dress. And we need to make the top. To do this, we tear off the core of the cosmos. And glue it with hot glue like a bodice (corset).


Glue three cosmos petals on top. It turns out to be such a beautiful skirt. And with that, the work with flowers is finished. Next we will glue only the leaves.

Let's take three elm leaves. And we will glue them not on top, but on the bottom of the yellow petals. This is how we made the dress widen due to the fact that the leaves are larger and wider than the flower petals.

Take three more elm leaves. And glue it from below under the previous three leaves. But here you need to glue it at a slight angle, as if the dress had a small train.

And we finish the whole dress with three birch leaves. After all, they are yellow and will go well with rudbeckia petals. We also glue them along the bottom of the dress. With this dress we are ready.
And all that remains is to glue the leaves as if a girl were scattering them while dancing. But since the leaves are too large for her, we will tear them into small pieces. And we will glue several of these scraps under each handle. This is such a beautiful and bright applique of autumn leaves and flowers!

September, October and even November are the best time to make fabulous appliqués from bright, fresh or dried autumn leaves. On the street we see a lot natural material, which definitely needs to be used, experimented and created something new. See how to do it here.
Applications from autumn leaves
Autumn leaves - DIY crafts
See how to do it here.
The main characters of any application on autumn theme, of course, are trees. The news portal "site" brings to your attention several colorful and original applications with autumn trees.
Applique Autumn tree made from pumpkin seeds

In order to create such a masterpiece, you will need a sheet of thick white paper, on which you will need to draw a tree trunk with branches with brown paint.
If you want your work to look neat, then print out a wood stencil.

Now you can start creating autumn leaves. This application uses pumpkin seeds, which were painted in various autumn colors (yellow, red and orange). You can paint pumpkin seeds with gouache, acrylic paints or markers.


Now it's a matter of small things. It is necessary to attach ready-made “autumn leaves” to the tree itself. This can be done with glue or using double-sided tape.
Applique Autumn tree made of colored paper

To make such a funny children's applique, you will need a sheet of thick cardboard (the base of the craft), a disposable plate (made of cardboard), cardboard, colored paper and glue.

Tear colored paper of the desired colors into small pieces. Grease a disposable plate with glue and chaotically glue pieces of colored paper. This will create the crown of the tree.

From a segment rectangular shape we will make a tree trunk. In order for the trunk to look more realistic, it is necessary to draw darker stripes on its trunk. This can be done with paints or a marker.
Now we glue the finished parts to a sheet of cardboard.

On a sheet of thick white paper, draw a tree trunk and its branches. Now, using autumn leaf stencils, cut out leaves from colored paper and glue them to the tree.


Application Autumn tree on the window

This applique option is suitable for decorating a school classroom in autumn style.
Cut out a tree trunk and its branches from double-sided colored paper. Glue the workpiece to the glass using a soap solution.

Now, using watercolor paints, make colored paper, from which you then cut out autumn leaves. You can also cut out autumn leaves from double-sided colored paper and, also using a soap solution, glue them to the window.
Three-dimensional applique Autumn tree

Upper part paper bag cut into thin strips. Then twist the bag and each strip separately. You should now have a tree trunk and branches. Cut the tree right down to the root and glue it to a sheet of thick cardboard.

Decorate the tree with autumn leaves made from colored paper.
Shcherbakova Yulia
Master– the class is designed for middle-age children preschool age, teachers and parents.
Purpose: decoration for a kindergarten group, crafts for an exhibition.
Target: development of artistic and creative abilities in children.
Tasks: consolidate the ability to work with colored paper and scissors, trace/draw a circle, develop creative thinking And fine motor skills hands
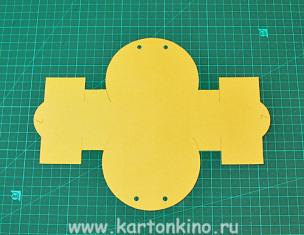
For wood you will need:
Sheet colored cardboard bright color- 1 piece. (for the base)
Stripes of colored paper brown : 1pc-4*20cm (soil, 1pc-3*15cm (trunk, 3pc-1*10cm (branches)
Circles cut from orange colored paper, yellow, green flowers(leaves): diameter 2-3cm
Simple pencil
Small saucer
Glue stick

1. Glue 3 thin strips and form the future crown tree. (3pcs-3*15cm)

2. Glue the barrel tree(1pcs-3*15cm)

3. Stick the soil (1pcs-4*20cm)

4. Bend the circles in half

5. Place the saucer on the branches tree, draw a circle with a simple pencil. This way the child will see where to stick the leaves. tree.

6. Spread glue on the halves of the leaves and glue them within the intended circle. Needs to be placed in different directions so that the applique looked voluminous.
7. Below on the soil we glue 2-3 "fallen" leaf.

Our autumn applique is ready!
Publications on the topic:
 Material for performing the master class: set for children's creativity“Colored cardboard”, colored paper, glue stick, scissors, plain paper.
 Master class “Flower of Desires” Many teachers claim that experimental activities is, along with gaming, a leading activity.
 From February 12 to 18 we celebrate Maslenitsa. Maslenitsa is a fun and bright holiday that has survived to this day. Maslenitsa is a farewell to winter.
 Master class voluminous “Candy tree” made of cardboard with your own hands step by step photos. I would like to present to your attention my “Candy Tree”.
 Dear colleagues. I would like to share with you my experience of a master class on appliqué with children middle group on the topic: " Autumn tree". Subject.
 Goal: teach children to do volumetric crafts from colored paper. Develop creativity and accuracy. I hasten to offer you my version of the craft.
 Master class “Heart butterflies made of colored paper” Good evening, dear friends! I offer you a master class on making cute ones.

What lines come to mind first when we think about autumn? "It's a sad time! The charm of the eyes! Autumn time inspired not only poets and artists. This time of year has always been fertile ground for the development of a child’s sense of beauty. Volumetric modeling in autumn depicts the gifts of the forest - mushrooms and berries, juicy fruits, or a broken applique on the theme of Late Autumn is a clear confirmation of this. Kindergartens and schools have always used this topic in their work. The child is happy to make something beautiful with his own hands. This allows him to feel more mature, significant and listen to the praise of his parents. Applications of this kind are a competent pedagogical step to instill in a child a sense of the beauty of the world around him. And you cannot refuse such techniques.
The autumn season inspired not only poets and artists
Application on the theme “Golden Autumn” in the preparatory group: a master class for the delight of children
The main task of kindergarten teachers has always been the same - to keep the child busy so that he does not sit idle. There is no need to waste time. If it can be spent on educating the baby. Let the child make an applique with his own hands on the theme of golden autumn. Outside the window there are beautiful landscapes that are natural visual aid for any kind of crafts. In 1st grade, children do the application “Birds Flight”, in 2nd grade - “Portrait of Autumn”, the older the children, the more interesting and rich the program becomes.
What you need for children preparatory group to accomplish the plan:
- colored cardboard;
- colored paper;
- scissors;
- glue.
The first step is to prepare the base. Then the tree trunks (trees) and leaves are cut out. After all the planned blanks are made, the process of gluing them to the base begins.
- Tree trunks are first glued to a sheet of cardboard. It’s better to figure out what kind of trees these will be in advance.
- Then comes the turn of the leaves. They need to be glued so that the tree crowns are rich, thick and large. In the preparatory group, you can cut out, for example, maple, oak and birch leaves.
- Glue should not be applied to the entire surface of the cut piece. It is enough to coat only the edges. This is done so that the glued parts do not become deformed after drying.
- You should not make more than two trees on one sheet of cardboard: it will be difficult for the child, he will simply get confused in this forest of blanks. One or two is enough.
Tell your children what can be improved, how to make it more beautiful: they are looking for advice from their elders, although they may not ask for it.

Dancing leaves: applique on an autumn theme (video)
Gallery: applique on the theme “Autumn” (25 photos)


Application on the theme “Autumn” in the younger group: teach a child the beauty
The simplest, but very interesting option for children junior group There will be an applique of real autumn foliage. While walking, invite your child to keep the beauty of autumn as a souvenir. Let him collect different leaves. Help him select good, dry, not torn leaves. Try to collect leaves from different trees with your children.
Necessary materials to continue work:
- glue, brush;
- paper that will be the background - the basis for the leaves;
- You can come up with some small decorative elements.
From the total mass of collected autumn “gold” it is necessary to select the most beautiful ones, those that have not had time to rot. Place them in one row and dry them a little. There is no need to dry the leaves too much - they will break when you start gluing them. Then you need to select the required number of sheets of colored background paper.
Apply glue to each leaf with a brush and glue the foliage onto the paper. It is better to do this chaotically, without observing any symmetry - this way the application on the golden autumn theme will be more natural. You need to try to ensure that on a sheet of paper there are leaves of not one type of tree, but different ones. After the sheet is filled, you need to put it, for example, closer to the battery so that the glue dries faster.
As an option, on a sheet of paper that serves as the background for the future application, you need to draw a tree - just a bare trunk. And then glue the collected leaves onto it. Such a combined applique will look even more interesting than one made from single leaves.


Application on the theme “Trees” for children of the preparatory group: instructions and useful tips
Children of the preparatory group can make an applique on the theme “Trees” not only from paper, but also from plasticine. But first things first.
First, let's see how to make an applique from colored paper:
- To do this, you need to take a sheet of brown paper. If it is not monochromatic, but with small third-party inclusions, it’s okay. A tree is drawn on the selected sheet. You can use ready-made templates if available. But still, if a child draws a tree on his own, it is much more useful.
- Next, carefully cut out the drawn tree with scissors.
- The approximate height of the tree will be 20 cm from an A4 sheet. Then we prepare the leaves: you need to cut squares of different colors about 3cm x 3 cm. After the leaves, you make a preparation for the grass - a green rectangle 2cm x 28 cm. The squares need to be folded like an accordion, starting from the corner. The grass blank should also be folded like an accordion, but in width.
- When the blanks for the tree itself are ready, you need to make a small mound on which the tree grows. To do this, fold a green rectangle 9cm x 4cm in half. Use scissors to cut along an arc. Unfold - you get a regular semicircle. Now you need to complete the formation of foliage. Bend the accordion, which is made from colored squares, in half and glue it in the middle. In the center of the bottom edge of a sheet of cardboard blue glue the cut out mound. In the center of the mound, retreat 1.5 cm from the bottom of the cardboard sheet. Glue the wood blank. Stretch the accordion of grass along the entire length of the bottom edge of the cardboard. The grass should cover the “roots” of the tree.
- Now the formation of the tree crown begins. You need to glue the leaves, trying to ensure that the colors do not go in a row. More leaves mean a more luxuriant crown. You can stick a couple of leaves that are not attached to anything, creating the effect of leaves torn off by the wind and floating in the air. All that remains is to make the sky. In fact, the sky itself already exists - the cardboard is blue, there is no need to highlight the sky on it. But the clouds will need to be made. For this, take blue paper. You can cut out the clouds, or you can simply tear the paper into small pieces. All that remains is to glue them to the top of the cardboard without any order.
The tree against the background of the autumn sky is ready, mind you, without any effort. But, if you want to complicate the drawing, it all depends on who is doing the appliqué. There would be a desire. The pictures below show several options, which are also quite simple to do.


Ideas for autumn applications for kids: let’s use imagination
How smaller child, the more demanding he is. It is always more difficult with the youngest part of humanity than with the rest. Here imagination and all sorts of little tricks come to the aid of parents. For example, you can make a fun autumn applique in just a few minutes. At the same time, the child will laugh with joy.
A simple option, which is already difficult to find simpler. Take just one yellow leaf from those that were blown onto the balcony by the wind (or, as a last resort, take yellow paper for applique).
The leaflet should look like in the picture:

Turn it over with the wide part facing down. Glue a sheet of cardboard. Draw legs and arms to it, one of which will have an umbrella. Glue a couple of larger buttons onto the leaf itself. And on them - a couple of smaller diameters. Draw drops of rain and a smile on the resulting cunning face. All. Cheerful yellow autumn man - the leaf is ready.
Time taken - 15 minutes. The child laughs with happiness. The parents breathe a sigh of relief.

Autumn was sung by many artists and poets. And this is not surprising, because it is rich in bright colors and gifts of nature. It is in the fall that the “Autumn” festival is held in kindergartens and schools; children bring handmade crafts to the exhibition. It is difficult for kids to make products from complex materials, so we offer paper crafts. Working with scissors develops fine motor skills, imagination and spatial thinking. Let's consider simple options crafts.
Paper applique on the theme “Autumn” made of paper
This applique can be made from paper.

- glue;
- scissors;
- colored paper;
- markers;
- colored cardboard;
- simple pencil.
Work progress.
Step 1. Prepare yellow paper and cut out two ovals from it - this is a blank for future corn.
Step 2. Cut out blanks for tomatoes - two smaller ovals and one larger.
Step 3: For the cabbage leaves, cut out two green circles and one salad-colored or other shade circle.
Step 4. Cut the two circles in half, making the edge wavy.
Step 5: Prepare your paper purple and cut out two beet shapes.
Step 6. Cut out a pumpkin tail and two bulbs from yellow paper.
Step 7. On wrong side Using orange paper, draw a pumpkin with a pencil, then cut it out with scissors.
Step 8. Green paper is needed for onion feathers, vegetable tails and leaves. Cut some straws.
Step 9: White cardstock will serve as the base. Draw the face of Autumn on it.

Step 10. From the previously prepared preparations, form a hairstyle for our image, gluing the vegetables with glue.

Step 11. When all the large parts are in place, glue on the small parts - tails, feathers, scales, then draw the facial features and don’t forget about the freckles. 
Step 12. Glue the applique onto a large piece of cardboard.
A bright applique on the theme “Autumn” made of paper is ready. The kids will love it.
Craft “Night in the Forest”
In autumn the forest looks special. It is fraught with a certain mystery. And at night it turns into fabulous magic: the quiet rustling of leaves lulls the inhabitants of the forest. You can convey this atmosphere in the form of an application.

For work, prepare the following materials:
- purple cardboard;
- curly and simple scissors;
- colored paper;
- black felt-tip pen;
- glue.
Work progress.
Step 1. Using scissors, cut a strip of brown paper - this will be the ground.
Step 2: Glue it onto the purple cardstock.
Step 3. Using curly scissors, cut out ten different ovals from colored paper: orange, yellow and green.
Step 4. Draw a Christmas tree on green paper with a pencil and cut it out.

Step 5. Glue all the ovals and the Christmas tree onto the purple cardboard (large parts in the background, and small ones in the foreground).

Step 6. Using a black felt-tip pen, draw trunks and branches for the trees.

The craft is ready.
We invite you to watch a master class on autumn crafts “Dancing Leaves”
Mushroom glade
Autumn is the time to pick mushrooms. Many people go into the forest to collect chanterelles, russula and honey mushrooms. Therefore, an application on the theme “Autumn” made from colored paper “Mushroom Glade” will be relevant.

To complete this craft, prepare the following materials:
- compass;
- glue;
- scissors;
- cardboard;
- colored paper.


Work progress.
This application is not simple, but modular. Volumetric figures look like real ones. Your mushroom meadow will simply come to life.
Step 1. Using a compass and pencil, draw several circles of different colors (brown for the caps, light brown for the legs). For the fly agaric, red caps.


Step 2: Make grass from green paper. The scheme is as follows: cut a 5-centimeter strip, about 20 cm long; fold it in half, then in half again, and so on until you get a narrow strip; cut the teeth along the edge of the strip, then unfold it.


Step 3: Cut the circles in half. Form a mushroom out of semicircles.

As a result of some labor, you have created an autumn mushroom meadow.

Step 4. Glue the grass without gluing it all the way so that it appears “alive.”
autumn sunflower
We have offered you several types of autumn applique that you can do with your children. It is very important that they participate in the creative process. After all, the application has a beneficial effect on the child. This type of creativity develops:
- aesthetic taste;
- artistic imagination;
- fine motor skills of hands;
- tactile sensation;
- promotes the study of colors and shapes.
For a positive result, the application requires a sequence of actions: sketching, cutting, smearing with glue, gluing. All creative process doesn't take much time. Invite your child to do simple craft“Sunflower”, which takes just a few minutes.

For work, prepare the following materials:
- glue;
- yellow paper;
- scissors;
- cardboard;
- buckwheat or tea.
Work progress.
Step 1: Draw a sunflower on the back of the construction paper and cut it out.
Step 2: Glue the sunflower onto the base.
Step 3. Coat the core of the flower with glue.
Step 4. Sprinkle buckwheat or tea onto the greased area.
The craft is ready.
We invite you to watch a video selection of applications on the theme “Autumn”.