Today everyone has a mobile phone or smartphone, even very young children, this is an essential attribute. modern life... The functionality of the device matters at the stage of its selection, but the aesthetic side of the issue shows itself already during operation. Phones are scratched, beaten, and a convenient case is simply necessary to keep them safe. You can always buy a ready-made accessory in the store, but it will be much more pleasant to use a thing that is made with your own hands, for example, a knitted cover.
Crochet Cover Knitting Tools
It doesn't take much to create a mobile phone case, just take care of the material and the tool:
Additionally, it is worth acquiring various decorative elements, because the finished product can be decorated.
How to tie a phone case
You need to start work on the cover by studying the scheme and taking measurements. So, there are two ways to make a product:
- tie the pipe, and at the end connect one edge of it with single crochet columns;
- start knitting from the bottom of the cover and continue it in a circle.
In the first method, the thickness of the phone will not be taken into account at the bottom of the case and when put on the corners will be sharp and not very attractive to stick out. Therefore, it is better to resort to the second way and start knitting from the bottom.
The cover is knitted in single crochet columns in a circle
The cover is knitted in a circle without any reductions or additions until the desired length is achieved
Using threads of different colors, you can get a striped cover
When the cover is ready, you need to think about the fastener. It may not be there at all, but you can use a button or a button. If desired, on the back of the cover, you can impose a strip of single crochet posts, which would overlap the top and go to the front of the cover, and put a button on it. For a button, a chain of air loops fixed with a loop will be enough.

To close the cover with a button, you need to tie a loop
My friend is engaged in knitting products for sale, and she does not create clothes. In our city, unusual knitted covers made it popular and in demand. Its tables on inserts were full of the most original accessories - a cover in the form of a minion, with a pug, an owl cover, etc. I myself became the proud owner of a cover in the form of my favorite cartoon character - Homer Simpson.
Cover decoration options
When the base is ready, you can start decorating. Here you can not limit your imagination, using different techniques:
- Impose additional elements and sew them onto the base. So you can create a cover in the form of an animal's face or just with colored knitted circles. The decor may well go beyond the cover itself, for example, you can make paws or ears.
- Sew decorative felt elements. This material does not crumble along the edge and is easy to cut, so you can create an excellent appliqué from it.
- Make embroidery with beads, attach beads, thorns, etc. Here it is worth using small-sized elements so that the cover is convenient to use.
- Make tassels from bundles of thread.
Photo gallery: knitted phone case ideas
 Knitted elements can be sewn to the cover, creating a variety of characters
  For completeness, you can add tassels from bundles of thread
  By tying ears, paws and eyes, you can make a cover in the form of an animal
  Decorative items can be cut out of felt and sewn onto the cover
The yarn cover is a comfortable, cozy little thing through which you can express your individuality. Such a product will be pleasant to wear yourself, and it will also become great gift... To create a cover, you only need yarn and a hook, and the scheme itself is so simple that a beginner can handle it.
It is unlikely that anyone needs to prove that a phone case is an extremely necessary thing. To protect the screen from scratches, you can buy a silicone or leather case, you can stick on a protective glass or film. We propose to knit a case with your own hands. This work is available even for beginner knitters. Even a child can crochet a phone case. Pattern, color, selection of threads, decorations - you choose yourself. Let's get down to knitting!
Partial Pattern Crochet Phone Case
We will need:
- threads "Iris" yellow;
- hook number 1.3;
- beads No. 10 transparent dark green, green, light green, beetroot, red and carrot colors;
- a needle for a set of beads on a thread;
- scissors.
Description
For knitting, a pattern is used on which grey colour denotes the background of the knitted fabric, and the colored cells -
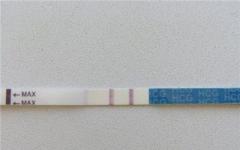
 Bead set
It is carried out in reverse knitting order, from top to bottom. We start with the 63rd p., End with the 1st. For odd rows, we make a set of beads according to the scheme from left to right, for even rows - from right to left. In details:
- 63r .: no beads;
- 62 RUR (even): set from right to left: 1 red, 1 beige;
- 61 RUR (odd): set from left to right: 2 beads, 1 red;
- 60 rub. (even): set from right to left: 1 lime, 1 green, 1 red, 1 carrot, 1 beet, 2 green;
- 3p. (odd): set from left to right: 3 light green, 2 green;
- 2p. (even): from right to left: 1 green, 1 lime, 1 green;
- 1p: no beads.
The photo below shows what you end up with when typing.
You can string beads directly onto the thread - see the photo with tips below.
Or you can try to make your job easier. To do this, thread a regular sewing thread with a length of about 6 cm into a thin needle. We make a loop by tying a knot. We thread a working thread into it - see the photo below. The beads strung on the needle, passing the usual thread, will go to the working one (f.2a, 2b).
Knitting
We collect 33 VP = 32 VP + 1 VP lifting. We turn knitting. We knit 63 rows of RLS, performing half of the cover without a pattern (f.3a, 3b, 3c).
Now let's start making the pattern. We will knit RLS, simple or with a bead.
We make 33 VP = 32 VP + 1 VP lifting (f. 4). We turn knitting and knit 1p. RLS without beads (f. 5).
Knitting technique for even and odd p. is different. We proceed to the 2nd p. (even). We turn the part. The scheme is as follows: 2 sc, 2 sc with beads, 14 sc, 1 sc with beads, 13 sc. We apply the knitting method "at work"
Move the bead close to the loops (f.6a). We start the hook in the nearest previous stlb. r., while the bead should remain at work (f.6b). Grabbing the thread by the bead, pull out a new loop (f.6v).
Once again, grabbing the thread, we drag it through two loops (f.6g).
Track. stage will be the next, 3rd row. We have it odd. We unfold the work. The scheme is as follows: 13 sc, 1 sc with beads, 8 sc, 1 sc with beads, 4 sc, 3 sc with beads, 2 sc. We apply the method of knitting "before work"
Move the bead close to the loops (f.7a). We start the hook in the nearest previous stlb. r., while the bead should be before work (f.7b). Grabbing the thread by the bead, we pull out a new loop (f.7v). Once again, grabbing the thread, we drag it through two loops (f.7g).
Assembly
The connection of the two parts of the cover can be done by crocheting the edges. In this case, use half-b / n, b / n stb, or rachiy step. If desired, you can simply sew both parts.
Size adjustment
If it suddenly turns out that the finished case is too small - do not be discouraged! Tie each part in rows of stlb b / n until receiving the right size... The cover is ready!
Pink case for smartphone: video MK
Gold case
Dimensions: 6.5cm by 11cm.
We will need:
- yarn, 100% cotton, peach blossom- 20g;
- Grass yarn, 100% polyester, golden color - 10g;
- hook number 2;
- blue beads.
How to crochet a phone case
With a peach thread, we collect a chain of 20 air. pet. (= 17 air. pet. basics + 3 air. pet. lifting) and knit:
- 1p: 1 stlb s / n in the 5th air. pet. chains from the hook, 15 stlb s / n in the next. 15 air. pet. chain bases;
- from the 2nd p. on the 28th p: 3 air. n. lifting, 16 pillars. with nak. in the next. 16 pillar. with nak. previous row. Cut the thread.
Assembly and finishing
Fold the finished canvas in half. We connect the grass yarn and knit on both sides according to the connection scheme. We tie the upper edge of the cover in a circular 1 p. pillar. without nak. We complete the row of connections. pillar.
We do not cut the thread, but we knit a chain of air. pet. arbitrary length.
Star
Make an asterisk out of blue beads according to the scheme. Sew it onto the cover.
Phone case "Dog": video master class
With beige yarn, we collect a chain of 20 air. item (= 17 air item + 3 air item) and knit:
- 1p: 1 CCH in the 5th VP of the chain from the hook, 14 CCH in the next. 14 VP of the base of the chain, 5 CCHs in the next. VP of the base of the chain, 15 CCHs in the next. 15 VP of the base of the chain on the reverse side, 4 CCHs in the next. VP of the base of the chain from the hook. We finish the row with a connecting post.
We carry out further work according to the scheme in a circular manner up to the 14th row inclusive. Each p. we complete the CCT. Next, we divide the canvas into two parts in half. We knit the valve in straight / reverse rows along the cx. from 13 p. for 22 rubles. Cut the thread.
Strapping
Connect pink yarn to the upper edge of the cover and knit round 1 row of RLS. We complete it with CCT.
Cut the thread.
From a beige thread we knit a chain from VP of arbitrary length. We connect the finished cord to the cover. stlb.
We decorate the case with ready-made roses and beads.
Crochet phone case "CAT": video MK
A convenient phone case, decorated with raised flowers or funny faces, with animal legs or bird wings, or even simply knitted from the remnants of multi-colored threads - these are the many ideas that the World Wide Web is replete with today. It is even proposed to use combined techniques, if only the products are original and beautiful. You can choose an option to your taste, especially since schemes are offered to many of them. However, if you tie the cover, it is taken experienced craftswoman, then she will understand from just one photo how many columns and crochets are required to be made in each row in order to create a similar masterpiece. And of course, it will bring its own touch to it, if only it does not turn out to be an exact copy.
Variants of covers are offered, knitted or beaded on any basis - knitted, woven, suede, etc. There are options for beading, without the use of knitting techniques. Knitted covers stretch well, especially made with knitting needles. They keep the phone warm in winter. A battery-powered mobile device is capable of producing small amounts of heat. Keeping a little warmth means keeping the battery running for a long time. In summer, it is better to change the cover to an openwork one, avoiding overheating of the device.
How to crochet a phone case
The most common options for crocheted covers. It is enough to know the columns - simple, with a crochet, two crochets to make a bag. You can tie protruding or voluminous elements to it.
For example:
- elegant frills;
- paws;
- wings;
- leaves.

We use decorations:
- sequins;
- rhinestones;
- interesting buttons;
- bugles;
- beads;
- beads.
With openwork knitting, we make sure that there are no too large holes in it, from where the gadget can slip out. If so openwork pattern I like it very much, we take the thread thinner, and the hook is smaller in number than we reduce the holes.
Knitted phone case - choose a design
You can make your gadget unique with your own knitted cover concept. You can crochet a phone case with a special pattern, invented on the go. Knitted ornaments will give the product originality and originality. Techniques can be combined: knitting with beading, embroidery or applique from knitted elements. It is enough to look at pictures of products already created by someone in order to come up with your own solution, and not blindly repeat the idea of another person.


Choosing a knitting method and pattern
For a modest cover, rows of identical posts and monochrome performance are suitable. Different shades one color for each row or two is a profitable solution, since the cover will not turn out to be too boring, but it will not be too pretentious either.
The crocheted canvas turns out to be harsh, so it is better to tie the bottom of the cover (it is also the beginning of work) with an elastic band:
1.) We measure the phone, not forgetting about the side surfaces, add up the values and get the perimeter;
2.) We knit a chain of air loops for the length of the obtained value and close;
3.) From each odd loop we knit a double crochet, from even - a convex column;
4.) The next two rows are single crochets.
You will get an elastic band, after which the main fabric of the cover is knitted in the same rows, but for each a thread of a different shade is taken. If you take contrasting threads, you can get a colorful striped cover.
If there is a thread of only one color, then you can tie the circles to the product with columns from one loop and make "eyes" and "nose" out of them. They must be sewn to the cover. Two semicircles can become "ears" that are sewn on top. In the middle of each "eye" you can place a black button, sequin or bead - "pupils". You will get a bear case. Triangular ears will turn the product into a cat, and the beak, instead of a round nose, will turn into an owl. It is good for an owl to tie its wings in semicircles of a larger diameter than ears for a teddy bear. To do this, an additional row of single crochet stitches is knitted around a small semicircle. If the phone is large, then it is worth tying a semicircle with two rows of posts. A bear, an owl and a cat can have their paws tied if such protruding details do not interfere with using the cover. Bird legs are knitted with yellow or beige thread, for a bear we make legs to match the "body", for a cat we knit white legs or also in tone. If the cat is light, you can make it "Siamese": make dark legs and ears. Only the muzzle will have to be knitted separately - with a large dark circle of threads of a chocolate or gray-blue shade.
Knitting pattern for a three-toed foot:
1st row: 1 air loop, single crochet from the same loop, single crochet into the next 2 loops, then turn to knit the 2nd row;
2nd row:* double crochet, connecting column to the first loop, 1 stitch * once more double crochet, connecting column to the last loop.
Such paws are more suitable for a bird, for animals, by analogy, four fingers can be made.
A crochet phone case can be crocheted from elastic bands. For this, a special type of hook is used. This tool is usually sold with a set of colored silicone rubber bands. It is not recommended to use a regular crochet hook, because it can accidentally tear the elastic bands.
Knitting method
Making a canvas of elastic bands resembles crocheting, it consists of very similar columns. Often, products made of elastic bands are recommended to be performed on a machine, but the hook has a lot of advantages: it is not so bulky and allows you to knit anywhere, even in public transport... Crocheting strings and rows is much clearer. So you need to start with this tool.
The advantages of the material - rubber bands - are in their elasticity, which makes it possible to make an open cover instead of boring silicone "sides". The rubber bands will allow you to make a hole for the camera on the back of the product. The main thing is not to make a mistake when drawing up a diagram. As the cover is weaved, it should be tried on to the phone in order to correct the initial calculations.


Schemes in pictures
To figure out how to knit from elastic bands on a hook is easy and simple if you watch the video. It is advisable to draw up a color scheme in order to draw on it. Rainbow sets are usually offered, and beginners can tie a striped case with colors arranged according to the spectrum. Also, the stripes can be arranged diagonally, but the scheme will become more complicated. There are options with a volumetric pattern that require additional skills when crocheting. It is worth mastering some techniques, then it will turn out to be creative on your own when drawing up diagrams.


How to knit a phone case
It is easier to knit a phone case with knitting needles than from elastic bands, if you own this technique. The canvas turns out to be straight, and you can connect its edges in different ways:
- crochet;
- sew;
- initially knit on circular needles, like a sock.
You can choose any patterns: with overlapping loops ("strings" and "pigtails"), embossed, openwork, two-color, etc.
Knitted covers - photo examples
Knitted fabric stretches well, so there is no need to perform an elastic band at the beginning of work. If you have to work with the selected threads and knitting needles for the first time, it is advisable to first knit a sample of the desired pattern - 10 loops in 10 rows and measure. Using the proportion, you can calculate how many loops to dial for the bottom of the cover. The number of rows can be estimated by periodically trying on the work for the gadget.
For patterns with tossing loops, you will need an additional pin, which can be replaced with a hairpin or even a toothpick, since knitting is miniature.


Schemes with description
An example of a cover with a "Rope" pattern:
1.) Cast on 18 loops and purl them;
2.) Start the 2nd, front row according to the scheme: 1 hem, 4 purl, 8 front, 4 purl, 1 hem;
3.) Purl 3rd row - how the loops look;
4.) The fourth and sixth rows are knitted like the second, fifth and seventh - like the third;
5.) In the 8th row we knit 1 hem, 4 purl, remove four on a pin, 4 knit with the front, remove the loops from the pin to the knitting needle, without twisting, and knit with the front, 4 purl, 1 hem;
6.) The ninth row is knitted as the loops look, then everything is repeated, as from the 2nd row.


The canvas should be as long as two phones, because it will have to be sewn from the sides behind edge loops. Beautiful seam for this - knitted.
How to weave a beaded phone case
To get a product that looks really rich, it will turn out from beads. The work is painstaking, but worth it! Especially if you use this technique to make a phone case, a clutch and a wallet. Such a set stylish accessories is unlikely to leave your fans indifferent, and when you find out that you did it yourself, your friends will be simply delighted.
Photo of cases for mobile


From beads, you can get analogs of pearl necklaces, fancy mosaics and stained glass windows, the main thing is to draw up a drawing correctly and choose beads of the appropriate colors. It is enough just to know the “Linen” technique and to have multi-colored beads to get a thing with a beautiful pattern.
Familiarization with mosaic weaving - double and single - will help diversify the cover. In addition, individual butterflies, flowers, leaves and other figures can be woven to it to be sewn as decorations.
Weaving patterns and patterns


Ornaments for beading can be created independently or taken from magazines, catalogs, from websites, or even copied from finished products... The main thing is to adapt them to the size of your own phone. When performing the “Linen” technique, you can take patterns for cross stitching and transfer them to beads. With mosaic weaving, such patterns will have to be reworked, since the beads are spaced apart, and not one above the other.
Beading technique is unlikely to make a case with a hole for the screen. modern gadget, but for a "grandmother's" phone with a small indicator, you can make a case with a window for the indicator. It will be a stylish gift for the progenitor.
DIY phone case - the simplest options
An original phone case can be made of patches of suede or leather. You need to cut out two plates and punch round holes in them, like for buttons. It is desirable to pierce it with a heated tube so that the skin does not crack later. You can connect the plates with a thread using crochet hook... It must be carefully inserted into the holes so as not to tear the edges. You can tie it with rainbow elastic bands, if there is a special hook in the arsenal. Lacquered leatherette will look good with elastic bands. Felt can be used instead of leather if you prefer a matte texture.
For the cover, you can make a cover fixed with Velcro. Tie the lid around the edge with the same material that connects the main plates.
No less original is the shockproof cover made of thermal glue. The basis of this glue is polyethylene. Today, you can buy not only colored rods for a special pistol, but even with the inclusion of the smallest particles of metal. Initially, this was done for technical purposes, but hot glue turned out to be so aesthetic that it became widely used in the creation of Christmas tree decorations.
To create such a cover, the phone will have to be wrapped in heat-resistant paper or parchment. On this material, you need to draw those places where the gadget has connectors, a camera lens, a microphone, an earpiece, a flash (it also plays the role of a flashlight). Leave a "window" for the logo - optional. Now we start applying hot melt glue. We circle the designated places to leave them free. Fill the rest of the space with patterns. They can also be drawn with a pencil on parchment in advance. You need to work quickly so that the glue hardens at the same time, otherwise it will not be possible to achieve a connection between the individual parts of the ornament.
Knitted tablet case
The tablet is even more critical to shocks than the phone due to its large screen. A knitted cover will become additional protection for him. It is easiest to make it on knitting needles or sew from soft tissue... Only such a cover will need a rigid insert; it can be made of hard cardboard, plastic or hardboard. Even the remains of thin drywall will do. The cover is made of four rigid parts that will fit the front and back parts, as well as the sides along the long side. The fifth piece is the cover.
Each piece needs to be sheathed or tied. Next, you need an elastic tape, from which "ears" are made along the corners of the lower part to insert the corners of the tablet. On the same part on the other side of the elastic tape, you can make a lock for the cover. The second option is to use Velcro Knitted cover it is appropriate to provide with a button fastener or a zipper. Then it can be done without a lid.
Examples in pictures
The difference in the manufacturing technology of knitted and woven covers is that for the first one you need to tie each rigid part separately, and then crochet them together. For the second option, you can use fabric panels for the entire length of the product.

So, you need a hook, thread, lock, Velcro, beads for decoration.
Making a pattern.
Option one: Velcro cover:
We collect a chain of air loops along the width of the cover (7 cm) and knit two lengths with single crochet plus 5 cm for the valve. We fold the canvas according to the pattern and tie it with contrasting threads. Now we will sew on the Velcro and knit the decoration.
Option two. Knitted pouch with a zipper. You need to tie two rectangles with single crochet columns to fit the phone and tie them on three sides with contrasting threads. Tie the fourth side of the rectangles separately. Sew in a zipper and decorate the cover.
Taken a cover with Kitty. 
First option- a handbag without a clasp. We collect 23 loops, the width of the cover is 7 cm. We knit 34 rows according to the scheme: * single crochet, air loop *, repeat from * to *. For the handle, cast on a chain of air loops 50 cm long. Knit three rows with single crochet. Sew the handle to the cover. Tie the cover according to the scheme.
Cover second, with lid.
The main drawing is single crochet. We knit a cover according to the pattern. The cover diagram is shown separately. In the table, the number of loops is indicated by the row number. Decorate the finished cover with the Kitty applique.

Option three:
Phone bag from Japanese magazine: 

Option four: 
So, we need: hook number 2 and any thread (not very thin) 2 colors.
We collect a chain from 9 century. p. we tie it with 2 or 3 rows of st. without crochet (depending on the thickness of the phone) on the extreme loops we knit 6-9 columns for expansion (only for 1 row of st. b. n.)
Now we turn to the main pattern - 5 tbsp. with crochet, knitted in one loop of the previous row 
So we knit according to the height of our phone, alternating each row with a new color of the thread, this is the pattern that turns out 
Before completing the work, we knit a row of double crochet, alternating with an air loop (in order to thread the tie. And the last row: in each VP of the previous row we knit 4-5 tbsp. With a crochet, this is how it turns out 
We tear off the thread and knit a chain from to. etc. by putting both threads together
The length of the chain is at your discretion. Our mobile phone case is ready.
Slightly other options for inspiration: 


Option five: Yellow mobile phone case, crocheted. 
To knit a cover, we need: cotton yarn, about 15 g yellow, hook number 1.5.
We collect a chain from the calculation of 1 rapport = 15 air loops and close it in a circle using a connecting post. 1st row: 4 air lifting loops, 2 unfinished posts with 2 crochets in the 1st air loop... lifting, connected together with the last lifting loop, 3 unfinished posts with 2 crochets in the 5th air loop of the base of the chain from the hook, an arch of 5 air loops, 1 post with 2 crochets in the same chain. the base of the chain. We finish the row according to the row diagram. Further, we continue to work according to the scheme to the desired length. 

A skilled craftswoman of crochet needlework will “put on” any little thing in a case - from your favorite smartphone to a cute vase that serves as a decor in the corner of the room. Although, in terms of the degree of complexity of knitting, the covers are among those items that lend themselves even to beginners who are holding a hook in their hands for the first time.

Of course, you should start with the simplest thing - knitting a mobile phone case. Having comprehended the basics of crocheting, many needlewomen move on to more difficult levels: knitting covers for stools, chairs and even car seats! 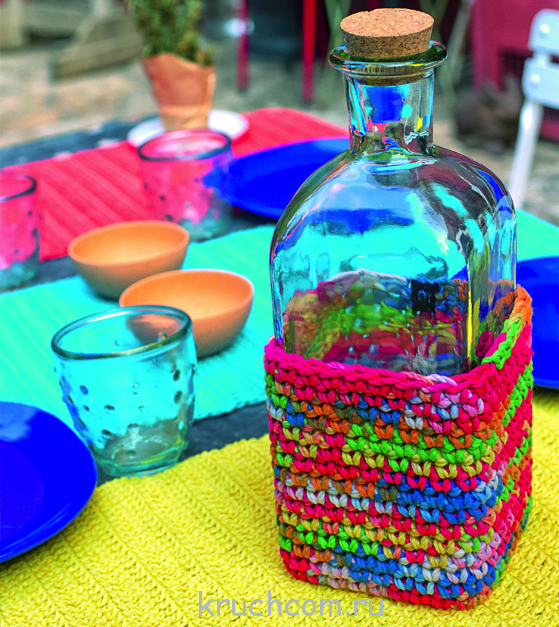
Today we will take you into the world of crocheted cases. Perhaps, let's start with the most popular one - cases for smartphones in different variations ( step by step photo master class, as well detailed description knitting openwork covers). Next, we suggest that readers try to knit chair covers ( fillet technique and a mosaic of squares) and finish with a master class for professional craftswomen - detailed instructions for making a decorative cover for a vase.
Mobile Phone Cases
Here the fantasy of the craftswomen has no boundaries. Cases for smartphones and phones can be anything you like: simple and multicolored, with drawings or knitted relief motifs, as well as in the form of your favorite cartoon heroes and other popular characters. 
When starting to create such a case, it is important to remember that its main purpose will be to keep the screen and phone case from scratches, bumps, and falls. Therefore, you need to choose the right yarn that can create strong knitted fabric... Fine threads for openwork knitting in this case, they will not work, it is better to stay on acrylic or cotton yarn of medium thickness, you can also consider combinations of threads with wool or merino. We select the hook in accordance with the thickness of the thread. 
Abbreviations for the text:
- VP - air. a loop;
- Runway - air. lifting loop;
- Art. s / n - double crochet;
- Art. b / n - single crochet;
- Art. s / 2n - a column with two crochets;
- pet. - a loop;
- chain. - chain;
- OL - previous. row;
- CC - connection column.
So, let's start knitting!
Step-by-step master class on knitting a simple thick cover

First, you need to measure the smartphone and dial the appropriate number of loops to close it front side in width. For example, let's take 25 VP. 
We take the main thread, knit st. s / n (in each pet. - on the 1st column). 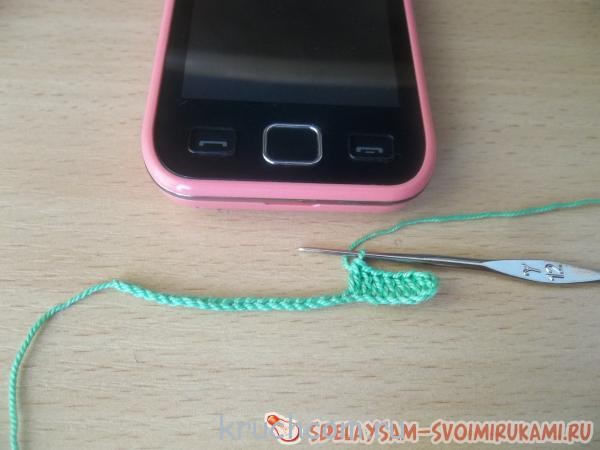
As soon as knitting reaches the last. pet. base chains, you need to knit 9 tbsp. s / n. Next, we go in a circular manner, tying the base chain on the second side - all the same Art. s / n in each pet. chain. At the "turn" - again 9 tbsp. s / n. Total we get: (50 + 18) = 68 loops. This number of stitches will be the same throughout the entire knitting.
Track. We knit 2 rows st. s / n (in each pet. - on the 1st column). As a result, it should look like this: 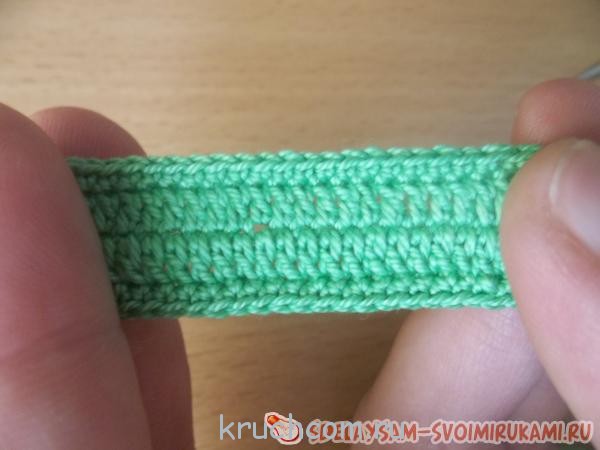
We attach the yarn of the desired color, do not cut the main thread, leave it on the wrong side of the work. We knit a trace. way: 2 tbsp. b / n, 3 st. s / n, stretched from the 1st row of knitting. 
Track. a row we knit with ordinary st. b / n yarn of the same color.
Track. we knit a row with a thread of the main color, according to the pattern (make sure that the relief alternates) using the combination already known to us: “2 tbsp. b / n, 3 st. s / n, stretched from the "color" row of knitting ". 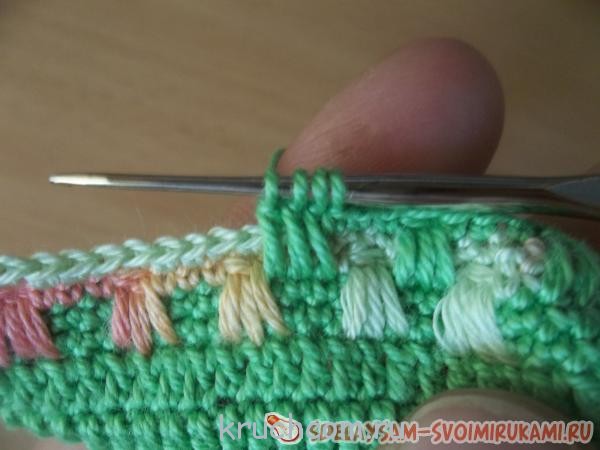
We get such a pattern: 
We knit all subsequent rows in the same way. 
As soon as the cover reaches the desired height (almost completely closes the smartphone), we proceed to the strapping: we knit, alternate. s / n + 1 VP. 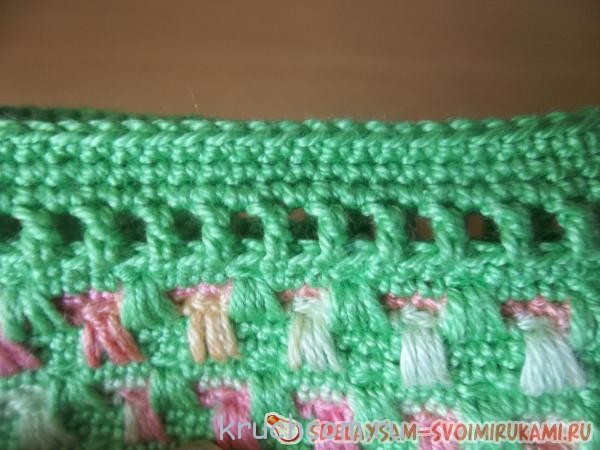
We finish knitting with two rows of Art. b / n.
We do not cut the thread, from the end of the last row we start knitting a lace: we collect 60 VP, on top of which we knit a row of st. b / n.
Stylish and reliable phone case is ready to use! 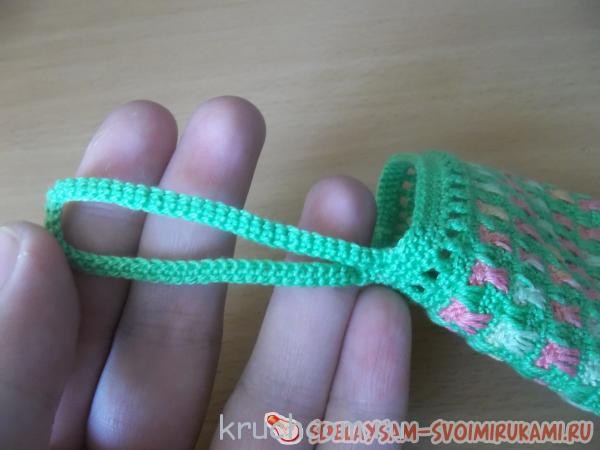
Pink openwork case for women's pens

Knitting pattern:
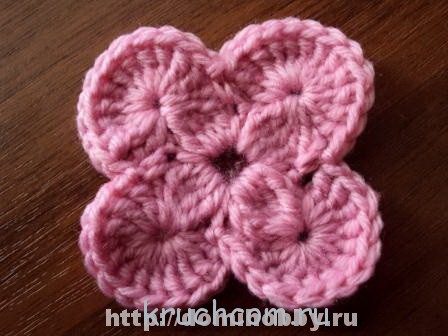
The cover differs from the previous one more intricate pattern"Fans". Knitted from threads of two colors.
We knit according to the scheme.
We collect the chain. on 11 VP, on both sides in a circle we tie them st. s / n, while - in the extreme loops of the chain. we knit in 9 tbsp. s / n, in the remaining loops - 1 st. s / n.
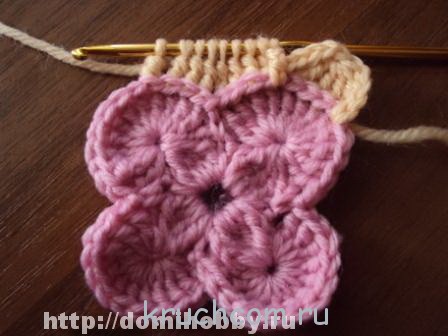
In the second row we knit according to Art. s / n - in each loop, one at a time, without additions.
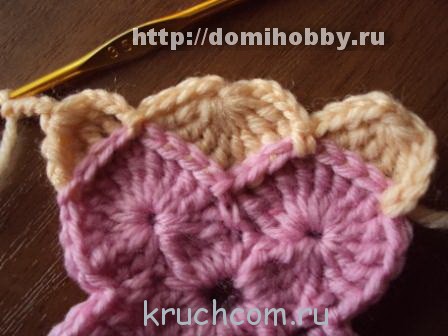
We continue to knit according to the pattern, do not forget to change the color of the thread, while repeating rows 5-6 the number of times until the cover reaches the desired height. Fans from s / n posts are knitted under art. b / n PR. At the end of the knitting of the main fabric of the cover, we knit a simple rope from the VP (tie SS or st.b / n) or more complex decorative cord- you can "caterpillar" or galloon.
Openwork phone case for romantic people

Knitting pattern:

Knitting order:
We collect the chain. on 21 VP (18 VP + 3 VPs).
Row number 1: 5 tbsp. s / n in the 4th VP chain., 16 st. s / n in the next. 16 VP chain., 4 tbsp. s / n in the next. VP chain., 16 Art. s / n on the reverse side of the chain. We finish a series of SS.
Row number 2: 3 runways, 1 st. s / n in the next. s / n PR, 2 VP, 14 rapports: “1 st. s / n in the 2nd st. s / n OL from the hook, 1 tbsp. s / n in the next. Art. s / n PR, 2 VP ". SS.
Row number 3: 5 VP (3 runways + 2 VP), 12 rapports: “2 st. s / n in the next. an arch of 2 VP PR, between the posts - 2 VP ". SS.
Rows No. 4-16 - we knit according to the scheme.
We knit a lace: from one VP, we knit rapports: “3 runways, 2 unfinished. Art. s / n, knitted together on one pet. base ”until the desired length is reached. We thread the lace between the arches of the 15th row, close it in the SS ring., Cut the thread inward. We thread the satin ribbon into the arches of the 8th row, tie it in a bow.
Schemes and detailed instructions for knitting covers for stools and chairs
Almost every home in the kitchen has boring stools that have lost their appeal over time. With the help of a hook, you can return them not only to their former beauty, but also bring original notes into them. By tying the stools to the color scheme of the kitchen interior, you will be able to create an absolute feeling of comfort and warmth to the kitchen. 
Decorating chairs and stools with your own hands is extremely simple, see for yourself!
Step-by-step lesson of knitting a stool cover with a mosaic pattern of squares
Such a pattern must be crocheted from the center, in the shape of a square. The color of the yarn is selected individually, you need to change it after every two rows knitted. Thanks to this knitting, a mosaic pattern is obtained.
The advantage of knitting such multi-colored stool covers is the ability to use leftover yarn from previous knitted projects. 
Knitting progress:
We twist the self-tightening ring. We knit 1 tbsp into it. s / n, and immediately knit with rapports in a ring: “4 runways + 4 st. s / 2n, united by one vertex + 4 VP + st. b / n ". There should be 4 rapports in total. 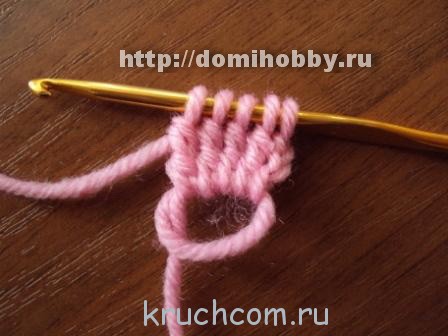


Row number 1 ends with SS, we start knitting the 2nd row: we find the top uniting 4 st. s / 2n PR - we knit a trace from it. rapports (4 p.): “12 tbsp. s / 2n + SS in st. w / n PR ". End of row - SS. Change the color of the thread. 
Row number 3 we knit from a corner fan from 12 tbsp. s / 2n (counting 4 tbsp. from the beginning), knit with rapports to the end of the row: “4 runways, 4 tbsp. s / 2n, combined. one top (attention: the hook is inserted from the back of the posts!), 4 VP, SS in the next. pet., 8 relief. Art. s / 2n, 4 VP, SS ". 
Row number 4: knit with rapports to the end of the row: “12 st. s / 2n from the top of 4 st, OL, 8 st. s / 2n from the top of the 8th st. NS". In the corners, you should get arches of 12 tbsp., On the sides - 8 tbsp. Each. SS. Cut the thread. 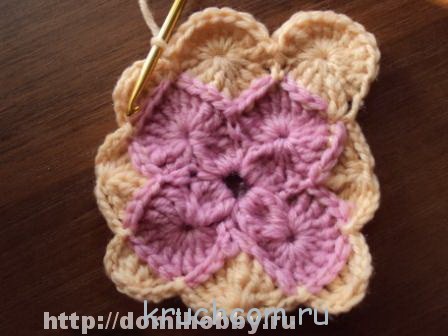
Row 5: Attach the new color yarn to the corner fan. We knit according to the principle of row number 3, but we knit in the corners 4 embossed column with total top, on the sides - 8 columns with total. top.
Row number 6: in the corners we knit fans from 12 tbsp. s / 2n, on the sides - 8 st. s / 2n. 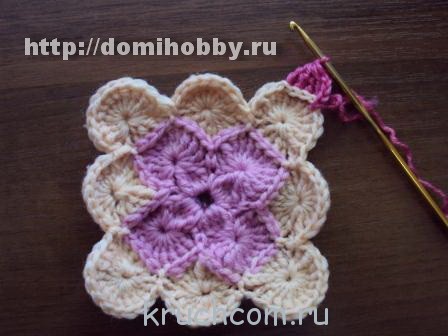
Knit a square cloth until it completely covers the stool. Next - we knit 3-5 rows with a monochromatic thread without increments, i.e. we knit in the corners of 8 tbsp. s / 2n. At the end of the knitting of the cover, you can knit two strings in the corners (we collect the chain from the VP, tie the st. B / n), only 8 pcs.
In addition to the kitchen interior, you can knit on the principle of such a pattern and potholders, and hot coasters. 
Chair cover using fillet knitting technique
The covers for chairs in the fillet technique look interesting - they are refined, airy, and at the same time, they can always boast of an incredible pattern, similar to hand embroidery. Chair covers are distinguished by the need to tie two parts at once: the seat and the back. 


Stages of knitting a cover:
Back: we collect the chain. from 123 VP (118 VP + 3 VP + 2 VP).
Row number 1: 1 st. s / n in the 9th VP chain. from the hook, 2 VP, to knit sirloin cells we repeat the trace 39 times. rapport: 1 tbsp. s / n in the 3rd VP main. chain., we end art. s / n.
Rows No. 2-54 are made with sirloin knitting according to the pattern No. 1, in forward and backward directions, not forgetting about knitting a swan pattern.
Row number 55: add 9 tbsp. s / n.
We continue knitting according to the scheme No. 2, we knit from row 1-49 inclusive.
Sitting: attach the thread on the back of the main. chain. backs and knit straight and back using the fillet technique according to the seat knitting pattern (rows No. 1-44).
Cover assembly: we carry out side seams... We tie the free sides of the cover according to the tying scheme in 6 rows with an openwork pattern.
Exclusive vase cover

You can also "put on" your favorite vase - an openwork cover made of a thin strand is a real proof of this! And if you knit several of these accessories in different colors, it will be possible to select a consonant "dress" for each bouquet for a vase.
Knitting pattern for a cover for a vase

Progress:
We start with a chain. on 32 VP, we close the SS in a ring.
Row number 1: 1 runway, 31 st. b / n in the ring. SS.
Row number 2: 1 runway, 31 st. b / n in each pet. NS. SS.
Row number 3: 4 VP (3 runways + 1 VP), 16 rapports: 1 st. s / n in the 2nd st. b / n PR, 1 VP. SS.
Rows No. 4-5: 4 VP (3 runways + 1 VP), 16 rapports: 1 st. s / n in the next. Art. s / n PR, 1 VP. SS.
Row number 6: 3 runways, 3 st. s / n in the arch from 1 VP PR, 16 rapports: 1 tbsp. s / n in the next. Art. s / n PR, 3 tbsp. s / n in the next. arch from 1 VP PR. In total, you should get 64 st. s / n. SS.
Rows №№7-33: we knit according to the scheme, we complete each SS.
Petal (8 pieces): from chain. for 14 VP we knit five rows according to the knitting pattern of a petal.
We collect a vase: we form a flower from eight petals, sew to a vase, decorate with a bead or rhinestone. We pass satin ribbon into fillet cells. We put the cover on the vase; for convenience, you can fix its correct position with a glue gun.
Crochet cover video tutorials
Crocheted covers are very popular with needlewomen, so there are plenty of master classes on this topic on the net. We have collected the best of them: