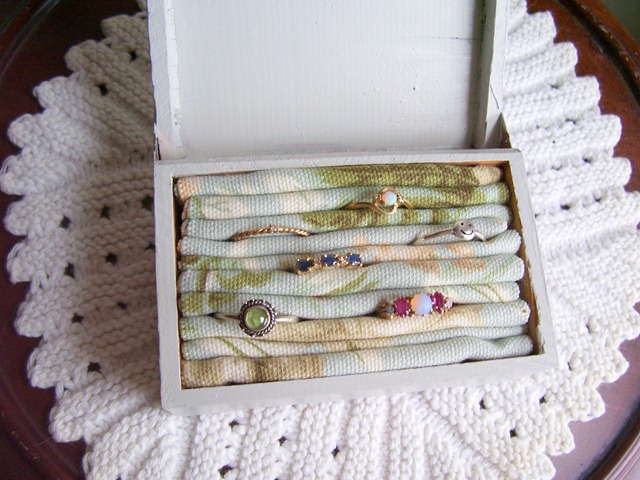
A neat and unusual casket on the dressing table of any woman is not only a very practical and useful thing, it is also an excellent interior decoration that emphasizes the individuality and style of its owner. Now the selection of all sorts of comedics, boxes, boxes and caskets is very large. Wooden, ceramic, glass and of course the most adorable - textile. Listening to the recommendations of the author, you can make this casket yourself. Such a box is simply impregnated with warmth and comfort, it can become an excellent gift or an excellent decoration for your dressing table.
To begin with, we will prepare all the necessary materials and tools:
1. Tight binding cardboard.
2. Thinner cardboard. The author uses designer cardboard with a thickness of 260-280 g / m3.
3. Fabric of several species.
4. A piece of fleece.
5. A piece of round.
6. Carved wooden or other interesting butchers for the decor.
7. Scotch on a paper basis.
8. Scissors.
9. Stationery knife.
10. Clamps stationery for papers.
11. Rule.
12. Simple pencil and eraser.
13. Universal transparent glue.
14. Sewing machine.
1 step.
First, we will draw all the necessary details on the cardboard and neatly cut them. In the photo below, all the more dark items are the details of the binding cardboard, and the bright parts are details cut from the design cardboard. In order to be more understandable further in the text we denote a dense binding cardboard as a PPK, and a thinner designer cardboard as TDK.
Now consider the details in the photo more detailed:
The cross in the circle is a small error, an absolutely unnecessary detail.
No. 1 - four details are necessary for sizes of 7 cm x 13 cm, two parts from each type of cardboard.
No. 2 - four details are necessary for sizes of 7 cm x 19 cm, two parts from each type of cardboard.
No. 3 - you need one part 7 cm x 19 cm, carved from TDK.
No. 4 - you need one part 7 cm x 20 cm, carved from the PPK.
No. 5 - two parts must be 13 cm x 19 cm made of TDK.
No. 6 - two parts are 14 cm x 20 cm made of PPKs.
2 step.
Now we select fabrics that are harmonizing in color and determine which fabric will be used to finish the inner sides, which is for the finishing of the outside and what is suitable for the lid.
4 step.
Then this workpiece put on the fabric, which was previously chosen for the casket cover. Cut out a rectangular detail from the fabric, not forgetting at each side to add 1 to 1.5 cm per battery.
5 step.
Now carefully wrap the fabric on the inner side of the cardboard blank and we are glued with glue. Special attention is paid to the corners, they should turn out to be smooth and neat.
6 step.
Now to the outside of the cover, sew decor and carved buttons, which will later serve as a clasp. So far I will postpone the blank for the cover to the side.
7 step.
Take the details number 1, №2 and one part number 5, carved from TDK. We declare them as shown in the photo below and glue with the help of universal glue.
8 step.
Now scotching on a paper basis, we glue all the seams between the details. It will make the entire design more durable.
9 step.
Cut the resulting workpiece.
10 step.
Now we take the fabric, which the caskets were previously chosen to finish the inner sides and we are tightening the workpiece with this cloth in the same way as previously covered the blank for the cover.
11 step.
With the help of a sewing machine, we grasp the workpiece along the bending lines.
12 step.
Now we fold the workpiece so that the box with the inner sides, covered with a cloth. Strengthen the design with the help of the same painting scotch. While we are postponing and this workpiece to the side.
13 step.
Take all the remaining parts from the PPK, stick them on the fleece and cut out.
14 step.
Then we are tightening them with a cloth selected to finish the external sides of the box. Very important moment: on long details, we leave the short sides open, that is, we do not fit and do not linate matter.
15 step.
Now we glue the long details to the previously assembled box, fix the design by clips for papers. Flusted matter at the ends of long parts glit directly to the case of the box.
16 step.
Now we stick on the box the box two short strips, covered with matter. Stop the box aside.
18 step.
Now we glue it to the middle item located on the cover-blank.
19 step.
With a cloth for finishing the outer sides, the last remaining item from TDK.
20 step.
We glue this item to the blank-cover so that it would hide the place where the threads from the previously sewn buttons are visible. In this case, the author posted on this detail its branded birch. Everything will be fixed by the clamps.
21 step.
And the last moment: we glue the box to the blank-cap, pre-inserting a piece of a rubber bouncing between them. This loop will be used in the future as a lock and throw on the previously crawled button.
Very cute and adorable textile box ready. Despite the fact that it is made of cardboard and tissue with glue, it is quite durable and comfortable. Thanks to the author for recommendations and idea.
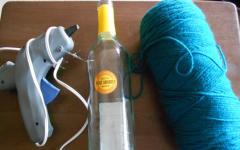
For the manufacture of a box on a tissue base, you will need a packaging from disks and one dial. The fabric is best taken with a drawing, a curtain. Fabric - companion can be selected by color scheme or style. In our case, it will be a country style. We will start work.
1. We measure the foundation for the box. The standard box under the discs has a diameter d \u003d 13 cm, height H \u003d 16 cm, perimeter P \u003d 40 cm.
2. Crow details of the box:
- 2 parts 42x18 cm, this is a casing for a basket and lining;
- 2 parts 102x14 cm for pockets of two tissue types;
- 1 part of the circle d \u003d 15 cm, this is the bottom of the box;
- 1 part 13,5x42 cm, it is a detail of the vertex;
- 1 part 9x30 cm, handle;
- cord 4 0 cmm;
- for the decor we will use ribbons and lace, wooden beads for lace.
3. With chalk with an inside, placing the case. We are laying in the seams, and the middle divide on 6 equal parts.

4. Top decorate with braid or lace.

5. Stick on the top edge of the pocket, it can also be decorated with lace. We divide on 6 parts in the same way.

6. We combine pocket sections and covers. We rock pins and customize pockets for the base on the chalk lines.

7. I spare on the bottom edges and flashing on the machine.
8. Blank for a tissue box we turn into a ring, sew lateral sections. After the wall is triggered, the cover is ready.

9. We fasten the walls and bottom. Still on the typewriter.
10. We make a top clasp. Create the sides, leaving an unnecessary plot of 1 cm. This is necessary for the lace at a distance of 3.5 cm from the top edge.

11. Singing seam (it can be processed by a web for better fixation), and the upper cut is processed into 2 cm bending.
12. Step up the fastener with the main part. Insert it inside the main detail face to face and steal at the top edge.
13. That's what happened in the end:

14. Casket with fabric with your own hands can be turned on the front part and pull the box to the base.
15. Now we will make the inner bottom for the tissue box. We deposit along the edge of the residue seam, put the disk and tighten the thread.
16. Insert the finished bottom in the box.
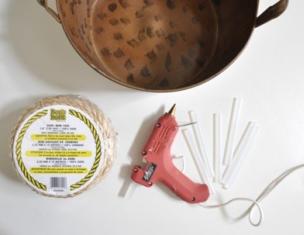
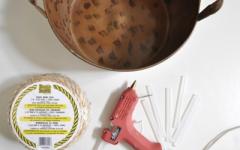
Large caskets with a multitude of small boxes and storage compartments are quite expensive. We want to offer you a simple and original idea - to sew, yes - yes, it is to sew your own casket for the rings.
You will need:
- old wooden box-box with a lid;
- paint for wood and brush;
- covenate of dense cotton or linen fabric;
- portnovo scissors;
- needle and threads for sewing
Casket for rings do it yourself
Step 1

If necessary, pass the wooden box, and then paint it. Give paint drying.
Step 2.
Measure the internal perimeter of the box and the height of the side.Step 3.
Cut from a dense linse or cotton tissue a long strip of the width of the perimeter of the casket with a 1 cm perimeter.Step 4.
Fold the strip in half the front side inside and take it to short cuts into the ring.Step 5.
Open sections Treat on overlock or zigzag lines on a sewing machine.Step 6.
Long sections are screwed to the wrong side and ran. Remove the strip on the front side.Step 7.

Fold the harmonic strip in such a way that the height of the resulting detail was slightly lower than the height of the Boxes.
Step 8.
"Scroll" the resulting harmonica - to put it in the box, the folds must fit tightly to each other.Step 9.

If the result suits you, remove the part folded by the harmonica from the box and sew the folds between them from below. For the reliability, the folds of the sides are manually.
This simple way you can quickly sew a casket for rings with your own hands.
In order to make such a casket with your own hands, you can use any decorative box (for example, a gift) or an old wooden casket of medium sizes.
To store jewelry and small accessories do not necessarily buy expensive boxes or organizers. It is enough just to make your own hands the casket for decorations from cardboard. Most at home has wrapping paper, small pieces of lace, beads or beads and other materials that can be applied to create an original box.
Components for manufacture:
Form of a cardboard box
Simple rectangular or square
Cabinet made of cardboard for needlework with your own hands is formed from the box and paper tubes. First you need to choose the appropriate base for the box - for example, a box of shoes. It is better to take the basis for the bottom of the size of approximately A4 sheet or less, it will be easier to pass the finish process. 
For the formation of the tubes you will need glue, knitting needles. For weaving, you can use tubes from ordinary paper for printing, unnecessary press and logs. The finished cardboard box can be painted with acrylic paints or leave in normal form.
Winning apply colored paper for the printer: it has an extensive color palette.
The process of creating your hands the caskets from the cardboard will not take much time. First, outside the box, you need to glue vertical tubes that serve as guides. It is necessary to glue in the range of 4-6 cm - it all depends on the size of the box. Then the tubes are bend on the side faces, and then inside.
On the bottom glued a compacted cardboard suitable in size, which will hide the place of fixing the tubes. Then twisted the tubes around the base circumference. The lid is also formed.
Round Casket
For the needlewomen, the round coil remaining from Scotch is an expensive material. This foundation can be used in different types of needlework: decoupage or scrapbooking, decorated with coffee grains, beads, beads, jewelry stones, stick skin or tissue. To perform a casket from round cardboard, they advise with their own hands to use a twisted cardboard. 
First you need to attach a reservoir to the cardboard and draw three circles on the inner and two by external diameter. The circumference with a smaller diameter is glued together, recommend applying the glue momentum. Ready element to handle emery paper and glue it with a large diameter of placing in the central part.
As a result, the lid is formed, which hermetically closed the box.
If there is a need to handle edges with sandpaper. Layout boxes ready. It is allowed to decorate to their taste with different beads and decorative stones in any technique of needlework. The lid can be made a little speaker: you need to increase one of the circles with a large diameter. So the box will be easier to open.
Heart shaped casket
A heart-shaped casket is wonderfully suitable as a wrapper for a surprise for the day of all lovers. First of all, it is necessary to cut a heart-shaped element from the cardboard - this is the bottom of the casket, the dimensions of which are predetermined by the box parameters as a whole. Then you need to cut from the cardboard a wide strip with teeth on one side. Glue striped to the bottom. Collect the other side similarly. 
It is necessary to glue two halves of the walls and attach them to the clips, wait when the glue dries off. Inside and outside the box, make a paper with different textures or ornaments. Two pieces of fringe stick to the base - they will be a curtain on which the lid is holding. Further cut the second heart, it will be the top cover. It must be glued to the curtains.
The decorated paper should be glued in the same way. Then you need to decorate a cardboard box in the form of a heart. By contour, as an option, you can glue the lace. On top decorating with flowers, beads, ribbons, etc.
How to make the lid for the box

Decorating the box with a cloth
To decorate a casket from cardboard, you can use not only the old press or wallpaper, but also decorate with fabric. With tightness it is possible to puncture a box of matter. Such a thing can serve as a separate presentation, as well as an organizer for saving small household goods, for example: toys for children, items for home decor, sewing accessories.
Materials and accessories that are indispensable for the case of a box of matter:
- Box. When choosing is allowed to apply the rules described above to work with the press, logs, wallpaper.
- The fabric itself will be lined.
- Specialized glue, tape.
- Outly ended scissors.
- It may take a selection in work, as well as a durable cord (you need to choose in the color of the fabric).
In order to accurately accurately and get a great result, you need to implement recommendations:

Soft cardboard and fabric box
It is possible to make a casket with your own hands from a compacted cardboard and plane cloth. Make a cover with a synthet board - it will be soft. Such a box is perfect for saving jewelry, handicraft materials. The parameters of this box 18 cm by 9 cm. Also, you can make your value based on what you will apply it.
To create you need:
- dense paper
- matter,
- filler,
- glue,
- stationery,
- scotch paper.
You need to draw a circle of the desired diameter on thick paper and cut it out. For the side of the side cut rectangles. 
Instruction:
- Scotch and clamps to form a casket.
- Put the box.
- Bottles backed out cloth.
- For sealing the side faces, cut a rectangle from not very thick cardboard and enclose it with a cloth.
- From cardboard cut the lid and glue the side. Singypron put on the lid and stick to the cloth.
- The added cut of the paper with the cloth is punctured the edge of the lid.
Box-needle
To create a casket needle need:
- White matter in peas.
- Satin ribbon.
- Coil from Scotch.
- Compacted cardboard.
- Adhesive gun or ordinary quality glue.
- Scrapbooking paper.
- Stationery.
- Fillers.
Instructions for the formation of your own needle caskets from cardboard:

Box-needle is almost ready - it remains to decorate:
- Red satin ribbon glue from above, bottom and sides.
- On a white cloth in the scarlet peas to circulate the coil.
- Alone to flash the canvas, to leave not covered.
- Cut parts so that the seam does not break.
- Remove on face side.
- Insert the cardboard circle into the fabric.
- Inside put a little filler.
- Long tissue glue with cardboard.
- Add more fillers, turn the tissue, glue to the cardboard.
To decorate the needle cover from the ribbon to make a bow and glue to the lid.
Master class on creating a box with drawers
Excellent box with advanced boxes, you can make your own hands from available resources, such as cardboard or match boxes. Only tiny rings will fit in ordinary match boxes, but if you buy tourist or fireplace matches, it is possible to make a full-fledged box.
Required items for creating a box:

The formation will take very little time:
- matchboxes, without a layer of sulfur, glue together;
- thick cardboard gluate outside;
- surfaces that form to reorganize with wallpaper or film;
- on a fishing line or wire with a selection, fasten decorative butt cases.
If desired, decorate beads, drawings, bows.
Casket in the shape of a puppet sofa
Instructions for making a casket in the form of a doll sofa:

Step-by-step instruction for organizer box
To construct a casket - organizer, you must have:
- untreated wood casket;
- velvet fabric;
- high-quality glue;
- tassels.
Tools that are needed to create a casual-organizer:

Instruction:
- Morilka Treat a wooden box, everything that did not approve, you need to erase with a rag.
- Using a drill, you need to drill a hole in the center in order to fix the handle
- Cut two pieces of fabric in size slightly less than the bottom and the casket cover. Then it is necessary to cut another piece twice as smaller. Next, you need to put a short segment of the fabric on a long, strain, to get a pocket. Fix velvet tissue and organizer inside the lid and at the bottom of the box.
Casket in the form of a book with a cache
Instructions for making a casket-cache:

Make a casket in Shebbi-Chic style
Components for making boxes:

From a decoupage napkin, you need to cut the pattern, then divide it on the layers. Cove the entire area of \u200b\u200ba pre-made box of cardboard paint. With a hair dryer, dry and leave until complete drying. In grate with a candle box in places where scuffs will be. Be sure to grasp the corners. Cove the box with white acrylic primer, dry.
Grate the sandpaper box to create a scuff. Attach the decoupage pattern to the box, apply glue from above. Damage to dry, paint the edge of the pattern with a tassel with your own hands. Dry and cover lacquer.
Ideas for homemade decor
The casket from the cardboard is easily decorated with anything, suitable: beads, old unnecessary jewelry, decorative stones, buttons, etc. Show fantasy, you can see various options for decorating on the network for inspiration. Do not be afraid to do something your own, the main thing is that this is done from the soul.
Variations of creating a beautiful box of cardboard house set. Did you decide to make something interesting? Choose the option you like and act.
Video: Cabinet box with your own hands
How to make a casket from cardboard with your own hands, look in a video clip:
Master class how to make a cardboard box with your own hands:
Each woman has many little things that need a special storage system. These are various decorations, accessories for creativity or needlework and many other items. The manufactured cardboard box can be an excellent option that allows you to store all the necessary little things. Create a suitable boxes is easy. The main thing is to connect fantasy and give it a unique and original look.
Simple box. Preparatory stage
This option is easy to create. The box is a cardboard box. Its capacity and functionality depends on your needs. To facilitate the task, it is recommended to take advantage of the workpieces. In this case, it is much easier and easier to make boxes of cardboard with your own hands.
Schemes must be transferred to paper. Before calculating sizes, consider: for what purposes your bowl will be used. If the decorations will be stored in it, then you should not make it cumbersome. But if the box is designed for needlework, the size of the box must be much larger.
Manufacturing technique
So, consider how to make a casket with your hands from the cardboard:
- Prepare a dense cardboard.
- Using the scheme, mark the casket contours on it.
- Cut the prepared workpiece.
- Bend bend lines. Carefully cord places in which the box is connected. If you took a tight cardboard, it is difficult to work with it. But it is it that allows you to create a solid design. Such a box will be an excellent place to store various things. You can use superclauses or PVA. But the scotch is more reliable.
- The resulting box needs a beautiful case. To do this, use wrapping paper. This is a thin material that perfectly decorate the surface of the cardboard. The old wallpaper is a good option.
- Having a box, be sure to leave the scores to the bending. Wrap them and stick to the inner sides of the box.
- Choose the wrapping paper suitable for the inner decor. Puck such a material at once the bottom of the Box. Then - internal side parts.
- Now it remains to come up with a decoration. For the decor you can use any ornaments, flowers, beads, beads. It all depends on your imagination.

Round Casket
Sometimes it is an opinion that it is difficult to make a box of this form. Permanently mistaken! It is quite easy to make a box round from cardboard with your own hands. You yourself make sure.
Round casket manufacturing technology:
- Make a circle on a dense cardboard. It will be the founding of the box.
- Draw a long rectangle. This is a side of the box. Its width is the height of the future casket. And the length must correspond to the circle plus 2-3 cm on the connection.
- For the assembly of such parts, the allowances will be needed. They can be left on the basis of the box. So, as shown in the figure or on a rectangular billet.
- Carefully calculated the sizes, cut out the blanks.
- Connect them with the help of glue or scotch.
- Cover for boxes Make the same technology. But remember that the foundation circle should be a little more. After all, the lid should easily be put on the box. And her height is less.
- So, the excellent cardboard box is made with your own hands. It remains to decorate it. Thinking on an interesting decoration, do not forget about the important point. All pods should be carefully disguised. Therefore, it is recommended to decorate and external parties, and internal.

Casket from Scotcha
This is a simple but original solution. How is the jewelry box made with their hands from cardboard and bobbins (from undercutch)?
Consider in detail.
- Circle bobbin on dense cardboard on an external circle. There will be two such blanks. One will become the basis, and the other is a lid.
- Couple bottom with a bottle. To do this, you can use Scotch. Or in advance to leave the bending allowance at the base.
- For the manufacture of the lid, use the technology described in the previous example. Remember that it should be a little more than the base.
- You created a remarkable box with your hands from cardboard with a lid. Now it's a fantasy. The original decor will make it a real work of art.
Soft casket
Having considered ordinary options, let's try a little variety of technology. For example, if you want to create caskets with your hands from cardboard and tissue, you can use the following way. Such a box will be an excellent place to store important things. In addition, it is an excellent decor element.

We will analyze how such a box is made with your hand from the cardboard. The master class will significantly help this:
- You will need a round box. You can use the finished workpiece (for example, the remaining after the hat) or make it yourself.
- Apply a thin layer of glue to the outer side surface.
- Stick to her thin foam rubber.
- Pick up a beautiful fabric. Measure the rectangular cut on it. Its width should be equal to double height of the box plus 10-15 cm for free bending. The length corresponds to the circle with the addition of cabin on the seam. Wrap your bowl with such a cloth.
- Cut out the circle of cardboard that will easily fit inside the box. Puck it with foam rubber and cloth. It is better for the bottom to pick up a lighter fabric.
- Optionally, you can decorate such a casket in any way. Use ribbons, beads, bubo, beads.
Casket Heart
This box itself looks quite original. In addition, this casket is not relieved, with your hands from the cardboard.

The master class allows you to understand the course of work:
- Cut two hearts from thick paper.
- Prepare two rectangles. One side will be detained by the "cloth".
- Start a rectangle heart perimeter. Combine with the base prepared "teeth". Best use the "moment" glue. This will ensure the necessary strength.
- Repeat the procedure for another rectangle. At the same time, be sure to consider the allowance required to connect both side parts.
- Down glue the second paper blank. The decor simulating the lace is originally.
- Cover the lid to your box in the same way.
- The sophistication and originality will give carved pictures of the bears or illustrations in a romantic style. Complete the decor by beads, flower, butterflies.

Box from thread
This is another amazing technique that can be used for the manufacture of the box. We will analyze how the box is made with your hands from cardboard and thread.
Progress:
- To base, you can choose any form. It can be a circle, rectangle or heart. Cut two blanks from thick cardboard.
- One of them, which will be the bottom of the Box, must be decorated. To do this, you can choose any solution. In the extreme case, let off with colored paper.
- In this base around the perimeter, make a needle hole. The distance between "holes" is 1 cm. Try not to leave a lot of space from the edge. In the outlined holes, screw the toothpicks. Each of them must be glued.
- Now you can take a thread. Ride between the toothpicks the first row. Skip thread as follows: Before the stick, then behind it. The next row is placed in a checker order.
- Up to the middle. Now for each toothpick put on the bead. Continue weave threads further.
- Having finished the casket, it is necessary to secure the design. To do this, go on each toothpick and stick beads.
- The top and bottom of the casket can be decorated with the original chain or ribbon.

Now you know how a wonderful cardboard box is created with your own hands.
Conclusion
If you were inspired by creating a similar masterpiece, then many recommendations given in the article will be useful to you. Such a detail will become an amazing decoration of the dwelling and the subject of your pride. In addition, an excellent cardboard box, with your own hands created, can be a great gift. After all, every woman needs such things.